Seasonal Nectarine Bread: Quick 60-Minute Homemade Recipe
The Sweet Symphony of Homemade Nectarine Bread
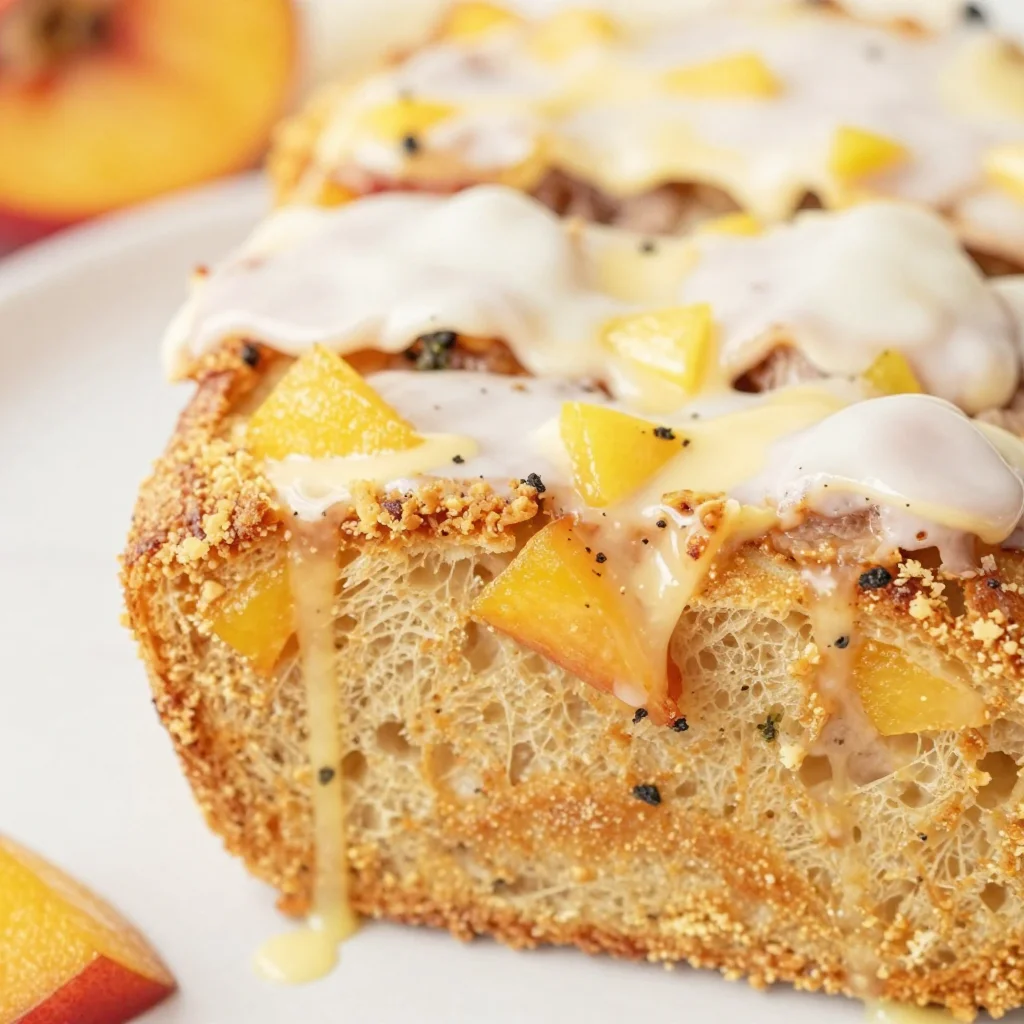
Hello, dear foodie friends! Today, we’re diving into the delightful world of homemade nectarines with a recipe that’s near and dear to my heart: Nectarine Bread! This isn’t just any bread; it’s a sunlit slice of summer, ready to brighten your kitchen and your table. Picture yourself biting into a warm slice, its tender crumb bursting with juicy pieces of sweet nectarines, while the warm aroma of cinnamon wafts through your home. Can you smell it already?
Why Nectarine Bread?
Nectarine bread encapsulates the essence of sweet, juicy nectarines wrapped in a soft, comforting loaf that feels both special and approachable. Whether it’s breakfast, a midday snack, or a cozy dessert, this bread adapts perfectly to any occasion. Plus, the vibrant fruit inside gives each bite a fresh burst of flavor, making even the simplest kitchen feel like a gourmet experience.
Before we head to the kitchen, let me take you on a little journey down memory lane that inspired this recipe.
A Memory to Savor
I remember my first foray into baking from scratch, inspired by a bountiful haul of fruits from our local farmer’s market. My grandmother used to make the most phenomenal fruit breads, and I recall standing beside her, mesmerized as she demonstrated the tender art of blending flavors. I was enchanted by the way she could transform ordinary ingredients into something extraordinary.
That summer afternoon, the kitchen was filled with laughter, the warmth of the oven, and the sweet scent of nectarines being sliced. We blended the nectarines into a batter, chatting about life while dancing to a tune on the radio. It was pure magic! When that first loaf came out of the oven, we could hardly contain our excitement as we slathered it with butter, and as the first slice was cut, it felt like a hug for our taste buds. Baking has since evolved into my language of love, and every time I make this Nectarine Bread, it’s a tribute to those moments shared in my grandmother’s kitchen.
Let’s recreate that magic together!
Ingredients
For our delightful homemade Nectarine Bread, you will need:
-
2 cups all-purpose flour
- You can substitute with whole wheat flour for added nutrition or gluten-free flour if you need a gluten-free option. Just be sure to adjust the liquid slightly for gluten-free blends!
-
1 cup brown sugar
- Brown sugar adds a lovely depth of flavor. Feel free to use coconut sugar for a more natural sweetness, or granulated sugar if that’s all you have on hand.
-
1 teaspoon baking soda
- This is your leavening agent! If you’re out of baking soda, you can substitute with baking powder (just double the amount), but your bread may be a bit denser.
-
1/2 teaspoon salt
- A crucial component that enhances flavors. Kosher or sea salt works just as well!
-
1 teaspoon ground cinnamon
- This spice brings warmth and a hint of cozy to your bread! Feel free to experiment with nutmeg or even ginger for a spicy twist.
-
1/2 cup unsalted butter, melted
- Use coconut oil for a dairy-free version, or leftover fruit puree for a lighter loaf if you’re feeling adventurous.
-
1 cup buttermilk
- Don’t have buttermilk? Mix 1 tablespoon of lemon juice or vinegar with enough milk to make 1 cup, and let it sit for 5 minutes to sour.
-
2 large eggs
- Eggs help bind the bread together. For a vegan version, substitute with flax eggs (1 tablespoon flaxseed meal + 2.5 tablespoons water per egg, let sit to gel).
-
1 cup diced nectarines
- Fresh nectarines are ideal, but you can use peaches or any other juicy fruit you love. Just adjust the sweetness accordingly!
-
1/2 cup powdered sugar (for glaze)
- Optional but recommended for a touch of sweetness on top! You can omit this or use a sugar substitute for a healthier choice.
-
1–2 tablespoons milk (for glaze)
- This can be almond milk, oat milk, or any milk of your choice!
Step-by-Step Instructions
Now, let’s house these beautiful flavors into your kitchen! Follow along step-by-step for delicious homemade Nectarine Bread.
-
Preheat Your Oven:
Preheat your oven to 350°F (175°C) and grease a 9×5-inch loaf pan with butter or cooking spray. This helps prevent any sticky situations later on. -
Combine Dry Ingredients:
In a large mixing bowl, whisk together the all-purpose flour, brown sugar, baking soda, salt, and ground cinnamon. This is your dry mix, and whisking helps to integrate everything evenly.Chef Tip: Sifting the flour first can add aeration and help create a lighter texture.
-
Mix Wet Ingredients:
In a separate bowl, whisk together the melted butter, buttermilk, and eggs until you have a smooth mixture. The melted butter will add richness to the bread, while the buttermilk gives it a slight tang. -
Combine Wet and Dry Mixes:
Pour the wet mixture into the dry ingredients, and gently fold them together. Remember, no need to overmix! A few lumps are totally fine. Overmixing can lead to a dense loaf, and we want soft and fluffy!Little Chef Hack: Use a spatula to fold instead of an electric mixer; it prevents a tough texture.
-
Add Nectarines:
Gently fold in the diced nectarines, making sure they are evenly distributed throughout the batter. -
Pour and Bake:
Pour the batter into your prepared loaf pan, smoothing the top. Pop it in the oven and bake for about 55-65 minutes. You’ll know it’s done when a toothpick inserted into the center comes out clean!Pro Tip: If the top starts browning too quickly, cover it loosely with aluminum foil halfway through baking to prevent over-browning.
-
Cool and Glaze:
Once baked, remove from the oven and let it cool in the pan for 10 minutes before transferring to a wire rack. While it cools, mix your powdered sugar with milk until you achieve a drizzling consistency. -
Drizzle Glaze:
Once the loaf is fully cooled, drizzle that sweet glaze over the top, and let it set for a few moments before slicing.
Serving Suggestions
When it comes to serving your Nectarine Bread, think of how you want to create that inviting atmosphere! Slice the loaf thick or thin, depending on your preference, and serve it warm with a pat of butter on the side. You can also pair it with tea or coffee for a lovely breakfast or afternoon treat. Sprinkle a few diced nectarines on the side for added flair!
Recipe Variations
Here are a few fun twists and swaps to make this recipe your own!
- Spiced Banana Nectarine Bread: Mash one ripe banana into the batter for added sweetness and moisture.
- Nutty Delight: Toss in 1/2 cup of chopped walnuts or pecans for a crunchy texture.
- Citrus Zing: Zest a lemon or orange into the batter to infuse a bright flavor.
- Gluten-Free Version: Use a gluten-free flour blend to accommodate your dietary needs—just be sure to follow the manufacturer’s instructions regarding liquid adjustments.
- Berry Infusion: Swap out some nectarines for blueberries or raspberries for a fruity explosion.
Chef’s Notes
This recipe has evolved over time, drawing inspiration from those cherished baking days with my grandmother. It’s easy to make and share, whether you’re hosting friends or just indulging with family. One of my funniest kitchen memories involved a bowl of flour spilling everywhere right before a holiday—I guess you could say I’ve had my share of “flour power!”
Remember, cooking is about joy and connection. This Nectarine Bread is not just a recipe; it’s a way to bring people together and create memories.
FAQs and Troubleshooting
Q: My bread didn’t rise! What went wrong?
A: Check your baking soda! If it’s old or expired, it might lose its potency. Always use fresh ingredients for the best results.
Q: Can I freeze Nectarine Bread?
A: Absolutely! Wrap the cooled loaf tightly in plastic wrap and aluminum foil. It will keep well for up to three months. Thaw in the fridge overnight, and enjoy the next day!
Q: Why is my bread dense?
A: Overmixing can lead to dense bread, as can insufficient leavening. Make sure to mix just until combined and double-check your baking soda’s freshness.
Q: Can I replace nectarines with other fruit?
A: Definitely! Peaches, apples, or even berries work wonderfully—just adjust the sweetness if needed.
Nutritional Info
(Optional, depending on your audience) A single slice of Nectarine Bread (approximately 1/12 of the loaf) has about 175 calories. This may vary depending on exact ingredients and portion size.
So there you have it, beloved foodies: a beautifully designed recipe for Nectarine Bread that’s as comforting as it is delicious. I can’t wait for you all to recreate this in your kitchens! If you do, drop a comment below or tag me on social media; I’d love to see your creations. Until next time, happy baking, and remember: good food isn’t about showing off; it’s about showing up and sharing love.
PrintNectarine Bread
A delightful homemade Nectarine Bread bursting with juicy pieces of nectarines and warm aromas of cinnamon.
- Prep Time: 15 minutes
- Cook Time: 65 minutes
- Total Time: 80 minutes
- Yield: 12 servings 1x
- Category: Dessert
- Method: Baking
- Cuisine: American
- Diet: Vegetarian
Ingredients
- 2 cups all-purpose flour
- 1 cup brown sugar
- 1 teaspoon baking soda
- 1/2 teaspoon salt
- 1 teaspoon ground cinnamon
- 1/2 cup unsalted butter, melted
- 1 cup buttermilk
- 2 large eggs
- 1 cup diced nectarines
- 1/2 cup powdered sugar (for glaze)
- 1–2 tablespoons milk (for glaze)
Instructions
- Preheat your oven to 350°F (175°C) and grease a 9×5-inch loaf pan with butter or cooking spray.
- Combine dry ingredients: In a large mixing bowl, whisk together the all-purpose flour, brown sugar, baking soda, salt, and ground cinnamon.
- Mix wet ingredients: In a separate bowl, whisk together the melted butter, buttermilk, and eggs until smooth.
- Combine wet and dry mixes, folding gently to combine without overmixing.
- Add diced nectarines and gently fold until evenly distributed.
- Pour the batter into the prepared loaf pan and bake for about 55-65 minutes, checking doneness with a toothpick.
- Cool in the pan for 10 minutes before transferring to a wire rack.
- Drizzle glaze: Mix powdered sugar with milk to a drizzling consistency, then glaze the cooled loaf.
Notes
Can be served warm with butter or paired with tea or coffee.
Nutrition
- Serving Size: 1 slice
- Calories: 175
- Sugar: 12g
- Sodium: 200mg
- Fat: 6g
- Saturated Fat: 4g
- Unsaturated Fat: 2g
- Trans Fat: 0g
- Carbohydrates: 26g
- Fiber: 1g
- Protein: 3g
- Cholesterol: 30mg
Keywords: nectarine bread, summer dessert, fruit bread, baking

30g Protein Breakfast Sandwich: Low-Cal, Fast & Fresh
Start Your Day Right with a High-Protein Low-Calorie Breakfast Sandwich
Hello, food lovers! Today, we’re diving into a breakfast wonder that’s not only delicious but incredibly wholesome — the High Protein Low Calorie Breakfast Sandwich. Imagine sinking your teeth into a warm, fluffy sandwich that gives you 30 grams of protein while keeping those calories in check. Sounds dreamy, right? Well, it’s not just a dream; it’s a breakfast reality that I’ll help you create step by step.
Why Breakfast?
Breakfast is often touted as the most important meal of the day, and for good reason! It’s a chance to fuel your body after a long night’s rest. When it comes to breakfast sandwiches, I’ve always believed that you don’t have to compromise on flavor or nutrition. This sandwich keeps it simple with high-quality ingredients while packing a punch of protein — ideal for anyone looking to kickstart their day with energy and satisfaction!
A Fond Memory of Breakfast
Let me take you back to one of my favorite mornings. I was home for the holidays, and the kitchen was a flurry of activity as the smell of coffee wafted through the air. My mom would make her signature breakfast sandwiches — layers of egg, bacon, and gooey cheese. We’d gather around the table, battling for the first sandwich before heading out for a long day of festivities. Those mornings were all about connection, laughter, and great food. This High Protein Low Calorie Breakfast Sandwich is a modern take on that nostalgia, allowing us to pack in the protein while reminiscing about those heartwarming moments.
Ingredients
Here’s what you need to whip up this protein-packed delight:
-
1 Whole Wheat English Muffin
- A nutritious base that is higher in fiber than white bread. You can also use a low-carb English muffin if you’re looking to cut down further on calories!
-
½ Cup Liquid Egg Whites
- Churned from egg whites, these are low in calories while providing a significant protein boost. You can substitute with whole eggs if you prefer the richer taste, but keep in mind that this will increase the calorie count.
-
1 Slice Reduced-Fat Cheddar Cheese
- Who doesn’t love melted cheese? This reduced-fat option keeps flavor intact while saving you some calories. If you’re dairy-free, feel free to swap in your favorite plant-based cheese!
-
2 Slices Turkey Bacon
- A leaner bacon alternative that’s savory and satisfying. If you love traditional bacon, you can use turkey bacon for a lower-calorie option, but it won’t have quite the same crispiness.
-
Cooking Spray
- A light spray for the skillet to prevent sticking. You could also use olive oil for cooking, just a teaspoon or so will do.
-
Ketchup or Sauce of Choice
- Adds that essential touch of flavor! You can also take this in a healthier direction by using salsa or avocado for a fresh twist.
Step-by-Step Instructions
Now, let’s get cooking! Follow these simple steps to create your breakfast masterpiece:
-
Prep Your Ingredients:
- Gather all your ingredients before you start cooking. This ensures everything goes smoothly and keeps your kitchen nice and tidy. Set your cooking spray, English muffin, egg whites, cheese, and turkey bacon at arm’s reach.
-
Cook the Turkey Bacon:
- Heat a non-stick skillet over medium heat and spray it lightly with cooking spray. Add the turkey bacon slices and cook for about 4-5 minutes. Flip them halfway through until they’re golden and crispy. This is your savory flavor punch for the sandwich!
-
Prepare the Egg Whites:
- In the same skillet, remove the cooked bacon, but don’t clean it just yet! The residual flavor will infuse into the egg whites. Pour in your ½ cup of liquid egg whites and let them cook undisturbed for about 2-3 minutes.
- Stir occasionally until the eggs are set but still soft. You can sprinkle some salt and pepper for seasoning — a little goes a long way!
-
Melt the Cheddar Cheese:
- Right before you take the eggs off the heat, lay the slice of reduced-fat cheddar cheese on top of the scrambled egg whites. Cover the skillet for a minute to allow the cheese to melt beautifully.
-
Toast the English Muffin:
- While the cheese is melting, slice your whole wheat English muffin in half and pop it in a toaster until golden brown. If you’re feeling indulgent, you could also throw it in the skillet for a minute or two!
-
Assemble Your Sandwich:
- Now for the fun part: assembling your sandwich! Start with the bottom half of the toasted muffin, place the cheesy egg whites on top, add your crispy turkey bacon, and drizzle with your sauce of choice. Finish with the muffin’s top half and voilà, beautiful breakfast bliss!
Serving Suggestions
For the perfect presentation, I recommend serving your breakfast sandwich on a fresh plate. You can add a side of fresh fruit or a small salad to brighten up your plate. If you’re feeling fancy, a sprig of fresh parsley or a dash of hot sauce on top adds a delightful pop of color and flavor!
Recipe Variations
Here are a few creative twists on this breakfast classic:
- Mediterranean Twist: Add spinach and diced tomatoes to the egg whites for a refreshing flavor combo.
- Southwest Style: Mix in some black beans and avocado, and swap the turkey bacon for a spicy chorizo.
- Veggie Lovers: Load up with roasted bell peppers and mushrooms for a hearty vegetarian option.
- Cheesy Italian: Replace cheddar with mozzarella and add a spoonful of marinara sauce for an Italian flair!
- Sweeten the Deal: For a sweeter touch, try adding a dollop of honey or a smear of almond butter on your muffin.
Chef’s Notes
This recipe has evolved over the years to meet my busy lifestyle without losing that breakfast comfort we all love. I started with standard bacon and scrambled eggs but quickly realized there’s beauty in lightening things up. One of my favorite kitchen stories involves a particularly chaotic morning when I accidentally grabbed the maple syrup instead of the ketchup. The unexpected sweetness paired with the savory dish opened my eyes to endless flavor possibilities! That’s the magic of cooking; it’s always an adventure.
FAQs and Troubleshooting
-
Can I make this sandwich ahead of time?
- Absolutely! You can prepare the ingredients and assemble the sandwich, then just heat it briefly in the microwave when you’re ready to eat. It might lose a little crispiness, but you’ll still enjoy the flavors!
-
What if I’ve never cooked egg whites before?
- No worries! Cooking egg whites is similar to cooking whole eggs. Just make sure they’re cooked until they’re no longer runny, and play with the seasoning to suit your taste.
-
Can I freeze this sandwich?
- Yes, you can! Wrap it tightly in foil and store it in the freezer. When you’re ready to eat, just heat it directly in the oven or microwave from frozen until heated through.
-
What is the calorie count for this sandwich?
- On average, this sandwich clocks in around 300 calories, and with the 30g of protein, it’s a fantastic option to fuel your day!
Eating doesn’t have to be complicated; it can be quick, easy, and still packed with flavor and nutrition. Grab your apron, gather your ingredients, and let this High Protein Low Calorie Breakfast Sandwich be a staple in your morning routine. Here’s to delicious mornings and beautiful moments shared around the table! Happy cooking!
PrintHigh Protein Low Calorie Breakfast Sandwich

A delicious and nutritious breakfast sandwich packed with 30 grams of protein while keeping the calories low.
- Prep Time: 10 minutes
- Cook Time: 10 minutes
- Total Time: 20 minutes
- Yield: 1 serving 1x
- Category: Breakfast
- Method: Cooking
- Cuisine: American
- Diet: Low-Calorie, High-Protein
Ingredients
- 1 Whole Wheat English Muffin
- ½ Cup Liquid Egg Whites
- 1 Slice Reduced-Fat Cheddar Cheese
- 2 Slices Turkey Bacon
- Cooking Spray
- Ketchup or Sauce of Choice
Instructions
- Prep your ingredients: Gather all your ingredients before you start cooking.
- Cook the turkey bacon: Heat a non-stick skillet over medium heat and spray it lightly with cooking spray. Add the turkey bacon slices and cook for about 4-5 minutes, flipping halfway.
- Prepare the egg whites: In the same skillet, remove the cooked bacon. Pour in your ½ cup of liquid egg whites and cook undisturbed for about 2-3 minutes. Stir occasionally until the eggs are set but still soft.
- Melt the cheddar cheese: Lay the slice of reduced-fat cheddar cheese on top of the scrambled egg whites and cover the skillet for a minute to melt the cheese.
- Toast the English muffin: Slice your muffin in half and toast until golden brown.
- Assemble your sandwich: Start with the bottom of the toasted muffin, add the cheesy egg whites, turkey bacon, drizzle with your sauce, and top with the muffin’s top half.
Notes
You can make this sandwich ahead of time and heat it briefly in the microwave. It can also be frozen.
Nutrition
- Serving Size: 1 sandwich
- Calories: 300
- Sugar: 2g
- Sodium: 600mg
- Fat: 10g
- Saturated Fat: 3g
- Unsaturated Fat: 5g
- Trans Fat: 0g
- Carbohydrates: 30g
- Fiber: 5g
- Protein: 30g
- Cholesterol: 0mg
Keywords: breakfast, sandwich, high-protein, low-calorie, healthy
Summer-Ready Baked Nectarines with Vanilla Ice Cream
Baked Nectarines with Vanilla Ice Cream: A Summer Delight
Summer is the season that brings a wonderful cascade of vibrant fruits bursting with flavor—hydration, sweetness, and sunshine in every bite. Among those refreshing gifts of nature, nectarines hold a special place in my heart. Their delicate skin hides juicy, fragrant flesh that can transform effortlessly from a simple snack into an elegant dessert. Today, I’m thrilled to share my favorite recipe for Baked Nectarines with Vanilla Ice Cream that is sure to impress and delight your family and friends or serve as a special treat for yourself!
A Sweet Memory
I remember summer evenings at my grandmother’s house, where the air would be filled with the scent of freshly baked goods. Every Saturday, we’d gather in her kitchen, where we rolled up our sleeves and dug into batches of fruit crisps, pies, and all kinds of goodies. One summer, she introduced us to her baked nectarines, which she’d drizzle with honey and sprinkle with cinnamon—a combination that ignited my taste buds with joy.
Watching the nectarines caramelize in the oven made the anticipation even sweeter. And when she served them warm with a scoop of creamy vanilla ice cream, it was like magic on a spoon! Those cherished memories of laughter, learning, and indulging in summer’s bounty are why I adore this dessert. Today, I continue that tradition, making it for my family and friends, inviting them to create their own sweet memories around the table.
Ingredients
Here’s everything you’ll need for this delightful dish:
-
Nectarines: The stars of this dessert! Choose ripe, firm nectarines for the best flavor. If nectarines are hard to find, peaches make an excellent substitute.
-
Cinnamon: This warm spice adds a cozy, aromatic depth. If you’re not a fan, nutmeg or allspice are great alternatives.
-
Honey: A natural sweetener that enhances the nectarines’ flavor profile. You can swap it with maple syrup or agave nectar for a vegan option.
-
Vanilla Ice Cream: The rich creaminess balances out the warm, baked nectarines. For a dairy-free option, consider coconut or almond milk ice cream.
Step-by-Step Instructions
Now let’s get cooking! Follow these steps, and we’ll have those baked nectarines ready in no time!
-
Preheat Your Oven: Start by preheating your oven to 375°F (190°C). This will provide the perfect climate for our nectarines to become tender and caramelized.
-
Prepare the Nectarines: Wash your nectarines thoroughly and cut them in half. Remove the pit and place the halves cut side up in a baking dish. As you cut, let your knife glide through the flesh with ease, enjoying the vibrant juice that drips from each slice.
-
Sprinkle with Cinnamon: Generously sprinkle ground cinnamon over the nectarines. This spice not only enhances flavor but also creates a lovely aroma that will fill your kitchen. If you’re feeling adventurous, consider adding a tiny pinch of cayenne pepper for a surprising twist!
-
Drizzle with Honey: Now, take your honey and drizzle it all over the nectarines. Make sure to coat them generously, as it will create a delicious caramelization during baking. Remember, a little honey goes a long way in sweetening the dish, but feel free to adjust to taste.
-
Bake: Slide the baking dish into your preheated oven and bake for 20 to 25 minutes. Keep an eye on them; you want them to become soft and bubbly, with caramelizing edges—but not mushy! The nectarines are ready when they yield easily to a fork.
-
Serve: Remove the baking dish from the oven and let it cool for a few minutes. For the final touch, scoop a generous serving of vanilla ice cream on top of each warm nectarine half. The ice cream will melt into the warm fruit—pure bliss!
Serving Suggestions
To make this dish visually stunning, serve the baked nectarines on individual dessert plates. Don’t forget to drizzle some of the delicious syrup from the baking dish over the top and finish with a fresh mint leaf for a pop of color. It’s an elegant touch that elevates even the simplest dessert!
Recipe Variations
- Nutty Crumble: Add a sprinkle of granola or chopped nuts like almonds or pecans over the nectarines before baking for added crunch.
- Alcoholic Twist: Drizzle some bourbon over the nectarines before baking for an adult version that adds sophistication.
- Different Fruits: Feel free to mix it up! Try using plums, peaches, or even apples or pears for a delightful twist on this recipe.
- Herbal Infusion: Infuse your honey with fresh lavender or rosemary to add a unique herbal note!
- Vegan Delight: Swap the vanilla ice cream with a coconut or almond-based ice cream for a completely dairy-free treat.
Chef’s Notes
This isn’t just any ordinary dessert—it’s a canvas for creativity! Each time I make this recipe, I find myself experimenting with new combinations of spices and toppings. I’ve even served it with a splash of dessert wine for a fun weekend gathering. Plus, it’s super adaptable to whatever fruit is in season! So don’t hesitate to play and make this dessert your own.
FAQs and Troubleshooting
1. How ripe should my nectarines be?
You want them slightly firm but not hard—like with peaches, go for a little give when you gently squeeze them. Avoid completely squishy ones, as they’ll turn to mush in the oven.
2. Can I make this dish in advance?
While baked nectarines are best served fresh, you can prepare them up to the baking step and store them in the fridge. When you’re ready, just pop them in the oven!
3. My nectarines turned out mushy. What did I do wrong?
Overbaking can cause your nectarines to become mushy. Keep a close eye on them during the cooking process; once fork-tender and bubbly, it’s time to take them out!
4. Can I use frozen nectarines?
While fresh is ideal, you can indeed use frozen ones! Just be sure to thaw them and drain off excess liquid before proceeding with the recipe to avoid a soggy result.
Nutritional Info
This dessert is all about balance. Each serving offers a delightful combination of fresh fruit, natural sugars, and creamy goodness. While I won’t dive into specific nutritional values today, it’s safe to say that this sweet treat is a lovely way to indulge while enjoying the health benefits of fruit!
Conclusion
As summer reaches its peak, delight in the pleasures of simple, beautiful desserts that bring joy to your table. Baked Nectarines with Vanilla Ice Cream showcase the best of summer flavors while being easy enough for any culinary enthusiast! Remember, this recipe is all about the experience—so gather your loved ones, tie on your apron, and let the good times roll!
I can’t wait to hear your stories as you bring this recipe to life. Remember, cooking is about connection, sharing, and those beautiful moments that make life richer. Happy cooking!
PrintBaked Nectarines with Vanilla Ice Cream

A delicious dessert featuring juicy nectarines baked to perfection and served warm with creamy vanilla ice cream.
- Prep Time: 15 minutes
- Cook Time: 25 minutes
- Total Time: 40 minutes
- Yield: 4 servings 1x
- Category: Dessert
- Method: Baking
- Cuisine: American
- Diet: Vegetarian
Ingredients
- 4 ripe nectarines
- 1 tsp ground cinnamon
- 2 tbsp honey
- Vanilla ice cream for serving
Instructions
- Preheat your oven to 375°F (190°C).
- Prepare the nectarines by washing them and cutting them in half; remove the pit.
- Sprinkle ground cinnamon over the nectarines.
- Drizzle honey all over the nectarines.
- Bake for 20 to 25 minutes until soft and bubbly.
- Serve with a generous scoop of vanilla ice cream on top.
Notes
For a vegan option, substitute honey with maple syrup or agave nectar, and use dairy-free ice cream.
Nutrition
- Serving Size: 1 serving
- Calories: 280
- Sugar: 22g
- Sodium: 25mg
- Fat: 8g
- Saturated Fat: 4g
- Unsaturated Fat: 3g
- Trans Fat: 0g
- Carbohydrates: 49g
- Fiber: 3g
- Protein: 3g
- Cholesterol: 30mg
Keywords: baked nectarines, dessert, summer recipe, vanilla ice cream, easy dessert

Minute Skillet Pan-Fried Peaches with Cinnamon Glaze
Savoring the Sweetness: The Art of Pan-Fried Peaches
Oh, summer! The vibrant colors, the warm breezes, and the glorious bounty of fresh fruits just waiting to be transformed into something delectable. If there’s one fruit that perfectly encapsulates the essence of sunny days, it’s peaches. Juicy, fragrant, and utterly delightful, peaches steal the show in countless recipes. Today, I’m thrilled to share with you a simple, yet stunning dish that celebrates this marvelous fruit: pan-fried peaches!
Imagine the scent of ripe peaches sizzling away in butter, caramelizing just enough to coax out that sweet, sticky goodness. This dish comes together in under 10 minutes, making it a perfect go-to for a sweet breakfast topping, a dreamy dessert, or even a delightful addition to your cheese platter when hosting friends. Plus, it showcases an elegant simplicity that embodies the spirit of Ivory Apron.
So, gather your ingredients, tie on your apron, and let’s create a dish that radiates summertime joy!
A Slice of My Memory: The Peach-Scented Summers of My Childhood
Growing up in the heart of summer, my fondest memories revolve around the kitchen filled with laughter, warmth, and the sweet smell of fruits. My family had a tradition of visiting local farms, and nothing was quite as special as picking ripe peaches right off the tree.
I remember my grandmother, a cooking magician in her own right, would turn the bounty of our picking adventures into mouthwatering dishes. However, my favorite was always her pan-fried peaches served with a dollop of whipped cream. It was a dish filled with love, laughter, and a hint of nostalgia. Every bite transported me back to those sunny afternoons spent amongst the trees, where peaches felt like nature’s candy.
As I prepare this recipe today, I can still hear my grandmother encouraging me to embrace the imperfections, savor the flavors, and make the most of what’s in season. It’s her spirit that inspires me to share my cooking journey with you!
Ingredients You’ll Need
Let’s dive into the simple yet delightful ingredients for our pan-fried peaches!
- 4 fresh peaches: Aim for ripe peaches that yield just slightly to pressure. If you can’t find fresh peaches, you can use nectarines as a substitute, though they may be a bit firmer.
- 1 tablespoon unsalted butter: This adds richness and a lovely golden color. You could use coconut oil or a dairy-free butter as a vegan alternative.
- 2 tablespoons brown sugar: The brown sugar will caramelize beautifully, giving off that irresistible sweetness. You can adjust the amount to your taste or swap it out with maple syrup for a lighter touch.
- ½ teaspoon cinnamon powder: Cinnamon adds a warm spice that complements the sweetness of the peaches. If you’re feeling adventurous, try adding a pinch of nutmeg!
- ¼ teaspoon ginger powder: This adds a subtle zing that lifts the flavor profile. Fresh, grated ginger works wonders too!
- A pinch of salt: Don’t underestimate salt; it enhances the sweetness by balancing the flavors.
Step-by-Step Instructions
Let’s get cooking!
-
Prepare the peaches: Start by washing your peaches under cold water and patting them dry. Slice them in half and remove the pit. If you have a soft peach, you can also simply cut it into wedges! There’s no need for perfection here; it’s all about flavor. (Chef tip: If your peaches are not quite ripe, you can place them in a paper bag at room temperature for a day or two to speed up the ripening process.)
-
Heat your skillet: Place a non-stick skillet over medium heat and add the unsalted butter. Allow it to melt and start bubbling but be careful not to let it brown too much. This is where the magic begins! (Little pro tip: A cast-iron skillet will add an extra layer of flavor and a nice sear – plus, it looks gorgeous when serving!)
-
Add the peaches: Once the butter is bubbling, gently place your sliced peaches cut-side down in the hot skillet. The sizzle is music to my ears! Let them cook for about 2-3 minutes, or until they start to develop a beautiful golden-brown color. (Hint: Avoid overcrowding the pan, or you’ll steam rather than fry!)
-
Sprinkle the sweetness: After a beautiful golden hue shows up, sprinkle the brown sugar evenly over the peaches. Toss in that cinnamon and ginger too! It’s an aromatic adventure. The sugar will begin to melt and create a lovely caramel sauce. Cook for another 2 minutes to let the flavors meld together.
-
Finish with a pinch of salt: At the last moment, add the pinch of salt. It may sound counterintuitive, but this tiny touch will elevate the dish! Once the peaches are tender and caramelized, remove them from the heat. (Chef’s note: If you’re feeling fancy, you can deglaze the pan with a splash of bourbon or brandy for an adult twist!)
Serving Suggestions
Now comes the best part—serving! For a lovely presentation, gently arrange the warm pan-fried peaches on a beautiful plate. Drizzle any leftover caramel sauce from the skillet over the top for a touch of elegance. Consider adding a scoop of vanilla ice cream or a dollop of cream to complement the sweetness. Fresh mint can also make the dish pop with color and a fresh note!
Recipe Variations
Here are a few creative spins you can put on this classic dish:
- Nutty addition: Add chopped pecans or walnuts during the last minute of cooking for a delightful crunch.
- Herbal twist: Sprinkle in fresh thyme or basil just before serving for an unexpected herbaceous flavor.
- Spice it up: Consider adding a dash of cardamom or a hint of smoked paprika for a unique spin!
- Cheese it up: Create a savory twist by topping with crumbled goat cheese or ricotta, complementing the sweet peaches with creamy richness.
- Grilled version: If you’re feeling adventurous, you can grill your peaches for a smoky flavor that goes wonderfully with the caramelized sugar.
Chef’s Notes
This recipe has evolved with me over the years. What started as a nostalgic treat quickly transformed into a versatile dish that can elevate any dessert table or breakfast spread. I love experimenting with different flavor profiles. Once, I added bourbon, and let me tell you, it added an unforgettable depth that left my guests raving! But whether you’re drenching your peaches in sauce or simply enjoying them fresh, this fruit is an endless source of joy in the kitchen.
FAQs and Troubleshooting
1. What if my peaches are not ripe?
You can still use them! Just slice them and fry them a little longer. Consider adding more brown sugar to balance the tartness.
2. Can I use frozen peaches?
Certainly! Just remember to thaw and drain excess liquid before frying. They may not hold their shape perfectly, but the flavor will still shine.
3. The sugar isn’t caramelizing! What do I do?
Make sure your pan is hot enough when adding the sugar. If there’s not enough heat, the sugar will dissolve without caramelizing. A little patience goes a long way!
4. How do I store leftovers?
Pan-fried peaches taste best fresh, but you can store them in an airtight container in the fridge for up to two days. Reheat gently in a skillet to enjoy them warm again.
Nutritional Info
While not overly indulgent, the beauty of pan-fried peaches lies in their simplicity. They offer a great source of vitamins A and C, along with fiber. Don’t forget to enjoy them in moderation, especially when adding sugar or toppings like ice cream!
And there you have it! A delightful, mouthwatering dish that reminds us of the joy found in simplicity and the fleeting flavors of summer. As you serve up your pan-fried peaches, I hope they bring as much warmth and nostalgia to your table as they do to mine. Remember, cooking is less about perfection and more about connection, love, and sharing moments around the table. Happy cooking, and let’s savor every bite!
PrintPan-Fried Peaches

A simple and elegant dish that celebrates the sweetness of summer peaches, perfect for breakfast, dessert, or as a topping.
- Prep Time: 10 minutes
- Cook Time: 5 minutes
- Total Time: 15 minutes
- Yield: 4 servings 1x
- Category: Dessert
- Method: Pan-Frying
- Cuisine: American
- Diet: Vegetarian
Ingredients
- 4 fresh peaches
- 1 tablespoon unsalted butter
- 2 tablespoons brown sugar
- ½ teaspoon cinnamon powder
- ¼ teaspoon ginger powder
- A pinch of salt
Instructions
- Prepare the peaches: Wash, dry, and slice the peaches in half, removing the pit.
- Heat your skillet: Melt the butter in a non-stick skillet over medium heat.
- Add the peaches: Place sliced peaches in the skillet cut-side down and cook for 2-3 minutes.
- Sprinkle the sweetness: Add brown sugar, cinnamon, and ginger; cook for another 2 minutes.
- Finish with a pinch of salt before removing from heat.
Notes
For a twist, consider adding a splash of bourbon or serving with vanilla ice cream.
Nutrition
- Serving Size: 1 serving
- Calories: 150
- Sugar: 15g
- Sodium: 25mg
- Fat: 7g
- Saturated Fat: 4g
- Unsaturated Fat: 3g
- Trans Fat: 0g
- Carbohydrates: 23g
- Fiber: 2g
- Protein: 1g
- Cholesterol: 15mg
Keywords: peaches, summer dessert, pan-fried, simple recipes, fruit dessert

4th of July Patriotic Pretzel Rods: Red, White & Blue Snack
Patriotic Pretzel Rods: A Celebration of Crunch and Color
Hello, friends! If you’ve ever rummaged through your pantry and uncovered a bag of pretzel rods, you know you’re in for a treat! Today, we’re taking those crunchy delights and transforming them into something festive and fun: Patriotic Pretzel Rods. Perfect for summer barbecues, Fourth of July celebrations, Memorial Day picnics, or any reason you want to bring a festive flair to your gathering, these pretzel rods are a delightful combination of sweet and salty that everyone will adore.
Now let’s talk about why I am particularly fond of these treats. As a kid, I always looked forward to summertime, not just for the warm weather and pool parties, but also for the family gatherings where creativity flowed as freely as the lemonade. I remember the excitement of helping my mom make festive snacks for our small neighborhood parades—dipping everything in chocolate and covering them with sprinkles made me feel like a true wizard in the kitchen. Those moments sparked my love for cooking and turned me into the chef I am today.
The Joy of Creating and Sharing
I recall one summer, we decided to make edible decorations for our fourth of July barbeque. Our entire family crowded around the kitchen table, armed with pretzel rods, chocolate, and a rainbow of sprinkles. As we dipped and designed each pretzel, we shared stories, played with textures, and embraced the mess! Chocolate dripped, sprinkles flew, and laughter filled the air. It was a beautiful chaos—all part of the joy of creating.
Those memories are what inspired these Patriotic Pretzel Rods. They capture the essence of family, laughter, and sharing. And the best part? They’re incredibly easy to make, so you can easily invite friends and family to join in on the fun!
Ingredients
Before we get cooking, here’s what you’ll need to make these festive delights!
-
1 bag pretzel rods
The stars of our show! Crunchy and salty, these pretzels act as the perfect canvas for deliciousness. You can substitute with any long pretzel, like pretzel sticks or even chocolate-covered pretzels, if you prefer. -
1 bag white candy melts
This creamy, sweet coating adds a beautiful layer of richness. If you can’t find white candy melts, feel free to use white chocolate instead. Just keep an eye on the melting temperature! -
1 bag red candy melts
These vibrant melts bring the all-important red to our patriotic palette! Alternatives include red chocolate or even strawberry-flavored candy melts for added flavor depth. -
1 bag blue candy melts
Blue completes our festive theme! You can swap these for blue chocolate or even royal blue sprinkles if needed, but the melts give a nice smooth finish. -
Patriotic sprinkles (optional)
Sprinkles add a fun visual effect and texture! Look for red, white, and blue varieties, but feel free to use any sprinkles you love for a personal touch. They’re optional but highly recommended for that extra wow factor!
Step-by-Step Instructions
Ready to dive into the fun? Let’s get started creating these delightful treats!
-
Melt the Candy Melts
Start by melting your candy melts. You can use the microwave or a double boiler. If you go the microwave route, place your candy melts in a microwave-safe bowl and heat in 30-second intervals, stirring in between until smooth. This ensures you don’t overheat them and ruin that gorgeous velvety texture! -
Prep Your Workstation
While melting your candy, lay out some parchment paper on a baking tray or countertop. This will be your cooling station, where all the magic will happen. Having everything within reach will make this process smooth and enjoyable! -
Dip the Pretzels
Choose a melted candy color to start. Holding a pretzel rod by one end, dip it into the melted candy, making sure it’s completely covered. Gently tap off any excess candy—less is more in terms of a neat finish! If the candy isn’t coating well, try quickly reheating it to achieve a smoother consistency. -
Add Sprinkles Immediately
Before the candy hardens, sprinkle your patriotic sprinkles generously over the dipped area. The melts set quickly, so you want to do this while they’re still wet. You can even get creative with the placement for a layered look! -
Repeat with Other Colors
Now, go to town by repeating the dipping process with your other colors. You can do alternating stripes or color blocks—whatever you’re feeling! Watch as your pretzel rods transform into festive masterpieces. -
Cool and Serve
Once coated and sprinkled, place your decorated pretzel rods on the parchment paper to set. If you’re in a hurry, put them in the fridge for about 10 minutes. Once they’ve hardened, they’re ready to serve or package as gifts!
Serving Suggestions
To present your beautiful Patriotic Pretzel Rods, arrange them in a tall glass jar or a cute vase for a striking centerpiece or place them on a decorative platter. You might even want to display them alongside other patriotic treats, like fruit skewers with red and blue berries. A sprinkle of festive table decorations will make your setup complete!
Recipe Variations
Feeling creative? Here are a few twists on this recipe:
- Chocolate Dip Delight: Instead of candy melts, use semi-sweet or milk chocolate for a richer flavor.
- Nutty Sprinkle Surprise: Add crushed nuts like almonds or pecans to your sprinkles for added texture and flavor.
- Flavor Infusion: Mix in a drop of peppermint or vanilla extract into your melted white chocolate for a fun flavor twist.
- Gluten-Free Option: Use gluten-free pretzel rods to accommodate dietary restrictions.
- Colorful Drizzle: After your pretzels set, drizzle some contrasting candy melts over the top for added flair.
Chef’s Notes
These Patriotic Pretzel Rods have been a staple at my summer gatherings for years. I’ll never forget one year when we ended up with chocolate all over our hands and clothes—but the smiles on the kids’ faces made it all worthwhile! While I love how aesthetically pleasing these treats are, the joy really comes from the fun and laughter shared around the creation process. Whenever I make these with friends, I remind myself that cooking is not just about the final product—it’s about the memories we make along the way!
FAQs and Troubleshooting
-
What if my candy melts are too thick?
If your melts aren’t smooth, reheat them in 10-second bursts until they reach a silky consistency. You can also add a teaspoon of coconut oil to thin them out. -
How do I store these pretzel rods?
Keep your pretzel rods in an airtight container. They can last up to two weeks at room temperature, although I doubt they’ll last that long! -
Can I use different color melts?
Absolutely! Feel free to get creative with colors that suit your occasion—think Halloween or Christmas themes! -
Why are my melted chocolate/bark seizing up?
If moisture gets into your melted candy melts, they may seize. Always ensure your bowls and utensils are dry!
Nutritional Info
While the nutritional details may vary based on specific ingredients used, a rough estimate for each pretzel rod would be around 100 calories with a mix of carbohydrates and sugars.
So there you have it, wonderful friends! I hope you feel inspired to tie on your apron, gather those ingredients, and whip up some fabulous Patriotic Pretzel Rods for your next celebration. Cooking is all about joy, creativity, and bringing people together—and I can’t wait to see the delicious treats you create! Let’s make beautiful memories around the table!
PrintPatriotic Pretzel Rods

These Patriotic Pretzel Rods are a delightful combination of sweet and salty, making them perfect for summer gatherings and festive celebrations.
- Prep Time: 15 minutes
- Cook Time: 10 minutes
- Total Time: 25 minutes
- Yield: 20 pretzel rods 1x
- Category: Snack
- Method: Dipping
- Cuisine: American
- Diet: Vegetarian
Ingredients
- 1 bag pretzel rods
- 1 bag white candy melts
- 1 bag red candy melts
- 1 bag blue candy melts
- Patriotic sprinkles (optional)
Instructions
- Melt the candy melts. You can use the microwave or a double boiler. If using the microwave, heat in 30-second intervals, stirring in between until smooth.
- Prep your workstation by laying out parchment paper on a baking tray or countertop for cooling.
- Dip the pretzels by holding a pretzel rod by one end and dipping it into the melted candy until covered. Tap off excess candy.
- Add sprinkles immediately over the dipped area before the candy hardens.
- Repeat the dipping process with other colors to create festive designs.
- Cool and serve by placing the coated pretzel rods on parchment paper to set.
Notes
These pretzel rods are fun to make with friends and family, and they can be creatively decorated for any occasion.
Nutrition
- Serving Size: 1 pretzel rod
- Calories: 100
- Sugar: 8g
- Sodium: 250mg
- Fat: 4g
- Saturated Fat: 2g
- Unsaturated Fat: 2g
- Trans Fat: 0g
- Carbohydrates: 15g
- Fiber: 1g
- Protein: 1g
- Cholesterol: 0mg
Keywords: patriotic snacks, pretzel rods, festive treats, fourth of July, summer desserts

Patriotic Poke Cake: No-Bake Party Dessert for 4th of July
Celebrate with a Patriotic Poke Cake: A Festive Treat for Every Occasion
Hello, darling foodies! Today, we’re diving into a recipe that’s as vibrant as the flag itself — the Patriotic Poke Cake! This delightful dessert is perfect for any summer celebration, whether it’s the Fourth of July, a backyard barbecue, or simply a Sunday dinner that calls for something sweet. The beauty of a poke cake is in its simplicity and approachability. With just a few ingredients, we can create a show-stopper that’ll impress your friends and family, all while bringing a burst of color to the table. So let’s roll up those sleeves, tie on our aprons, and get baking!
A Sweet Slice of Nostalgia
Growing up, many of my fondest memories were shaped around the dinner table during the summer. Our family would gather at my grandmother’s house, where the air was filled with laughter, the sound of sizzling grilled meats, and, of course, the delicious aroma of her famous poke cake. My grandmother had this way of making everything feel special, and her poke cake was a staple for every celebration. I can still see her in her worn apron, gently poking holes into the cake with the end of a wooden spoon, explaining how each hole would capture sweet flavor and moisture.
I love how a poke cake took something simple and let it shine in its own way. The layers of sweetened condensed milk soaking into the delicate cake made it moist and decadent. Topped with fresh strawberries and blueberries, it became a festive masterpiece to celebrate our American spirit. This is a dish that takes me back to those cherished moments, reminding me how good food creates an atmosphere of togetherness.
Ingredients You’ll Need:
Here are your star ingredients for the Patriotic Poke Cake:
-
1 Box of White Cake Mix: The base of our cake. You can use any brand you prefer; just make sure you follow the package instructions for baking.
-
1 Cup Water: Adds moisture to the cake; using room-temperature water helps achieve a fluffy texture.
-
1/3 Cup Vegetable Oil: This keeps the cake tender and moist. If you want a flavor twist, feel free to substitute with melted coconut oil!
-
3 Large Eggs: Eggs help bind the ingredients together and provide a rich flavor. If you’re making it vegan, you can replace each egg with 1/4 cup unsweetened applesauce.
-
1 Cup Sweetened Condensed Milk: The magic ingredient! This rich and creamy milk adds sweetness and moisture. If you prefer a dairy-free option, look for coconut condensed milk.
-
1 Cup Strawberries (sliced): These provide a sweet and fresh flavor — plus, they add a pop of red goodness.
-
1 Cup Blueberries: Another fruit that adds sweetness and provides that beautiful blue hue. Frozen blueberries can be a substitute, just drain them well.
-
1 Cup Whipped Topping: For that final creamy layer, you can use store-bought or homemade whipped cream. If you’re avoiding dairy, a coconut whipped topping works wonderfully.
-
Red and Blue Food Coloring: To enhance those patriotic colors! You can skip this if you prefer the natural look, but a little color never hurts for some festive fun!
Step-By-Step Instructions
Now that we have our ingredients ready, let’s get into the cooking. This cake is a breeze to whip up!
-
Preheat the Oven: Start by preheating your oven to 350°F (175°C). This ensures your cake bakes evenly.
-
Prepare Your Cake Batter: In a large mixing bowl, combine the white cake mix, water, vegetable oil, and eggs. [Chef tip: Mix this on medium speed for about 2 minutes until the batter is smooth and well combined.]
-
Bake the Cake: Pour the batter into a greased 9×13 inch baking dish. [Here’s a little hack: Make sure you spread the batter evenly to avoid uneven baking.] Bake according to the package directions, usually around 30-35 minutes, or until a toothpick comes out clean.
-
Cool the Cake: Once your cake is done baking, let it cool in the pan for about 10-15 minutes. After that, take a skewer or the handle of a wooden spoon and poke holes all over the top of the cake, about an inch apart. This is where all the flavor magic happens!
-
Add the Sweetened Condensed Milk: Carefully pour the sweetened condensed milk over the warm cake, ensuring that it seeps into the holes. [Chef insight: Letting the cake soak while it’s still warm will help it absorb more moisture.]
-
Chill Your Cake: Cover your cake with plastic wrap and pop it in the refrigerator for at least 2 hours, or overnight if you can wait! This step is crucial for flavor development.
-
Top It Off: Once chilled, spread your whipped topping evenly across the cake. Now, here comes the fun part — let’s decorate!
-
Create a Patriotic Design: Arrange the sliced strawberries and blueberries on top of the whipped topping to showcase those red, white, and blue colors. You can create a flag design or any pattern that excites you!
Serving Suggestions
To serve this lovely cake, slice it generously into squares, and plate each piece with a dollop of extra whipped topping and a fresh berry on top for a beautiful presentation. Don’t forget to set the mood! Scented candles, colorful plates, and maybe even some festive napkins will enhance the experience and make your guests feel special.
Recipe Variations
Feel free to get creative with this cake! Here are a few ideas:
-
Layered Poke Cake: Consider making two layers of cake and sandwiching the filling between them for a show-stopping effect.
-
Flavor Twist: Instead of white cake, use lemon or almond cake mix for an unexpected yet delightful flavor.
-
Dietary Swaps: Try a gluten-free cake mix for a gluten-free option or make mini poke cakes in muffin tins for single-serving treats.
-
Fruit Mix-up: Swap the strawberries and blueberries with your favorite seasonal fruits — think peaches or kiwi for a tropical twist!
-
Chocolate Sprinkle: Want to tempt chocolate lovers? Add cocoa powder to the cake mix or use chocolate whipped topping!
Chef’s Notes
I have to tell you, this recipe has evolved beautifully over the years. The first time I made it was quite a spectacle! I forgot to poke holes in the cake, and let me tell you, it turned out like a dense sponge. Lesson learned, but that’s the beauty of cooking — we learn from our moments in the kitchen, and each mistake leads to greater adventures! Now, it’s one of my go-to desserts when I want to impress someone (and, let’s be real, it always gets rave reviews!).
FAQs and Troubleshooting
-
Why did my poke cake turn out dry? Make sure to pour the sweetened condensed milk while the cake is warm. Additionally, letting it chill for at least 2 hours is essential for moistened goodness!
-
Can I freeze my poke cake? Absolutely! Just be sure to wrap it tightly in plastic wrap. It can be frozen for up to three months. Just thaw it in the fridge overnight before serving.
-
My cake fell while baking. What happened? This can happen if you opened the oven door too soon. Always wait for at least the first 20 minutes before peeking!
-
Can I use cool whip instead of whipped topping? Yes! If you’re looking for convenience, Cool Whip is a great alternative, just be sure to defrost it properly before spreading.
Nutritional Info
While nutrition details can vary, a serving of this Patriotic Poke Cake typically contains about 250-300 calories. Remember, it’s all about enjoying the moment around the table!
So, there you have it — a vibrant and delicious Patriotic Poke Cake that will have everyone asking for seconds. Whether it’s for a holiday or a casual gathering, this cake is your ticket to creating wonderful memories. I hope you try it out and make it your own. Happy baking, and let’s raise a slice to all the beautiful moments that food can share!
PrintPatriotic Poke Cake

A festive poke cake topped with strawberries and blueberries, perfect for summer celebrations.
- Prep Time: 15 minutes
- Cook Time: 35 minutes
- Total Time: 50 minutes
- Yield: 12 servings 1x
- Category: Dessert
- Method: Baking
- Cuisine: American
- Diet: Vegetarian
Ingredients
- 1 Box of White Cake Mix
- 1 Cup Water
- 1/3 Cup Vegetable Oil
- 3 Large Eggs
- 1 Cup Sweetened Condensed Milk
- 1 Cup Strawberries (sliced)
- 1 Cup Blueberries
- 1 Cup Whipped Topping
- Red and Blue Food Coloring
Instructions
- Preheat the oven to 350°F (175°C).
- Combine the white cake mix, water, vegetable oil, and eggs in a large mixing bowl, mixing for about 2 minutes until smooth.
- Pour the batter into a greased 9×13 inch baking dish and bake according to package directions for 30-35 minutes.
- Cool the cake in the pan for 10-15 minutes, then poke holes all over the top.
- Pour the sweetened condensed milk over the warm cake.
- Chill the cake covered with plastic wrap in the refrigerator for at least 2 hours.
- Spread whipped topping evenly across the chilled cake.
- Arrange sliced strawberries and blueberries on top in a patriotic design.
Notes
Letting the cake soak while still warm helps absorb more moisture. For different flavors, try lemon or almond cake mix.
Nutrition
- Serving Size: 1 slice
- Calories: 275
- Sugar: 23g
- Sodium: 320mg
- Fat: 9g
- Saturated Fat: 2g
- Unsaturated Fat: 7g
- Trans Fat: 0g
- Carbohydrates: 40g
- Fiber: 1g
- Protein: 4g
- Cholesterol: 50mg
Keywords: poke cake, patriotic dessert, summer cake, festive dessert, easy cake recipe
Patriotic 4th of July Monster Cookies: Quick Party Treat
Celebrate with 4th of July Monster Cookies: A Sweet, Festive Treat!
As the summer sun shines bright and the scent of barbecue fills the air, there’s one thing that truly captures the spirit of the 4th of July for me: baking up a storm in my kitchen! And what better way to celebrate America’s birthday than with a batch of vibrant, indulgent Monster Cookies? These spirited confections are the epitome of a festive treat—they’re chewy, chunky, and bursting with flavors that make your taste buds dance!
Picture this: friends and family gathered around, laughter echoing in the warm summer air, as you present a platter of these delightful cookies, each one a masterpiece of flavors and colors. What’s more? Monster Cookies are wonderfully forgiving, allowing even novice bakers to create a stunning dessert that impresses without the fuss. I’m excited to guide you through this family-friendly cookie adventure, so grab your apron, and let’s get baking!
A Cookie That Holds Memories
Let me take you on a little trip down memory lane. I remember the first time I ever made cookies for a party—ironically, it was another 4th of July gathering. Armed with just a worn-out cookbook and my mom’s old mixer, I whipped up a batch of chocolate chip cookies, thinking I could impress a few friends.
What I didn’t anticipate was how they would turn out! The cookies were a complete disaster; they spread too thin and ended up like puddles of goo on the baking sheet! But amidst the culinary chaos, I learned something invaluable: it’s not just about the cookies, but the joy of sharing, creating, and laughing together in the kitchen.
Fast forward a few years, and I’ve perfected my cookie game, adding colorful M&M’s to my classic recipe to create the ultimate Monster Cookies. Now, these festive favorites not only remind me of my early baking days but are also my go-to treat for any celebration—especially the 4th of July!
Ingredients
Here’s what you’ll need to make these festive 4th of July Monster Cookies:
-
1 cup browned butter
Browned butter adds a rich, nutty flavor that transforms basic cookies into something truly special. If you’re short on time, melted regular butter can work as a substitute, although you won’t get that toasty depth of flavor. -
1 cup brown sugar
This adds moisture and a hint of caramel sweetness. If you need a lighter option, you can use coconut sugar, though it may alter the taste slightly. -
1/2 cup granulated sugar
The granulated sugar balances the richness of the brown sugar and helps achieve the perfect chewy texture. You could substitute with a sugar alternative like agave syrup, but the amount will vary. -
2 large eggs
Eggs not only bind the ingredients together but also contribute to the cookies’ rise. For a vegan option, you can use flaxseed meal mixed with water as a substitute. -
1 teaspoon vanilla extract
Pure vanilla extract elevates the cookie’s flavor with a sweet aromatic essence. Try to use pure vanilla rather than imitation for best results. -
2 cups all-purpose flour
This creates the base of the cookie. You can use a gluten-free all-purpose flour blend if you’re looking for a gluten-free option. -
1 teaspoon baking soda
This is essential for leavening, giving your cookies that perfect soft-chewy texture. Don’t confuse it with baking powder; they are NOT interchangeable. -
1/2 teaspoon salt
A pinch of salt enhances the sweetness of your cookies and balances flavors. If you’re watching your sodium intake, feel free to reduce the amount, but don’t omit it altogether. -
1 cup chocolate chips
Semi-sweet chocolate chips are a classic choice, but feel free to mix things up with milk chocolate or dark chocolate, depending on your preference. -
1/2 cup M&M’s
These colorful candies are not only delicious, they also add a pop of fun and color, perfect for the 4th of July festivities! -
1/2 cup oats
Oats add chewiness to each cookie and a bit of heartiness. You can use quick-cooking oats in a pinch, but the texture will be slightly different.
Step-by-Step Instructions
Now that we have our ingredients gathered, let’s dive into the fun part—the baking!
-
Brown the Butter
Start by adding the butter to a saucepan over medium heat. Let it melt and continue cooking until it turns a lovely golden brown, with a nutty aroma wafting through your kitchen. Make sure to stir it occasionally to prevent burning. Once browned, remove from heat and let it cool for a few minutes. -
Combine Sugars
In a large mixing bowl, combine the cooled browned butter with brown sugar and granulated sugar. Using a hand mixer or a whisk, beat until the mixture is smooth and creamy—about 2-3 minutes. This fluffy mixture means we’re on the right track! -
Add Eggs and Vanilla
Next up, add in the eggs one at a time, mixing well after each addition. Then, pour in the vanilla extract, mixing until it’s well incorporated. This step will make your kitchen smell heavenly! -
Mix Dry Ingredients
In a separate bowl, whisk together the all-purpose flour, baking soda, and salt. Gradually add the dry mixture to the wet ingredients, mixing until just combined—overmixing can lead to tough cookies, and we don’t want that! -
Fold in Chocolate and M&M’s
Using a spatula, gently fold in the chocolate chips, M&M’s, and oats. The batter should look thick and luscious—just how cookie dough should be! -
Chill the Dough (Optional)
If you have time, it’s advantageous to chill the dough for at least 30 minutes. This helps to solidify the fats in the dough, leading to thicker cookies. It’s a small step that makes a big difference! -
Preheat the Oven
While the dough chills, preheat your oven to 350°F (175°C). Don’t skip this step; a well-preheated oven is key to even-baked cookies. -
Scoop and Bake
Line baking sheets with parchment paper. Use a cookie scoop (or two spoons) to drop generous mounds of dough onto the baking sheet, spacing them about 2 inches apart. Bake for 10-12 minutes or until the edges are lightly golden but the centers are still soft. Remember, they will continue to cook as they cool! -
Cool and Enjoy
Once baked, let the cookies cool on the baking sheet for a few minutes before transferring them to a wire rack. Warm cookies are the best, especially with a glass of milk!
Serving Suggestions
These beautiful Monster Cookies are perfect for sharing! You can plate them on a festive 4th of July-themed platter or create individual servings in colorful paper bags tied with ribbon for picnics and gatherings. A scoop of vanilla ice cream on the side wouldn’t hurt either—think cookie ice cream sandwiches or simply a delicious accompaniment.
Recipe Variations
Want to customize your Monster Cookies? Here are a few fun variations:
-
Add Nuts: Throw in chopped pecans or walnuts for an extra crunch.
-
Nut Butter Swirl: Mix in a spoonful of peanut butter or almond butter for a nutty twist.
-
Fruit Frenzy: Swap the M&M’s for dried fruits like cranberries or cherries for a chewy, fruity flavor.
-
Spice It Up: Add a dash of cinnamon or nutmeg for a warm, comforting undertone.
Chef’s Notes
I’d be remiss if I didn’t mention that these Monster Cookies have a little history of their own in my kitchen! The recipe has evolved over time based on what’s in the pantry or what I’m craving. Sometimes I experiment with different types of chocolate or even add a sprinkle of sea salt on top right before baking. Do you get the urge to take a bite of your freshly baked cookies while standing over the cooling rack? Guilty as charged! It’s all about the joy of indulging in the fruits of your labor.
FAQs and Troubleshooting
-
Why did my cookies spread too much?
This can happen if the butter is too warm or if you didn’t chill the dough. Make sure to let your cookies rest before baking! -
How do I know when my cookies are done?
Look for edges that are set and a slightly soft center. They’ll continue to firm up while cooling on the baking sheet. -
Can I freeze the cookie dough?
Absolutely! You can scoop the dough into balls and freeze them on a baking sheet. Once frozen, transfer them to a ziplock bag for later baking—great for last-minute cravings! -
What should I do if my cookies turn out too dry?
Overmixing can lead to dry cookies. Make sure to mix until just combined and not too much after adding the flour.
Nutritional Info
While I love indulging during festivities, moderation is key! Here’s a rough outline for one cookie (based on 24 servings):
- Calories: 180
- Total Fat: 9g
- Carbohydrates: 24g
- Protein: 2g
- Fiber: 1g
And there you have it! Your ultimate guide to creating delicious 4th of July Monster Cookies—made with love, laughter, and a pinch of nostalgia. So this holiday season, gather your loved ones, tie on an apron, and whip up a batch of these delightful cookies. Remember, it’s all about creating memories around your table while enjoying the sweet rewards of baking together. Happy 4th of July!
Print4th of July Monster Cookies

Celebrate America’s birthday with these vibrant, chewy Monster Cookies bursting with flavors and colors. Perfect for sharing at summer gatherings!
- Prep Time: 15 minutes
- Cook Time: 12 minutes
- Total Time: 45 minutes
- Yield: 24 servings 1x
- Category: Dessert
- Method: Baking
- Cuisine: American
- Diet: Vegetarian
Ingredients
- 1 cup browned butter
- 1 cup brown sugar
- 1/2 cup granulated sugar
- 2 large eggs
- 1 teaspoon vanilla extract
- 2 cups all-purpose flour
- 1 teaspoon baking soda
- 1/2 teaspoon salt
- 1 cup chocolate chips
- 1/2 cup M&M’s
- 1/2 cup oats
Instructions
- Brown the Butter: Add the butter to a saucepan over medium heat. Let it melt and continue cooking until it turns golden brown, stirring occasionally to prevent burning. Remove from heat and let it cool.
- Combine Sugars: In a large mixing bowl, combine the cooled browned butter with brown sugar and granulated sugar. Beat until smooth and creamy, about 2-3 minutes.
- Add Eggs and Vanilla: Add in the eggs one at a time, mixing well after each addition. Pour in the vanilla extract and mix until incorporated.
- Mix Dry Ingredients: In a separate bowl, whisk together flour, baking soda, and salt. Gradually add to the wet ingredients, mixing until just combined.
- Fold in Chocolate and M&M’s: Gently fold in the chocolate chips, M&M’s, and oats until the batter is thick.
- Chill the Dough (Optional): Chill the dough for at least 30 minutes for thicker cookies.
- Preheat the Oven: While the dough chills, preheat your oven to 350°F (175°C).
- Scoop and Bake: Line baking sheets with parchment paper. Scoop mounds of dough onto the sheets, spaced about 2 inches apart. Bake for 10-12 minutes or until edges are lightly golden.
- Cool and Enjoy: Let the cookies cool on the baking sheet for a few minutes before transferring them to a wire rack.
Notes
For a fun twist, consider adding nuts or a swirl of nut butter. These cookies can also be frozen for later enjoyment.
Nutrition
- Serving Size: 1 cookie
- Calories: 180
- Sugar: 10g
- Sodium: 150mg
- Fat: 9g
- Saturated Fat: 5g
- Unsaturated Fat: 3g
- Trans Fat: 0g
- Carbohydrates: 24g
- Fiber: 1g
- Protein: 2g
- Cholesterol: 30mg
Keywords: Monster Cookies, 4th of July, festive cookies, baking, summer desserts
Summer Nectarine Frozen Yogurt: 5-Minute No-Churn Recipe
Whip Up a Delightful Nectarine Frozen Yogurt: A Sweet Summer Treat
Hello, friend! If you’re craving something cool, creamy, and absolutely delightful, then you’ve stumbled upon the right recipe! Today, we’re diving into the luscious world of Nectarine Frozen Yogurt, a treat that’s as refreshing as a summer breeze and just as bright in flavor. This isn’t just your everyday frozen dessert; it’s a vibrant showcase of fresh nectarines, tangy Greek yogurt, and a touch of sweetness—perfect to beat that summer heat!
Picture this: you’re lounging on your porch, basking in the golden sunshine, and you realize you need a sweet treat to cool you down. That’s where this easy, elegant recipe comes in. With only a handful of ingredients and a little bit of your precious time, you’ll create a frozen yogurt that’s bursting with juicy nectarines and creamy goodness. Trust me; it’s going to be a new favorite in your kitchen!
Time to Get Nostalgic
Let me take you back to a sun-soaked summer day in my childhood. My family had a lovely little orchard we frequented every July, where juicy nectarines hung from the branches like little golden gems waiting to be plucked. The excitement of wandering through those rows, sunlight filtering through the leaves, and tasting the sweet nectarines straight off the tree was indescribable.
One summer afternoon, my mom decided she wanted to try her hand at making a fruity frozen treat. We sliced those nectarines, mixed them with some yogurt, and poured everything into our old-fashioned ice cream maker. Oh, the pure joy of churning it by hand while eagerly anticipating that frozen delight! When we finally indulged, the creamy, fruity goodness melting on our tongues was sheer bliss. That simple, playful memory is the inspiration behind today’s Nectarine Frozen Yogurt.
Ingredients You’ll Need
Here’s what you’ll need for this refreshing treat:
-
Fresh Nectarines:
- The star of the show! Aim for ripe, sweet nectarines—perfectly aromatic and juicy. You can substitute them with peaches or plums if you’d like a little twist.
-
Greek Yogurt:
- For that creamy base! Choose plain, full-fat Greek yogurt for the best flavor and texture. If you prefer a dairy-free option, coconut yogurt works just as well.
-
Honey or Sugar (optional):
- This is to enhance the sweetness. Adjust based on the sweetness of your nectarines. Maple syrup is a great alternative if you want a different flavor profile.
-
Lemon Juice:
- A splash of acidity to balance the sweetness. Freshly squeezed is best. Feel free to use lime juice for a zesty kick!
Step-by-Step Instructions
So, how do we turn these simple ingredients into a creamy, dreamy frozen yogurt? Let’s break it down step by step:
-
Wash and Cut the Nectarines:
- Begin by giving your nectarines a good rinse under cool water. Slice them in half, removing the pit, and then chop them into chunks. The smaller the pieces, the easier they’ll blend up!
-
Blend the Nectarines:
- Toss those chunks into a blender or food processor. Add the lemon juice and, if you’re using it, honey or sugar. Blend until smooth! Don’t be afraid to scrape down the sides to ensure everything is well mixed.
Chef Tip: If your nectarines are a bit firm and not as juicy, try adding a splash of water to help with blending.
-
Incorporate the Greek Yogurt:
- Once your nectarines are pureed to perfection, add the Greek yogurt. Pulse a few times until everything is nicely combined. You want it to be light and fluffy, not over-blended.
-
Taste and Adjust:
- Here’s a chance to be the chef! Taste your mixture and see if it needs a pinch more sweetness. This varies based on how ripe your nectarines are.
-
Chill the Mixture:
- Transfer your mixture into an airtight container, and pop it in the freezer for about an hour. This helps it firm up a bit and makes it easier to churn later.
-
Churn the Frozen Yogurt:
- If you have an ice cream maker, this is where the magic happens! Churn the mixture according to the manufacturer’s instructions until it’s nice and fluffy. If you don’t have an ice cream maker, no worries! Just take the container out of the freezer every 30 minutes and stir vigorously with a fork until it’s smooth and creamy.
Chef Hack: If you skip the ice cream maker, aim to do this for about 2-3 hours to ensure the frozen yogurt stays creamy and doesn’t become a solid block.
-
Freeze until Firm:
- Once you’ve achieved that lovely, soft-serve-like consistency, transfer the yogurt back into your container. Freeze it for another 3-4 hours until it’s fully set.
Serving Suggestions
When you’re ready to serve your fresh Nectarine Frozen Yogurt, scoop it into chilled bowls. For a delightful presentation, you could drizzle a bit of honey on top, sprinkle some chopped nuts, or toss on fresh mint leaves. Pair it with a slice of almond torte or a shortbread cookie for a gourmet dessert experience.
Recipe Variations
Want to jazz things up? Here are some ideas!
- Berry Bliss: Mix in fresh blueberries or strawberries for a vibrant color and flavor change.
- Minty Fresh: Add a handful of fresh mint leaves while blending for an aromatic twist.
- Creamsicle Dream: Combine with a splash of orange juice for a refreshing citrus note.
- Nutty Crunch: Stir in some crushed nuts or granola just before serving for added texture.
Chef’s Notes
This recipe has become a staple in my kitchen, and it’s so versatile! I’ve played with various flavors—adding in spices like cinnamon or even a bit of vanilla always brings a new dimension. I once tried making it at a friend’s gathering, and it turned into a fun taste test with everyone contributing their favorite toppings.
One little story that cracks me up: the first time I made this without proper measuring, I tossed in extra nectarines that actually turned into a delightful nectar intake! Though it didn’t match my original plan, it taught me the beauty of experimenting in the kitchen—sometimes, you discover a gem you never thought you’d create.
FAQs and Troubleshooting
Can I use frozen nectarines instead of fresh?
Absolutely! Just remember to let them thaw a bit before blending for the best results.
My frozen yogurt is too hard; how can I fix it?
If your yogurt is too hard after freezing, let it sit at room temperature for about 10 minutes before scooping, or give it a good stir to break up any icy texture!
Can I make this dairy-free?
Yes! Substitute Greek yogurt with coconut yogurt or another plant-based yogurt. Adjust the sweetness as some plant-based yogurts can vary in taste.
How long does it keep in the freezer?
For optimal freshness, consume your Nectarine Frozen Yogurt within a week or two, but it can last longer in the freezer (though it may lose some creaminess).
Nutritional Info
If you’re counting calories or looking to maintain a healthy balance, this delightful frozen yogurt boasts a load of nutrients! Greek yogurt provides protein and probiotics, while nectarines are rich in vitamins A and C. You can tweak the sweetness depending on your diet—using less or no sweetener will keep it light and refreshing.
So there you have it! A beautiful, creamy bowl of Nectarine Frozen Yogurt, perfect for cooling down on a warm day or impressing friends at your next gathering. It’s simple, stunning, and packed with nostalgia. I can’t wait for you to give it a try. Tie on your apron, blend those flavors, and let’s create some delicious memories together! Enjoy every bite!
PrintNectarine Frozen Yogurt

Refreshing Nectarine Frozen Yogurt made with ripe nectarines and creamy Greek yogurt—a perfect summer treat!
- Prep Time: 15 minutes
- Cook Time: 120 minutes
- Total Time: 135 minutes
- Yield: 4 servings 1x
- Category: Dessert
- Method: Freezing
- Cuisine: American
- Diet: Vegetarian
Ingredients
- 4 ripe Fresh Nectarines
- 2 cups Greek Yogurt (plain, full-fat)
- 2 tablespoons Honey or Sugar (optional)
- 2 tablespoons Lemon Juice (freshly squeezed)
Instructions
- Wash and cut the nectarines into chunks.
- Blend the nectarines with lemon juice and honey or sugar until smooth.
- Incorporate Greek yogurt into the mixture and pulse until combined.
- Taste the mixture and adjust the sweetness if necessary.
- Chill the mixture in an airtight container for about 1 hour.
- Churn the mixture in an ice cream maker according to instructions or stir every 30 minutes if using a container.
- Freeze for another 3-4 hours until firm.
Notes
Drizzle with honey and top with nuts or mint leaves before serving. Various flavor additions like berries or spices can enhance it further.
Nutrition
- Serving Size: 1 serving
- Calories: 220
- Sugar: 12g
- Sodium: 40mg
- Fat: 8g
- Saturated Fat: 4g
- Unsaturated Fat: 4g
- Trans Fat: 0g
- Carbohydrates: 30g
- Fiber: 2g
- Protein: 8g
- Cholesterol: 20mg
Keywords: nectarine, frozen yogurt, summer dessert, healthy dessert, easy recipes

Minute Peach & Basil Naan Bread Pizza: Summer Flavor
Easy Peach & Basil Naan Bread Pizza: A Culinary Love Story
Hello, my friends! Today, we’re embarking on a delicious culinary adventure that combines the sweetness of summer peaches with the aromatic flavors of fresh basil, all atop the wonderfully versatile canvas of naan bread. Seriously, who doesn’t adore a good naan bread pizza? It’s like the ultimate love letter from the Indian subcontinent to Italian cuisine, and I’m here for it!
As the days get warmer and the sun shines a little brighter, often my mind wanders to all the delightful seasonal ingredients that grace our markets. Peaches—golden, juicy, and oh-so-sweet—are one of my favorite things to cook with during the summer months. The best part? They pair extraordinarily well with savory flavors, particularly when you introduce herby basil and rich mozzarella into the mix.
This Easy Peach & Basil Naan Bread Pizza not only embraces the essence of summer but is also perfect for entertaining friends or enjoying a cozy night in. It’s elegant enough to impress your guests yet so simple you won’t break a sweat (trust me, I’ve got your back!). You can whip this up in under 30 minutes—yes, you read that right! So grab your apron, and let’s dive into a dish that will make your taste buds sing!
Personal Story
This recipe brings back fond memories of summers spent at my grandmother’s house. Every summer, she’d stock up on ripe peaches from the local farmers’ market. I remember her bustling around the kitchen, the warmth from the oven mingling with the sweet aroma of fresh peaches. On lazy afternoons, we would make peach cobbler or just slice them up and enjoy them with a sprinkle of sugar and a squeeze of lemon.
One day, during a particularly hot heatwave, we decided to create something new. With thin slices of freshly baked bread, we layered peaches, mozzarella, and fresh basil from her garden. My grandma and I laughed as we watched the cheese melt and the peaches caramelize under the broiler. That day was filled with laughter, delicious foods, and a few messy kitchen moments (don’t even get me started on the cheese pull!). This naan bread pizza is inspired by that very essence of summer—simple, joyful, and brimming with flavor. And now, I’m thrilled to pass the baton and share this recipe with you!
Ingredients
-
2 large naan breads
The base of our pizza! Naan bread is wonderfully soft and chewy, perfect for holding our toppings. You can substitute with pita bread or tortilla if needed. -
1 tablespoon olive oil
A splash of olive oil brings richness and helps achieve that lovely crispy texture on the naan. If you don’t have olive oil, feel free to use avocado or vegetable oil. -
1 clove garlic, minced
Garlic adds a beautiful aroma and depth of flavor. If you want a milder garlic taste, you can roast it beforehand or substitute with garlic powder. -
1/2 fresh peach, thinly sliced
Peaches are the star here! Choose peaches that are ripe but firm. If peaches aren’t in season, apricots or pears would work nicely, too. -
4 oz fresh mozzarella, sliced
The creamy, gooey goodness of mozzarella complements the sweetness of the peaches beautifully. For a twist, try burrata for a creamier consistency or feta for a tangy touch. -
15 basil leaves, chopped
Fresh basil brings a fragrant burst of flavor that enhances the whole dish! If fresh basil isn’t available, you can use a teaspoon of dried basil—though I promise, fresh makes a world of difference! -
1/2 cup balsamic vinegar (optional)
Drizzling balsamic vinegar adds a sweet-tart finish that ties all elements together. If you’re looking for alternatives, try a splash of lemon juice or a fruity balsamic glaze.
Step-by-Step Instructions
-
Preheat Your Oven
Start by preheating your oven to 450°F (232°C). This high temperature will help achieve that perfect crispy naan base! -
Prepare the Naan
Brush each naan bread lightly with olive oil. This not only gives it flavor but also helps it crisp up beautifully in the oven. Place the naan on a baking sheet lined with parchment paper. -
Add the Garlic
Sprinkle the minced garlic evenly over the naan breads. The garlic will infuse the bread with a lovely aroma and flavor as it cooks! -
Layer the Ingredients
Start layering your toppings! First, add the sliced peaches. Remember to spread them evenly for balanced flavor. Next, place the mozzarella slices atop the peaches, ensuring each slice gets its fair share of gooey goodness. Finally, sprinkle the chopped basil over the top, which will give a fragrant lift to the pizza. -
Bake
Pop the naan into the preheated oven for about 10–12 minutes. You’ll want to keep an eye on it—once the cheese is melted and bubbly, and the edges of the naan start to turn golden, it’s done! If you like a little extra color, you can broil for an additional 1–2 minutes. -
Prepare the Balsamic Drizzle
While your pizza is baking, it’s time for the balsamic drizzle! Pour the balsamic vinegar into a small saucepan over medium heat and bring it to a gentle simmer. Let it reduce for about 5-7 minutes until it thickens slightly. Keep stirring to prevent it from burning. -
Serve
Once your naan bread pizza is out of the oven and smelling divine, let it cool for a minute. Drizzle the balsamic reduction over the top, and voilà! You have a stunning dish that just begs to be shared.
Serving Suggestions
Slice your naan bread pizza into wedges and serve it warm. It pairs wonderfully with a light salad or a refreshing cocktail for a delightful summer meal. For an elegant touch, you can garnish with a few whole basil leaves and some extra mozzarella pearls. It’s all about making that presentation pop without any fuss!
Recipe Variations
- Grilled Peach & Chicken: Add some grilled chicken pieces for a protein boost.
- Spicy Kick: Sprinkle some chili flakes over the top before baking if you’re looking for a little heat.
- Cheese Swap: Experiment with different cheeses like goat cheese or sliced brie for a rich flavor profile.
- Vegan Version: Use vegan mozzarella and a drizzle of olive oil for a delicious plant-based option.
- Herb Infusion: Try adding rosemary or thyme along with the basil for a unique twist on flavors.
Chef’s Notes
Cooking is a journey filled with experimentation, and this recipe is no exception! The concept of naan bread pizzas is adaptable to so many flavors and ingredients—just let your creativity flow! Whenever I make this dish, I think back to the times spent in my grandmother’s kitchen, crafting new recipes together. Each bite is a delightful reminder of those moments, inspiring me to find joy in both cooking and sharing good food. Plus, there are fewer things more gratifying than seeing people savor your dishes!
FAQs and Troubleshooting
What if my naan bread gets soggy?
If your naan feels soggy, try pre-baking it for a couple of minutes without toppings before adding them. This creates a barrier and helps keep it crispy.
Can I make this pizza ahead of time?
You can assemble the pizza and place it in the oven when you’re ready to serve. Just be aware it may require a couple of additional minutes to heat through.
How do I store leftovers?
Leftovers can be stored in an airtight container in the fridge for up to two days. Reheat in the oven for a crispy finish.
What can I use if I don’t have peaches?
If peaches aren’t on hand, feel free to use plums, nectarines, or even apples for a lovely twist on this recipe!
Nutritional Info
As this is a fun and flexible recipe, you can tailor it to fit various dietary needs! But generally speaking, each serving will be an excellent source of vitamins from the fruit and healthy fats from the olive oil.
So there you have it! A delightful, summery Easy Peach & Basil Naan Bread Pizza that’s easy to whip up and full of flavor. Join me in the kitchen, and let’s share our love for food one recipe at a time! Happy cooking, friends!
PrintEasy Peach & Basil Naan Bread Pizza

A delightful and simple naan bread pizza topped with juicy peaches, fresh basil, and mozzarella, perfect for summer gatherings.
- Prep Time: 10 minutes
- Cook Time: 12 minutes
- Total Time: 22 minutes
- Yield: 2 servings 1x
- Category: Main Course
- Method: Baking
- Cuisine: Fusion
- Diet: Vegetarian
Ingredients
- 2 large naan breads
- 1 tablespoon olive oil
- 1 clove garlic, minced
- 1/2 fresh peach, thinly sliced
- 4 oz fresh mozzarella, sliced
- 15 basil leaves, chopped
- 1/2 cup balsamic vinegar (optional)
Instructions
- Preheat your oven to 450°F (232°C).
- Brush each naan bread lightly with olive oil and place on a baking sheet lined with parchment paper.
- Sprinkle the minced garlic evenly over the naan breads.
- Layer the sliced peaches, then mozzarella slices, and top with the chopped basil.
- Bake for about 10–12 minutes until the cheese is melted and bubbly.
- Prepare the balsamic drizzle by simmering balsamic vinegar in a saucepan until thickened.
- Serve the naan pizza warm with a drizzle of balsamic reduction.
Notes
Serve with a light salad or refreshing cocktail. Experiment with different cheese options for varied flavors.
Nutrition
- Serving Size: 1 serving
- Calories: 320
- Sugar: 8g
- Sodium: 300mg
- Fat: 10g
- Saturated Fat: 4g
- Unsaturated Fat: 6g
- Trans Fat: 0g
- Carbohydrates: 42g
- Fiber: 4g
- Protein: 12g
- Cholesterol: 20mg
Keywords: naan pizza, peach pizza, summer recipes, quick meals, vegetarian pizza

Minute Peach Lemonade: Fresh, Homemade Summer Sip
Sip into Summer: The Ultimate Homemade Peach Lemonade Recipe
Hello, my fellow food lovers! Today, we’re diving into a refreshing classic that embodies the taste of summer — Homemade Peach Lemonade. Picture this: a lazy afternoon, a sun-drenched patio, and the sweet, tangy goodness of ripe peaches mingling with zesty lemons. It’s a drink that doesn’t just quench your thirst; it sparks joy and creates memories. Grab your apron, and let’s make this deliciously vibrant drink together!
A Salty Peach Memory
Before we dive into the recipe, let me share a little story. Growing up in the heart of summer, my family would host weekend gatherings in our backyard. The air buzzed with laughter, the sound of sizzling burgers, and the mouthwatering aroma of fresh peach cobbler baking in the oven. But it was the peach lemonade that stole the show!
One afternoon, my grandmother decided to let me take the reins. I was about ten, and my ambitious spirit was ready to create the ultimate summer drink. I still remember the warmth of the sun on my face, the feel of sticky peach juice on my fingers, and my grandma’s encouraging smile.
Well, let’s just say my first attempt was a bit of a disaster (let’s just say the sugar was more like a blindfolded sprinkle). But after a few giggles and some minor adjustments, we ended up with the best peach lemonade on the block. It was that moment of trial, error, and the joy of creation that sparked my passion for cooking and sharing recipes. So, when you take the time to make this homemade peach lemonade, may it remind you of carefree summer days and gathering loved ones around your table!
Ingredients
Here’s what you’ll need to whip up this delightful drink:
-
4 ripe peaches (peeled and pitted):
Look for peaches that feel slightly soft and smell sweet. If peaches aren’t in season, frozen peaches work just as well — just make sure to thaw them beforehand! -
1 cup fresh lemon juice:
Fresh is best! About 4-6 lemons should give you a cup of juice, depending on their size. Bottled lemon juice lacks the vibrant flavor of fresh juice, so opt for the real deal. -
3/4 cup sugar (to taste):
Sweetness is subjective! Adjust the sugar based on your taste preference. You can swap it with honey or agave syrup for a more natural sweetener. -
4 cups cold water:
The foundation for your lemonade. If you’re feeling fancy, try using sparkling water for a little fizz!
Step-by-Step Instructions
-
Prep the peaches:
Start by peeling and pitting your peaches. A serrated peeler can make this task a breeze. Cut them into smaller chunks to help them blend easily. Pro tip: If your peaches are a bit hard to peel, you can blanch them in boiling water for about 30 seconds to loosen the skin. -
Blend the peaches:
Toss the peach chunks into a blender along with a cup of water. Blend until smooth and luscious. You’ll want to enjoy every bit of that peachy goodness! If you like a chunkier texture, feel free to blend less. -
Strain the puree:
Using a fine mesh sieve or cheesecloth, strain the peach puree into a large pitcher to remove any solids. This step ensures a smooth beverage that’s super refreshing and drinkable. -
Mix in the lemons and sugar:
Pour in the fresh lemon juice and sugar into the pitcher. Stir until the sugar is fully dissolved. Tasting is key here — adjust the sweetness if desired. If it’s too tart, add a bit more sugar or agave. If it’s a tad sweet, just squeeze in more lemon! -
Add the remaining water:
Now, add in the remaining 3 cups of cold water. Stir well and taste once more. This is your moment to shine! If it’s perfect, you’re ready for the next step. -
Chill and serve:
Refrigerate your homemade peach lemonade for at least an hour to let those flavors meld beautifully. When you’re ready to serve, fill glasses with ice, pour in the peach lemonade, and garnish with peach slices or a sprig of mint. Voila! You’ve created a summer celebration in a glass.
Serving Suggestions
Get creative when serving your peach lemonade! For a chic presentation, use mason jars or clear glasses that showcase that gorgeous peach color. Garnish with a fresh mint sprig or thinly sliced peaches for an inviting touch. You could even add a little flair with colorful straws or themed drink stirrers for a festive look. It’s all about that perfect Instagram moment and good vibes!
Recipe Variations
Feeling adventurous? Here are some delightful twists to give your peach lemonade a new flavor profile:
-
Ginger Peach Lemonade: Add a tablespoon of freshly grated ginger to the blender with the peaches for a spicy kick!
-
Herbal Twist: Infuse your lemonade with herbs like basil or thyme during the blending process for a unique aromatic experience.
-
Berry Add-In: Toss in a cup of fresh strawberries or raspberries with the peaches to create a fruity medley that’s vibrant and fun.
-
Sparkling Peach Lemonade: Swap some of the cold water for sparkling water for a refreshing fizz. Who doesn’t love a bubbly drink on a hot day?
-
Frozen Treat: Freeze the lemonade in ice cube trays and use the cubes to chill your drinks without diluting their flavor!
Chef’s Notes
This peach lemonade recipe has evolved over the years in my kitchen. What started as an overly sweet concoction became a balanced masterpiece through trial and error. One question I often get is, “What do I do if I use too many peaches?” Well, here’s a fun secret: If you have leftover peach puree, you can swirl it into yogurt or oatmeal for an extra sweet treat or make a fresh peach sorbet by freezing and blending it!
And don’t forget, entertaining is all about being yourself, so embrace the messiness of cooking! What’s a little spilled sugar when you’re creating something memorable?
FAQs and Troubleshooting
Q: Why does my lemonade taste too tart?
A: If your lemonade is too tart, don’t panic! Simply add a bit more sugar or honey to balance out the acidity from the lemons.
Q: Can I use bottled lemon juice instead of fresh?
A: While you can, fresh lemon juice has a bright, vibrant flavor that takes this recipe to the next level. So if you can, squeeze those lemons!
Q: How can I store leftover lemonade?
A: Keep any leftovers in an airtight container in the refrigerator for up to 3 days. Just give it a good stir before serving, as natural separation may occur.
Q: Can I make this ahead of time?
A: Absolutely! You can make your peach lemonade a day in advance. Just remember to keep it chilled and stir before serving to blend the flavors.
Nutritional Info
While specifics can vary based on the ripeness of the peaches and amount of sugar used, here’s a general idea for one serving (8 oz) of this refreshing peach lemonade:
- Calories: ~120
- Total Fat: 0g
- Carbohydrates: 30g
- Sugars: 25g
- Protein: <1g
Pairing food with memories, fun, and tasty experimentation is what it’s all about. So, dear friends, I encourage you to gather your ingredients, share a laugh, and make this delicious peach lemonade. Cheers to creating memories and sipping joy! Let’s raise our glasses and celebrate sweet summertime in every sip. Happy cooking! 🍑🍋
PrintHomemade Peach Lemonade

A refreshing peach lemonade recipe that captures the essence of summer, combining sweet peaches and zesty lemons.
- Prep Time: 15 minutes
- Cook Time: 0 minutes
- Total Time: 75 minutes
- Yield: 4 servings 1x
- Category: Beverage
- Method: Blending
- Cuisine: American
- Diet: Vegetarian
Ingredients
- 4 ripe peaches, peeled and pitted
- 1 cup fresh lemon juice
- 3/4 cup sugar (to taste)
- 4 cups cold water
Instructions
- Prep the peaches: Start by peeling and pitting your peaches. Cut them into smaller chunks to help them blend easily.
- Blend the peaches: Toss the peach chunks into a blender along with a cup of water. Blend until smooth.
- Strain the puree: Using a fine mesh sieve, strain the peach puree into a large pitcher to remove any solids.
- Mix in the lemons and sugar: Pour in the lemon juice and sugar. Stir until dissolved and adjust sweetness as desired.
- Add the remaining water: Pour in the remaining 3 cups of cold water. Stir well and taste again.
- Chill and serve: Refrigerate for at least an hour. Serve over ice and garnish with peach slices or mint.
Notes
For extra flair, serve in mason jars and garnish with fresh mint or peach slices.
Nutrition
- Serving Size: 1 serving
- Calories: 120
- Sugar: 25g
- Sodium: 10mg
- Fat: 0g
- Saturated Fat: 0g
- Unsaturated Fat: 0g
- Trans Fat: 0g
- Carbohydrates: 30g
- Fiber: 1g
- Protein: <1g
- Cholesterol: 0mg
Keywords: peach lemonade, summer drinks, refreshing beverages