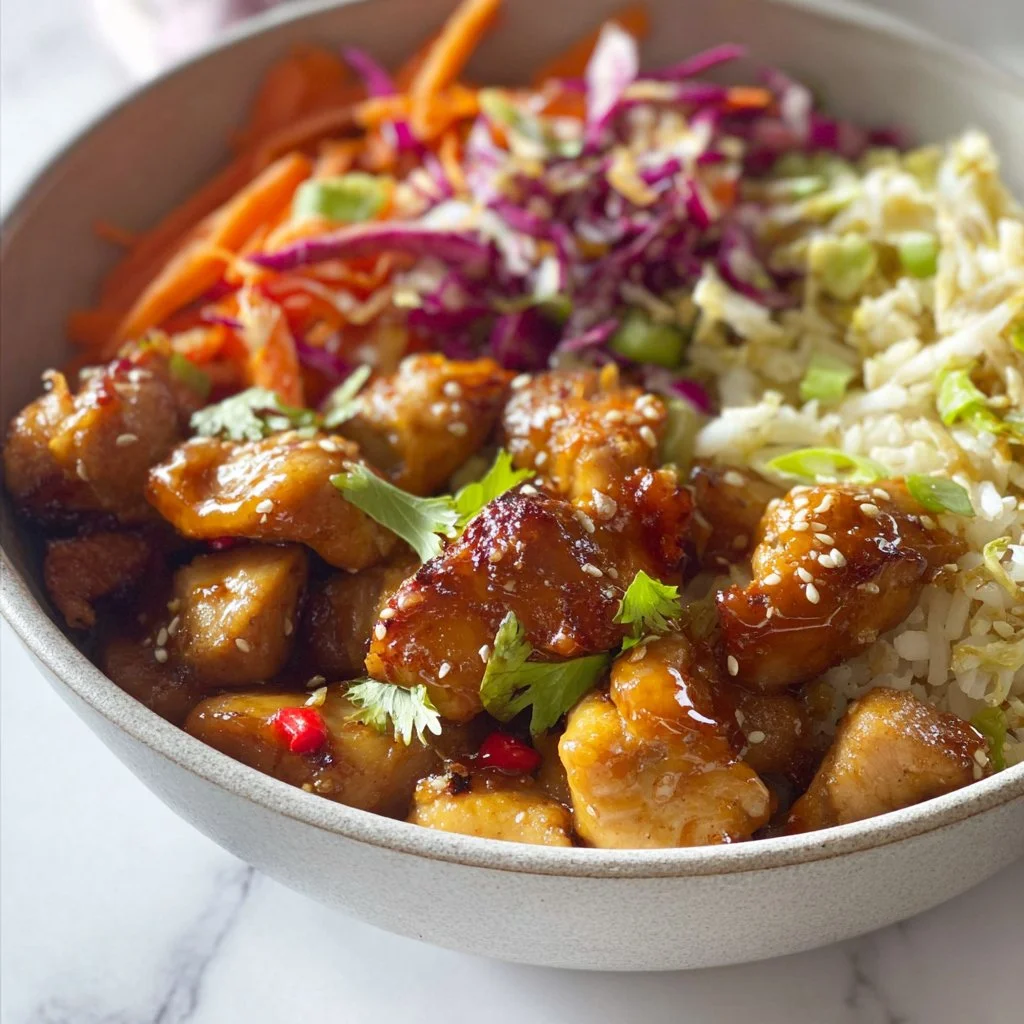
Honey Chicken Bowl
Honey Chicken Bowl: A Delightful Dish to Gather Around
Hello, my friends! Welcome back to Ivory Apron, where we’re all about cooking with grace and ease. Today, I’m excited to share a recipe that has captured our hearts and taste buds: the Honey Chicken Bowl. This dish is not just a recipe; it’s a celebration of fresh ingredients, vibrant flavors, and the joy of gathering around the table with loved ones.
Imagine this: tender chicken, glazed with a sweet and sticky honey sauce, resting on a bed of fresh greens, topped with colorful veggies, and finished with creamy avocado. How delightful does that sound? This bowl is perfect for any occasion—to elevate a weeknight dinner or impress friends at a gathering. Whether you’re looking for something light and refreshing or a dish packed with flavor, the Honey Chicken Bowl has got you covered.
The best part of this bowl is how easily it comes together. In less than 30 minutes, you can transform simple ingredients into a dish that feels gourmet yet approachable. I’m all about creating meals that look polished while still being achievable—even for a novice chef! So grab your apron, and let’s dive into this delightful recipe!
Personal Story
Every time I make this Honey Chicken Bowl, I’m taken back to a sunny afternoon spent in my grandmother’s kitchen. I can still picture her cooking with love, humming to her favorite tunes while preparing something magical. One day, she decided to serve us her honey-glazed chicken. We gathered at the table outside, with laughter ringing in the air and the aroma wafting from the kitchen like a warm hug.
The sun’s rays danced on our plates as I took my first bite. The sweetness of the honey paired perfectly with the savory chicken; it was like a warm embrace for my taste buds. We all sat around the table, sharing stories and enjoying life’s simplest pleasures. That memory has stuck with me and shaped my cooking philosophy: food should be enjoyed, shared, and celebrated—just like our time together.
Creating this Honey Chicken Bowl today feels like an homage to those sunny afternoons and shared laughter. And I hope it brings you and your loved ones together just as it did for me.
Ingredients
Here’s what you’ll need to whip up this flavorful Honey Chicken Bowl. Remember, quality ingredients make all the difference—so let’s dive into this list!
-
2 chicken breasts
A great source of protein, chicken breasts provide a lean, juicy base for our dish. If you have a favorite cut, feel free to swap it out. Boneless thighs work beautifully, too! -
2 tablespoons honey
The star of the show! Honey adds that sweet, sticky glaze that makes this dish shine. If you’re looking for a substitute, you can use maple syrup for a unique flavor twist. -
1 tablespoon soy sauce
This tangy, salty sauce brings depth to the dish. For a gluten-free option, tamari is a solid choice. You could also use coconut aminos for a lighter, sweeter taste. -
1 tablespoon olive oil
This healthy fat helps achieve a lovely sear on the chicken. If you’re not an olive oil fan, avocado oil is a great substitute. -
Salt and pepper to taste
Never underestimate the power of seasoning! Use freshly cracked black pepper for an aromatic punch, and adjust the salt according to your preference. -
Mixed greens (spinach, arugula)
A vibrant base for our bowl! You can mix it up with kale or romaine for additional crunch. -
Cherry tomatoes, halved
Juicy and sweet, they brighten up the plate. If they’re out of season, regular tomatoes will do just fine—just chop them into bite-sized pieces. -
Cucumber, sliced
Cool and refreshing, cucumber adds a delightful crunch. If you want a twist, try pickled cucumbers for an extra zing! -
Avocado, diced
Creamy and rich, avocado provides that perfect balance to the honey chicken. If you have avocados that aren’t ripe yet, substituting a dollop of Greek yogurt can also add creaminess.
Step-by-Step Instructions
Now, let’s roll up our sleeves and get cooking! Follow these steps, and you’ll have your Honey Chicken Bowl ready in no time.
Step 1: Prepare the Chicken
- Start by patting the chicken breasts dry with paper towels—this helps achieve a nice, golden-brown crust.
- Season both sides of the chicken with salt and pepper. Don’t skimp on this step, as it layers the flavor beautifully!
- Heat a large skillet over medium-high heat and add 1 tablespoon of olive oil. Allow it to get hot, which should take about 1-2 minutes.
Chef Tip: The key here is to not overcrowd the pan. Cook one or two pieces at a time if you’re making more than two. This way, the chicken can sear rather than steam!
Step 2: Cook the Chicken
- Gently place the chicken in the hot skillet. Sear on one side for about 5-7 minutes without moving it, which allows that lovely golden crust to form.
- Once it’s beautifully browned, flip the chicken and cook for another 5-7 minutes until the internal temperature reaches 165°F (75°C). This ensures it’s fully cooked and safe to eat.
Chef Hack: Use a meat thermometer for perfect results every time. And if you want to add some flair, toss in a sprig of fresh rosemary or thyme while cooking for an aromatic surprise!
Step 3: Make the Honey Sauce
- While the chicken cooks, let’s whip up the honey sauce! In a small bowl, mix 2 tablespoons of honey with 1 tablespoon of soy sauce. Stir well until combined.
- Once the chicken is fully cooked, drizzle the honey sauce over it, allowing it to caramelize for a minute or two (trust me, this is heavenly!). Gently coat the chicken to ensure every bit is glazed.
Step 4: Assemble the Bowl
- Remove the chicken from the skillet and let it rest on a cutting board for about 5 minutes. Resting helps to keep those juices locked in!
- Meanwhile, prepare your bowl: Start with a generous handful of mixed greens as the base. It’s like a garden on your plate!
Presentation Tip: Layer the greens to make it visually engaging—think about alternating the colors and textures!
-
Slice the honey-glazed chicken and place it on top of the greens. You want to show off its beautiful color and glistening glaze!
-
Now, add your halved cherry tomatoes, sliced cucumber, and diced avocado, arranging them artfully around the chicken.
Serving Suggestions
When it comes to plating, remember, it’s all about inviting that homey feeling. Serve the Honey Chicken Bowl in deep, wide bowls to showcase the beautiful colors of your ingredients. Finish with a light drizzle of olive oil and a sprinkle of freshly cracked black pepper for that finishing touch. Trust me; your guests won’t be able to resist diving in!
Recipe Variations
Feel free to make this Honey Chicken Bowl your own! Here are some fun variations:
- Grilled Version: Fire up the grill for a smoky flavor—season the chicken and cook it on the grill for that barbecue vibe.
- Spicy Twist: Add a dash of sriracha or chili flakes to the honey sauce if you like a kick of heat!
- Sweet Potato Swap: Replace the chicken with roasted sweet potato for a delightful vegetarian option.
- Grains Galore: Serve it over a bed of quinoa or brown rice to make it heartier.
- Nutty Crunch: Sprinkle some toasted almonds or sesame seeds on top for added crunch!
Chef’s Notes
As with any recipe, this Honey Chicken Bowl has a life of its own in my kitchen. It all started from that sweet afternoon with my grandmother, but over the years, I’ve made countless variations. Some days I’ll toss in seasonal veggies—like bell peppers or radishes—while other times, it’s all about the greens! The dish has evolved, but its essence remains the same: creating something deliciously beautiful that brings loved ones together.
Funny Moment: One time, I misread the labels and grabbed a bottle of balsamic vinegar instead of soy sauce! Let’s just say, the flavor turned out to be, well, interesting. But that’s part of the fun—embracing the mishaps in the kitchen!
FAQs and Troubleshooting
1. How do I know when the chicken is fully cooked?
Use a meat thermometer to ensure your chicken reaches an internal temperature of 165°F (75°C). If you don’t have one, color is key—the meat should be white all the way through and the juices should run clear.
2. What can I do if my chicken isn’t browning?
Ensure your skillet is hot enough before adding the chicken. A hot pan will create a lovely crust. If it’s not browning, try cooking it for longer on each side without moving it around too much.
3. Can I make this dish ahead of time?
Absolutely! You can cook the chicken and prepare the veggies earlier in the day. Just combine everything right before serving to keep the veggies fresh and crisp.
4. I want to make this dish vegetarian—what should I substitute for the chicken?
You can easily swap the chicken for grilled tofu, chickpeas, or roasted sweet potatoes for a hearty vegetarian option. Just season everything well to ensure those flavors shine!
Nutritional Info
Note: Nutritional values may vary based on ingredient choices and portion sizes:
- Calories: Approximately 450 per serving
- Protein: 30g
- Fat: 20g
- Carbohydrates: 30g
There you have it—a delightful recipe to create memories around the table! The Honey Chicken Bowl is perfect for any occasion and evokes that warm, inviting feeling every time you take a bite. Let’s gather, enjoy, and create lasting memories. Tie on your apron, pour something bubbly, and let’s get cooking! Happy culinary adventures, my friends!
Thank you for joining me today! I’m thrilled to embark on this cooking journey with you. Let me know how your Honey Chicken Bowl turns out or any variations you try! Happy cooking!
PrintHoney Chicken Bowl
A delightful dish featuring tender chicken glazed with honey, served over fresh greens and topped with colorful veggies and creamy avocado.
- Prep Time: 10 minutes
- Cook Time: 20 minutes
- Total Time: 30 minutes
- Yield: 4 servings 1x
- Category: Main Course
- Method: Searing
- Cuisine: American
- Diet: Gluten-Free
Ingredients
- 2 chicken breasts
- 2 tablespoons honey
- 1 tablespoon soy sauce
- 1 tablespoon olive oil
- Salt and pepper to taste
- Mixed greens (spinach, arugula)
- Cherry tomatoes, halved
- Cucumber, sliced
- Avocado, diced
Instructions
- Prepare the chicken by patting it dry with paper towels and seasoning it with salt and pepper.
- Heat a large skillet over medium-high heat and add 1 tablespoon of olive oil.
- Place the chicken in the skillet and sear for 5-7 minutes on one side.
- Flip the chicken and cook for another 5-7 minutes until fully cooked.
- Mix honey with soy sauce in a bowl while the chicken is cooking.
- Drizzle the honey sauce over the chicken and allow it to caramelize for a minute or two.
- Remove the chicken from the skillet and let it rest for 5 minutes.
- Assemble the bowl with mixed greens, sliced chicken, cherry tomatoes, cucumber, and avocado.
Notes
Feel free to add seasonal veggies or substitute chicken with grilled tofu or chickpeas for a vegetarian option.
Nutrition
- Serving Size: 1 bowl
- Calories: 450
- Sugar: 10g
- Sodium: 600mg
- Fat: 20g
- Saturated Fat: 3g
- Unsaturated Fat: 12g
- Trans Fat: 0g
- Carbohydrates: 30g
- Fiber: 4g
- Protein: 30g
- Cholesterol: 70mg
Keywords: honey chicken, healthy bowl, quick dinner, gluten-free, summer recipes
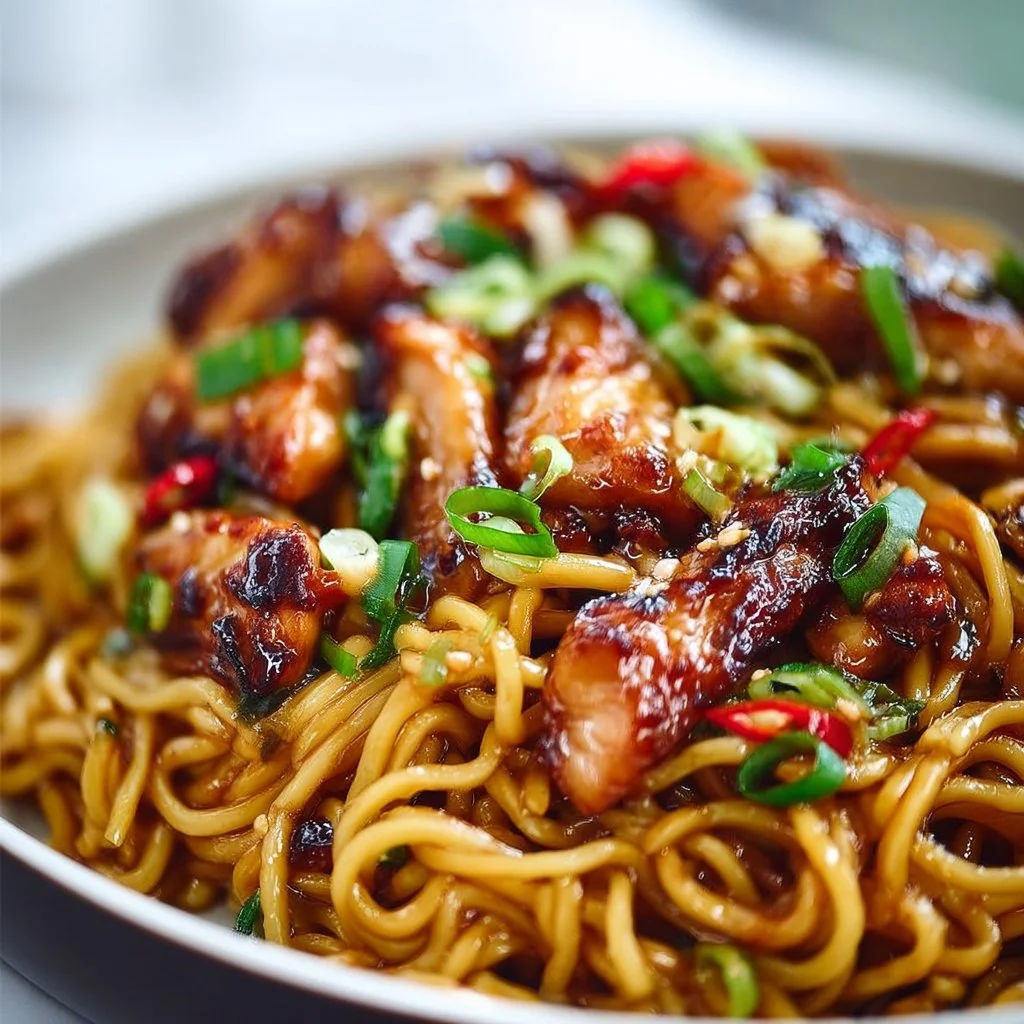
Sticky Garlic Chicken Noodles
Sticky Garlic Chicken Noodles: A Flavorful Journey
Hey there, fellow food lovers! I’m so excited to share one of my favorite dishes with you today: Sticky Garlic Chicken Noodles. This easy-to-make recipe is a perfect blend of sweet, savory, and a hint of spice—all wrapped up in a delightful noodle dish that’s sure to impress your family and friends. It’s cozy enough for a weeknight dinner yet elegant enough to serve at your next dinner party.
Picture this: a bustling kitchen, the tantalizing aroma of garlic sizzling in sesame oil, and the joyful laughter of loved ones gathered at the table. That’s what this dish embodies—an experience that warms the heart and satisfies the belly! Whether you’re a seasoned pro or just starting your culinary journey, you’ll find this recipe both approachable and delicious. So, tie on your apron, and let’s get cooking!
Personal Story
This dish brings back so many fond memories for me. I remember the first time I made sticky garlic chicken noodles for my friends. It was a chilly autumn evening, and we had decided to host a little get-together at my place. Feeling adventurous, I wanted to whip up something that would warm our hearts and tickle our taste buds.
After rummaging through my pantry and striking gold with a few staple ingredients, I found inspiration! I remember the kitchen filled with laughter as we danced around, taste-testing the sauce straight out of the bowl while the noodles cooked to perfection. When I finally plated the sticky garlic chicken, the moment was magical. Everyone gathered around, forks in hand, and within minutes, the deliciousness had us all cheering for seconds.
That evening reminded me of the power food has to bring people together. Nothing compares to sharing a meal, stories, and laughter around the table with those you care about. This recipe never fails to capture that spirit, and I can’t wait for you to experience it too!
Ingredients
Here’s what you’ll need to create these delightful sticky garlic chicken noodles:
-
8 oz noodles (such as rice or egg noodles)
Noodles are the star of the show! I love using rice noodles for a gluten-free option, but egg noodles add a lovely richness. If you’re looking for alternatives, soba noodles work beautifully too! -
1 lb chicken breast, sliced
Chicken breast gives a lean protein kick that pairs perfectly with the rich sauce. If you’re feeling adventurous, swap it out for tofu, shrimp, or even grilled vegetables for a vegetarian twist. -
3 cloves garlic, minced
Garlic is the heart of this dish! Feel free to add more if you’re a garlic lover like me. If fresh garlic isn’t available, garlic powder can provide a nice alternative—1/8 teaspoon will do! -
1/4 cup soy sauce
For that rich umami flavor, you can’t go wrong with soy sauce! For a gluten-free or less sodium option, tamari is an excellent substitute. -
2 tbsp honey
Honey adds sweetness that balances the soy sauce and garlic beautifully. You can swap it with maple syrup for a vegan alternative. -
1 tbsp sesame oil
This oil provides a wonderful nutty flavor. If sesame oil isn’t on hand, a light olive oil works just fine. -
1 tbsp vegetable oil
This is for cooking the chicken and preventing it from sticking. Use any neutral oil you have, like canola or grapeseed. -
1/2 tsp red pepper flakes (optional)
Spice it up! Adjust according to your heat preference—or leave it out if you’re catering to mild palates. -
Green onions, chopped (for garnish)
Fresh herbs elevate everything! Chopped green onions add color and a zesty crunch. Try cilantro or basil if you’re looking for something different.
Step-by-Step Instructions
Now, let’s dive into creating these decadent sticky garlic chicken noodles:
Step 1: Cook the Noodles
Start by bringing a large pot of salted water to a rolling boil. Add your noodles and cook according to the package instructions until they’re al dente. This usually takes around 5-7 minutes for fresh noodles (8-10 minutes for dried).
Chef’s Tip: Save a cup of pasta water before draining! This starchy water is magic when it comes to thicken your sauce later.
Step 2: Sauté the Chicken
While the noodles are cooking, heat 1 tablespoon of vegetable oil in a large skillet or wok over medium-high heat. Season your sliced chicken breast with a pinch of salt and pepper, then add it to the hot skillet.
Cook for about 5-7 minutes, stirring occasionally, until the chicken is golden brown and cooked through. Remove the chicken from the skillet and set it aside.
Chef’s Hack: For juicy chicken, don’t overcrowd the pan. Work in batches if necessary!
Step 3: Unlock the Flavors with Garlic
In the same skillet (don’t wash it—flavor lives here!), add another tablespoon of vegetable oil if the skillet seems dry. Toss in the minced garlic and sauté for about 30 seconds until it’s fragrant but not browned.
Note: Garlic can turn bitter if overcooked, so keep an eye on it!
Step 4: Make the Sauce
It’s time to create that sticky goodness! Add the soy sauce, honey, and sesame oil to the skillet. Whisk everything together until well combined. Let it simmer for about 2 minutes, allowing the flavors to mingle.
Chef Insight: Use this opportunity to taste your sauce! Adjust the sweetness with more honey or the saltiness with a splash of soy sauce.
Step 5: Combine Everything
Return the sautéed chicken to the skillet and toss it with the sauce until evenly coated. Now comes the fun part—add the cooked noodles! Toss the noodles in, ensuring they’re all beautifully coated with that sticky sauce.
Bonus Tip: If the mixture gets too thick, add in a splash of the reserved pasta water to loosen up the sauce.
Step 6: Add the Finishing Touches
Sprinkle in the red pepper flakes if you’re using them and give everything a final toss. Cook for an additional minute or so to heat through, allowing the noodles to soak up even more flavor.
Chef’s Note: This is where you can get creative! Consider adding broccoli, bell peppers, or snow peas for an extra pop of color and nutrition!
Serving Suggestions
Now, let’s talk presentation! Transfer the sticky garlic chicken noodles onto a large serving platter or individual bowls. Garnish them generously with chopped green onions and maybe even a sprinkle of sesame seeds for an extra touch of elegance.
Pair this dish with a chilled glass of sparkling water or a light white wine to create the complete dining experience. Trust me; your guests will be asking for your secret recipe!
Recipe Variations
Here are a few fun twists to try the next time you make these noodles:
- Spicy Mandarin: Add a tablespoon of sriracha or chili paste for a spicy kick.
- Citrus Burst: Incorporate a squeeze of fresh lime or lemon juice when serving for zesty brightness.
- Veggie Delight: Toss in pre-steamed broccoli, bell peppers, or snap peas for a colorful veggie medley.
- Noodle Swap: Use zucchini noodles for a low-carb twist—just sauté them lightly before mixing in the sauce.
- Protein Power: Experiment with shrimp, beef, or even lentils for added protein options.
Chef’s Notes
Oh, I have to share a funny kitchen story! One time, I got overly ambitious and decided to invite over 10 friends for dinner without really planning a menu. What did I make? You guessed it—sticky garlic chicken noodles! I doubled the recipe, but I forgot one important detail: my pot was too small! As the noodles boiled, they spilled over onto the stove; I was left frantically cleaning while trying to plate 10 servings. But in the end, all laughter and good memories flowed even as my kitchen looked like a noodle explosion. Sometimes it’s the messes that make the best stories!
Through trial and error, this recipe has evolved, and I’ve learned that simplicity is key. Always keep the core ingredients on hand, and you can make this dish any time the craving strikes!
FAQs and Troubleshooting
Q1: My noodles turned out mushy. What happened?
A: This can occur if you overcook the noodles, so it’s key to keep an eye on the timing and check for that perfect al dente bite. If they seem mushy, you can still salvage the dish by tossing them in the sauce and letting them soak in flavor!
Q2: Can I make this dish ahead of time?
A: Absolutely! Cook everything and store it in an airtight container in the fridge. To reheat, add a splash of water or broth to loosen up the sauce. It may thicken as it cools, but a bit of liquid will bring it back to life.
Q3: What can I use instead of honey if I’m allergic?
A: You can substitute honey with agave syrup, maple syrup, or even brown sugar mixed with a bit of water to dissolve. You’ll still get that lovely sweetness without any issues!
Q4: Why is my sauce not as sticky?
A: If the sauce seems too thin, try simmering it for a bit longer to reduce it down. If you’re looking for an even stickier consistency, adding a bit of cornstarch mixed with water can help thicken it up perfectly.
Nutritional Info (Optional)
This is a rough estimate per serving:
- Calories: 400
- Protein: 30g
- Carbohydrates: 40g
- Fat: 15g
And there you have it, my delightful Sticky Garlic Chicken Noodles recipe! I hope it brings you as much joy as it has brought into my kitchen. Remember, good food is all about intention, so enjoy the process, savor those moments with loved ones, and let your kitchen become a gathering place, just like mine. Happy cooking! 🍽️✨
PrintSticky Garlic Chicken Noodles

A perfect blend of sweet, savory, and spicy, this easy-to-make noodle dish promises to impress your family and friends.
- Prep Time: 15 minutes
- Cook Time: 20 minutes
- Total Time: 35 minutes
- Yield: 4 servings 1x
- Category: Main Course
- Method: Stir-frying
- Cuisine: Asian
- Diet: Non-Vegetarian
Ingredients
- 8 oz noodles (rice or egg noodles)
- 1 lb chicken breast, sliced
- 3 cloves garlic, minced
- 1/4 cup soy sauce
- 2 tbsp honey
- 1 tbsp sesame oil
- 1 tbsp vegetable oil
- 1/2 tsp red pepper flakes (optional)
- Green onions, chopped (for garnish)
Instructions
- Cook the noodles by bringing salted water to a boil. Add noodles and cook according to package instructions until al dente (5-7 minutes for fresh, 8-10 minutes for dried).
- Sauté the chicken in heated vegetable oil over medium-high heat for 5-7 minutes, until golden brown. Remove and set aside.
- Unlock the flavors with garlic by adding the minced garlic to the skillet and sautéing for about 30 seconds until fragrant.
- Make the sauce by adding soy sauce, honey, and sesame oil to the skillet. Whisk together and let simmer for about 2 minutes.
- Combine everything by returning the chicken to the skillet, then add the cooked noodles, tossing to coat evenly in sauce.
- Add in red pepper flakes if using, stir to mix, and cook for an additional minute.
Notes
Consider adding broccoli, bell peppers, or snap peas for added nutrition. You can swap honey with maple syrup for a vegan version.
Nutrition
- Serving Size: 1 serving
- Calories: 400
- Sugar: 8g
- Sodium: 600mg
- Fat: 15g
- Saturated Fat: 2g
- Unsaturated Fat: 12g
- Trans Fat: 0g
- Carbohydrates: 40g
- Fiber: 3g
- Protein: 30g
- Cholesterol: 70mg
Keywords: Sticky Garlic Chicken, Noodles, Easy Dinner, Asian Cuisine, Comfort Food
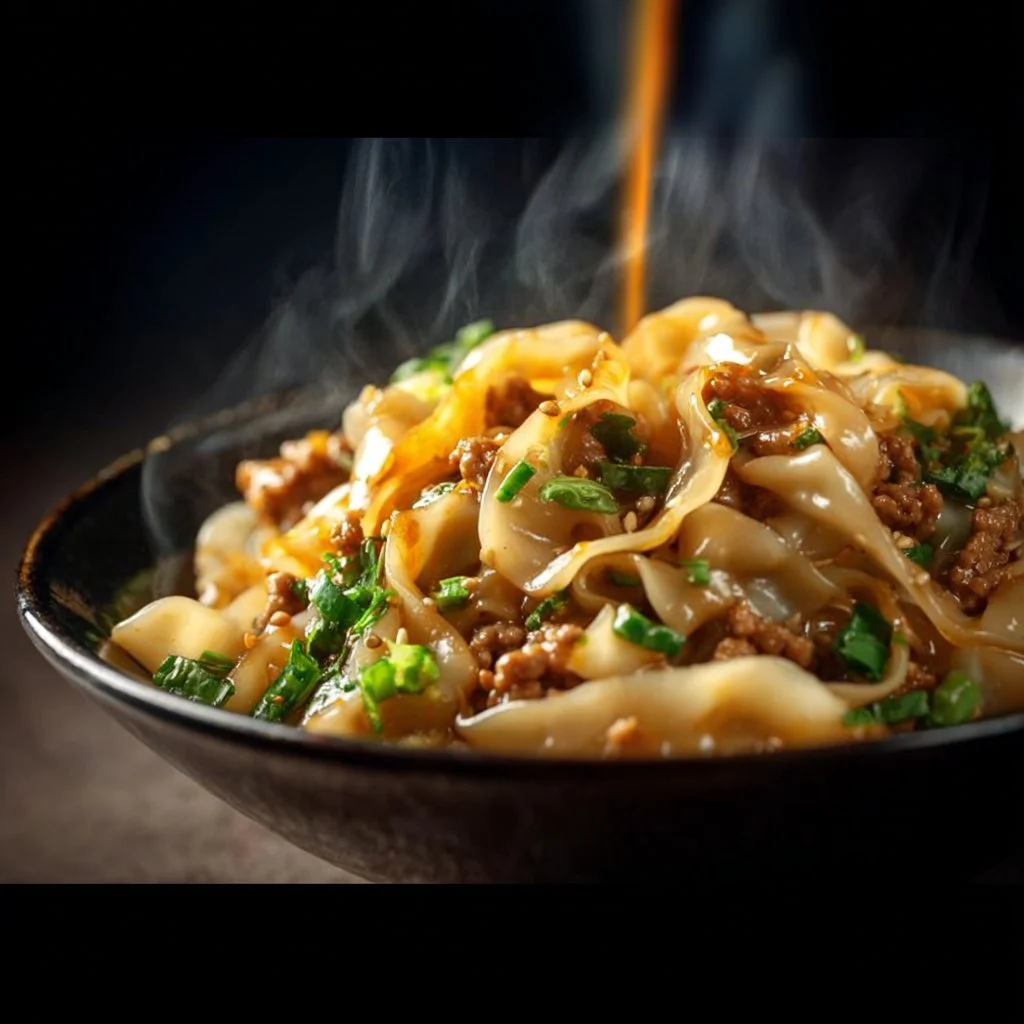
Potsticker Noodle Bowl
Potsticker Noodle Bowl: A Culinary Hug in a Bowl
Hey there, fellow kitchen adventurers! I’m so thrilled to whisk you away on another delicious journey, and today we’re diving into a cozy, comforting dish that’s as satisfying as your favorite blanket on a chilly night. Say hello to the Potsticker Noodle Bowl! This dish is a celebration of all things delicious—think of it as your beloved potstickers transformed into a hearty noodle bowl that makes weeknight dinners feel special without all the fuss.
What I adore about this recipe is its versatility. It’s perfect whether you’re hosting friends for a casual dining experience or simply craving something comforting on a Wednesday evening. With flavors that meld beautifully, a medley of textures, and just the right hint of spice, this noodle bowl is sure to become a favorite in your home. And let me tell you, once you get a taste of the savory blend of ground pork, juicy green onions, and the delightful crunch of coleslaw mix, you won’t want to stop at just one bowl!
So let’s roll up our sleeves, tie that apron around our waist, and get ready to create our very own potsticker noodle bowl. Trust me, you’ll impress yourself—and anyone lucky enough to share this meal with you!
Personal Story
Growing up, my family had this tradition every Friday night where we’d gather around the table for some DIY potsticker making. My mom was the master, expertly folding wonton wrappers into little pockets of joy, and I was her tiny sous-chef, anointed with a smudge of flour on my forehead. I’ll never forget the merriment surrounding those nights. The laughter, the occasional flour fight, and that delightful aroma wafting through the house made Fridays feel like a festival.
As the years went by, I found myself longing for that same heartwarming experience, but with a twist. Enter the Potsticker Noodle Bowl! It marries my love for those cherished family memories with an updated, convenient dish that still delivers on comfort. Every time I whip up this bowl, I’m transported back to those joyful Fridays filled with laughter and love. So grab your apron, and let’s get cooking; I promise this recipe has those same warm vibes!
Ingredients
Here’s what you’ll need to create your Potsticker Noodle Bowl. I’ll share a bit about each ingredient and some handy tips along the way!
-
8 oz wide Lo Mein noodles, cooked and rinsed
Lo Mein noodles are perfect for this dish because they soak up that delicious flavor while remaining delightfully chewy. You can substitute these with any wide noodle like fettuccine or even a gluten-free alternative if needed! -
1 tablespoon peanut oil
This oil has a lovely nutty flavor that enhances the pork wonderfully. If you’re sensitive to nuts, feel free to swap it out with vegetable or canola oil. -
1 pound ground pork
Juicy and flavorful, ground pork is the star of the show. If you’re looking for a healthier option, ground turkey or chicken works great too! -
1/4 cup + 2 tablespoons sliced green onions
Green onions add a refreshing crunch and flavor pop. You can also substitute with shallots or even regular onions if that’s what you have. -
1/2 cup low-sodium chicken broth
Broth adds depth to your dish. Using low-sodium ensures you have more control over the saltiness. Homemade broth is always a treat, but store-bought works in a pinch! -
3 tablespoons mirin
This sweet rice wine adds a lovely sweetness and depth that compliments the pork beautifully. If you don’t have mirin, you can use a mix of rice vinegar and sugar. -
2 tablespoons dark soy sauce
Dark soy sauce deepens the color and flavor of your dish. Regular soy sauce will do if that’s what you have on hand, but it will be lighter in flavor. -
1 tablespoon minced garlic
Garlic is a must for any comforting dish! Freshly minced is best, but jarred garlic can work if you’re in a hurry. -
2 teaspoons grated ginger
Ginger adds a zingy freshness—an essential component for flavor balance! You could also use powdered ginger, but the fresh stuff is unbeatable. -
1 teaspoon sesame oil
A little drizzle goes a long way here! It offers a lovely aroma and flavor. If you’re out, you can skip it, though you’ll miss that distinct taste! -
1/2 teaspoon sriracha
Spice up your bowl! Adjust to your taste; no judgment here if you want to crank up the heat! -
4 cups coleslaw mix
This blend of cabbage and carrots adds a delightful crunch and freshness to the bowl. Feel free to substitute with fresh cabbage or any crunchy veggies you have handy!
Step-by-Step Instructions
Let’s get to the cooking part! Follow my detailed steps, and I’ll sprinkle in some chef tips along the way.
-
Cook the Noodles:
Begin by bringing a pot of water to a rolling boil. Add the wide Lo Mein noodles and cook according to the package instructions until they’re al dente. Once cooked, drain the noodles in a colander and rinse them under cold water to stop the cooking process. This helps prevent them from becoming mushy. Remember, we want that beautiful sheen and structure! -
Sauté the Pork:
In a large pan or wok, heat the peanut oil over medium heat. Once hot (you want a shimmer!), add the ground pork. With a spatula, break the pork into small chunks. Cook for about 5-7 minutes, stirring occasionally until the pork is browned and no longer pink. This is where the magic happens; the aroma of cooking pork fills the kitchen! If you want to add a little more depth, season the meat with a pinch of salt and pepper. -
Add the Aromatics:
Now, it’s time to add that fragrant garlic and grated ginger. Toss them into the pan and stir for about 1-2 minutes until you can smell those delightful flavors—trust me, your kitchen will smell divine! -
Make the Sauce:
Pour in the low-sodium chicken broth, mirin, dark soy sauce, and sriracha to the pan with the pork mixture. Stir well to combine. Let this simmer for about 3-4 minutes so the flavors can mingle beautifully—you’re on your way to creating a luscious sauce! -
Incorporate Coleslaw Mix:
Add the coleslaw mix and half of the sliced green onions to the pan. Stir everything together and let it cook for an additional 3-5 minutes. The coleslaw adds a fresh crunch that elevates the dish. If you like it extra crunchy, toss the coleslaw in just before serving! -
Combine with Noodles:
Now, add in the already cooked Lo Mein noodles. Gently fold everything together to ensure the noodles soak up all those incredible flavors. If the dish feels a bit dry, feel free to splash in a little more chicken broth! -
Finish with Sesame Oil:
Drizzle the sesame oil over your noodle bowl mixture and give it one last toss. This final touch adds a vibrant flavor you won’t want to miss!
Serving Suggestions
Now that you’ve got your glorious Potsticker Noodle Bowl ready, it’s time to plate it up! Use deep bowls to showcase the vibrant colors and textures—think layers of noodles, the savory pork mix, and a sprinkle of fresh green onions on top. Maybe even toss on some chili flakes or extra sriracha for a pop of color and spice.
If you’re feeling extra fancy, pair the noodle bowl with some crispy wonton chips or your favorite spring rolls on the side! Trust me; they’ll make your dish look like it belongs in a fancy restaurant!
Recipe Variations
Feeling adventurous? Here are a few fun twists you can try:
-
Vegetarian/Vegan Option: Substitute the ground pork with a mix of sautéed mushrooms and tofu for a delicious vegetarian version that’s packed with flavor. You’ll still get that lovely texture!
-
Spicy Kick: Increase the sriracha or add in some diced fresh chili peppers for an extra layer of heat.
-
Crispy Topping: Top the bowl with crushed peanuts or sesame seeds for an added layer of crunch.
-
Different Noodles: Experiment with rice noodles or even zucchini noodles for a gluten-free option that’s lighter but still satisfying.
-
Add More Veggies: Throw in some snap peas, bok choy, or bell peppers into the mix for more color and nutrients!
Chef’s Notes
This recipe has become a staple in my kitchen over the years. I’ll let you in on a little secret: when I have friends over, I sometimes double the recipe and make a noodle bowl bar. Everyone loves customizing their own bowls, and it makes for such a fun, interactive dining experience!
And let’s not forget the inevitable kitchen mishaps! I once mistook a cup of sugar for my salt when making the sauce—let’s just say the noodle bowl ended up as a dessert rather than dinner! But in the spirit of cooking, that’s all part of the journey, right? Don’t be afraid to embrace the unexpected in your kitchen.
FAQs and Troubleshooting
1. My noodles turned out gummy; what went wrong?
This often happens when the noodles are overcooked or not rinsed properly. Always make sure to rinse them under cold water after cooking to stop the cooking process!
2. Can I use other meats in this dish?
Absolutely! Ground chicken, turkey, or even beef would work wonderfully. Just adjust the cooking time according to the meat you choose.
3. The sauce is too salty; what can I do?
If your sauce turns out saltier than desired, add a splash of vinegar or a bit of sugar to balance it out. That should help neutralize the saltiness!
4. How can I store leftovers?
Store any leftovers in an airtight container in the refrigerator for up to 3 days. Reheat gently in the microwave or on the stovetop with a splash of chicken broth to recover some moisture.
Nutritional Info
This Potsticker Noodle Bowl is not just delicious but also packed with protein and colorful veggies! If you’re tracking nutrition, here’s a rough estimate per serving:
- Calories: 450
- Protein: 28g
- Carbohydrates: 45g
- Fiber: 3g
- Fat: 20g
Of course, this can vary based on your specific ingredients, but it’s a pretty hearty and satisfying meal!
And there you have it—your very own Potsticker Noodle Bowl! I hope you enjoy making this comforting dish as much as I love sharing it with you. Remember, good food is about good company and heart, so gather your loved ones, serve up those bowls, and relish every bite. Happy cooking from my kitchen to yours at Ivory Apron! 🍜✨
PrintPotsticker Noodle Bowl

A cozy and comforting Potsticker Noodle Bowl, combining the flavors of potstickers with nourishing noodles and vegetables for a delightful weeknight meal.
- Prep Time: 15 minutes
- Cook Time: 25 minutes
- Total Time: 40 minutes
- Yield: 4 servings 1x
- Category: Main Course
- Method: Stir-Frying
- Cuisine: Asian
- Diet: Pork
Ingredients
- 8 oz wide Lo Mein noodles, cooked and rinsed
- 1 tablespoon peanut oil
- 1 pound ground pork
- 1/4 cup + 2 tablespoons sliced green onions
- 1/2 cup low-sodium chicken broth
- 3 tablespoons mirin
- 2 tablespoons dark soy sauce
- 1 tablespoon minced garlic
- 2 teaspoons grated ginger
- 1 teaspoon sesame oil
- 1/2 teaspoon sriracha
- 4 cups coleslaw mix
Instructions
- Cook the Noodles: Begin by bringing a pot of water to a rolling boil. Add the noodles and cook according to the package instructions until al dente. Drain and rinse under cold water.
- Sauté the Pork: Heat the peanut oil over medium heat in a large pan or wok. Add the ground pork and cook for about 5-7 minutes until browned.
- Add the Aromatics: Stir in the garlic and grated ginger, cooking for 1-2 minutes until fragrant.
- Make the Sauce: Pour in chicken broth, mirin, dark soy sauce, and sriracha. Stir and let simmer for 3-4 minutes.
- Incorporate Coleslaw Mix: Add the coleslaw mix and half of the green onions. Stir and cook for an additional 3-5 minutes.
- Combine with Noodles: Fold in the cooked Lo Mein noodles, mixing gently to allow flavors to blend.
- Finish with Sesame Oil: Drizzle sesame oil over the mixture and toss once more.
Notes
Feel free to make this dish vegetarian by substituting the pork with sautéed mushrooms and tofu.
Nutrition
- Serving Size: 1 serving
- Calories: 450
- Sugar: 8g
- Sodium: 800mg
- Fat: 20g
- Saturated Fat: 5g
- Unsaturated Fat: 10g
- Trans Fat: 0g
- Carbohydrates: 45g
- Fiber: 3g
- Protein: 28g
- Cholesterol: 70mg
Keywords: noodle bowl, potstickers, Asian cuisine, comforting recipes, weeknight dinners