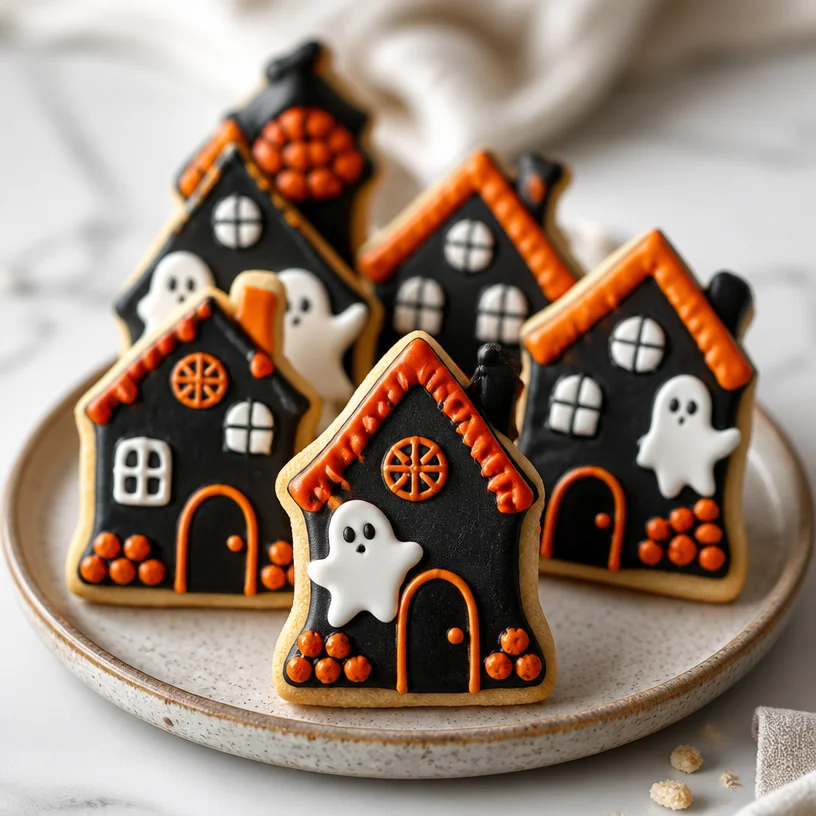
Minute Haunted House Cookies for a Spooky Halloween Treat
Spook-tacular Haunted House Cookies: A Treat for Your Halloween Gatherings!
Hello there, fellow food enthusiasts! As the leaves turn golden and the air gets that crisp bite, it’s time to channel our inner ghouls and goblins. If you’re anything like me, you can’t resist the seasonal charm that Halloween brings. Amongst the eerie decor and restless spirits, the real magic happens in the kitchen, and I have the perfect treat to elevate your spooky celebrations: Haunted House Cookies!
These aren’t just any cookies; they’re whimsical works of art that you and your little ghosts can create together. Picture this: ahouse made of delicious sugar cookies, drizzled with royal icing, and dusted with colorful sprinkles, all beckoning for a Halloween-themed gathering at your table. They’re ideal for crafting with kids, impressing your friends, or simply indulging your artistic spirit. Ready to get your mix on? Let’s dive into this delightful journey of baking!
A Whimsical Memory
Growing up, Halloween was my favorite holiday—not just because of the costumes and candies but because of the annual tradition of cookie decorating with my family. I can still recall the smell of sugar cookies baking in the oven, making the house feel warm and inviting, even when the weather outside was a bit frightful.
One crisp autumn evening, my mom and I decided to host a small gathering for my friends. We whipped up a massive batch of sugar cookie dough and rolled it out into all sorts of spooky shapes. Ghosts, tombstones, and of course, miniature haunted houses!
I remember the laughter as my friends and I got creative with icing; some cookies ended up looking like they came from a haunted nightmare, while others were surprisingly elegant! That magical night spent with family and friends over a table laden with colors, laughter, and stories is a sweet memory I carry with me. And today, I want to help you sprinkle some of that joy into your kitchen with these Haunted House Cookies!
Ingredients
Here’s what you’ll need to create your Haunted House Cookies:
-
Sugar Cookies
- These are the canvas of your cookie art! Their simplicity allows the decoration to shine through.
-
Royal Icing
- This icing is your magical glue and decorating medium. It hardens beautifully and is perfect for intricate designs. You can substitute it with buttercream icing if you prefer a softer frosting, but it won’t hold up quite as well for decoration.
-
Food Coloring
- Gel food coloring works best for bright, vibrant hues. You can get creative with shades of black, purple, and orange for that Halloween themed flair.
-
Sprinkles
- Think of sprinkles as the finishing touch or the festive confetti of your haunted houses. Without them, it’s like Halloween without a pumpkin—unthinkable!
-
Edible Decor (Candy Corn, Chocolate Chips, etc.)
- Use these to add some personality and charm to your haunted houses. They make for great windows, doors, and spooky decorations!
Step-by-Step Instructions
Grab your apron, pour yourself a spooky drink, and let’s get to baking these Haunted House Cookies!
-
Prepare the Sugar Cookie Dough
- In a large bowl, cream together softened butter and sugar until light and fluffy. (Tip: Using room temperature butter cream will ensure it mixes well and creates a light texture!)
- Mix in one egg and a splash of vanilla extract—trust me, this is the magic ingredient. Pro Tip: For an extra kick, you can add a dash of almond extract for a unique flavor!
-
Combine Dry Ingredients
- In a separate bowl, whisk together all-purpose flour, baking powder, and a pinch of salt. Gradually add this into the butter mixture until just combined. (Don’t overmix; it’s important for our cookies to be tender!)
-
Chill the Dough
- Divide the dough into two halves, wrap them in plastic wrap, and refrigerate for about 30 minutes. This step is crucial; it prevents the cookies from spreading too much while baking, keeping those beautiful shapes intact!
-
Preheat the Oven
- While the dough chills, preheat your oven to 350°F (175°C).
-
Roll Out the Dough
- Once chilled, on a floured surface, roll out the dough to about 1/4-inch thickness. Use cookie cutters to cut out spooky shapes! If you’re making haunted houses, use house-shaped cookie cutters.
-
Bake the Cookies
- Place the cookies on a parchment-lined baking sheet, giving them a little space to breathe. Bake for 8-10 minutes or until the edges are lightly golden. (Note: They’ll harden further while cooling!)
-
Cool the Cookies
- Transfer the cookies to a wire rack to cool completely. Patience, friends! You don’t want to ice warm cookies as they can melt your icing away.
-
Make the Royal Icing
- In a bowl, beat egg whites and powdered sugar until smooth and stiff peaks form. This can take a few minutes, but it’s worth the effort for that gorgeous hold. (Did you know you can use meringue powder as an egg white substitute? Perfect for those with egg allergies!)
-
Color the Icing
- Divide the icing into bowls and mix in your food coloring. For a traditional haunted house, try a spooky black, purple, and orange!
-
Decorate!
- Using piping bags, pipe outlines and details on your cookies. Don’t rush! The creative part is where the fun and stories come in. Let your imagination run wild—you might just create the next haunted cookie masterpiece!
Serving Suggestions
When it’s time to serve, gather your Haunted House Cookies on a charming platter and maybe even add a few floating candles for that spooky, enchanting ambiance. Dim the lights and let their glow highlight the edible artistry you’ve created.
For small gatherings, you can even create “cookie take-home bags” filled with a couple of decorated cookies for your guests—just tie them with a whimsical ribbon!
Recipe Variations
Now, if you’re looking to shake up the traditional haunted house vibe, here are a few creative twists:
- Gingerbread Houses: Use a gingerbread cookie recipe for a spicier twist that pairs wonderfully with icing.
- Gluten-Free Option: Substitute regular flour with a 1:1 gluten-free baking flour. Your cookies will still be tasty with an added crunch!
- Spooky Themed Flavors: Infuse your cookies with seasonal extracts, like pumpkin spice or maple, for a unique flavor experience.
- Fillings: Consider sandwiching your cookies with a layer of delicious pumpkin or gingerbread-flavored cream cheese filling. Treat yourself to that creamy goodness!
- Themed Toppers: Use different candies or edible glitter to decorate based on a theme—think “zombie apocalypse” or “witch’s brew”!
Chef’s Notes
These haunted house cookies bring back fond memories of Halloween, and over the years, I’ve expanded my decorating techniques and flavor profiles to keep the tradition alive. From my family’s kitchen to yours, these cookies have seen their fair share of spooky stories and laughs.
I can’t tell you how many Halloween parties I’ve attended with a batch of these cookies in tow, and it never fails—people love the creativity and fun that comes with decorating! Once, I brought to a party a cookie specifically designed to look like a creepy cat; let’s just say it garnered quite a few laughs and complements!
FAQs and Troubleshooting
Q: My cookies didn’t hold their shape. What went wrong?
A: This usually happens when the dough is too warm or isn’t chilled enough before baking. Make sure to chill the dough and keep your work surface floured.
Q: How can I achieve the perfect consistency for royal icing?
A: Aim for a flowy consistency that holds shape but isn’t too runny. If it’s too thick, add a tiny bit of water. If too runny, add more powdered sugar.
Q: How do I store my decorated cookies?
A: Allow the icing to dry completely before stacking or storing. Place them in an airtight container, and they can last for up to a week!
Q: Can I make these cookies in advance?
A: Absolutely! You can bake the cookies up to a week in advance and decorate them the day before your event.
Nutritional Info
While I believe good food should nourish the soul, it’s nice to keep track! One haunted house cookie roughly contains:
- Calories: 120 kcal
- Total Fat: 4 g
- Carbohydrates: 20 g
- Sugar: 10 g
- Protein: 1 g
Remember, enjoy in moderation—these cookies are certainly a treat worth every bite!
Onward to Spooky Delights!
Gather your family, your friends, or even whisk away your favorite little ghoul, and embark on this joyful baking adventure together. I promise that the laughter, creativity, and deliciousness are priceless. Wrap up your time crafting these Haunted House Cookies with a mug of hot cider or your favorite Halloween-themed drink.
Happy Halloween, my lovelies! May your days be filled with joy, creativity, and a sprinkle or two of magic. Until next time!
PrintHaunted House Cookies
Delightful sugar cookies shaped like haunted houses, perfect for Halloween gatherings!
- Prep Time: 30 minutes
- Cook Time: 10 minutes
- Total Time: 40 minutes
- Yield: 24 cookies 1x
- Category: Dessert
- Method: Baking
- Cuisine: American
- Diet: Vegetarian
Ingredients
- 3 cups all-purpose flour
- 1 cup unsalted butter, softened
- 1 cup granulated sugar
- 1 large egg
- 1 teaspoon vanilla extract
- 1/2 teaspoon almond extract (optional)
- 1 teaspoon baking powder
- 1/2 teaspoon salt
- 2 cups powdered sugar (for royal icing)
- 2 egg whites (or meringue powder)
- Gel food coloring (black, purple, orange)
- Sprinkles
- Edible decorations (candy corn, chocolate chips, etc.)
Instructions
- Prepare the Sugar Cookie Dough: In a large bowl, cream together softened butter and sugar until light and fluffy. Mix in one egg and a splash of vanilla extract; add almond extract if desired.
- Combine Dry Ingredients: In a separate bowl, whisk together flour, baking powder, and salt. Gradually add this to the butter mixture until just combined.
- Chill the Dough: Divide the dough in half, wrap in plastic, and refrigerate for 30 minutes.
- Preheat the Oven: While the dough chills, preheat your oven to 350°F (175°C).
- Roll Out the Dough: On a floured surface, roll out the dough to about 1/4-inch thickness and cut out spooky shapes.
- Bake the Cookies: Place them on a parchment-lined baking sheet, and bake for 8-10 minutes until edges are lightly golden.
- Cool the Cookies: Transfer to a wire rack to cool completely.
- Make the Royal Icing: Beat egg whites and powdered sugar until smooth and stiff peaks form.
- Color the Icing: Divide icing into bowls and mix in your food coloring.
- Decorate</strong!: Using piping bags, outline and detail your cookies creatively.
Notes
Allow the icing to dry completely before storing in an airtight container.
Nutrition
- Serving Size: 1 cookie
- Calories: 120
- Sugar: 10g
- Sodium: 50mg
- Fat: 4g
- Saturated Fat: 2g
- Unsaturated Fat: 1g
- Trans Fat: 0g
- Carbohydrates: 20g
- Fiber: 0g
- Protein: 1g
- Cholesterol: 30mg
Keywords: Halloween cookies, spooky treats, haunted house cookies
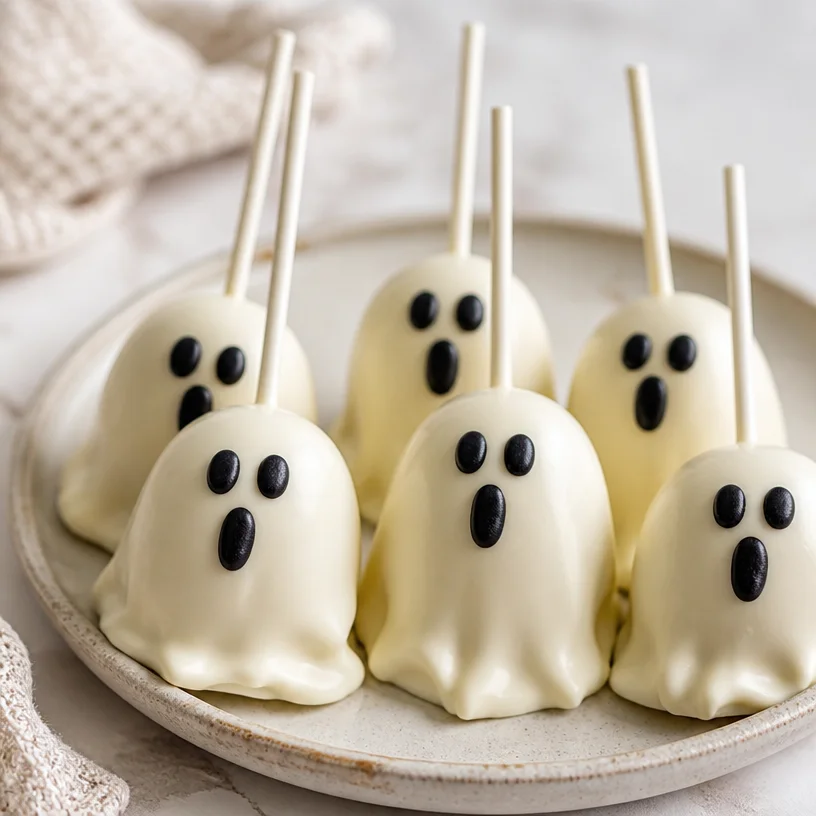
Spooky Ghost Marshmallow Pops: Quick Halloween Treats
Ghost Marshmallow Pops: A Sweet Treat for Spooky Nights
Welcome, my fellow foodies! I’m so excited to have you here, baking your way into the spirit of Halloween with a treat that’s not only delicious but also a fun, festive activity for everyone. Today, we’ll be diving into the delightfully spooky world of Ghost Marshmallow Pops. These whimsically adorable treats are perfect for Halloween parties, school bake sales, or even cozy nights in with a good movie and a warm blanket. Grab your apron, and let’s get started!
Creating these little ghostly delights is extremely simple, allowing you to channel your inner child while simultaneously impressing guests with your culinary creativity. The beautiful thing about these pops is their versatility — they can be as simple or as fancy as you like! Plus, they’re so much fun to make that you can easily involve the kiddos for a thrilling family bonding experience. Are you ready? Let’s whip up some Ghost Marshmallow Pops and create a treat that will haunt your friends and family in the best way possible!
A Sweet Memory from the Past
As I stand here mixing up those creamy white chocolate and setting marshmallows on skewers, I can’t help but recall a delightful Halloween from my childhood. My friends and I gathered at my house, which, of course, was transformed into a haunted mansion. We decorated cupcakes and whipped up all kinds of spooky snacks. I remember one particular moment vividly; my mom brought out these cute marshmallow pops she had decorated to resemble little ghosts. Every bite was a delightful combination of sweet marshmallow and rich chocolate, and I remember giddy laughter filling the room. It was moments like these that sparked my love for cooking and entertaining.
Now, every Halloween, I try to rekindle that same spirit and charm by making Ghost Marshmallow Pops. Each bite is not just a treat; it’s a memory wrapped in flavor! Whether you’re planning a big Halloween bash or just want to add a sprinkle of fun to your family dinner, these pops are sure to do the trick.
Ingredients
Here’s what you’ll need to conjure up these ghostly delights:
-
Marshmallows:
- The star of the show! Look for nice, fluffy marshmallows (regular size works best). You can also swap them for mini marshmallows if you prefer smaller ghosts or want to make a variety.
-
White Chocolate:
- Use high-quality white chocolate chips or melts for an easy melt-and-dip. If you’re feeling adventurous, you can substitute with white chocolate almond bark. Just remember, the smoother the chocolate, the easier the dipping!
-
Black Icing or Chocolate (for eyes):
- This is where the personality of your ghosts comes to life! You can use store-bought black icing in a tube for precision, or have fun tempering some dark chocolate and dabbing on little dots for eyes. Feel free to get creative! Mini chocolate chips or edible eyes work too.
-
Lollipop Sticks or Skewers:
- These are essential for turning our marshmallows into pops! Lollipop sticks give a more professional look, but wooden skewers work just fine too. If you want to keep things simple, you can also skip the stick and just leave the marshmallows as sweet little bites.
Step-by-Step Instructions
Now, let’s get down to the fun part — making our Ghost Marshmallow Pops! Here’s a detailed guide to ensure you nail it:
-
Prep Your Workspace:
- Before you dive into melting chocolate, clear off a space in the kitchen, and gather all your ingredients. Lay down some parchment paper on a baking sheet for your completed pops. This will help prevent sticking!
-
Melt the White Chocolate:
- In a microwave-safe bowl, add your white chocolate. Heat in 30-second intervals, stirring in between until the chocolate is completely melted and smooth. Make sure not to overheat, as this can cause the chocolate to seize.
-
Skewer the Marshmallows:
- Take your lollipop sticks or skewers and gently insert them into the marshmallows, about halfway through. They should stand up straight and not wobble much. This process is simple, but take your time — you don’t want to push too hard and break the marshmallow.
-
Dip the Marshmallows:
- Holding the skewer, dip each marshmallow into the melted white chocolate, letting the excess drip off. You want a nice, even coating. If you’d like a thicker layer, you can dip them twice after the first layer has cooled for a minute.
-
Set on Parchment:
- Place the dipped marshmallows onto your parchment-lined baking sheet. This is your time to get artistic — feel free to twirl or tilt the marshmallows as you go to create a ghostly swirl shape!
-
Add the Eyes:
- While the chocolate is still soft, take your black icing or melted chocolate and carefully dot two little eyes onto each ghost. They don’t have to be perfect; a little irregularity makes them more charming and fun!
-
Let Them Set:
- Allow your Ghost Marshmallow Pops to set at room temperature, or you can speed up the process by placing them in the refrigerator for about 10-15 minutes until the chocolate hardens.
-
Enjoy!
- Serve these pops at your next gathering, or simply enjoy them yourself while watching your favorite Halloween movie. Treat yourself to an adorable sculptural snack!
Serving Suggestions
To plate your Ghost Marshmallow Pops, stick them in a simple mason jar filled with festive candies or popcorn for a charming centerpiece at your Halloween party. Alternatively, you can lean them against each other on a decorative platter for a spooky display. Either way, a little sprinkle of edible glitter or Halloween-themed confetti will add the finishing touch to your spooky treats!
Recipe Variations
If you’d like to shake things up, here are a few creative twists and variations for your Ghost Marshmallow Pops:
-
Drizzle of Chocolate:
- After dipping in white chocolate, you can drizzle dark chocolate or orange-colored candy melts over the top for a fun contrast.
-
Flavored Marshmallows:
- Try using flavored marshmallows, such as pumpkin spice or chocolate mint, for a different taste twist!
-
Sprinkle Toppings:
- While the chocolate is still wet, try sprinkling some crushed graham crackers, candy corn, or festive sprinkles on top for added texture and flavor.
-
Fruit-based Pops:
- Want a healthier approach? Dip ripe strawberries in white chocolate and decorate with chocolate eyes instead. These little guys would make for a ghostly fruit display!
-
Vegan Version:
- Swap regular marshmallows for vegan marshmallows and use dairy-free chocolate instead. This way, everyone can enjoy a spooky treat!
Chef’s Notes
These Ghost Marshmallow Pops are a fantastic way to get creative and have fun in the kitchen, and I love watching everyone’s eyes light up when they see what you’ve made. They’ve evolved over the years from simple marshmallows dipped in chocolate to now becoming a mini canvas for culinary expression!
One funny kitchen story that comes to mind involves my dog, Charlie, who decided that he was the real ghost of the kitchen one Halloween. While I was getting ready to dip my marshmallows, he snuck onto the counter and helped himself to a few marshmallows! It was hilarious, and while I couldn’t be mad at him, I made sure to keep a watchful eye during future baking endeavors.
FAQs and Troubleshooting
1. What should I do if my chocolate seizes?
- If your chocolate seizes, don’t panic! Try adding a teaspoon of vegetable oil or shortening to the bowl and reheat gently while stirring. This should bring it back to a smoother consistency.
2. Can I use flavorings in the melted chocolate?
- Absolutely! Feel free to add a few drops of extract, like vanilla or almond, to enhance the flavor of your chocolate. Just be sure to use oil-based extracts if you’re melting chocolate, as water can cause it to seize.
3. What’s the best way to store leftovers?
- Store your pops in an airtight container at room temperature. They should last for 3-5 days. If you need to refrigerate them, be sure to separate layers with parchment to keep them from sticking.
4. Can I make these ahead of time?
- Yes! These Ghost Marshmallow Pops can be made a day in advance. Just make sure to keep them in a cool, dry place to prevent the chocolate from melting.
Nutritional Info (Optional)
For those interested in the nutritional aspect, each Ghost Marshmallow Pop contains approximately:
- Calories: 100
- Fat: 5g
- Carbohydrates: 15g
- Protein: 1g
However, keep in mind that this is an estimate based on the ingredients used.
So, there you have it! A delightfully spooky recipe that’s as fun to make as it is to eat. I hope you feel encouraged to tie on your apron, indulge in a little kitchen adventure, and perhaps even relive some of those special moments like I do every Halloween. Here’s to creating cherished memories with food and friends — one Ghost Marshmallow Pop at a time! Happy haunting!
PrintGhost Marshmallow Pops
Delicious and whimsical Ghost Marshmallow Pops perfect for Halloween celebrations.
- Prep Time: 15 minutes
- Cook Time: 5 minutes
- Total Time: 20 minutes
- Yield: 12 servings
- Category: Dessert
- Method: Dipping
- Cuisine: American
- Diet: Vegetarian
Ingredients
- Marshmallows (regular or mini)
- White chocolate chips or melts
- Black icing or chocolate (for eyes)
- Lollipop sticks or wooden skewers
Instructions
- Prep your workspace: Clear off a space in the kitchen, and gather all your ingredients. Lay down some parchment paper on a baking sheet.
- Melt the white chocolate in a microwave-safe bowl by heating in 30-second intervals, stirring until smooth.
- Skewer the marshmallows by inserting lollipop sticks or skewers halfway through them.
- Dip the marshmallows into the melted white chocolate, letting excess drip off.
- Set the dipped marshmallows on a parchment-lined baking sheet.
- Add the eyes with black icing or melted chocolate while the chocolate is still soft.
- Let them set at room temperature or refrigerate for about 10-15 minutes until chocolate hardens.
- Enjoy! Serve and enjoy these spooky treats, or decorate them for a festive display.
Notes
These pops can be made a day in advance. Store in an airtight container.
Nutrition
- Serving Size: 1 pop
- Calories: 100
- Sugar: 15g
- Sodium: 20mg
- Fat: 5g
- Saturated Fat: 3g
- Unsaturated Fat: 2g
- Trans Fat: 0g
- Carbohydrates: 15g
- Fiber: 0g
- Protein: 1g
- Cholesterol: 0mg
Keywords: Halloween, dessert, marshmallow, treats, spooky snacks, family fun