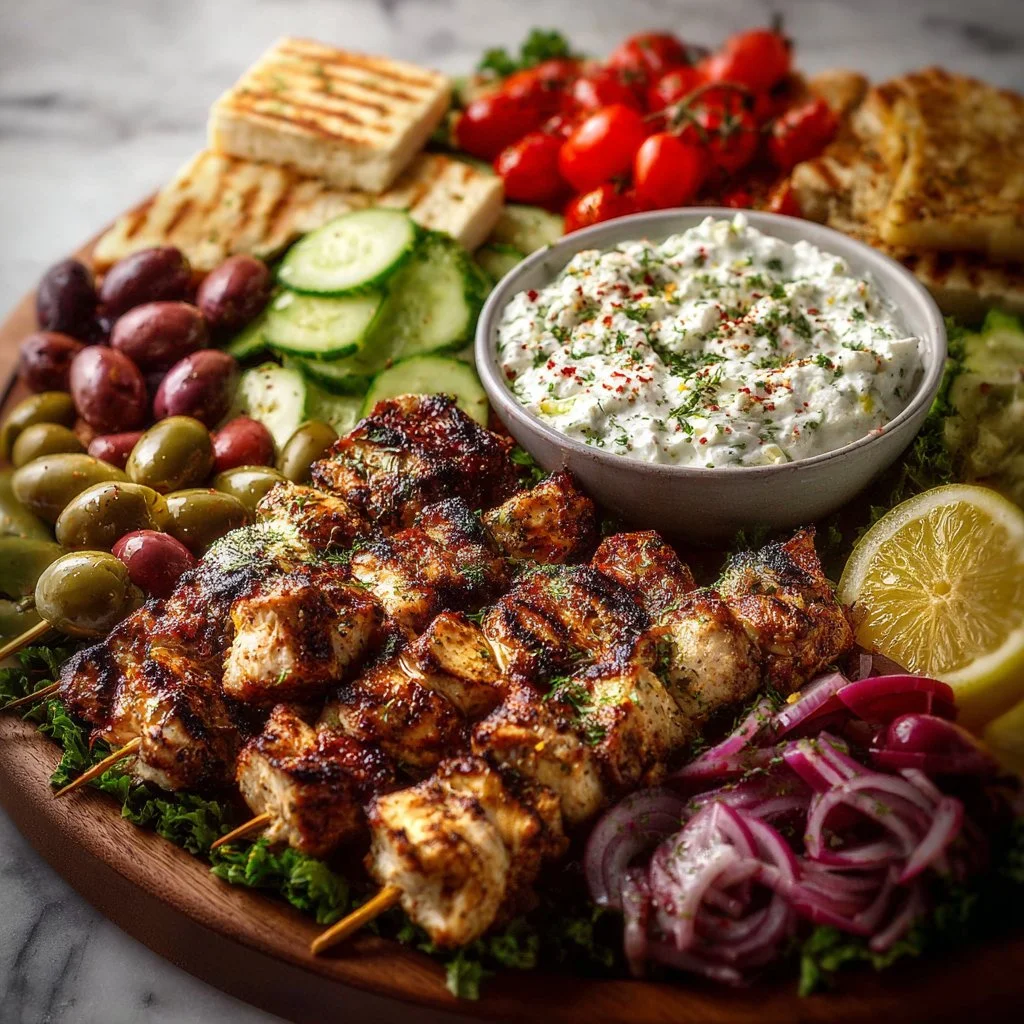
Greek Chicken Souvlaki Grazing Board with Feta Dip – A Mediterranean Feast to Share
# Greek Chicken Souvlaki Grazing Board with Feta Dip – A Mediterranean Feast to Share

## Introduction

Hello, my fellow food enthusiasts! Picture this: a sun-drenched afternoon, a long table adorned with colorful dishes, laughter echoing around as friends gather close to share stories and delicious fare. This is the essence of my kitchen philosophy, where every meal is an invitation to connect, celebrate, and savor the moment. Today, I'm excited to share my *Greek Chicken Souvlaki Grazing Board with Feta Dip*, a dish that encourages sharing and, more importantly, feasting in style!

This recipe is a love letter to the flavors of Greece, blending vibrant herbs, succulent chicken, and a creamy feta dip that you'll want to slather on everything. It's perfect for entertaining, casual get-togethers, or simply enjoying a laid-back evening at home with loved ones. There's something magical about a grazing board. It’s inviting, interactive, and gives everyone a chance to build their own delicious creations.

So, grab a glass of something delightful, tie on that ivory apron, and let’s embark on this Mediterranean culinary journey together!

## Personal Story

Growing up, my family had a tradition: every summer, we’d gather at my grandparents' home for a series of backyard barbecues. My grandmother was the queen of grilled meats, marinating chicken in vibrant herbs, garlic, and lemon—sending the most mouthwatering aromas wafting through the air. One of my fondest memories is of my cousins and me running around, playing tag while the adults prepared a spread worthy of divinity. My grandmother’s chicken souvlaki always stole the show, grilled to perfection and served alongside her homemade tzatziki.

As I grew older and started my culinary journey, I realized how these flavors became more than just food; they connected me to my roots and the love that surrounded our gatherings. This recipe is a tribute not only to those cheerful family BBQs but to the joyous spirit of sharing good food. So, with every skewer you grill, think of your own stories—because cooking is timeless, much like the memories made around the table.

## Ingredients

Here's what you'll need to craft this beautiful grazing board:

- **1 ½ lbs boneless, skinless chicken breasts**: Cut into 1-inch cubes. Chicken breast is lean and absorbs flavors beautifully. If you're feeling adventurous, swap it with chicken thighs for a juicier texture!

- **3 tbsp olive oil**: Use a high-quality olive oil for marinating as it adds depth. If you’re out, avocado oil can also add a nice flavor.

- **2 tbsp lemon juice**: Freshly squeezed is key! It brightens up the dish. If lemons aren’t available, a splash of white wine vinegar can work too.

- **2 cloves garlic, minced**: Garlic brings a punch of flavor. If you love it, feel free to add extra!

- **1 tsp dried oregano**: A classic Mediterranean herb that brings an earthy flavor. Fresh oregano can take it up a notch too!

- **½ tsp paprika**: Adds a mild smokiness. Try smoked paprika if you prefer a more robust flavor.

- **Salt and black pepper, to taste**: Essential for seasoning. Remember, you can always add more but it’s hard to take it out!

- **Wooden skewers, soaked in water for 30 minutes**: Soaking prevents burning on the grill. If you prefer, metal skewers work just as well.

### For the Feta Dip:
- **1 cup crumbled feta cheese**: Gives the dip its rich, creamy texture. If you’re not a feta fan, goat cheese is a delicious substitute!

- **½ cup plain Greek yogurt**: Adds creaminess and tang. Sour cream can also do the trick if you need a quick swap.

- **1 tbsp olive oil**: For a richer flavor.

- **1 tsp lemon zest**: Captures the essence of lemon without the acidity. If you’re short on fresh lemons, lime zest works just as beautifully!

- **1 tbsp lemon juice**: Adds brightness. See above for alternatives!

- **1 small clove garlic, minced**: Trust me, it amplifies the flavors.

- **1 tbsp chopped fresh dill**: Fresh herbs elevate any dish! Use parsley or mint for different flavor notes.

### For Serving:
- **Warm pita bread, cut into triangles**: The perfect vehicle for your dip and souvlaki.

- **Cherry tomatoes**: Bright, juicy bites that complement the chicken.

- **Sliced cucumbers**: Refreshing and crunchy—great for adding texture.

- **Kalamata olives**: A salty depth that captures the essence of the Mediterranean.

- **Roasted red peppers**: Adds sweetness; they’re a colorful addition to your board.

- **Fresh herbs (parsley, mint, or dill)**: For garnishing, which feels fresh and adds vibrance.

## Step-by-Step Instructions

### Step 1: Marinate the Chicken
In a large mixing bowl, combine olive oil, lemon juice, minced garlic, oregano, paprika, salt, and pepper. Whisk the ingredients together until well combined. **Chef Hack**: Use a zip-top bag for marinating, it makes for easier cleanup and more flavorful chicken!

Add the chicken cubes and ensure they are fully coated in the marinade. Seal that bag tight or cover your bowl and let that chicken soak up the flavors for at least 30 minutes—preferably a couple of hours for maximum deliciousness!

### Step 2: Prepare the Feta Dip
While the chicken is marinating, let’s whip up that feta dip! In a mixing bowl, combine the crumbled feta, Greek yogurt, olive oil, lemon zest, lemon juice, minced garlic, and chopped dill. Blend until smooth and creamy. **Tip**: If you like a chunkier dip, pulse in a food processor instead of blending completely.

Taste it and adjust the seasoning if needed! Store it in the fridge until you’re ready to serve; this dip gets even better as the flavors meld.

### Step 3: Skewer the Chicken
Once the chicken is marinated, it's time to get your skewers ready! Thread the marinated chicken onto the wooden skewers, ensuring they’re snug but not overcrowded—this allows them to cook evenly.

**Chef’s Tip**: If you’re using wooden skewers, make sure they’ve been soaked in water for about 30 minutes to prevent them from burning.

### Step 4: Grill the Chicken
Preheat your grill (or grill pan) to medium-high heat. Once it’s ready, place the skewers on the grill. Cook for about 10-12 minutes, turning occasionally. **Pro Tip**: You want those beautiful grill marks, so avoid flipping them too often! The chicken should be cooked through and have nice charred edges.

### Step 5: Warm the Pita
While the chicken is grilling, wrap your pita bread in aluminum foil and place it on the grill for the last few minutes to warm through.

### Step 6: Plate and Serve
Plate the skewers alongside your feta dip and colorful sides. Use a large board or platter to create an inviting grazing experience. Arrange cherry tomatoes, cucumber slices, Kalamata olives, and roasted red peppers artfully around the dip. Don’t forget to add those warm pita triangles for dipping and scooping!

## Serving Suggestions

When it comes to serving, presentation matters! Lay everything out beautifully on a large wooden board or platter. Stack the pita triangles neatly, place the skewers in a small jar or stand them up in the middle, and create little mounds of veggies around the dip. Garnish with fresh herbs for a pop of color. Encourage guests to dive in and make their own plates!

## Recipe Variations

1. **Spicy Souvlaki**: Add a pinch of cayenne pepper or crushed red pepper flakes to the marinade for an extra kick!

2. **Vegan Option**: Swap chicken for firm tofu or mushrooms. Simply marinate and skewer as you would the chicken.

3. **Mediterranean Chickpea Salad**: Add a fresh salad of chickpeas, chopped peppers, onions, and a drizzle of olive oil for a refreshing side.

4. **Herb Variations**: Experiment with fresh herbs like mint or cilantro in the feta dip for a unique twist.

5. **Balsamic Glaze Drizzle**: After grilling, a drizzle of balsamic glaze over the skewers adds a beautiful touch of sweetness and acidity.

## Chef's Notes

Over the years, this recipe has morphed into something of a staple in my entertaining repertoire. I’ve played around with different herbs, seasoning levels, and even dips—so don’t hesitate to make it your own. Reflecting on those sunny afternoons filled with laughter reminds me that cooking isn’t just about feeding the body; it’s about nourishing the soul and celebrating the moments together.

Here’s a funny kitchen story: One time, I got so excited about entertaining that I accidentally swapped sugar for salt in the dip! I’ll let you guess how that went over with my guests. Lesson learned—always double-check those labels!

## FAQs and Troubleshooting

1. **What if my chicken is dry?**
   Ensure you’re not overcooking the chicken! Use a meat thermometer—165°F is your magic number for perfectly grilled chicken.

2. **Can I make the dip ahead of time?**
   Absolutely! The feta dip stays fresh in the fridge for about 3 days. Just give it a good stir before serving; flavors get even better when they sit.

3. **Do I have to grill the chicken?**
   Not at all! You can bake the marinated chicken skewers in a preheated oven at 400°F for about 15-20 minutes, turning halfway through.

4. **What’s the best way to repurpose leftovers?**
   Any leftover chicken is fabulous in a wrap with fresh veggies or mixed into a salad. And the feta dip? It’s delicious on grilled vegetables or as a spread on sandwiches.

## Nutritional Info

*Note: Consider this a general overview; always adjust based on specific brands and methods:*

- **Calories (per serving)**: Approximately 400 calories
- **Protein**: 25g
- **Fat**: 20g
- **Carbohydrates**: 30g

---

Gather your friends and family, indulge in the flavors of Greece, and celebrate the joy of cooking together. This Greek Chicken Souvlaki Grazing Board with Feta Dip is sure to become a favorite at your gatherings! Thanks for sharing this time with me in the kitchen.
Greek Chicken Souvlaki Grazing Board with Feta Dip
A delightful Mediterranean grazing board featuring marinated chicken souvlaki served with a creamy feta dip and colorful accompaniments.
- Prep Time: 30 minutes
- Cook Time: 12 minutes
- Total Time: 42 minutes
- Yield: 4 servings 1x
- Category: Main Course
- Method: Grilling
- Cuisine: Mediterranean
- Diet: Paleo
Ingredients
- 1 ½ lbs boneless, skinless chicken breasts, cut into 1-inch cubes
- 3 tbsp olive oil
- 2 tbsp lemon juice
- 2 cloves garlic, minced
- 1 tsp dried oregano
- ½ tsp paprika
- Salt and black pepper, to taste
- Wooden skewers, soaked in water for 30 minutes
- 1 cup crumbled feta cheese
- ½ cup plain Greek yogurt
- 1 tbsp olive oil
- 1 tsp lemon zest
- 1 tbsp lemon juice
- 1 small clove garlic, minced
- 1 tbsp chopped fresh dill
- Warm pita bread, cut into triangles
- Cherry tomatoes
- Sliced cucumbers
- Kalamata olives
- Roasted red peppers
- Fresh herbs (parsley, mint, or dill) for garnishing
Instructions
- Marinate the chicken: In a large mixing bowl, combine olive oil, lemon juice, minced garlic, oregano, paprika, salt, and pepper. Whisk until well combined. Add the chicken cubes and ensure they are fully coated. Let marinate for at least 30 minutes.
- Prepare the feta dip: In a mixing bowl, combine crumbled feta, Greek yogurt, olive oil, lemon zest, lemon juice, minced garlic, and chopped dill. Blend until smooth and creamy. Store in the fridge until ready to serve.
- Skewer the chicken: Thread marinated chicken onto soaked skewers, ensuring they are snug but not overcrowded.
- Grill the chicken: Preheat your grill to medium-high heat. Grill skewers for 10-12 minutes, turning occasionally, until cooked through.
- Warm the pita: Wrap pita bread in aluminum foil and place on the grill for the last few minutes to warm.
- Plate and serve: Arrange skewers, feta dip, and colorful sides on a large board or platter for a beautiful grazing experience.
Notes
You can adjust the marinade and dip ingredients based on your taste preferences. This recipe encourages creativity and sharing.
Nutrition
- Serving Size: 1 serving
- Calories: 400
- Sugar: 3g
- Sodium: 600mg
- Fat: 20g
- Saturated Fat: 7g
- Unsaturated Fat: 6g
- Trans Fat: 0g
- Carbohydrates: 30g
- Fiber: 2g
- Protein: 25g
- Cholesterol: 75mg
Keywords: Greek, Chicken, Souvlaki, Feta, Mediterranean, Grazing Board

Skordalia
Skordalia: A Mediterranean Delight to Elevate Your Table
Hey there, food lovers! Today, we’re stepping into the vibrant and flavorful world of Mediterranean cuisine to whip up a timeless classic — Skordalia. If you’ve never encountered this delicious garlic and potato dip, you’re in for a treat! It’s creamy, tangy, and has just the right amount of garlic punch to liven up any meal. Skordalia is often served at Greek feasts and is perfect for spreading on warm bread, dolloping on roasted veggies, or even using as a zesty sauce for grilled meats. Trust me, it’s a crowd-pleaser!
When I first learned about Skordalia, my mind was blown. A blend of straightforward ingredients turns into something that feels truly luxurious. Plus, it’s a reminder that cooking doesn’t have to be complicated to be impressive. Growing up, family dinners were often about gathering around the table and sharing food that brought everyone together. Skordalia embodies that spirit — each scoop is a hug for your taste buds, a celebration of simple yet quality ingredients, and a testament to the beauty of sharing food with loved ones.
So, whether you’re planning an intimate dinner for two or a lively gathering with friends, this Skordalia recipe can take center stage on your table. Let’s roll up our sleeves, tie on our aprons, and get cooking together!
Personal Story
The first time I had Skordalia, it was at my friend Maria’s family gathering. I remember walking into her home, the air thick with laughter, warmth, and the irresistible aroma of garlicky goodness wafting through the kitchen. Maria’s grandmother was the culinary matriarch of the family, and boy, did she know how to entertain!
As dinner commenced, Maria’s family surrounded the table, and Skordalia was the first dish to grab my attention. Served in a beautiful bowl, drizzled with olive oil and topped with chopped parsley, it looked stunning. I took a scoop onto my plate and was instantly hooked. The texture was creamy, yet featherlight, and the garlic flavor was bold but balanced with a hint of lemon. That evening, I not only savored the food but also soaked in the essence of togetherness.
From that moment on, Skordalia became a staple in my cooking repertoire. It reminds me of that joyful evening filled with love, laughter, and a table full of cherished stories — and I can’t wait for you to experience that same connection with this dish!
Ingredients
To whip up your batch of Skordalia, here’s what you’ll need:
-
2 large potatoes, peeled and cubed
Potatoes give Skordalia its creamy texture. For a twist, you can use sweet potatoes for a natural sweetness or cauliflower for a lighter version. -
4-6 cloves of garlic, minced
Garlic is the star here! Adjust the quantity based on your personal taste. If you’re garlic-averse, try roasting the cloves first for a milder flavor. -
1/2 cup olive oil
Use high-quality extra virgin olive oil for rich flavor. If you prefer a lighter oil, avocado oil can be a great substitute. -
2 tablespoons lemon juice
Freshly squeezed lemon juice adds brightness and balances the dip. You can also experiment with white wine vinegar for a different tang. -
Salt to taste
Always taste as you go! Sea salt or flaky salt works best, giving your Skordalia that perfect savory edge.
With these pantry staples in hand, you’re ready to create something truly special!
Step-by-Step Instructions
Let’s jump into the kitchen! Here’s how you’ll prepare your Skordalia step by step:
-
Boil the Potatoes
Begin by placing your cubed potatoes in a large pot and covering them with cold water. Add a generous pinch of salt. Bring to a boil over medium-high heat. This step ensures that the potatoes cook evenly and get nice and tender. Once boiling, reduce the heat, and let them simmer for about 15 minutes or until easily pierced with a fork. -
Prep the Garlic
While the potatoes are cooking, finely mince your garlic. The smell of fresh garlic will fill your kitchen and get everyone excited! If you’re feeling adventurous, try slicing the garlic instead — it will give the dip a unique texture. -
Drain and Mash
Once your potatoes are tender, drain them well in a colander and return them to the pot. Let them steam for a minute or two to remove any excess moisture. You want them as dry as possible for a fluffier result. Use a potato masher or a fork to mash them into a smooth purée. -
Incorporate the Ingredients
To the mashed potatoes, add minced garlic, olive oil, and lemon juice. Using a spatula or a whisk, mix until velvety and seamless. The key is to add the olive oil gradually to achieve a creamy consistency. If it feels too thick, add a splash of warm water or more olive oil until you reach your desired thickness. -
Season to Taste
Once your Skordalia is well mixed, sprinkle in salt to taste. Give it a good stir and taste. This is your moment to adjust; feel free to add more garlic or lemon to suit your preferences! -
Serve with Style
Transfer your Skordalia to a serving bowl. Drizzle with a bit of extra olive oil on top and sprinkle with freshly chopped parsley or even a pinch of paprika for color. Serve it warm, at room temperature, or chilled — all options are delicious!
Remember, each step is an opportunity to infuse it with your personal touch. Don’t rush through; cooking is about enjoying the journey as much as the destination!
Serving Suggestions
Skordalia can be served in many fun and fabulous ways! Here are a few ideas:
-
With Warm Bread: Grab a loaf of crusty, warm bread, and let guests dip straight into the bowl. Think of it as a Mediterranean fondue!
-
As a Side Dish: Serve Skordalia alongside grilled meats, roasted veggies, or fish. It’s the perfect sauce that complements hearty flavors.
-
On Veggie Platters: Add it to your charcuterie board as a beautiful dip. Surround it with sliced cucumbers, bell peppers, and crunchy carrots for a colorful spread.
-
With Grains: Drizzle Skordalia over a bowl of quinoa or couscous for a delightful flavor boost.
No matter how you choose to serve it, Skordalia will surely be a hit at any gathering!
Recipe Variations
Feeling creative? Here are some fun variations on classic Skordalia:
-
Add Herbs: Mix in fresh herbs like dill, basil, or parsley for a fresh twist. They add an incredible aroma and depth of flavor.
-
Nuts and Seeds: Blend in walnuts or almonds for added crunch and nutrition. Toasting them a bit beforehand enhances their flavors too!
-
Roasted Garlic: Roast your garlic instead of using it raw for a mellower, sweeter flavor that blends beautifully with the potatoes.
-
Spices: Consider adding a hint of cumin or smoked paprika for a unique flavor profile. This can transport your Skordalia from Mediterranean to more exotic realms.
-
Dairy-Free: For a vegan option, you’re already there! Just ensure your olive oil is high quality to make up for any richness from butter.
Chef’s Notes
I must confess, the evolution of my Skordalia recipe has been a journey. When I first attempted it, I was terrified that I’d overpower the dish with too much garlic or not enough seasoning. It took me a few tries to find that perfect balance, but hey, what’s cooking without a few experiments along the way?
Sometimes, I even add a splash of soy sauce or tahini for an unexpected umami hit. It’s those quirky twists that can make a recipe uniquely your own! As a fun kitchen story, I remember one adventure where a family member got extra enthusiastic with the garlic (we’re talking a full head instead of a few cloves!). The results were potent but our laughter filled the kitchen that day — that’s what cooking is all about!
FAQs and Troubleshooting
Can I use different potatoes?
Absolutely! While russets or Yukon Golds are traditional, any variety will do. Just ensure they are starchy for that creamy texture.
My Skordalia is too runny. What can I do?
If your Skordalia ends up too watery, try adding more mashed potatoes to thicken it up. You can also give it a quick whip to incorporate air back into the mixture, making it lighter.
How do I store leftovers?
Store any leftover Skordalia in an airtight container in the refrigerator for up to 3 days. It can also be frozen, but the texture may change slightly upon thawing.
Can I make Skordalia in advance?
Yes! Skordalia actually tastes better the next day as the flavors meld together. Prepare it a day in advance, and let it chill in the fridge until you’re ready to serve!
Nutritional Info (Optional)
- Serving Size: 1/2 cup
- Calories: Approximately 200
- Fat: 10g
- Carbohydrates: 28g
- Protein: 3g
- Fiber: 3g
While this is a loved comfort dish, remember to enjoy it in moderation and incorporate it into a balanced diet!
So there you have it, friends! A delicious journey into the world of Skordalia. I hope you feel inspired to tie on your apron, gather your ingredients, and create your own memories around the dining table. Let’s continue to enjoy the beauty of good food — because at the end of the day, it’s all about connecting with one another through the joy of cooking. Happy cooking!
PrintSkordalia

A creamy, tangy garlic and potato dip from Mediterranean cuisine that elevates any meal.
- Prep Time: 15 minutes
- Cook Time: 15 minutes
- Total Time: 30 minutes
- Yield: 4 servings 1x
- Category: Appetizer
- Method: Boiling
- Cuisine: Mediterranean
- Diet: Vegetarian
Ingredients
- 2 large potatoes, peeled and cubed
- 4–6 cloves of garlic, minced
- 1/2 cup olive oil
- 2 tablespoons lemon juice
- Salt to taste
Instructions
- Boil the potatoes by placing them in a large pot, covering with cold water, and adding a pinch of salt. Bring to a boil and simmer for about 15 minutes or until tender.
- Prep the garlic by mincing it finely.
- Drain the tender potatoes in a colander, return to the pot, and mash them into a smooth purée.
- Incorporate the minced garlic, olive oil, and lemon juice into the mashed potatoes, mixing until smooth.
- Season to taste with salt, adjusting ingredients as desired.
- Serve in a bowl, drizzled with olive oil and garnished with parsley or paprika.
Notes
For creamier consistency, add warm water or more olive oil as necessary. Can be served warm, at room temperature, or chilled.
Nutrition
- Serving Size: 1/2 cup
- Calories: 200
- Sugar: 1g
- Sodium: 300mg
- Fat: 10g
- Saturated Fat: 1.5g
- Unsaturated Fat: 8.5g
- Trans Fat: 0g
- Carbohydrates: 28g
- Fiber: 3g
- Protein: 3g
- Cholesterol: 0mg
Keywords: skordalia, garlic dip, Mediterranean appetizer