
Honey Lime Chicken & Avocado Rice Stack – Irresistible 25-Minute Dinner
Honey Lime Chicken & Avocado Rice Stack – Irresistible 25-Minute Dinner
Hello, fellow food lovers! Are you ready to step into the kitchen for a quick yet delicious meal that’s as vibrant as a summer’s day? Today, I’m excited to share one of my absolute favorites: Honey Lime Chicken & Avocado Rice Stack. This dish is not only a cinch to whip up—taking just about 25 minutes from prep to plate—but it also bursts with flavor and color that will elevate your dining experience.
Picture this: succulent chicken breasts marinated in a zesty honey-lime mix, all laid atop fluffy rice and rich, creamy avocados. The sweet and tangy notes from the honey and lime marry beautifully with the freshness of the avocado and the inviting warmth of the rice. You’ve got a mini flavor explosion in every bite!
Now, I know that weeknight cooking can sometimes feel daunting, but that’s where I come in. This recipe embraces simplicity without sacrificing elegance, making it perfect for cozy dinners at home or when you need something special but quick to impress your guests. Plus, it’s a fantastic way to gather everyone around the table. Let’s dig in and set the stage for a meal that feels both rewarding and effortless.
Personal Story
One of my fondest memories that inspired this dish dates back to a sunny afternoon when I decided to host an impromptu backyard barbecue for my closest friends. With the grill fired up and the aromatic scent of marinated chicken wafting through the air, I felt a warmth of anticipation. As the chicken sizzled, I tossed together a vibrant avocado and rice salad, reminiscent of the ones we’d enjoy during summer picnics as kids. The laughter and chatter of my friends mingled with the gentle clinking of glasses—it was pure magic!
I remember plating the juicy honey lime chicken on a bed of fluffy rice, then layering on the diced avocado as a refreshing touch to create a stack. The smiles around the table said it all—everyone loved it! That day, I realized how food could transcend taste; it creates moments, nostalgia, and connections. And that’s exactly why I can’t wait to share this recipe with you. Each bite is a reminder of those sunny afternoons filled with laughter and love.
Ingredients
Here’s what you’ll need to create your Honey Lime Chicken & Avocado Rice Stack. Each ingredient contributes to the overall deliciousness and can often be swapped based on what you have at home!
-
2 Boneless, Skinless Chicken Breasts
The star of the show! Boneless and skinless make for quick cooking and easy eating. If you’re in a bind, feel free to use thighs for a richer flavor. -
2 Tablespoons Olive Oil
Extra virgin for elevated flavor, but any olive oil will do! This not only helps to prevent sticking but also adds a lovely richness to the chicken. -
Zest and Juice of 2 Limes
Fresh lime juice brightens up the dish, while the zest adds that extra aromatic touch. If limes aren’t available, lemons can work in a pinch! -
2 Tablespoons Honey
This natural sweetener balances the acidity of the lime beautifully. If you need a substitute, agave syrup works wonderfully too! -
2 Cloves Garlic, Minced
A little minced garlic goes a long way in adding depth to the marinade—that aromatic flavor really enhances the dish. Fresh is best, but garlic powder can work if you’re in a hurry. -
1/2 Teaspoon Ground Cumin
Earthy and warm, cumin brings a touch of spice to the mix. Just a sprinkle enhances the flavor profile, but don’t overdo it unless you’re a cumin lover! -
Salt and Black Pepper, to Taste
Essential seasoning! Always taste as you go to get that perfect seasoning balance. -
2 Cups Cooked White or Jasmine Rice
Fluffy rice forms a cozy base for layering. Leftovers or even microwave rice can save time if you’re in a major rush. -
2 Ripe Avocados, Diced
Creamy and delicious, avocados add richness to the stacks. Choose ripe ones for the best flavor—if they’re too firm, leave them a day or two on the counter. -
1 Tablespoon Fresh Cilantro, Chopped
This herb brightens and lifts the entire dish—definitely a must! If cilantro isn’t your thing, fresh parsley can be a good substitute. -
1/2 Cup Cherry Tomatoes, Finely Chopped (Optional)
A burst of color and sweetness! These can be omitted if you prefer, or swapped for diced bell peppers for a crunchy twist.
Step-by-Step Instructions
Let’s get cooking in just a few easy steps. Have that apron tied around your waist? Good! Here we go:
-
Marinate the Chicken: In a medium bowl, whisk together the olive oil, lime zest and juice, honey, minced garlic, cumin, salt, and black pepper. This marinade is your magic potion, infusing the chicken with incredible flavor. Place the chicken breasts in the bowl, coating them thoroughly, and let them marinate while you prep your other ingredients (or at least 10 minutes).
-
Cook the Chicken: Heat a skillet over medium-high heat. Once hot, add the marinated chicken breasts (discard any remaining marinade). Cook for about 5-7 minutes on each side or until the chicken is golden brown and the internal temperature reaches 165°F (75°C). This is key for that juicy texture. Pro tip: use a meat thermometer for accuracy!
-
Prepare Rice: If you’re using leftover rice, heat it up in the same skillet after the chicken is done, scraping up any little brown bits for extra flavor. If you’re using freshly cooked rice, fluff it with a fork and set aside.
-
Avocado Time: While the chicken cooks, cut your ripe avocados in half, remove the pit, and scoop the flesh out with a spoon. Dice it into bite-sized pieces and toss with a squeeze of lime juice (to keep it from browning) and a pinch of salt.
-
Plating the Stack: For a stunning presentation, take a shallow bowl or plate. Start with a generous scoop of rice at the bottom, creating a nice base. Slice the chicken breasts and lay them on top of the rice, then finish with the diced avocado and sprinkle the fresh cilantro for that finishing touch. If you’re feeling extra, toss in those cherry tomatoes for an added burst of flavor and color.
-
Enjoy: Gather your loved ones around the table, serve, and watch as they revel in the delightful layers of flavor and texture!
Serving Suggestions
To plate your Honey Lime Chicken & Avocado Rice Stack, consider using a wide, shallow bowl or a beautiful plate where all the colors can shine. Start with a scoop of rice and layer the sliced chicken on top. Then, add the diced avocado, finishing with a sprinkle of fresh cilantro and a few halved cherry tomatoes for a pop of color. A wedge of lime on the side makes for a lovely garnish and offers that extra zesty squeeze for those who crave it!
Recipe Variations
-
Grilled Chicken: Swap the skillet method for a grill for added smoky flavor. Just make sure to oil the grates!
-
Spicy Kick: Add some diced jalapeños or a sprinkle of chili flakes to the chicken marinade for a spicy twist!
-
Vegetarian Version: Replace chicken with grilled halloumi or a plant-based protein such as chickpeas or tofu, marinated in the same sweet-tangy dressing.
-
Nutty Flavor: Toss in some toasted pine nuts or sunflower seeds for a delightful crunch!
-
Different Rice: Use quinoa or cauliflower rice as a base for a low-carb option.
Chef’s Notes
Ah, this recipe has evolved beautifully over time! I remember when I first started experimenting with honey and lime as a marinade. Initially, I paired them with different proteins, but the chicken really took the spotlight and became a staple at dinners among friends. I have even used this technique to marinate shrimp and fish, and let me tell you, it’s divine! Life’s too short for boring meals, and this dish is one of those that just keeps evolving with every gathering I host. Plus, it’s a hit every time!
FAQs and Troubleshooting
1. What if my chicken is too dry?
Cooking chicken can be tricky! If your chicken turns out dry, ensure you’re not overcooking it by using a meat thermometer. You want a perfect 165°F! Also, letting the chicken rest for a few minutes off the heat allows the juices to redistribute.
2. Can I make this in advance?
Yes! You can marinate the chicken in the morning, and when you’re ready to eat, simply cook it up and assemble the stack. The rice can also be prepped ahead of time.
3. What can I do if my avocados are hard?
If your avocados aren’t ripe yet, place them in a brown paper bag with an apple or banana for a day or two; the ethylene gas will speed up the ripening process!
4. How do I store leftovers?
Leftovers can be refrigerated in an airtight container for up to 2 days. However, I recommend keeping avocado separate until you’re ready to serve to prevent browning.
Nutritional Info
This dish is not only delicious but also nutritious! A serving contains:
- Calories: 480
- Protein: 32g
- Carbohydrates: 37g
- Fat: 24g
- Fiber: 8g
But remember, nutritional values can vary based on your ingredients and serving sizes.
And there you have it, my beautiful friends! I hope you enjoy making and sharing this Honey Lime Chicken & Avocado Rice Stack as much as I do. It’s all about the joy of cooking and savoring the moments spent together at the table. So tie on your ivory apron, grab a glass of something sparkling, and let’s create some magic! Happy cooking!
PrintHoney Lime Chicken & Avocado Rice Stack

A vibrant and delicious 25-minute dinner with chicken marinated in honey-lime, served over fluffy rice and creamy avocado.
- Prep Time: 10 minutes
- Cook Time: 15 minutes
- Total Time: 25 minutes
- Yield: 4 servings 1x
- Category: Main Course
- Method: Skillet
- Cuisine: Mexican
- Diet: Gluten-Free
Ingredients
- 2 Boneless, Skinless Chicken Breasts
- 2 Tablespoons Olive Oil
- Zest and Juice of 2 Limes
- 2 Tablespoons Honey
- 2 Cloves Garlic, Minced
- 1/2 Teaspoon Ground Cumin
- Salt and Black Pepper, to Taste
- 2 Cups Cooked White or Jasmine Rice
- 2 Ripe Avocados, Diced
- 1 Tablespoon Fresh Cilantro, Chopped
- 1/2 Cup Cherry Tomatoes, Finely Chopped (Optional)
Instructions
- Marinate the Chicken: In a medium bowl, whisk together the olive oil, lime zest and juice, honey, minced garlic, cumin, salt, and black pepper. Place the chicken breasts in the bowl, coating them thoroughly, and let them marinate while you prep your other ingredients (or at least 10 minutes).
- Cook the Chicken: Heat a skillet over medium-high heat. Add the marinated chicken breasts (discard any remaining marinade). Cook for about 5-7 minutes on each side or until the chicken is golden brown and the internal temperature reaches 165°F (75°C).
- Prepare Rice: If you’re using leftover rice, heat it up in the same skillet after the chicken is done. If you’re using freshly cooked rice, fluff it with a fork and set aside.
- Avocado Time: While the chicken cooks, cut your ripe avocados in half, remove the pit, and scoop the flesh out with a spoon. Dice it into bite-sized pieces and toss with a squeeze of lime juice and a pinch of salt.
- Plating the Stack: Take a shallow bowl or plate. Start with a scoop of rice at the bottom, creating a base. Slice the chicken breasts and lay them on top of the rice, then finish with the diced avocado and sprinkle the fresh cilantro.
- Enjoy: Gather your loved ones around the table, serve, and watch as they revel in the delightful layers of flavor and texture!
Notes
Consider using a wide, shallow bowl for presentation. A wedge of lime on the side makes for a lovely garnish.
Nutrition
- Serving Size: 1 serving
- Calories: 480
- Sugar: 10g
- Sodium: 300mg
- Fat: 24g
- Saturated Fat: 4g
- Unsaturated Fat: 20g
- Trans Fat: 0g
- Carbohydrates: 37g
- Fiber: 8g
- Protein: 32g
- Cholesterol: 70mg
Keywords: chicken, avocado, honey lime, quick dinner, summer meal
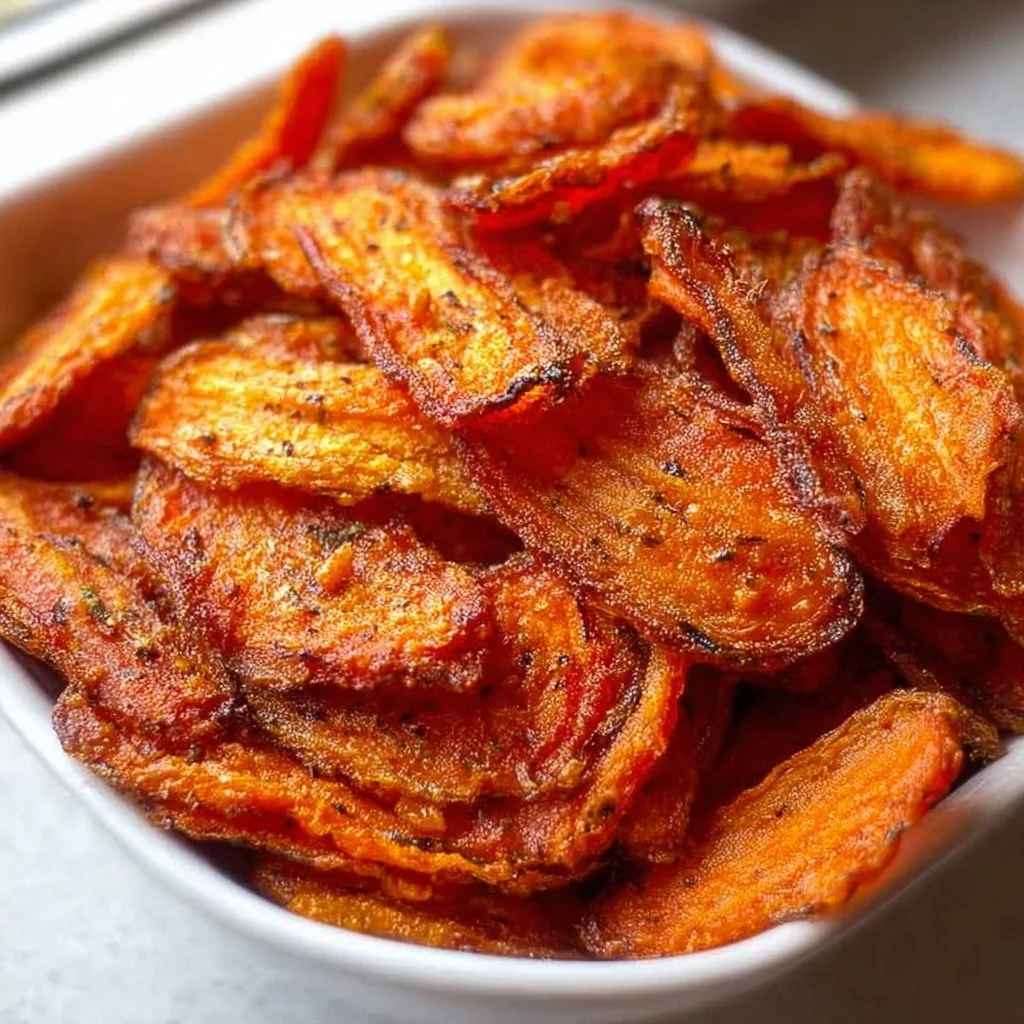
Homemade Carrot Chips, Oven-Baked
Homemade Carrot Chips: A Crunchy Delight Straight from Your Oven
Hey there, fellow food lovers! Today, we’re diving into a recipe that’s not just a hit at dinner parties but also a fantastic guilt-free snack for your everyday munching. I’m talking about Homemade Oven-Baked Carrot Chips! If you’ve ever craved a crunch that doesn’t come with the heaviness of traditional chips, you’re in for a treat.
These carrot chips are not only easy to whip up, but they can also be customized to your taste. Plus, they’re a brilliant way to sneak in those essential veggies while satisfying your craving for something crisp and delicious. And did I mention how fun it is to bring a little color onto your plate? The bright orange hue of the carrots reflects a sunny, cheerful vibe that can uplift any mealtime.
Think of this recipe as a love letter to all the crunch enthusiasts out there. I remember the first time I tried making these—my kitchen was alive with anticipation as the sweet aroma of roasted carrots filled the air. With a sprinkle of salt and a dash of seasoning, those humble root vegetables transformed into a show-stopping snack. So, grab your apron and let’s get cooking—this might just become your new favorite way to enjoy carrots!
Personal Story
Growing up, my family had a tradition of Saturday movie nights. We’d gather in the living room, blankets piled high, and a spread of snacks that would make any movie studio envious. But there was one tricky challenge: my brother, the snack connoisseur, was always looking for something new and exciting to munch on. One weekend, craving a break from the usual popcorn and chips, I decided to experiment.
Channeling my inner chef, I grabbed some carrots from the fridge and set to work. I sliced them thin, drizzled some olive oil, and seasoned them with a little salt and pepper before sending them off to the oven. The result? Crunchy, flavorful chips that my brother devoured in minutes, and suddenly, carrot chips were all the rage in our household. My mom couldn’t believe I had concocted a healthy snack that actually beat the store-bought versions. Those delightful little chips became a staple for our movie nights, adding a colorful twist to our munching routine. Now, every time I whip up a batch, I’m transported back to those cozy evenings, sharing laughs and bites with my family.
Ingredients
Here’s what you’ll need to create your batch of delectable carrot chips:
-
Carrots: The star of the show! Choose firm, fresh carrots for the best flavor and crunch. Alternatively, you could use colorful varieties, like purple or rainbow carrots, for a vibrant twist.
-
Olive Oil: This will help the chips crisp up and adds a lovely richness. If you want a different flavor profile, avocado oil or coconut oil work wonderfully as substitutes.
-
Salt: A sprinkle of salt enhances the flavor of the carrots. You can use sea salt, Himalayan pink salt, or kosher salt depending on your preference.
-
Seasonings: This is where you can let your creativity flow! I recommend garlic powder, smoked paprika, or even a dash of chili powder. Feel free to experiment with herbs like dried thyme or rosemary for an extra flavor kick.
-
Parmesan Cheese (optional): For an extra layer of flavor, you can sprinkle some finely grated Parmesan on top before baking. It mellows out as the chips cook, lending richness that’s simply scrumptious.
Step-by-Step Instructions
-
Preheat Your Oven: Start by preheating your oven to 400°F (200°C). An adequately heated oven is essential for achieving that perfect crunch!
-
Prepare Your Carrots: Wash and peel the carrots. Then, using a sharp knife or a mandoline, slice the carrots as thinly as possible, about 1/8 inch thick. The thinner the slices, the crispier the final product will be!
-
Toss with Olive Oil: In a large mixing bowl, add the carrot slices. Drizzle them with about 1 to 2 tablespoons of olive oil. Use your hands to gently toss the carrots, ensuring they are well-coated. This step is crucial—too little oil, and they may turn out soggy.
-
Season the Carrots: Now, sprinkle salt and your choice of seasonings over the oil-coated carrots. Mix again to distribute the spices evenly. Here’s a little chef hack: use your hands (why not get a bit messy?) to really massage the flavors into the carrots.
-
Arrange on a Baking Sheet: Line a baking sheet with parchment paper for easy cleanup. Spread the seasoned carrot slices in a single layer on the sheet. Make sure they aren’t overlapping—this allows for even cooking.
-
Bake: Pop the baking sheet into the preheated oven. Bake for about 15-20 minutes. Keep an eye on them, as every oven is different! You want them to be golden brown with crispy edges. If they seem to be softening, you might need a few extra minutes; just don’t let them burn.
-
Cool and Crisp: After baking, let the carrot chips sit on the baking sheet for a few minutes to cool—this helps them crisp up even more. Trust me; patience pays off here!
-
Serve and Enjoy: Once cool enough to handle, transfer your lovely carrot chips to a serving dish. If using, sprinkle with freshly grated Parmesan cheese while they’re still warm for it to melt slightly.
And voila! You have a delightful, healthy snack that serves beautifully and tastes even better.
Serving Suggestions
Carrot chips can be served in various fun ways! Create a vibrant platter by pairing them with a dip like hummus or tzatziki for a delightful crunch and creaminess combo. You can also add a touch of flair by garnishing with fresh herbs or serving them in mini cones for a playful presentation. Either way, they’re sure to impress your guests.
Recipe Variations
Looking to mix things up? Here are a few creative twists on the classic carrot chips:
-
Spicy Sriracha Carrot Chips: Drizzle some Sriracha sauce along with the olive oil for an extra kick. Just be cautious with the amount—start with a teaspoon!
-
Honey Glazed Carrot Chips: For a sweet twist, drizzle some honey before baking, resulting in a caramelized, slightly sticky treat!
-
Cinnamon Sugar Carrot Chips: If you have a sweet tooth, toss the baked chips in a mixture of cinnamon and sugar for a dessert-like snack.
-
Herbed Garlic Carrot Chips: Mix in your favorite dried herbs with garlic powder for a fragrant and flavorful twist.
-
Crispy Parmesan Carrot Chips: Add a generous sprinkle of grated Parmesan before baking for cheesy goodness that pairs beautifully with the sweet carrots.
Chef’s Notes
These oven-baked carrot chips have become a staple in my kitchen, especially when I’m feeling snacky but want to avoid the usual potato chip temptation. Over the years, I’ve played around with different seasonings and toppings. One particularly memorable baking session involved an accidental flour cloud in my kitchen when I was trying to add a pinch of cayenne for spice. The kitchen turned into a mini flour explosion! While that batch didn’t turn out exactly as planned, we had a hearty laugh, and those chips still found their way onto our movie night platter.
What I love most about these carrot chips is how versatile and forgiving they are. Don’t sweat it if you burn a batch or two—each experience sharpens your skills!
FAQs and Troubleshooting
-
Why are my carrot chips soggy?
- This usually happens due to excess moisture. Make sure the carrot slices are as thin as possible and pat them dry with a paper towel before tossing them in oil.
-
Can I store leftovers?
- Although best enjoyed fresh, you can keep leftover chips in an airtight container for up to a day. Reheat them briefly in the oven to restore some crispiness.
-
Can I use baby carrots?
- Absolutely! Just slice them thinly, as they tend to be a bit thicker. You may need to adjust the baking time accordingly.
-
What’s the best way to cut the carrots?
- A mandoline slicer is ideal for uniform thickness. If you don’t have one, just use a sharp knife, and try your best to keep the slices even.
Nutritional Info (Optional)
Carrot chips are not only delicious but semi-nutritious too! Here’s a quick overview per serving (based on about one medium carrot):
- Calories: ~50 (with olive oil)
- Carbohydrates: ~10g
- Fat: ~3g (mostly heart-healthy fats from olive oil)
- Fiber: ~2g
- Vitamin A: High (great for vision and skin health!)
There you have it—your ultimate guide to making homemade carrot chips! Now put on that ivory apron, get creative, and let those crunchy delights inspire joy in your kitchen. Happy cooking!
PrintHomemade Carrot Chips

Deliciously crunchy oven-baked carrot chips that are a guilt-free snack option.
- Prep Time: 10 minutes
- Cook Time: 20 minutes
- Total Time: 30 minutes
- Yield: 2 servings 1x
- Category: Snack
- Method: Baking
- Cuisine: American
- Diet: Vegan
Ingredients
- 2–3 medium Carrots
- 1–2 tablespoons Olive Oil
- Salt to taste
- Seasonings of choice (e.g., garlic powder, smoked paprika, chili powder)
- Parmesan Cheese (optional)
Instructions
- Preheat your oven to 400°F (200°C).
- Prepare the carrots by washing and peeling them, then slice thinly, about 1/8 inch thick.
- Toss the carrot slices with olive oil in a mixing bowl, ensuring they’re well-coated.
- Season the carrots with salt and your choice of seasonings, mixing well.
- Arrange the slices in a single layer on a lined baking sheet, avoiding overlap.
- Bake for about 15-20 minutes, checking occasionally for doneness.
- Cool for a few minutes on the baking sheet to enhance crispiness.
- Serve the chips on a dish, sprinkling with Parmesan if desired.
Notes
These carrot chips make a versatile snack and can be paired with dips like hummus or tzatziki.
Nutrition
- Serving Size: 1 serving
- Calories: 50
- Sugar: 3g
- Sodium: 150mg
- Fat: 3g
- Saturated Fat: 0g
- Unsaturated Fat: 3g
- Trans Fat: 0g
- Carbohydrates: 10g
- Fiber: 2g
- Protein: 1g
- Cholesterol: 0mg
Keywords: carrot chips, healthy snacks, oven-baked snacks, vegetable chips
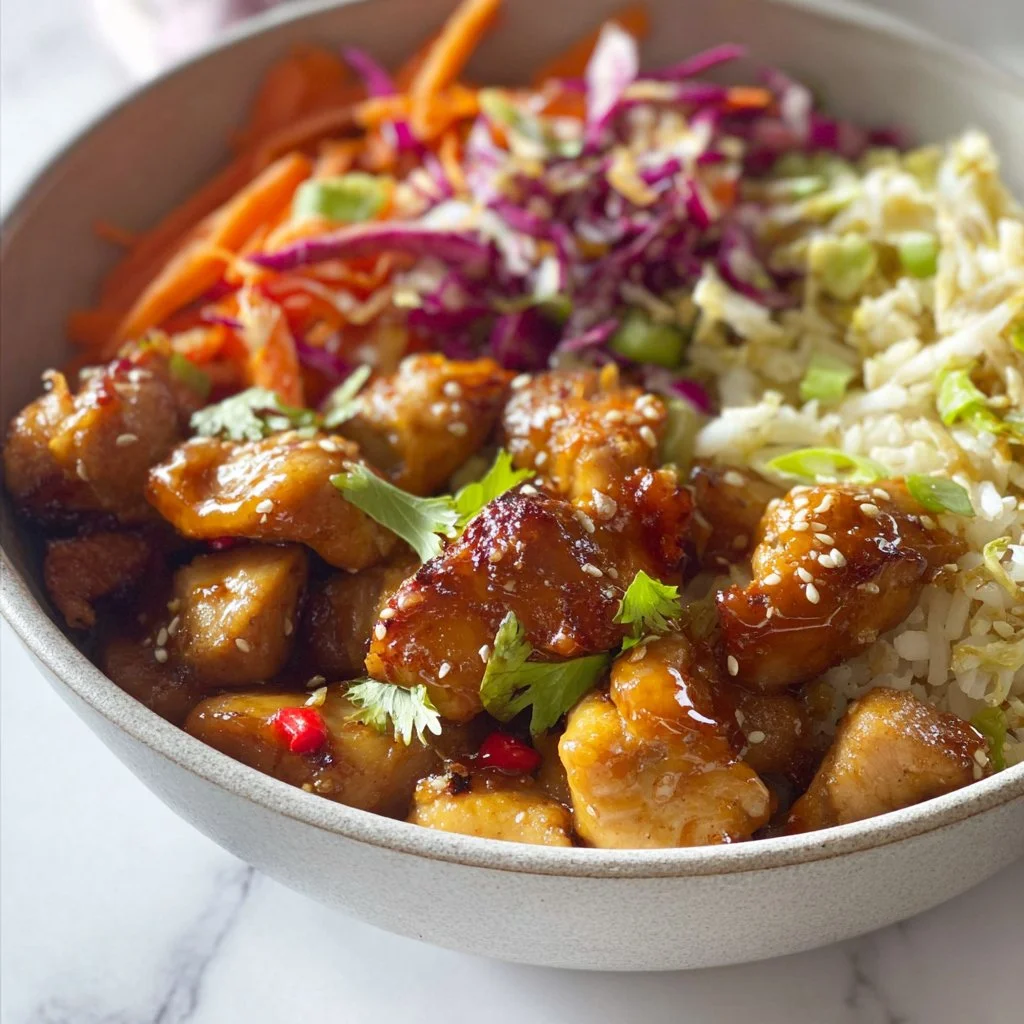
Honey Chicken Bowl
Honey Chicken Bowl: A Delightful Dish to Gather Around
Hello, my friends! Welcome back to Ivory Apron, where we’re all about cooking with grace and ease. Today, I’m excited to share a recipe that has captured our hearts and taste buds: the Honey Chicken Bowl. This dish is not just a recipe; it’s a celebration of fresh ingredients, vibrant flavors, and the joy of gathering around the table with loved ones.
Imagine this: tender chicken, glazed with a sweet and sticky honey sauce, resting on a bed of fresh greens, topped with colorful veggies, and finished with creamy avocado. How delightful does that sound? This bowl is perfect for any occasion—to elevate a weeknight dinner or impress friends at a gathering. Whether you’re looking for something light and refreshing or a dish packed with flavor, the Honey Chicken Bowl has got you covered.
The best part of this bowl is how easily it comes together. In less than 30 minutes, you can transform simple ingredients into a dish that feels gourmet yet approachable. I’m all about creating meals that look polished while still being achievable—even for a novice chef! So grab your apron, and let’s dive into this delightful recipe!
Personal Story
Every time I make this Honey Chicken Bowl, I’m taken back to a sunny afternoon spent in my grandmother’s kitchen. I can still picture her cooking with love, humming to her favorite tunes while preparing something magical. One day, she decided to serve us her honey-glazed chicken. We gathered at the table outside, with laughter ringing in the air and the aroma wafting from the kitchen like a warm hug.
The sun’s rays danced on our plates as I took my first bite. The sweetness of the honey paired perfectly with the savory chicken; it was like a warm embrace for my taste buds. We all sat around the table, sharing stories and enjoying life’s simplest pleasures. That memory has stuck with me and shaped my cooking philosophy: food should be enjoyed, shared, and celebrated—just like our time together.
Creating this Honey Chicken Bowl today feels like an homage to those sunny afternoons and shared laughter. And I hope it brings you and your loved ones together just as it did for me.
Ingredients
Here’s what you’ll need to whip up this flavorful Honey Chicken Bowl. Remember, quality ingredients make all the difference—so let’s dive into this list!
-
2 chicken breasts
A great source of protein, chicken breasts provide a lean, juicy base for our dish. If you have a favorite cut, feel free to swap it out. Boneless thighs work beautifully, too! -
2 tablespoons honey
The star of the show! Honey adds that sweet, sticky glaze that makes this dish shine. If you’re looking for a substitute, you can use maple syrup for a unique flavor twist. -
1 tablespoon soy sauce
This tangy, salty sauce brings depth to the dish. For a gluten-free option, tamari is a solid choice. You could also use coconut aminos for a lighter, sweeter taste. -
1 tablespoon olive oil
This healthy fat helps achieve a lovely sear on the chicken. If you’re not an olive oil fan, avocado oil is a great substitute. -
Salt and pepper to taste
Never underestimate the power of seasoning! Use freshly cracked black pepper for an aromatic punch, and adjust the salt according to your preference. -
Mixed greens (spinach, arugula)
A vibrant base for our bowl! You can mix it up with kale or romaine for additional crunch. -
Cherry tomatoes, halved
Juicy and sweet, they brighten up the plate. If they’re out of season, regular tomatoes will do just fine—just chop them into bite-sized pieces. -
Cucumber, sliced
Cool and refreshing, cucumber adds a delightful crunch. If you want a twist, try pickled cucumbers for an extra zing! -
Avocado, diced
Creamy and rich, avocado provides that perfect balance to the honey chicken. If you have avocados that aren’t ripe yet, substituting a dollop of Greek yogurt can also add creaminess.
Step-by-Step Instructions
Now, let’s roll up our sleeves and get cooking! Follow these steps, and you’ll have your Honey Chicken Bowl ready in no time.
Step 1: Prepare the Chicken
- Start by patting the chicken breasts dry with paper towels—this helps achieve a nice, golden-brown crust.
- Season both sides of the chicken with salt and pepper. Don’t skimp on this step, as it layers the flavor beautifully!
- Heat a large skillet over medium-high heat and add 1 tablespoon of olive oil. Allow it to get hot, which should take about 1-2 minutes.
Chef Tip: The key here is to not overcrowd the pan. Cook one or two pieces at a time if you’re making more than two. This way, the chicken can sear rather than steam!
Step 2: Cook the Chicken
- Gently place the chicken in the hot skillet. Sear on one side for about 5-7 minutes without moving it, which allows that lovely golden crust to form.
- Once it’s beautifully browned, flip the chicken and cook for another 5-7 minutes until the internal temperature reaches 165°F (75°C). This ensures it’s fully cooked and safe to eat.
Chef Hack: Use a meat thermometer for perfect results every time. And if you want to add some flair, toss in a sprig of fresh rosemary or thyme while cooking for an aromatic surprise!
Step 3: Make the Honey Sauce
- While the chicken cooks, let’s whip up the honey sauce! In a small bowl, mix 2 tablespoons of honey with 1 tablespoon of soy sauce. Stir well until combined.
- Once the chicken is fully cooked, drizzle the honey sauce over it, allowing it to caramelize for a minute or two (trust me, this is heavenly!). Gently coat the chicken to ensure every bit is glazed.
Step 4: Assemble the Bowl
- Remove the chicken from the skillet and let it rest on a cutting board for about 5 minutes. Resting helps to keep those juices locked in!
- Meanwhile, prepare your bowl: Start with a generous handful of mixed greens as the base. It’s like a garden on your plate!
Presentation Tip: Layer the greens to make it visually engaging—think about alternating the colors and textures!
-
Slice the honey-glazed chicken and place it on top of the greens. You want to show off its beautiful color and glistening glaze!
-
Now, add your halved cherry tomatoes, sliced cucumber, and diced avocado, arranging them artfully around the chicken.
Serving Suggestions
When it comes to plating, remember, it’s all about inviting that homey feeling. Serve the Honey Chicken Bowl in deep, wide bowls to showcase the beautiful colors of your ingredients. Finish with a light drizzle of olive oil and a sprinkle of freshly cracked black pepper for that finishing touch. Trust me; your guests won’t be able to resist diving in!
Recipe Variations
Feel free to make this Honey Chicken Bowl your own! Here are some fun variations:
- Grilled Version: Fire up the grill for a smoky flavor—season the chicken and cook it on the grill for that barbecue vibe.
- Spicy Twist: Add a dash of sriracha or chili flakes to the honey sauce if you like a kick of heat!
- Sweet Potato Swap: Replace the chicken with roasted sweet potato for a delightful vegetarian option.
- Grains Galore: Serve it over a bed of quinoa or brown rice to make it heartier.
- Nutty Crunch: Sprinkle some toasted almonds or sesame seeds on top for added crunch!
Chef’s Notes
As with any recipe, this Honey Chicken Bowl has a life of its own in my kitchen. It all started from that sweet afternoon with my grandmother, but over the years, I’ve made countless variations. Some days I’ll toss in seasonal veggies—like bell peppers or radishes—while other times, it’s all about the greens! The dish has evolved, but its essence remains the same: creating something deliciously beautiful that brings loved ones together.
Funny Moment: One time, I misread the labels and grabbed a bottle of balsamic vinegar instead of soy sauce! Let’s just say, the flavor turned out to be, well, interesting. But that’s part of the fun—embracing the mishaps in the kitchen!
FAQs and Troubleshooting
1. How do I know when the chicken is fully cooked?
Use a meat thermometer to ensure your chicken reaches an internal temperature of 165°F (75°C). If you don’t have one, color is key—the meat should be white all the way through and the juices should run clear.
2. What can I do if my chicken isn’t browning?
Ensure your skillet is hot enough before adding the chicken. A hot pan will create a lovely crust. If it’s not browning, try cooking it for longer on each side without moving it around too much.
3. Can I make this dish ahead of time?
Absolutely! You can cook the chicken and prepare the veggies earlier in the day. Just combine everything right before serving to keep the veggies fresh and crisp.
4. I want to make this dish vegetarian—what should I substitute for the chicken?
You can easily swap the chicken for grilled tofu, chickpeas, or roasted sweet potatoes for a hearty vegetarian option. Just season everything well to ensure those flavors shine!
Nutritional Info
Note: Nutritional values may vary based on ingredient choices and portion sizes:
- Calories: Approximately 450 per serving
- Protein: 30g
- Fat: 20g
- Carbohydrates: 30g
There you have it—a delightful recipe to create memories around the table! The Honey Chicken Bowl is perfect for any occasion and evokes that warm, inviting feeling every time you take a bite. Let’s gather, enjoy, and create lasting memories. Tie on your apron, pour something bubbly, and let’s get cooking! Happy culinary adventures, my friends!
Thank you for joining me today! I’m thrilled to embark on this cooking journey with you. Let me know how your Honey Chicken Bowl turns out or any variations you try! Happy cooking!
PrintHoney Chicken Bowl
A delightful dish featuring tender chicken glazed with honey, served over fresh greens and topped with colorful veggies and creamy avocado.
- Prep Time: 10 minutes
- Cook Time: 20 minutes
- Total Time: 30 minutes
- Yield: 4 servings 1x
- Category: Main Course
- Method: Searing
- Cuisine: American
- Diet: Gluten-Free
Ingredients
- 2 chicken breasts
- 2 tablespoons honey
- 1 tablespoon soy sauce
- 1 tablespoon olive oil
- Salt and pepper to taste
- Mixed greens (spinach, arugula)
- Cherry tomatoes, halved
- Cucumber, sliced
- Avocado, diced
Instructions
- Prepare the chicken by patting it dry with paper towels and seasoning it with salt and pepper.
- Heat a large skillet over medium-high heat and add 1 tablespoon of olive oil.
- Place the chicken in the skillet and sear for 5-7 minutes on one side.
- Flip the chicken and cook for another 5-7 minutes until fully cooked.
- Mix honey with soy sauce in a bowl while the chicken is cooking.
- Drizzle the honey sauce over the chicken and allow it to caramelize for a minute or two.
- Remove the chicken from the skillet and let it rest for 5 minutes.
- Assemble the bowl with mixed greens, sliced chicken, cherry tomatoes, cucumber, and avocado.
Notes
Feel free to add seasonal veggies or substitute chicken with grilled tofu or chickpeas for a vegetarian option.
Nutrition
- Serving Size: 1 bowl
- Calories: 450
- Sugar: 10g
- Sodium: 600mg
- Fat: 20g
- Saturated Fat: 3g
- Unsaturated Fat: 12g
- Trans Fat: 0g
- Carbohydrates: 30g
- Fiber: 4g
- Protein: 30g
- Cholesterol: 70mg
Keywords: honey chicken, healthy bowl, quick dinner, gluten-free, summer recipes