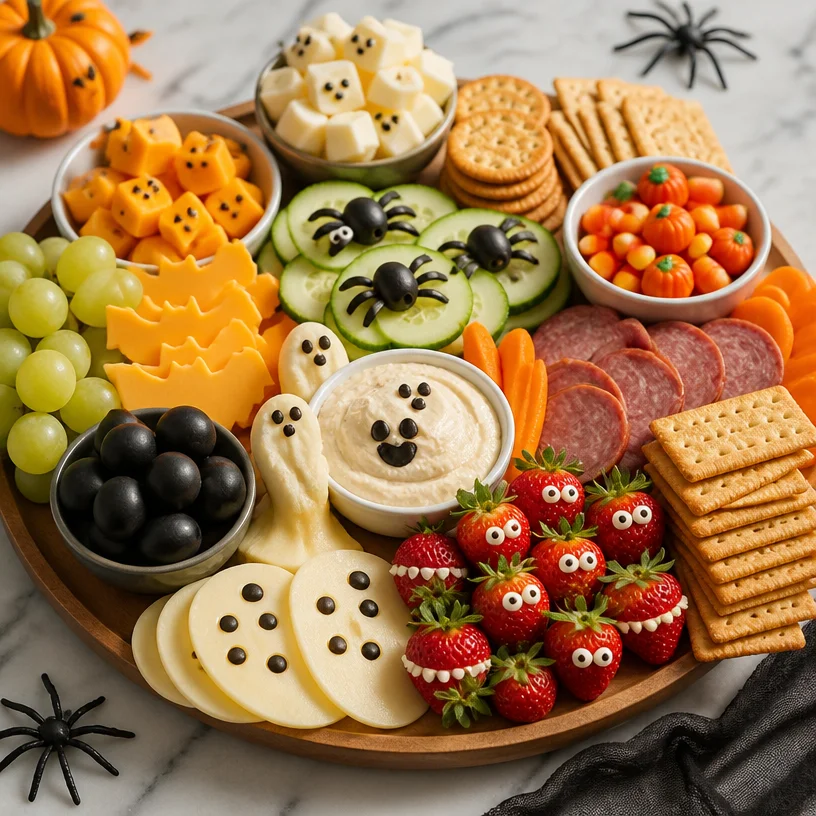
Minute Halloween Snack Board for Spook-tacular Parties
Spooktacular Snacking: Your Guide to Creating the Ultimate Halloween Snack Board
As the air turns crisp and the leaves start to dance in a kaleidoscope of colors, the anticipation of Halloween fills the air. It’s that magical time of year when costumes come alive, laughter echoes, and the sweet scent of candy wafts through the neighborhood. But what really brings everyone together during this festive season? Delicious snacks and sharing spooky stories around the table! That’s where the Halloween Snack Board comes in, and I can’t wait to share my secrets on how to create your own enchanting spread.
Imagine a beautifully arranged board filled with vibrant fruits, crunchy vegetables, delectable cheeses, and, let’s not forget, a touch of candy for that sweet kick. Not only does it look fabulous, but it also caters to all taste buds and dietary preferences. And the best part? Constructing this board is as much about creativity and enjoyment as it is about the food itself. Whether you’re hosting a spooky gathering or simply want to treat the kids after their trick-or-treating adventure, this Halloween Snack Board is your ticket to a festive feast that’s simple yet stunning.
Pull on your apron and join me in this culinary adventure as we craft the ultimate Halloween Snack Board that’s sure to impress — let’s set the stage for a frightfully good time!
A Taste of Nostalgia
I’ll never forget the first Halloween gathering I hosted at my home. It was a crisp October evening, and the scent of freshly baked pumpkin bread filled the air. I wanted to create a centerpiece that would capture the spirit of the season, so I decided to craft a snack board. I fondly recall the laughter and chatter that surrounded the table as friends dug in, sneaking candy while grabbing veggies and swapping ghost stories. It was a moment that sparked my love for effortless entertaining — all thanks to a simple board brimming with seasonal snacks.
Over the years, I’ve refined the idea, incorporating seasonal themes, vibrant colors, and a variety of textures. I love how a snack board invites everyone to nibble and chat while they create their own perfect bite. It became a staple for every Halloween, and I’m excited to share it with you — and trust me, you’ll want to make it a tradition in your home too!
Ingredients
Let’s dive into what you’ll need to create your magnificent Halloween Snack Board. Feel free to customize it based on your guests’ tastes, allergies, and preferences:
-
Fruits: Choose seasonal fruits like apple slices, grapes, or clementines. They add a burst of color and sweetness! Want a Halloween twist? Use a cookie cutter to shape apple slices into spooky figures, or make clementines look like mini pumpkins by adding a green stem with a piece of celery.
-
Vegetables: Carrot sticks, cucumber slices, and assorted bell peppers bring crunch and freshness. Experiment with fun shapes, like turning cucumber slices into little ghosts with a bit of edible marker or cream cheese for eyes.
-
Cheese: Select a variety of cheeses — perhaps sharp cheddar, creamy brie, or a spooky black cheese like aged gouda for a unique flavor profile. Need a replacement? Consider vegan cheese or a nut-based option for a dairy-free version.
-
Crackers: Offer a crunchy contrast with whole grain, herb-infused, or gluten-free crackers. Flatbreads can also provide a rustic touch; try serving them cut into shapes for that extra festive flair!
-
Candy: Make sure to include a selection of candies for that sweet element. Think chocolate-covered pretzels, gummy worms, or even festive candy corn. Feel free to swap in healthier options like dark chocolate-covered almonds or dried fruits for a satisfying crunch.
Step-by-Step Instructions
Now that we have our ingredients, it’s time to start assembling that stunning Halloween Snack Board! Here’s how to put it together with some tips along the way:
-
Choose Your Base: Start with a large wooden board, a platter, or even a fun Halloween-themed tray. The size will depend on how many guests you’re expecting. I love to use something rustic, as it adds an inviting touch to the table.
-
Select Your Layout: Before you start placing items, take a moment to envision how you want your board to look. Do you want clusters of colors, or would you prefer a more organized layout? It’s up to you! Create sections for each type of ingredient.
-
Place the Cheeses: Begin by placing your cheeses on the board. Cut a few slices of each and arrange them in a way that makes them easily accessible. I often pile the soft cheeses high to create height and interest.
-
Add the Fruits: Next, fill in the gaps with fruits. Scatter apple slices, grapes, and those adorable clementines around the cheeses. Want to make it extra special? Use a melon baller to create little fruit balls for easy snacking!
-
Incorporate the Vegetables: It’s time for those vibrant veggies. Arrange the carrot sticks, cucumber slices, and bell pepper strips in a way that complements the colors of the fruits. A simple tip: group colors together for a visually striking presentation.
-
Add Crackers: Now for the crackers — place them alongside the cheeses so guests can easily grab them. You might stand them upright in a jar for a fun touch or create a little stack. This also encourages guests to build their perfect bite!
-
Fill in With Candy: Finally, it’s time for the sugar rush! Nestle candy around the board — keep it within reach, but make sure it doesn’t overpower the other sections. You don’t want your guests to forget the array of deliciousness surrounding those sweets!
-
Final Touches: Once everything is in place, finish your board with fresh herbs for garnish. Rosemary sprigs or parsley can add a beautiful touch of green! It’s like the cherry on top for a snack board that is both Instagram-ready and mouthwatering.
Serving Suggestions
Now that your stunning Halloween Snack Board is ready, how do you get guests to dig in? One idea is to place some cute personalized labels next to each section, adding a lighthearted touch with funny names like “Witches’ Veggies” or “Goblin Grapes.” You can present it on a table with flickering candles or fairy lights to enhance the enchanting atmosphere. Encourage your guests to build their own plates, mixing and matching flavors. Trust me, it’s all about creating those interactive moments that leave everyone feeling connected and satisfied!
Recipe Variations
Here’s where the fun really starts! Don’t hesitate to mix things up. Here are a few creative twists to consider:
-
Themed Color Board: Stick to a color theme, such as all orange and black items, to boost your Halloween spirit!
-
Savory Bites Board: Swap out fruit for more savory elements like olives, sun-dried tomatoes, or charcuterie. Perfect for adults!
-
Dessert-Driven Board: Opt for all candies and sweet treats, including brownies, cookies, and chocolate-covered strawberries for those who have a major sweet tooth.
-
Kid-Friendly Board: For little ones, include peanut butter-filled crackers, sliced bananas, and yogurt dips to keep things playful and delicious.
-
Vegan-Friendly Board: Substitute everything with plant-based options like hummus, vegetable chips, coconut yogurt, and vegan cheese.
Chef’s Notes
One of the most exciting things about creating a snack board is witnessing how it evolves with each gathering. I have fond memories of guests chatting and laughing, their plates brimming with color and flavor variations. I once hosted a Halloween party where each guest contributed a "spooky" snack of their own, resulting in the most eclectic and delicious spread! Sharing that experience opened my kitchen to a world of creativity and connection, reminding me of why I adore cooking and entertaining.
FAQs and Troubleshooting
Q: Can I make my snack board ahead of time?
Absolutely! You can prep most of the ingredients a day in advance. Just keep everything covered and stored well in the fridge, and toss it all together just before serving. I recommend storing cut fruits and veggies in airtight containers to preserve freshness.
Q: What if my guests have allergies or dietary restrictions?
That’s no problem! Just ensure you inquire about any dietary preferences beforehand and incorporate a variety of options. The beauty of a snack board is that it can cater to everyone!
Q: How can I keep my fruits from browning?
A simple trick is to toss apple slices in a mixture of water and lemon juice before arranging them on the board. This helps to keep their vibrant color while retaining their crunch.
Q: What should I serve as a dip?
Consider including a couple of dips, such as hummus, ranch dressing, or guacamole. Not only do they add flavor, but they also provide a fun interactive element as guests scoop and spread!
Nutritional Info
While creating a snack board is all about enjoyment and celebration, it’s always nice to be mindful. Here’s a rough estimate of what a serving might look like:
- Calories: Approximately 250-300 (depending on portion sizes and specific ingredients used)
- Protein: Varies based on cheese and meat choices
- Carbohydrates: Varies based on crackers and fruits
- Fiber: Fruits and vegetables provide a nice fiber boost
Remember, the nutritional aspect comes second to the joy of gathering with loved ones and creating beautiful memories around your Halloween Snack Board.
So there you have it! A complete guide to constructing the ultimate Halloween Snack Board that is sure to delight your guests, fuel laughter, and fill your home with warmth and holiday spirit. I can’t wait to see how your boards turn out, so don’t forget to share your creations with me! Happy snacking and enjoy a spooktacular Halloween!
PrintHalloween Snack Board
Create a festive and colorful Halloween Snack Board filled with seasonal fruits, crunchy vegetables, delicious cheeses, and sweet treats.
- Prep Time: 30 minutes
- Cook Time: 0 minutes
- Total Time: 30 minutes
- Yield: 8 servings
- Category: Appetizer
- Method: No-Cook
- Cuisine: American
- Diet: Vegetarian
Ingredients
- Seasonal fruits: apple slices, grapes, clementines
- Vegetables: carrot sticks, cucumber slices, assorted bell peppers
- Cheese: sharp cheddar, creamy brie, aged gouda
- Crackers: whole grain, herb-infused, gluten-free
- Candy: chocolate-covered pretzels, gummy worms, candy corn
Instructions
- Choose Your Base: Start with a large wooden board or platter.
- Select Your Layout: Decide on clusters of colors or sections for each ingredient.
- Place the Cheeses: Arrange your cheeses to make them easily accessible.
- Add the Fruits: Scatter fruits around the cheeses, using a melon baller if desired.
- Incorporate the Vegetables: Arrange vibrant veggies to complement the fruits’ colors.
- Add Crackers: Place them alongside cheeses for easy grabbing.
- Fill in With Candy: Nestle candy around the board without overpowering it.
- Finish with Fresh Herbs: Add decorative herbs for garnish.
Notes
Customize the board based on guests’ tastes and dietary restrictions. Consider including dips for added flavor.
Nutrition
- Serving Size: 1 serving
- Calories: 275
- Sugar: 15g
- Sodium: 300mg
- Fat: 10g
- Saturated Fat: 5g
- Unsaturated Fat: 3g
- Trans Fat: 0g
- Carbohydrates: 36g
- Fiber: 5g
- Protein: 8g
- Cholesterol: 20mg
Keywords: Halloween snack board, party food, festive snacks, seasonal fruits, vegetable platter