
No-Pectin Plum Jam in 30 Minutes: Peel-Free & Easy
Homemade Plum Jam Without Pectin: A Sweet, Simple Recipe
Hello, fellow food lovers! Today, I’m excited to share with you one of my all-time favorite recipes: plum jam made without pectin. Yes, you heard that right! This recipe is not only wonderfully easy, but it also celebrates the natural goodness of ripe plums. Trust me; this jam will leave your kitchen smelling divine and your taste buds dancing with delight. So grab your apron, and let’s dive into a culinary adventure filled with sweetness—and no peeling necessary!
A Taste of Nostalgia
Growing up, summers were a magical time filled with the comforting scent of fruit wafting through the air. My grandma had this old plum tree in her backyard—it produced the juiciest plums you could imagine! I still remember those long summer afternoons, picking plums with my cousins, the sun shining down on us, and laughter echoing around the yard. We would gather buckets full of fruit, which soon became the centerpiece of our family kitchen.
The highlight of those summers was definitely the day we would spend making jam. Standing beside my grandma, I watched as she turned those ripe plums into jars of sunshine that we would savor all year long. She never used pectin, believing the plums had enough natural pectin to create a perfect balance of sweetness and tartness. And oh, how I loved slathering that homemade jam over warm toast, hearing the pop of each jar as we sealed them up. Today, I’m excited to share that same joy with you, minus the peeling—because who has time for that?
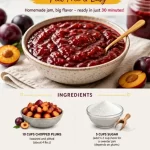
Ingredients
To create this delightful plum jam, you’ll need the following ingredients:
-
10 cups of ripe plums (washed and pitted; about 4 lbs.): The star of the show! Choose plums that yield slightly when you press them, indicating they’re ripe and juicy. Optional: Korean or Italian plums work beautifully!
-
5 cups of granulated sugar: This helps to sweeten the jam and act as a preservative. Want it sweeter? Feel free to add an extra ½ to 1 cup of sugar! Remember, the sweetness of plums can vary, so taste-testing is key.
Quick Chef Insights on Ingredients:
- Plums: You can substitute other stone fruits like peaches or apricots if you’re feeling adventurous.
- Sugar: If you want to experiment, try using brown sugar for a caramel note, or even honey for a unique flavor twist. Keep in mind that honey has a different sweetness profile, so adjust accordingly!
Step-by-Step Instructions
Ready to start cooking? Let’s walk through the simple steps to jam-making bliss:
-
Prepare the Plums: First things first, take your gorgeous plums and chop them into quarters—no need to peel! Place the chopped plums into a large pot. If you encounter any pits, make sure to remove them, as we want nothing but sweet fruit goodness.
-
Add Sugar: Sprinkle the sugar evenly over the plums in the pot. Gently stir to combine. Let this mixture sit for about 30 minutes. What’s happening here? This resting period allows the plums to release their juices and creates a lovely syrup!
-
Cook Over Medium Heat: After 30 minutes, place your pot on the stove over medium heat. Stir occasionally, and watch as the sugar dissolves and the plums soften. This process will take about 15-20 minutes. You may notice some foaming; just skim it off if it bothers you!
-
Mash and Simmer: Once your plums have softened, grab a potato masher (or an immersion blender if you like your jam smoother) and mash to your desired consistency. I like mine a little chunky for that rustic feel! Continue to simmer the jam for about 20-30 minutes, allowing it to thicken. Remember, it’ll continue to set as it cools.
-
Test for Doneness: If you’re unsure if your jam is ready, do the “plate test.” Spoon a little jam onto a chilled plate, let it sit for about a minute, then run your finger through it. If it holds its shape and doesn’t run back together—voilà, you’re ready to jar it up!
-
Can Your Jam: Sterilize your jars by boiling them in water for 10 minutes. Remove them carefully, and while they are still hot, fill with the jam, leaving about ¼ inch of headspace. Wipe the rims with a clean cloth to ensure a proper seal, then screw on the lids tightly. Optional: You can process the jars in a water bath for 10 minutes if you want long-term preservation.
Congratulations! You’ve got yourself some delicious, homemade plum jam!
Serving Suggestions
Let’s talk about presentation—no jam deserves to be hidden away! Pour your luscious plum jam into a cute little jar and tie it up with a twine bow for that charming touch. Serve with warm, crusty bread, scones, or a delightful cheese platter. It’s also fantastic as a filling for pastries or drizzled over yogurt for breakfast. Just remember to keep tasting—it’s too good not to!
Recipe Variations
Feeling creative? Here are a few variations to keep your jam exciting:
-
Spiced Plum Jam: Add a cinnamon stick or some cloves while cooking for a warm, spiced flavor.
-
Zesty Plum Jam: Throw in some grated lemon or orange zest for a refreshing citrus kick.
-
Herbed Plum Jam: Consider adding fresh rosemary or thyme. Trust me; it’s a flavor explosion!
-
Stone Fruit Medley: Combine plums with peaches or apricots for a fruit jam with an extra depth of flavor.
-
Less Sugary: Use a sugar substitute like stevia or monk fruit for a lower-sugar version, but be sure to read the instructions to ensure proper sweetness levels.
Chef’s Notes
This recipe has become a staple in my kitchen over the years. The beauty of making jam without pectin is that it’s forgiving—it allows you to experiment and adjust to your taste with each batch. One summer, I went a little wild and threw in some leftover berries! Oh, the glorious result had us spreading berry-plum goodness on everything.
And here’s a funny tidbit: the first time I tried making jam as a teenager, I got so distracted by a phone call that I missed the “plate test.” Let’s just say, my family had a rather syrupy surprise that year! Good thing I learned my lessons early on.
FAQs and Troubleshooting
-
Why didn’t my jam thicken?
- There are a few reasons: perhaps the plums weren’t ripe enough, or it didn’t cook long enough. If this happens, you can re-cook the jam with a bit of extra sugar until it reaches your desired thickness.
-
Can I use frozen plums?
- Absolutely! Just be sure to thaw them first before following the main recipe. You might need to adjust sugar depending on how tart they are once thawed.
-
How long will my jam last?
- If processed properly, sealed jars can last up to one year in a cool, dark place. Once opened, store in the refrigerator and consume within a few weeks.
-
What’s the best way to serve my jam?
- My personal favorite is on warm croissants, but feel free to explore! Try it on almond butter toast or mixed into oatmeal for a flavor dynamo.
Nutritional Info
(Optional, based on serving size and preferences.)
Now that you’re well-equipped to make the most delightful plum jam ever, I can’t wait for you to try it! So gather those ingredients, channel your inner chef, and make some memories in the kitchen. Happy cooking, and remember—good food is all about showing up, enjoying the process, and sharing it with the ones you love. Cheers!
PrintHomemade Plum Jam Without Pectin
This easy recipe for plum jam celebrates the natural sweetness of ripe plums without the need for pectin.
- Prep Time: 30 minutes
- Cook Time: 50 minutes
- Total Time: 80 minutes
- Yield: 4 cups 1x
- Category: Condiment
- Method: Canning
- Cuisine: American
- Diet: Vegan
Ingredients
- 10 cups of ripe plums (washed and pitted; about 4 lbs.)
- 5 cups of granulated sugar
Instructions
- Prepare the plums by chopping them into quarters and placing them in a large pot.
- Add sugar evenly over the plums and stir gently, then let sit for 30 minutes.
- Cook over medium heat, stirring occasionally, for 15-20 minutes until sugar dissolves and plums soften.
- Mash the plums to your desired consistency and continue to simmer for 20-30 minutes to thicken.
- Test for doneness using the plate test; if it holds its shape, it’s ready.
- Can your jam by sterilizing jars and filling them while hot, ensuring proper seals.
Notes
Feel free to substitute other stone fruits or adjust the sugar for desired sweetness.
Nutrition
- Serving Size: 1 tablespoon
- Calories: 45
- Sugar: 11g
- Sodium: 0mg
- Fat: 0g
- Saturated Fat: 0g
- Unsaturated Fat: 0g
- Trans Fat: 0g
- Carbohydrates: 12g
- Fiber: 0g
- Protein: 0g
- Cholesterol: 0mg
Keywords: plum jam, homemade jam, fruit preserves, easy recipes