Nilla Wafer Banana Pudding Cups: A Sweet Nostalgic Delight
Hello, fellow food lovers! Today, we’re diving into a dessert that feels like a warm hug after a long day—Nilla Wafer Banana Pudding Cups. This delightful treat is perfect for any occasion, whether you’re hosting a cozy dinner party or simply craving a sweet bite on a Tuesday night. The balance of creamy vanilla pudding, fresh bananas, and the crunch of Nilla Wafers makes this dessert not just delicious but also a brilliant trip down memory lane.
A Personal Story: A Dessert That Brings Back Memories
I can still picture the summer afternoons of my childhood, sun filtering through the kitchen window, and the enticing aroma of freshly baked treats wafting through the air. My grandma, the ultimate hostess, was a magician in the kitchen, always whipping up something delightful just for us. One of my favorite memories centers around her legendary banana pudding. In her version, layers of ripe bananas, homemade vanilla custard, and crisp Nilla Wafers came together to create a sensational treat that was the highlight of any family gathering.
The best part? She often let me help! I was in charge of layering the bananas and wafers, which was a messy but fun job that always ended with a little pudding on my nose. As we spooned the pudding into cups, we would sneak bites when no one was looking (because who could resist?).
Years later, I still cherish that dish, and now, I’m bringing my own twist to the table with these Nilla Wafer Banana Pudding Cups. They’re a gorgeous tribute to my grandma’s recipe, with a simple yet elegant presentation that feels just right for today’s gatherings.
Ingredients
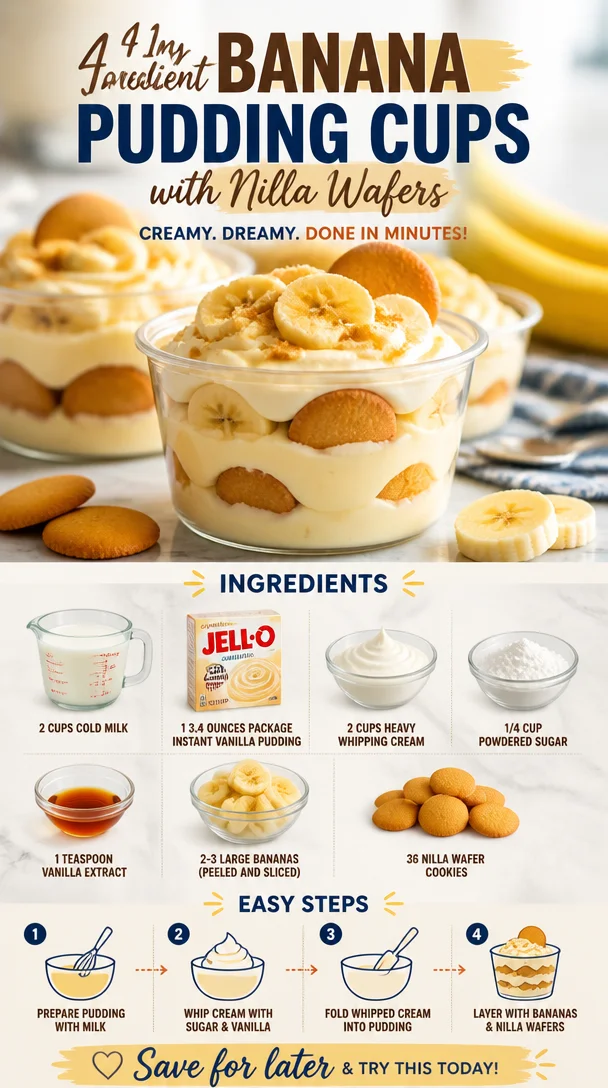
To whip up these delightful Nilla Wafer Banana Pudding Cups, you’ll need the following ingredients:
-
2 cups cold milk
The base for our pudding. Whole milk works best for a creamy texture, but you can substitute with almond milk or any other milk alternative if you want to lighten things up! -
1 (3.4 ounces) package instant vanilla pudding
This is your shortcut to creamy deliciousness. If you’re feeling adventurous, a homemade vanilla pudding can be a beautiful alternative, although it requires more time and attention. -
2 cups heavy whipping cream
Whipping cream gives a rich, luxurious feel to the pudding. If you’re looking for a lighter option, you can use half-and-half, but be cautious as it won’t whip as beautifully. -
1/4 cup powdered sugar
Sweetens up the whipped cream and pudding without grittiness. Feel free to adjust the amount based on your sweetness preference; you can even use coconut sugar for a less refined choice. -
1 teaspoon vanilla extract
A splash of pure vanilla extract takes the flavor up a notch. I always recommend sticking to pure extract rather than imitation for the best flavor. -
2-3 large bananas (peeled and sliced)
Ripe bananas are key; the sweeter and softer, the better. If you’re worried about browning, toss them in a little lemon juice after slicing! -
36 Nilla Wafer cookies
These little gems add the crunch and classic taste everyone loves. If you’re feeling adventurous, feel free to swap for a chocolate wafer or even almond cookies for a fun twist!
Step-by-Step Instructions
-
Prep the Pudding
In a large mixing bowl, pour in the cold milk. Gradually whisk in the instant vanilla pudding until smooth. Together, they’ll be the creamy base for your delicious cups. -
Whip the Cream
In another bowl, pour in the heavy whipping cream. Add in the powdered sugar and vanilla extract. Using an electric mixer, beat on medium-high speed until soft peaks form. This should take about 3-5 minutes. Make sure not to overbeat; you want it fluffy, but not too stiff! -
Combine
Gently fold the whipped cream into the pudding mixture using a spatula. Be careful not to deflate the whipped cream; we want all that airy goodness to stay intact! -
Prepare Your Cups
Now for the fun part! Grab your dessert cups or any small glasses you want to use. Start with a layer of Nilla Wafers on the bottom of each cup. Feel free to break some of them if they don’t fit! -
Layer the Pudding
Add a generous spoonful of the pudding mixture over the wafers, followed by a layer of banana slices. Repeat the layers—Nilla Wafers, pudding, bananas—until you reach the top, finishing with a dollop of pudding. -
Chill
Cover the cups with plastic wrap and refrigerate for at least 2 hours. If you can let them sit overnight, even better! This is when the flavors meld, and the cookies soften, creating a luscious treat. -
Top & Serve
Before serving, crush a few Nilla Wafers and sprinkle them on top. Feel free to add a small dollop of whipped cream if desired. You’ll end up with a gorgeous presentation that’s sure to impress guests!
Serving Suggestions
For plating, I love serving these Nilla Wafer Banana Pudding Cups on a rustic wooden platter, lined with fresh mint leaves for a pop of color. You could also sprinkle some crushed nuts or chocolate shavings on top for added flair. Either way, these cups will steal the show!
Recipe Variations
Here are a few fun twists to this classic recipe:
- Chocolate Lovers: Swap half of the vanilla pudding for chocolate pudding for a delightful chocolate-banana combo.
- Nutty Banana Bliss: Incorporate chopped walnuts or pecans in between the layers for a crunch!
- Coconut Cream Twist: Use coconut milk instead of regular milk and add shredded coconut into the pudding mixture.
- Add Some Spice: A pinch of cinnamon or nutmeg can add a warm tone to the pudding—perfect for autumn!
Chef’s Notes
This recipe is one that has evolved over time for me. I can’t tell you how many attempts I made trying to get the texture just right! I initially tried using regular whipped cream instead of heavy whipping cream, but the result was never as satisfying. You live and learn! And while my grandma’s version will always hold a special place in my heart, I love how these cups feel modern yet nostalgic. They’re a blend of everything I adore about cooking—comfort, family, and a touch of creativity!
FAQs and Troubleshooting
1. My pudding didn’t set properly! What went wrong?
This often happens if the milk wasn’t cold enough or if it wasn’t whisked enough with the pudding mix. Make sure both are really cold for the right consistency.
2. Are there alternatives to Nilla Wafers?
Absolutely! Try using oreo cookies for a cookies-and-cream twist, or even graham crackers for a classic flavor.
3. Can I make this ahead of time?
Yes! These pudding cups hold up well in the fridge. They’re actually better after a night in the fridge, so feel free to prep them the day before your event.
4. How do I keep my bananas from browning?
Tossing them in a splash of lemon juice is the easiest way to keep them looking fresh and vibrant!
Nutritional Info
While I’m not a nutritionist, it’s worth noting that this dessert does contain rich ingredients like heavy cream and sugar. For those tracking calories, an approximation per cup would be about 320-350 calories, depending on portion sizes and any variations you make. Enjoy in moderation, or make them specially for those “just because” moments!
So there you have it! Nilla Wafer Banana Pudding Cups that bring joy, nostalgia, and deliciousness to your table. Remember, cooking is all about sharing love and creating memories—so gather your people, tie on that apron, and let’s get to work. Happy cooking!
PrintNilla Wafer Banana Pudding Cups
A delightful dessert that combines creamy vanilla pudding, fresh bananas, and the crunch of Nilla Wafers, perfect for any occasion.
- Prep Time: 15 minutes
- Cook Time: 0 minutes
- Total Time: 135 minutes
- Yield: 6 servings 1x
- Category: Dessert
- Method: Chilling
- Cuisine: American
- Diet: Vegetarian
Ingredients
- 2 cups cold milk
- 1 (3.4 ounces) package instant vanilla pudding
- 2 cups heavy whipping cream
- 1/4 cup powdered sugar
- 1 teaspoon vanilla extract
- 2–3 large bananas (peeled and sliced)
- 36 Nilla Wafer cookies
Instructions
- Pour the cold milk into a large mixing bowl. Gradually whisk in the instant vanilla pudding until smooth.
- Add the heavy whipping cream to another bowl. Incorporate the powdered sugar and vanilla extract. Beat on medium-high speed until soft peaks form (about 3-5 minutes).
- Gently fold the whipped cream into the pudding mixture using a spatula.
- Grab your dessert cups and start layering Nilla Wafers on the bottom of each cup.
- Add a spoonful of pudding mixture over the wafers, followed by a layer of banana slices. Repeat layers until reaching the top.
- Cover the cups with plastic wrap and refrigerate for at least 2 hours, or overnight for best results.
- Before serving, crush a few Nilla Wafers and sprinkle them on top, optionally adding a dollop of whipped cream.
Notes
For plating, serve on a rustic wooden platter with mint leaves for color. Experiment with toppings like crushed nuts or chocolate shavings.
Nutrition
- Serving Size: 1 cup
- Calories: 350
- Sugar: 24g
- Sodium: 85mg
- Fat: 25g
- Saturated Fat: 15g
- Unsaturated Fat: 7g
- Trans Fat: 0g
- Carbohydrates: 35g
- Fiber: 1g
- Protein: 4g
- Cholesterol: 80mg
Keywords: banana pudding, dessert, Nilla Wafers, pudding cups, nostalgic dessert