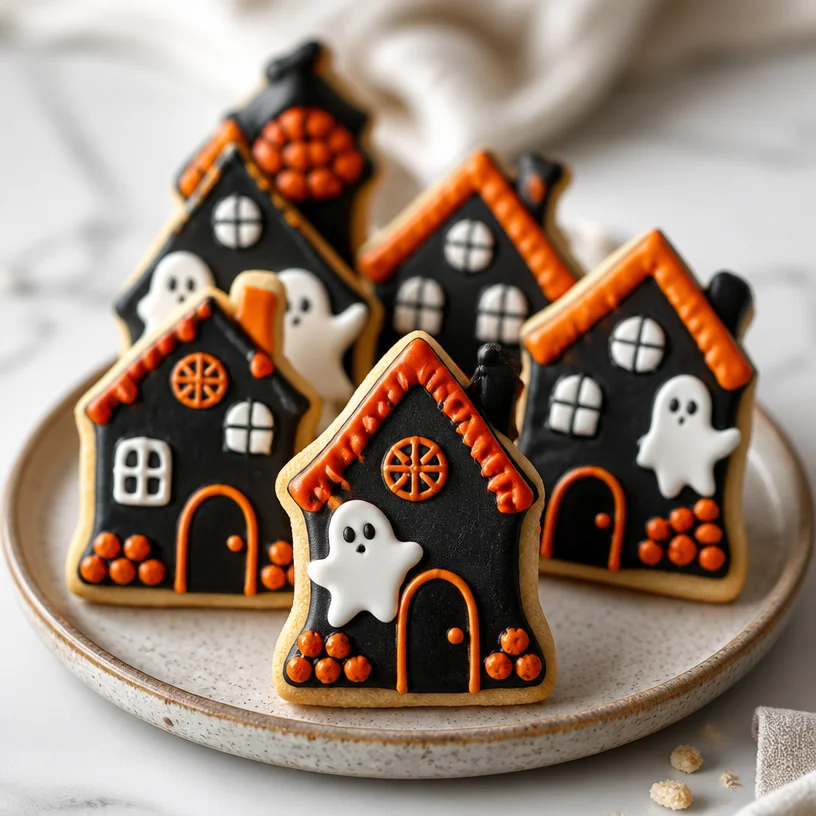
Spook-tacular Haunted House Cookies: A Treat for Your Halloween Gatherings!
Hello there, fellow food enthusiasts! As the leaves turn golden and the air gets that crisp bite, it’s time to channel our inner ghouls and goblins. If you’re anything like me, you can’t resist the seasonal charm that Halloween brings. Amongst the eerie decor and restless spirits, the real magic happens in the kitchen, and I have the perfect treat to elevate your spooky celebrations: Haunted House Cookies!
These aren’t just any cookies; they’re whimsical works of art that you and your little ghosts can create together. Picture this: ahouse made of delicious sugar cookies, drizzled with royal icing, and dusted with colorful sprinkles, all beckoning for a Halloween-themed gathering at your table. They’re ideal for crafting with kids, impressing your friends, or simply indulging your artistic spirit. Ready to get your mix on? Let’s dive into this delightful journey of baking!
A Whimsical Memory
Growing up, Halloween was my favorite holiday—not just because of the costumes and candies but because of the annual tradition of cookie decorating with my family. I can still recall the smell of sugar cookies baking in the oven, making the house feel warm and inviting, even when the weather outside was a bit frightful.
One crisp autumn evening, my mom and I decided to host a small gathering for my friends. We whipped up a massive batch of sugar cookie dough and rolled it out into all sorts of spooky shapes. Ghosts, tombstones, and of course, miniature haunted houses!
I remember the laughter as my friends and I got creative with icing; some cookies ended up looking like they came from a haunted nightmare, while others were surprisingly elegant! That magical night spent with family and friends over a table laden with colors, laughter, and stories is a sweet memory I carry with me. And today, I want to help you sprinkle some of that joy into your kitchen with these Haunted House Cookies!
Ingredients
Here’s what you’ll need to create your Haunted House Cookies:
-
Sugar Cookies
- These are the canvas of your cookie art! Their simplicity allows the decoration to shine through.
-
Royal Icing
- This icing is your magical glue and decorating medium. It hardens beautifully and is perfect for intricate designs. You can substitute it with buttercream icing if you prefer a softer frosting, but it won’t hold up quite as well for decoration.
-
Food Coloring
- Gel food coloring works best for bright, vibrant hues. You can get creative with shades of black, purple, and orange for that Halloween themed flair.
-
Sprinkles
- Think of sprinkles as the finishing touch or the festive confetti of your haunted houses. Without them, it’s like Halloween without a pumpkin—unthinkable!
-
Edible Decor (Candy Corn, Chocolate Chips, etc.)
- Use these to add some personality and charm to your haunted houses. They make for great windows, doors, and spooky decorations!
Step-by-Step Instructions
Grab your apron, pour yourself a spooky drink, and let’s get to baking these Haunted House Cookies!
-
Prepare the Sugar Cookie Dough
- In a large bowl, cream together softened butter and sugar until light and fluffy. (Tip: Using room temperature butter cream will ensure it mixes well and creates a light texture!)
- Mix in one egg and a splash of vanilla extract—trust me, this is the magic ingredient. Pro Tip: For an extra kick, you can add a dash of almond extract for a unique flavor!
-
Combine Dry Ingredients
- In a separate bowl, whisk together all-purpose flour, baking powder, and a pinch of salt. Gradually add this into the butter mixture until just combined. (Don’t overmix; it’s important for our cookies to be tender!)
-
Chill the Dough
- Divide the dough into two halves, wrap them in plastic wrap, and refrigerate for about 30 minutes. This step is crucial; it prevents the cookies from spreading too much while baking, keeping those beautiful shapes intact!
-
Preheat the Oven
- While the dough chills, preheat your oven to 350°F (175°C).
-
Roll Out the Dough
- Once chilled, on a floured surface, roll out the dough to about 1/4-inch thickness. Use cookie cutters to cut out spooky shapes! If you’re making haunted houses, use house-shaped cookie cutters.
-
Bake the Cookies
- Place the cookies on a parchment-lined baking sheet, giving them a little space to breathe. Bake for 8-10 minutes or until the edges are lightly golden. (Note: They’ll harden further while cooling!)
-
Cool the Cookies
- Transfer the cookies to a wire rack to cool completely. Patience, friends! You don’t want to ice warm cookies as they can melt your icing away.
-
Make the Royal Icing
- In a bowl, beat egg whites and powdered sugar until smooth and stiff peaks form. This can take a few minutes, but it’s worth the effort for that gorgeous hold. (Did you know you can use meringue powder as an egg white substitute? Perfect for those with egg allergies!)
-
Color the Icing
- Divide the icing into bowls and mix in your food coloring. For a traditional haunted house, try a spooky black, purple, and orange!
-
Decorate!
- Using piping bags, pipe outlines and details on your cookies. Don’t rush! The creative part is where the fun and stories come in. Let your imagination run wild—you might just create the next haunted cookie masterpiece!
Serving Suggestions
When it’s time to serve, gather your Haunted House Cookies on a charming platter and maybe even add a few floating candles for that spooky, enchanting ambiance. Dim the lights and let their glow highlight the edible artistry you’ve created.
For small gatherings, you can even create “cookie take-home bags” filled with a couple of decorated cookies for your guests—just tie them with a whimsical ribbon!
Recipe Variations
Now, if you’re looking to shake up the traditional haunted house vibe, here are a few creative twists:
- Gingerbread Houses: Use a gingerbread cookie recipe for a spicier twist that pairs wonderfully with icing.
- Gluten-Free Option: Substitute regular flour with a 1:1 gluten-free baking flour. Your cookies will still be tasty with an added crunch!
- Spooky Themed Flavors: Infuse your cookies with seasonal extracts, like pumpkin spice or maple, for a unique flavor experience.
- Fillings: Consider sandwiching your cookies with a layer of delicious pumpkin or gingerbread-flavored cream cheese filling. Treat yourself to that creamy goodness!
- Themed Toppers: Use different candies or edible glitter to decorate based on a theme—think “zombie apocalypse” or “witch’s brew”!
Chef’s Notes
These haunted house cookies bring back fond memories of Halloween, and over the years, I’ve expanded my decorating techniques and flavor profiles to keep the tradition alive. From my family’s kitchen to yours, these cookies have seen their fair share of spooky stories and laughs.
I can’t tell you how many Halloween parties I’ve attended with a batch of these cookies in tow, and it never fails—people love the creativity and fun that comes with decorating! Once, I brought to a party a cookie specifically designed to look like a creepy cat; let’s just say it garnered quite a few laughs and complements!
FAQs and Troubleshooting
Q: My cookies didn’t hold their shape. What went wrong?
A: This usually happens when the dough is too warm or isn’t chilled enough before baking. Make sure to chill the dough and keep your work surface floured.
Q: How can I achieve the perfect consistency for royal icing?
A: Aim for a flowy consistency that holds shape but isn’t too runny. If it’s too thick, add a tiny bit of water. If too runny, add more powdered sugar.
Q: How do I store my decorated cookies?
A: Allow the icing to dry completely before stacking or storing. Place them in an airtight container, and they can last for up to a week!
Q: Can I make these cookies in advance?
A: Absolutely! You can bake the cookies up to a week in advance and decorate them the day before your event.
Nutritional Info
While I believe good food should nourish the soul, it’s nice to keep track! One haunted house cookie roughly contains:
- Calories: 120 kcal
- Total Fat: 4 g
- Carbohydrates: 20 g
- Sugar: 10 g
- Protein: 1 g
Remember, enjoy in moderation—these cookies are certainly a treat worth every bite!
Onward to Spooky Delights!
Gather your family, your friends, or even whisk away your favorite little ghoul, and embark on this joyful baking adventure together. I promise that the laughter, creativity, and deliciousness are priceless. Wrap up your time crafting these Haunted House Cookies with a mug of hot cider or your favorite Halloween-themed drink.
Happy Halloween, my lovelies! May your days be filled with joy, creativity, and a sprinkle or two of magic. Until next time!
PrintHaunted House Cookies
Delightful sugar cookies shaped like haunted houses, perfect for Halloween gatherings!
- Prep Time: 30 minutes
- Cook Time: 10 minutes
- Total Time: 40 minutes
- Yield: 24 cookies 1x
- Category: Dessert
- Method: Baking
- Cuisine: American
- Diet: Vegetarian
Ingredients
- 3 cups all-purpose flour
- 1 cup unsalted butter, softened
- 1 cup granulated sugar
- 1 large egg
- 1 teaspoon vanilla extract
- 1/2 teaspoon almond extract (optional)
- 1 teaspoon baking powder
- 1/2 teaspoon salt
- 2 cups powdered sugar (for royal icing)
- 2 egg whites (or meringue powder)
- Gel food coloring (black, purple, orange)
- Sprinkles
- Edible decorations (candy corn, chocolate chips, etc.)
Instructions
- Prepare the Sugar Cookie Dough: In a large bowl, cream together softened butter and sugar until light and fluffy. Mix in one egg and a splash of vanilla extract; add almond extract if desired.
- Combine Dry Ingredients: In a separate bowl, whisk together flour, baking powder, and salt. Gradually add this to the butter mixture until just combined.
- Chill the Dough: Divide the dough in half, wrap in plastic, and refrigerate for 30 minutes.
- Preheat the Oven: While the dough chills, preheat your oven to 350°F (175°C).
- Roll Out the Dough: On a floured surface, roll out the dough to about 1/4-inch thickness and cut out spooky shapes.
- Bake the Cookies: Place them on a parchment-lined baking sheet, and bake for 8-10 minutes until edges are lightly golden.
- Cool the Cookies: Transfer to a wire rack to cool completely.
- Make the Royal Icing: Beat egg whites and powdered sugar until smooth and stiff peaks form.
- Color the Icing: Divide icing into bowls and mix in your food coloring.
- Decorate</strong!: Using piping bags, outline and detail your cookies creatively.
Notes
Allow the icing to dry completely before storing in an airtight container.
Nutrition
- Serving Size: 1 cookie
- Calories: 120
- Sugar: 10g
- Sodium: 50mg
- Fat: 4g
- Saturated Fat: 2g
- Unsaturated Fat: 1g
- Trans Fat: 0g
- Carbohydrates: 20g
- Fiber: 0g
- Protein: 1g
- Cholesterol: 30mg
Keywords: Halloween cookies, spooky treats, haunted house cookies