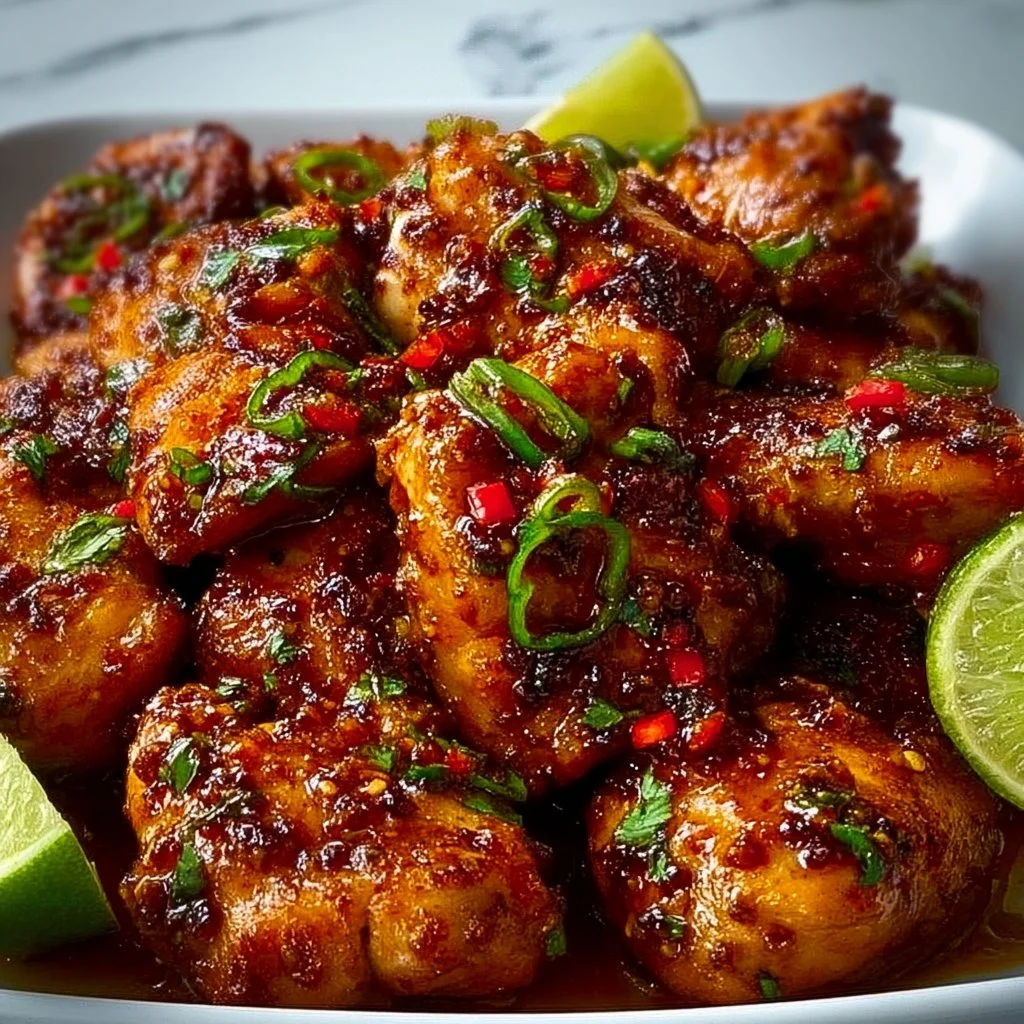
Vietnamese Lemongrass Chicken
Vietnamese Lemongrass Chicken: A Flavorful Journey to Your Table
Hello, fellow food enthusiasts! Today, I’m excited to share one of my all-time favorite recipes: Vietnamese Lemongrass Chicken. This dish is not just an explosion of vibrant flavors; it has a beautiful story that weaves through my culinary journey. Remember that cozy kitchen filled with the fragrance of simmering spices, where family gathered around the table for shared meals and laughter? That’s the heart and soul of cooking for me, and this recipe embodies that spirit perfectly.
Lemongrass Chicken reflects the timeless charm of Vietnamese cuisine, blending the fresh aromatics of lemongrass with the warmth of marinated chicken that delights your taste buds. Perfect for a casual weeknight dinner or an inviting gathering of friends, this dish showcases the beauty of simplicity without sacrificing elegance. So, grab your apron, and let’s dive into the vibrant world of flavors awaiting us in this delightful recipe!
What I love most about Vietnamese cooking is its balance of sweet, salty, sour, and umami flavors. It’s all about that harmony that transforms the simplest ingredients into something extraordinary. Plus, the enticing aroma of lemongrass filling your kitchen is like a warm hug! I can’t wait for you to try this recipe and create a meal that brings everyone to the table.
Personal Story
When I think of lemongrass, I am transported back to my grandmother’s kitchen, where every dish prepared told a story. My earliest memories revolve around visiting her on weekends, where I would often help chop veggies and, more importantly, taste-test the dishes bubbling away on the stove. One summer afternoon, she decided to teach me how to make her famous Vietnamese Lemongrass Chicken. I remember the excitement bubbling in my chest as the kitchen filled with the lemony fragrance, peppering my senses with warmth and nostalgia.
She explained each step as I listened in awe, absorbing not just the recipe but also the legacy of flavors passed down through generations. As we stirred the mixture together, I marveled at how a simple ingredient like lemongrass could transport us to faraway places. To this day, I cherish the moments spent laughing, tasting, and learning from her. Now, every time I make this dish, I feel connected to her and the vibrant heritage of Vietnamese cuisine.
Ingredients
For this fantastic Vietnamese Lemongrass Chicken, you’ll need the following ingredients:
-
1 ½ lbs boneless, skinless chicken thighs: Chicken thighs are perfect for this dish due to their tenderness and juiciness. Feel free to substitute with chicken breast for a leaner option, but I recommend thighs for deeper flavor and juiciness.
-
3 stalks fresh lemongrass (trimmed and finely minced) or 3 tablespoons lemongrass paste: Fresh lemongrass brings a bright, citrusy flavor that’s unmistakable. If you can’t find fresh lemongrass, lemongrass paste is a fantastic backup—just keep it in your fridge for quick use!
-
3 cloves garlic, minced: Garlic adds depth and a savory kick. You can swap it with shallots if you prefer a milder flavor.
-
1 small onion, finely sliced: Onions provide sweetness when cooked and complements the chicken perfectly. Red onions or green onions can also do the trick!
-
2 tablespoons fish sauce: This gives our chicken a wonderful umami flavor. If you’re vegetarian or looking for milder flavor, try using soy sauce instead.
-
2 tablespoons oyster sauce: Another umami powerhouse! You can opt for a vegetarian oyster sauce made from mushrooms for a plant-based version.
-
1 tablespoon light soy sauce: This adds a hint of saltiness. Make sure it’s light soy sauce for a fresher flavor!
-
1 tablespoon brown sugar: Balance is key! Brown sugar adds a hint of sweetness, but you can use coconut sugar for a lighter taste.
-
1 teaspoon ground black pepper: Adds a subtle kick. Freshly ground pepper always has a more vibrant flavor.
-
2 tablespoons vegetable oil: Used for cooking. Choose oils with a high smoke point, such as canola or peanut oil.
-
Optional garnish:
- Sliced red chili: For a touch of heat.
- Fresh cilantro: Adds freshness and color.
- Lime wedges: A squeeze of lime takes this dish to another level!
Step-by-Step Instructions
Now that we have our ingredients lined up, let’s get cooking! Follow these detailed step-by-step instructions to whip up your Vietnamese Lemongrass Chicken.
Step 1: Marinate Your Chicken
In a bowl, combine the chicken thighs, minced lemongrass, garlic, onion, fish sauce, oyster sauce, soy sauce, brown sugar, and black pepper. Mix well to coat the chicken evenly.
Chef’s Tip: Let the chicken marinate for at least 30 minutes to an hour! If you can, pop it in the fridge for a few hours or overnight. The longer it sits, the more flavorful it becomes!
Step 2: Heat Up the Pan
In a large skillet or wok, heat the vegetable oil over medium-high heat. You want the oil to shimmer nicely—this will prevent the chicken from sticking.
Chef’s Hack: If you want to enhance the flavors, you can add a little minced lemongrass to the oil while it heats up.
Step 3: Cook the Chicken
Once the oil is hot, carefully add the marinated chicken to the pan in a single layer (you may need to do this in batches to avoid overcrowding).
Sear the chicken for about 4-5 minutes on each side until it gets that beautiful golden crust. Stir occasionally to ensure even cooking and to incorporate the lovely bits sticking to the pan.
Chef’s Tip: The key here is to not rush the process! The caramelization makes the flavors shine even more.
Step 4: Finish Cooking
After the chicken is cooked through (internal temperature should reach 165°F), lower the heat. If there’s extra marinade left in the bowl, pour it into the pan and let it simmer for a few minutes until slightly thickened.
Note: This step not only intensifies the flavor but also gives the dish a beautiful glaze!
Step 5: Taste and Adjust
At this point, taste your chicken and adjust seasoning as needed. You can add more fish sauce for saltiness, brown sugar for sweetness, or lime juice for tartness.
Chef’s Note: Cooking is all about balance, so don’t hesitate to tailor it to your liking!
Step 6: Serve It Up!
Once you’re satisfied with the flavor profile, remove from heat and transfer the chicken to a serving dish. Garnish with sliced red chili, fresh cilantro, and lime wedges for a fresh presentation that invites your guests to dig in!
Serving Suggestions
For a beautiful table, serve your Vietnamese Lemongrass Chicken over a bed of fluffy jasmine rice or alongside crunchy lettuce wraps. This makes it easy for your guests to customize their plates. Drizzle some of that rich, flavorful sauce over the top and don’t forget to include extra lime wedges on the side, allowing everyone to add a squeeze to taste!
Recipe Variations
Want to mix things up? Here are a few creative twists for your Vietnamese Lemongrass Chicken:
-
Lemon-Lime Zest: Add some lime or lemon zest during marination for an extra citrusy kick.
-
Veggie Boost: Toss in bell peppers, snap peas, or bok choy towards the end of cooking for a burst of color and nutrition.
-
Coconut Cream: Stir in a splash of coconut cream during the last minutes of cooking for a luscious twist.
-
Spicy Twist: If you love heat, incorporate chopped Thai bird chilies into the marinade for a spicy kick.
-
Grilled Version: Skewer the marinated chicken for a fun grilling experience. Chargrilling adds a unique flavor that complements the lemongrass beautifully!
Chef’s Notes
This Vietnamese Lemongrass Chicken recipe is a cherished family favorite that has evolved over time. I started with my grandmother’s guidance, but I’ve experimented with various ingredients and had loads of fun adapting it. One time, I accidentally used too much brown sugar, resulting in a surprisingly delicious sweet marinade that my friends raved about! That day taught me that cooking is about embracing the unexpected.
Over the years, I’ve also learned to appreciate the vibrant colors and aromas of fresh ingredients. The petite, fragrant lemongrass stalks remind me just how powerful simplicity can be in the kitchen. I hope this recipe inspires you as it does me!
FAQs and Troubleshooting
1. My chicken is tough. What went wrong?
Answer: Overcooking can make chicken tough. Always check for doneness at 165°F and cook until just done. Chicken thighs are forgiving, but if they’re overcooked, they can dry out quickly.
2. Can I make this dish ahead of time?
Answer: Absolutely! You can marinate the chicken a day in advance. Just cook it fresh when you’re ready to eat. Leftovers also keep well in the fridge for meals during the week, just be sure to reheat gently.
3. What can I serve with this dish?
Answer: Serve with fragrant jasmine rice, refreshing Vietnamese rice noodles, or even in lettuce wraps with fresh veggies! The dish’s beautiful flavors enhance almost anything.
4. Why won’t my sauce thicken?
Answer: If your sauce isn’t thickening, it might be too watery or you might need to simmer it longer. A cornstarch slurry can help to thicken; mix a tablespoon of cornstarch with water and stir it in simmering sauce until thick.
Nutritional Info
While this dish is delicious, remember to enjoy it as part of a balanced diet! Each serving boasts protein from chicken, essential vitamins from fresh herbs, and delightful flavor that will have everyone coming back for more.
I hope this recipe brings warmth and joy into your kitchen, just as it has in mine. Cooking is a creative journey, so don’t be afraid to tweak this recipe to your liking. Cheers to good food, delightful company, and cherished memories around the table! Happy cooking! 🌟
PrintVietnamese Lemongrass Chicken
A flavorful and aromatic Vietnamese dish that combines tender marinated chicken with the bright taste of lemongrass.
- Prep Time: 15 minutes
- Cook Time: 20 minutes
- Total Time: 35 minutes
- Yield: 4 servings 1x
- Category: Main Course
- Method: Stovetop
- Cuisine: Vietnamese
- Diet: Gluten-Free
Ingredients
- 1 ½ lbs boneless, skinless chicken thighs
- 3 stalks fresh lemongrass (trimmed and finely minced) or 3 tablespoons lemongrass paste
- 3 cloves garlic, minced
- 1 small onion, finely sliced
- 2 tablespoons fish sauce
- 2 tablespoons oyster sauce
- 1 tablespoon light soy sauce
- 1 tablespoon brown sugar
- 1 teaspoon ground black pepper
- 2 tablespoons vegetable oil
- Optional garnish: Sliced red chili, fresh cilantro, lime wedges
Instructions
- Marinate Your Chicken: In a bowl, combine the chicken thighs, minced lemongrass, garlic, onion, fish sauce, oyster sauce, soy sauce, brown sugar, and black pepper. Mix well to coat the chicken evenly. Let the chicken marinate for at least 30 minutes to an hour.
- Heat Up the Pan: In a large skillet or wok, heat the vegetable oil over medium-high heat.
- Cook the Chicken: Once the oil is hot, carefully add the marinated chicken to the pan in a single layer. Sear the chicken for about 4-5 minutes on each side.
- Finish Cooking: Lower the heat, pour in any leftover marinade, and let it simmer until slightly thickened.
- Taste and Adjust: Taste your chicken and adjust seasoning as needed.
- Serve It Up: Remove from heat and transfer the chicken to a serving dish. Garnish and serve with jasmine rice or lettuce wraps.
Notes
Let the chicken marinate longer for deeper flavor. Adjust the seasoning to your taste at the end of cooking.
Nutrition
- Serving Size: 1 serving
- Calories: 400
- Sugar: 8g
- Sodium: 600mg
- Fat: 20g
- Saturated Fat: 4g
- Unsaturated Fat: 12g
- Trans Fat: 0g
- Carbohydrates: 15g
- Fiber: 1g
- Protein: 35g
- Cholesterol: 120mg
Keywords: Vietnamese chicken, lemongrass, quick dinner, flavorful recipe

Best Keto Chicken Recipes
The Best Keto Chicken Recipes: Your Ultimate Guide to Flavorful Dinners
Welcome to the wonderful world of keto cooking, where flavor and health unite! Today, we’re diving into the best keto chicken recipes that will have your taste buds dancing while keeping you on track with your dietary goals. Whether you’re a seasoned cook or just starting to explore the benefits of keto, I’m here to walk you through every delicious step.
Why Chicken on Keto?
Chicken is a fantastic protein source that’s naturally low in carbohydrates, making it perfect for a ketogenic lifestyle. It’s versatile, easy to prepare, and can turn an ordinary weeknight dinner into a spectacular feast. Plus, there’s something comforting about a hearty chicken dish that warms the heart and fills the belly. So grab that apron, and let’s get started!
My Personal Story: The Night I Cracked the Perfect Spice Blend
I have to tell you about the first time I perfectly nailed my spice blend for roasted chicken. It was a cozy December evening, and friends were coming over to celebrate the holidays. The house was filled with the scent of fresh pine and the sound of crackling logs in the fireplace. I remember bustling around the kitchen—an eclectic mix of excitement and nervousness filling the air.
I had invited a group of my dearest friends over, and I wanted to impress them with something special yet comforting. As I tossed the chicken thighs in spices, I stumbled upon a unique combination of garlic, onion powder, and paprika. The aroma was intoxicating! As the chicken roasted in the oven, I set the table with my favorite dinnerware and lit candles that flickered like stars against the dark night.
When my friends arrived, the laughter and joy were contagious. Each bite of the tender, juicy chicken was met with delightful surprise—"Savannah, this is incredible!" they exclaimed. That night, we shared not only delicious food but beautiful moments, deep conversations, and lots of laughter—magic times that remain dear to my heart.
Ingredients
Let’s gather our ingredients! Here’s what you’ll need for our delicious keto chicken recipe:
-
2 lbs chicken thighs or breasts: Choose thighs for juiciness or breasts for leaner meat. Thighs are typically more forgiving in terms of moisture and flavor, while breasts can be great for a lighter option.
-
2 tablespoons olive oil: A fantastic source of healthy fats. You can substitute coconut oil or avocado oil if you prefer a different flavor or want to change the smoke point.
-
1 teaspoon garlic powder: This adds a warm depth of flavor that enhances the chicken. Fresh minced garlic can also be used if you want that vibrant taste—about 2 cloves should do.
-
1 teaspoon onion powder: Like garlic powder, it delivers a subtle sweetness and depth. You can also use fresh onions sautéed for a bit more flavor.
-
1 teaspoon paprika: Adds a beautiful color and a mild warmth. Consider smoked paprika for a deeper, smoky flavor twist.
-
Salt and pepper to taste: Essential for bringing out other flavors. I recommend using kosher salt for even seasoning.
-
Fresh herbs (optional, for garnish): Fresh parsley, thyme, or basil can elevate your dish. They’re more than a garnish—they add fresh flavor and a pop of color.
Step-by-Step Instructions
Now that we have everything ready, let’s get cooking! Follow these steps, and you’ll be amazed at how easy and delicious this keto chicken can be.
-
Preheat Your Oven: Set your oven to 400°F (200°C). This high heat allows the chicken to roast beautifully, giving you a perfect golden exterior while keeping the inside juicy and tender.
-
Prepare the Chicken: Place your chicken thighs or breasts in a large bowl. Drizzle with olive oil to coat them evenly. This oil not only adds flavor but keeps the chicken moist. Here’s a little tip: If you let the chicken marinate in the oil and spices for about 30 minutes to an hour before cooking, it’ll give you even better flavor!
-
Season Generously: Sprinkle your garlic powder, onion powder, paprika, salt, and pepper across the chicken. Toss the chicken until every piece is coated in these scrumptious seasonings. Don’t be shy! This is where the magic happens—your chicken will thank you later!
-
Arrange on a Baking Sheet: Line a baking sheet with parchment paper for easy cleanup. You’ll want to spread the chicken out in a single layer. Overcrowding will lead to steaming, and nobody likes soggy chicken!
-
Roast in the Oven: Roast your chicken in the preheated oven for about 25-30 minutes, flipping halfway through. You want your chicken to reach an internal temperature of 165°F (74°C). Not sure how to tell? An instant-read thermometer will be your best friend here!
-
Broil for a Perfect Finish: If you want that extra crispy skin (who doesn’t?), turn your oven to broil for the last 3-5 minutes. Just keep an eye on it to avoid burning—this is the time for that golden crust!
-
Let it Rest: Once the chicken is done, remove it from the oven and let it rest for 5-10 minutes. This allows the juices to redistribute, ensuring each bite is flavorful and juicy.
Serving Suggestions
Serving this keto chicken dish is all about presentation. I love to plate my chicken on a rustic wooden board with a healthy sprinkle of fresh herbs on top. You can also serve it alongside a vibrant salad or some roasted low-carb veggies like zucchini, bell peppers, or broccoli. Arrange the chicken pieces artistically and finish with a drizzle of extra virgin olive oil for that professional touch!
Recipe Variations
Let’s get creative! Here are a few variations to spice up your keto chicken game:
-
Lemon Herb Chicken: Before roasting, squeeze fresh lemon juice and add zest to the chicken for a bright, refreshing flavor. Pair with rosemary or thyme for an aromatic lift.
-
Creamy Mushroom Sauce: After removing the chicken, sauté mushrooms in the same pan. Add a splash of heavy cream, garlic, and cheese for a luscious sauce to pour over your chicken.
-
Spicy Chipotle Chicken: Incorporate chipotle powder or adobo sauce into your seasoning mix for a smoky, spicy twist.
-
Honey Garlic Glaze: If you’re not strictly adhered to fully keto, drizzle a bit of sugar-free honey or make a homemade caramelized garlic sauce to glaze your chicken before serving.
-
Mediterranean Chicken Bake: Top with feta cheese and olives, and roast it all together for a heartier meal that transports you to the Mediterranean.
Chef’s Notes
This recipe has evolved over the years based on my journey as a foodie. Initially, I would just toss whatever spices I could find together. As I learned more about flavor balance, each piece became a labor of love that reflects my cooking style: simpler yet more sophisticated. I still recall one dinner with that mishap when I accidentally reached for cayenne instead of paprika. Talk about spicy! My friends laughed so hard, but it turned into an unexpected favorite that night!
FAQs and Troubleshooting
1. My chicken is dry; what did I do wrong?
Dry chicken usually means it was overcooked. Be sure to check the internal temperature, and remember that letting it rest afterward helps maintain juiciness.
2. Can I use chicken breasts instead of thighs?
Absolutely! Just keep an eye on the cooking time, as breasts can dry out faster than thighs. Adjust your cooking time to around 20-25 minutes for breasts.
3. How do I know when my chicken is done?
The safest method is to use an instant-read thermometer, which should read 165°F (74°C) in the thickest part of the chicken.
4. What if I don’t have paprika?
If you’re out of paprika, chili powder is a fantastic substitute that adds a different yet delicious flavor. You can also mix a bit of cayenne for heat or rely on the garlic and onion powders for flavor.
Nutritional Info (Optional)
- Calories: 335
- Protein: 26g
- Fat: 25g
- Carbohydrates: 0g
- Fiber: 0g
Cooking should be fun and fulfilling, and my hope is that this keto chicken recipe inspires you to create something beautiful in your kitchen. Remember, it’s all about finding joy in the process of cooking and gathering around the table with those you love. So, tie on that ivory apron, pour yourself a refreshing beverage, and let’s whip up some delicious memories together. Happy cooking!
PrintKeto Roasted Chicken
A flavorful keto chicken recipe that’s easy to prepare and perfect for a hearty dinner.
- Prep Time: 30 minutes
- Cook Time: 30 minutes
- Total Time: 60 minutes
- Yield: 4 servings 1x
- Category: Main Course
- Method: Roasting
- Cuisine: Keto
- Diet: Keto
Ingredients
- 2 lbs chicken thighs or breasts
- 2 tablespoons olive oil
- 1 teaspoon garlic powder
- 1 teaspoon onion powder
- 1 teaspoon paprika
- Salt and pepper to taste
- Fresh herbs (optional, for garnish)
Instructions
- Preheat your oven to 400°F (200°C).
- Prepare the chicken by coating it in olive oil.
- Season the chicken with garlic powder, onion powder, paprika, salt, and pepper.
- Arrange the chicken on a parchment-lined baking sheet.
- Roast in the oven for 25-30 minutes, flipping halfway through.
- Broil for 3-5 minutes for extra crispy skin.
- Let it rest for 5-10 minutes before serving.
Notes
Optional garnishes include fresh parsley, thyme, or basil for added flavor and presentation.
Nutrition
- Serving Size: 1 serving
- Calories: 335
- Sugar: 0g
- Sodium: 500mg
- Fat: 25g
- Saturated Fat: 5g
- Unsaturated Fat: 20g
- Trans Fat: 0g
- Carbohydrates: 0g
- Fiber: 0g
- Protein: 26g
- Cholesterol: 80mg
Keywords: keto chicken, roasted chicken, low carb dinner, healthy chicken recipes
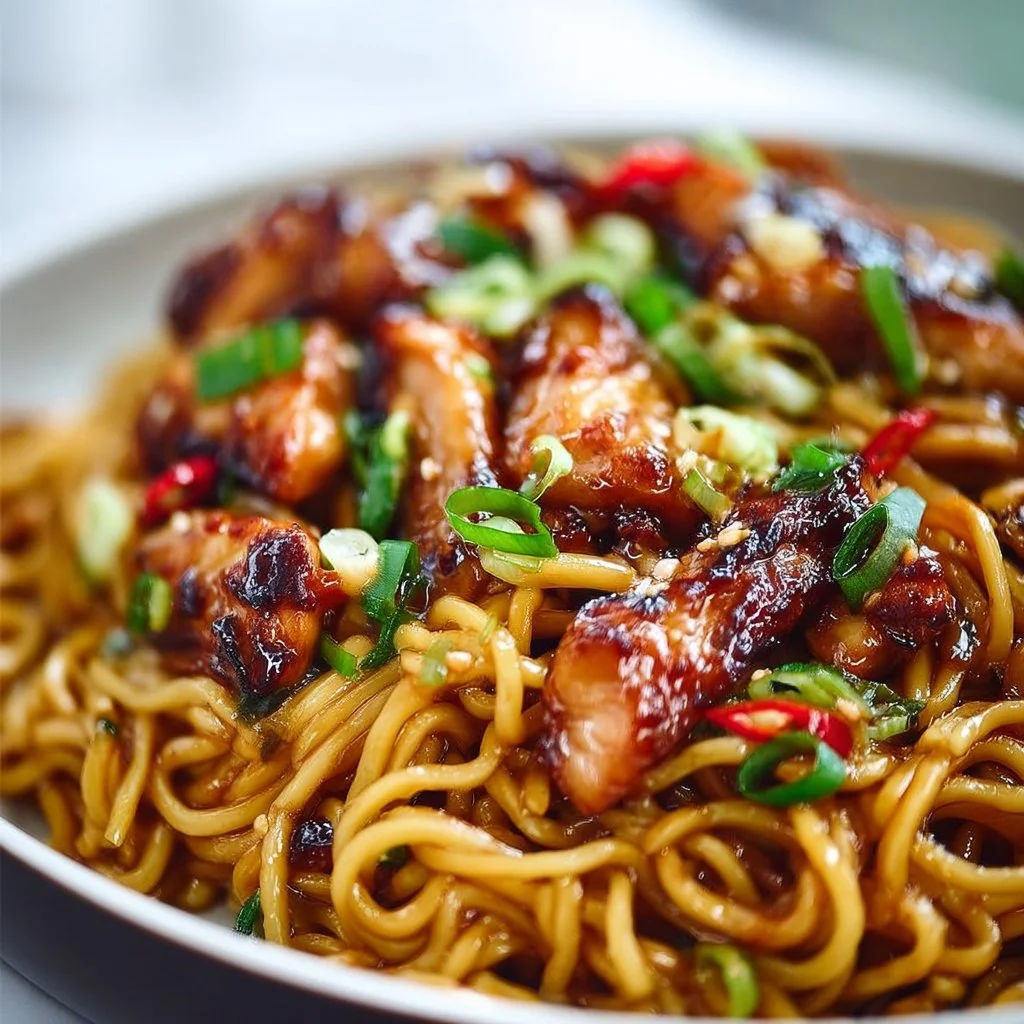
Sticky Garlic Chicken Noodles
Sticky Garlic Chicken Noodles: A Flavorful Journey
Hey there, fellow food lovers! I’m so excited to share one of my favorite dishes with you today: Sticky Garlic Chicken Noodles. This easy-to-make recipe is a perfect blend of sweet, savory, and a hint of spice—all wrapped up in a delightful noodle dish that’s sure to impress your family and friends. It’s cozy enough for a weeknight dinner yet elegant enough to serve at your next dinner party.
Picture this: a bustling kitchen, the tantalizing aroma of garlic sizzling in sesame oil, and the joyful laughter of loved ones gathered at the table. That’s what this dish embodies—an experience that warms the heart and satisfies the belly! Whether you’re a seasoned pro or just starting your culinary journey, you’ll find this recipe both approachable and delicious. So, tie on your apron, and let’s get cooking!
Personal Story
This dish brings back so many fond memories for me. I remember the first time I made sticky garlic chicken noodles for my friends. It was a chilly autumn evening, and we had decided to host a little get-together at my place. Feeling adventurous, I wanted to whip up something that would warm our hearts and tickle our taste buds.
After rummaging through my pantry and striking gold with a few staple ingredients, I found inspiration! I remember the kitchen filled with laughter as we danced around, taste-testing the sauce straight out of the bowl while the noodles cooked to perfection. When I finally plated the sticky garlic chicken, the moment was magical. Everyone gathered around, forks in hand, and within minutes, the deliciousness had us all cheering for seconds.
That evening reminded me of the power food has to bring people together. Nothing compares to sharing a meal, stories, and laughter around the table with those you care about. This recipe never fails to capture that spirit, and I can’t wait for you to experience it too!
Ingredients
Here’s what you’ll need to create these delightful sticky garlic chicken noodles:
-
8 oz noodles (such as rice or egg noodles)
Noodles are the star of the show! I love using rice noodles for a gluten-free option, but egg noodles add a lovely richness. If you’re looking for alternatives, soba noodles work beautifully too! -
1 lb chicken breast, sliced
Chicken breast gives a lean protein kick that pairs perfectly with the rich sauce. If you’re feeling adventurous, swap it out for tofu, shrimp, or even grilled vegetables for a vegetarian twist. -
3 cloves garlic, minced
Garlic is the heart of this dish! Feel free to add more if you’re a garlic lover like me. If fresh garlic isn’t available, garlic powder can provide a nice alternative—1/8 teaspoon will do! -
1/4 cup soy sauce
For that rich umami flavor, you can’t go wrong with soy sauce! For a gluten-free or less sodium option, tamari is an excellent substitute. -
2 tbsp honey
Honey adds sweetness that balances the soy sauce and garlic beautifully. You can swap it with maple syrup for a vegan alternative. -
1 tbsp sesame oil
This oil provides a wonderful nutty flavor. If sesame oil isn’t on hand, a light olive oil works just fine. -
1 tbsp vegetable oil
This is for cooking the chicken and preventing it from sticking. Use any neutral oil you have, like canola or grapeseed. -
1/2 tsp red pepper flakes (optional)
Spice it up! Adjust according to your heat preference—or leave it out if you’re catering to mild palates. -
Green onions, chopped (for garnish)
Fresh herbs elevate everything! Chopped green onions add color and a zesty crunch. Try cilantro or basil if you’re looking for something different.
Step-by-Step Instructions
Now, let’s dive into creating these decadent sticky garlic chicken noodles:
Step 1: Cook the Noodles
Start by bringing a large pot of salted water to a rolling boil. Add your noodles and cook according to the package instructions until they’re al dente. This usually takes around 5-7 minutes for fresh noodles (8-10 minutes for dried).
Chef’s Tip: Save a cup of pasta water before draining! This starchy water is magic when it comes to thicken your sauce later.
Step 2: Sauté the Chicken
While the noodles are cooking, heat 1 tablespoon of vegetable oil in a large skillet or wok over medium-high heat. Season your sliced chicken breast with a pinch of salt and pepper, then add it to the hot skillet.
Cook for about 5-7 minutes, stirring occasionally, until the chicken is golden brown and cooked through. Remove the chicken from the skillet and set it aside.
Chef’s Hack: For juicy chicken, don’t overcrowd the pan. Work in batches if necessary!
Step 3: Unlock the Flavors with Garlic
In the same skillet (don’t wash it—flavor lives here!), add another tablespoon of vegetable oil if the skillet seems dry. Toss in the minced garlic and sauté for about 30 seconds until it’s fragrant but not browned.
Note: Garlic can turn bitter if overcooked, so keep an eye on it!
Step 4: Make the Sauce
It’s time to create that sticky goodness! Add the soy sauce, honey, and sesame oil to the skillet. Whisk everything together until well combined. Let it simmer for about 2 minutes, allowing the flavors to mingle.
Chef Insight: Use this opportunity to taste your sauce! Adjust the sweetness with more honey or the saltiness with a splash of soy sauce.
Step 5: Combine Everything
Return the sautéed chicken to the skillet and toss it with the sauce until evenly coated. Now comes the fun part—add the cooked noodles! Toss the noodles in, ensuring they’re all beautifully coated with that sticky sauce.
Bonus Tip: If the mixture gets too thick, add in a splash of the reserved pasta water to loosen up the sauce.
Step 6: Add the Finishing Touches
Sprinkle in the red pepper flakes if you’re using them and give everything a final toss. Cook for an additional minute or so to heat through, allowing the noodles to soak up even more flavor.
Chef’s Note: This is where you can get creative! Consider adding broccoli, bell peppers, or snow peas for an extra pop of color and nutrition!
Serving Suggestions
Now, let’s talk presentation! Transfer the sticky garlic chicken noodles onto a large serving platter or individual bowls. Garnish them generously with chopped green onions and maybe even a sprinkle of sesame seeds for an extra touch of elegance.
Pair this dish with a chilled glass of sparkling water or a light white wine to create the complete dining experience. Trust me; your guests will be asking for your secret recipe!
Recipe Variations
Here are a few fun twists to try the next time you make these noodles:
- Spicy Mandarin: Add a tablespoon of sriracha or chili paste for a spicy kick.
- Citrus Burst: Incorporate a squeeze of fresh lime or lemon juice when serving for zesty brightness.
- Veggie Delight: Toss in pre-steamed broccoli, bell peppers, or snap peas for a colorful veggie medley.
- Noodle Swap: Use zucchini noodles for a low-carb twist—just sauté them lightly before mixing in the sauce.
- Protein Power: Experiment with shrimp, beef, or even lentils for added protein options.
Chef’s Notes
Oh, I have to share a funny kitchen story! One time, I got overly ambitious and decided to invite over 10 friends for dinner without really planning a menu. What did I make? You guessed it—sticky garlic chicken noodles! I doubled the recipe, but I forgot one important detail: my pot was too small! As the noodles boiled, they spilled over onto the stove; I was left frantically cleaning while trying to plate 10 servings. But in the end, all laughter and good memories flowed even as my kitchen looked like a noodle explosion. Sometimes it’s the messes that make the best stories!
Through trial and error, this recipe has evolved, and I’ve learned that simplicity is key. Always keep the core ingredients on hand, and you can make this dish any time the craving strikes!
FAQs and Troubleshooting
Q1: My noodles turned out mushy. What happened?
A: This can occur if you overcook the noodles, so it’s key to keep an eye on the timing and check for that perfect al dente bite. If they seem mushy, you can still salvage the dish by tossing them in the sauce and letting them soak in flavor!
Q2: Can I make this dish ahead of time?
A: Absolutely! Cook everything and store it in an airtight container in the fridge. To reheat, add a splash of water or broth to loosen up the sauce. It may thicken as it cools, but a bit of liquid will bring it back to life.
Q3: What can I use instead of honey if I’m allergic?
A: You can substitute honey with agave syrup, maple syrup, or even brown sugar mixed with a bit of water to dissolve. You’ll still get that lovely sweetness without any issues!
Q4: Why is my sauce not as sticky?
A: If the sauce seems too thin, try simmering it for a bit longer to reduce it down. If you’re looking for an even stickier consistency, adding a bit of cornstarch mixed with water can help thicken it up perfectly.
Nutritional Info (Optional)
This is a rough estimate per serving:
- Calories: 400
- Protein: 30g
- Carbohydrates: 40g
- Fat: 15g
And there you have it, my delightful Sticky Garlic Chicken Noodles recipe! I hope it brings you as much joy as it has brought into my kitchen. Remember, good food is all about intention, so enjoy the process, savor those moments with loved ones, and let your kitchen become a gathering place, just like mine. Happy cooking! 🍽️✨
PrintSticky Garlic Chicken Noodles

A perfect blend of sweet, savory, and spicy, this easy-to-make noodle dish promises to impress your family and friends.
- Prep Time: 15 minutes
- Cook Time: 20 minutes
- Total Time: 35 minutes
- Yield: 4 servings 1x
- Category: Main Course
- Method: Stir-frying
- Cuisine: Asian
- Diet: Non-Vegetarian
Ingredients
- 8 oz noodles (rice or egg noodles)
- 1 lb chicken breast, sliced
- 3 cloves garlic, minced
- 1/4 cup soy sauce
- 2 tbsp honey
- 1 tbsp sesame oil
- 1 tbsp vegetable oil
- 1/2 tsp red pepper flakes (optional)
- Green onions, chopped (for garnish)
Instructions
- Cook the noodles by bringing salted water to a boil. Add noodles and cook according to package instructions until al dente (5-7 minutes for fresh, 8-10 minutes for dried).
- Sauté the chicken in heated vegetable oil over medium-high heat for 5-7 minutes, until golden brown. Remove and set aside.
- Unlock the flavors with garlic by adding the minced garlic to the skillet and sautéing for about 30 seconds until fragrant.
- Make the sauce by adding soy sauce, honey, and sesame oil to the skillet. Whisk together and let simmer for about 2 minutes.
- Combine everything by returning the chicken to the skillet, then add the cooked noodles, tossing to coat evenly in sauce.
- Add in red pepper flakes if using, stir to mix, and cook for an additional minute.
Notes
Consider adding broccoli, bell peppers, or snap peas for added nutrition. You can swap honey with maple syrup for a vegan version.
Nutrition
- Serving Size: 1 serving
- Calories: 400
- Sugar: 8g
- Sodium: 600mg
- Fat: 15g
- Saturated Fat: 2g
- Unsaturated Fat: 12g
- Trans Fat: 0g
- Carbohydrates: 40g
- Fiber: 3g
- Protein: 30g
- Cholesterol: 70mg
Keywords: Sticky Garlic Chicken, Noodles, Easy Dinner, Asian Cuisine, Comfort Food
Chili Lime Chicken
Chili Lime Chicken: A Zesty Delight for Your Dinner Table
Hello, fellow food lovers! Today, I’m thrilled to share a recipe that’s become a staple in my kitchen—all while bringing a gorgeous pop of color and flavor to your table: Chili Lime Chicken! Picture this: succulent chicken breasts marinated in freshly squeezed lime juice and a sprinkle of vibrant chili powder. The result? A dish that dances on your palate with hints of citrus and a gentle heat that keeps things exciting.
We all have those go-to recipes that save us on busy weeknights and transform simple ingredients into something that feels remarkable. This Chili Lime Chicken is one of those dishes for me—it’s hassle-free yet feels like a gourmet experience. The best part? You don’t have to spend hours in the kitchen to impress your family or guests. The combination of zesty lime and smoky chili powder is an incredible flavor duo that will have everyone at the table asking for seconds.
So, gather your ingredients and let’s embark on this culinary journey together. Prepare to tie on your apron, pour a refreshing drink, and embrace the joy of cooking!
Personal Story
Let me take you back a few years to a sunny Sunday afternoon, where I found myself rummaging through my pantry, searching for something to whip up for dinner. I stumbled upon chicken breasts and remembered a similar recipe I had seen on a food blog. Inspired, I grabbed fresh limes from my fruit bowl and my trusty chili powder stash from the spice cabinet.
As I marinated the chicken, the fragrance of lime wafted through my kitchen and made me reminisce about family gatherings in my grandmother’s kitchen—where love was served on every plate. She would always say, “Cooking is like love; it should be entered into with abandon or not at all.” I kept her spirit alive that day by creating a meal from the heart. When my friends arrived, the aroma invited them to the table before we even sat down. We ended up sharing laughter and stories over platefuls of my Chili Lime Chicken. It was one of those evenings I’ll never forget, filled with joy, connection, and delicious food!
Ingredients
Let’s dive into the crucial players for our Chili Lime Chicken. Here’s what you’ll need:
-
Chicken Breasts
- A lean source of protein that soaks up flavors beautifully. If you prefer, you can substitute with chicken thighs for a juicier option or use tofu for a vegetarian alternative.
-
Fresh Lime Juice
- Provides zing—always use fresh limes for the best flavor. If you happen to be out of fresh limes, lemon juice will work in a pinch, though the flavor will be a bit different.
-
Chili Powder
- This spice adds a warm, earthy flavor with a kick. It’s versatile too! If you’re feeling adventurous, try out smoked paprika for a smokier flavor, or cayenne pepper for extra heat.
-
Olive Oil
- A key player in this marinade that helps keep the chicken moist and flavorful. You can swap it with avocado oil or even coconut oil for a different twist.
-
Garlic (minced)
- Fresh garlic elevates the dish with its rich aroma and taste. In a hurry? Pre-minced garlic from a jar can save time, but the fresh stuff is always better.
-
Salt and Pepper
- Never underestimate the power of seasoning! They bring out the natural flavors of your ingredients. Sea salt or kosher salt works wonderfully; for pepper, freshly ground will pack a bigger punch.
Step-by-Step Instructions
Now, let’s talk about how to bring this culinary masterpiece to life!
1. Marinate the Chicken
- In a large bowl, combine the fresh lime juice, minced garlic, chili powder, olive oil, salt, and pepper. Whisk until well blended.
- Chef Tip: Want more depth of flavor? Allow the chicken to marinate for at least 30 minutes, or for best results, overnight in the refrigerator. This will give all those flavors time to soak in!
2. Prep the Chicken
- If you’re using chicken breasts, pound them to an even thickness for uniform cooking. This prevents the thinner parts from drying out.
- Pro Hack: Use plastic wrap to cover the chicken while you pound it with a mallet—no mess and easy cleanup!
3. Coat the Chicken
- Add the chicken to the marinade, making sure each piece is fully coated. Cover the bowl with plastic wrap or transfer to a resealable bag. Let it hang out in the fridge for a while.
- Chef Insight: If you’re short on time, even a 10-minute marination can add flavor. But the longer, the better!
4. Prepare to Grill or Sear
- Preheat your grill or a cast-iron skillet over medium-high heat. You want it hot to achieve that lovely sear on the chicken.
- Tip: If using a skillet, add a splash of olive oil right before cooking to prevent sticking.
5. Cook the Chicken
- Once your grill is preheated, place the marinated chicken on it. If using a skillet, add the chicken to the hot oil. Cook for about 6-8 minutes per side, or until the internal temperature reaches 165°F (75°C).
- Crisp Tip: Avoid flipping your chicken too soon. Let it form a nice crust before you turn it over. This lock-in moisture and flavor!
6. Rest and Serve
- After cooking, remove the chicken from heat and let it rest for 5 minutes. This allows the juices to redistribute and keeps the chicken tender.
- Resting Insight: Don’t skip this step! Resting your meat is crucial for that juicy bite—trust the process!
Serving Suggestions
To plate your Chili Lime Chicken, slice it into juicy pieces and artfully arrange them on a crisp bed of mixed greens or your favorite grain. You can drizzle with a touch more lime juice and sprinkle with freshly chopped cilantro for that extra pop of color. Serve it alongside colorful roasted vegetables or a tangy salsa for a delightful touch!
Recipe Variations
Feeling creative? Here are a few fun variations you can try:
- Chipotle Lime Chicken: Add a bit of chipotle pepper in adobo sauce to the marinade for a smoky, spicy kick.
- Tropical Twist: Mix in some pineapple juice with the lime for a sweet and tangy marinade that screams summer!
- Herb-Infused: Toss in some fresh herbs like cilantro or parsley into the marinade for added freshness.
- Sheet Pan Dinner: Throw some sliced bell peppers and onions on the baking sheet while roasting the chicken for an all-in-one meal.
- Zesty Tacos: Shred the cooked chicken and serve it in taco tortillas with avocado, salsa, and lime wedges for a fun taco night!
Chef’s Notes
As I reflected on how this Chili Lime Chicken recipe has evolved over the years, I remember the mishaps that led to the magical moments in my kitchen. There was that one time I accidentally confused chili powder with cinnamon—yikes! Let’s just say, I quickly transformed it into a “sweet and spicy” dish that we all still laugh about to this day.
No recipe is flawless, and that’s where the adventure truly lies! Embrace those kitchen surprises and don’t be afraid to make each dish your own. Just remember, every great chef has a few stories up their sleeve.
FAQs and Troubleshooting
1. My chicken is dry — what went wrong?
Overcooking can dry out chicken; ensure you check the internal temperature and let it rest before cutting into it.
2. Can I use frozen chicken breasts?
Yes, but it’s best to thaw them fully before marinating and cooking for even flavor distribution.
3. What if my chili lime chicken is too spicy?
Adjust the amount of chili powder to your preference. Remember, you can always add more spice later, but you can’t take it away!
4. How can I store leftovers?
Store leftover chicken in an airtight container in the refrigerator for up to 3 days. It’s great cold on salads or can be reheated gently in the oven.
Nutritional Info (Optional)
This Chili Lime Chicken packs a punch with protein and zest while being low in carbohydrates, making it a healthy choice for any meal! Each serving generally contains about 200 calories, 30g of protein, 7g of fat, and 1g of carbohydrates.
There you have it! I hope this recipe lights up your kitchen as much as it has mine. Remember, it’s all about creating those moments of joy and connection around the dining table. So tie on that apron and enjoy every bite! Happy cooking!
PrintChili Lime Chicken
A zesty dish featuring marinated chicken breasts in lime juice and chili powder that delivers vibrant flavor and easy preparation.
- Prep Time: 10 minutes
- Cook Time: 15 minutes
- Total Time: 25 minutes
- Yield: 4 servings 1x
- Category: Main Course
- Method: Grilling
- Cuisine: Mexican
- Diet: Gluten-Free
Ingredients
- 4 Chicken Breasts
- 1/4 cup Fresh Lime Juice
- 2 tbsp Chili Powder
- 2 tbsp Olive Oil
- 3 cloves Garlic (minced)
- Salt and Pepper to taste
Instructions
- Marinate the chicken by combining the fresh lime juice, minced garlic, chili powder, olive oil, salt, and pepper in a large bowl. Whisk until well blended.
- Prep the chicken by pounding it to an even thickness for uniform cooking.
- Coat the chicken with the marinade, ensuring it is fully covered, and refrigerate.
- Preheat your grill or skillet over medium-high heat.
- Cook the chicken for 6-8 minutes on each side or until fully cooked through.
- Rest the chicken for 5 minutes before serving.
Notes
Resting the chicken is crucial for juicy meat. Consider variations with chipotle or tropical twists for different flavor experiences.
Nutrition
- Serving Size: 1 serving
- Calories: 200
- Sugar: 1g
- Sodium: 400mg
- Fat: 7g
- Saturated Fat: 1g
- Unsaturated Fat: 6g
- Trans Fat: 0g
- Carbohydrates: 1g
- Fiber: 0g
- Protein: 30g
- Cholesterol: 90mg
Keywords: chicken, lime, chili, easy dinner, grilling

Hawaiian Chicken Sheet Pan
Aloha to Flavor: Hawaiian Chicken Sheet Pan Recipe
Introduction
Aloha and welcome to my kitchen, where the sun is always shining, and flavors are as vibrant as a Hawaiian sunset! Today, we’re diving into a dish that perfectly captures the spirit of the islands — Hawaiian Chicken Sheet Pan. This recipe is your ticket to a tropical paradise, one bite at a time, and trust me, it’s just as effortless as it is delicious!
Picture this: you’re at a luau, the warm breeze softly rustling your hair, the aroma of grilled chicken and sweet pineapple wafting through the air, and the sound of laughter echoing all around you. That’s the essence I wanted to bottle up with this recipe. It’s a dish that evokes nostalgia and happiness, making it perfect for weeknights or gatherings with friends.
Cooking should be an experience, a delightful journey filled with color, laughter, and, of course, great food. The best part? This Hawaiian Chicken Sheet Pan is not only a feast for the senses but also incredibly easy to whip up. It’s all about bringing together perfectly seasoned chicken, fresh veggies, and juicy pineapple, roasted to perfection on one pan. Let’s roll up our sleeves and get cooking, shall we?
Personal Story
I remember the first time I tried a similar dish at a summer BBQ in my friend’s backyard. The sun was setting behind the palm trees, and my heart was as leaping as the flames on the grill. The sweet and tangy pineapple mixed with perfectly grilled chicken made every bite an instant favorite. I could hardly wait for the next BBQ, and that dish became my absolute go-to request for summer parties.
Years later, as I found my way into the world of recipe creation at Ivory Apron, I knew I wanted to bring that very same joy to your kitchens. So, I crafted this sheet pan version, making it accessible for every home chef. The charm of Hawaiian Chicken Sheet Pan is not just in the flavors, but also in the shared memories it creates around the table. Cooking should always feel like a celebration, and I hope this recipe helps you make many beautiful moments!
Ingredients
Here’s what you need to gather for your Hawaiian Chicken Sheet Pan:
-
1 ½ lbs (700 g) boneless skinless chicken breasts, cut into 1-inch pieces
- The star of our dish! Boneless, skinless chicken breasts are super versatile and cook evenly. Feel free to substitute with thighs for a richer flavor or even tofu for a plant-based take.
-
1 red bell pepper (chopped)
- Sweet and crunchy, this pepper adds color and nutrition. You can swap it with orange or green bell peppers according to your taste!
-
1 yellow bell pepper (chopped)
- Bringing in a burst of sunshine! Yellow bell peppers are also sweeter than their green cousins. Use any color you prefer, just keep the sweetness in mind.
-
1 small red onion (cut into wedges)
- Onions are essential for depth of flavor. If you’re not a fan, try shallots or even spring onions for a milder taste.
-
1 ½ cups fresh pineapple chunks (or canned, drained)
- Pineapple is the tropical superstar! Fresh is great, but canned works too—just ensure it’s well-drained. You can also use mango for a spin on flavors.
-
2 tbsp olive oil
- Great for flavor and ensuring even cooking. You can substitute it with avocado oil if you want a higher smoke point.
-
2 cloves garlic (minced)
- Garlic brings everything together! If you’re short on fresh garlic, garlic powder works in a pinch—about ½ teaspoon should do it.
-
½ tsp salt
- Essential for flavor enhancement! Adjust based on your dietary needs or preference.
-
½ tsp black pepper
- A dash of black pepper adds subtle heat; feel free to increase this for more kick.
-
½ tsp paprika
- This adds a lovely smokiness! Smoked paprika would give an additional depth of flavor.
-
¼ tsp chili flakes (optional)
- If you like it spicy, add these! Otherwise, you can leave them out for a milder dish.
Sauce (for tossing & drizzling)
-
⅓ cup low-sodium soy sauce
- A salty, umami-rich base. You can substitute with tamari for gluten-free or coconut aminos for a sweeter profile.
-
¼ cup pineapple juice (from the can or fresh)
- The sweet and tangy element that balances flavors.
-
3 tbsp honey (or brown sugar)
- For that touch of sweetness which caramelizes beautifully in the oven! Use maple syrup for a vegan alternative.
-
2 tbsp rice vinegar (or apple cider vinegar)
- Adds a zesty kick! You can also try white vinegar or even lemon juice.
-
1 tbsp cornstarch + 2 tbsp water (slurry, optional for thickening)
- Cornstarch will help thicken the sauce if you prefer a glaze. It’s totally optional; just mix it with water until smooth before adding to the sauce.
Step-by-Step Instructions
Now that we’ve got everything prepped and ready, let’s get cooking! Here’s how to whip up this delightful dish in just a few simple steps:
-
Preheat Your Oven:
- Start by preheating your oven to 400°F (200°C). This will ensure everything bakes evenly.
-
Prepare the Chicken:
- In a large mixing bowl, toss the cut chicken pieces with olive oil, minced garlic, salt, black pepper, paprika, and chili flakes (if using). Make sure every piece of chicken is coated well. This seasoning is key to infusing glorious flavor; use your hands and get in there!
-
Chop Your Veggies:
- While the chicken is getting cozy with those spices, chop your bell peppers and onion. The goal is to have them in bite-sized pieces so they mix beautifully with the chicken and roast uniformly. Think of colorful confetti — it makes a happy dish!
-
Mix Everything on a Sheet Pan:
- Line a large baking sheet with parchment paper or aluminum foil for easy cleanup — kitchen happiness starts with less mess! Spread the seasoned chicken across the pan, followed by the chopped veggies and pineapple. Try to arrange them in a single layer for even cooking.
-
Make the Sauce:
- In a bowl, whisk together the soy sauce, pineapple juice, honey, and rice vinegar. If you’re using the cornstarch, mix it with water until smooth and add it to the sauce. This is your flavor enhancer! Drizzle most of this delightful mixture evenly over the chicken and veggies but save a bit for drizzling before serving!
-
Bake Away!
- Slide your beautiful sheet pan into the oven and let everything bake for about 20-25 minutes, or until the chicken reaches an internal temperature of 165°F (74°C) and is cooked through! Keep an eye after 20 minutes — you want everything to be golden and slightly caramelized.
-
Drizzle and Serve:
- Just before serving, drizzle your reserved sauce over the dish for an extra splash of flavor. It’ll make the whole meal sing!
-
Watch as Everyone Flocks to the Table:
- Pull it out of the oven, let that warm, inviting aroma fill your kitchen, and watch your friends and family flock to your table. The colorful, exuberant display will have everyone excited.
Serving Suggestions
Plating is an art, but remember, perfection isn’t the goal – joy is! Serve your Hawaiian Chicken straight from the pan for a rustic, family-style meal, or plate it individually with a scoop of rice or quinoa and garnish with sliced green onions or sesame seeds for that extra flair. A lime wedge on the side adds a nice pop of freshness!
Recipe Variations
Feel free to play around with this dish! Here are a few delightful variations you can try:
- Tropical Twist: Add mango slices for an added layer of sweetness and flavor.
- Spicy Hawaiian Chicken: Incorporate jalapeños for that extra kick!
- Veggie Boost: Throw in some snap peas, zucchini, or broccoli for a nutrition-packed update.
- Grain-Free Darling: Serve over cauliflower rice for a lighter, veggie-based option.
- Meal Prep Hero: Double the recipe and save half for later! It keeps beautifully in the fridge for a couple of days and makes for an easy lunch.
Chef’s Notes
I adore how flexible this Hawaiian Chicken Sheet Pan dish is! Over the years, I’ve swapped out ingredients based on what I had on hand and it’s always turned out fantastic. One memorable experiment was using roasted veggies that were still in my fridge — talk about “zero waste” cooking! And speaking of stories, I once had an impromptu dinner party where I confidently threw everything onto the pan, and it was a smashing success! That’s the magic of this recipe: it welcomes your creativity and turns quick meals into memorable feasts.
FAQs and Troubleshooting
-
Can I use frozen chicken?
- While fresh is best for uniform cooking, you can use frozen chicken! Just make sure to thaw it correctly before cooking to avoid uneven cooking.
-
My chicken is not cooking evenly.
- Ensure that you’re cutting your chicken and veggies into similar-sized pieces. This allows for even cooking time.
-
What if my veggies are overcooked?
- If they’re starting to char too much, simply take them out of the oven while the chicken continues cooking. You can also add them halfway through for more steaming.
-
How do I store leftovers?
- Store them in an airtight container in the fridge for up to 4 days. Reheat in the oven or microwave, adding a splash of water to keep it moist.
Nutritional Info (optional)
(Nutritional values may vary; the following estimation provides a general idea.)
- Servings: 4
- Calories: 350
- Protein: 30g
- Carbs: 28g
- Fat: 15g
Cooking should be fun and filled with flavor and laughter! This Hawaiian Chicken Sheet Pan recipe is the perfect way to bring a piece of the islands to your home without the fuss. With fresh ingredients, vibrant flavors, and the joy of sharing it with loved ones, you are well on your way to becoming everyone’s go-to chef.
So tie on that apron, grab a drink, and let’s get cooking! Welcome to your kitchen adventure. 🍍🥥🌺
PrintHawaiian Chicken Sheet Pan
A vibrant and flavorful Hawaiian Chicken Sheet Pan recipe, combining chicken, fresh veggies, and sweet pineapple, roasted to perfection.
- Prep Time: 15 minutes
- Cook Time: 25 minutes
- Total Time: 40 minutes
- Yield: 4 servings 1x
- Category: Main Course
- Method: Baking
- Cuisine: Hawaiian
- Diet: Gluten-Free, Dairy-Free
Ingredients
- 1 ½ lbs (700 g) boneless skinless chicken breasts, cut into 1-inch pieces
- 1 red bell pepper, chopped
- 1 yellow bell pepper, chopped
- 1 small red onion, cut into wedges
- 1 ½ cups fresh pineapple chunks (or canned, drained)
- 2 tbsp olive oil
- 2 cloves garlic, minced
- ½ tsp salt
- ½ tsp black pepper
- ½ tsp paprika
- ¼ tsp chili flakes (optional)
- ⅓ cup low-sodium soy sauce
- ¼ cup pineapple juice
- 3 tbsp honey (or brown sugar)
- 2 tbsp rice vinegar (or apple cider vinegar)
- 1 tbsp cornstarch + 2 tbsp water (slurry, optional for thickening)
Instructions
- Preheat your oven to 400°F (200°C).
- Toss the cut chicken pieces with olive oil, minced garlic, salt, black pepper, paprika, and chili flakes in a large mixing bowl.
- Chop your bell peppers and onion into bite-sized pieces.
- Line a large baking sheet with parchment paper or aluminum foil. Spread the seasoned chicken, chopped veggies, and pineapple on the pan.
- Whisk together the soy sauce, pineapple juice, honey, and rice vinegar in a bowl, adding cornstarch slurry if desired.
- Drizzle most of the sauce evenly over the chicken and veggies, reserving some for serving.
- Bake for about 20-25 minutes, or until the chicken reaches an internal temperature of 165°F (74°C).
- Drizzle the reserved sauce over the dish just before serving.
- Serve warm and enjoy with family and friends!
Notes
This dish is flexible; feel free to substitute ingredients or add more veggies. It pairs beautifully with rice or quinoa.
Nutrition
- Serving Size: 1 serving
- Calories: 350
- Sugar: 12g
- Sodium: 600mg
- Fat: 15g
- Saturated Fat: 2g
- Unsaturated Fat: 10g
- Trans Fat: 0g
- Carbohydrates: 28g
- Fiber: 3g
- Protein: 30g
- Cholesterol: 70mg
Keywords: Hawaiian Chicken, Sheet Pan Dinner, Easy Chicken Recipe, Tropical Cuisine, Quick Meal