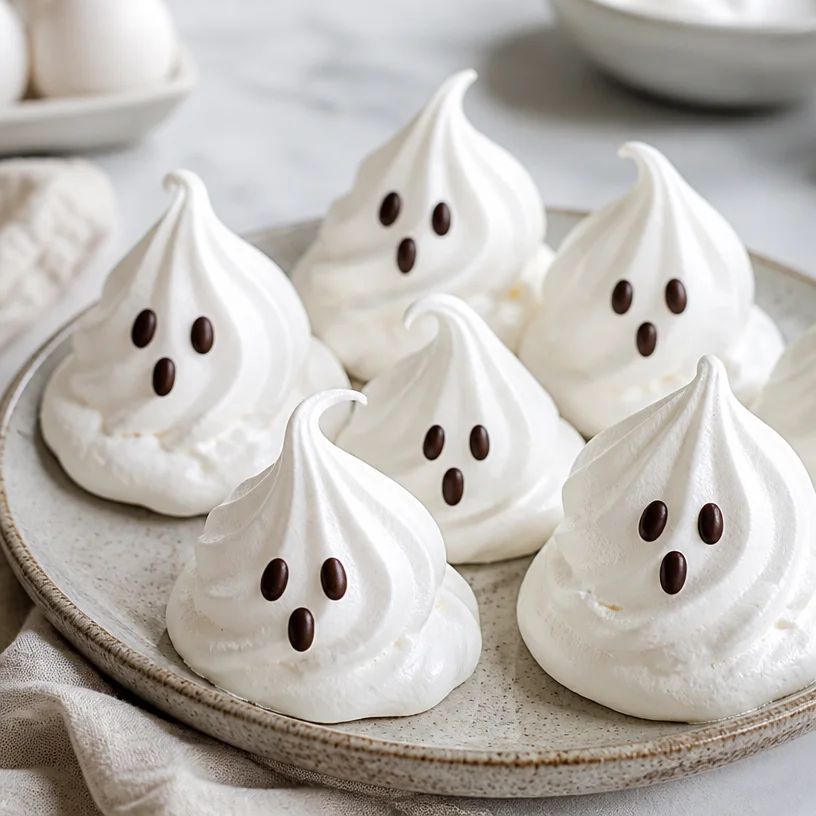
Ghost Meringues
Whip Up Some Ghost Meringues – A Spooktacular Treat!
Hello, fellow foodies! Gather ’round because today we’re diving into the whimsical world of Ghost Meringues, perfect for every festive occasion – especially Halloween! These airy, light-as-a-feather treats are not just a delightful confection but also a canvas for some of the most fun and festive memories we can create in the kitchen. Whether you’re baking up a storm with little goblins or having a chill night in on the couch, these ghostly delights are sure to impress.
There’s something magical about meringues. They almost feel like they float off the tray, dancing into the mouths of anyone lucky enough to snag one. And the best part? Making them is easier than you might think! With just two core ingredients, we’ll create spooky little specters that will haunt your dessert table in the best way possible.
A Whimsical Memory with Meringues
Let me take you back to one of my favorite Halloween evenings from my childhood. Picture this: the sun has just set, and my friends and I are scampering around the neighborhood clad in our spooky costumes, collecting treats. After our adventures, we’d return to my house, excitedly dumping our candy onto the kitchen table. But the real star of that night was my beloved grandma, who would whip up her signature meringues while we sorted through our hauls.
Her meringues were legendary – light, airy, and topped with the most adorable little chocolate eyes. As we would gather around her kitchen, the air filled with laughter and the sweet aroma of vanilla. Her magic didn’t just lie in her skills but in her warm, joyful spirit. Making those ghostly treats brought us closer together, turning mere sugar and egg whites into memories that have haunted me (in the best way) ever since. Now, I’m thrilled to share this ghostly recipe with you!
The Ingredients: Keep it Simple, Friends!
To whip up these delightful Ghost Meringues, you’ll need just a couple of ingredients. Here’s your shopping list:
-
Egg Whites:
- The backbone of your meringue! You’ll need these to create that dreamy, fluffy texture. Make sure your egg whites are at room temperature for the best results. If you’re in a pinch, you can also use pasteurized egg whites found in cartons.
-
Sugar:
- Regular granulated sugar will do wonders for stabilizing those egg whites and adding sweetness. It’s super important to add sugar slowly – like a gentle snowfall – to ensure it dissolves perfectly. If you want to swap it out, superfine sugar can create a smoother texture, or even coconut sugar for a slightly different flavor profile. Just keep in mind that the coloring may vary!
Keep in mind that meringues require a little bit of patience and precision, but trust me; the result is well worth it!
Step-by-Step Instructions: Let’s Get Whipping!
Now, are you ready to embark on your meringue-making adventure? Let’s dive into the step-by-step process!
-
Preheat Your Oven: Preheat that oven to 225°F (about 110°C). Low and slow is the name of the game here – we want to dry out the meringues rather than bake them, creating that perfect texture.
-
Gather Your Tools: Grab a mixing bowl (metal or glass works best; avoid plastic as they can retain oils). You’ll also need a hand mixer or stand mixer with a whisk attachment. If you’re feeling adventurous, you can whip them by hand, but prepare for quite the workout!
-
Beat the Egg Whites: Begin whipping those room temperature egg whites on medium speed until they’re frothy. This usually takes about 1-2 minutes. You’ll want to see some bubbles forming!
-
Add the Sugar: Gradually add your granulated sugar, one tablespoon at a time, while continuing to beat the egg whites. This allows the sugar to dissolve and prevents gritty meringues. Don’t rush this step! Keep whipping until you have stiff glossy peaks. This means when you lift the whisk out of the bowl, the peaks stay upright and hold their shape.
-
Flavoring Your Meringue (Optional): If you’d like to add a touch of flavor, now is the time! A splash of vanilla extract or almond extract can enhance your meringue nicely, but be cautious with the amount. A little goes a long way!
-
Prepare Your Baking Sheet: Line a baking sheet with parchment paper. If you need help keeping it in place, pop a dab of meringue under each corner to hold it down.
-
Pipe Your Ghosts: Now comes the fun part! Using a piping bag with a round tip, or a zip-top bag with the corner snipped off, pipe small ghost shapes. It’s okay if they’re not perfect – these are ghosts after all! Create a little swirl at the top to give them their ghostly appearance.
-
Bake Those Ghosts: Pop your tray into the preheated oven and let them bake for about 1.5-2 hours. Resist the temptation to open the door! Meringues need that steady, gentle heat to dry out. You’ll know they’re done when they easily peel off the parchment and feel crisp to the touch.
-
Cool Down: Once baked, turn off the oven and leave the meringues inside with the door ajar. This allows them to cool gradually – a critical step in ensuring they don’t crack.
-
Decorate with Eyes: Once cooled, you can decorate your meringues. Use melted chocolate or edible food markers to create little eyes that pop! Get creative – you can make them funny, spooky, or even a bit cheeky!
Serving Suggestions: Spook-tacular Presentation!
These Ghost Meringues are perfect for any festive occasion! Arrange them on a beautiful serving platter with a sprinkle of cocoa powder for an eerie effect, or place them in a decorative jar for a fun centerpiece. These treats are sure to become the talk of your next Halloween gathering (or any cozy get-together)! Don’t forget to serve them alongside a festively spooky drink – a pumpkin spice latte or some apple cider would be the perfect companion.
Recipe Variations: Get Creative!
Feeling adventurous? Here are a few fun variations to try on your Ghost Meringues:
- Spiced Meringues: Add a pinch of cinnamon or nutmeg to the mixture for a warm, spiced flavor perfect for fall.
- Chocolate Meringues: Incorporate cocoa powder into your egg whites before whipping to create a chocolatey twist on this classic treat.
- Matcha Meringues: Add a teaspoon of matcha powder for a vibrant green twist with a hint of earthy flavor.
- Colorful Ghouls: Add a few drops of food coloring into the meringue before piping to create colorful versions of these ghostly delights!
- Mini Ghosts: Pipe mini meringues for bite-sized treats that are perfect for snacking or serving at parties.
Chef’s Notes: Kitchen Stories and Evolutions
Every recipe has a story, and these Ghost Meringues are no exception. Over the years, I’ve made many variations, from lemon-flavored bites that brighten up a gloomy day to chocolate-dipped ones that fulfill my sweet tooth. The beauty of these little ghosts is in their simplicity and adaptability.
I also remember a time when I tried whipping meringues on a particularly rainy day, and, to my dismay, they never quite reached those lofty peaks. This taught me that humidity can be a meringue’s worst enemy. So, if the weather is funky, keep that in mind!
FAQs and Troubleshooting: Your Ghostly Questions Answered
-
Why didn’t my meringues rise?
- If the egg whites didn’t whip up to stiff peaks, it could be due to grease or yolk in the mixture. Ensure your mixing bowl and utensils are squeaky clean, and that no egg yolk made its way into the whites.
-
My meringues cracked. What happened?
- If cracks appeared, it might be due to baking at too high a temperature. Meringues need low and slow baking, so keep that oven temperature low.
-
How do I store leftover meringues?
- Store your ghosts in an airtight container at room temperature. They’ll stay crispy for several days, but try to eat them as soon as possible for optimal texture!
-
Can I make these ahead of time?
- Absolutely! Meringues store well, making them the perfect treat to prep in advance. Just keep them stored in an airtight container away from humidity.
Nutritional Info
While meringues aren’t usually a health food, they pack a fun, sweet punch! Each ghost meringue is approximately 15 calories, depending on how big you make them. They are naturally gluten-free and can fit into low-fat diets, but remember to enjoy them in moderation!
Now, my fellow food enthusiasts, it’s time for you to tie on your aprons, whip out your mixing bowls, and make some magical Ghost Meringues! Embrace the joy of creating and gather those you love around your table for delightful moments. Remember, cooking is as much about the experience as it is about the food. So let’s have fun and make some spooky memories together!
Happy baking! 🎃👻
PrintGhost Meringues
Delightful and airy Ghost Meringues that are perfect for Halloween and festive occasions, easy to make with just two core ingredients.
- Prep Time: 15 minutes
- Cook Time: 120 minutes
- Total Time: 135 minutes
- Yield: 20 servings 1x
- Category: Dessert
- Method: Baking
- Cuisine: American
- Diet: Gluten-Free
Ingredients
- 4 Egg Whites (room temperature)
- 1 cup Granulated Sugar
Instructions
- Preheat your oven to 225°F (about 110°C).
- Gather your mixing tools and prepare to whip the egg whites.
- Beat the egg whites on medium speed until frothy (1-2 minutes).
- Add sugar gradually, one tablespoon at a time, until stiff glossy peaks form.
- Flavor your meringue with vanilla or almond extract if desired.
- Prepare your baking sheet by lining it with parchment paper.
- Pipe small ghost shapes with a piping bag or zip-top bag.
- Bake for 1.5-2 hours without opening the oven door.
- Cool the meringues in the oven with the door ajar.
- Decorate with melted chocolate or edible food markers for eyes.
Notes
Meringues store well in an airtight container at room temperature for several days. Ensure all tools are clean and free of grease for best results.
Nutrition
- Serving Size: 1 meringue
- Calories: 15
- Sugar: 3g
- Sodium: 5mg
- Fat: 0g
- Saturated Fat: 0g
- Unsaturated Fat: 0g
- Trans Fat: 0g
- Carbohydrates: 4g
- Fiber: 0g
- Protein: 0g
- Cholesterol: 0mg
Keywords: Halloween, meringues, dessert, ghosts, festive treats
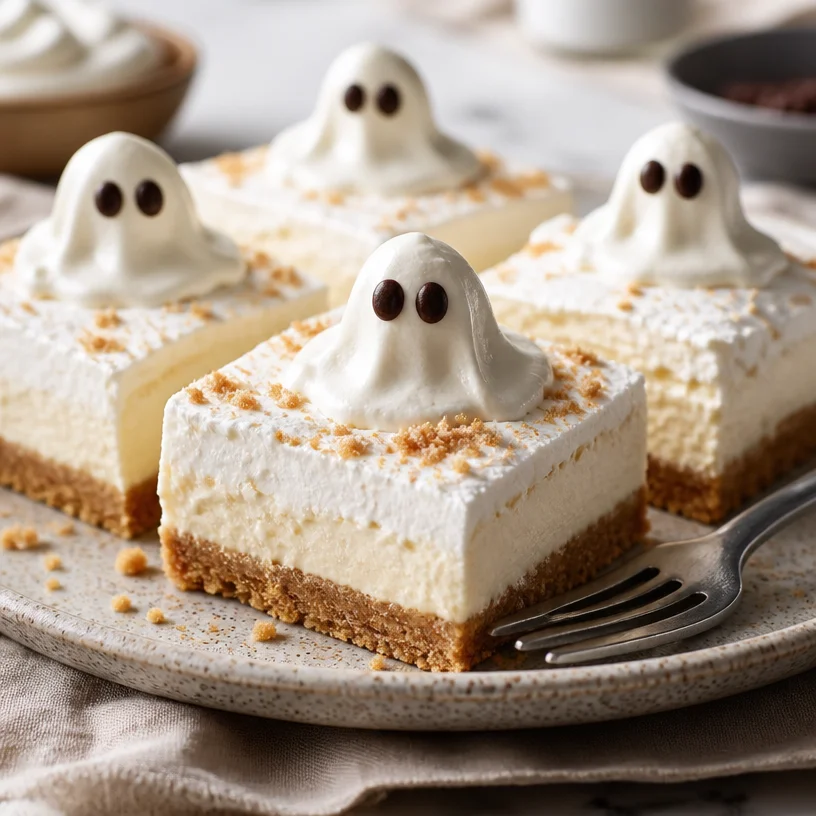
Halloween Ghost Cheesecake Bars: No-Bake Creamy Treat
Ghost Cheesecake Bars: A Spooktacular Treat for Your Halloween Gatherings
Hello, fellow food lovers! It’s Savannah here from Ivory Apron, and I’m beyond excited to share one of my absolute favorite treats that’s perfect for the spooky season: Ghost Cheesecake Bars. You might be asking yourself, “How can something that looks this cute also taste so good?” Well, my dear friend, I assure you that these bars are both a feast for the eyes and a dream for the palate. Grab your apron, and let’s get baking!
As we dive into this whimsical dessert, think about the joy of gathering with loved ones during Halloween. There’s something magical about turning the kitchen into a haunted haven, with flickering candlelight and the sweet aroma of baked goodies wafting through the air. The Ghost Cheesecake Bars are not just a delicious dessert; they are also an opportunity to create memories.
A Fun, Nostalgic Memory
I remember the first Halloween party I hosted in college—oh, what a night! I decided to get crafty and whipped up a batch of spooky treats for my friends. With a bit of imagination, I transformed simple cheesecake into what I called “Ghost Cheesecake Bites.” Picture this: soft, creamy cheesecake, adorned with little chocolate eyes on top like joyous little spirits floating on a cloud. Everyone had a blast, and we spent the night sharing ghost stories while sinking our teeth into those delightful bites. That night I learned that food has an amazing power to bring together friends and create those cherished moments we hold dear.
Fast forward to today, and I’ve refined that college creation into these delightful bars, which are perfect for serving a crowd! So, let’s get to it!
Ingredients
Gather these simple ingredients to get started on your Ghost Cheesecake Bars:
-
Cream Cheese: The star of the show! Cream cheese makes the filling rich and creamy. For a lighter version, you can substitute with a lower-fat cream cheese.
-
Graham Crackers: These little crunchy delights form the base of our bars. If you want a gluten-free option, crushed almonds or gluten-free cookies work beautifully!
-
Sugar: Adds the perfect amount of sweetness to balance the tanginess of the cream cheese. You can use coconut sugar or agave for a healthier alternative.
-
Vanilla Extract: A splash of this luscious extract enhances the flavor of the cheesecake. Use pure vanilla extract for the best taste, but imitation vanilla will work in a pinch.
-
Whipped Cream: Light and airy, whipped cream adds a dreamy texture to the filling. You can opt for store-bought or make your own for a fresher taste.
-
Chocolate or Edible Decorations: This is where the fun begins! Use melted chocolate or edible decorations to create ghostly figures on top of the bars. How about melting white chocolate and piping it out for a ghostly appearance?
Step-by-Step Instructions
Now let’s walk through the steps of making these enchanting cheesecake bars together:
-
Preheat Your Oven: Set your oven to 325°F (160°C). Pre-heating is crucial for even baking. Give your oven a moment to reach the right temperature—it’ll help ensure that your cheesecake bars turn out perfectly.
-
Prepare an 8×8 Baking Pan: Line your pan with parchment paper, allowing some overhang for easy removal later. This is a trick I swear by! It saves you from the heartbreak of broken bars.
-
Make the Graham Cracker Crust: In a mixing bowl, crush the graham crackers into fine crumbs. You could use a food processor for this, or just place them in a resealable bag and pound them with a rolling pin—it’s therapeutic! Combine the crumbs with melted butter and sugar, then mix until the mixture resembles wet sand. Press this mixture tightly into the bottom of the prepared pan. This is your sturdy foundation!
-
Bake the Crust: Pop the crust into the preheated oven and bake for about 8–10 minutes or until golden brown. The smell will be heavenly, and your kitchen will start to feel like a bakery!
-
Prepare the Cheesecake Filling: In a mixing bowl, add the softened cream cheese and sugar. Beat with an electric mixer on medium speed until smooth and creamy, about 2 minutes. Scrape down the sides of the bowl to ensure everything is mixed well.
-
Add Vanilla and Whipped Cream: Pour in the vanilla extract and fold in the whipped cream gently to keep it airy. Remember, we want lightness here! This is also the moment to taste—adjust sweetness if needed.
-
Combine and Pour: Once the mixture is fluffy, pour it over your baked crust, smoothing it out with a spatula. Don’t be shy—put your heart into it!
-
Bake the Cheesecake: Return the pan to the oven and bake for about 25–30 minutes. It’s done when the edges are set, but there’s still a slight jiggle in the middle. This will firm up as it cools.
-
Chill the Cheesecake: After baking, let it cool at room temperature for about an hour. Then, transfer it to the refrigerator and chill for at least 3 hours or overnight if time allows. Patience is key!
-
Decorate Your Ghosts: Once chilled, lift the cheesecake from the pan using the parchment overhang. Cut into bars, and now it’s time to bring those ghostly characters to life! Use melted white chocolate to create ghost shapes, or use edible decorations to make them come alive with personality. The more quirky, the better!
Serving Suggestions
When it comes to plating these delightful bars, simplicity is key! I suggest placing these on a beautiful serving platter, perhaps garnished with fresh berries or sprigs of mint for a pop of color. You can also add a drizzle of chocolate sauce around the bars for a fun effect. Don’t forget to sprinkle some edible glitter for that extra festive touch—it’s Halloween magic!
Recipe Variations
Let’s mix things up a bit! Here are some fun twists you can try:
-
Pumpkin Spice Ghost Cheesecake: Add pumpkin puree and pumpkin spice to your filling for a fall twist!
-
Chocolate Ghost Bars: Fold in melted chocolate chips or a swirl of Nutella for an indulgent chocolate version.
-
Berry Berry Ghosts: Top with fresh berry compote to add a tart freshness that complements the richness of the cheesecake.
-
Vegan Variation: Swap out traditional cream cheese for a vegan alternative and use coconut whipped cream!
-
Gluten-Free Adaptation: Use gluten-free graham crackers or an almond flour crust for gluten-free guests.
Chef’s Notes
Over the years, these Ghost Cheesecake Bars have become a staple for my Halloween gatherings. I remember one year when I dressed them up with little almond slivers to make them look extra spooky! It became a year-on-year tradition to battle for the spookiest presentation with my friends—it’s always a blast!
This recipe has blossomed over time, with little adjustments that’ve made it even better. I love experimenting with colors and flavors, connecting with the heart of the season, and creating fun memories packed in each bite.
FAQs and Troubleshooting
1. Why did my cheesecake crack?
Cracks can happen if the filling is overmixed or the cheesecake is baked at too high a temperature. Make sure to mix just until smooth and check the oven temperature with a thermometer!
2. Can I leave out the whipped cream?
You can, but it brings a lovely lightness to the filling. If you skip it, consider adding a bit of sour cream or Greek yogurt for a creamy texture.
3. How do I store leftovers?
Store any leftovers in an airtight container in the refrigerator for up to a week. They can also be frozen; just wrap them tightly for up to 3 months!
4. How can I make sure they are set properly?
The jiggle is normal, but if it looks overly wet or loose, it needs more time. You can always put it back into the oven for a few more minutes (watch it closely!).
Nutritional Info
While I recommend indulging in these bars occasionally, here’s a rough estimation per bar (yielding about 12 bars if cut evenly):
- Calories: 230
- Total Fat: 15g
- Saturated Fat: 9g
- Carbohydrates: 20g
- Sugars: 10g
- Protein: 3g
Enjoying these deliciously spooktacular Ghost Cheesecake Bars will surely draw smiles from your guests and create lasting memories around your table. So tie on that apron, gather your loved ones, and let’s cherish the moments we create together—all while indulging in the delightful flavors of Halloween. Happy cooking!
PrintGhost Cheesecake Bars
Delightful Ghost Cheesecake Bars perfect for Halloween gatherings, featuring a rich cream cheese filling and a crunchy graham cracker crust.
- Prep Time: 20 minutes
- Cook Time: 40 minutes
- Total Time: 180 minutes
- Yield: 12 servings 1x
- Category: Dessert
- Method: Baking
- Cuisine: American
- Diet: Vegetarian
Ingredients
- 8 oz Cream Cheese
- 1 cup Graham Crackers, crushed
- 1/3 cup Sugar
- 1 tsp Vanilla Extract
- 1 cup Whipped Cream
- Chocolate or Edible Decorations
Instructions
- Preheat your oven to 325°F (160°C).
- Prepare an 8×8 baking pan lined with parchment paper.
- Make the graham cracker crust by mixing crumbs with melted butter and sugar.
- Bake the crust for about 8–10 minutes until golden brown.
- Prepare the cheesecake filling by beating cream cheese and sugar until smooth.
- Add vanilla extract and fold in whipped cream gently.
- Combine the mixture and pour it over the baked crust.
- Bake the cheesecake for about 25–30 minutes until the edges are set.
- Chill the cheesecake for at least 3 hours.
- Decorate with melted white chocolate or edible decorations.
Notes
Store leftovers in an airtight container in the refrigerator for up to a week, or freeze for up to 3 months.
Nutrition
- Serving Size: 1 bar
- Calories: 230
- Sugar: 10g
- Sodium: 200mg
- Fat: 15g
- Saturated Fat: 9g
- Unsaturated Fat: 4g
- Trans Fat: 0g
- Carbohydrates: 20g
- Fiber: 1g
- Protein: 3g
- Cholesterol: 30mg
Keywords: Halloween, cheesecake, dessert, ghost, spooky treats
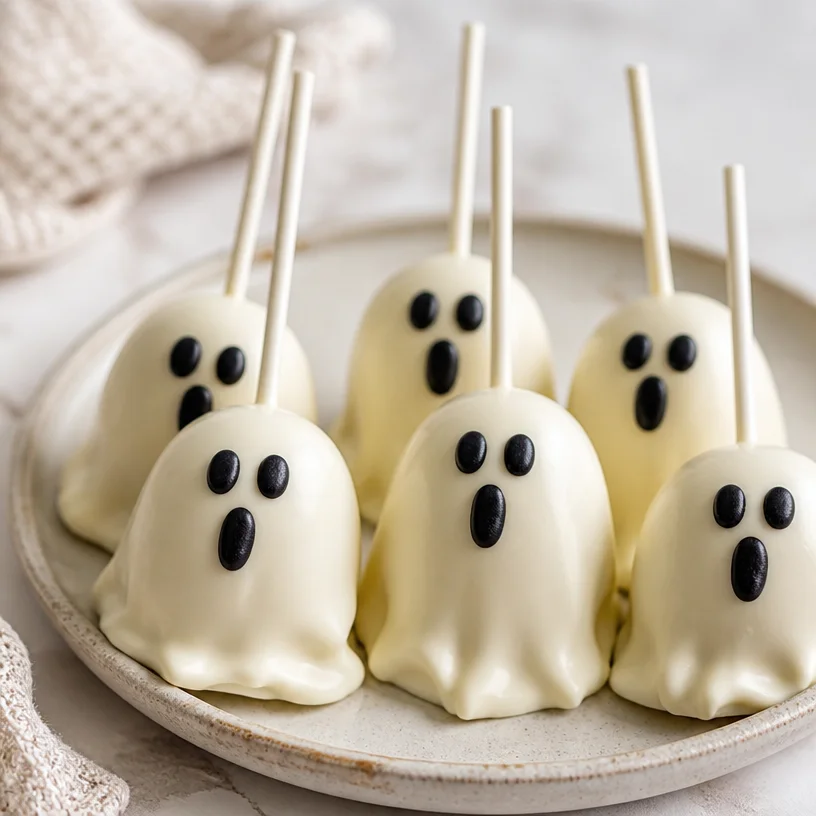
Spooky Ghost Marshmallow Pops: Quick Halloween Treats
Ghost Marshmallow Pops: A Sweet Treat for Spooky Nights
Welcome, my fellow foodies! I’m so excited to have you here, baking your way into the spirit of Halloween with a treat that’s not only delicious but also a fun, festive activity for everyone. Today, we’ll be diving into the delightfully spooky world of Ghost Marshmallow Pops. These whimsically adorable treats are perfect for Halloween parties, school bake sales, or even cozy nights in with a good movie and a warm blanket. Grab your apron, and let’s get started!
Creating these little ghostly delights is extremely simple, allowing you to channel your inner child while simultaneously impressing guests with your culinary creativity. The beautiful thing about these pops is their versatility — they can be as simple or as fancy as you like! Plus, they’re so much fun to make that you can easily involve the kiddos for a thrilling family bonding experience. Are you ready? Let’s whip up some Ghost Marshmallow Pops and create a treat that will haunt your friends and family in the best way possible!
A Sweet Memory from the Past
As I stand here mixing up those creamy white chocolate and setting marshmallows on skewers, I can’t help but recall a delightful Halloween from my childhood. My friends and I gathered at my house, which, of course, was transformed into a haunted mansion. We decorated cupcakes and whipped up all kinds of spooky snacks. I remember one particular moment vividly; my mom brought out these cute marshmallow pops she had decorated to resemble little ghosts. Every bite was a delightful combination of sweet marshmallow and rich chocolate, and I remember giddy laughter filling the room. It was moments like these that sparked my love for cooking and entertaining.
Now, every Halloween, I try to rekindle that same spirit and charm by making Ghost Marshmallow Pops. Each bite is not just a treat; it’s a memory wrapped in flavor! Whether you’re planning a big Halloween bash or just want to add a sprinkle of fun to your family dinner, these pops are sure to do the trick.
Ingredients
Here’s what you’ll need to conjure up these ghostly delights:
-
Marshmallows:
- The star of the show! Look for nice, fluffy marshmallows (regular size works best). You can also swap them for mini marshmallows if you prefer smaller ghosts or want to make a variety.
-
White Chocolate:
- Use high-quality white chocolate chips or melts for an easy melt-and-dip. If you’re feeling adventurous, you can substitute with white chocolate almond bark. Just remember, the smoother the chocolate, the easier the dipping!
-
Black Icing or Chocolate (for eyes):
- This is where the personality of your ghosts comes to life! You can use store-bought black icing in a tube for precision, or have fun tempering some dark chocolate and dabbing on little dots for eyes. Feel free to get creative! Mini chocolate chips or edible eyes work too.
-
Lollipop Sticks or Skewers:
- These are essential for turning our marshmallows into pops! Lollipop sticks give a more professional look, but wooden skewers work just fine too. If you want to keep things simple, you can also skip the stick and just leave the marshmallows as sweet little bites.
Step-by-Step Instructions
Now, let’s get down to the fun part — making our Ghost Marshmallow Pops! Here’s a detailed guide to ensure you nail it:
-
Prep Your Workspace:
- Before you dive into melting chocolate, clear off a space in the kitchen, and gather all your ingredients. Lay down some parchment paper on a baking sheet for your completed pops. This will help prevent sticking!
-
Melt the White Chocolate:
- In a microwave-safe bowl, add your white chocolate. Heat in 30-second intervals, stirring in between until the chocolate is completely melted and smooth. Make sure not to overheat, as this can cause the chocolate to seize.
-
Skewer the Marshmallows:
- Take your lollipop sticks or skewers and gently insert them into the marshmallows, about halfway through. They should stand up straight and not wobble much. This process is simple, but take your time — you don’t want to push too hard and break the marshmallow.
-
Dip the Marshmallows:
- Holding the skewer, dip each marshmallow into the melted white chocolate, letting the excess drip off. You want a nice, even coating. If you’d like a thicker layer, you can dip them twice after the first layer has cooled for a minute.
-
Set on Parchment:
- Place the dipped marshmallows onto your parchment-lined baking sheet. This is your time to get artistic — feel free to twirl or tilt the marshmallows as you go to create a ghostly swirl shape!
-
Add the Eyes:
- While the chocolate is still soft, take your black icing or melted chocolate and carefully dot two little eyes onto each ghost. They don’t have to be perfect; a little irregularity makes them more charming and fun!
-
Let Them Set:
- Allow your Ghost Marshmallow Pops to set at room temperature, or you can speed up the process by placing them in the refrigerator for about 10-15 minutes until the chocolate hardens.
-
Enjoy!
- Serve these pops at your next gathering, or simply enjoy them yourself while watching your favorite Halloween movie. Treat yourself to an adorable sculptural snack!
Serving Suggestions
To plate your Ghost Marshmallow Pops, stick them in a simple mason jar filled with festive candies or popcorn for a charming centerpiece at your Halloween party. Alternatively, you can lean them against each other on a decorative platter for a spooky display. Either way, a little sprinkle of edible glitter or Halloween-themed confetti will add the finishing touch to your spooky treats!
Recipe Variations
If you’d like to shake things up, here are a few creative twists and variations for your Ghost Marshmallow Pops:
-
Drizzle of Chocolate:
- After dipping in white chocolate, you can drizzle dark chocolate or orange-colored candy melts over the top for a fun contrast.
-
Flavored Marshmallows:
- Try using flavored marshmallows, such as pumpkin spice or chocolate mint, for a different taste twist!
-
Sprinkle Toppings:
- While the chocolate is still wet, try sprinkling some crushed graham crackers, candy corn, or festive sprinkles on top for added texture and flavor.
-
Fruit-based Pops:
- Want a healthier approach? Dip ripe strawberries in white chocolate and decorate with chocolate eyes instead. These little guys would make for a ghostly fruit display!
-
Vegan Version:
- Swap regular marshmallows for vegan marshmallows and use dairy-free chocolate instead. This way, everyone can enjoy a spooky treat!
Chef’s Notes
These Ghost Marshmallow Pops are a fantastic way to get creative and have fun in the kitchen, and I love watching everyone’s eyes light up when they see what you’ve made. They’ve evolved over the years from simple marshmallows dipped in chocolate to now becoming a mini canvas for culinary expression!
One funny kitchen story that comes to mind involves my dog, Charlie, who decided that he was the real ghost of the kitchen one Halloween. While I was getting ready to dip my marshmallows, he snuck onto the counter and helped himself to a few marshmallows! It was hilarious, and while I couldn’t be mad at him, I made sure to keep a watchful eye during future baking endeavors.
FAQs and Troubleshooting
1. What should I do if my chocolate seizes?
- If your chocolate seizes, don’t panic! Try adding a teaspoon of vegetable oil or shortening to the bowl and reheat gently while stirring. This should bring it back to a smoother consistency.
2. Can I use flavorings in the melted chocolate?
- Absolutely! Feel free to add a few drops of extract, like vanilla or almond, to enhance the flavor of your chocolate. Just be sure to use oil-based extracts if you’re melting chocolate, as water can cause it to seize.
3. What’s the best way to store leftovers?
- Store your pops in an airtight container at room temperature. They should last for 3-5 days. If you need to refrigerate them, be sure to separate layers with parchment to keep them from sticking.
4. Can I make these ahead of time?
- Yes! These Ghost Marshmallow Pops can be made a day in advance. Just make sure to keep them in a cool, dry place to prevent the chocolate from melting.
Nutritional Info (Optional)
For those interested in the nutritional aspect, each Ghost Marshmallow Pop contains approximately:
- Calories: 100
- Fat: 5g
- Carbohydrates: 15g
- Protein: 1g
However, keep in mind that this is an estimate based on the ingredients used.
So, there you have it! A delightfully spooky recipe that’s as fun to make as it is to eat. I hope you feel encouraged to tie on your apron, indulge in a little kitchen adventure, and perhaps even relive some of those special moments like I do every Halloween. Here’s to creating cherished memories with food and friends — one Ghost Marshmallow Pop at a time! Happy haunting!
PrintGhost Marshmallow Pops
Delicious and whimsical Ghost Marshmallow Pops perfect for Halloween celebrations.
- Prep Time: 15 minutes
- Cook Time: 5 minutes
- Total Time: 20 minutes
- Yield: 12 servings
- Category: Dessert
- Method: Dipping
- Cuisine: American
- Diet: Vegetarian
Ingredients
- Marshmallows (regular or mini)
- White chocolate chips or melts
- Black icing or chocolate (for eyes)
- Lollipop sticks or wooden skewers
Instructions
- Prep your workspace: Clear off a space in the kitchen, and gather all your ingredients. Lay down some parchment paper on a baking sheet.
- Melt the white chocolate in a microwave-safe bowl by heating in 30-second intervals, stirring until smooth.
- Skewer the marshmallows by inserting lollipop sticks or skewers halfway through them.
- Dip the marshmallows into the melted white chocolate, letting excess drip off.
- Set the dipped marshmallows on a parchment-lined baking sheet.
- Add the eyes with black icing or melted chocolate while the chocolate is still soft.
- Let them set at room temperature or refrigerate for about 10-15 minutes until chocolate hardens.
- Enjoy! Serve and enjoy these spooky treats, or decorate them for a festive display.
Notes
These pops can be made a day in advance. Store in an airtight container.
Nutrition
- Serving Size: 1 pop
- Calories: 100
- Sugar: 15g
- Sodium: 20mg
- Fat: 5g
- Saturated Fat: 3g
- Unsaturated Fat: 2g
- Trans Fat: 0g
- Carbohydrates: 15g
- Fiber: 0g
- Protein: 1g
- Cholesterol: 0mg
Keywords: Halloween, dessert, marshmallow, treats, spooky snacks, family fun
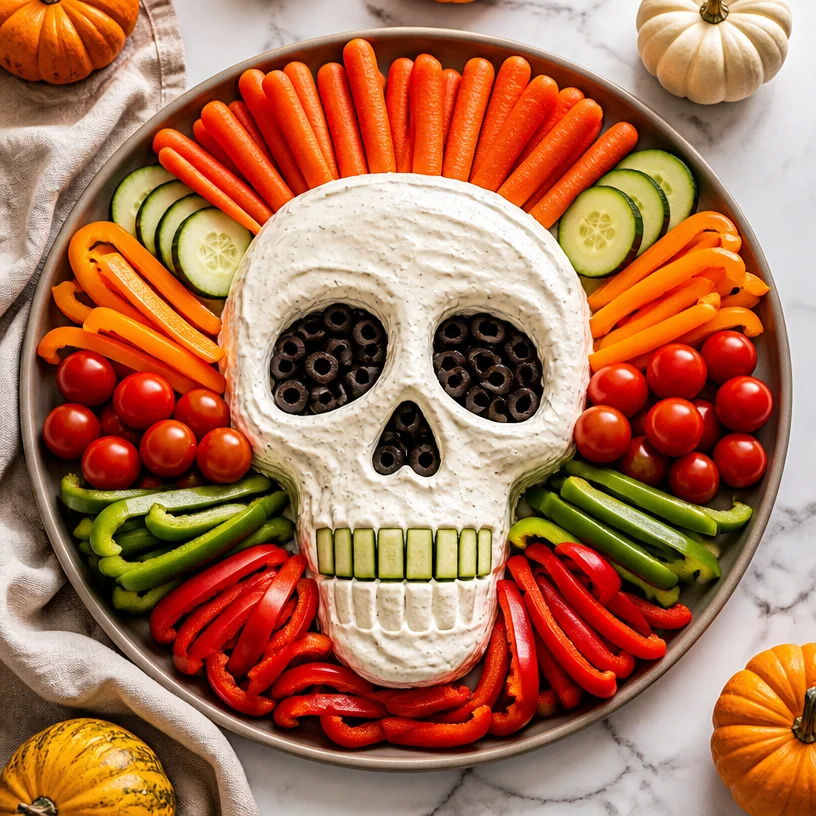
Halloween Skull Veggie Tray: Quick Spooky Party Platter
The Spook-tacular Skull Veggie Tray: Elevate Your Halloween Party with Style!
Ah, Halloween! A time for ghouls and goblins, but also an opportunity to make a bang in the kitchen! Whether you’re hosting a spooky gathering for friends or just looking to spice up a family dinner, crafting a Skull Veggie Tray is a clever way to impress your guests while sticking to healthy snacks. Who would have thought that a simple plate of vegetables could transform into a festive centerpiece?
Picture this: flickering candles, a playlist of spine-tingling tunes, and a table adorned with cobwebs. The final piece of the puzzle? A beautifully arranged Skull Veggie Tray that’s both eye-catching and delicious! This isn’t just any veggie platter; it’s a playful nod to the season that brings smiles along with a dash of horror—perfect for those Instagram moments!
In today’s blog post, I’ll walk you through creating this delightful and spooky dish. From personal memories and clever tips to its presentation, I’ll ensure that you not only nail this recipe but also have fun in the process. So grab your apron, and let’s dive into the wonderful world of veggie creativity!
A Memory From My Childhood
As a child, Halloween was filled with magic for me. I remember the vibrant orange and black decorations, the anticipation of trick-or-treating, and, oddly enough, my family’s legendary Halloween parties. My mom always took the time to create something special in the kitchen, and one year, she decided to craft a whimsical veggie tray.
With her hostess hat on, she artfully arranged carrots, cucumbers, and other colorful veggies into a fun, spooky design. I can still see the pride on her face as she served it to the guests, proudly declaring it the "Healthier Choice." People loved it—and so did I! Watching adults revel in healthy snacks inspired me to bring that same joy into my own hosting ventures. Now, it’s my turn to carry the torch with the Skull Veggie Tray, keeping tradition alive while adding my modern twist.
Ingredients
Gather ‘round, fellow foodies! Let’s look at the ingredients you’ll need to bring this Skull Veggie Tray to life. Each component plays a role in sculpting this festive masterpiece.
-
Carrots: Sweet and crunchy! Choose baby carrots for an easy option, or slice large carrots into sticks for that perfect skull shape. If you’re not a fan of carrots, parsnips offer a similar texture with a slight sweetness.
-
Cucumber: A refreshing touch! Opt for English cucumbers, which are less bitter and have fewer seeds. Want something different? Zucchini can also be a fun substitute.
-
Bell Peppers: These colorful beauties add a burst of sweetness and texture. Go for a mix of colors (red, yellow, green) for visual appeal. If you want to spice it up, use jalapeños or even roasted red peppers for added flavor.
-
Cherry Tomatoes: Their juicy pop adds a fantastic contrast to the crunch of other veggies. If tomatoes aren’t your thing, consider using radishes for a spicy flair.
-
Ranch Dip: The perfect creamy accompaniment! You can use store-bought ranch dressing or whip up a homemade version with sour cream, a dash of garlic powder, and fresh herbs. For a healthier twist, try Greek yogurt instead of sour cream!
These ingredients combine to create a lively, vibrant display perfect for Halloween or any occasion that calls for festive snacking. Plus, they’re all packed with vitamins—truly a win-win!
Step-by-Step Instructions
Ready to create the ultimate Skull Veggie Tray? Follow these simple steps and feel free to put your personal stamp on it along the way!
-
Prepare Your Veggies: Start by washing all your vegetables thoroughly. Give them a little scrub under water—this will help remove any lingering dirt or pesticides. For extra crunch, you can soak the carrots in ice water for 30 minutes to get that refreshing crispness.
-
Create Your Skull Outline: Find a large platter or board. You can even use parchment paper to map out your skull outline! Use a pencil to draw a simple skull shape if you’re feeling artsy. If you prefer to eyeball it, go for a rounded skull shape at the top with a wide jaw.
-
Arranging Your Carrots: Using baby carrots or sliced carrots, place them in the shape of the skull. Start at the forehead and work your way down to the jaw. Use larger carrot sticks for the jawline to create definition.
-
Adding the Cucumber: Slice cucumber into rounds and gradually position them to form the eye sockets for a haunting effect. You can also cut them into half moons for added variety. If you’re artistic, consider creating a cheekbone effect for an extra spooky vibe!
-
Bell Peppers for Detail: Now, let’s make it pop! Slice bell peppers into strips or triangles. Use red or yellow bell pepper pieces to create a nose and wide teeth along the jawline. Assemble them carefully to achieve that distinctive skull expression—feel free to channel your inner artist!
-
Cherry Tomatoes & Final Touches: Scatter cherry tomatoes around the platter, filling any gaps and adding color. They can double as bloodshot eyes if you place them within the eye sockets—creepy and delightful!
-
Prepare Your Ranch Dip: Pour your ranch dressing into a small bowl and place it in the center of the veggie tray or off to one side. It serves as the perfect accompaniment for dipping into those scrumptious veggies.
-
Secure and Serve: If you’re transporting your tray, consider using toothpicks and a little bit of plastic wrap to secure some of the veggies lightly. It’ll keep everything in place while ensuring that your Skull Veggie Tray reaches its destination intact.
And voila! You now have a spooky yet fun Skull Veggie Tray ready to dazzle your guests.
Serving Suggestions
When it’s time to serve, gather everyone around and draw them into the delight of your Skull Veggie Tray. It can be the conversational piece at your Halloween party. Encourage guests to dive in, offering them small plates or bowls for their veggie haul. You might even want to provide some fun napkins or Halloween-themed plates for a cohesive look!
Remember, there’s no wrong way to enjoy this tray! Whether they’re dipping or grazing straight from the platter, everyone will love this creative take on a healthy snack.
Recipe Variations
Looking to shake things up a bit? Here are a few variations for your Skull Veggie Tray that you might find inspiring:
-
Spooky Spreads: Instead of ranch, try a hummus dip mixed with roasted garlic or a spicy guacamole for that extra kick.
-
Add Some Protein: Include bite-sized pieces of cheese, like cubes of cheddar or mozzarella, to complement your veggies and add a hearty touch.
-
Herbaceous Twist: Add herbs like parsley or dill sprigs for freshness. They can also double as a garnish to enhance the overall presentation.
-
Creative Shapes: Use a cookie cutter to create spooky veggie shapes (like bats and ghosts) for a child-friendly option.
-
Flavor Boost: Spice up your ranch by incorporating hot sauce or different seasoning blends. Try ranch packets from your pantry for some quick flavor variations!
Chef’s Notes
I adore how a simple veggie tray can bring people together! It’s funny how, with a bit of creativity, an ordinary platter can steal the show. Over the years, I’ve made more veggie trays than I can count, and while they started as a simple way to present healthy options, they’ve turned into a canvas for my culinary imagination.
Once, at a Halloween bash, I accidentally knocked over the tray, sending veggies flying everywhere. Instead of panicking, I spun it as a fun “veggie explosion” moment, and everyone laughed—sometimes, you just have to embrace the chaos!
Crafting this Skull Veggie Tray has become a cherished Halloween tradition that adds a touch of whimsy to our gatherings. Here’s to continuing that legacy with each new creation while keeping it relaxed, casual, and full of joy!
FAQs and Troubleshooting
Q: How long can I prepare the veggie tray in advance?
A: You can prep the veggies a few hours ahead of time. Just be sure to keep everything covered and chilled to maintain freshness!
Q: Can I make this vegan-friendly?
A: Absolutely! The veggie tray is naturally vegan. Just choose a vegan ranch dressing or make your own using tahini or avocado for a creamy dip.
Q: What do I do if my veggies start to wilt?
A: Be sure to keep your veggies submerged in ice water and refrigerate until just before serving. This will help them stay crisp!
Q: Can I mix other vegetables into the tray?
A: Yes! Feel free to include snap peas, celery sticks, or even broccoli florets for variety. Just be mindful of how they fit into your skull design!
Nutritional Info
While I generally focus more on flavor than numbers, it is worthwhile to note that this Skull Veggie Tray is low in calories and high in vitamins A and C, fiber, and antioxidants. Perfect for guilt-free snacking!
So, there you have it—your guide to crafting a show-stopping Skull Veggie Tray that will charm all your guests while nourishing them. Cooking is truly about sharing and connecting. Enjoy the festivities, and happy Halloween! Your ghostly kitchen awaits! 🍁👻✨
PrintSkull Veggie Tray

A spooky and creative veggie tray perfect for Halloween parties, featuring a playful skull design made with fresh vegetables.
- Prep Time: 15 minutes
- Cook Time: 0 minutes
- Total Time: 15 minutes
- Yield: 8 servings
- Category: Appetizer
- Method: Assembly
- Cuisine: American
- Diet: Vegan
Ingredients
- Carrots (baby or sliced)
- Cucumber (English or zucchini)
- Bell Peppers (mix of red, yellow, green)
- Cherry Tomatoes
- Ranch Dip (store-bought or homemade)
Instructions
- Prepare your veggies by washing them thoroughly.
- Create your skull outline on a platter or board.
- Arranging your carrots in the shape of the skull starting from the forehead.
- Adding sliced cucumber for eye sockets.
- Bell peppers to create nose and teeth details.
- Scatter cherry tomatoes around the tray for color.
- Prepare your ranch dip in a small bowl in the center.
- Secure and serve your veggie tray for guests to enjoy.
Notes
Consider adding other veggies such as snap peas or celery sticks for variety.
Nutrition
- Serving Size: 1 serving
- Calories: 100
- Sugar: 6g
- Sodium: 200mg
- Fat: 7g
- Saturated Fat: 1g
- Unsaturated Fat: 6g
- Trans Fat: 0g
- Carbohydrates: 10g
- Fiber: 3g
- Protein: 2g
- Cholesterol: 0mg
Keywords: Halloween, veggie tray, healthy snacks, party food
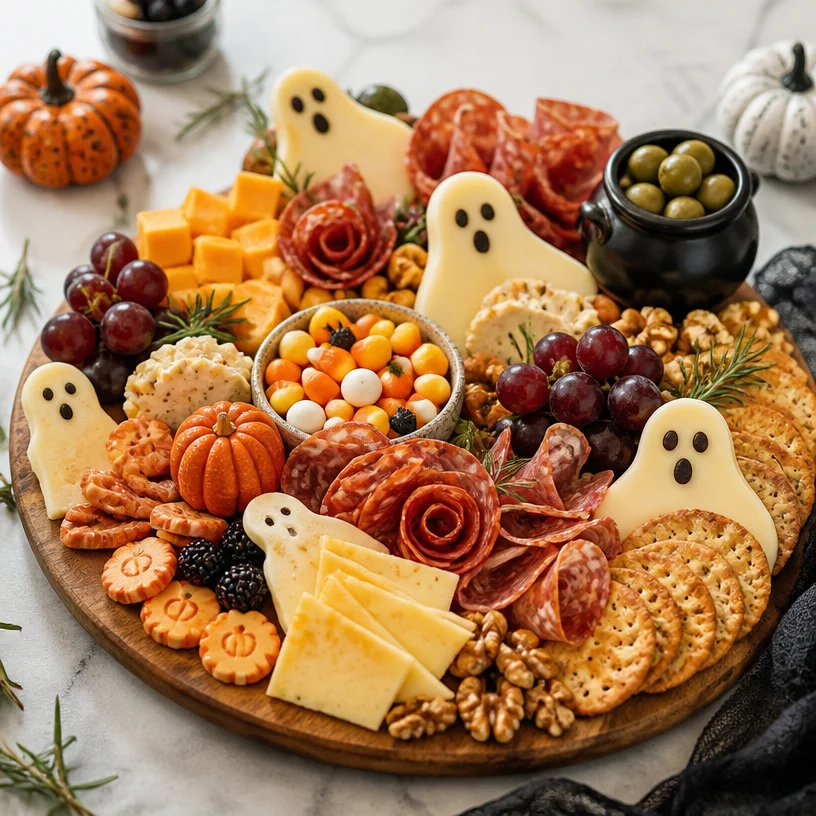
Minute Halloween Charcuterie Board for Spooky Gatherings
A Spooktacular Halloween Charcuterie Board: Elevate Your Festivities
Hello, fabulous foodies! As we approach the season of pumpkin spice lattes, crisp fall air, and all things spooky, it’s time to embrace the fun of Halloween! There’s nothing quite like gathering friends and family for a ghoulishly delightful night filled with good company and great food. Today, I’m thrilled to share my ultimate guide to creating a Halloween-themed charcuterie board that will be the centerpiece of your Halloween festivities.
Charcuterie boards are a crowd-pleaser, perfect for any occasion, but when you add a touch of Halloween magic, they become something truly special. Think of a delightful array of meats, cheeses, fruits, and sweet treats, all artfully arranged to capture the charm of the Halloween spirit. Whether you’re hosting a spooky gathering, a Halloween party, or simply looking to impress your family with a fun dinner, this charcuterie board will become a beloved tradition for years to come.
So, let’s roll up our sleeves, tie on our aprons, and get creative!
A Memory to Cherish
I remember the first Halloween party I hosted back in college. I was nervous but excited to welcome friends into my little apartment. It was an eclectic decor frenzy — cobwebs draped over every surface, jack-o’-lanterns illuminating the room, and of course, a table filled with an array of snacks.
That was my first time crafting a charcuterie board, although I called it a “spooky snack platter.” My friends and I filled it with whatever we could find: a mishmash of cheeses, old crackers, and a bag of candy corn that had seen better days. You know what? It didn’t matter! What made it special was the laughter, the “boo” jokes, and the memories we created around that table. That night sparked my love for food styling and entertaining.
Fast forward to today, and I can’t wait to share elevated, easy-to-create charcuterie boards that make hosting as enjoyable as attending. Now let’s dive into creating your Halloween charcuterie board!
Ingredients You’ll Need
To get started, here’s a simple breakdown of the ingredients you’ll need to create your Halloween masterpiece:
-
Cheese: A variety of textures and flavors adds depth. Think sharp cheddar, creamy brie, and tangy goat cheese. For dairy-free options, try cashew or almond-based cheeses.
-
Meats: Select a mix of cured meats such as salami, prosciutto, and pepperoni. If you’re catering to vegetarians, consider adding marinated tempeh or smoked tofu.
-
Crackers: Choose an assortment—some crisp, some soft—to provide a crispy contrast. Gluten-free options are easy too! Look for rice cakes or nut-based crackers.
-
Fruit: Fresh fruits like grapes, figs, or apple slices give a refreshing burst; dried fruits like apricots and cranberries add chewiness. Opt for seasonal picks like blood oranges or pomegranate seeds to keep things festively colorful!
-
Candy: No Halloween board is complete without some sweet treats! Mini chocolate bars, gummy worms, and candy corn add a playful touch. For a healthier twist, use dark chocolate-covered almonds.
-
Nuts: Don’t forget a sprinkle of nuts for crunch! Almonds, walnuts, or dry roasted pistachios add sophistication and flair.
Let your creativity flow as you shop! Don’t hesitate to swap in seasonal ingredients or local finds.
Step-by-Step Instructions
1. Gather Your Supplies
Before diving in, make sure you have a lovely wooden board or platter, as well as small bowls or ramekins for dips or spreads. Once you’ve set the stage, grab your ingredients and let’s get building!
Pro Tip: A good charcuterie board starts with a balanced flow — work on visual appeal. Consider a triangle or circular shape, allowing your ingredients to shine evenly.
2. Start with Cheese
Begin by placing your cheese selections on the board. Slice some and leave others whole for added texture. Arrange them a bit artistically, varying heights and angles. For instance, a creamy brie can sit in a center position flanked by sharp cheddar blocks and crumbles of blue cheese.
Chef Hack: For a ghoulish twist, use a cookie cutter to slice your cheeses into festive shapes! Ghosts, bats, or pumpkins are always a hit.
3. Add the Meats
Next, it’s meat time! Fan out the cured meats around the cheese, folding them in creative shapes to add visual intrigue. Think of creating mini “rose” shapes with salami or prosciutto.
Chef Insight: Laying down parchment paper before adding meats can help with cleanup and keep your board looking pristine.
4. Crackers and Fruits
Now, sprinkle your crackers around the cheesiest parts of the board, alternating shapes and sizes. Then, tuck in your fresh fruits like grapes and slices of apples. Use bursts of color from figs and pomegranates to create visual contrast!
Tip: Hiding some of the fruit under meats and cheeses creates layers, drawing the eye in deeper.
5. Sweeten the Deal
It’s time for treats! Place your candy and sweets in the gaps around the board. This is where you can really have fun! If you want, fill a small bowl with gummy worms or stack chocolate bars for a haunted house look.
Chef Story: I remember adding gummy spiders one year for extra creepiness, and the kids went wild!
6. Sprinkle with Nuts
Finally, fill in any remaining gaps with nuts for that satisfying crunch. Scatter them around the fruits and as accents to the meats and cheeses.
7. Include Dips or Spreads
Consider adding a small dish of honey, mustard, or a festive pumpkin hummus for variety. If using a spooky spread, like a “blood” (tomato-based) sauce, this elevates the fun even more!
Serving Suggestions
To serve your Halloween charcuterie board, simply set it in the center of the table or kitchen island for easy access. Provide small plates and napkins for guests as they help themselves. For a cozy atmosphere, consider dimming the lights and lighting some candles — it’s all about creating a warm, inviting space.
Recipe Variations
-
Vegetarian Delight: Replace meat with marinated vegetables like roasted peppers, olives, or artichoke hearts for a colorful vegetarian board.
-
Sweet Tooth Special: Include an assortment of cheeses paired with caramel drizzles or sweet spreads alongside fresh figs for a dessert-inspired twist.
-
Savory and Spicy: Add spicy spreads, jalapeño cheddar, or hot salami for those who crave heat!
-
Kid-Friendly Edition: Use colorful fruits, mini pizza bagels, and cookies instead of traditional meats and cheeses to appeal to younger guests.
-
Gluten-Free: Opt for gluten-free crackers, fresh veggies like cucumber, and crisp apple slices for dipping in dips and spreads.
Chef’s Notes
Creating charcuterie boards should never feel stressful! If you find yourself short on time, it’s perfectly okay to grab pre-sliced meats and cheeses from the deli — they can still look fantastic! Remember, the goal is to share delicious food with your favorite people.
I recall a last-minute Halloween party where I threw together a hodgepodge of leftover cheeses and fruits. It wasn’t Pinterest-perfect, but everyone raved about the flavors. Sharing food is about the connection, not the perfection!
FAQs and Troubleshooting
1. How can I keep my fruits from browning?
To keep your apple slices fresh, soak them in a mixture of water and lemon juice for a few minutes before adding them to the board. Rinse and dry before serving.
2. What if my board feels too sparse?
Filling in gaps with nuts, dried fruits, or even little chocolates can bridge areas and create a fuller presentation!
3. How can I ensure flavors work well together?
When building your board, aim for a balance of flavors—sharp vs. creamy, sweet vs. salty. Tasting along the way will guide you in finding a delightful mix!
4. What if I have dietary restrictions among guests?
Communicate with your guests ahead of time regarding dietary needs and swap in alternatives accordingly. This will ensure there’s always something delicious for everyone.
Nutritional Info
While charcuterie boards can vary widely, remember the beauty lies in their customization. If you’re concerned about nutritional values, consider factors like portion sizes for meats and cheeses and balance them with fruits and nuts for a wholesome experience.
Let’s elevate our Halloween with style this year! Making this charcuterie board will not only feed your guests but also create memories filled with laughter and delight. So, gather ‘round the table (and add some spooky decor!), and let’s celebrate the season together. Happy Halloween, my fellow food lovers!
PrintHalloween Charcuterie Board
Create a stunning Halloween-themed charcuterie board filled with festive meats, cheeses, fruits, and treats for your celebrations.
- Prep Time: 15 minutes
- Cook Time: 0 minutes
- Total Time: 15 minutes
- Yield: 8 servings
- Category: Appetizer
- Method: No-Cook
- Cuisine: American
- Diet: Vegetarian
Ingredients
- Sharp cheddar cheese
- Creamy brie cheese
- Tangy goat cheese
- Salami
- Prosciutto
- Pepperoni
- Marinated tempeh (for vegetarian option)
- Smoked tofu (for vegetarian option)
- Assorted crackers (choose gluten-free if needed)
- Grapes
- Figs
- Apple slices
- Dried apricots
- Cranberries
- Blood oranges
- Pomegranate seeds
- Mini chocolate bars
- Gummy worms
- Candy corn
- Dark chocolate-covered almonds
- Almonds
- Walnuts
- Dry roasted pistachios
- Dips: honey, mustard, or pumpkin hummus
Instructions
- Gather your supplies including a wooden board and small bowls for dips.
- Start with cheese, slicing some and leaving others whole.
- Add the meats, folding them into creative shapes.
- Sprinkle crackers around the cheese and tuck in fresh fruits.
- Sweeten the deal by placing candy in gaps on the board.
- Sprinkle nuts around for crunch.
- Consider including dips or spreads for variety.
Notes
Feel free to swap in seasonal or local ingredients as desired.
Nutrition
- Serving Size: 1 serving
- Calories: 400
- Sugar: 15g
- Sodium: 600mg
- Fat: 24g
- Saturated Fat: 10g
- Unsaturated Fat: 14g
- Trans Fat: 0g
- Carbohydrates: 40g
- Fiber: 5g
- Protein: 15g
- Cholesterol: 25mg
Keywords: Halloween, charcuterie board, appetizers, festive recipes, party food
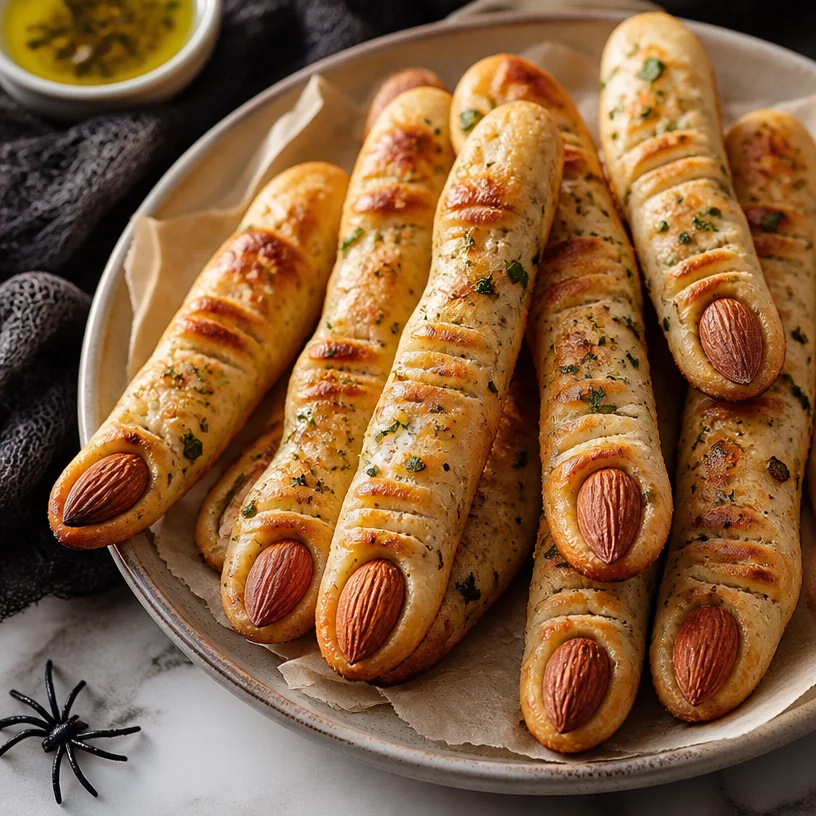
Halloween Witch Finger Breadsticks: 30-Minute Party Appetizer
Witch Finger Breadsticks: A Spooktacular Treat
Hello, fellow food lovers! Savannah here from Ivory Apron, and I’m thrilled to guide you through the delightfully eerie world of Witch Finger Breadsticks. Perfect for themed parties, Halloween feasts, or simply to surprise your loved ones, these breadsticks are as fun to make as they are to eat. Trust me, your friends and family will be intrigued and entertained when they spot these spooky treats on the dinner table!
A Dash of Nostalgia
When I think of Halloween, I can’t help but sway back to the days of crafting creative treats for school parties. Growing up, my friends and I always made a point to outdo each other with extravagant culinary concoctions. One year, I decided to whip up something a little out of the ordinary—Witch Finger Breadsticks! My mom and I spent the afternoon creating a mini culinary masterpiece. The dough shaped like fingers, complete with almond nails painted with garlic butter—pure creativity on a plate. That Halloween, we had not only a tasty treat but the biggest laugh as we handed them out to our friends at school. It was a moment that perfectly embodies what cooking is all about: fun, creativity, and a sprinkle of nostalgia.
Ingredients You’ll Need
Let’s dive into the essentials for your Witch Finger Breadsticks. Here’s what you’ll need:
-
Pizza Dough: This is the star of your breadsticks! You can use store-bought or homemade pizza dough. If you’re looking for a healthier option, whole wheat dough works nicely, too.
-
Almonds: These will serve as your witchy fingernails. Go for slivered almonds for easy application. If you prefer something nut-free, consider using peeled sunflower seeds or even roasted pumpkin seeds for a spooky touch.
-
Garlic Butter: A blend of melted butter with minced garlic, this concoction will add tons of flavor. You can make it healthier by swapping out the butter for olive oil, or even a vegan butter substitute if you want to keep these breadsticks dairy-free.
Step-by-Step Instructions
Ready to conjure up some magic in your kitchen? Let’s bake!
-
Preheat your Oven: First things first, preheat your oven to 400°F (200°C). This ensures your breadsticks get all warm and golden while baking.
-
Prepare the Pizza Dough: If using store-bought pizza dough, let it sit at room temperature for about 15 minutes—this makes it easier to handle. If you’re feeling ambitious, homemade dough always delivers that warm-from-the-oven feel. Roll or stretch your dough into a rectangular shape on a well-floured surface.
-
Cutting the Fingers: Take a sharp knife or pizza cutter and slice the dough into strips about 1 inch wide and 5-6 inches long. Think about the width and length of a finger—after all, we want these to look as ghoulish as possible!
-
Shape the Fingers: Here comes the fun part! Take each strip of dough and gently pinch one end to form a knobby fingertip. You can twist the dough slightly to create a more natural look. Most important? Don’t worry about perfection; the more unique they look, the spookier they’ll be!
-
Add the Almond Nails: Place a slivered almond at the tip of each finger to mimic a fingernail. Press it in gently so it holds during baking.
-
Brush with Garlic Butter: Melt some butter in a small saucepan and add minced garlic. Let it infuse for a minute, then remove from heat. Brush the garlic butter mixture over each breadstick, ensuring to coat them thoroughly—this adds a rich flavor that’ll make your mouth water.
-
Bake the Breadsticks: Place your witch fingers on a parchment-lined baking sheet and pop them into the oven. Bake them for about 15-20 minutes or until they’re golden brown and irresistible to the eye.
-
Serve with Style: Once out of the oven, you may want to brush them again with garlic butter for an extra punch. Let them cool slightly before arranging them on a spooky platter.
Serving Suggestions
Presentation matters almost as much as taste, right? Arrange your Witch Finger Breadsticks in a skeleton hand or atop a spooky-themed platter with some marinara sauce for dipping on the side. Maybe even throw in some creepy decorations like fake spider webs or mini pumpkins to complete the look. The more festive, the better!
Recipe Variations
Let’s explore some fun twists to keep things fresh:
-
Cheesy Witch Fingers: Sprinkle some shredded mozzarella or parmesan cheese on top of the dough before baking for an added cheesy touch!
-
Spicy Twist: Mix in a pinch of red pepper flakes to your garlic butter for a bit of heat that will elevate your Witch Fingers!
-
Herb-Infused: Add some dried herbs like oregano or thyme to your garlic butter for a herbal kick that enhances the flavor.
-
Sweet Version: For a dessert alternative, use crescent roll dough, brush with honey or cinnamon sugar, and use chocolate chips for “nails”!
Chef’s Notes
Oh, where do I begin? Making Witch Finger Breadsticks has become a Halloween tradition in my household. Every year, I seem to come up with new ways to personalize them. One time, we even topped them with pesto for a vibrant green look that absolutely screamed “witch!” I’ve also experimented by adding a drop of food coloring to the dough for an extra spooky twist. Just a reminder, the kitchen is your playground—don’t be shy about getting creative!
FAQs and Troubleshooting
1. Can I freeze these breadsticks?
Absolutely! Prepare them as instructed, but instead of baking, let them cool and pop them in the freezer. When you’re ready, bake from frozen, adding a few extra minutes to the time.
2. My dough didn’t rise — what happened?
Ensure your yeast is fresh if making homemade dough. If you’ve used store-bought dough and it didn’t rise, it might have been frozen for too long. Always check the date!
3. What can I use if I don’t have garlic butter?
No garlic butter? No problem! You can use olive oil with minced garlic or even a blend of butter and Italian herbs for flavor.
4. The breadsticks are too crispy.
If they come out overly crispy, your oven might be too hot, or they may have baked longer than necessary. Ensure you keep an eye on them as every oven is a bit different.
Nutritional Info
For a serving size of approximately 2 Witch Finger Breadsticks, you can expect about:
- Calories: 120-150
- Total Fat: 6g
- Carbohydrates: 15g
- Protein: 3g
Keep in mind, this can vary based on your dough and any toppings you add!
There you have it! Witch Finger Breadsticks are not just a delightfully spooky treat; they embody the essence of crafting beautiful memories in the kitchen. So when you gather your friends or family around the table this Halloween, serve them with a side of laughter, stories, and of course, a sprinkle of culinary magic.
I can’t wait to hear how your Witch Finger Breadsticks turn out! Don’t forget to share your creations with me on social media, and happy cooking!
PrintWitch Finger Breadsticks

Perfect for Halloween feasts or themed parties, these spooky breadsticks are shaped like witch fingers and topped with almond nails and garlic butter.
- Prep Time: 15 minutes
- Cook Time: 20 minutes
- Total Time: 35 minutes
- Yield: 8 servings 1x
- Category: Snack
- Method: Baking
- Cuisine: American
- Diet: Vegetarian
Ingredients
- 1 lb pizza dough (store-bought or homemade)
- 1/2 cup slivered almonds
- 1/4 cup garlic butter (melted butter with minced garlic)
Instructions
- Preheat your oven to 400°F (200°C).
- Prepare the pizza dough by letting it sit at room temperature for 15 minutes.
- Cut the dough into strips about 1 inch wide and 5-6 inches long.
- Shape each strip by pinching one end to form a knobby fingertip.
- Add a slivered almond at the tip of each finger.
- Brush each breadstick with garlic butter mixture.
- Bake for 15-20 minutes until golden brown.
- Serve with marinara sauce on a spooky platter.
Notes
Feel free to experiment with toppings like cheese, herbs, or even sweet variations!
Nutrition
- Serving Size: 2 breadsticks
- Calories: 135
- Sugar: 1g
- Sodium: 250mg
- Fat: 6g
- Saturated Fat: 3g
- Unsaturated Fat: 2g
- Trans Fat: 0g
- Carbohydrates: 15g
- Fiber: 1g
- Protein: 3g
- Cholesterol: 15mg
Keywords: Halloween, spooky snacks, Witch Finger Breadsticks, fun food, party food