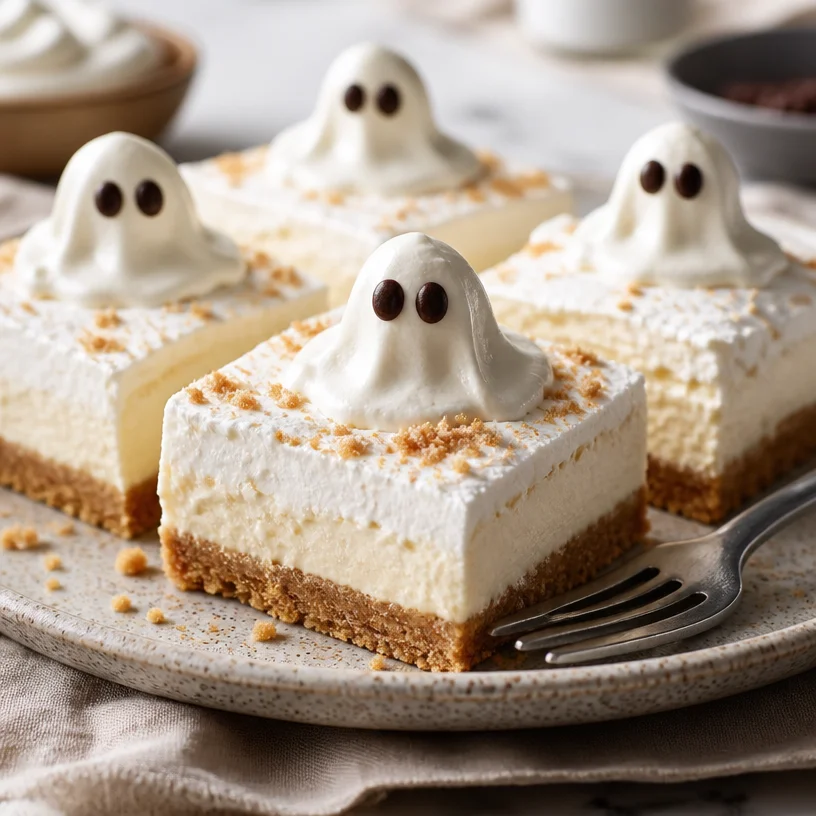
Halloween Ghost Cheesecake Bars: No-Bake Creamy Treat
Ghost Cheesecake Bars: A Spooktacular Treat for Your Halloween Gatherings
Hello, fellow food lovers! It’s Savannah here from Ivory Apron, and I’m beyond excited to share one of my absolute favorite treats that’s perfect for the spooky season: Ghost Cheesecake Bars. You might be asking yourself, “How can something that looks this cute also taste so good?” Well, my dear friend, I assure you that these bars are both a feast for the eyes and a dream for the palate. Grab your apron, and let’s get baking!
As we dive into this whimsical dessert, think about the joy of gathering with loved ones during Halloween. There’s something magical about turning the kitchen into a haunted haven, with flickering candlelight and the sweet aroma of baked goodies wafting through the air. The Ghost Cheesecake Bars are not just a delicious dessert; they are also an opportunity to create memories.
A Fun, Nostalgic Memory
I remember the first Halloween party I hosted in college—oh, what a night! I decided to get crafty and whipped up a batch of spooky treats for my friends. With a bit of imagination, I transformed simple cheesecake into what I called “Ghost Cheesecake Bites.” Picture this: soft, creamy cheesecake, adorned with little chocolate eyes on top like joyous little spirits floating on a cloud. Everyone had a blast, and we spent the night sharing ghost stories while sinking our teeth into those delightful bites. That night I learned that food has an amazing power to bring together friends and create those cherished moments we hold dear.
Fast forward to today, and I’ve refined that college creation into these delightful bars, which are perfect for serving a crowd! So, let’s get to it!
Ingredients
Gather these simple ingredients to get started on your Ghost Cheesecake Bars:
-
Cream Cheese: The star of the show! Cream cheese makes the filling rich and creamy. For a lighter version, you can substitute with a lower-fat cream cheese.
-
Graham Crackers: These little crunchy delights form the base of our bars. If you want a gluten-free option, crushed almonds or gluten-free cookies work beautifully!
-
Sugar: Adds the perfect amount of sweetness to balance the tanginess of the cream cheese. You can use coconut sugar or agave for a healthier alternative.
-
Vanilla Extract: A splash of this luscious extract enhances the flavor of the cheesecake. Use pure vanilla extract for the best taste, but imitation vanilla will work in a pinch.
-
Whipped Cream: Light and airy, whipped cream adds a dreamy texture to the filling. You can opt for store-bought or make your own for a fresher taste.
-
Chocolate or Edible Decorations: This is where the fun begins! Use melted chocolate or edible decorations to create ghostly figures on top of the bars. How about melting white chocolate and piping it out for a ghostly appearance?
Step-by-Step Instructions
Now let’s walk through the steps of making these enchanting cheesecake bars together:
-
Preheat Your Oven: Set your oven to 325°F (160°C). Pre-heating is crucial for even baking. Give your oven a moment to reach the right temperature—it’ll help ensure that your cheesecake bars turn out perfectly.
-
Prepare an 8×8 Baking Pan: Line your pan with parchment paper, allowing some overhang for easy removal later. This is a trick I swear by! It saves you from the heartbreak of broken bars.
-
Make the Graham Cracker Crust: In a mixing bowl, crush the graham crackers into fine crumbs. You could use a food processor for this, or just place them in a resealable bag and pound them with a rolling pin—it’s therapeutic! Combine the crumbs with melted butter and sugar, then mix until the mixture resembles wet sand. Press this mixture tightly into the bottom of the prepared pan. This is your sturdy foundation!
-
Bake the Crust: Pop the crust into the preheated oven and bake for about 8–10 minutes or until golden brown. The smell will be heavenly, and your kitchen will start to feel like a bakery!
-
Prepare the Cheesecake Filling: In a mixing bowl, add the softened cream cheese and sugar. Beat with an electric mixer on medium speed until smooth and creamy, about 2 minutes. Scrape down the sides of the bowl to ensure everything is mixed well.
-
Add Vanilla and Whipped Cream: Pour in the vanilla extract and fold in the whipped cream gently to keep it airy. Remember, we want lightness here! This is also the moment to taste—adjust sweetness if needed.
-
Combine and Pour: Once the mixture is fluffy, pour it over your baked crust, smoothing it out with a spatula. Don’t be shy—put your heart into it!
-
Bake the Cheesecake: Return the pan to the oven and bake for about 25–30 minutes. It’s done when the edges are set, but there’s still a slight jiggle in the middle. This will firm up as it cools.
-
Chill the Cheesecake: After baking, let it cool at room temperature for about an hour. Then, transfer it to the refrigerator and chill for at least 3 hours or overnight if time allows. Patience is key!
-
Decorate Your Ghosts: Once chilled, lift the cheesecake from the pan using the parchment overhang. Cut into bars, and now it’s time to bring those ghostly characters to life! Use melted white chocolate to create ghost shapes, or use edible decorations to make them come alive with personality. The more quirky, the better!
Serving Suggestions
When it comes to plating these delightful bars, simplicity is key! I suggest placing these on a beautiful serving platter, perhaps garnished with fresh berries or sprigs of mint for a pop of color. You can also add a drizzle of chocolate sauce around the bars for a fun effect. Don’t forget to sprinkle some edible glitter for that extra festive touch—it’s Halloween magic!
Recipe Variations
Let’s mix things up a bit! Here are some fun twists you can try:
-
Pumpkin Spice Ghost Cheesecake: Add pumpkin puree and pumpkin spice to your filling for a fall twist!
-
Chocolate Ghost Bars: Fold in melted chocolate chips or a swirl of Nutella for an indulgent chocolate version.
-
Berry Berry Ghosts: Top with fresh berry compote to add a tart freshness that complements the richness of the cheesecake.
-
Vegan Variation: Swap out traditional cream cheese for a vegan alternative and use coconut whipped cream!
-
Gluten-Free Adaptation: Use gluten-free graham crackers or an almond flour crust for gluten-free guests.
Chef’s Notes
Over the years, these Ghost Cheesecake Bars have become a staple for my Halloween gatherings. I remember one year when I dressed them up with little almond slivers to make them look extra spooky! It became a year-on-year tradition to battle for the spookiest presentation with my friends—it’s always a blast!
This recipe has blossomed over time, with little adjustments that’ve made it even better. I love experimenting with colors and flavors, connecting with the heart of the season, and creating fun memories packed in each bite.
FAQs and Troubleshooting
1. Why did my cheesecake crack?
Cracks can happen if the filling is overmixed or the cheesecake is baked at too high a temperature. Make sure to mix just until smooth and check the oven temperature with a thermometer!
2. Can I leave out the whipped cream?
You can, but it brings a lovely lightness to the filling. If you skip it, consider adding a bit of sour cream or Greek yogurt for a creamy texture.
3. How do I store leftovers?
Store any leftovers in an airtight container in the refrigerator for up to a week. They can also be frozen; just wrap them tightly for up to 3 months!
4. How can I make sure they are set properly?
The jiggle is normal, but if it looks overly wet or loose, it needs more time. You can always put it back into the oven for a few more minutes (watch it closely!).
Nutritional Info
While I recommend indulging in these bars occasionally, here’s a rough estimation per bar (yielding about 12 bars if cut evenly):
- Calories: 230
- Total Fat: 15g
- Saturated Fat: 9g
- Carbohydrates: 20g
- Sugars: 10g
- Protein: 3g
Enjoying these deliciously spooktacular Ghost Cheesecake Bars will surely draw smiles from your guests and create lasting memories around your table. So tie on that apron, gather your loved ones, and let’s cherish the moments we create together—all while indulging in the delightful flavors of Halloween. Happy cooking!
PrintGhost Cheesecake Bars
Delightful Ghost Cheesecake Bars perfect for Halloween gatherings, featuring a rich cream cheese filling and a crunchy graham cracker crust.
- Prep Time: 20 minutes
- Cook Time: 40 minutes
- Total Time: 180 minutes
- Yield: 12 servings 1x
- Category: Dessert
- Method: Baking
- Cuisine: American
- Diet: Vegetarian
Ingredients
- 8 oz Cream Cheese
- 1 cup Graham Crackers, crushed
- 1/3 cup Sugar
- 1 tsp Vanilla Extract
- 1 cup Whipped Cream
- Chocolate or Edible Decorations
Instructions
- Preheat your oven to 325°F (160°C).
- Prepare an 8×8 baking pan lined with parchment paper.
- Make the graham cracker crust by mixing crumbs with melted butter and sugar.
- Bake the crust for about 8–10 minutes until golden brown.
- Prepare the cheesecake filling by beating cream cheese and sugar until smooth.
- Add vanilla extract and fold in whipped cream gently.
- Combine the mixture and pour it over the baked crust.
- Bake the cheesecake for about 25–30 minutes until the edges are set.
- Chill the cheesecake for at least 3 hours.
- Decorate with melted white chocolate or edible decorations.
Notes
Store leftovers in an airtight container in the refrigerator for up to a week, or freeze for up to 3 months.
Nutrition
- Serving Size: 1 bar
- Calories: 230
- Sugar: 10g
- Sodium: 200mg
- Fat: 15g
- Saturated Fat: 9g
- Unsaturated Fat: 4g
- Trans Fat: 0g
- Carbohydrates: 20g
- Fiber: 1g
- Protein: 3g
- Cholesterol: 30mg
Keywords: Halloween, cheesecake, dessert, ghost, spooky treats
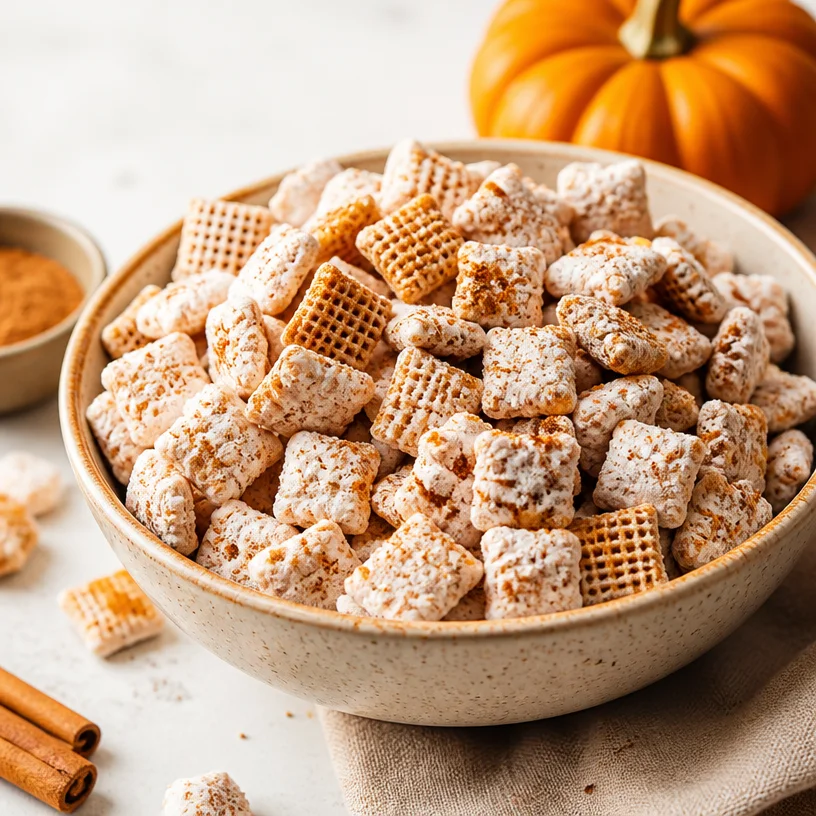
Fall Pumpkin Spice Puppy Chow: 15-Minute No-Bake Treat
Embrace the Cozy Vibes with Pumpkin Spice Puppy Chow
Hello, fellow food lovers! If you’re anything like me, the onset of autumn sparks a joyful transition in the kitchen. Leaves begin to change, the air gets crisper, and suddenly, every recipe calls for pumpkin spice. Today, I’m sharing a delightful treat that captures all of those cozy flavors in a fun and sweet way: Pumpkin Spice Puppy Chow!
Imagine a blend of crunchy Chex cereal coated in creamy white chocolate with the warm, inviting essence of pumpkin spice. It’s a snack that is perfect for those cozy nights in, festive gatherings, or even just as a little treat for yourself while you cuddle under a blanket with your favorite book. Puppy Chow, also known as Muddy Buddies, has long been a staple in my treat repertoire, and adding that pumpkin spice twist takes it to a whole new level of deliciousness!
So grab your apron and let’s dive into this easy and fun fall recipe, designed to impress everyone from family to friends—yes, even that neighbor you keep meaning to invite over for coffee!
My Pumpkin Spice Story
Back in college, I hosted a pumpkin-themed dinner party every year when the leaves began to turn. I’d invite friends over, and we’d share everything from pumpkin soup to pumpkin pie, creating an evening of warmth and laughter. One year, after making a more traditional dessert, I had a sudden urge to try something different. That’s when I whipped up a batch of Puppy Chow and tossed in some pumpkin spice just for fun.
As my friends gathered around the table, they couldn’t get enough of this sweet, crunchy, and subtly spiced snack. The laughter, delicious bites, and cozy atmosphere made it a memory I cherish to this day. The simplicity of Puppy Chow mixed with the lovely warmth of the season was a hit! I like to think of that night as my jump into culinary creativity, where all it took was a little imagination—and a sprinkle of pumpkin spice—to delight everyone.
Let’s create some of that magic in your kitchen!
Ingredients
Gathering quality ingredients is key to making this recipe truly shine.
-
Chex Cereal:
- Use the original rice or corn Chex for that perfect crunch. These cereals are gluten-free, making them an excellent choice for anyone with dietary restrictions. Feel free to swap with any crunchy cereal you love!
-
White Chocolate Chips:
- A rich and creamy base for your Puppy Chow. Look for quality white chocolate for the best flavor. If you’re feeling adventurous, you can swap with dark chocolate or even caramel chips for a different twist!
-
Pumpkin Spice:
- This magical blend typically includes cinnamon, nutmeg, ginger, and allspice. You can make your own at home or buy a pre-made mix. If you want to get creative, consider a blend of your own favorite spices like cardamom or all spice!
-
Powdered Sugar:
- This serves as the “snow” coating for your puppy chow. It gives that sweet touch and helps to seal in the flavor. No substitutions for this one—powdered sugar is key!
-
Vanilla Extract:
- Just a splash elevates the flavor profile, rounding out the sweetness. Homemade vanilla extract works wonders, or use a good quality store-bought option.
-
Sea Salt (Optional):
- Just a sprinkle at the end can enhance the sweetness and create a wonderful contrast in flavors. It’s not necessary, but I personally love the balance it brings!
Step-by-Step Instructions
Now that we have our ingredients ready, let’s get to the good stuff—the cooking!
-
Prep Your Workspace:
- First, clear some counter space and gather all your tools: a microwave-safe bowl, a large mixing bowl, a spatula, and a baking sheet lined with parchment paper.
-
Melt the White Chocolate:
- In a microwave-safe bowl, add the white chocolate chips. Microwave them on high power for 30-second intervals, stirring well between each, until they’re completely melted and smooth. Keep an eye on it; you don’t want to overheat the chocolate!
-
Add Pumpkin Spice and Vanilla:
- Once melted, stir in the pumpkin spice and vanilla extract until fully combined. This is where the magic happens! The warm aroma is sure to get your taste buds tingling.
-
Coat the Chex Cereal:
- Place your Chex cereal in a large mixing bowl. Pour the melted white chocolate mixture over the cereal. Using a spatula, gently fold the cereal until it’s evenly coated. Be careful not to crush the cereal; you want those lovely little squares to stay intact!
-
Add the Powdered Sugar:
- Transfer the coated Chex to a large plastic bag (or sprinkle directly into the mixing bowl if you prefer). Add the powdered sugar and seal the bag, shaking gently until all the cereal pieces are coated. If you used a mixing bowl, sprinkle the sugar generously over the mixture and fold until well-coated.
-
Spread and Cool:
- Pour the Puppy Chow mixture onto your lined baking sheet in an even layer to cool. This step helps to prevent clumping.
-
Let it Set:
- Allow it to sit for about 30 minutes. The coating will firm up, making it delightfully crispy and crunchy!
-
Serve and Enjoy:
- Once it’s ready, feel free to serve right away or store it in an airtight container for up to a week. Just don’t be surprised if your friends and family devour it all in one night!
Serving Suggestions
To make your Pumpkin Spice Puppy Chow truly festive, consider serving it in small clear bags tied with twine or in decorative bowls at a gathering. For an extra touch, sprinkle a little sea salt on top before serving or dust with extra powdered sugar to give it that lovely snowy effect. It makes a gorgeous centerpiece for any fall-themed table!
Recipe Variations
Feeling adventurous? Here are a few delightful twists to try with your Puppy Chow:
- Nutty Addition: Toss in some chopped pecans or walnuts for a crunchy element that pairs perfectly with the pumpkin spice.
- Chocolate Drizzle: After coating, drizzle some melted dark or milk chocolate over the finished product for a richer taste.
- Dried Fruit: Mix in some dried cranberries or raisins for a chewy texture and a hint of tartness to balance the sweetness.
- Different Spices: Swap the pumpkin spice for chai spice or cinnamon sugar for a different flavor profile that still embraces warmth!
- Vegan Option: Use dairy-free chocolate chips and plant-based butter to create a vegan-friendly version without losing any deliciousness!
Chef’s Notes
Creating Puppy Chow has always been a light-hearted joy for me. I remember one particular holiday season when I tried to make a double batch for a gathering but accidentally doubled the pumpkin spice instead of the chocolate! The result was a wonderfully strong flavor that—surprisingly—everyone loved! It had a kick to it that made it unique and memorable.
From that point on, I embraced the idea of experimenting and letting a bit of joy and whimsy enter my recipes. The kitchen is all about exploration, and it’s okay to have a few happy accidents along the way.
FAQs and Troubleshooting
1. Why did my Puppy Chow clump together?
If you find your Puppy Chow has clumped together, it might be because the chocolate wasn’t cooled enough when mixed or wasn’t evenly coated. Be sure to cool it slightly before mixing and ensure the powdered sugar fully coats the cereal!
2. Can I make this ahead of time?
Absolutely! Puppy Chow can be made up to a week in advance. Just store it in an airtight container at room temperature, and it’ll stay fresh and delicious!
3. What can I use if I don’t have powdered sugar?
You can make your own powdered sugar by blending regular granulated sugar in a blender or food processor until it’s super fine. It will work just as well!
4. Can I use different types of cereal?
Definitely! While Chex is traditional, you could use any similar crisp cereal, like Crispix, or even granola for a fun texture. Just keep in mind that different cereals absorb chocolate differently, so you might need to adjust the quantities a bit.
Nutritional Info
Per serving (about 1/4 cup):
- Calories: 190
- Total Fat: 9g
- Saturated Fat: 5g
- Carbohydrates: 28g
- Sugars: 12g
- Protein: 1g
So there you have it! A simple and fun recipe for Pumpkin Spice Puppy Chow that’s perfect for bringing warmth and joy into your autumn gatherings. Grab your apron, embrace those cozy vibes, and let’s create some delightful memories together in the kitchen. Happy snacking!
PrintPumpkin Spice Puppy Chow
A cozy and delightful twist on the classic Puppy Chow, combining crunchy cereal with creamy white chocolate and warm pumpkin spice for a perfect autumn treat.
- Prep Time: 10 minutes
- Cook Time: 5 minutes
- Total Time: 45 minutes
- Yield: 8 servings 1x
- Category: Snack
- Method: No-Cook
- Cuisine: American
- Diet: Vegetarian
Ingredients
- 4 cups Chex cereal (rice or corn)
- 2 cups white chocolate chips
- 2 teaspoons pumpkin spice
- 1 cup powdered sugar
- 1 teaspoon vanilla extract
- Sea salt (optional)
Instructions
- Prep your workspace by gathering all your tools: a microwave-safe bowl, a large mixing bowl, a spatula, and a baking sheet lined with parchment paper.
- Melt the white chocolate chips in a microwave-safe bowl, using high power for 30-second intervals, stirring between each, until completely melted and smooth.
- Add the pumpkin spice and vanilla extract to the melted chocolate and stir until fully combined.
- Coat the Chex cereal in a large mixing bowl by pouring the melted white chocolate over it, gently folding until evenly coated.
- Add the powdered sugar to the coated cereal, sealing it in a large plastic bag and shaking gently until all pieces are coated, or sprinkle directly in the mixing bowl.
- Spread the Puppy Chow mixture onto your lined baking sheet in an even layer to cool.
- Let it sit for about 30 minutes until the coating firms up.
- Serve and enjoy immediately or store in an airtight container for up to a week.
Notes
Consider packaging in small clear bags for gifting or serving in decorative bowls at gatherings. Top with a sprinkle of sea salt for added flavor.
Nutrition
- Serving Size: 1/4 cup
- Calories: 190
- Sugar: 12g
- Sodium: 50mg
- Fat: 9g
- Saturated Fat: 5g
- Unsaturated Fat: 4g
- Trans Fat: 0g
- Carbohydrates: 28g
- Fiber: 1g
- Protein: 1g
- Cholesterol: 0mg
Keywords: Pumpkin Spice, Puppy Chow, Snack, Autumn Treat, Easy Recipe
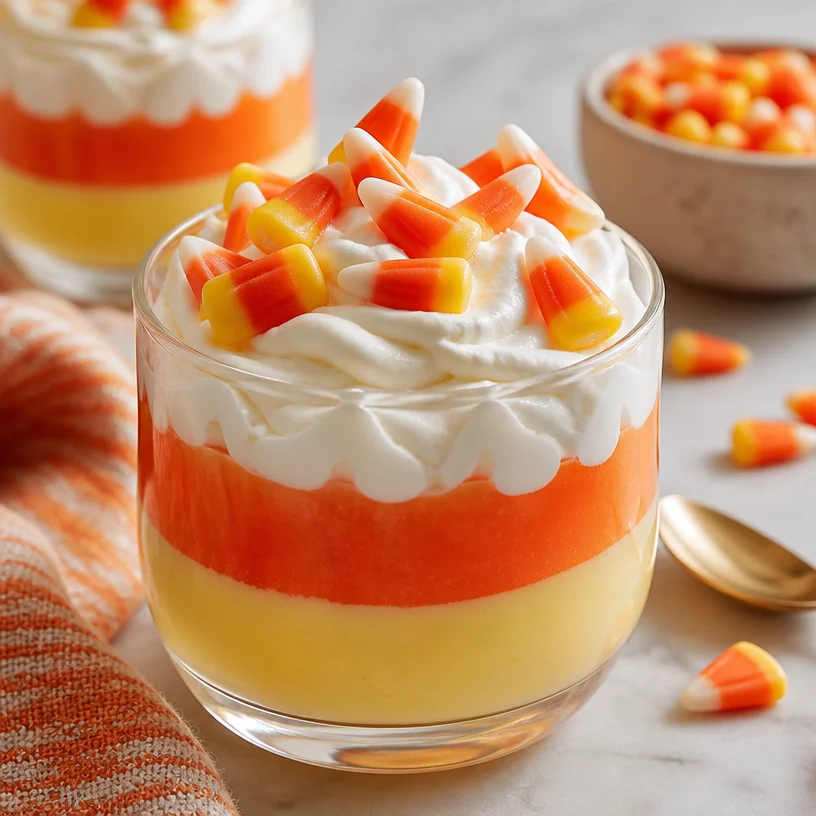
Seasonal Halloween Candy Corn Parfaits: No-Bake Creamy Treats
Celebrate Fall with Candy Corn Parfaits!
As the leaves begin to turn and the crispness of fall fills the air, there’s a certain excitement that washes over us. It’s that wonderful time of year when pumpkins, spiced desserts, and yes, candy corn suddenly take center stage in our culinary adventures. Today, I’m thrilled to share a delightful treat that’s as nostalgic as it is delicious: Candy Corn Parfaits! These layered delights not only celebrate the quintessential flavors of autumn but also bring a splash of color to your table, making them a hit for any gathering or just a fun weekday dessert!
Creating these parfaits offers a perfect opportunity to gather friends and family, whether you’re hosting a casual afternoon get-together or looking for a fun way to get the little ones involved in the kitchen. While they might look like a gourmet creation, I promise— they come together effortlessly and make a fabulous centerpiece for any fall festivity. So, let’s bring a taste of joy and comfort to our tables, shall we?
A Taste of Nostalgia
You know, every time I think of candy corn, it takes me back to my childhood Halloweens spent trick-or-treating with my friends. I can almost hear their laughter and the crinkling of candy wrappers as we proudly displayed our loot. Amongst all the chocolate bars and gummy goodies, there was always that distinct triangular treat: candy corn. While some folks appreciate it, others seem to be divided, but it’s hard to deny that these little morsels are synonymous with autumn!
One year, we decided to host a Halloween party—a gathering for our closest friends complete with spooky decorations, themed games, and, of course, plenty of sugary snacks. Those candy corn parfaits became a usual request, not just because of their beautiful layers but because they sparked joy. Each layer represented a different aspect of the season, combining flavors and textures that brought everyone together in cheerful anticipation. This tradition made its way back into my kitchen, leading me to the luscious recipe I’m excited to share with you today.
Ingredients
Let’s start by gathering everything we need for these fabulous Candy Corn Parfaits. Here’s what you’ll need:
-
Vanilla Pudding
A creamy base that provides a smooth and rich flavor. You can make it from scratch or use instant pudding mix for quicker preparation. -
Orange Gelatin
It gives these parfaits that wonderful candy corn color and a light, fruity sweetness. If you’re looking for a citrusy kick, a lemon flavor can work, too! -
Whipped Cream
This fluffy topping adds a delightful lightness to the dessert. Use freshly whipped cream for the best taste, or opt for store-bought if you’re short on time. For a twist, you could try flavored whipped cream, like vanilla or cinnamon. -
Candy Corn
The star of our parfaits! Use classic candy corn for sweetness and color. If you’re feeling adventurous, consider mixing in some chocolate-covered varieties for a different flavor.
Chef Insight
If you’re short on time or just want to simplify the process, you can layer these parfaits in clear plastic cups for easy serving. Just remember, the clearer the vessel, the better the color contrast will shine through!
Step-by-Step Instructions
Alright, are you ready to dive into the kitchen? Let’s get these parfaits layered and beautiful, one spoonful at a time.
-
Prepare the Vanilla Pudding
Start by whisking together your vanilla pudding mix with cold milk. If you’re using a cooked recipe, be sure to follow the package instructions to achieve that perfect texture. This typically takes about 2 minutes. Let it sit for 5 minutes so it can thicken up beautifully. It’s like magic watching it go from liquid to creamy! -
Mix the Orange Gelatin
While the pudding is setting, prepare the orange gelatin according to package instructions. Usually, this requires dissolving the gelatin powder in boiling water and then adding cold water. Just follow the instructions and let it cool for a moment. This is your vibrant layer that brings a zesty contrast to our dessert! -
Get Your Cups Ready
Grab some clear glasses or jars—this is where your parfaits will shine! You want to showcase those beautiful layers, so the more transparent, the better. Set them on a baking tray or your counter for easy assembly. -
Layer Like a Pro
Start with a generous spoonful of vanilla pudding at the bottom of each glass. Aim for about a quarter of the cup. Follow it with a layer of the orange gelatin, then another layer of pudding. If you want to be fancy, you can create additional layers by alternating between the two. -
Top it Off
Once your layers are assembled, it’s time for the whipped cream! Spoon a dollop on the top of each parfait; don’t be shy—make it fluffy! For an even more playful look, pipe it on with a star tip for those perfect peaks. -
Add the Finishing Touch
Sprinkle the top with a handful of candy corn. This not only adds decoration but also that quintessential sweetness and a bit of crunch. If you’d like, add some extra whipped cream around the edges for a more extravagant appearance!
And just like that, your Candy Corn Parfaits are done! Chill them in the fridge for a little while if you want the layers to set nicely, then get ready to impress.
Serving Suggestions
When it’s time to serve, place these candy corn parfaits as the centerpiece of your dessert table. You could even create a Halloween or fall-themed table setting with pumpkins and fairy lights for an added festive feel! Make sure to provide spoons for that perfect scoop of layers, and watch your guests’ faces light up as they unveil the colorful layers with each bite.
Recipe Variations
Looking to switch things up? Here are a few fun variations you can try for your parfaits:
- Chocolate Layer: Swap one layer of vanilla pudding for chocolate pudding for a delicious chocolate/candy corn combo.
- Fruit Flavor: Try using a fruit-flavored gelatin, like peach or mango, to introduce refreshing tastes.
- Healthy Twist: Use Greek yogurt mixed with a bit of honey for a healthier version of the pudding layer—still delicious and much lighter!
- Seasonal Spice: Add a dash of cinnamon to the vanilla pudding for a warm, fall flavor, making it perfectly cozy.
- Candy Bow-Tie: Incorporate mini chocolate candies or sprinkles between the layers for a crunchier texture and a playful twist.
Chef’s Notes
Creating these parfaits over the years has been a delightful journey, filled with laughter and joy. I’ll always remember one Halloween when my niece insisted on adding gummy worms to her parfait, saying it needed to be a "creepy dessert." It turned into a fun tradition, and now those peanut butter-filled little horrors often make a guest appearance in our family gatherings!
As I play with flavors and ideas, it’s fascinating to see how a simple dessert can evolve into something new and exciting. When you allow yourself to experiment and have fun in the kitchen, that’s when the magic truly happens.
FAQs and Troubleshooting
Q: What can I do if my pudding doesn’t thicken?
A: If your vanilla pudding isn’t thickening, make sure you whisk it well for the right amount of time. If it’s still too runny, you can always sprinkle a little cornstarch into the mix as it cooks. Let it cook longer; patience is key!
Q: Can I make these parfaits ahead of time?
A: Absolutely! You can prepare the layers a day in advance and assemble them a few hours before serving. Just keep them covered in the fridge to maintain freshness!
Q: What if I can’t find candy corn?
A: No candy corn? No problem! You could use colorful fruit like mandarin oranges or tropical candies to create a similar vibrant and fun look in your parfaits.
Q: How can I prevent my whipped cream from deflating?
A: For whipping cream that holds its shape, ensure you chill your mixing bowl and beaters beforehand. Using heavy cream also helps, as it whips up thicker and more stable!
Now, that’s a wrap! Your Candy Corn Parfaits are ready to dazzle, spiral, and deliver joy to your table. With their colorful layers and delicious flavors, they’ll bring a bit of nostalgia while celebrating the best of fall. Whether for a gathering or just to sweeten up your week, I hope they become a cherished favorite just like they are in my kitchen. Happy cooking, and let’s keep gathering around the table!
PrintCandy Corn Parfaits
Delightful layered desserts that celebrate the flavors of autumn with vibrant colors and sweet candy corn.
- Prep Time: 10 minutes
- Cook Time: 0 minutes
- Total Time: 10 minutes
- Yield: 4 servings 1x
- Category: Dessert
- Method: No-Cook
- Cuisine: American
- Diet: Vegetarian
Ingredients
- 2 cups Vanilla Pudding
- 1 package Orange Gelatin
- 1 cup Whipped Cream
- 1 cup Candy Corn
Instructions
- Prepare the Vanilla Pudding by whisking together the pudding mix with cold milk. Let it sit for 5 minutes to thicken.
- Mix the Orange Gelatin according to package instructions and let it cool.
- Grab some clear glasses or jars for layering the parfaits.
- Layer the ingredients starting with vanilla pudding, followed by orange gelatin, and repeat until you reach the top.
- Top off with a dollop of whipped cream on each parfait.
- Add a sprinkle of candy corn for decoration and extra sweetness.
Notes
For easy serving, layer the parfaits in clear plastic cups and chill them for a bit before serving.
Nutrition
- Serving Size: 1 serving
- Calories: 250
- Sugar: 20g
- Sodium: 90mg
- Fat: 8g
- Saturated Fat: 4g
- Unsaturated Fat: 4g
- Trans Fat: 0g
- Carbohydrates: 40g
- Fiber: 0g
- Protein: 2g
- Cholesterol: 15mg
Keywords: candy corn, parfait, fall desserts, Halloween treats, layered desserts
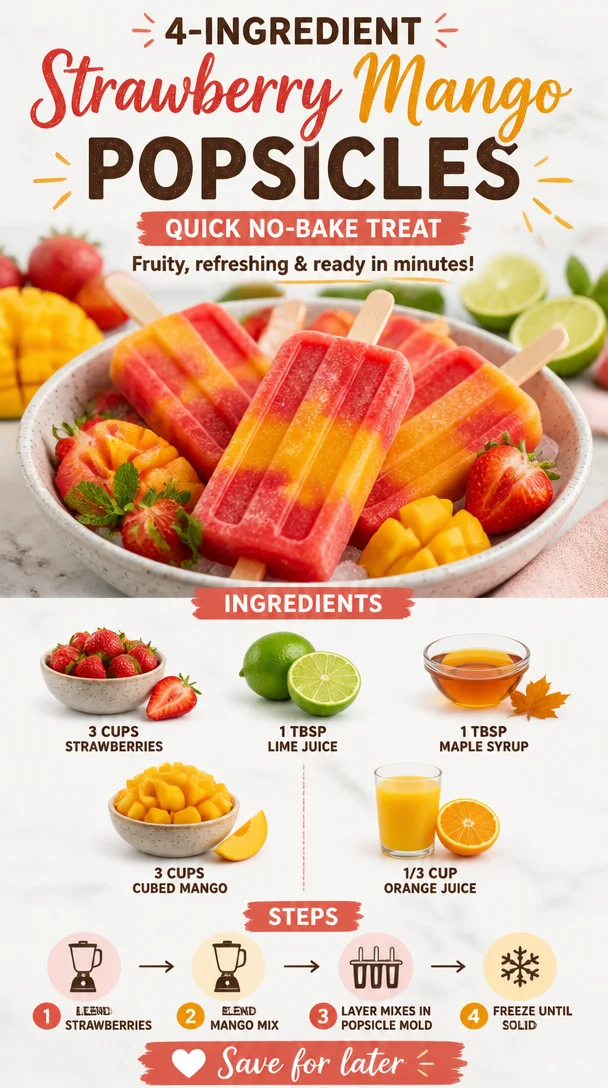
Ingredient Strawberry Mango Popsicles: Quick No-Bake Treat
Cool Off This Summer with Homemade Strawberry Mango Popsicles
Are you looking for a fabulous way to beat the heat? These strawberry mango popsicles are just what you need! This recipe not only delivers a burst of tropical flavor but also fills your kitchen with nostalgia, fun, and vibrant colors. Trust me, nothing screams summer quite like fresh fruit popsicles, and once you whip up a batch, you’ll be wishing you’d done it sooner!
Popsicles have been a part of my summer since childhood. I fondly remember those hot afternoons when my siblings and I would race to the freezer, anticipating the moment we could sink our teeth into something cool and sweet. These strawberry mango popsicles are my adult twist on those cherished memories. They’re simple enough to whip up in a jiffy but elegant enough to impress your guests at a garden party. Plus, you can feel good about the ingredients you’re using!
Now, gather your trusty apron, because we’re about to embark on a fruity adventure that’ll have everyone chewing their way to the bone—er, popsicle stick! The combination of strawberries and mango is a tropical paradise on a stick, balanced perfectly with a splash of lime and a touch of maple syrup. Believe me, you’ll want to keep these in your freezer year-round!
A Sweet Taste of Nostalgia
Every summer, my family took a road trip to the beach, and one of the highlights was always stopping at a little roadside stand selling fresh fruit and homemade popsicles. I can still hear the distant laughter of children and the sizzle of snacks being fried in the background. The sweet, tart flavor of strawberries, alongside the lush pulp of sun-ripened mango, became my go-to treat. Back then, nothing was more refreshing than biting into a colorful popsicle while feeling the ocean breeze tousle my hair.
Fast forward to today, and I find that blending those childhood memories with my love for cooking yields a tasty, magical treat. When I make these strawberry mango popsicles, it’s like I’m instantly transported back to those carefree summers, the warm sun on my skin, and the excitement of sharing popsicles with friends and family. Now, let’s pack those sweet memories into a mold and make some magic!
Ingredients
To create these delightful strawberry mango popsicles, here’s what you will need:
-
3 cups strawberries: Use fresh, ripe strawberries for the best flavor! If you can’t find them, you can substitute with frozen strawberries, but be sure to thaw and drain them before blending.
-
1 tbsp lime juice: A splash of lime juice brightens up the flavors and balances sweetness. If you don’t have lime, lemon juice works great too for a zesty kick!
-
1 tbsp maple syrup: This natural sweetener adds depth and a hint of earthiness. Honey or agave syrup can be a perfect alternative—just tweak the quantity to your taste.
-
3 cups cubed mango: Fresh mango adds a tropical twist, but feel free to use frozen mango if that’s more accessible. Make sure to allow it to thaw a bit for easier blending!
-
1/3 cup orange juice: It’s the perfect refresher! If you’re not fond of orange juice, pineapple juice can also elevate those tropical notes.
Get ready to experience the essence of summer in every bite. If you’ve got everything prepped, let’s dive into making our popsicles!
Step-by-Step Instructions
-
Preparation: Begin by washing your strawberries thoroughly and hulling them. This means removing the green tops and any white parts underneath. Surprisingly, having super ripe strawberries makes a world of difference in flavor!
-
Blend the Strawberries: Toss the strawberries into your blender. Add the lime juice and maple syrup. Blend until smooth. Don’t be afraid to pause and taste! The sweetness of the strawberries should shine through. If they aren’t sweet enough, a little more maple syrup won’t hurt!
-
Set Aside: Once blended, pour the strawberry mixture into a bowl and set it aside. You’ll want to keep the strawberry mix separate for layering that beautiful popsicle effect.
-
Blend the Mango: Rinse the blender (no one wants a strawberry-mango mix just yet!). Add the cubed mango and orange juice. Blend until creamy and smooth. You’re going to love how vibrant and silky this mixture is!
-
Layer the Molds: Now for the fun part! Grab your popsicle molds. Start by adding a layer of the strawberry mixture to each mold, about a third of the way full. Use a spoon to tap the bottom gently, which helps eliminate air bubbles.
-
Add the Mango Mixture: Follow up with a layer of mango blend on top of the strawberry. You can alternate the layers until the molds are full. I usually end with the mango for that stunning golden top!
-
Insert Sticks and Freeze: If your molds come with stick holders, insert them now. Place the molds in the freezer and allow them to chill for at least 4-6 hours. Overnight is even better if you can wait!
-
Pop and Enjoy: Once frozen solid, remove the popsicles. If they’re hard to get out, run some warm water over the outside of the molds for a few seconds. Enjoy your homemade popsicles as a sweet afternoon treat!
Serving Suggestions
There’s something visually stunning about a beautiful popsicle! For serving, you could plate these popsicles on a vibrant plate and surround them with fresh strawberries and mango slices for that wow factor. Drizzle over a bit of melted dark chocolate for a gourmet touch, or serve with a dollop of coconut whipped cream on the side for those who appreciate fluffy indulgence.
Recipe Variations
-
Berry Blast: Combine strawberries with other berries like blueberries or raspberries for a mixed-berry treat. Toss in a few basil leaves for an unexpected twist!
-
Creamy Delight: Add a layer of Greek yogurt or coconut cream between the fruit layers for a creamy variation. It adds a lovely texture that contrasts beautifully with the fruit.
-
Chili-Lime Popsicle: Spice things up! Blend a pinch of chili powder into the lime juice mix. It adds a tangy, spicy surprise that kicks every bite up a notch.
-
Chocolate-Dipped: After freezing, dip your pops in melted dark chocolate and immediately roll in crushed nuts or sprinkles for a delightful crunch.
-
Herbal Infusion: Try blending some mint or basil with the mango for a refreshingly herbaceous flavor that delights the palate!
Chef’s Notes
Ah, the popsicle journey! When I first developed this recipe, I made so many fruity concoctions that my kitchen looked like a fruit explosion—everywhere you looked, it was a cascade of colors! The first batch turned out too icy because I didn’t use enough sweetener. Lesson learned!
Now, I like to experiment with the layering, making sure each color stands out while still blending harmoniously once bitten into. It’s all about finding that balance between the textures and flavors. And honestly, the best part? Watching my nieces and nephews devour them with smiles on their little faces. There’s no better joy than creating something that brings people together, don’t you think?
FAQs and Troubleshooting
1. My popsicles are too hard! What did I do wrong?
If your popsicles come out rock-solid, this usually means they might have been in the freezer for too long or didn’t have enough sweetener. If they’re too hard, just let them sit at room temperature for a minute or run some warm water over the mold to help release them.
2. Can I use other fruits?
Absolutely! You can blend any fruit of your choice. Just ensure they are ripe for optimal flavor. Fruits like kiwi, bananas, and peaches work wonderfully too.
3. Are these popsicles healthy?
Yes! They’re made with whole fruits and natural sugars, making them a healthier choice compared to store-bought popsicles. You can modify the sweetener to your taste and use all organic ingredients if you prefer!
4. How long do these popsicles last in the freezer?
Homemade popsicles typically last about 2-3 months in the freezer. Just be sure to keep them stored in a sealed container or bag to avoid freezer burn!
These strawberry mango popsicles are sure to be a summer staple at your home. Simple, refreshing, and vibrant—they capture that warm weather vibe perfectly! I hope you’ll enjoy making these as much as I do. Now, let’s share some popsicle love with family and friends, shall we? Cheers to sweet and sunny days ahead!
PrintStrawberry Mango Popsicles
Delightful strawberry mango popsicles that capture the essence of summer with fresh fruits and a dash of lime.
- Prep Time: 15 minutes
- Cook Time: 0 minutes
- Total Time: 15 minutes
- Yield: 8 servings 1x
- Category: Dessert
- Method: Freezing
- Cuisine: American
- Diet: Vegetarian
Ingredients
- 3 cups strawberries, hulled
- 1 tbsp lime juice
- 1 tbsp maple syrup
- 3 cups cubed mango
- 1/3 cup orange juice
Instructions
- Wash your strawberries thoroughly and hull them.
- Toss the strawberries into your blender. Add the lime juice and maple syrup.
- Pour the strawberry mixture into a bowl and set it aside.
- Rinse the blender and add the cubed mango and orange juice.
- Grab your popsicle molds and add a layer of the strawberry mixture.
- Follow up with a layer of mango blend on top of the strawberry.
- Insert sticks if your molds come with holders and freeze for at least 4-6 hours.
- Once frozen solid, remove the popsicles and enjoy!
Notes
For serving, plate popsicles with fresh fruit and drizzle with chocolate or coconut whipped cream.
Nutrition
- Serving Size: 1 popsicle
- Calories: 80
- Sugar: 10g
- Sodium: 5mg
- Fat: 0g
- Saturated Fat: 0g
- Unsaturated Fat: 0g
- Trans Fat: 0g
- Carbohydrates: 22g
- Fiber: 2g
- Protein: 1g
- Cholesterol: 0mg
Keywords: popsicles, summer dessert, strawberry mango, homemade ice pops, healthy treats