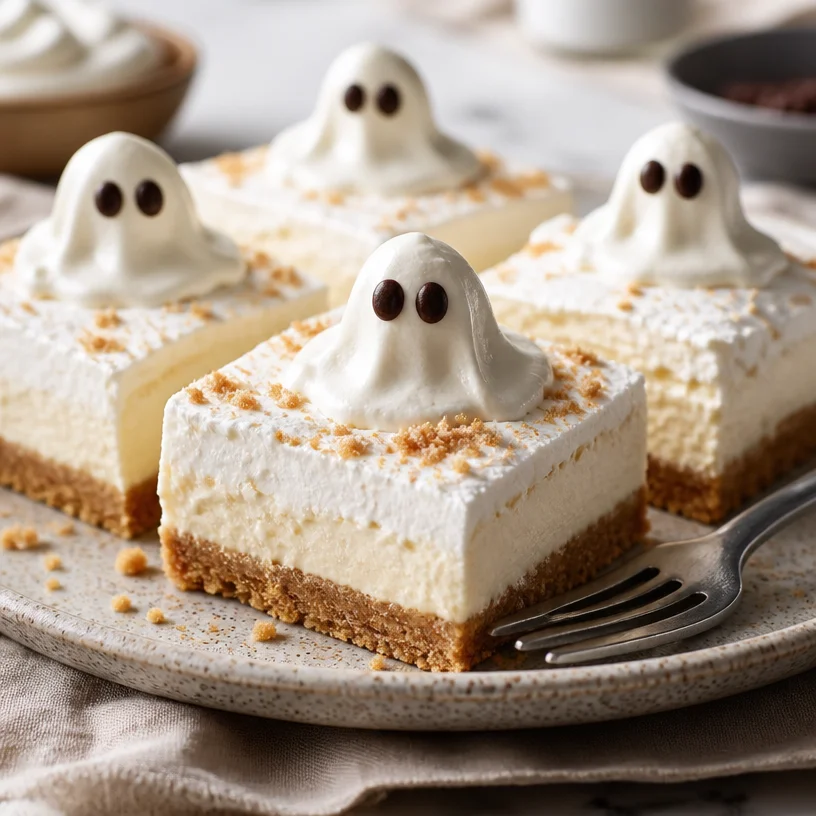
Ghost Cheesecake Bars: A Spooktacular Treat for Your Halloween Gatherings
Hello, fellow food lovers! It’s Savannah here from Ivory Apron, and I’m beyond excited to share one of my absolute favorite treats that’s perfect for the spooky season: Ghost Cheesecake Bars. You might be asking yourself, “How can something that looks this cute also taste so good?” Well, my dear friend, I assure you that these bars are both a feast for the eyes and a dream for the palate. Grab your apron, and let’s get baking!
As we dive into this whimsical dessert, think about the joy of gathering with loved ones during Halloween. There’s something magical about turning the kitchen into a haunted haven, with flickering candlelight and the sweet aroma of baked goodies wafting through the air. The Ghost Cheesecake Bars are not just a delicious dessert; they are also an opportunity to create memories.
A Fun, Nostalgic Memory
I remember the first Halloween party I hosted in college—oh, what a night! I decided to get crafty and whipped up a batch of spooky treats for my friends. With a bit of imagination, I transformed simple cheesecake into what I called “Ghost Cheesecake Bites.” Picture this: soft, creamy cheesecake, adorned with little chocolate eyes on top like joyous little spirits floating on a cloud. Everyone had a blast, and we spent the night sharing ghost stories while sinking our teeth into those delightful bites. That night I learned that food has an amazing power to bring together friends and create those cherished moments we hold dear.
Fast forward to today, and I’ve refined that college creation into these delightful bars, which are perfect for serving a crowd! So, let’s get to it!
Ingredients
Gather these simple ingredients to get started on your Ghost Cheesecake Bars:
-
Cream Cheese: The star of the show! Cream cheese makes the filling rich and creamy. For a lighter version, you can substitute with a lower-fat cream cheese.
-
Graham Crackers: These little crunchy delights form the base of our bars. If you want a gluten-free option, crushed almonds or gluten-free cookies work beautifully!
-
Sugar: Adds the perfect amount of sweetness to balance the tanginess of the cream cheese. You can use coconut sugar or agave for a healthier alternative.
-
Vanilla Extract: A splash of this luscious extract enhances the flavor of the cheesecake. Use pure vanilla extract for the best taste, but imitation vanilla will work in a pinch.
-
Whipped Cream: Light and airy, whipped cream adds a dreamy texture to the filling. You can opt for store-bought or make your own for a fresher taste.
-
Chocolate or Edible Decorations: This is where the fun begins! Use melted chocolate or edible decorations to create ghostly figures on top of the bars. How about melting white chocolate and piping it out for a ghostly appearance?
Step-by-Step Instructions
Now let’s walk through the steps of making these enchanting cheesecake bars together:
-
Preheat Your Oven: Set your oven to 325°F (160°C). Pre-heating is crucial for even baking. Give your oven a moment to reach the right temperature—it’ll help ensure that your cheesecake bars turn out perfectly.
-
Prepare an 8×8 Baking Pan: Line your pan with parchment paper, allowing some overhang for easy removal later. This is a trick I swear by! It saves you from the heartbreak of broken bars.
-
Make the Graham Cracker Crust: In a mixing bowl, crush the graham crackers into fine crumbs. You could use a food processor for this, or just place them in a resealable bag and pound them with a rolling pin—it’s therapeutic! Combine the crumbs with melted butter and sugar, then mix until the mixture resembles wet sand. Press this mixture tightly into the bottom of the prepared pan. This is your sturdy foundation!
-
Bake the Crust: Pop the crust into the preheated oven and bake for about 8–10 minutes or until golden brown. The smell will be heavenly, and your kitchen will start to feel like a bakery!
-
Prepare the Cheesecake Filling: In a mixing bowl, add the softened cream cheese and sugar. Beat with an electric mixer on medium speed until smooth and creamy, about 2 minutes. Scrape down the sides of the bowl to ensure everything is mixed well.
-
Add Vanilla and Whipped Cream: Pour in the vanilla extract and fold in the whipped cream gently to keep it airy. Remember, we want lightness here! This is also the moment to taste—adjust sweetness if needed.
-
Combine and Pour: Once the mixture is fluffy, pour it over your baked crust, smoothing it out with a spatula. Don’t be shy—put your heart into it!
-
Bake the Cheesecake: Return the pan to the oven and bake for about 25–30 minutes. It’s done when the edges are set, but there’s still a slight jiggle in the middle. This will firm up as it cools.
-
Chill the Cheesecake: After baking, let it cool at room temperature for about an hour. Then, transfer it to the refrigerator and chill for at least 3 hours or overnight if time allows. Patience is key!
-
Decorate Your Ghosts: Once chilled, lift the cheesecake from the pan using the parchment overhang. Cut into bars, and now it’s time to bring those ghostly characters to life! Use melted white chocolate to create ghost shapes, or use edible decorations to make them come alive with personality. The more quirky, the better!
Serving Suggestions
When it comes to plating these delightful bars, simplicity is key! I suggest placing these on a beautiful serving platter, perhaps garnished with fresh berries or sprigs of mint for a pop of color. You can also add a drizzle of chocolate sauce around the bars for a fun effect. Don’t forget to sprinkle some edible glitter for that extra festive touch—it’s Halloween magic!
Recipe Variations
Let’s mix things up a bit! Here are some fun twists you can try:
-
Pumpkin Spice Ghost Cheesecake: Add pumpkin puree and pumpkin spice to your filling for a fall twist!
-
Chocolate Ghost Bars: Fold in melted chocolate chips or a swirl of Nutella for an indulgent chocolate version.
-
Berry Berry Ghosts: Top with fresh berry compote to add a tart freshness that complements the richness of the cheesecake.
-
Vegan Variation: Swap out traditional cream cheese for a vegan alternative and use coconut whipped cream!
-
Gluten-Free Adaptation: Use gluten-free graham crackers or an almond flour crust for gluten-free guests.
Chef’s Notes
Over the years, these Ghost Cheesecake Bars have become a staple for my Halloween gatherings. I remember one year when I dressed them up with little almond slivers to make them look extra spooky! It became a year-on-year tradition to battle for the spookiest presentation with my friends—it’s always a blast!
This recipe has blossomed over time, with little adjustments that’ve made it even better. I love experimenting with colors and flavors, connecting with the heart of the season, and creating fun memories packed in each bite.
FAQs and Troubleshooting
1. Why did my cheesecake crack?
Cracks can happen if the filling is overmixed or the cheesecake is baked at too high a temperature. Make sure to mix just until smooth and check the oven temperature with a thermometer!
2. Can I leave out the whipped cream?
You can, but it brings a lovely lightness to the filling. If you skip it, consider adding a bit of sour cream or Greek yogurt for a creamy texture.
3. How do I store leftovers?
Store any leftovers in an airtight container in the refrigerator for up to a week. They can also be frozen; just wrap them tightly for up to 3 months!
4. How can I make sure they are set properly?
The jiggle is normal, but if it looks overly wet or loose, it needs more time. You can always put it back into the oven for a few more minutes (watch it closely!).
Nutritional Info
While I recommend indulging in these bars occasionally, here’s a rough estimation per bar (yielding about 12 bars if cut evenly):
- Calories: 230
- Total Fat: 15g
- Saturated Fat: 9g
- Carbohydrates: 20g
- Sugars: 10g
- Protein: 3g
Enjoying these deliciously spooktacular Ghost Cheesecake Bars will surely draw smiles from your guests and create lasting memories around your table. So tie on that apron, gather your loved ones, and let’s cherish the moments we create together—all while indulging in the delightful flavors of Halloween. Happy cooking!
PrintGhost Cheesecake Bars
Delightful Ghost Cheesecake Bars perfect for Halloween gatherings, featuring a rich cream cheese filling and a crunchy graham cracker crust.
- Prep Time: 20 minutes
- Cook Time: 40 minutes
- Total Time: 180 minutes
- Yield: 12 servings 1x
- Category: Dessert
- Method: Baking
- Cuisine: American
- Diet: Vegetarian
Ingredients
- 8 oz Cream Cheese
- 1 cup Graham Crackers, crushed
- 1/3 cup Sugar
- 1 tsp Vanilla Extract
- 1 cup Whipped Cream
- Chocolate or Edible Decorations
Instructions
- Preheat your oven to 325°F (160°C).
- Prepare an 8×8 baking pan lined with parchment paper.
- Make the graham cracker crust by mixing crumbs with melted butter and sugar.
- Bake the crust for about 8–10 minutes until golden brown.
- Prepare the cheesecake filling by beating cream cheese and sugar until smooth.
- Add vanilla extract and fold in whipped cream gently.
- Combine the mixture and pour it over the baked crust.
- Bake the cheesecake for about 25–30 minutes until the edges are set.
- Chill the cheesecake for at least 3 hours.
- Decorate with melted white chocolate or edible decorations.
Notes
Store leftovers in an airtight container in the refrigerator for up to a week, or freeze for up to 3 months.
Nutrition
- Serving Size: 1 bar
- Calories: 230
- Sugar: 10g
- Sodium: 200mg
- Fat: 15g
- Saturated Fat: 9g
- Unsaturated Fat: 4g
- Trans Fat: 0g
- Carbohydrates: 20g
- Fiber: 1g
- Protein: 3g
- Cholesterol: 30mg
Keywords: Halloween, cheesecake, dessert, ghost, spooky treats