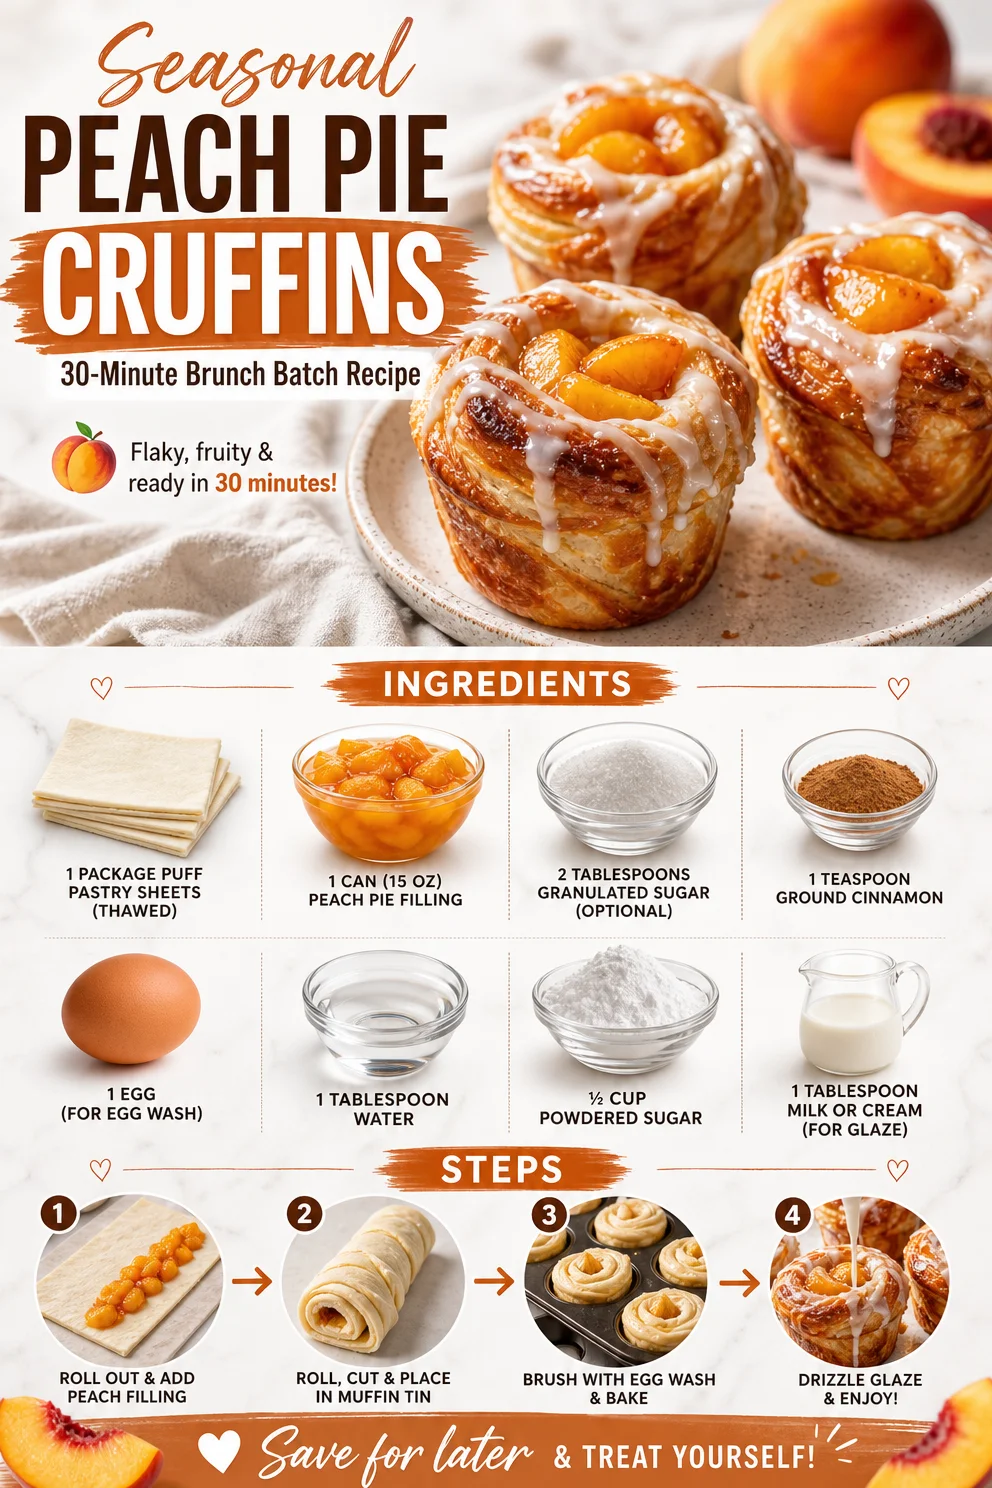
Seasonal Peach Pie Cruffins: 30-Minute Brunch Batch Recipe
Peach Pie Cruffins: A Sweet Twist on a Classic Delight
There’s something magical about the aroma of peaches wafting through the kitchen on a warm summer day. Those juicy, sun-kissed fruits remind me of lazy afternoons spent in my grandmother’s backyard, picking ripe peaches straight from the tree. The scent was so sweet and intoxicating that I often found myself longing for the fruit to transform into a glorious dessert. Fast forward to today, and here I am, combining nostalgia and creativity in a delightful treat: Peach Pie Cruffins.
Cruffins—a hybrid of croissants and muffins—offer the perfect vessel for the luscious peach filling. These flaky, buttery delights captivate the heart and the palate. Each bite is like a warm hug, with layers of crispy pastry giving way to a sweet, gooey center. This is the treat you didn’t know you needed, and I’m thrilled to share this recipe with you.
Whether you’re hosting a brunch, surprising someone special, or simply indulging in a self-care day, these Peach Pie Cruffins will elevate the moment. Together, we’ll transform humble puff pastry into something extraordinary, bringing joy and warmth to your table. Ready to dive in? Let’s get started!
A Sweet Memory: The Origin of Peach Pie Cruffins
As a child, summers meant one thing for our family—peach-picking adventures. My grandmother, the queen of baking, would take my siblings and me to our favorite orchard, where the trees stood heavy with ripe, fuzzy peaches. I can still hear her laughter as we raced one another to see who could collect the juiciest fruits. Little did I know that those peaches were destined for her famous peach pie—a recipe passed down through generations.
When it was pie-baking day, the entire house filled with the sweet aroma of cinnamon and sugar, mixing harmoniously with that perfect peach scent. I was always tasked with stemming and slicing the precious fruit. One day, I accidentally dropped a piece on the floor, and my grandma laughed, saying, "Not to worry, dear! Even the imperfect peaches can make the best memories." That philosophy stuck with me in the kitchen: it’s the joy and love you infuse into the food that counts.
Years later, inspired by my grandmother’s wisdom, I decided to put a modern twist on her classic peach pie by inventing these cruffins. While they carry the essence of her beloved dessert, they also embody a new adventure in flavor and texture. Join me as we create something beautiful that carries the spirit of those sun-drenched summer days!
Ingredients for Peach Pie Cruffins
Here’s what you’ll need to bring these delightful treats to life:
-
1 package puff pastry sheets (thawed)
Puff pastry is the star of this show! It gives these cruffins their signature flaky texture. If you can’t find puff pastry, you can use phyllo dough — just make sure to layer it for that flaky goodness. -
1 can (15 oz) peach pie filling
This is the heart of our cruffins. However, fresh peaches sautéed with sugar and cinnamon make a fantastic substitute if you’re feeling adventurous. You can even simmer frozen peaches with a bit of sugar! -
2 tablespoons granulated sugar (optional)
Adding sugar to the filling can enhance the sweetness, especially if your peaches are not as ripe. Adjust according to your taste; a sprinkle may be all you need! -
1 teaspoon ground cinnamon
A warm sprinkle of cinnamon not only compliments the peaches wonderfully but also adds an extra layer of flavor that makes these cruffins truly special. -
1 egg (for egg wash)
This is essential for achieving that golden-brown finish on your cruffins, making them shine in all their glory. -
1 tablespoon water
Mixed with the egg, this will help you achieve that perfect wash for deeper color. -
½ cup powdered sugar
For the sweet glaze on top! This will give the cruffins that dreamy, sugary finish. -
1 tablespoon milk or cream (for glaze)
Just enough to create a lovely drizzle for your cruffins. Swap with almond milk or coconut milk for a dairy-free option.
Step-by-Step Instructions
Ready to embark on this delightful baking journey? Let’s break this down step by step:
-
Preheat Your Oven
Preheat the oven to 400°F (200°C). This ensures a perfectly flaky and cooked cruffin when they go in. -
Prepare the Puff Pastry
Roll out your thawed puff pastry sheets on a lightly floured surface. If using pre-rolled sheets, ensure they’re completely thawed for easy handling. Cut each sheet into square pieces, about 4×4 inches. -
Layer the Dough
Take each square and gently stretch it to make it larger (about 5×5 inches). Layer two pieces on top of each other to create a slightly thicker base. This will yield more flakiness in your cruffins! -
Add the Peach Filling
Spoon about 2 tablespoons of peach pie filling into the center of each layered square. Make sure to leave some space around the edges to seal later. -
Sprinkle the Cinnamon and Sugar
Dust a pinch of ground cinnamon and a smidgen of granulated sugar (if using) over the peach filling. This little addition enhances the flavor beautifully! -
Fold and Roll
Fold the corners of the dough squares toward the center, making an envelope-like shape. Gently roll from one end to the other to form a spiral. This is where the magic happens—the layers will create that stunning flakiness. -
Prepare the Egg Wash
In a small bowl, whisk together the egg and water until combined. Brush the mixture over the top of each cruffin for that gorgeous golden finish. -
Bake
Place the cruffins in a muffin tin, ensuring they have a bit of space to puff up. Bake in the preheated oven for 15-20 minutes or until they are golden brown and puffed. -
Make the Glaze
While they cool, create the glaze by whisking together powdered sugar and milk/cream in a bowl until smooth. It should be thick but pourable. -
Glaze the Cruffins
Once the cruffins are cool enough to handle, drizzle the glaze over the top. The sweetness will balance beautifully with the peach filling.
And voila! Your Peach Pie Cruffins are ready to be enjoyed. Don’t forget to share, although they’re hard to resist!
Serving Suggestions
For a delightful presentation, serve your Peach Pie Cruffins warm out of the oven with a dusting of powdered sugar on top. You can also add a scoop of vanilla ice cream or a dollop of whipped cream for extra indulgence. Pair them with a refreshing iced tea or a cup of coffee for the ultimate treat experience at brunch or dessert time.
Recipe Variations
-
Berry Mix: Swap out the peach filling for your choice of berries (blueberries, raspberries, or strawberries) for a fresh twist.
-
Nutty Crust: Add a layer of crushed almonds or pecans to the filling for a delightful crunch and nutty flavor.
-
Spiced Pear: Use spiced pear filling instead of peach for a fall-inspired cruffin.
-
Vegan Version: Use vegan puff pastry, a flax egg for the wash, and almond milk for the glaze.
-
Chocolate Drizzle: For a decadent surprise, fold mini chocolate chips into the filling!
Chef’s Notes
These Peach Pie Cruffins have evolved through many iterations in my kitchen. Originally aiming to recreate my grandmother’s peach pie, I stumbled upon cruffins one rainy afternoon, and the rest is history! I experimented wildly, only to find that even the simplest ingredient combinations can create striking experiences. I chuckle every time a friend asks where my recipe came from because now they insist I’m a ‘pastry genius’! Remember, cooking is as much about creativity as it is about technique. Embrace the journey, and don’t forget to laugh at any little mishaps along the way!
FAQs and Troubleshooting
-
Why are my cruffins not rising?
Make sure your puff pastry is thawed properly. If it’s too cold or overworked, it won’t puff up as desired. -
Can I make these in advance?
Yes! You can prepare the cruffins and store them in the fridge before baking. Just bake them fresh when you want to serve them. -
What if my filling leaks out?
Ensure you seal the edges well after folding and rolling. You can also place the cruffins in muffin tins to help them maintain shape. -
Can I freeze these cruffins?
Absolutely! Before baking, you can freeze them in an airtight container. Bake from frozen—just add an extra few minutes to the cooking time.
Embrace your inner pastry chef and create these Peach Pie Cruffins with love. Remember, the kitchen is all about connection and joy—enjoy the sweet process, and tie on that apron! Happy baking!
PrintPeach Pie Cruffins
Delightful Peach Pie Cruffins combine flaky puff pastry with sweet peach filling for a unique twist on a classic dessert.
- Prep Time: 15 minutes
- Cook Time: 20 minutes
- Total Time: 35 minutes
- Yield: 12 servings 1x
- Category: Dessert
- Method: Baking
- Cuisine: American
- Diet: Vegetarian
Ingredients
- 1 package puff pastry sheets (thawed)
- 1 can (15 oz) peach pie filling
- 2 tablespoons granulated sugar (optional)
- 1 teaspoon ground cinnamon
- 1 egg (for egg wash)
- 1 tablespoon water
- ½ cup powdered sugar
- 1 tablespoon milk or cream (for glaze)
Instructions
- Preheat the oven to 400°F (200°C).
- Prepare the thawed puff pastry sheets on a lightly floured surface and cut into 4×4 inch squares.
- Layer two squares on top of each other to create a thicker base.
- Add 2 tablespoons of peach pie filling into the center of each layered square.
- Sprinkle ground cinnamon and sugar (if using) over the filling.
- Fold the corners of the squares toward the center and roll to form a spiral.
- Prepare the egg wash by mixing egg and water, then brush over each cruffin.
- Bake in the preheated oven for 15-20 minutes until golden brown.
- Make the glaze by whisking powdered sugar and milk/cream until smooth.
- Glaze the cool cruffins with the prepared mixture before serving.
Notes
Serve warm with a dusting of powdered sugar or a scoop of ice cream for a special treat.
Nutrition
- Serving Size: 1 cruffin
- Calories: 250
- Sugar: 12g
- Sodium: 200mg
- Fat: 12g
- Saturated Fat: 4g
- Unsaturated Fat: 6g
- Trans Fat: 0g
- Carbohydrates: 30g
- Fiber: 1g
- Protein: 4g
- Cholesterol: 75mg
Keywords: Peach Pie, Cruffins, Dessert, Baking, Summer Treat
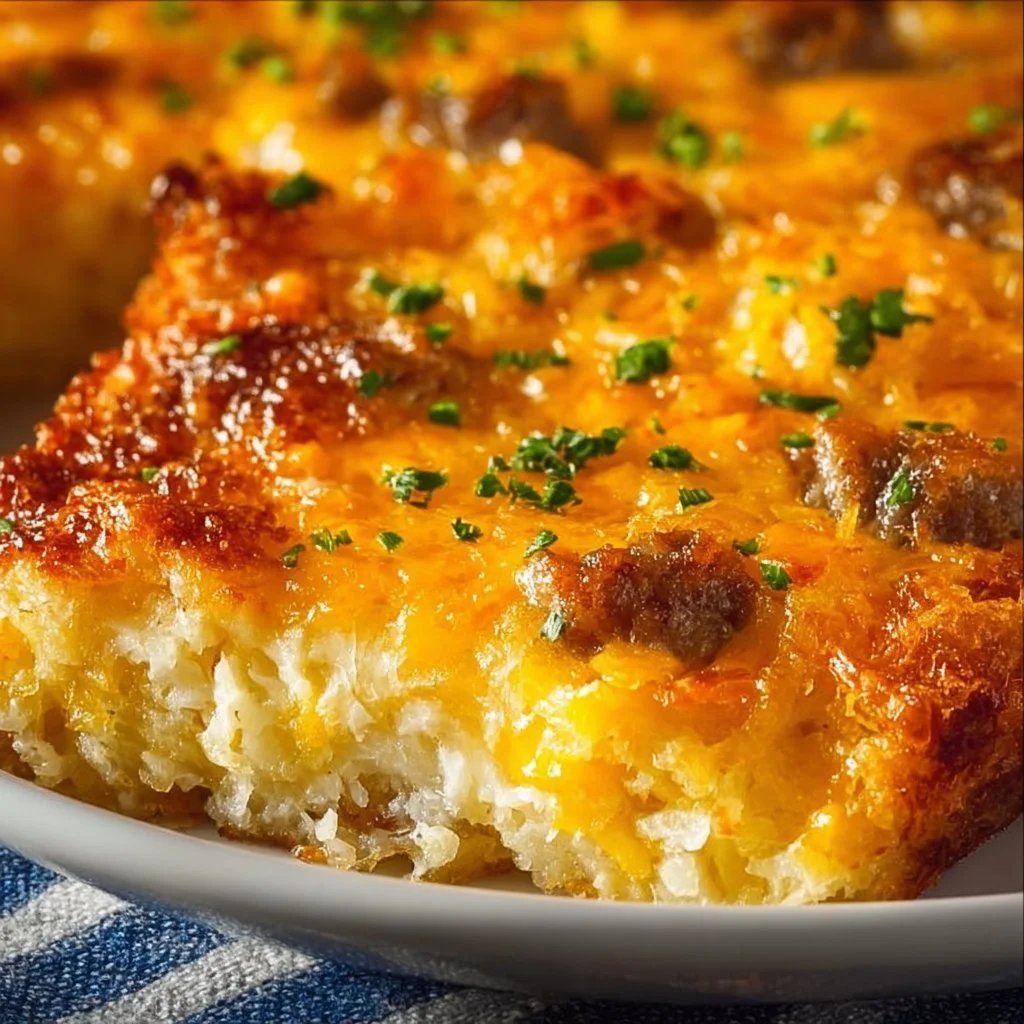
Classic Breakfast Hashbrown Casserole
Classic Breakfast Hashbrown Casserole: A Comforting Start to Your Day
Hello, breakfast lovers! Are you ready to kick-start your day with a hearty, delicious meal? If you’re like me, you know that breakfast isn’t just the first meal of the day; it’s an experience, a ritual that sets the tone for everything that follows. Today, I’m excited to share a dish that has earned its rightful place in my breakfast repertoire: the Classic Breakfast Hashbrown Casserole.
Imagine waking up to the delightful aroma of hashbrowns sizzling in your oven, combined with the melty goodness of cheese and the creamy texture of sour cream. This hashbrown casserole is as comforting as a warm blanket on a chilly morning. It’s easy to prepare and is perfect for feeding a crowd, making it an ideal recipe for brunch gatherings, holiday breakfasts, or lazy Sunday mornings.
What I love most about this dish is its versatility. It’s packed with flavors and textures that will make your taste buds dance. Plus, it’s a recipe you can customize to your heart’s content. Whether you’re adding crispy bacon or a sprinkle of fresh herbs, every bite is sure to be a delight! So, let’s roll up our sleeves and start cooking—because good food is all about creating memories in the kitchen!
Personal Story
Let me take you back a few years to a bustling kitchen during a family gathering. It was one of those beautiful Sunday mornings when everyone is still lounging in their pajamas, sipping on coffee, and exchanging sleepy smiles. My grandma was at the helm of the kitchen, her apron tied snugly around her waist. She often made her famous breakfast casserole, but on this particular morning, I decided to try my hand at making it.
The smell of hashbrowns and cheese began to fill the house, and I could hear the rustling of family members shuffling in, drawn in by the irresistible scent. As I pulled the casserole out of the oven, I felt a rush of excitement and pride. We all gathered around the table, and as we dug in, laughter and compliments flowed as freely as the coffee. That morning solidified my love for this dish. It wasn’t just food; it was a gathering, a celebration of flavors and family. Since then, I’ve perfected my own version of that hashbrown casserole, and I can’t wait to share it with you all!
Ingredients
Here’s what you’ll need to create a delicious Classic Breakfast Hashbrown Casserole:
-
4 cups frozen hashbrowns: The base of our casserole! You can use fresh hashbrowns if you prefer; just make sure to wring out any excess moisture.
-
1 cup sour cream: Adds creaminess and a slight tang. For a lighter option, Greek yogurt can be used as a great substitute!
-
1 can cream of chicken soup: This contributes to the casserole’s richness and helps bind everything together. Feel free to swap it out for cream of mushroom soup or a homemade version if you’re feeling adventurous!
-
2 cups shredded cheese (cheddar or your choice): Cheddar is traditional, but I love mixing it up with Monterey Jack or a spicy Pepper Jack for an extra kick. Just remember to shred your own cheese for the best flavor!
-
1/2 cup chopped onions: These add a sweetness that complements the hashbrowns. Green onions make a great substitute if you prefer a milder flavor.
-
1/4 cup melted butter: This adds rich flavor. Watch out for substitutes like olive oil or coconut oil to keep things dairy-free!
-
Salt and pepper to taste: Essential for elevating all the flavors!
-
Optional: cooked sausage or bacon: For those looking to add some protein, these are fantastic additions. You could also use crumbled tofu for a vegetarian twist.
Step-by-Step Instructions
Alright, let’s get cooking! Grab your mixing bowl and preheat the oven; you’re about to whip up a casserole that will have everyone asking for seconds!
-
Preheat the Oven: Start by preheating your oven to 350°F (175°C). This ensures your casserole cooks evenly and comes out perfectly golden brown.
-
Combine Ingredients: In a large mixing bowl, combine the frozen hashbrowns, sour cream, cream of chicken soup, and melted butter. Mix until everything is well incorporated. You want those hashbrowns coated in creamy goodness!
-
Season It Up: Add the chopped onions, salt, and pepper to taste. This is where you can get creative! If you’re adding cooked sausage or bacon, fold it in now. The more flavors, the better!
-
Cheesy Goodness: Stir in 1 1/2 cups of your shredded cheese, reserving the other half for topping. This step is essential for that ooey-gooey texture we all love in a good casserole.
-
Prepare the Dish: Grease a 9×13-inch casserole dish with cooking spray or a bit of melted butter. Pour the hashbrown mixture into the dish, spreading it out evenly.
-
Top It Off: Sprinkle the reserved cheese on top of the casserole. This will create a lovely golden crust as it bakes!
-
Bake: Place your casserole in the preheated oven and bake for about 45-50 minutes, or until it’s bubbly and the top is golden brown. You might want to check it around the 30-minute mark—nobody wants burnt cheese!
-
Let It Rest: Once it’s out of the oven, let it sit for about 5-10 minutes. This helps it set up nicely, making it easier to serve.
-
Slice and Serve: Cut into squares and serve warm. Watch as everyone gathers around, eager to dig in!
Serving Suggestions
This casserole is as beautiful as it is delicious, and presentation matters! Serve it straight from the oven in your favorite dishware. Garnish with fresh herbs like chives or parsley for a pop of color. Pair your hashbrown casserole with fresh fruit or a light salad for a complete meal, and don’t forget the coffee!
Recipe Variations
Want to mix things up? Here are a few creative twists on this classic dish:
- Southwestern Style: Add diced jalapeños and a sprinkle of taco seasoning for a spicy kick!
- Veggie Delight: Mix in sautéed bell peppers, spinach, or mushrooms for a healthy boost.
- Breakfast Burrito Bake: Layer some tortillas at the bottom, top with the hashbrown mixture, and bake it as a burrito casserole!
- Cheesy Potato Skins: After baking, scoop out some of the casserole, refill the shells, top with cheese and bake until crispy.
- Gluten-Free Option: Use gluten-free cream of chicken soup and ensure your hashbrowns are certified gluten-free.
Chef’s Notes
Over the years, I’ve learned that this recipe is perfect for experimenting. One Christmas, I made my hashbrown casserole with leftover holiday ham, and it became an instant hit. Plus, every time I make this dish, I’m reminded of those cozy family mornings filled with laughter—food really has a magical way of bringing us together. If you ever find yourself with leftovers (though it’s rare!), this casserole reheats beautifully, making it the perfect meal prep option for the week!
FAQs and Troubleshooting
Q: Can I make this casserole ahead of time?
Absolutely! You can assemble the casserole a day ahead and refrigerate it. Just add a few extra minutes to the baking time if it’s coming straight from the fridge.
Q: What can I do if my casserole is too dry?
If your casserole seems dry after baking, consider adding a splash of chicken broth, cream, or even a drizzle of melted butter before serving.
Q: How do I prevent my cheese from burning?
If you notice the cheese is starting to brown too quickly, cover the casserole with foil halfway through baking. This will help retain moisture.
Q: Can I freeze the leftovers?
Yes! Just make sure to let it cool completely before freezing. You can store it in an airtight container for up to three months. Thaw in the fridge overnight and reheat in the oven.
Nutritional Info
Although I’m all about enjoying food, I understand the importance of knowing what we’re eating. Here’s a rough estimation of the nutritional breakdown for a serving of the casserole:
- Calories: Approximately 350
- Protein: 15g
- Fat: 25g
- Carbohydrates: 30g
- Fiber: 2g
- Sodium: 600mg
(Nutritional info can vary based on additions and specific brands of ingredients used.)
So there you have it! Your ticket to a delightful breakfast experience right at home. I hope this Classic Breakfast Hashbrown Casserole fills your mornings with warmth and joy. Tie on your apron, gather your favorite people, and enjoy every cheesy bite. Let’s continue to create beautiful moments around the table—one delectable dish at a time!
Happy cooking! 🥔🥘✨
PrintClassic Breakfast Hashbrown Casserole

A comforting hashbrown casserole that combines crispy hashbrowns, creamy sour cream, and melty cheese for an ideal breakfast dish.
- Prep Time: 15 minutes
- Cook Time: 50 minutes
- Total Time: 65 minutes
- Yield: 8 servings 1x
- Category: Breakfast
- Method: Baking
- Cuisine: American
- Diet: Vegetarian (optional with substitutions)
Ingredients
- 4 cups frozen hashbrowns
- 1 cup sour cream
- 1 can cream of chicken soup
- 2 cups shredded cheese (cheddar or your choice)
- 1/2 cup chopped onions
- 1/4 cup melted butter
- Salt and pepper to taste
- Optional: cooked sausage or bacon
Instructions
- Preheat the oven to 350°F (175°C).
- Combine the frozen hashbrowns, sour cream, cream of chicken soup, and melted butter in a large mixing bowl. Mix until well incorporated.
- Season it up with chopped onions, salt, and pepper. Fold in cooked sausage or bacon if desired.
- Stir in 1 1/2 cups of shredded cheese, reserving the other half for topping.
- Prepare a 9×13-inch casserole dish by greasing it with cooking spray or melted butter. Pour the mixture into the dish, spreading it evenly.
- Top with reserved cheese.
- Bake for 45-50 minutes or until bubbly and golden brown.
- Let it rest for 5-10 minutes before serving. Cut into squares and enjoy!
Notes
This casserole is great for experimenting with different ingredients like veggies or meats. Leftovers reheat beautifully!
Nutrition
- Serving Size: 1 serving
- Calories: 350
- Sugar: 3g
- Sodium: 600mg
- Fat: 25g
- Saturated Fat: 12g
- Unsaturated Fat: 8g
- Trans Fat: 0g
- Carbohydrates: 30g
- Fiber: 2g
- Protein: 15g
- Cholesterol: 30mg
Keywords: hashbrown casserole, breakfast casserole, cheesy breakfast, comfort food, brunch recipe