
Minute Copycat Crunchwrap Supreme Recipe: Crispy at Home
The Crunchwrap Supreme: Your New Favorite Weeknight Dinner
Hello, fellow food lovers! Are you ready to experience a dish that’s not just an indulgence but a delightful memory of late-night adventures and Taco Bell runs? Today, we’re diving into the world of the Copycat Crunchwrap Supreme! This fun, satisfying meal packs layers of flavor and nostalgia into every bite, making it perfect for casual Fridays or any night you want to shake things up.
Let’s talk about how this recipe came to be a staple in my kitchen. I think we can all recall that feeling of excitement when deciding what to grab after a long day. For me, the Crunchwrap Supreme was always a favorite — that glorious combination of crispy and creamy, savory and fresh, all wrapped in a perfectly soft tortilla. It was the go-to for late-night snacks with friends after a good time out or just a cozy movie night at home. And you know what? It inspires laughter and a bit of friendly competition over who can create the best version at home.
The beauty of making your own Copycat Crunchwrap is that you get to control all the ingredients and flavors while still indulging your cravings. Today, I’ll walk you through how to whip up these delightful wraps in your kitchen so you can bring that fast-food nostalgia home. Let’s gather our ingredients and prepare to create a Crunchwrap that’s not just satisfying but also made with love!
A Little Kitchen Story: Crunchy Memories
I remember vividly the first time I tried to recreate the Crunchwrap Supreme at home. It was a rainy Friday night, and my friends and I had just returned from a long week of work and responsibilities. Instead of heading out for fast food, we decided to have a DIY night! Armed with a list of ingredients and a playful spirit, we got to work.
We laughed at our not-so-perfect folds and had a friendly debate about whether to use guacamole or not (Team Guac won, of course). When those crunchy, cheesy wraps finally came out of the pan, the delicious aroma filled the kitchen, and everyone eagerly gathered around the table. Every bite was met with cheers and laughter, and we ended up eating way more than we had planned. That magical evening solidified my love for creating vibrant dishes at home, reminding me that cooking can be just as fun and rewarding as dining out.
Ingredients
Here’s what you’ll need to assemble your Copycat Crunchwrap Supreme:
-
1/2 lb extra-lean ground beef
A leaner option means less grease, but feel free to swap with ground turkey for a lighter flavor or keep the classic beef. You could also use plant-based ground meat for a vegetarian version! -
1 tbsp taco seasoning
This is where the magic happens! You can use store-bought or whip up your own mix with chili powder, cumin, onion powder, garlic powder, and a pinch of salt. Adjust to taste for those who like it spicy! -
8 large flour tortillas
Soft and pliable, these will be the wrap’s backbone. If you want a whole-grain option, look for whole wheat tortillas. Or, swap for corn tortillas if you’re gluten-free (though the folding may need a gentle touch!). -
1/2 cup jarred nacho cheese sauce or queso (optional)
This is optional but highly recommended for that melting, gooey goodness. You can also use shredded cheese if you prefer that over sauce. Alternatively, a creamy vegan cheese can substitute well! -
4 tostadas
These crispy rounds add that vital crunch factor! If you can’t find tostadas, lightly crisped corn tortillas can also do the trick. -
1/2 cup sour cream
For a classic touch! You can use Greek yogurt for a healthier twist or dairy-free sour cream for a vegan option. -
1 cup iceberg lettuce (shredded)
A fresh, crunchy component that brings brightness to the wrap. Romaine or cilantro can also add a delicious twist! -
1 plum tomato (deseeded and diced)
Fresh tomatoes add juicy sweetness. You can substitute with salsa if you prefer a bigger flavor punch! -
2 cups cheddar cheese (shredded)
Combine sharp or mild cheddar for a flavorful melt—blend with Monterey Jack for a fun twist! -
Cooking spray
For that golden-brown finish! Olive oil or butter can also work to get those tortillas crispy.
Step-by-Step Instructions
Ready to get cooking? Let’s do this! Follow these simple steps to create your very own Copycat Crunchwrap Supreme:
Step 1: Cook the Beef
Start by heating a skillet over medium heat. Add your extra-lean ground beef and break it apart with a spatula. Cook it until browned, about 5-7 minutes. Drain any excess fat, then stir in the taco seasoning along with a splash of water. This helps the spices blend beautifully into the beef. Stir it well and let it simmer for another couple of minutes until everything is combined.
Chef Tip: Use lean ground beef to avoid greasiness, and keep things healthier! You can also make this ahead and store it in the fridge for quick meals during the week.
Step 2: Layer It Up
Now it’s time to build your Crunchwrap! Start with a large tortilla and spread a little nacho cheese sauce in the center. This creates a delicious cheesy barrier. On top of that, add a small handful of the cooked beef, followed by a tostada. Press down gently on the tostada. Then slather on the sour cream, lettuce, diced tomato, and a generous sprinkle of shredded cheddar cheese.
Chef Insight: Don’t worry about being too precise; each Crunchwrap’s personality will shine through its layers!
Step 3: Fold and Close
Here comes the fun part! Carefully take the edges of the tortilla and fold them toward the center, creating pleats as you go. The goal is to form a circular shape with an open center. Once you’ve made it around, it should look like a flower. Place the seam side down on a clean plate.
Chef Hack: To make folding easier, warm the tortillas for a few seconds in the microwave; it makes them more pliable!
Step 4: Crisp It Up
In the same skillet, spray a little cooking spray or heat a bit of butter over medium heat. Place the Crunchwrap seam-side down and cook for 3-4 minutes until golden brown. Carefully flip it over and repeat on the other side. If you want it extra crispy, feel free to cook it for an additional minute or two.
Pro Tip: Use a heavy pan or press down gently with a spatula to help the wrap hold its shape while cooking!
Step 5: Serve and Enjoy
Your Crunchwrap Supreme is ready to be devoured! Cut it in half to reveal those enticing layers and serve with extra sour cream or salsa for dipping.
Chef Tip: Pair it with a side of homemade nacho cheese or a fresh salsa for added flavor!
Serving Suggestions
When plating your Crunchwraps, consider adding a beautiful layer of fresh toppings like diced avocado or cilantro on the side. You could also serve it with a vibrant salad for a colorful plate. Just picture it: a golden-brown Crunchwrap surrounded by a sprinkle of fresh ingredients, inviting your friends and family to dig in!
Recipe Variations
Want to get creative? Here are some fantastic twists you can try:
- Spicy Crunchwrap: Add sliced jalapeños or a few dashes of your favorite hot sauce for a spicy kick!
- Veggie Crunchwrap: Swap the beef for sautéed bell peppers, zucchini, and black beans for a vegetarian delight.
- Breakfast Crunchwrap: Replace the ground beef with scrambled eggs, crumbled bacon, and sautéed vegetables for a fabulous breakfast twist.
- Cheesy Crunchwrap: Use a blend of cheeses (like pepper jack, mozzarella, or goat cheese) to bring a new flavor profile to life!
Chef’s Notes
Looking back on my journey of creating the perfect Crunchwrap, I chuckle at my early attempts. They were less about aesthetics and more about ensuring there was enough cheese to go around! Over time, I found myself drawn to perfecting the balance of flavors and textures, and I love that each family has its own unique way of enjoying this dish. The Kitchen becomes filled with laughter, especially when a few friends are attempting to fold their Crunchwraps at the same time!
FAQs and Troubleshooting
1. My Crunchwrap fell apart! What did I do wrong?
Don’t worry! This happens to the best of us. The key to a successful Crunchwrap is making sure all the layers stay snug. Make sure to fold the tortilla tightly around the filling and ensure it’s closed properly on the seam side.
2. Can I make these ahead of time?
Absolutely! You can prep the filling ahead of time and assemble the Crunchwraps just before cooking. You can store the built Crunchwraps in the fridge for about a day but enjoy them fresh for the best flavor and texture!
3. How do I keep them crispy?
Cook the Crunchwraps over medium heat and avoid overcrowding the pan. If you’re making several at once, keep them warm in a low oven (around 200°F) until serving.
4. What if I don’t have tostadas?
No problem! You can use another layer of tortilla or even try crackers for the crunch factor, just bake them for extra crispness before adding them in.
Nutritional Info
While exact nutritional values will depend on the specific brands and ingredients you use, here’s a basic overview:
- Calories: Approximately 450 per Crunchwrap
- Protein: 25g
- Carbohydrates: 40g
- Fats: 20g (depending on cooking methods and specific ingredients)
So there you have it! The Copycat Crunchwrap Supreme is now ready to steal the spotlight at your dinner table. I hope you enjoy making it as much as I enjoy sharing it. Now, roll up those sleeves, grab your apron, and let’s create something delicious together! Cheers to good company and great food!
PrintCopycat Crunchwrap Supreme

Recreate the beloved Crunchwrap Supreme at home with this fun and satisfying recipe packed with layers of flavor and nostalgia.
- Prep Time: 15 minutes
- Cook Time: 15 minutes
- Total Time: 30 minutes
- Yield: 4 servings 1x
- Category: Main Course
- Method: Pan-frying
- Cuisine: Mexican
- Diet: Optional Meat
Ingredients
- 1/2 lb extra-lean ground beef
- 1 tbsp taco seasoning
- 8 large flour tortillas
- 1/2 cup jarred nacho cheese sauce or queso (optional)
- 4 tostadas
- 1/2 cup sour cream
- 1 cup iceberg lettuce (shredded)
- 1 plum tomato (deseeded and diced)
- 2 cups cheddar cheese (shredded)
- Cooking spray
Instructions
- Cook the beef: Heat a skillet over medium heat, add ground beef, and cook until browned, about 5-7 minutes. Drain excess fat, stir in taco seasoning and water, and let simmer.
- Layer it up: On a large tortilla, spread nacho cheese sauce, top with cooked beef, a tostada, sour cream, lettuce, diced tomato, and shredded cheddar.
- Fold and close: Fold the edges of the tortilla toward the center, creating pleats to form a circular shape.
- Crisp it up: Spray cooking spray or heat butter in the skillet, place the Crunchwrap seam-side down, and cook until golden brown, about 3-4 minutes on each side.
- Serve and enjoy: Cut in half to reveal layers and serve with extra sour cream or salsa.
Notes
For a spicy kick, add jalapeños or hot sauce. For a vegetarian version, swap beef for sautéed veggies.
Nutrition
- Serving Size: 1 Crunchwrap
- Calories: 450
- Sugar: 3g
- Sodium: 600mg
- Fat: 20g
- Saturated Fat: 8g
- Unsaturated Fat: 10g
- Trans Fat: 0g
- Carbohydrates: 40g
- Fiber: 3g
- Protein: 25g
- Cholesterol: 55mg
Keywords: Crunchwrap, Taco, Copycat Recipe, Homemade
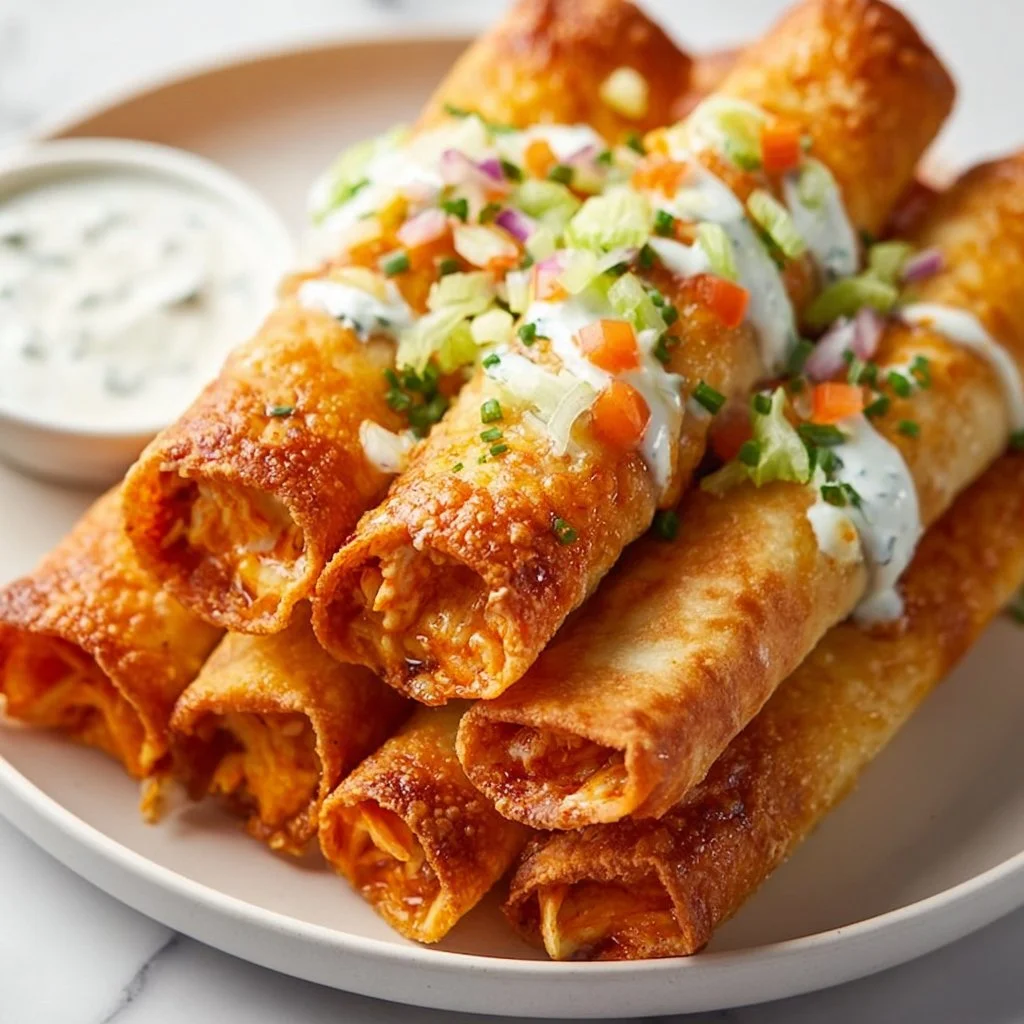
Crispy Buffalo Chicken Taquitos (Perfect for Meal Prep)
Buffalo Chicken Taquitos: A Flavorful Twist on a Classic Favorite
Hello, dear foodies! Today, I’m thrilled to share a mouthwatering recipe that has quickly become a staple in my home: Buffalo Chicken Taquitos. If you’re someone who craves that spicy, tangy kick complemented by cheesy goodness, you’re in for a treat! These delightful rolled-up tortillas are perfect for game day snacking, casual gatherings, or even a cozy weeknight meal.
I’ve been in love with taquitos ever since I took my first bite of a crispy, golden one at a little Mexican joint back in college. The crunch, the taste, the sheer joy of dive-in-and-enjoy without a second thought—it was love at first bite! But as I grew a little older and kitchen-savvy, I started experimenting. What could I turn into a taquito? That’s when buffalo chicken entered the scene and changed everything. Let me tell you, these taquitos combine everything we love about buffalo chicken wings—spice, flavor, and some serious comfort food feels—into an easy, hand-held delight.
In this blog post, we’ll dive into the wonderful world of Buffalo Chicken Taquitos! You’ll get everything from a personal story related to this amazing dish, to detailed cooking instructions, serving suggestions, and variations to keep things exciting. So, grab your apron, and let’s turn your kitchen into a spicy haven!
A Taste of Nostalgia
Every dish has a memory tied to it, doesn’t it? For me, Buffalo Chicken Taquitos take me back to my college years. It was a chilly game day, and my friends and I gathered at my tiny apartment, bursting with excitement and a bit too much enthusiasm for our favorite team. We each brought something to share, and of course, I didn’t just want to stick to traditional snacks. I wanted something that would wow everyone without sending me into a cooking frenzy.
I decided to whip up these taquitos, inspired by my love for buffalo chicken wings. The aroma of shredded chicken mingled with the spicy buffalo sauce filled my kitchen, enticing my friends as they piled into my cozy space. Everyone crowded around the table, diving into the crispy taquitos, with blue cheese dressing drizzled on top. Laughter echoed as we cheered for our team, and in that moment, life felt perfectly complete.
That night wasn’t just about the food or the game; it was about connection. Those buffalo chicken taquitos became a hit and transformed into a regular fixture at our get-togethers. Today, they still hold that nostalgic joy while being an innovative twist on a classic favorite. Let me show you how to bring this recipe to life in your own kitchen!
Ingredients Gather Round
Now, let’s move on to the essentials! Here’s what you’ll need to make these delicious Buffalo Chicken Taquitos:
-
2 cups shredded cooked chicken: You can use rotisserie chicken for ease or boil and shred some chicken breasts. It’s one of those go-to ingredients that are versatile and saves a ton of prep time!
-
1/2 cup buffalo sauce: This is your key flavor player! Choose your favorite brand or make your own for a homemade touch. Feel free to adjust the spiciness to your liking; you can mix in a bit of honey if you prefer a milder flavor.
-
1 cup shredded cheese (cheddar or mozzarella): Cheese adds that creamy, indulgent element. Cheddar gives a sharper flavor while mozzarella provides that gooey melt. Choose your favorite, or even mix them up!
-
8 small flour tortillas: These are the perfect size for taquitos. If you want to add a touch of health, consider using whole wheat tortillas or corn tortillas for a gluten-free option.
-
Cooking spray: This helps achieve that golden, crispy finish without the need for excess oil. A light layer goes a long way!
-
Blue cheese or ranch dressing for dipping: No buffalo sauce dish is complete without a delicious dip on the side. Choose your favorite dressing, or make both for guests to sample!
Step-by-Step Instructions: Let’s Get Cooking
Now let’s get down to the nitty-gritty! Follow these easy steps to whip up crispy Buffalo Chicken Taquitos that will leave everyone coming back for more.
-
Preheat your Oven: Preheat your oven to 400°F (200°C). This is crucial for achieving that perfectly crispy taquito!
-
Prep the Filling: In a large mixing bowl, combine the shredded chicken and buffalo sauce. Mix until the chicken is evenly coated. This is your flavor base, where all that delicious spice comes together. Taste it here—if you’re feeling adventurous, sprinkle in a bit of garlic powder or onion powder for additional kick!
-
Add Cheese: Stir in the shredded cheese into the chicken mixture. This is where the magic happens—the cheese melts and binds, giving the taquitos that stretchy goodness we all love about cheesy dishes.
-
Assemble the Taquitos: Take a tortilla and lay it flat on a clean surface. Spoon about 2 tablespoons of the chicken mixture onto one end of the tortilla. Tightly roll the tortilla, enclosing the filling, and place it seam side down on a baking sheet. Repeat with the remaining tortillas. Pro tip: If you warm the tortillas slightly in the microwave (just a few seconds), they become more pliable and easier to roll without cracking.
-
Spray and Bake: Lightly spray each taquito with cooking spray to help them crisp up in the oven. Bake for about 20-25 minutes, until they are golden brown and crispy. Halfway through, feel free to flip them for an even crispier finish!
-
Serve and Enjoy: As soon as they come out of the oven, let them cool for a minute (or two!) and serve with your favorite dipping sauces. Prepare yourself for cheerful “oohs” and “aahs” when everyone digs in!
Serving Suggestions: Plating Perfection
Presentation matters, just like I mentioned in my introduction! To plate the taquitos, arrange them in a lovely circle on a platter, making them the star of the show. Drizzle a little extra buffalo sauce on top for flair, or sprinkle chopped green onions for a pop of color. A small bowl of blue cheese or ranch dressing should sit nearby for that essential dipping action. Remember, we eat with our eyes first!
Recipe Variations: Spice Things Up!
Ready to switch it up? Here are some creative variations for you to explore:
-
Spinach and Artichoke Taquitos: Mix in some sautéed spinach and artichoke hearts with your chicken, and consider using cream cheese instead of buffalo sauce for a creamy twist.
-
Barbecue Chicken Taquitos: Swap the buffalo sauce for your favorite barbecue sauce, and add some crispy bacon for a smoky flavor that’s absolutely addictive.
-
Cheesy Veggie Taquitos: Keep it vegetarian by using shredded zucchini, corn, and bell peppers as the filling along with cheese. It’ll be colorful and delicious!
-
Sweet and Spicy Taquitos: Mix honey into your buffalo sauce for a sweet-savory balance. This also makes it perfect for those with a less adventurous palate.
-
Spicy Black Bean Taquitos: For a vegan version, replace the chicken with mashed black beans and toss in chopped peppers and spices.
Chef’s Notes: Little Tidbits from My Kitchen
This recipe has an interesting journey. What started out as a game-day snack quickly turned into an irresistible fixture in my dinner rotations. They’re quick to make but feel like a special treat, which is why I love sharing them with friends and family.
One particular evening, I was pressed for time and tried using leftover Thanksgiving turkey instead of chicken. Guess what? They were a hit! If you ever find yourself with extra meats, know that you can adapt this recipe easily.
When your kitchen is filled with the spicy aroma of these taquitos baking away, trust me, it creates a cozy, irresistible atmosphere. You’ll definitely want to make these regularly!
FAQs and Troubleshooting
-
Q: My taquitos are coming out soggy. What am I doing wrong?
- A: Ensure you are using enough cooking spray and baking them at a high temperature. If you’re adding too much filling, that can also make them soggier, so stick to the recommended portion size!
-
Q: Can I make these ahead of time?
- A: Absolutely! You can freeze the uncooked taquitos on a baking sheet, then transfer them to a freezer bag. When you’re ready to eat, bake them straight from the freezer, adjusting the cooking time slightly longer.
-
Q: What’s the best way to reheat these?
- A: The oven is your best friend for reheating crispy food without making it soggy. Preheat the oven to 350°F (175°C) and heat for about 10-15 minutes until warmed through.
-
Q: Can I use gluten-free tortillas?
- A: Yes! There are plenty of gluten-free tortilla options available in stores now. They work just as well in this recipe!
Nutritional Info
While I aim to keep things light and fun, here’s a brief look at the nutritional aspect. For a serving of Buffalo Chicken Taquitos (2 taquitos), you can expect approximately:
- Calories: 250-300
- Protein: 15g
- Carbohydrates: 25g
- Fat: 12g
Remember that the nutrition facts may vary based on specific ingredients and cooking methods.
And there you have it—your complete guide to Buffalo Chicken Taquitos! I hope you feel inspired to gather some friends, roll up your sleeves, and savor these delightful bites. Cooking should never feel like a chore; it’s all about passion and connection. Enjoy the process, embrace the mess, and, most importantly, relish every bite. Happy cooking, friend!
PrintBuffalo Chicken Taquitos

Crispy Buffalo Chicken Taquitos filled with shredded chicken and spicy buffalo sauce, perfect for game day or casual gatherings.
- Prep Time: 10 minutes
- Cook Time: 25 minutes
- Total Time: 35 minutes
- Yield: 4 servings 1x
- Category: Snack
- Method: Baking
- Cuisine: American
- Diet: Gluten-Free Option
Ingredients
- 2 cups shredded cooked chicken
- 1/2 cup buffalo sauce
- 1 cup shredded cheese (cheddar or mozzarella)
- 8 small flour tortillas
- Cooking spray
- Blue cheese or ranch dressing for dipping
Instructions
- Preheat your oven to 400°F (200°C).
- Combine the shredded chicken and buffalo sauce in a large mixing bowl, mixing until evenly coated.
- Stir in the shredded cheese into the chicken mixture.
- Take a tortilla and lay it flat, spoon about 2 tablespoons of the chicken mixture onto one end, and roll tightly.
- Spray each taquito with cooking spray and place on a baking sheet.
- Bake for about 20-25 minutes until golden brown and crispy.
- Serve with your favorite dipping sauces.
Notes
For added flavor, consider mixing in a bit of garlic or onion powder into the chicken mixture. They can also be made ahead of time and frozen for later.
Nutrition
- Serving Size: 2 taquitos
- Calories: 300
- Sugar: 2g
- Sodium: 450mg
- Fat: 12g
- Saturated Fat: 6g
- Unsaturated Fat: 4g
- Trans Fat: 0g
- Carbohydrates: 25g
- Fiber: 1g
- Protein: 15g
- Cholesterol: 30mg
Keywords: Buffalo Chicken, Taquitos, Game Day Snacks, Spicy Snacks, Easy Recipes