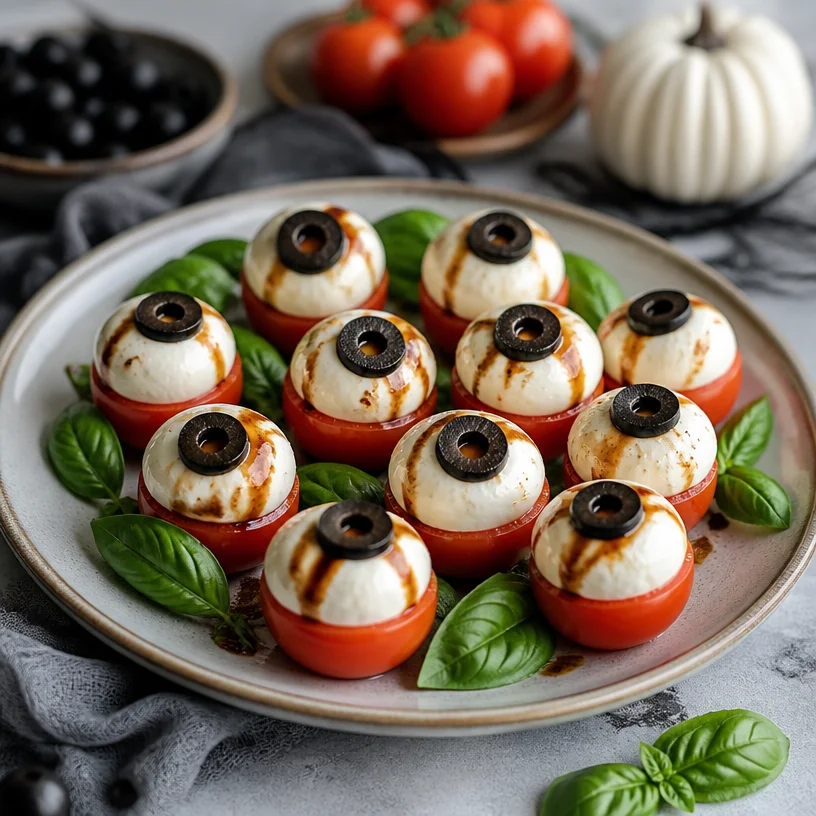
Spooky Eyeball Caprese Bites for Halloween Parties
Eyeball Caprese Bites: A Spook-tacular Twist on an Italian Classic
Hello, lovely friends! As the days shorten and the air grows crisp, the excitement of autumn begins to take hold. One thing I adore about this season is the playful spirit it brings, especially with gatherings—whether spooky Halloween parties or cozy fall dinners. Today, I’m thrilled to share a fun and spooky twist on a classic appetizer that will not only impress your guests but also spark a conversation or two. Are you ready for Eyeball Caprese Bites? These delightful little morsels combine the elegance of traditional Caprese salad with a fun, eerie aesthetic that’s perfect for your next gathering!
A Bite of Nostalgia
Let me take you back to my childhood for a moment. I remember the excitement that swirled around our kitchen every Halloween. My mother was a magician in her own right, transforming ordinary dishes into whimsical delights. I can still see her rolling up her sleeves, her apron dusted with flour, and turning basic ingredients into creepy creations. One year, she made “witches’ fingers” with green bell peppers and almond slices, and I was utterly captivated.
But it was her play with flavors—like the fresh mozzarella, juicy tomatoes, and vibrant basil of Caprese salad—that truly inspired me. I’ve always loved how food can evoke memories and bring people together. So, when I was contemplating a festive dish that encapsulated those heartfelt moments, Eyeball Caprese Bites leaped to mind. This fun take not only looks captivating but also packs a punch of deliciousness. So let’s dive in, shall we?
Ingredients
Here’s what you’ll need to bring these delightful eyeball bites to life:
-
Cherry Tomatoes
Beautifully juicy, cherry tomatoes are perfect for this recipe. Choose a mix of red, yellow, or even heirloom varieties for added color! If you can’t find cherry tomatoes, grape tomatoes can be a fine substitute. Just make sure they’re firm and ripe. -
Fresh Mozzarella Balls (Bocconcini or Ciliegine)
These little gems are creamy and rich, making them the star of the show. They come in various sizes, but for this recipe, go for the smaller ones, about the size of the cherry tomatoes. If you’re looking for a dairy-free option, try marinated tofu or cashew cheese for a similar texture. -
Black Olives
They add the perfect touch of a "pupil" to our eyeballs! You can use kalamata olives or any black olives you prefer. For a twist, consider using green olives for a different flavor profile. Just ensure they’re pitted before use—no one wants an unwelcome surprise when biting into these. -
Fresh Basil Leaves
Basil adds that quintessential Italian flavor we love in Caprese. Look for vibrant green leaves, and if you want to add a little fun, consider using basil-flavored vegan cream cheese for a unique spin.
Step-by-Step Instructions
Now, let’s get cooking! Follow these simple steps to assemble your Eyeball Caprese Bites.
-
Prepare the Tomatoes
Start by carefully slicing the tops off each cherry tomato, just enough to create a little cap. Use a paring knife to scoop out the insides lightly. Don’t worry if you lose a tomato or two—that’s what taste testing is for! -
Stuff with Mozzarella
Take your fresh mozzarella balls and gently press them into the hollowed tomatoes. You want them to sit snugly, resembling a little eyeball peeking out. If you’re feeling extra creative, try stuffing some of the mozzarella with a hint of pesto or roasted garlic for a flavor kick. -
Create the Olives’ Pupils
Next, slice your black olives in half. Using one olive half, place it right in the center of each stuffed mozzarella ball to create the “pupil.” This is my favorite part because it’s where the dish comes to life! -
Add the Basil
Finish your eyeballs off by placing a small basil leaf on top of each tomato. It’s an easy way to introduce that classic Caprese flavor and adds a pop of green to contrast with the red and white! -
Drizzle and Serve
For an added touch, drizzle balsamic reduction over your assembled Eyeball Caprese Bites right before serving. This not only enhances the flavor but also adds a beautiful presentation element.
Serving Suggestions
When it comes to serving, remember that presentation is everything! Arrange your Eyeball Caprese Bites on a beautiful platter, perhaps with some spooky decorations like mini pumpkins or black lace for a Halloween touch. If you want to keep it simple, a wooden cutting board can add a rustic charm. Trust me, your guests won’t be able to resist diving in!
Recipe Variations
Want to shake things up a bit? Here are a few fun twists to consider:
- Caprese Skewers: Thread your eyeball ingredients onto skewers for a fun, handheld appetizer that’s perfect for mingling.
- Spicy Eyeballs: Add a slice of jalapeño or a sprinkle of chili flakes on top for a spicy kick.
- Herbed Ricotta Swap: Instead of mozzarella, use herbed ricotta or goat cheese for a creamier texture and a burst of flavor.
- Vegan Option: Swap the mozzarella for marinated tofu balls and use olives for the pupils for a delightful vegan treat.
Chef’s Notes
As I reflect on how Eyeball Caprese Bites have evolved over the years, I can’t help but laugh at some of the mishaps that happened along the way! I once tried using grape tomatoes instead of cherry tomatoes, thinking they’d be cuter—what a mess that was! The cheese didn’t fit quite right, and let’s just say they didn’t have the same visual impact. Now I always stick with cherry tomatoes for that perfectly playful look!
These bites have become a staple at my gatherings, not just for Halloween. They are so versatile and loved by all, young and old! I love how they blend elegance and whimsy and how they offer a delightful surprise on the table.
FAQs and Troubleshooting
1. Can I prepare these ahead of time?
Absolutely! You can prep the components a few hours in advance. Just assemble them right before serving to keep the ingredients fresh.
2. What if I don’t have fresh mozzarella?
You can substitute with string cheese, paneer, or even tofu for a dairy-free version.
3. My tomatoes are too big; what do I do?
If your tomatoes are oversized, you can always cut them in half for a more manageable bite—and they look slightly more spooky that way!
4. How long will these last?
These are best enjoyed fresh, but if you have leftovers, store them in an airtight container for up to 2 days in the refrigerator. The texture may slightly change, but the flavors will still be fun!
Nutritional Info
While I didn’t calculate the exact nutritional information here, these bites are generally low in calories, particularly if you’re mindful of portions. Cherry tomatoes and basil are nutrient-dense, providing vitamins and antioxidants, while mozzarella offers protein and calcium. Just keep an eye on the balsamic drizzle if you’re counting calories!
Thank you for joining me on this delightful culinary adventure! I hope you’re inspired to create your own Eyeball Caprese Bites this season, bringing together family and friends around your table. Remember, it’s all about the joy of cooking and sharing. Tie on that apron, gather your ingredients, and let’s make something memorable! Happy cooking!
PrintEyeball Caprese Bites

A fun and spooky twist on traditional Caprese salad, perfect for Halloween parties and fall gatherings.
- Prep Time: 15 minutes
- Cook Time: 0 minutes
- Total Time: 15 minutes
- Yield: 4 servings
- Category: Appetizer
- Method: No-Cook
- Cuisine: Italian
- Diet: Vegetarian
Ingredients
- Cherry Tomatoes
- Fresh Mozzarella Balls (Bocconcini or Ciliegine)
- Black Olives
- Fresh Basil Leaves
Instructions
- Prepare the Tomatoes by slicing the tops off each cherry tomato and scooping out the insides.
- Stuff with Mozzarella by pressing the fresh mozzarella balls into the hollowed tomatoes.
- Create the Olives’ Pupils by slicing black olives in half and placing one half in the center of each mozzarella ball.
- Add the Basil by placing a small basil leaf on top of each tomato.
- Drizzle and Serve by adding balsamic reduction over the assembled bites just before serving.
Notes
For a spicy kick, add jalapeño slices or chili flakes on top. These can be prepared a few hours in advance and assembled right before serving.
Nutrition
- Serving Size: 1 serving
- Calories: 150
- Sugar: 2g
- Sodium: 300mg
- Fat: 10g
- Saturated Fat: 4g
- Unsaturated Fat: 6g
- Trans Fat: 0g
- Carbohydrates: 10g
- Fiber: 2g
- Protein: 6g
- Cholesterol: 15mg
Keywords: Eyeball Caprese Bites, Halloween appetizers, spooky food ideas, Caprese salad, easy party snacks

Crispy Ham & Cheese Puff Pastries: 15-Minute Snack Hit
The Ultimate Ham and Cheese Puff Pastries: An Easy Delight for Any Occasion
Hello, friends! Today, I’m thrilled to share a recipe that’s one of my absolute favorites: Ham and Cheese Puff Pastries. These little pockets of deliciousness are not just a hit at dinner parties but also perfect for a quiet evening in. Imagine flaking into soft, buttery pastry followed by savory ham and melted cheese—a bite that says “comfort” with every morsel! So let’s roll up our sleeves, tie on our aprons, and dive into this delightful culinary adventure.
Personal Story
This recipe takes me back to my childhood kitchen, where the aroma of golden pastries filled the air. My mom would whip them up on weekends for a special brunch. I can still picture her skillfully rolling out the puff pastry, her laughter echoing in the air as we chased each other around the kitchen. Those moments taught me that cooking is more than just preparing food—it’s about creating memories and cherishing time spent with loved ones. When I make Ham and Cheese Puff Pastries, I feel like I’m channeling my mom’s spirit, mixing nostalgia with creativity. I love serving these pastries at gatherings, knowing each bite can brighten someone’s day just like they did for me all those years ago.
Ingredients
-
1 sheet of puff pastry
Puff pastry is the star of this dish! It’s flaky, buttery, and creates a wonderful texture. Feel free to use store-bought for convenience. If you’re feeling adventurous, you might even try making your own, but that’s a recipe for another day! -
4 oz ham, diced
Choose your favorite type of ham—smoked, honey, or even leftover holiday ham works beautifully here. Don’t have ham? Cooked chicken or turkey make great substitutes, too! -
4 oz cheese (like cheddar or Swiss), shredded
The creaminess of the cheese complements the savory ham perfectly. You can swap cheddar for mozzarella or pepper jack for an extra kick—just keep it shredded for even melting. -
1 egg, beaten (for egg wash)
This golden egg wash will give your pastries that gorgeous, shiny finish. You can use an egg substitute if needed, like a mixture of grounded flaxseed and water. -
Salt and pepper to taste
Just a pinch is all you need for seasoning! Remember to taste as you go—cooking should be an adventure of flavor.
Step-by-Step Instructions
-
Preheat the Oven
Preheat your oven to 400°F (200°C). This step is vital, as a hot oven helps the puff pastry rise beautifully and become gloriously flaky. -
Prepare the Puff Pastry
If your puff pastry is frozen, let it thaw in the refrigerator or on the counter for about 30 minutes until it’s pliable but still cold. Once thawed, roll it out gently on a floured surface to prevent sticking. If it’s too soft, pop it in the freezer for a few minutes. Trust me, it’ll be easier to handle! -
Cut the Pastry
Using a sharp knife or a pizza cutter, slice the pastry into squares—roughly 4×4 inches. This doesn’t have to be exact; we’re going for rustic charm, not perfection! -
Mix Ham and Cheese
In a mixing bowl, combine the diced ham with the shredded cheese. Season with salt and pepper. Remember, the ham might already be salty, so taste your mixture before adding any extra salt. -
Fill the Pastry
Place a heaping tablespoon of the ham and cheese mixture in the center of each pastry square. Make sure not to overfill them—you don’t want the delicious filling spilling out while baking! -
Fold and Seal
Fold the corners of the pastry into the center to form a little pocket. You can press down around the edges with a fork to seal them securely. This is also a fun step—get creative with the design! -
Egg Wash Time
Brush the tops of the pastries with the beaten egg. This is where the magic happens; it gives them a beautiful golden color that will make them irresistible. -
Bake
Place the pastries on a parchment-lined baking sheet, ensuring they are spaced well apart. Bake for about 15-20 minutes or until they are puffed up and perfectly golden-brown. You might want to take a peek at them after 15 minutes—you’ll want them just right!
Serving Suggestions
Serve these lovely ham and cheese puff pastries warm, straight out of the oven! For an elegant touch, plate them on a beautiful serving platter alongside a small bowl of mustard for dipping. Fresh herbs, like parsley or chives, sprinkled on top will elevate the presentation even further. Trust me, they’ll disappear in no time!
Recipe Variations
-
Spinach and Feta: Swap the ham for sautéed spinach and crumbled feta cheese for a delicious vegetarian twist.
-
Apple and Cheddar: Add diced apples to the ham-and-cheese filling for a sweet and savory contrast.
-
Spicy Kick: Add jalapeños or red pepper flakes to the cheese mixture if you crave some heat.
-
Herbed Cream Cheese: Use herbed cream cheese for an extra creamy filling that adds a burst of flavor.
-
Whole Wheat Puff Pastry: For a more wholesome option, use whole wheat puff pastry for an added nutrient boost.
Chef’s Notes
This recipe has evolved so much over the years. I started with plain ham and cheese, and with time, I’ve experimented with different fillings and spices. I once hosted a gathering where I made a variety of pastries, and guests were encouraged to mix and match the fillings. It turned into a delightful culinary exploration! And here’s a funny tidbit: during that gathering, my dough didn’t fully seal on a few pastries. They oozed cheese, causing quite the mess—but they tasted amazing, and everyone loved the ‘lava’ effect!
FAQs and Troubleshooting
1. My puff pastry didn’t rise properly; what happened?
Ensure your oven was preheated and not overcrowded. Airflow is essential for perfect puffing! Also, check that your pastry was chilled before baking—warm dough doesn’t puff as well.
2. Can I make the filling ahead of time?
Absolutely! You can prepare the ham and cheese filling a day in advance. Just store it in an airtight container in the refrigerator and assemble the pastries just before baking.
3. How do I store leftovers?
Keep any uneaten pastries in an airtight container in the fridge for up to 2 days. Reheat them in the oven to regain their crispiness.
4. Can I freeze the pastries?
Yes! Assemble the pastries but don’t bake them. Place them on a baking sheet, freeze until solid, and then transfer to a freezer bag. Whenever you’re ready, pop them in the oven straight from the freezer—just add a few extra minutes to the baking time.
Nutritional Info
While I believe in enjoying food without stress, it’s always helpful to have a look at nutrition! Each Ham and Cheese Puff Pastry (based on this recipe) contains approximately:
- Calories: 223
- Total Fat: 15g
- Saturated Fat: 7g
- Cholesterol: 55mg
- Sodium: 360mg
- Total Carbohydrate: 15g
- Dietary Fiber: 1g
- Protein: 7g
So there you have it—a double delight of nostalgia and newfound kitchen magic! I hope you feel encouraged to try your hand at these Ham and Cheese Puff Pastries. They’re simple, straightforward, and oh-so-delicious. Gather your loved ones around, serve warm, and create your own wonderful memories in the kitchen—in the spirit of love, laughter, and great food. Happy cooking!
PrintHam and Cheese Puff Pastries

These flaky pastries filled with savory ham and melted cheese are perfect for any occasion, bringing comfort and nostalgia to your table.
- Prep Time: 15 minutes
- Cook Time: 20 minutes
- Total Time: 35 minutes
- Yield: 4 servings 1x
- Category: Appetizer
- Method: Baking
- Cuisine: French
- Diet: Omnivore
Ingredients
- 1 sheet of puff pastry
- 4 oz ham, diced
- 4 oz cheese (like cheddar or Swiss), shredded
- 1 egg, beaten (for egg wash)
- Salt and pepper to taste
Instructions
- Preheat your oven to 400°F (200°C).
- Prepare the puff pastry by thawing it if frozen and rolling it out.
- Cut the pastry into squares, roughly 4×4 inches.
- Mix the diced ham with shredded cheese, adding salt and pepper to taste.
- Fill each pastry square with a heaping tablespoon of the ham and cheese mixture.
- Fold the corners of the pastry into the center and seal with a fork.
- Brush the tops with the beaten egg.
- Bake for 15-20 minutes until golden brown.
Notes
Serve warm and optionally with mustard for dipping. Fresh herbs can elevate the presentation.
Nutrition
- Serving Size: 1 pastry
- Calories: 223
- Sugar: 1g
- Sodium: 360mg
- Fat: 15g
- Saturated Fat: 7g
- Unsaturated Fat: 5g
- Trans Fat: 0g
- Carbohydrates: 15g
- Fiber: 1g
- Protein: 7g
- Cholesterol: 55mg
Keywords: ham, cheese, puff pastry, appetizer, easy recipe

Irresistible Ham and Cheese Sticks You Can’t Resist
Irresistible Ham and Cheese Sticks You Can’t Resist
Welcome to my cozy corner of the culinary world! If you’re in search of a dish that hits all the right notes—savory, flaky, and utterly irresistible—then you’re in for a treat today. We’re diving into the delightful world of Ham and Cheese Sticks, a snack or appetizer that will leave everyone begging for more. Picture this: crispy, golden puff pastry wrapped around layers of delicious ham and melted cheese, brushed with a hint of mustard, and sprinkled with fresh parsley. What’s not to love?
It’s funny how some of the foods we cherish the most come wrapped in a little nostalgia. For me, the joy of Ham and Cheese Sticks stems from glorious afternoons spent in my grandmother’s kitchen, where the air was filled with the aroma of baking treats and laughter echoed off the walls. Every Sunday, she would whip up these delightful snacks for our family gathering. As a child, I was fascinated by the way those golden sticks would appear from the oven, a glorious triumph in both flavor and fun. It always felt like magic, and I knew I wanted to carry that tradition into my own kitchen.
So, whether you’re prepping for a family gathering, game night with friends, or just treating yourself, let’s embark on this culinary adventure together! Ready to tie on your apron and create something amazing? Let’s get cooking!
My Personal Story: The Sunday Staple
Memory is a powerful ingredient in cooking, don’t you think? I can still picture my grandmother’s hands—gentle yet skilled—rolling out the dough while we kids squealed in anticipation. The moment those Ham and Cheese Sticks came out of the oven, we’d crowd around the kitchen island, each hoping to snag the first bite. I remember how she always saved the last one just for me, a little secret between us as she winked and said, "You deserve it, darling."
Those sticks became a staple, a tradition that brought our family together every Sunday. Over time, I’ve made adjustments, trying out different cheeses and spices, but my love for this dish has remained constant. It represents not only comfort but also the joy of sharing moments with loved ones around the table.
Ingredients
Here’s what you’ll need to whip up these fabulous Ham and Cheese Sticks:
-
1 sheet thawed puff pastry
This flaky wonder serves as the perfect base to hold in all that savory goodness. If you don’t have puff pastry, you can swap it for phyllo dough, but remember, it will be flakier and might need careful handling. -
8 slices deli ham
Adds a salty, savory layer that pairs beautifully with the cheese. Feel free to use turkey or even plant-based deli slices for a lighter option. -
1 cup cheddar or mozzarella cheese
Choose your favorite cheese for a melty, rich filling that everyone will love! For a bolder flavor, consider sharp cheddar or pepper jack. -
1 large beaten egg
Provides a golden, shiny finish to your Ham and Cheese Sticks. If you’re vegan, a splash of non-dairy milk can work as an alternative glaze. -
1 tablespoon Dijon mustard
A tangy kick that elevates the flavor of the filling. You can also use whole grain mustard for a bit of texture or a touch of honey mustard for sweetness. -
2 tablespoons chopped fresh parsley (optional)
Adds freshness and color. You could substitute with fresh thyme or chives for a different herbal note. -
to taste salt
Essential for rounding out the flavors. Just a pinch will do, especially if your ham is salty. -
to taste pepper
Essential, too! Freshly cracked black pepper can enhance the overall seasoning of the dish.
Step-by-Step Instructions
Now, let’s dive into the kitchen. It’s time to create these irresistible Ham and Cheese Sticks!
-
Preheat Your Oven
Set your oven to 400°F (200°C). Preheating is essential for achieving that perfect flaky texture—trust me! -
Prepare the Pastry
Roll out your thawed puff pastry on a lightly floured surface. You want it to be as thin as possible without tearing. Think of it as a delicious canvas waiting for your masterpiece. -
Cut Your Pastry
Using a sharp knife or pizza cutter, slice the pastry into rectangles, roughly 3 inches by 5 inches. These will be your individual Ham and Cheese Sticks, so size them according to your appetite! -
Layer the Ingredients
Start with a slice of ham, laying it in the center of each pastry rectangle. Next, sprinkle a generous amount of cheese over the ham. Remember, the more cheese, the merrier! -
Add a Brush of Mustard
If you like a bit of tanginess, spread a tiny dollop of Dijon mustard on top of the cheese. It adds great depth and keeps everything deliciously moist. -
Fold and Seal
Fold the pastry over the filling to create a pocket, then pinch the edges together to seal them securely. This is where our flavors will cozy up during baking! -
Brush with Egg
Place the prepared sticks on a baking sheet lined with parchment paper. Brush the tops with the beaten egg for that golden sheen. Don’t be shy; it makes all the difference! -
Sprinkle with Seasoning
A light dusting of salt and pepper on top will elevate your Ham and Cheese Sticks. If you’re feeling fancy, throw on some sesame seeds or everything bagel seasoning for an extra pop of flavor. -
Bake
Slide your baking sheet into the preheated oven and bake for 15-20 minutes or until everything is puffed and gloriously golden brown. Keep an eye on them—no one likes a burnt stick! -
Cool & Serve
Once baked, let the sticks cool on a wire rack for a minute. This helps them retain their crispiness. But don’t wait too long; they’re best enjoyed warm!
Serving Suggestions
To plate these lovely Ham and Cheese Sticks, consider serving them on a beautiful wooden board. Pair with a small bowl of honey mustard or a tangy dip on the side for an extra zing! You can even garnish with a sprinkle of fresh parsley for a pop of color—as always, presentation is key!
Recipe Variations
Looking to mix things up? Here are some creative twists to consider:
- Spicy Kick: Add some sliced jalapeños or red pepper flakes to the filling for a spicy version.
- Herb Infusion: Experiment with fresh herbs, like thyme or rosemary, mixed in with your cheese for an aromatic lift.
- Veggie Delight: Toss in some diced bell peppers or spinach to the filling for added nutrition and flavor.
- Sweet Twist: Spread a thin layer of fig jam before layering ham and cheese for a sweet-savory combo.
- Cheesy Surprise: Mix a variety of cheeses, like brie and gouda, for a rich, decadent filling.
Chef’s Notes
As I’ve played with this recipe over the years, I’ve learned that the beauty lies in its adaptability. One day I might feel like making them spicy, while another might call for that classic sweet and savory flavor. And let me tell you, I’ve had my fair share of culinary missteps! I once forgot to seal the edges entirely, which sent melted cheese oozing out all over my baking sheet. The result? A mess—but also a new favorite dish inspired by the chaos!
Every burn, spill, and success in the kitchen shapes our cooking journey. So, embrace it all, and remember: cooking is about joy, not perfection.
FAQs and Troubleshooting
1. What do I do if my puff pastry is tearing?
If your pastry tears, don’t panic! You can easily patch it up with a bit of water to create a seal, or just use extra dough to cover the spot.
2. Can I make these ham and cheese sticks ahead of time?
Absolutely! You can prepare them a few hours in advance, cover them with plastic wrap, and pop them in the fridge until you’re ready to bake. Just be sure to brush them with the egg wash right before baking.
3. What can I serve alongside these sticks?
Pair these delightful bites with a fresh salad, a charcuterie board, or even a simple bowl of tomato soup for dipping!
4. Why are my Ham and Cheese Sticks not puffing up?
Ensure your oven is fully preheated before baking, and avoid overcrowding the baking sheet. Fresh puff pastry should give you that lovely rise. If in doubt, try chilling the pastry before baking to help with the puffing!
Nutritional Info
While I believe good food is about balance, here’s a quick nutritional overview per serving (based on one stick, for a batch of 8):
- Calories: 200
- Protein: 8g
- Carbohydrates: 15g
- Fat: 12g
So there you have it! From nostalgic memories to decadent flavors, these Ham and Cheese Sticks are sure to delight. I hope you find as much joy in making them as I do. Happy cooking, and remember—good food isn’t just about nourishment; it’s about connection. Tie on your apron and let’s keep spreading those culinary smiles!
PrintIrresistible Ham and Cheese Sticks

Delicious crispy puff pastry filled with savory ham and melted cheese, brushed with mustard and sprinkled with parsley.
- Prep Time: 15 minutes
- Cook Time: 20 minutes
- Total Time: 35 minutes
- Yield: 8 servings 1x
- Category: Appetizer
- Method: Baking
- Cuisine: American
- Diet: None
Ingredients
- 1 sheet thawed puff pastry
- 8 slices deli ham
- 1 cup cheddar or mozzarella cheese
- 1 large beaten egg
- 1 tablespoon Dijon mustard
- 2 tablespoons chopped fresh parsley (optional)
- to taste salt
- to taste pepper
Instructions
- Preheat your oven to 400°F (200°C).
- Prepare the puff pastry on a lightly floured surface.
- Cut the pastry into 3×5 inch rectangles.
- Layer the ham and cheese in the center of each rectangle.
- Add a tiny dollop of Dijon mustard on top of the cheese.
- Fold the pastry over the filling and pinch edges to seal.
- Brush the tops with the beaten egg.
- Sprinkle with salt and pepper.
- Bake for 15-20 minutes until golden brown.
- Cool on a wire rack before serving.
Notes
Serve warm with dipping sauce for extra flavor.
Nutrition
- Serving Size: 1 stick
- Calories: 200
- Sugar: 1g
- Sodium: 600mg
- Fat: 12g
- Saturated Fat: 4g
- Unsaturated Fat: 7g
- Trans Fat: 0g
- Carbohydrates: 15g
- Fiber: 1g
- Protein: 8g
- Cholesterol: 30mg
Keywords: ham, cheese, puff pastry, appetizer, snack, party food

Fresh Vegetable Tortilla Roll Ups
Fresh Vegetable Tortilla Roll Ups: A Delightful Bite of Flavor
Hello, fellow foodies! Today, I’m thrilled to share a vibrant, fresh dish that’s not only a favorite for gatherings but also a wonderful addition to your weeknight meals: Fresh Vegetable Tortilla Roll Ups. These colorful bites are all about bringing together fresh ingredients, delightful flavors, and the joy of sharing with loved ones. Whether you’re hosting a party, preparing a healthy lunch, or simply looking to snack in style, these tortilla roll ups are here to impress!
A Bit of Nostalgia
Ah, the memories! I remember the first time I rolled up veggies in a tortilla. It was a sunny afternoon, and my best friend invited me over for a little gathering. She was always the creative one, and that day she presented us with these beautiful tortilla roll ups filled to the brim with crisp vegetables and creamy spread. I was amazed at how something so simple could be such a crowd-pleaser! We sat in her backyard, laughing and enjoying the burst of flavors, with our plates stacked high with these adorable roll ups. It was a carefree day filled with good food, laughter, and the undeniable magic of fresh ingredients coming together. That inspired me to bring my own twist to these fun bites, and I’m excited to pass them down to you!
So, let’s roll up our sleeves and get cooking, shall we?
Ingredients
Here’s a friendly little rundown of what you’ll need for these delightful Fresh Vegetable Tortilla Roll Ups:
-
Large Flour Tortillas (3-4 pieces)
- A blank canvas for all those fresh fillings. Feel free to substitute with whole wheat tortillas for a healthier option or spinach tortillas for an extra pop of color.
-
Cream Cheese (8 oz)
- This adds a creamy richness that binds everything together. Go for herb-flavored cream cheese for an extra kick or use Greek yogurt as a lighter alternative!
-
Bell Peppers (1 red, 1 yellow)
- Sweet and crunchy, bell peppers provide a vibrant color contrast. You can swap them for cucumbers if you prefer a more refreshing crunch.
-
Carrots (1-2 medium)
- Adding sweetness and crunch, carrots are a staple in these roll ups. You can also grate them instead of slicing for a different texture.
-
Cucumber (1 medium)
- Cool and refreshing, cucumbers balance out the creaminess. If you want a more robust flavor, try using zucchini!
-
Fresh Spinach (1 cup)
- For that green goodness! You could also use arugula for a peppery twist.
-
Avocado (1 ripe)
- Creamy and dreamy; you can’t go wrong here. If you’re out of avocados, a thin layer of guacamole would work well too.
-
Fresh Herbs (1/4 cup; dill, chives, or parsley)
- These add a burst of freshness and zest. Use whatever herbs you love or have on hand!
-
Salt and Pepper (to taste)
- Always essential! A pinch of garlic powder or cumin can amp up flavors if you’re feeling adventurous.
Step-by-Step Instructions
-
Prep Your Ingredients:
Start by washing all your vegetables thoroughly. Slice the bell peppers into thin strips, julienne the carrots, and slice the cucumber into thin sheets. If you want to make life easier, use a mandoline slicer for those veggies! -
Mix the Cream Cheese:
In a small bowl, whip the cream cheese until it’s soft and spreadable. You can add a pinch of salt and pepper and even a dash of lemon juice for a little extra zing! -
Assemble the Tortillas:
Lay a tortilla flat on a clean surface. Using a spatula or a butter knife, spread a generous layer of cream cheese evenly across the tortilla, leaving about an inch at the edges to avoid overflow. -
Layer Your Veggies:
Start layering your sliced veggies! Lay down the fresh spinach first, followed by the bell peppers, carrots, cucumbers, and avocado. Remember, you want balance and color here, so feel free to mix it up! -
Roll It Up:
Time to roll! Starting from one end, gently lift the edge of the tortilla over the filling and begin to roll tightly. Be sure not to overstuff, or it might burst out. Keep rolling until you reach the end, then give it a gentle press to seal. -
Slice and Serve:
With a sharp knife, slice the roll into bite-sized pieces—around 1-2 inches works nicely. Make sure to slice straight down to maintain that beautiful filling show-off! -
Plating:
Arrange the roll ups on a platter, and consider drizzling a little balsamic glaze or serving with a tangy dipping sauce on the side. A sprinkle of fresh herbs or edible flowers can elevate the presentation even more!
Serving Suggestions
These Fresh Vegetable Tortilla Roll Ups make a fantastic centerpiece for any platter. Serve them alongside some hummus or tzatziki for dipping, or pair with a refreshing salad to create a light meal. You could even stack them up like a tower for some added flair!
Recipe Variations
- Mediterranean Twist: Add some feta cheese and olives for a Greek-inspired version.
- Spicy Kick: Mix in a bit of chopped jalapeño or use a spicy herb cream cheese to add some heat.
- Sweet and Savory: Throw in some roasted red peppers and a hint of balsamic vinegar for unexpected sweetness.
- Vegan Option: Replace cream cheese with crushed avocado and use a vegan tortilla for a plant-based delight.
Chef’s Notes
When I first started making these roll ups, I made the mistake of overloading them—I can’t tell you how many times I had a filling explosion! So, when you’re rolling, remember that less is more. It’s all about balance! And don’t fret over other potential mishaps; cooking is all about learning and having fun. Over time, these roll ups have morphed from just a party snack into my go-to for light lunches, quick dinners, and even school lunches for my kids!
FAQs and Troubleshooting
Q: Can I prepare these roll ups in advance?
A: Absolutely! Just wrap them tightly in plastic wrap or foil to keep them fresh. I’d suggest not slicing them until you’re ready to serve; it helps maintain their shape.
Q: What if my tortillas are too dry?
A: If your tortillas are not pliable, try microwaving them for 10-15 seconds. This softens them up and makes rolling much easier!
Q: Can I freeze these roll ups?
A: Yes, but keep in mind that the texture might change once thawed. If you want to freeze them, I recommend freezing them uncut and without the avocado.
Q: I can’t find fresh herbs; can I use dried?
A: Sure! Dried herbs work, but you’ll want to use them sparingly as they’re more potent than fresh.
Nutritional Info
Though I don’t have specific numbers for you today, these roll ups are loaded with veggies, healthy fats from the avocado, and can easily fit into a healthy lifestyle depending on your ingredients. If you’re counting calories or macros, simply calculate based on your specific substitutions.
And there you have it, my dear friends! Fresh Vegetable Tortilla Roll Ups are not just a recipe; they’re a doorway into gathering, sharing, and enjoying the beauty of cooking. So let’s tie on our aprons, gather those lovely ingredients, and whip up something delicious together! Happy cooking!
PrintFresh Vegetable Tortilla Roll Ups

A vibrant and fresh dish featuring rolled tortillas filled with assorted vegetables and cream cheese. Perfect for gatherings or a nutritious snack.
- Prep Time: 15 minutes
- Cook Time: 0 minutes
- Total Time: 15 minutes
- Yield: 4 servings
- Category: Appetizer
- Method: No-Cook
- Cuisine: Mediterranean
- Diet: Vegetarian
Ingredients
- Large Flour Tortillas (3-4 pieces)
- Cream Cheese (8 oz)
- Bell Peppers (1 red, 1 yellow)
- Carrots (1-2 medium)
- Cucumber (1 medium)
- Fresh Spinach (1 cup)
- Avocado (1 ripe)
- Fresh Herbs (1/4 cup; dill, chives, or parsley)
- Salt and Pepper (to taste)
Instructions
- Prep Your Ingredients: Start by washing all your vegetables thoroughly. Slice the bell peppers into thin strips, julienne the carrots, and slice the cucumber into thin sheets. If you want to make life easier, use a mandoline slicer for those veggies!
- Mix the Cream Cheese: In a small bowl, whip the cream cheese until it’s soft and spreadable. You can add a pinch of salt and pepper and even a dash of lemon juice for a little extra zing!
- Assemble the Tortillas: Lay a tortilla flat on a clean surface. Using a spatula or a butter knife, spread a generous layer of cream cheese evenly across the tortilla, leaving about an inch at the edges to avoid overflow.
- Layer Your Veggies: Start layering your sliced veggies! Lay down the fresh spinach first, followed by the bell peppers, carrots, cucumbers, and avocado. Remember, you want balance and color here, so feel free to mix it up!
- Roll It Up: Time to roll! Starting from one end, gently lift the edge of the tortilla over the filling and begin to roll tightly. Be sure not to overstuff, or it might burst out. Keep rolling until you reach the end, then give it a gentle press to seal.
- Slice and Serve: With a sharp knife, slice the roll into bite-sized pieces—around 1-2 inches works nicely. Make sure to slice straight down to maintain that beautiful filling show-off!
- Plating: Arrange the roll ups on a platter, and consider drizzling a little balsamic glaze or serving with a tangy dipping sauce on the side. A sprinkle of fresh herbs or edible flowers can elevate the presentation even more!
Notes
Serve with hummus or tzatziki for dipping, or pair with a refreshing salad.
Nutrition
- Serving Size: 1 roll up (approximately 2 inches)
- Calories: 250
- Sugar: 3g
- Sodium: 300mg
- Fat: 15g
- Saturated Fat: 5g
- Unsaturated Fat: 8g
- Trans Fat: 0g
- Carbohydrates: 30g
- Fiber: 5g
- Protein: 6g
- Cholesterol: 20mg
Keywords: vegetable roll ups, tortilla roll ups, healthy snacks, appetizers, party food