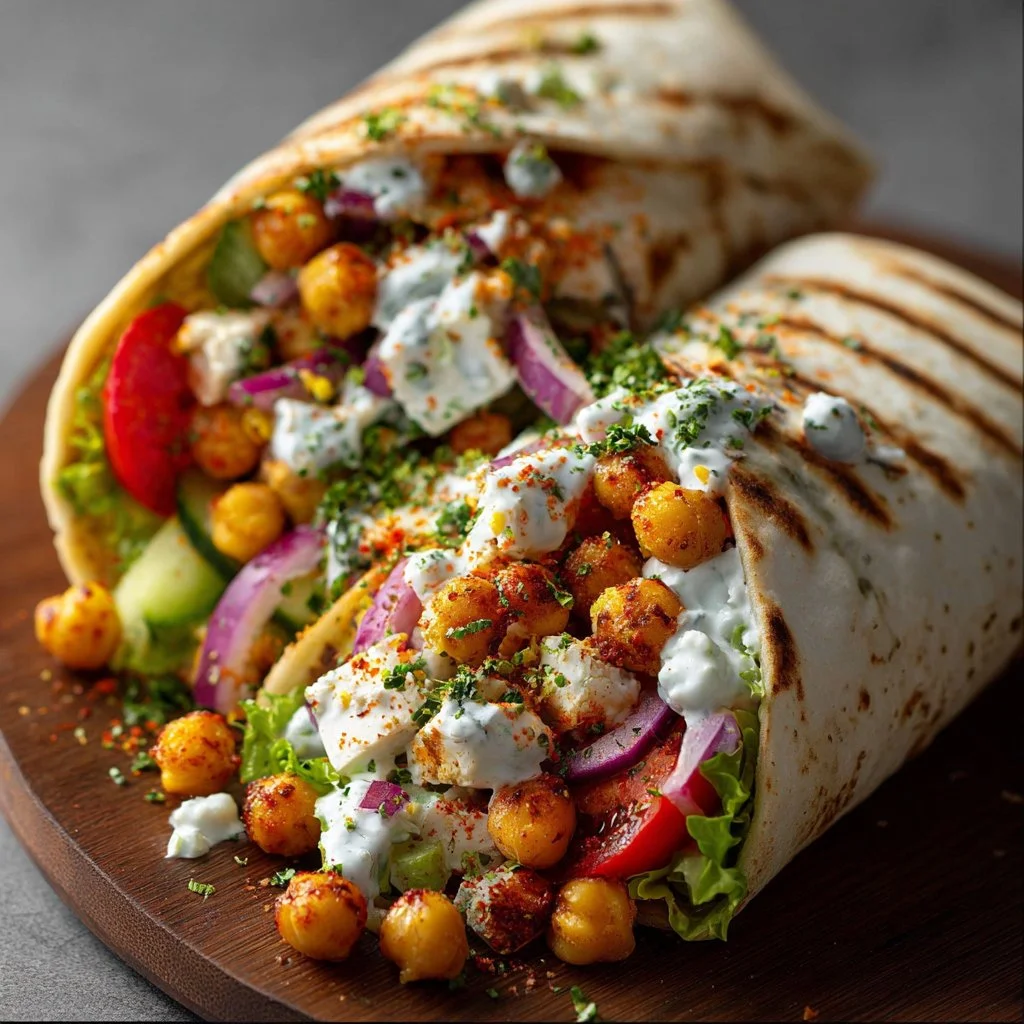
Chickpea & Feta Wrap with Veggies & Yogurt Sauce
Chickpea & Feta Wrap with Veggies & Yogurt Sauce – 5 Quick Flavorful Ways!
Hello, fellow food lovers! Welcome back to my kitchen. I’m so excited to share one of my all-time favorite recipes: the Chickpea & Feta Wrap with Veggies & Yogurt Sauce. This dish is not only vibrant and packed with flavor, but it’s also quick to put together, making it perfect for any day of the week. Trust me when I say, it’s a wrap you’ll want to make again and again!
A Taste of Nostalgia
Let me take you back for a moment. Picture this: it’s a bright summer afternoon, and I’m at my best friend’s house. We had just come back from a morning at the farmer’s market, our bags heavy with the freshest vegetables and herbs. Her mom, a phenomenal cook, was in the kitchen whipping up something delicious. Suddenly, she turned to us and proposed a challenge: “Let’s create our own wraps using what we bought!”
With giggles and a bit of friendly competition, we each grabbed ingredients and got to work. I remember wanting to impress with bold flavors, stuffing my wrap with a colorful array of veggies, chickpeas, and a sprinkle of feta cheese for that salty goodness. Drizzling a zesty yogurt sauce over it all, my creation was not only a feast for the eyes but a memory that sticks with me even today.
Now, every time I make these Chickpea & Feta Wraps, I’m reminded of that wonderful day filled with friendship, laughter, and good food. Are you ready to create your own delicious memories? Let’s dive into this quick and flavorful recipe that’s just begging to be made!
Ingredients
Here’s what you’ll need to create your Chickpea & Feta Wrap:
- 1 cup canned chickpeas, drained and rinsed
- Chickpeas are packed with protein and fiber. If you don’t have canned ones, you can use dried chickpeas that have been soaked and cooked.
- 1 tbsp olive oil
- A splash of good-quality olive oil brings a lovely richness. Avocado oil works as a great substitute too.
- 1/2 tsp paprika
- This spice adds a warm, smoky flavor. For a bit more heat, try using smoked paprika!
- 1/2 tsp ground cumin
- Cumin adds depth and earthiness. Feel free to substitute with coriander for a lighter flavor.
- Salt and black pepper to taste
- Essential for enhancing all the lovely flavors. Remember, it’s always easier to add than to take away!
- 1/2 cup crumbled feta cheese
- Feta brings a tangy bite to your wrap. If you’re feeling adventurous, goat cheese or even ricotta can be a delightful swap.
- 1 cup cucumber, diced
- Fresh cucumbers add a crisp texture. You can swap them for zucchini or even bell peppers for a crunch.
- 1/2 cup cherry tomatoes, halved
- Cherry tomatoes are sweet and juicy. If it’s not tomato season, try sun-dried tomatoes for a different twist.
- 1/4 cup red onion, thinly sliced
- Red onions add a bit of bite and color. Substitute with green onions or shallots if you prefer a milder flavor.
- 4 large flour tortillas or wraps
- Any tortillas will do! Whole wheat or gluten-free wraps are great alternatives if that suits your diet.
- 1 cup plain yogurt
- Yogurt adds creaminess and tang. You can use Greek yogurt for an extra protein boost or a dairy-free option for a vegan twist.
- 1 tbsp lemon juice
- Fresh lemon juice brightens up the sauce and wrap. Lime juice can be a zesty substitute!
- 1 clove garlic, minced
- Garlic gives an aromatic punch. If fresh garlic isn’t on hand, garlic powder will work too.
- 1 tbsp olive oil (for yogurt sauce)
- Extra virgin olive oil in the sauce adds creaminess. Feel free to skip it or use a drizzle of tahini for a nutty flavor.
- Salt to taste for yogurt sauce
- A pinch of salt will help balance the zingy flavors in the sauce.
Step-by-Step Instructions
Let’s roll up our sleeves and get cooking! Here’s how to make your Chickpea & Feta Wrap:
- Prepare the Chickpeas: In a medium bowl, combine the drained chickpeas, olive oil, paprika, cumin, salt, and black pepper. Mix well until the chickpeas are evenly coated. Here’s a pro tip: for extra crispy chickpeas, you can roast them in the oven at 400°F (200°C) for about 20 minutes!
- Make the Yogurt Sauce: In a small bowl, combine the yogurt, lemon juice, minced garlic, and olive oil. Stir until smooth and season it to taste with salt. This sauce is the star of the show – don’t skip it!
- Chop Your Veggies: While the chickpeas are marinating, dice your cucumber, halve the cherry tomatoes, and thinly slice the red onion. The goal here is a colorful mixture that looks fresh and inviting!
- Assemble Your Wraps: Lay out your tortillas or wraps on a clean surface. Start by placing a generous spoonful of the chickpea mixture in the center of each tortilla, followed by some diced cucumber, cherry tomatoes, sliced red onion, and a hearty sprinkle of crumbled feta cheese.
- Drizzle the Sauce: Top your veggie-filled wrap with a few dollops of the yogurt sauce. You can always add more depending on your taste!
- Wrap It Up: Carefully fold the sides of the tortilla over the filling, then roll it tightly from the bottom to the top. Voila! You have yourself a delicious wrap. If you’re traveling with these or making them ahead, you can wrap them in parchment paper for easy handling.
- Serve and Enjoy: Slice your wraps in half for a beautiful presentation, and there you have it—Chickpea & Feta Wraps ready to devour!
Serving Suggestions
To elevate your wrap serving game, consider plating with an extra drizzle of yogurt sauce on the side and a sprinkle of fresh herbs like cilantro or parsley. You can also serve these wraps with a refreshing side salad or some crispy roasted potatoes for a complete meal.
Recipe Variations
- Spicy Kick: Add a dash of hot sauce or a pinch of red pepper flakes to the chickpea mixture for some heat!
- Veggie Delight: Toss in roasted bell peppers, shredded carrots, or spinach for added nutrition and color.
- Mediterranean Twist: Swap the feta with olives and add artichoke hearts for a Mediterranean flair.
- Protein Boost: Consider adding grilled chicken or even a sprinkle of nuts for added crunch and protein.
- Vegan Friendly: Use avocado in place of feta for a creamy texture and store-bought vegan yogurt for the sauce.
Chef’s Notes
This recipe for Chickpea & Feta Wraps was born out of my love for vibrant meals that don’t take hours to prepare. It’s evolved over the years—where once I used different proteins, I’ve now embraced the incredible versatility of chickpeas. Plus, every time I make these wraps, I’m transported back to that sunny day with my friends, brainstorming new wraps and savoring laughter and good food.
FAQs and Troubleshooting
1. Can I prep these wraps ahead of time? Absolutely! You can assemble the wraps in advance, but I recommend adding the yogurt sauce right before serving to keep everything fresh.
2. What if I don’t have chickpeas? No worries! You can substitute them with black beans, quinoa, or even lentils for a different yet equally delicious base.
3. How can I make this gluten-free? Simply swap the flour tortillas for corn tortillas or use large lettuce leaves for a low-carb wrap.
4. What can I do if my wraps are too soggy? If you’re worried about sogginess, try to avoid overstuffing them and consider drying the veggies with a paper towel before adding them to your wrap.
Nutritional Info
This Chickpea & Feta Wrap is a great source of protein and fiber, making it a nourishing meal option. Each wrap contains approximately 350 calories, depending on the ingredients used and portion sizes.
So there you have it—a delicious, quick recipe for Chickpea & Feta Wraps that you can whip up for lunch or dinner any day of the week! I hope you enjoy making these as much as I do. Remember, cooking should be fun and creative, so feel free to experiment and make this dish your own.
Until next time, happy cooking!
PrintChickpea & Feta Wrap with Veggies & Yogurt Sauce
A quick and flavorful Chickpea & Feta Wrap, loaded with fresh veggies and a zesty yogurt sauce, perfect for any day of the week.
- Prep Time: 15 minutes
- Cook Time: 10 minutes
- Total Time: 25 minutes
- Yield: 4 servings 1x
- Category: Main Course
- Method: Wraping
- Cuisine: Mediterranean
- Diet: Vegetarian
Ingredients
- 1 cup canned chickpeas, drained and rinsed
- 1 tbsp olive oil
- 1/2 tsp paprika
- 1/2 tsp ground cumin
- Salt and black pepper to taste
- 1/2 cup crumbled feta cheese
- 1 cup cucumber, diced
- 1/2 cup cherry tomatoes, halved
- 1/4 cup red onion, thinly sliced
- 4 large flour tortillas or wraps
- 1 cup plain yogurt
- 1 tbsp lemon juice
- 1 clove garlic, minced
- 1 tbsp olive oil (for yogurt sauce)
- Salt to taste for yogurt sauce
Instructions
- Prepare the chickpeas: In a medium bowl, combine the drained chickpeas, olive oil, paprika, cumin, salt, and black pepper. Mix well until the chickpeas are evenly coated.
- Make the yogurt sauce: In a small bowl, combine the yogurt, lemon juice, minced garlic, and olive oil. Stir until smooth and season it to taste with salt.
- Chop your veggies: Dice your cucumber, halve the cherry tomatoes, and thinly slice the red onion.
- Assemble your wraps: Lay out your tortillas on a clean surface and place a generous spoonful of the chickpea mixture in the center, followed by the veggies and feta.
- Drizzle the sauce: Top your veggie-filled wrap with dollops of the yogurt sauce.
- Wrap it up: Fold the sides of the tortilla over the filling and roll it tightly.
- Serve and enjoy: Slice your wraps in half for a beautiful presentation.
Notes
Wraps can be prepped ahead of time; add yogurt sauce right before serving to keep everything fresh.
Nutrition
- Serving Size: 1 wrap
- Calories: 350
- Sugar: 5g
- Sodium: 400mg
- Fat: 12g
- Saturated Fat: 4g
- Unsaturated Fat: 6g
- Trans Fat: 0g
- Carbohydrates: 45g
- Fiber: 3g
- Protein: 15g
- Cholesterol: 30mg
Keywords: chickpea wrap, vegetarian wrap, Mediterranean wraps, quick meals, healthy recipes
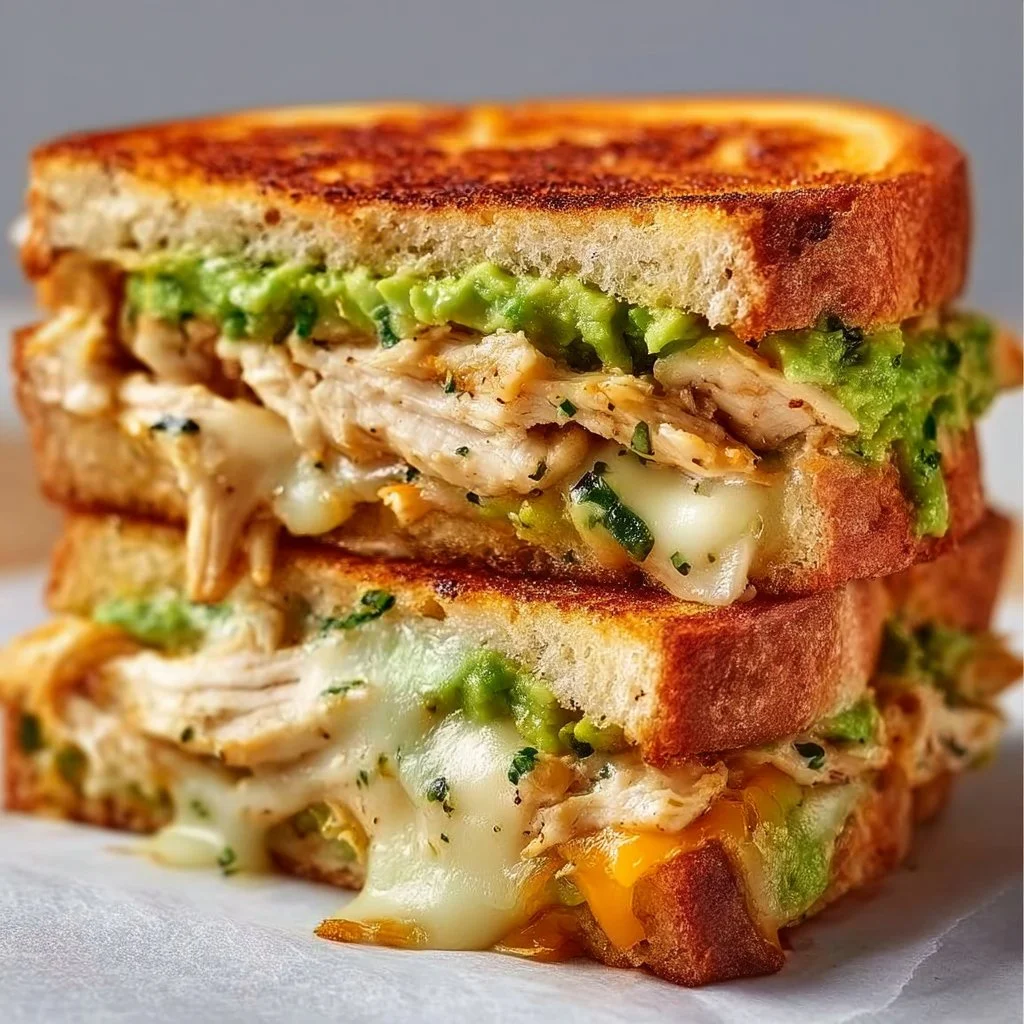
Chicken Avocado Melt Sandwich
Chicken Avocado Melt Sandwich: A Slice of Heaven
Hey there, fellow food lovers! Welcome back to my kitchen where I believe every meal has a story, and today, we’re diving into a delightful creation that’s not just delicious but also oh-so-simple to whip up: the Chicken Avocado Melt Sandwich. This sandwich is a harmonious blend of comfort food and fresh ingredients, making it a perfect addition to your lunch rotation or even a cozy dinner.
Why do I love this sandwich, you ask? Well, it brings me back to sunny afternoons spent with my friends, lounging around with plates in hand and laughter in the air. Picture this: the sun shining, music playing softly in the background, and us trying to make the perfect sandwich while comparing recipes and reminiscing about our childhood culinary escapades. This Chicken Avocado Melt always made an appearance because it was a crowd-pleaser—creamy, cheesy, and satisfying.
This sandwich is not just about its components; it’s about the joyful experience of gathering. It’s about using your hands to bring together vibrant flavors and sharing them with people you love. So, tie your apron, and let’s get cooking. Whether you’re serving this at a casual get-together or simply treating yourself, this Chicken Avocado Melt Sandwich is bound to impress.
Personal Story
I remember the first time I made a similar sandwich—there was a group of us at my friend Emily’s house for a weekend getaway. We had just come back from a long hike, and all we wanted was something comforting yet energizing. After rummaging through her kitchen, I stumbled upon some leftover grilled chicken, a perfectly ripe avocado, and a stash of cheese that was just begging to be melted.
We gathered around the stove, making a glorious mess, experimenting with flavors, seasoning the mixture as we went. There was laughter, the sound of butter sizzling in the pan, and a delightful anticipation of that first bite. We each constructed our own version—some with spicy mustard, others with a sprinkle of lime juice. But I wouldn’t trade my Chicken Avocado Melt for the world. I took a bite, and it was everything I hoped for—creamy, cheesy, and utterly satisfying.
That moment stuck with me. It reminded me of what cooking—and especially sharing food—is all about: creating beautiful memories that linger long after the plates are cleared. And now, I want to share that experience with you!
Ingredients
Let’s gather our ingredients. Here’s what you’ll need for this mouthwatering Chicken Avocado Melt Sandwich:
-
2 slices of bread
Choose your favorite! Sourdough adds a delightful tang, while whole wheat offers a wholesome touch. You can even go gluten-free if that suits your fancy! -
1 cup cooked chicken, shredded
Grilled, roasted, or even rotisserie chicken works perfectly here. No chicken? No problem! Tofu or chickpeas can be delicious substitutes for a vegetarian option. -
1 ripe avocado, mashed
Make sure it’s perfect! Gently squeeze—if it yields but doesn’t feel mushy, you’ve hit the avocado jackpot! For a twist, consider a spread of hummus instead. -
1/2 cup shredded cheese (cheddar or mozzarella)
I’m all about the melty goodness! Cheddar gives a sharp flavor, while mozzarella is gooey and delightful. Consider a dairy-free cheese if you’re looking for a vegan alternative. -
Salt and pepper to taste
Seasoning is key! It can elevate your flavors dramatically. You can also add garlic powder or even chili flakes for a kick. -
Butter or oil for grilling
For that perfect golden crust! Use olive oil or coconut oil for a different flavor profile. And if you’re feeling fancy, herb-infused butter can add an elegant touch.
Step-by-Step Instructions
Alright, let’s get cooking! Here’s how to create your Chicken Avocado Melt Sandwich step by step:
-
Prep the Filling
In a mixing bowl, combine the shredded chicken, mashed avocado, and a sprinkle of salt and pepper. This is where you can get creative—add diced tomatoes for freshness or even a teaspoon of lime juice for a zesty kick. Mix everything until it’s well incorporated. -
Choose Your Bread
Select your favorite bread and lay it out on a clean surface. If you’re feeling indulgent, you can even toast your bread lightly before assembling—this will give it an added crunch in the end. -
Assemble Your Sandwich
On one slice of bread, generously spread your chicken and avocado mixture. Sprinkle your shredded cheese on top. Tip: If you want an extra cheesy experience, add cheese both above and below the filling! -
Seal the Deal
Place the second slice of bread on top and press down gently. This isn’t a wedding cake—no need to crush it, but give it a little press to hold everything together. -
Get Grilling
Heat a skillet over medium heat and add a pat of butter or a drizzle of oil. Once hot, carefully place your sandwich in the pan. Cook for about 3-4 minutes on one side, until it’s golden brown and the cheese begins to melt. Insider Tip: If you’re worried about burning, reduce the heat a little and give it a longer cook time—better slow and golden than quick and burnt! -
Flip and Finish
Using a spatula, flip the sandwich and cook the other side until golden and the cheese is perfectly melted. It should take about the same amount of time as before. Feel free to add a touch more butter or oil before flipping if you like that extra richness. -
Slice and Serve
Once both sides are beautifully golden and crisp, remove the sandwich from the skillet and let it rest for a minute—this helps the cheese regain a bit of firmness. Then, slice it in half to reveal that glorious melted interior!
Serving Suggestions
Plate your Chicken Avocado Melt Sandwich on a rustic wooden board or a chic white plate for a lovely contrast. Consider adding a side of mixed greens dressed with a tangy vinaigrette or crispy sweet potato fries to make it a complete meal. You can garnish with a sprinkle of fresh herbs like cilantro or parsley for that extra flair!
Recipe Variations
Ready to switch things up? Here are a few fun variations to try:
-
Spicy Kick: Mix in crushed red pepper flakes or jalapeños in the filling. For an even spicier twist, step it up with pepper jack cheese!
-
Mediterranean Flair: Add feta cheese, sun-dried tomatoes, and a few kalamata olives for a delightful Mediterranean-inspired sandwich.
-
BBQ Chicken Melt: Swap the seasoning for your favorite BBQ sauce in the mix—this gives it a great sweet smoky flavor.
-
Caprese Style: Layer slices of fresh mozzarella and tomatoes with basil for a fresh twist. Drizzle with balsamic glaze before serving for wow factor.
-
Breakfast Delight: Add a fried egg on top of the filling before grilling for a breakfast sandwich that will keep you energized all morning long.
Chef’s Notes
This Chicken Avocado Melt Sandwich has evolved over time in my kitchen. When I first started making it, it was a simple combination of chicken and cheese. But as I grew more adventurous, I started experimenting with flavors and ingredients, and it became a go-to for casual get-togethers or cozy nights in. And can I just say, there’s something undeniably delightful about gooey cheese paired with creamy avocado? It’s comfort food at its finest, made even better with a side of laughter and good company!
Every time I make it, I remember that day at Emily’s house, where it all began. Food has a beautiful way of bringing us together, doesn’t it?
FAQs and Troubleshooting
1. My sandwich didn’t melt enough. What went wrong?
Use lower heat and give it more time on the skillet. The cheese needs a bit of gentle coaxing to get all melty and wonderful.
2. What if my avocado is too firm?
If your avocado isn’t ripe yet, simply slice it thinly and layer it on the sandwich instead of mashing it. You can even add a splash of lime juice to enhance the flavor!
3. Can I make this sandwich ahead of time?
Absolutely! Just keep the filling in an airtight container and assemble the sandwich when you’re ready to grill. This works great for meal prep!
4. How can I make it vegan?
Substitute the chicken with tofu or chickpeas, use plant-based cheese, and replace the butter with olive oil for grilling.
Nutritional Info (Optional)
Tracking your nutrition? A serving of the Chicken Avocado Melt Sandwich may contain:
- Calories: Approximately 450
- Protein: 30g
- Fat: 25g
- Carbohydrates: 30g
This varies based on the bread and ingredients used but is a wholesome and satisfying meal packed with protein and healthy fats!
That’s it, my friends! With just a handful of simple ingredients and a little bit of love, you’ll have a Chicken Avocado Melt Sandwich that’s packed with flavor and memories. Enjoy the deliciousness, and remember—the best meals are the ones shared around the table. Happy cooking!
PrintChicken Avocado Melt Sandwich

A delightful blend of creamy avocado, shredded chicken, and melted cheese, perfect for lunch or dinner.
- Prep Time: 10 minutes
- Cook Time: 8 minutes
- Total Time: 18 minutes
- Yield: 1 sandwich 1x
- Category: Main Course
- Method: Grilling
- Cuisine: American
- Diet: Non-Vegetarian
Ingredients
- 2 slices of bread
- 1 cup cooked chicken, shredded
- 1 ripe avocado, mashed
- 1/2 cup shredded cheese (cheddar or mozzarella)
- Salt and pepper to taste
- Butter or oil for grilling
Instructions
- Prep the filling by mixing shredded chicken, mashed avocado, salt, and pepper in a bowl.
- Choose your bread and lay it on a surface.
- Assemble the sandwich by spreading the chicken and avocado mixture on one slice and sprinkling cheese on top.
- Seal the sandwich by placing the second slice of bread on top and pressing gently.
- Get grilling by heating a skillet, adding butter or oil, and cooking the sandwich for 3-4 minutes on one side until golden brown.
- Flip the sandwich and cook the other side until golden and the cheese is melted.
- Slice the sandwich in half after letting it rest for a minute.
Notes
You can add hot sauce, tomatoes, or different cheeses for variation.
Nutrition
- Serving Size: 1 sandwich
- Calories: 450
- Sugar: 2g
- Sodium: 600mg
- Fat: 25g
- Saturated Fat: 10g
- Unsaturated Fat: 12g
- Trans Fat: 0g
- Carbohydrates: 30g
- Fiber: 5g
- Protein: 30g
- Cholesterol: 70mg
Keywords: sandwich, chicken, avocado, comfort food, easy recipe