
Juicy Grilled California Avocado Chicken
Juicy Grilled California Avocado Chicken: Elevate Your Meal with Style
Hello, fellow food lovers! If you’re anything like me, there’s nothing quite like cooking up a storm in the kitchen. It’s where magic happens—ingredients come together, flavors collide, and you create beautiful memories around your table. Today, I’m thrilled to share a dish that perfectly captures those special moments: Juicy Grilled California Avocado Chicken. Trust me; this dish is all about fresh flavors and simple elegance.
Introduction: Let’s Talk About Avocados and Chicken
Picture a sunny California afternoon: the sound of birds chirping, a light breeze blowing through the trees, and the tantalizing aroma of grilled chicken wafting through the air. Avocados are king here, and adding them to your chicken dish elevates it from pretty good to absolutely divine!
This recipe combines succulent grilled chicken with creamy avocado and vibrant tomatoes that will transport you straight to the golden coasts of California. Imagine juicy chicken breasts marinated in a zesty blend of lime juice, garlic, and spices, then grilled to perfection. As if that wasn’t enough, we’re adding ripe avocado slices and sweet cherry tomatoes on top—a beautiful explosion of flavors and textures in each bite.
Beyond the deliciousness, this dish is also about connection. It’s about bringing friends and family together around a beautifully set table. Whether you’re hosting a Sunday brunch, planning a casual dinner, or simply craving a fresh and delicious meal, this Juicy Grilled California Avocado Chicken has got you covered. So grab your apron, and let’s get cooking!
Personal Story: A California Summer
Growing up, I spent my summers soaking in the California sun, often at my grandmother’s house. Her garden was bursting with ripe vegetables and fragrant herbs, and the moment I stepped through her door, I could smell something scrumptious. One of my fondest memories is cooking with her in her backyard kitchen. She would pull out perfectly ripe avocados and tell me stories of how she used to make guacamole for her friends during summer picnics.
One particular day, while she grilled her famous chicken, I asked if we could try something new. That’s when we combined her grilled chicken recipe and those luscious avocados into one incredible dish. We created a summer sensation that had everyone coming back for seconds. My grandma’s eyes twinkled with delight as we prepared our meal, and the laughter shared around the table was priceless. Those moments became the bedrock of my culinary journey and inspire me every time I step into the kitchen today.
Ingredients
Here’s what you’ll need for this delightful dish:
-
2 boneless, skinless chicken breasts
Juicy and lean, chicken breasts are perfect for grilling. They soak up flavors beautifully and deliver a satisfying bite every time. -
2 ripe avocados, sliced
Ripe avocados are rich and creamy, adding a luxurious texture to the dish. Look for avocados that yield slightly to pressure. -
1 cup cherry tomatoes, halved
Sweet and bursting with flavor, cherry tomatoes balance the dish with their juicy freshness. Substitute with grape tomatoes if needed! -
1/4 cup fresh lime juice
This bright and tangy juice not only adds flavor but also helps tenderize the chicken. If fresh limes aren’t available, bottled lime juice will do just fine. -
2 tablespoons olive oil
Great for marinating and grilling, olive oil adds richness. You can substitute it with avocado oil for a more intense avocado flavor. -
1 teaspoon garlic powder
Garlic powder infuses the chicken with a subtle garlicky goodness. If you prefer fresh garlic, 1-2 cloves minced will also work. -
1 teaspoon chili powder
This spice lends warmth and depth to the chicken. Feel free to adjust according to your heat preference. -
1 teaspoon cumin
Cumin adds an earthy flavor that compliments the other spices beautifully. If you don’t have cumin, try smoked paprika as an alternative. -
Salt and pepper to taste
Essential for enhancing all the flavors—don’t skip out! Use coarse salt for better texture! -
Fresh cilantro for garnish
Cilantro adds a fresh herbaceous kick that elevates the entire dish. If you’re not a cilantro fan, fresh parsley is a great substitute!
Step-by-Step Instructions
Alright, let’s dive into the cooking process! Follow these steps to make your gorgeous Juicy Grilled California Avocado Chicken:
-
Prepare the Marinade
In a bowl, combine the lime juice, olive oil, garlic powder, chili powder, cumin, salt, and pepper. Whisk until the mixture is smooth and well combined. This marinade is essential for infusing your chicken with layers of flavor.Chef’s Tip: Marinate your chicken breasts for at least 30 minutes—if you can let them soak for 2 hours or more, even better! This will enhance the flavor and tenderness.
-
Marinate the Chicken
Place the chicken breasts in a resealable plastic bag or a shallow dish. Pour the lime marinade over the chicken, ensuring it’s evenly coated. Seal the bag or cover the dish and refrigerate. Let it work its magic!Little Hack: If you want an extra kick, consider adding a little bit of your favorite hot sauce to the marinade!
-
Preheat the Grill
While your chicken is marinating, preheat your grill over medium-high heat (about 375°F to 450°F). Make sure it’s nice and hot before placing the chicken on it—this will help create those beautiful grill marks!Commentary: You can also use a grill pan on the stove if you don’t have access to an outdoor grill. Just be sure to follow the same heat guidelines!
-
Grill the Chicken
Remove the chicken from the marinade, letting any excess drip off, and place it on the grill. Close the lid and grill for about 6-7 minutes on one side, then flip and grill for another 5-6 minutes, or until the chicken is cooked through and has nice grill marks. A meat thermometer should read 165°F when done.Tip: Avoid flipping too soon! Let it sear to get those perfect grill marks before flipping.
-
Prepare the Avocado and Tomatoes
While the chicken is grilling, slice your ripe avocados and halve your cherry tomatoes. This is your opportunity to add a sprinkle of salt and pepper on the tomatoes for added flavor! -
Rest the Chicken
Once the chicken is done grilling, remove it from the grill and let it rest for about 5 minutes. This allows the juices to redistribute, keeping your chicken moist.Chef Insight: Don’t skip this step! A rested chicken is a happy chicken.
-
Plating Perfection
Slice the grilled chicken, then layer it on a serving platter. Top it with the sliced avocados and halved cherry tomatoes, sprinkling fresh cilantro over everything for that pop of color.Presentation Matters: For an elegant touch, drizzle a little extra lime juice over the top or a dash of balsamic reduction!
Serving Suggestions
Serve this beautiful dish with a side of quinoa salad, garlic bread, or over a bed of mixed greens for a refreshing meal. Pair it with a chilled glass of white wine or lemonade for the ultimate California vibe. Don’t forget to provide extra lime wedges on the side for guests who want an extra zing!
Recipe Variations
Feel free to mix things up with these creative twists:
- Spicy Kick: Add diced jalapeños into the marinade for heat.
- Different Proteins: Swap out chicken for shrimp or firm tofu for a vegetarian version.
- Grilled Veggies: Add grilled veggies like zucchini or bell peppers as sides or toppings.
- Herbed Chicken: Incorporate fresh herbs such as thyme or rosemary into your marinade for a different flavor profile.
- Creamy Avocado Sauce: Blend avocados with Greek yogurt, lime juice, and garlic for a creamy drizzle on top.
Chef’s Notes
I’ve made this recipe countless times, and it never gets old! Every time I prepare it, I think of those summer afternoons with my grandma, creating dishes that filled our home with laughter. I’ve learned that cooking is as much about the experience as it is about the ingredients and techniques. Each bite tells a story of connection and love.
And be prepared for compliments! When you bring this dish to your table, be ready for guests to ask for the recipe—it’s that good!
FAQs and Troubleshooting
1. Can I use frozen chicken?
Absolutely! Just make sure to thaw it completely before marinating and grilling. Otherwise, you’ll end up with uneven cooking.
2. My chicken is dry after grilling. What happened?
Overcooking is usually the culprit! Always check your chicken with a meat thermometer, and remember to let it rest after grilling to retain moisture.
3. What should I do if I can’t find ripe avocados?
You can speed up the ripening process by placing them in a brown paper bag with an apple or banana. However, if you’re in a hurry, sliced cucumbers on the side provide a refreshing alternative!
4. How do I store leftovers?
Store any leftovers in an airtight container in the fridge for up to 3 days. Reheat gently to avoid drying the chicken.
Nutritional Info
While precise nutritional info can vary based on ingredient brands and portions, here’s a rough estimate per serving:
- Calories: 450
- Protein: 30g
- Carbohydrates: 22g
- Fat: 28g
So there you have it, my dear culinary friends! Now you’re ready to create your own Juicy Grilled California Avocado Chicken experience at home. It’s a dish that captures the heart of summer and the essence of gathering together. I can’t wait to hear how yours turns out! Let’s set the table and celebrate the joy of cooking together. Happy cooking! 🍽️✨
PrintJuicy Grilled California Avocado Chicken

A delicious grilled chicken dish topped with creamy avocados and cherry tomatoes, perfect for summer gatherings.
- Prep Time: 30 minutes
- Cook Time: 20 minutes
- Total Time: 50 minutes
- Yield: 4 servings 1x
- Category: Main Course
- Method: Grilling
- Cuisine: California
- Diet: Gluten-Free
Ingredients
- 2 boneless, skinless chicken breasts
- 2 ripe avocados, sliced
- 1 cup cherry tomatoes, halved
- 1/4 cup fresh lime juice
- 2 tablespoons olive oil
- 1 teaspoon garlic powder
- 1 teaspoon chili powder
- 1 teaspoon cumin
- Salt and pepper to taste
- Fresh cilantro for garnish
Instructions
- Prepare the Marinade: In a bowl, combine the lime juice, olive oil, garlic powder, chili powder, cumin, salt, and pepper. Whisk until the mixture is smooth and well combined.
- Marinate the Chicken: Place the chicken breasts in a resealable plastic bag or a shallow dish. Pour the lime marinade over the chicken, ensuring it’s evenly coated. Seal the bag or cover the dish and refrigerate.
- Preheat the Grill: Preheat your grill over medium-high heat (about 375°F to 450°F).
- Grill the Chicken: Remove the chicken from the marinade and place it on the grill. Grill for about 6-7 minutes on one side, then flip and grill for another 5-6 minutes, or until cooked through.
- Prepare the Avocado and Tomatoes: Slice the ripe avocados and halve the cherry tomatoes.
- Rest the Chicken: Remove it from the grill and let it rest for about 5 minutes.
- Plating Perfection: Slice the grilled chicken, layer on a serving platter, top it with the sliced avocados and halved cherry tomatoes, sprinkle fresh cilantro on top.
Notes
Serve with a side of quinoa salad or garlic bread. Add extra lime wedges for guests.
Nutrition
- Serving Size: 1 serving
- Calories: 450
- Sugar: 3g
- Sodium: 700mg
- Fat: 28g
- Saturated Fat: 4g
- Unsaturated Fat: 20g
- Trans Fat: 0g
- Carbohydrates: 22g
- Fiber: 8g
- Protein: 30g
- Cholesterol: 80mg
Keywords: grilled chicken, avocado, summer recipe, healthy meal, California cuisine

Grilled Steak Bowl with Avocado and Corn
Savory Grilled Steak Bowl with Avocado and Corn
Hello, food lovers! Are you ready to elevate your mealtime game? Today, we’re diving into a dish that’s not just delicious but also brimming with vibrant flavors and textures: the Grilled Steak Bowl with Avocado and Corn. Believe me, this bowl is everything you could ever want—a delightful combination of juicy grilled steak, creamy avocado, and sweet roasted corn, all topped with zesty lime juice and cilantro.
If you’re a fan of quick, satisfying meals that impress without overwhelming, you’ve come to the right place. Perfect for family dinners, casual get-togethers, or that cozy night in, this dish is all about providing the comfort we crave while still looking stunning on the plate.
Imagine the satisfying crunch of sweet corn mingling with the rich flavors of grilled steak, complemented beautifully by creamy avocado—it’s not just food; it’s an experience! And the best part? You don’t need a five-star kitchen or lengthy prep time to create this masterpiece. Just a little intention, quality ingredients, and a sprinkle of love.
Ready to transform your weeknight meals? Grab your apron, and let’s get cooking!
Personal Story
Every time I whip up a Grilled Steak Bowl, I’m taken back to a summer barbecue in my backyard, surrounded by the laughter of friends and the sizzling sound of the grill. It was one of those golden evenings where the setting sun painted the sky with pink and orange hues. The air was filled with the mouth-watering aroma of seasoned steak grilling to perfection.
As I stood by the grill, flipping the steak and listening to everyone’s chatter, I couldn’t help but smile. I remember a dear friend holding up a bowl filled with grilled corn, and saying, “This corn is like candy!” Laughter erupted as we piled our bowls high with grilled goodies, avocado, and whatever fresh veggies we could find in the garden. Those moments of connection, laughter, and delicious food are what it’s all about. And now, I want to share that love, that nostalgia, with you through this recipe!
Ingredients
Here’s what you’ll need to create this savory delight:
-
Juicy Grilled Steak
Whether you choose ribeye, flank, or sirloin, make sure it’s well-marbled for incredible flavor. Look for cuts that have a good balance of fat for that perfect juicy bite. And don’t worry—if steak isn’t your thing, grilled chicken or tofu can be just as fabulous! -
Creamy Avocado
Avocados add a luxurious creaminess that elevates any dish. Look for avocados that yield slightly to gentle pressure; they should be ripe but not overly soft. If avocados are out of season, you can switch to hummus for a creamy alternative! -
Sweet Roasted Corn
Fresh corn is best, but you can easily use canned or frozen corn. Just sauté it in a little bit of oil to achieve that roasted flavor. Pro tip: grill corn on the cob directly on the grill for an extra layer of smokiness! -
Cilantro
This bright herb brings freshness to the dish. If you’re not a fan of cilantro, feel free to swap it for parsley or green onions—both impart a lovely fresh note. -
Sour Cream
It’s a classic topping that adds a tangy creaminess. Greek yogurt is a fantastic substitute if you prefer something lighter. -
Lime Juice
Freshly squeezed lime juice brightens up the flavors, giving it that zesty kick. Bottled lime juice works in a pinch, but fresh is always best! -
Salt and Pepper
Season to taste! Salt enhances the flavors, while freshly cracked black pepper adds a little spice.
Step-by-Step Instructions
Alright, let’s dive into the cooking process! Follow along, and let me share a few chef secrets as we go.
-
Prep the Steak:
First things first—let’s get your steak ready! Take your steak out of the fridge and let it come to room temperature for about 30 minutes. This ensures even cooking. While it’s resting, season it liberally with salt and freshly cracked pepper. This step isn’t just for flavor; it helps form a beautiful crust when you grill. -
Grill the Corn:
While that steak is relaxing, let’s prepare the corn. If you’re using fresh corn, shuck it, then drizzle it with a bit of olive oil and a pinch of salt. Grill it on medium-high heat until it’s slightly charred, about 10 minutes. If you’re using frozen corn, toss it into a skillet with a bit of oil and sauté until golden! -
Fire Up the Grill:
Preheat your grill to high heat. If you don’t have a grill, a cast-iron skillet on the stovetop works wonder, too! Just make sure it’s super hot before you add the steak—you want that sear! -
Grill the Steak:
Place the steak on the grill and resist the urge to move it around too much—let it sear! Depending on the thickness of your steak, grill for about 4-6 minutes per side for medium-rare. Here’s my tip: use an instant-read thermometer; it should read about 135°F for perfect medium-rare. -
Rest the Steak:
Once it’s grilled to your liking, remove it from the heat and let it rest for at least 5-10 minutes. This allows the juices to redistribute throughout the meat, ensuring each bite is tender and juicy. -
Slice and Dine:
After resting, slice the steak against the grain—this is crucial for tenderness! As you slice, imagine the beautiful layers of flavor you’re creating. -
Assemble Your Bowl:
Now, let’s put it all together! In a bowl, layer your sliced steak, grilled corn, and diced avocado. Drizzle with sour cream, a splash of lime juice, and a handful of fresh cilantro.
And voilà! You’ve created a stunning Grilled Steak Bowl that’s a feast for the eyes and the belly!
Serving Suggestions
Presentation is key to making your meal feel special, so let’s plate it up! Start with a generous base of the grilled corn and steak at the bottom. Neatly arrange slices of avocado on top, and finish with a lovely dollop of sour cream. Sprinkle some fresh cilantro over everything for that pop of green. You can even serve it in a rustic bowl or on a wooden board for an extra chic touch!
Recipe Variations
Here are a few creative twists on the classic Grilled Steak Bowl:
- Spicy Kick: Add some diced jalapeños or a drizzle of hot sauce for those who love a little heat.
- Mexican Flair: Swap the sour cream for cotija cheese and add black beans for a heartier meal.
- Vegetarian Delight: Replace steak with grilled portobello mushrooms or marinated tempeh for a satisfying plant-based option.
- Mediterranean Vibe: Use grilled chicken and swap the avocado for tzatziki sauce—a refreshing complement!
- Tropical Twist: Add pineapple chunks in place of some corn for a fruity explosion of flavor.
Chef’s Notes
Over the years, this Grilled Steak Bowl has become a staple in my home. It started as a way to use up leftover grilled steak but evolved into a must-have dish for every gathering. Sometimes I throw in whatever veggies I have left in the fridge, and it always surprises me how versatile it can be.
Funny story: A friend of mine once challenged me to create a bowl entirely without any of the usual ingredients. By the end of the cook-off, I ended up grilling peaches and topping them with balsamic reduction, and it turned out to be a hit! Who knew bowls could be so creatively liberating?
FAQs and Troubleshooting
-
What if my steak is tough?
Make sure to slice the steak against the grain, and let it rest before cutting. If it’s still tough, you might have cooked it too long. A meat thermometer is a great tool to avoid that! -
Can I make this bowl ahead of time?
Absolutely! You can grill the steak and corn in advance. Just store them separately in the fridge and assemble when you’re ready to eat. -
My avocado isn’t ripe; what should I do?
If you find yourself with a hard avocado, place it in a brown paper bag with an apple or banana for a day or two to help it ripen faster. -
How can I make this dish gluten-free?
Great news—this recipe is naturally gluten-free! Just ensure any sides or additional toppings are also gluten-free.
Nutritional Info
While I always emphasize the joy of cooking and sharing, I know that nutritional information can be valuable. Here’s a quick overview:
- Calories: Approximately 550 per bowl (without any additional toppings)
- Protein: 35g
- Fats: 35g (depending on avocado and sour cream)
- Carbohydrates: 30g (mostly from corn)
And there you have it—a delicious journey through the art of creating a Grilled Steak Bowl with Avocado and Corn! I hope you find joy in making and sharing this dish as much as I have. Keep creating those beautiful moments around your table, and remember that the secret ingredient is always love! Happy cooking!
PrintSavory Grilled Steak Bowl with Avocado and Corn

A delightful combination of juicy grilled steak, creamy avocado, and sweet roasted corn, all topped with zesty lime juice and cilantro.
- Prep Time: 15 minutes
- Cook Time: 30 minutes
- Total Time: 45 minutes
- Yield: 4 servings
- Category: Main Course
- Method: Grilling
- Cuisine: American
- Diet: Gluten-Free
Ingredients
- Juicy Grilled Steak
- Creamy Avocado
- Sweet Roasted Corn
- Cilantro
- Sour Cream
- Lime Juice
- Salt and Pepper
Instructions
- Prep the steak: Take your steak out of the fridge and let it come to room temperature for about 30 minutes. Season it with salt and pepper.
- Grill the corn: Prepare the corn and grill it until slightly charred, about 10 minutes.
- Fire up the grill: Preheat your grill to high heat.
- Grill the steak: Place the steak on the grill and grill for about 4-6 minutes per side for medium-rare.
- Rest the steak: Remove it from the heat and let it rest for at least 5-10 minutes.
- Slice and dine: Slice the steak against the grain.
- Assemble your bowl: Layer your sliced steak, grilled corn, and diced avocado, then drizzle with sour cream and lime juice.
Notes
Feel free to add diced jalapeños for a spicy kick or replace steak with portobello mushrooms for a vegetarian option.
Nutrition
- Serving Size: 1 bowl
- Calories: 550
- Sugar: 4g
- Sodium: 500mg
- Fat: 35g
- Saturated Fat: 10g
- Unsaturated Fat: 20g
- Trans Fat: 0g
- Carbohydrates: 30g
- Fiber: 6g
- Protein: 35g
- Cholesterol: 90mg
Keywords: steak bowl, grilled steak, avocado, corn, healthy meal

Chickpea Feta Avocado Salad
# Chickpea Feta Avocado Salad: A Deliciously Vibrant Celebration of Flavor

## Introduction

Hello, fellow food enthusiasts! Today, I’m thrilled to share one of my absolute favorite recipes: **Chickpea Feta Avocado Salad**. This vibrant dish not only packs a punch of flavor but also comes together in a snap, making it the perfect companion for both everyday meals and special gatherings. Whether you’re seeking a nutritious lunch, a refreshing side dish, or a light dinner option, this salad has got you covered!

Imagine biting into creamy avocado, tangy feta, and hearty chickpeas, all tossed with fresh herbs and a zesty dressing. Each bite is like a Mediterranean escape, offering bright, clean flavors that awaken your taste buds. Plus, assembling this beauty is as easy as pie— or should I say, as easy as tossing ingredients into a bowl? You know I believe that cooking should feel elegant but never intimidating, and this salad embodies that philosophy perfectly.

From summer picnics to cozy weeknight dinners, this Chickpea Feta Avocado Salad can elevate any occasion without breaking a sweat. So grab your apron, pour yourself a refreshing drink, and let’s dive into a story that perfectly captures why this salad holds a special place in my culinary heart!

## Personal Story

I have a vivid memory of one sunny afternoon spent in my grandmother’s garden, surrounded by the colors and scents of freshly bloomed flowers and ripe vegetables. As a child, I spent hours with her, learning the intimate dance of creating dishes that were not just simply about nourishment but were deeply tied to our love for one another. I remember her saying, “Food is a love letter shared at the table,” and I’ve carried that thought with me ever since.

One day, while picking herbs, I stumbled upon a couple of ripe avocados resting in the sun. Inspired, my grandmother suggested we make a salad that combined her garden’s bounty. She tossed in chickpeas, a bit of feta, and whatever fresh herbs we could find, drizzling it all with vibrant olive oil. The result was nothing short of magical! That simple, fresh mixture was both delicious and packed with love, and it became a summer staple at every family gathering.

Years later, I still make my version of that garden-inspired dish—a Chickpea Feta Avocado Salad that celebrates simplicity, freshness, and all the wonderful memories wrapped around food.

## Ingredients

Gathering quality ingredients is key to creating a spectacular Chickpea Feta Avocado Salad! Here’s what you’ll need:

- **1 (15-ounce/425g) can chickpeas**: Drain and rinse these little gems! They’re packed with protein and fiber, making them a filling base. If you’re looking for a swap, try black beans or cannellini beans for a different twist.

- **1 avocado**: Creamy and rich, this is the star of the show. Choose one that’s slightly soft to the touch, but not mushy. If avocados aren’t in season, you can substitute with ripe mango for a sweet contrast.

- **4 ounces (115g) feta cheese**: Crumbled feta adds a salty, tangy kick. If you’re looking for a vegan option, try using almond feta or simply omit it for a lighter variation.

- **1/2 cup (75g) red onion**: Thinly sliced for a nice crunch and flavor. Soak them in cold water for about 10 minutes to mellow their sharpness if preferred. You can also use green onions if you want a milder taste.

- **1/2 cup (50g) fresh parsley**: Chopped for that fresh, herbaceous flavor. If you're not a fan of parsley, fresh basil also works beautifully!

- **1/4 cup (25g) fresh mint**: A handful of mint elevates the dish with its refreshing bite. If you can't find mint, substitute it with fresh dill for a different flavor profile.

- **3 tablespoons (45ml) olive oil**: Use high-quality extra virgin olive oil for a rich taste. If you’re looking to mix it up, avocado oil is a fantastic alternative.

- **2 tablespoons (30ml) lemon juice, freshly squeezed**: Fresh lemon juice brightens up the salad wonderfully. If you don’t have lemons, lime juice will work in a pinch!

- **1 clove garlic, minced**: Adding a touch of garlic enhances the flavor profile. Feel free to use garlic powder if you're trying to reduce the amount of raw garlic.

- **1/2 teaspoon (2.5ml) dried oregano**: A sprinkle of oregano ties everything together with its aromatic essence. Substitute with Italian seasoning if that’s what you have on hand!

- **Salt and pepper to taste**: Essential for balancing all the flavors! Start small and add to your preference.

With these ingredients ready, we’re one step closer to creating a gorgeous dish that will make your taste buds sing!

## Step-by-Step Instructions

Now let’s get to the fun part: making your Chickpea Feta Avocado Salad! Follow these steps, and you’ll be enjoying this culinary delight in no time.

1. **Prepare Your Ingredients**: Start by gathering all your ingredients on the countertop. This helps streamline the process. Take a moment to check the ripeness of your avocado; it should yield slightly when you press it.

2. **Rinse and Drain the Chickpeas**: Open the can of chickpeas and give them a good rinse under cold water in a colander. This helps remove excess sodium and any canned taste. Drain thoroughly—nobody likes a soggy salad!

3. **Chop the Veggies**: Slice the red onion thinly. Remember, you want the pieces to be bite-sized—no one likes a mouthful of raw onion! If you’d like, soak them in cold water for about 10 minutes to take the edge off their sharpness.

4. **Dice the Avocado**: Carefully cut your avocado in half, remove the pit, and scoop the flesh out with a spoon. Cut the avocado into bite-sized chunks, but be gentle! You want it to hold its shape in the salad.

5. **Mix the Fresh Herbs**: Chop your parsley and mint finely. This is where your salad will get its fresh, fragrant dimension. The simpler it is to chop, the better for getting those delicious oils released into your dish!

6. **Make the Dressing**: In a small bowl, whisk together the olive oil, lemon juice, minced garlic, dried oregano, salt, and pepper. Taste it and adjust accordingly. The dressing should be tangy, salty, and complements the salad’s flavors beautifully.

7. **Combine Everything**: In a large mixing bowl, combine the rinsed chickpeas, diced avocado, sliced onion, crumbled feta, chopped parsley, and mint. Drizzle with the dressing and tend to toss gently with a spatula or your hands. You want everything to be coated in the dressing without mashing the avocado.

8. **Taste Test**: Now, for the best part! Give your salad a taste and adjust the seasoning—add more salt, pepper, or lemon juice if needed. Cooking is all about personal flavor, so don’t be shy!

9. **Chill It Out**: If you have some time, let the salad sit in the fridge for about 15-30 minutes before serving. This allows all those flavors to meld together and creates a lovely harmony in each bite.

10. **Serve and Enjoy**: Serve it chilled or at room temperature. Gather your friends, pour some drinks, and dive into this flavorful creation!

## Serving Suggestions

Plating this beautiful salad is as easy as it is enjoyable. For a fancy touch, you can layer it in a large glass bowl or individual glasses, allowing each ingredient to shine. Drizzle a little extra olive oil and garnish with additional herbs or lemon wedges for a pop of color. Serve it alongside roasted chicken, grilled seafood, or even atop a bed of greens for a full meal.

## Recipe Variations

1. **Mediterranean-Style Twist**: Add Kalamata olives and roasted red peppers for an extra Mediterranean flair.
2. **Grain Bowl Addition**: Serve the salad over a base of quinoa or farro for a more filling meal.
3. **Spicy Kick**: Toss in diced jalapeños or sprinkle with red pepper flakes for a touch of heat.
4. **Creamy Delight**: For an extra creamy version, mix in a dollop of Greek yogurt or a splash of tahini.
5. **Nutty Flavor**: Sprinkle toasted pine nuts or sunflower seeds on top for an additional crunch!

## Chef’s Notes

As with any recipe, I encourage you to make this salad your own. I’ve tinkered with the ingredient ratios over many dinner parties, and surprisingly, there’s something magical about using fresh herbs from your garden. They can elevate the simple salad into something sensational! Don’t worry too much about ratios or measurements—cooking is an art, not a science.

Whenever I make this salad, I cannot help but smile, thinking about those afternoons in my grandmother’s garden. The love and joy that come from simple gatherings are immeasurable; it reminds me that sometimes it’s the simplest meals that create the best memories.

## FAQs and Troubleshooting

**Q: Can I make this salad ahead of time?**
A: Absolutely! Just wait to add the avocado until right before serving to keep it vibrant and fresh. The salad can be stored in an airtight container in the fridge for up to 2 days.

**Q: What if I don’t like feta cheese?**
A: No problem at all! You can entirely omit the feta or substitute it with a different cheese like goat cheese or a vegan cheese option for a creamy element.

**Q: My salad is too salty; what do I do?**
A: If you oversalted, try adding more chickpeas or another diced avocado to balance it out. Increasing the volume of other ingredients can help mitigate the saltiness.

**Q: Can I use dried chickpeas instead of canned?**
A: While you certainly can, remember to soak and cook them beforehand. It will take a bit more time, but you'll get a heartier texture!

## Nutritional Info

*Per Serving (based on 4 servings)*:
- Calories: 250
- Protein: 9g
- Carbohydrates: 22g
- Fat: 15g
- Fiber: 8g

Dig into this vibrant Chickpea Feta Avocado Salad and let it be a joyful addition to your kitchen repertoire! I hope you enjoy creating and sharing it as much as I do. Happy cooking, friends!
Chickpea Feta Avocado Salad

A vibrant salad featuring creamy avocado, tangy feta, and hearty chickpeas, perfect for lunches or gatherings.
- Prep Time: 15 minutes
- Cook Time: 0 minutes
- Total Time: 15 minutes
- Yield: 4 servings 1x
- Category: Salad
- Method: No cooking required
- Cuisine: Mediterranean
- Diet: Vegetarian
Ingredients
- 1 (15-ounce/425g) can chickpeas, drained and rinsed
- 1 avocado, diced
- 4 ounces (115g) feta cheese, crumbled
- 1/2 cup (75g) red onion, thinly sliced
- 1/2 cup (50g) fresh parsley, chopped
- 1/4 cup (25g) fresh mint, chopped
- 3 tablespoons (45ml) olive oil
- 2 tablespoons (30ml) lemon juice, freshly squeezed
- 1 clove garlic, minced
- 1/2 teaspoon (2.5ml) dried oregano
- Salt and pepper to taste
Instructions
- Prepare your ingredients by gathering them on the countertop.
- Rinse and drain the chickpeas under cold water.
- Chop the red onion thinly.
- Dice the avocado into bite-sized chunks.
- Mix the fresh herbs (parsley and mint).
- Make the dressing by whisking together olive oil, lemon juice, garlic, oregano, salt, and pepper.
- Combine all ingredients in a large mixing bowl and toss with the dressing.
- Taste and adjust seasoning as needed.
- Chill the salad in the fridge for 15-30 minutes before serving.
- Serve chilled or at room temperature.
Notes
For best results, add the avocado right before serving to keep it fresh. This salad can be made ahead of time, just wait to add the avocado.
Nutrition
- Serving Size: 1 serving
- Calories: 250
- Sugar: 4g
- Sodium: 300mg
- Fat: 15g
- Saturated Fat: 4g
- Unsaturated Fat: 9g
- Trans Fat: 0g
- Carbohydrates: 22g
- Fiber: 8g
- Protein: 9g
- Cholesterol: 0mg
Keywords: salad, chickpea salad, avocado salad, Mediterranean foods, healthy recipes
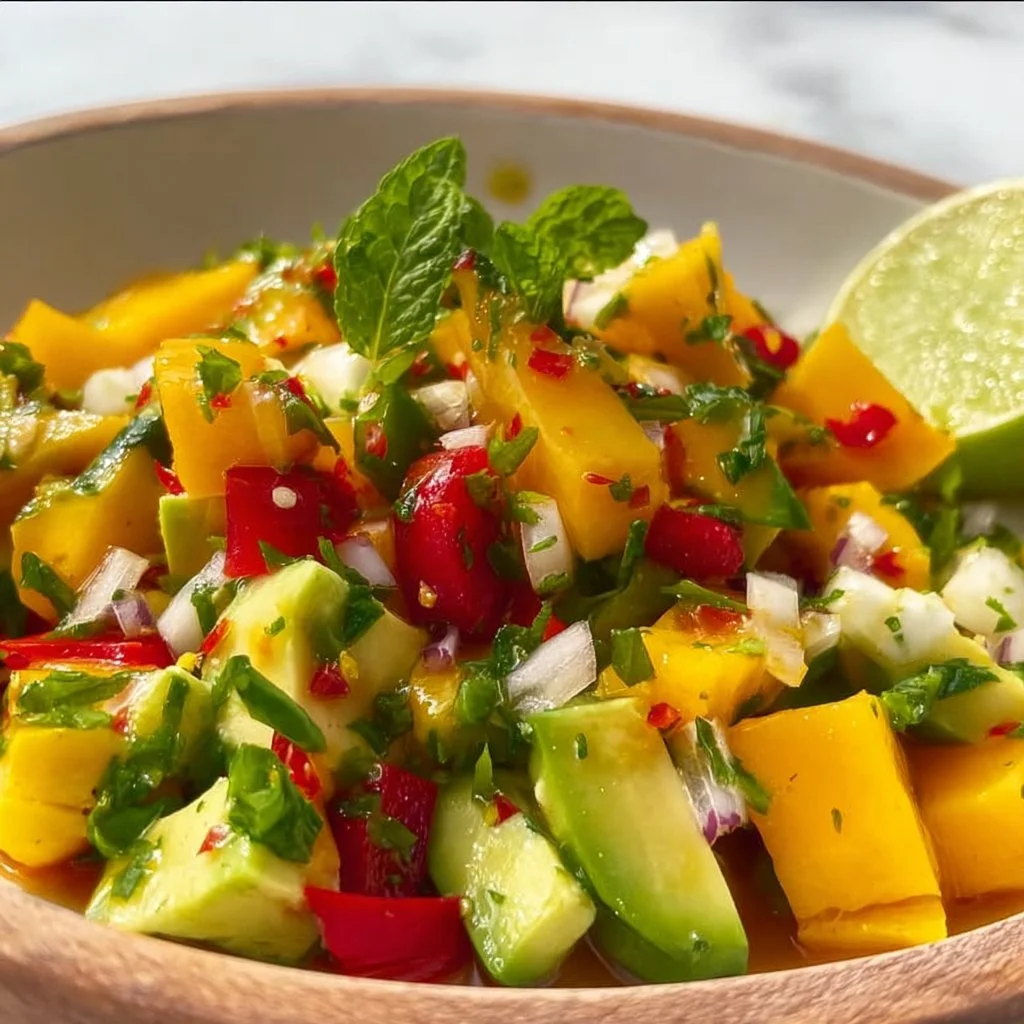
Mango Avocado Salad
Tropical Delight: Mango Avocado Salad Recipe
Hey there, fellow food lovers! Today, we’re diving into a refreshing and vibrant dish that screams sunshine: Mango Avocado Salad. Regardless of the season, this salad brings a little tropical magic right to your table. Trust me, the first bite will transport you to a sun-kissed beach, the sea breeze kissing your skin, and the sound of laughter filling the air.
What I absolutely adore about this dish is how simple yet impactful it is. This salad combines sweet, juicy mangoes with creamy avocados, crunchy cucumbers, and crisp red onions, all dressed together in a zesty lime vinaigrette. It’s a celebration of flavors and textures, and it comes together in a matter of minutes—perfect for busy weeknights or casual gatherings with friends.
Now, before we jump into the chopping and mixing, I want you to feel the same excitement I have for this salad. It’s the perfect side dish for grilled meats, or it can be enjoyed on its own as a light lunch. And let’s not forget: it’s an absolute showstopper at any potluck or barbecue! To make it even better, the vibrant colors of this salad will have your guests oohing and aahing as soon as you set it down on the table.
So roll up your sleeves, grab your cutting board, and let’s embark on this delicious journey together. By the end of this post, you’ll not only master the perfect Mango Avocado Salad, but you’ll also have a few fun stories and tips to bring your culinary skills to the next level!
Personal Story
Ah, mangoes and avocados—the perfect duo. I still remember the first time I tried this salad many years ago at my aunt’s summer barbecue. The sun was shining high, and the scent of grilled chicken wafted through the air. My aunt, the queen of gatherings, called everyone to the table, and there it was—a vibrant bowl of Mango Avocado Salad.
As I scooped some onto my plate, the aroma of fresh lime and cilantro filled the air. One bite, and I was hooked! The sweetness of the mango paired with the rich, creaminess of the avocado danced in my mouth. My aunt shared her secrets, and little did I know, this dish would become a staple in my own home. It often makes an appearance at birthday parties, family dinners, or even quiet evenings when I want to treat myself to something special.
Over the years, I’ve tweaked the recipe here and there—adding a pinch of spice or experimenting with herbs—but that first bite always brings back cherished memories. I hope that this salad brings you as much joy as it has brought me and my family!
Ingredients
Here’s what you’ll need to create your Mango Avocado Salad:
-
Mango:
- Choose ripe, sweet mangoes for the best flavor. Look for fruit that gives slightly to the touch. If you’re in a pinch, you can substitute with peaches or nectarines for a similar sweetness!
-
Avocado:
- The creamy crowd-pleaser of this salad! Choose avocados that are ripe but still firm. If you’re not a fan of avocados, try using chopped cooked sweet potatoes for a softer texture!
-
Red Capsicum Peppers:
- These add a sweet crunch! If you prefer something spicier, you can use jalapeño or switch to yellow or green bell peppers for mildness.
-
Red Onions:
- Their sharp flavor mellows when combined with other ingredients. While red onions are recommended for their color and taste, scallions or shallots can also work in a pinch!
-
Cucumber:
- Use English cucumbers for their crisp texture and lower seeds. If cucumbers aren’t your thing, try Zucchini for a unique twist.
-
Coriander (Cilantro):
- Fresh cilantro adds an aromatic touch. If you’re not a fan, swap it with fresh parsley or mint for a refreshing change.
-
Lime:
- Fresh lime juice brightens the whole salad up! If limes are hard to get, lemon juice can be a zesty substitute, though it will slightly change the flavor profile.
-
Salt:
- A pinch is essential to enhance flavor! Use sea salt or Himalayan pink salt for a gourmet finish.
-
Red Chilli Flakes:
- Add some heat to the salad with these flakes. Feel free to adjust the amount to suit your spice tolerance or omit them entirely for a milder version.
-
Olive Oil:
- A drizzle of good quality extra virgin olive oil brings richness to the dish. If you want to switch it up, avocado oil or grapeseed oil can be used.
Step-by-Step Instructions
Now let’s get into the nitty-gritty of making this divine salad. Don’t worry, it’s incredibly straightforward!
1. Gather Your Ingredients
Start by assembling all the ingredients on your countertop. This not only keeps you organized but allows you to have everything within reach as you cook. Pro tip: Wash your fruits and veggies thoroughly to remove any residual pesticides and dirt.
2. Chop the Veggies
Begin by dicing the mango. Use a sharp knife to slice around the pit and then cube the flesh. Remember, a ripe mango is easier to cut! If you’re unsure about your knife skills, go slow and steady; practice makes perfect!
3. Prepare the Avocado
Cut the avocado in half, remove the pit (be careful here!), and use a spoon to scoop out the flesh. Dice it just like your mango but try to keep pieces a bit larger, as it adds nice texture. If avocados are not perfectly ripe, don’t worry—just make sure they are not too hard.
4. Dice the Red Capsicum, Cucumbers, and Red Onions
Chop the red capsicum and cucumber into bite-sized pieces, almost the same size as the mango and avocado. For the red onion, the finer you chop, the mellower the flavor (so go slow if you want less onion punch!).
5. Mix Everything Together
In a large bowl, gently toss in the mango, avocado, red capsicum, cucumber, and red onion. This is where the visual magic happens! Take a moment to admire the vibrant colors before we dress it!
6. Prepare the Dressing
In a small bowl, whisk together the olive oil, lime juice, salt, and red chili flakes. Taste it to ensure it’s just how you like it. Adjust with more lime, salt, or chili if needed. This dressing is what will pull the whole salad together!
7. Dress the Salad
Drizzle the dressing over the salad. Gently toss everything together, being careful not to mash the avocado. Pro tip: use a rubber spatula for soft and gentle mixing—it allows you to incorporate everything without losing that luscious avocado texture.
8. Let It Rest
Allow the salad to sit for about 10-15 minutes before serving. This will let the flavors meld beautifully. If you’re prepping ahead, keep the avocado separate until just before serving to avoid browning.
9. Final Touches
Before serving, give the salad another gentle toss and add additional salt, lime, or chili flakes to taste. A sprinkle of fresh cilantro on top can also be a gorgeous finishing touch!
Serving Suggestions
To serve your Mango Avocado Salad, consider a beautiful bowl or platter that lets the vibrant colors shine through. You can ladle generous portions onto individual plates or keep it communal for guests to serve themselves. For a touch of elegance, use a fork to create a slight swirl in the salad before serving. It adds a little flair without requiring any extra effort!
Recipe Variations
Want to switch things up? Here are a few ideas:
- Add Protein: Toss in some grilled shrimp, chicken, or chickpeas to make this salad a complete meal.
- Tropical Twist: Add diced pineapple or papaya for a double dose of tropical goodness.
- Cheese Please: Crumbled feta or goat cheese can offer creaminess and a lovely salty bite.
- Nuts for Crunch: Sprinkle some toasted almonds or cashews on top for an additional crunch factor.
- Dressing Variations: Try adding honey or agave syrup for some sweetness, or swap the lime for orange juice for a different citrus zest.
Chef’s Notes
This recipe has become a cherished tradition in my home, and I’ve loved watching it evolve over time. One summer, after attending a zesty salsa-making class, I decided to substitute the salad dressing with a homemade mango salsa mix—what a hit that was!
Sometimes, I’ll even throw in whatever fresh herbs I have on hand—basil one day, mint another; it’s all about what inspires me at the moment. And let’s be honest; the calm chatter around the table as everyone digs into this colorful salad makes every effort worthwhile.
FAQs and Troubleshooting
1. Why did my avocado turn brown?
It’s all about the air! Avocados oxidize quickly, so if you want to keep them fresh, add the lime juice right before serving, or keep the pit in the leftover salad.
2. My mango isn’t sweet enough; what can I do?
If your mango isn’t ripe, try adding a teaspoon of honey or agave to the salad for a touch of sweetness, or let it sit at room temperature for another day until it ripens.
3. How can I prepare this salad ahead of time?
You can chop the mango, cucumber, and capsicum up to a day in advance. Keep the avocado separate until serving. Enjoy the delicious simplicity!
4. Can I make this a meal prep dish?
Absolutely! Just portion it out in airtight containers, and it’s perfect for a week of lunches. Just remember to add the avocado just before eating to keep everything fresh.
Nutritional Info (Optional)
While the focus here is on flavor, it’s worth noting that this Mango Avocado Salad is packed with nutrients! The healthy fats from the avocado, vitamin C from the mango, and dietary fiber from the vegetables make it not only delightful but nutritious as well.
And there you have it—a delightful Mango Avocado Salad that’s as colorful as it is delicious! I hope you enjoy making this dish as much as I do. So grab your apron, get those ingredients chopped, and let the tropical flavors whisk you away! Happy cooking!
PrintMango Avocado Salad

A refreshing Mango Avocado Salad that combines sweet mangoes, creamy avocados, crunchy cucumbers, and zesty lime vinaigrette.
- Prep Time: 15 minutes
- Cook Time: 0 minutes
- Total Time: 15 minutes
- Yield: 4 servings 1x
- Category: Salad
- Method: No Cooking
- Cuisine: Tropical
- Diet: Vegetarian
Ingredients
- 2 ripe mangoes
- 2 ripe avocados
- 1 red capsicum pepper
- 1/2 red onion
- 1 cucumber
- 1/4 cup fresh coriander (cilantro)
- Juice of 2 limes
- 1/2 teaspoon salt
- 1/4 teaspoon red chilli flakes
- 2 tablespoons olive oil
Instructions
- Gather your ingredients.
- Chop the mango.
- Prepare the avocado.
- Dice the red capsicum, cucumbers, and red onions.
- Mix everything together in a bowl.
- Prepare the dressing by whisking the olive oil, lime juice, salt, and red chilli flakes.
- Dress the salad.
- Let it rest for 10-15 minutes.
- Final touches before serving.
Notes
To prevent browning, add the avocado just before serving.
Nutrition
- Serving Size: 1 serving
- Calories: 250
- Sugar: 15g
- Sodium: 150mg
- Fat: 16g
- Saturated Fat: 2g
- Unsaturated Fat: 14g
- Trans Fat: 0g
- Carbohydrates: 30g
- Fiber: 7g
- Protein: 3g
- Cholesterol: 0mg
Keywords: mango, avocado, salad, tropical, healthy, vegetarian
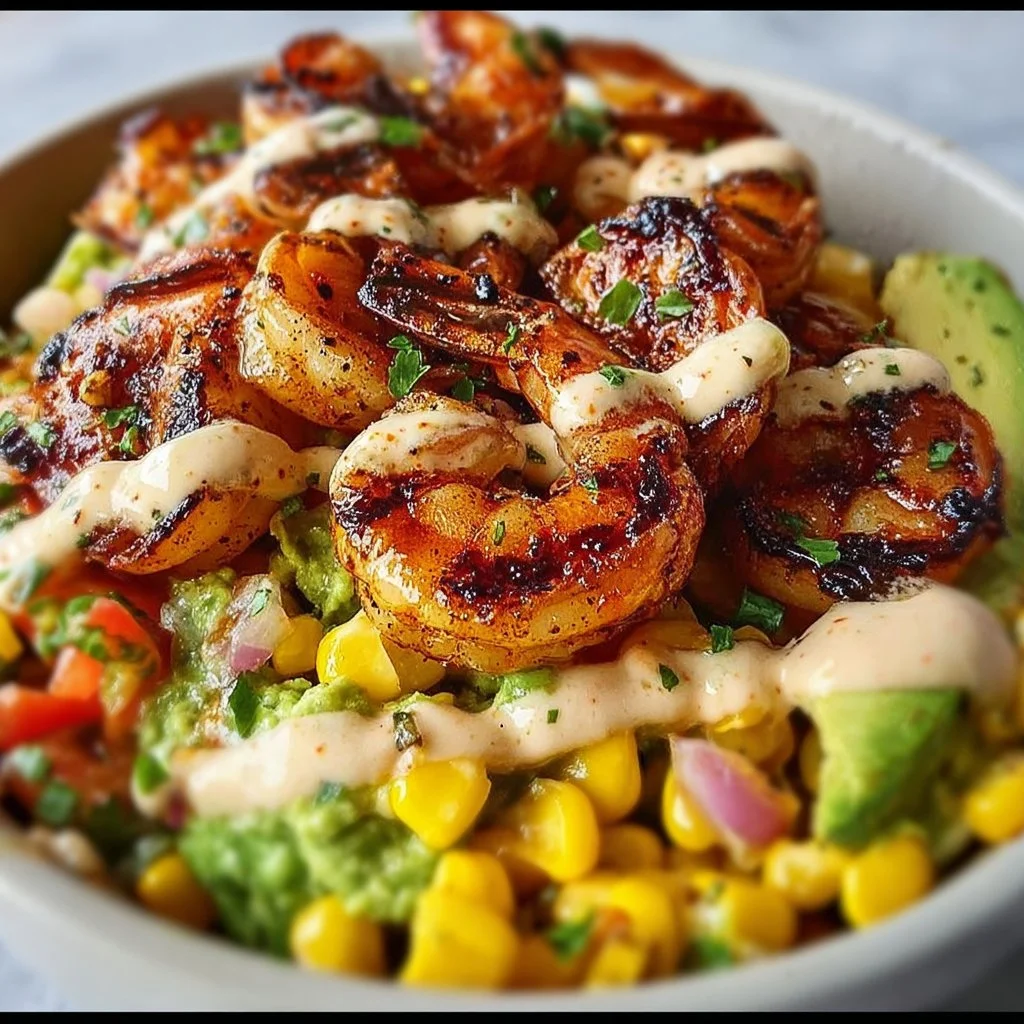
Grilled Shrimp Bowl with Avocado, Corn Salsa & Creamy Garlic Sauce
# Grilled Shrimp Bowl with Avocado, Corn Salsa & Creamy Garlic Sauce: A Delicious Journey

### Introduction

Welcome to my kitchen, food lovers! Today, we’re embarking on a culinary adventure full of vibrant flavors and colorful ingredients. Allow me to introduce you to a dish that has become one of my absolute favorites—**Grilled Shrimp Bowl with Avocado, Corn Salsa, and Creamy Garlic Sauce**. Picture a beautiful bowl brimming with perfectly grilled shrimp, fresh corn salsa, and a dollop of creamy garlic goodness, all topped off with luscious avocado. It’s the kind of meal that’s not only nourishing but a total showstopper, perfect for any occasion!

What I love most about this dish is its versatility. Whether you’re hosting a fancy dinner party or just enjoying an ordinary weeknight dinner, this grilled shrimp bowl fits the bill. The fresh ingredients combine to create a delightful harmony of textures and flavors—each bite is an explosion of summer freshness! Plus, grilled shrimp are a cinch to make and can be ready in less than 30 minutes, allowing for those precious moments to relax and enjoy with loved ones.

So grab your apron, tie it on, and let’s dive into this succulent dish that’s sure to impress. Are you ready to create something that looks beautiful and tastes even better? Let's go!

### Personal Story

Let me take you back to a sun-drenched summer day a few years ago when I had some friends over for a weekend barbecue. The sun was shining, the music was playing, and the scent of grilled food wafted through the air. I had decided to prepare grilled shrimp skewers—light, succulent, and packed with flavor. As I marinated the shrimp, I couldn’t help but remember those lazy summer days spent by the sea, where fresh shrimp were abundant and cooking was always a shared joy.

As the shrimp sizzled on the grill and the corn salsa mixed with ripe avocados, laughter filled the patio. We chatted and reminisced about vacations and adventures while waiting for the food to cook—such simple yet magical moments! That evening, the grilled shrimp was the highlight, paired beautifully with that creamy garlic sauce everybody went crazy over. Everyone left with full bellies and big smiles, and I knew then that this dish would become a staple in my recipe repertoire!

### Ingredients

Let’s gather our ingredients to make this delightful grilled shrimp bowl:

- **1 lb large shrimp, peeled and deveined**
    Perfect for grilling—look for shrimp that are firm and slightly sweet. If you can’t find large shrimp, medium works too, just adjust the cooking time accordingly. Frozen shrimp is also an option; just ensure they’re completely thawed.

- **1 tbsp olive oil**
    This will help to add flavor and keep the shrimp from sticking to the grill. You can swap it out for avocado oil or even melted butter for a richer taste.

- **1 tsp paprika**
    Adds a subtle smokiness and depth. Feel free to use smoked paprika for a more intense flavor or omit it if you're not a fan!

- **½ tsp garlic powder**
    Enhances that lovely garlic flavor without the fuss of prepping fresh garlic. If you prefer fresh, use a whole clove instead!

- **¼ tsp salt**
    Essential for seasoning. Adjust according to your taste preferences!

- **¼ tsp black pepper**
    A necessity for balancing out flavors! You can switch this for freshly cracked pepper for a spicier kick.

- **¼ tsp cayenne pepper (optional)**
    For those who like a bit of heat! Remove if you’re serving kids or anyone who prefers milder flavors.

- **1 cup frozen corn, thawed**
    Sweet and crunchy, it adds a lovely texture to the salsa. Fresh corn off the cob is perfect if it’s in season!

- **½ cup red onion, diced**
    For a sharp sweetness that complements the shrimp beautifully! You can substitute with green onions or white onions if you prefer.

- **¼ cup cilantro, chopped**
    Adds a bright, herby flavor. If cilantro isn’t your thing, parsley can work too.

- **1 jalapeño, seeded and minced (optional)**
    A nice touch if you enjoy some heat; skip it for a milder flavor.

- **1 lime, juiced**
    The acid will brighten the dish up! If you don’t have lime, lemon is a suitable substitute.

- **Salt to taste**
    Always taste as you go and season as needed!

- **½ cup mayonnaise**
    It serves as the base for our creamy garlic sauce. For a healthier twist, use Greek yogurt!

- **¼ cup sour cream**
    Adds tanginess and creaminess. If you’re dairy-free, opt for plant-based yogurt.

- **1 tbsp cilantro, chopped**
    For flavor and garnish in the sauce—optional but recommended!

- **1 tbsp lemon juice**
    Brightens the sauce while adding refreshing depth. Fresh lemon juice is always best!

- **1 clove garlic, minced**
    Fresh garlic provides that unmistakable punch—use two cloves if you're feeling bold.

- **¼ tsp salt**
    Essential for seasoning the sauce.

- **¼ tsp black pepper**
    For a little hint of warmth.

- **1 avocado, sliced or mashed**
    Creamy, delicious, and oh-so-decadent! If you're in a hurry, guacamole makes a lovely substitute.

- **Sesame seeds, for garnish**
    These add a lovely crunch and visual appeal. Toast them lightly for added flavor!

- **Green onions, chopped, for garnish**
    A bright green sprinkle over the bowl for that final touch!

### Step-by-Step Instructions

#### Step 1: Prepare the Shrimp Marinade

In a bowl, combine the shrimp with olive oil, paprika, garlic powder, salt, black pepper, and cayenne pepper (if using). Toss everything together until the shrimp are evenly coated. Allow the shrimp to marinate for about 15-20 minutes while you prepare the corn salsa—this lets the flavors enhance beautifully!

#### Step 2: Make the Corn Salsa

While waiting, in another bowl, combine the thawed corn, diced red onion, chopped cilantro, minced jalapeño (if using), and the juice of one lime. Season the salsa with salt to taste and set it aside. The freshness of this salsa is truly the star—make sure to mix it well so every bite is bursting with flavor!

#### Step 3: Preheat the Grill

Preheat your grill to medium-high heat (`about 400°F`). If you’re using a grill pan, heat it on the stove over medium-high heat. You want that perfect char on each shrimp, so let’s get that grill sizzling!

#### Step 4: Grill the Shrimp

Once the grill is ready, add your marinated shrimp. Grill them for about 2-3 minutes on each side, or until they turn pink and opaque. Avoid overcooking them; shrimp can go from perfect to rubbery in a flash! Keep a close eye, and don’t forget to flip them halfway through cooking!

#### Step 5: Prepare the Creamy Garlic Sauce

As the shrimp is grilling, prepare the creamy garlic sauce. In a small bowl, combine mayonnaise, sour cream, chopped cilantro, minced garlic, lemon juice, and a pinch of salt and pepper. Mix everything until smooth and creamy. Taste and adjust seasoning as needed!

#### Step 6: Assemble the Bowl

Now, it’s time to assemble your grilled shrimp bowl! Start with a base of your favorite grains like rice or quinoa. Layer on the grilled shrimp, then scoop generous amounts of corn salsa over the top. Add your creamy garlic sauce, and for the final touch, sprinkle with sliced avocado, sesame seeds, and chopped green onions—it’s all about that gorgeous presentation!

### Serving Suggestions

Serve this grilled shrimp bowl immediately. A vibrant, fresh garnish like lime wedges can be added for people who enjoy a hit of acidic goodness. You can also offer extra cilantro or hot sauce on the side for those who want a flavor kick!

### Recipe Variations

- **Taco Style:** Build a shrimp taco with warm corn tortillas and pile on the corn salsa and avocado for a fresh twist!
- **Zoodles:** Swap the grain for zucchini noodles for a healthy, low-carb option.
- **Spicy Shrimp:** Add chipotle peppers in adobo sauce to the marinade for a smoky, spicy flavor kick.
- **Fruit Salsa:** Mix in some diced mango or pineapple for a sweet fruit salsa instead of a corn salsa.
- **Dairy-Free:** Use vegan mayo and coconut cream to make the sauce while keeping it creamy and flavorful.

### Chef’s Notes

This grilled shrimp bowl is truly a versatile dish that can endlessly evolve based on the ingredients you have on hand or seasonal produce. I once made a version using pineapple in the salsa, and it was an instant hit! It’s so rewarding to see how a simple dish can create beautiful memories and be customized to fit any palate. And let’s be honest, who doesn’t love a meal that looks beautiful and comes together so quickly?

### FAQs and Troubleshooting

**1. What if my shrimp is tough after grilling?**
   - Overcooked shrimp can become rubbery. Keep a close watch on the shrimp while they’re on the grill; they usually take just a few minutes per side until they turn pink.

**2. Can I make the creamy garlic sauce in advance?**
   - Absolutely! The sauce can be made a day ahead. Just store it in an airtight container in the refrigerator, and give it a stir before serving.

**3. How can I tell if the shrimp is cooked through?**
   - Cooked shrimp should be opaque and pink, and they will form a nice “C” shape. Avoid the “O” shape; that’s a sign of overcooking!

**4. What should I serve with this shrimp bowl?**
   - This dish pairs beautifully with a fresh green salad, grilled vegetables, or even a tangy coleslaw for some extra crunch!

### Nutritional Info
Each serving of this Grilled Shrimp Bowl is packed with protein, healthy fats, and vibrant vegetables, making it a well-rounded meal. While nutritional values can vary based on specific ingredients and portion sizes, a rough estimate per serving might look like this:

- Calories: 450
- Protein: 30g
- Fats: 25g
- Carbohydrates: 30g

Tuning into your taste buds and making this Grilled Shrimp Bowl with Avocado, Corn Salsa & Creamy Garlic Sauce is a delightful way to create a nourishing and beautiful dish. Enjoy every bite and relish the memories you create around your table!
Grilled Shrimp Bowl with Avocado, Corn Salsa & Creamy Garlic Sauce
A vibrant and flavorful grilled shrimp bowl with fresh corn salsa and creamy garlic sauce, topped with avocado.
- Prep Time: 20 minutes
- Cook Time: 10 minutes
- Total Time: 30 minutes
- Yield: 4 servings 1x
- Category: Main Course
- Method: Grilling
- Cuisine: Mexican
- Diet: Gluten-Free
Ingredients
- 1 lb large shrimp, peeled and deveined
- 1 tbsp olive oil
- 1 tsp paprika
- ½ tsp garlic powder
- ¼ tsp salt
- ¼ tsp black pepper
- ¼ tsp cayenne pepper (optional)
- 1 cup frozen corn, thawed
- ½ cup red onion, diced
- ¼ cup cilantro, chopped
- 1 jalapeño, seeded and minced (optional)
- 1 lime, juiced
- Salt to taste
- ½ cup mayonnaise
- ¼ cup sour cream
- 1 tbsp cilantro, chopped
- 1 tbsp lemon juice
- 1 clove garlic, minced
- ¼ tsp salt
- ¼ tsp black pepper
- 1 avocado, sliced or mashed
- Sesame seeds, for garnish
- Green onions, chopped, for garnish
Instructions
- Prepare the shrimp marinade by combining shrimp with olive oil, paprika, garlic powder, salt, black pepper, and cayenne pepper in a bowl.
- Make the corn salsa by mixing corn, red onion, cilantro, jalapeño, and lime juice in another bowl; season with salt.
- Preheat your grill to medium-high heat (about 400°F).
- Grill the marinated shrimp for 2-3 minutes on each side until pink and opaque.
- Prepare the creamy garlic sauce by mixing mayonnaise, sour cream, cilantro, garlic, lemon juice, and seasoning until smooth.
- Assemble the bowl with a base of grains, grilled shrimp, corn salsa, creamy garlic sauce, and garnish with avocado, sesame seeds, and green onions.
Notes
This dish is versatile and can be adjusted based on available ingredients. Enjoy it fresh with lime wedges for added flavor!
Nutrition
- Serving Size: 1 serving
- Calories: 450
- Sugar: 3g
- Sodium: 600mg
- Fat: 25g
- Saturated Fat: 4g
- Unsaturated Fat: 20g
- Trans Fat: 0g
- Carbohydrates: 30g
- Fiber: 4g
- Protein: 30g
- Cholesterol: 200mg
Keywords: grilled shrimp, corn salsa, avocado bowl, healthy recipe, summer dish
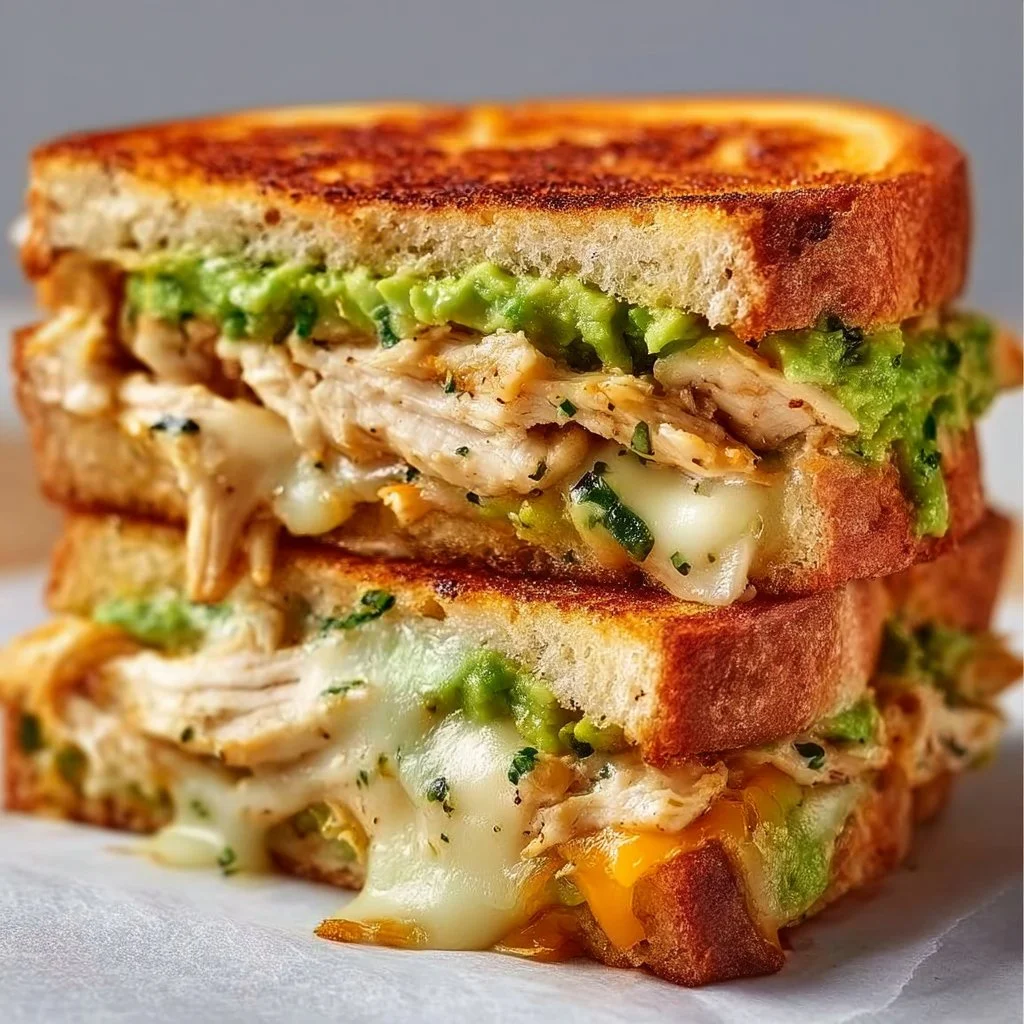
Chicken Avocado Melt Sandwich
Chicken Avocado Melt Sandwich: A Slice of Heaven
Hey there, fellow food lovers! Welcome back to my kitchen where I believe every meal has a story, and today, we’re diving into a delightful creation that’s not just delicious but also oh-so-simple to whip up: the Chicken Avocado Melt Sandwich. This sandwich is a harmonious blend of comfort food and fresh ingredients, making it a perfect addition to your lunch rotation or even a cozy dinner.
Why do I love this sandwich, you ask? Well, it brings me back to sunny afternoons spent with my friends, lounging around with plates in hand and laughter in the air. Picture this: the sun shining, music playing softly in the background, and us trying to make the perfect sandwich while comparing recipes and reminiscing about our childhood culinary escapades. This Chicken Avocado Melt always made an appearance because it was a crowd-pleaser—creamy, cheesy, and satisfying.
This sandwich is not just about its components; it’s about the joyful experience of gathering. It’s about using your hands to bring together vibrant flavors and sharing them with people you love. So, tie your apron, and let’s get cooking. Whether you’re serving this at a casual get-together or simply treating yourself, this Chicken Avocado Melt Sandwich is bound to impress.
Personal Story
I remember the first time I made a similar sandwich—there was a group of us at my friend Emily’s house for a weekend getaway. We had just come back from a long hike, and all we wanted was something comforting yet energizing. After rummaging through her kitchen, I stumbled upon some leftover grilled chicken, a perfectly ripe avocado, and a stash of cheese that was just begging to be melted.
We gathered around the stove, making a glorious mess, experimenting with flavors, seasoning the mixture as we went. There was laughter, the sound of butter sizzling in the pan, and a delightful anticipation of that first bite. We each constructed our own version—some with spicy mustard, others with a sprinkle of lime juice. But I wouldn’t trade my Chicken Avocado Melt for the world. I took a bite, and it was everything I hoped for—creamy, cheesy, and utterly satisfying.
That moment stuck with me. It reminded me of what cooking—and especially sharing food—is all about: creating beautiful memories that linger long after the plates are cleared. And now, I want to share that experience with you!
Ingredients
Let’s gather our ingredients. Here’s what you’ll need for this mouthwatering Chicken Avocado Melt Sandwich:
-
2 slices of bread
Choose your favorite! Sourdough adds a delightful tang, while whole wheat offers a wholesome touch. You can even go gluten-free if that suits your fancy! -
1 cup cooked chicken, shredded
Grilled, roasted, or even rotisserie chicken works perfectly here. No chicken? No problem! Tofu or chickpeas can be delicious substitutes for a vegetarian option. -
1 ripe avocado, mashed
Make sure it’s perfect! Gently squeeze—if it yields but doesn’t feel mushy, you’ve hit the avocado jackpot! For a twist, consider a spread of hummus instead. -
1/2 cup shredded cheese (cheddar or mozzarella)
I’m all about the melty goodness! Cheddar gives a sharp flavor, while mozzarella is gooey and delightful. Consider a dairy-free cheese if you’re looking for a vegan alternative. -
Salt and pepper to taste
Seasoning is key! It can elevate your flavors dramatically. You can also add garlic powder or even chili flakes for a kick. -
Butter or oil for grilling
For that perfect golden crust! Use olive oil or coconut oil for a different flavor profile. And if you’re feeling fancy, herb-infused butter can add an elegant touch.
Step-by-Step Instructions
Alright, let’s get cooking! Here’s how to create your Chicken Avocado Melt Sandwich step by step:
-
Prep the Filling
In a mixing bowl, combine the shredded chicken, mashed avocado, and a sprinkle of salt and pepper. This is where you can get creative—add diced tomatoes for freshness or even a teaspoon of lime juice for a zesty kick. Mix everything until it’s well incorporated. -
Choose Your Bread
Select your favorite bread and lay it out on a clean surface. If you’re feeling indulgent, you can even toast your bread lightly before assembling—this will give it an added crunch in the end. -
Assemble Your Sandwich
On one slice of bread, generously spread your chicken and avocado mixture. Sprinkle your shredded cheese on top. Tip: If you want an extra cheesy experience, add cheese both above and below the filling! -
Seal the Deal
Place the second slice of bread on top and press down gently. This isn’t a wedding cake—no need to crush it, but give it a little press to hold everything together. -
Get Grilling
Heat a skillet over medium heat and add a pat of butter or a drizzle of oil. Once hot, carefully place your sandwich in the pan. Cook for about 3-4 minutes on one side, until it’s golden brown and the cheese begins to melt. Insider Tip: If you’re worried about burning, reduce the heat a little and give it a longer cook time—better slow and golden than quick and burnt! -
Flip and Finish
Using a spatula, flip the sandwich and cook the other side until golden and the cheese is perfectly melted. It should take about the same amount of time as before. Feel free to add a touch more butter or oil before flipping if you like that extra richness. -
Slice and Serve
Once both sides are beautifully golden and crisp, remove the sandwich from the skillet and let it rest for a minute—this helps the cheese regain a bit of firmness. Then, slice it in half to reveal that glorious melted interior!
Serving Suggestions
Plate your Chicken Avocado Melt Sandwich on a rustic wooden board or a chic white plate for a lovely contrast. Consider adding a side of mixed greens dressed with a tangy vinaigrette or crispy sweet potato fries to make it a complete meal. You can garnish with a sprinkle of fresh herbs like cilantro or parsley for that extra flair!
Recipe Variations
Ready to switch things up? Here are a few fun variations to try:
-
Spicy Kick: Mix in crushed red pepper flakes or jalapeños in the filling. For an even spicier twist, step it up with pepper jack cheese!
-
Mediterranean Flair: Add feta cheese, sun-dried tomatoes, and a few kalamata olives for a delightful Mediterranean-inspired sandwich.
-
BBQ Chicken Melt: Swap the seasoning for your favorite BBQ sauce in the mix—this gives it a great sweet smoky flavor.
-
Caprese Style: Layer slices of fresh mozzarella and tomatoes with basil for a fresh twist. Drizzle with balsamic glaze before serving for wow factor.
-
Breakfast Delight: Add a fried egg on top of the filling before grilling for a breakfast sandwich that will keep you energized all morning long.
Chef’s Notes
This Chicken Avocado Melt Sandwich has evolved over time in my kitchen. When I first started making it, it was a simple combination of chicken and cheese. But as I grew more adventurous, I started experimenting with flavors and ingredients, and it became a go-to for casual get-togethers or cozy nights in. And can I just say, there’s something undeniably delightful about gooey cheese paired with creamy avocado? It’s comfort food at its finest, made even better with a side of laughter and good company!
Every time I make it, I remember that day at Emily’s house, where it all began. Food has a beautiful way of bringing us together, doesn’t it?
FAQs and Troubleshooting
1. My sandwich didn’t melt enough. What went wrong?
Use lower heat and give it more time on the skillet. The cheese needs a bit of gentle coaxing to get all melty and wonderful.
2. What if my avocado is too firm?
If your avocado isn’t ripe yet, simply slice it thinly and layer it on the sandwich instead of mashing it. You can even add a splash of lime juice to enhance the flavor!
3. Can I make this sandwich ahead of time?
Absolutely! Just keep the filling in an airtight container and assemble the sandwich when you’re ready to grill. This works great for meal prep!
4. How can I make it vegan?
Substitute the chicken with tofu or chickpeas, use plant-based cheese, and replace the butter with olive oil for grilling.
Nutritional Info (Optional)
Tracking your nutrition? A serving of the Chicken Avocado Melt Sandwich may contain:
- Calories: Approximately 450
- Protein: 30g
- Fat: 25g
- Carbohydrates: 30g
This varies based on the bread and ingredients used but is a wholesome and satisfying meal packed with protein and healthy fats!
That’s it, my friends! With just a handful of simple ingredients and a little bit of love, you’ll have a Chicken Avocado Melt Sandwich that’s packed with flavor and memories. Enjoy the deliciousness, and remember—the best meals are the ones shared around the table. Happy cooking!
PrintChicken Avocado Melt Sandwich

A delightful blend of creamy avocado, shredded chicken, and melted cheese, perfect for lunch or dinner.
- Prep Time: 10 minutes
- Cook Time: 8 minutes
- Total Time: 18 minutes
- Yield: 1 sandwich 1x
- Category: Main Course
- Method: Grilling
- Cuisine: American
- Diet: Non-Vegetarian
Ingredients
- 2 slices of bread
- 1 cup cooked chicken, shredded
- 1 ripe avocado, mashed
- 1/2 cup shredded cheese (cheddar or mozzarella)
- Salt and pepper to taste
- Butter or oil for grilling
Instructions
- Prep the filling by mixing shredded chicken, mashed avocado, salt, and pepper in a bowl.
- Choose your bread and lay it on a surface.
- Assemble the sandwich by spreading the chicken and avocado mixture on one slice and sprinkling cheese on top.
- Seal the sandwich by placing the second slice of bread on top and pressing gently.
- Get grilling by heating a skillet, adding butter or oil, and cooking the sandwich for 3-4 minutes on one side until golden brown.
- Flip the sandwich and cook the other side until golden and the cheese is melted.
- Slice the sandwich in half after letting it rest for a minute.
Notes
You can add hot sauce, tomatoes, or different cheeses for variation.
Nutrition
- Serving Size: 1 sandwich
- Calories: 450
- Sugar: 2g
- Sodium: 600mg
- Fat: 25g
- Saturated Fat: 10g
- Unsaturated Fat: 12g
- Trans Fat: 0g
- Carbohydrates: 30g
- Fiber: 5g
- Protein: 30g
- Cholesterol: 70mg
Keywords: sandwich, chicken, avocado, comfort food, easy recipe