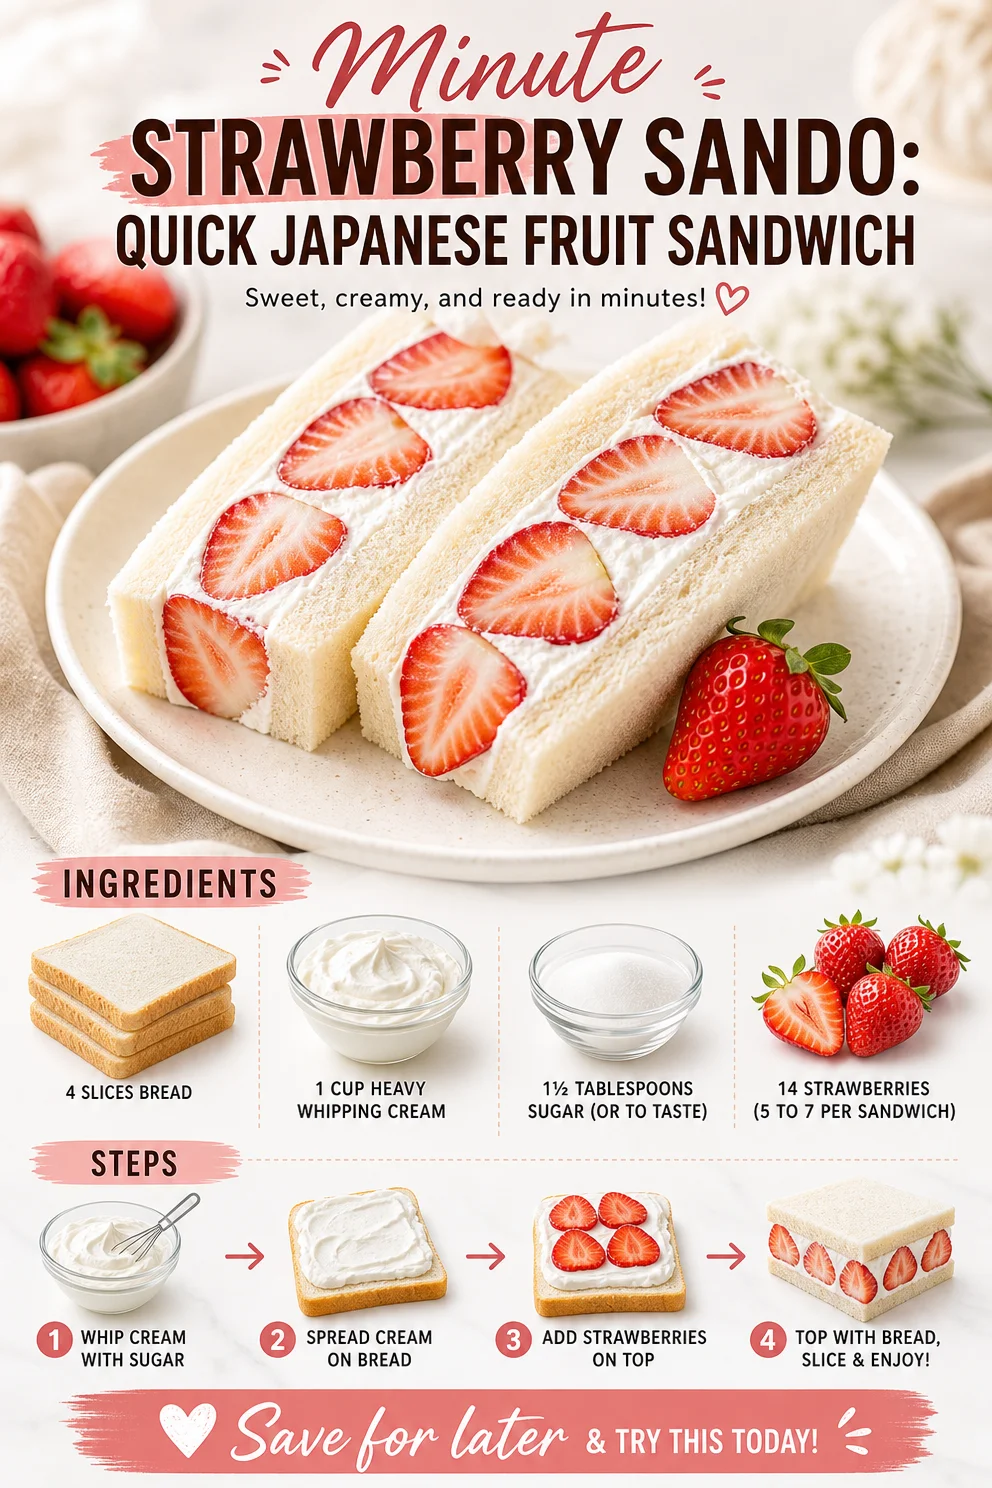
Minute Strawberry Sando: Quick Japanese Fruit Sandwich
Strawberry Sando: A Taste of Japan in Your Kitchen
Hello, fellow foodies! Today, we’re diving into one of Japan’s most delightful culinary trends—the Fruit Sandwich, or as it’s affectionately known in Japan, フルーツサンド (Furūtsu Sando). Specifically, I’m all about the luscious Strawberry Sando that’s guaranteed to elevate your snack game.
Imagine this: a soft, fluffy bread cradle holding juicy strawberries intertwined with sweetened heavy cream. Delicious, right? These delightful sandwiches feel like a bite of sunshine and are perfect for any occasion—be it brunch with friends or a sweet afternoon treat.
Now, if you’ve never experienced a Fruit Sandwich before, you’re in for a real treat! It’s simple yet impressive, beautifully balancing rich creaminess with the freshness of seasonal fruit. Plus, there’s something quite magical about the presentation—who wouldn’t want to dig into a sandwich that looks like it belongs in a design magazine? So, are you ready to tie on your apron and create this indulgent delight? Let’s get started!
My Strawberry Sando Story
One of my happiest childhood memories involves my grandmother and a nearby market that sold the biggest, juiciest strawberries I had ever seen. Every summer, we would visit together, handpicking these vibrant red berries, filling our baskets to the brim. After a long day in the sun, we’d head back to her cozy kitchen where the magic happened.
My grandmother would whip up her signature Strawberry Sando. I can still picture her—an ivory apron tied at her waist, laughter bubbling up as she taught me the secrets to the perfect whipped cream. The smell of fresh strawberries and sweet cream filled the air, creating an irresistible atmosphere full of love. We would make sandwiches, cut them into neat triangles, and savor each bite like it was a little piece of joy.
Through this, I learned how simple ingredients and a little creativity can transform a mundane meal into something memorable. And today, I want to share that joy with you. Let’s make some Strawberry Sando that your friends and family will rave about!
Ingredients
Here’s what you need to achieve this strawberry perfection:
-
4 slices of soft bread: Look for a high-quality white or milk bread. For a twist, you could use brioche or even matcha-flavored bread for a Japanese flair!
-
1 cup of heavy whipping cream: This is what gives your sandwich that luxurious, creamy texture. If you’re looking to lighten it up, feel free to substitute with coconut cream or a non-dairy whipped topping.
-
1 ½ tablespoons of sugar: This sweetener will enhance the cream’s flavor. Adjust the amount based on your sweetness preference; honey or maple syrup could be fun alternatives to experiment with!
-
14 strawberries: Ideal for making 2-3 sandwiches. Use 5 to 7 strawberries per sandwich. Look for plump, ripe strawberries for the best flavor. If strawberries are out of season, you can also use kiwi or mango slices.
These ingredients are straightforward, and sourcing them shouldn’t be too difficult. Remember, quality matters when it comes to creating an elevated dish. Choose ingredients that you love!
Step-by-Step Instructions
1. Prep Your Strawberries
Start by washing your strawberries thoroughly. As you rinse them in cool water, take a moment to admire their luscious red color; trust me, it adds to the overall cooking experience!
Tip: After washing, gently dry them with a paper towel. Excess moisture can dilute the cream and the sandwich won’t hold together as well.
2. Slice Them Up
Remove the green tops and slice the strawberries. Aim for even slices, about ¼ inch thick.
Chef Hack: Keep some whole for garnishing later or for tasting—quality control, right?
3. Make the Whipping Cream
In a mixing bowl, combine your heavy whipping cream and sugar. Using either a hand whisk or an electric mixer, whip the mixture until you reach stiff peaks. Soft peaks are great, but for this recipe, we want that dreaminess that holds its shape!
Tip: Be cautious not to over-whip; if you do, your cream could turn into butter.
4. Assemble Your Sando
Lay a slice of bread flat on your cutting board. Generously spread a layer of whipped cream over the slice. Now, arrange your strawberry slices on top—don’t be shy, this is the fun part!
Cooking Commentary: You can create art here, layering the strawberries beautifully, or just throw them on for a more rustic feel.
5. Top It Off
Add another layer of whipped cream on top of the strawberries and then cover with another slice of bread. Press down gently but firmly to create a nice sandwich.
6. Slice and Serve
Use a sharp knife to cut the sandwich into half, then into triangles, or even into fourths if you’re feeling fancy!
Presentation Tip: A quick dusting of powdered sugar on the top can really wow your guests. Add a strawberry on the side for extra flair!
Serving Suggestions
To serve your delicious Strawberry Sando, plate them on a charming platter. You might want to surround them with a few whole strawberries for decoration or even a mint leaf for a pop of color. Whether it’s for brunch, dessert, or an afternoon pick-me-up, these sandwiches look delightful on any table!
Recipe Variations
-
Tropical Twist: Swap strawberries with kiwi and pineapple for a tropical vibe.
-
Nutty Flavor: Spread a thin layer of almond or hazelnut spread on the bread before adding the whipped cream for a delightful depth of flavor.
-
Herbal Infusion: Add fresh mint leaves or basil to the strawberries for a refreshing herbal note.
-
Choco-Lover: Drizzle some melted chocolate on top of your strawberries before assembling for a chocolate-dipped experience.
-
Vegan Version: Use a cashew cream or coconut whipped topping in place of heavy cream, and opt for vegan bread.
Chef’s Notes
This recipe is close to my heart not just because it reminds me of my grandmother but also due to its versatility: you can really make it your own! Over the years, I’ve experimented with different fruits and flavors, and what I’ve learned is that the joy of cooking comes from the personal touch you add—whether it’s a sprinkle of cinnamon, a splash of vanilla, or even a remix of the fruit! Also, I laughed while making these recently when I accidentally used salt instead of sugar in my whipping cream. Who knew a tiny error could lead to such a salty surprise?
FAQs and Troubleshooting
Q: What if my whipped cream isn’t fluffy?
A: Ensure you start with chilled heavy cream and chill your mixing bowl and whisk too! This helps maintain that luxurious fluffiness.
Q: Can I prepare these sandwiches ahead of time?
A: While you can prepare the components in advance (like the whipped cream and sliced strawberries), it’s best to assemble them just before serving to keep the bread fresh and prevent sogginess.
Q: What if my strawberries are too sour?
A: Simply adjust the sugar in your whipped cream to balance the tartness. Or toss the strawberries in a bit of sugar and let them sit for a few minutes to create a natural syrup.
Q: Is there a gluten-free option for the bread?
A: Absolutely! There are many delicious gluten-free bread options available now that will work perfectly in this recipe.
Nutritional Info
For 1 serving (2 sandwich halves):
- Calories: 300-350 (based on standard ingredients)
- Protein: 4g
- Carbs: 30g
- Fat: 21g
Don’t forget, these numbers can vary based on your unique ingredient choices!
So there you have it, your guide to making a delightful Strawberry Sando! This simple yet stunning creation will leave your taste buds dancing with joy and your guests begging for your secret recipe. Remember, it’s not just about the food; it’s about the love you put into it and the moments you create around the table. Enjoy your cooking, and let’s continue to celebrate the beautiful little moments that food brings into our lives! Happy cooking, friends!
PrintStrawberry Sando

Delightful Japanese Fruit Sandwich featuring juicy strawberries and sweetened heavy cream, perfect for brunch or a sweet treat.
- Prep Time: 15 minutes
- Cook Time: 0 minutes
- Total Time: 15 minutes
- Yield: 2 servings 1x
- Category: Dessert
- Method: No Cooking
- Cuisine: Japanese
- Diet: Vegetarian
Ingredients
- 4 slices of soft bread (white or milk bread)
- 1 cup of heavy whipping cream
- 1 ½ tablespoons of sugar
- 14 strawberries
Instructions
- Prep your strawberries by washing them thoroughly and drying them with a paper towel.
- Slice the strawberries into even slices, about ¼ inch thick.
- Make the whipping cream by combining heavy whipping cream and sugar, then whip until stiff peaks form.
- Assemble by spreading whipped cream on a slice of bread, arranging strawberry slices on top.
- Top it off with another layer of whipped cream and cover with a second slice of bread.
- Slice the sandwich into halves or triangles for serving.
Notes
Best served immediately to keep the bread fresh. Can garnish with powdered sugar and whole strawberries.
Nutrition
- Serving Size: 2 sandwich halves
- Calories: 325
- Sugar: 15g
- Sodium: 150mg
- Fat: 21g
- Saturated Fat: 12g
- Unsaturated Fat: 8g
- Trans Fat: 0g
- Carbohydrates: 30g
- Fiber: 2g
- Protein: 4g
- Cholesterol: 50mg
Keywords: strawberry, fruit sandwich, Japanese recipe, dessert, easy recipe
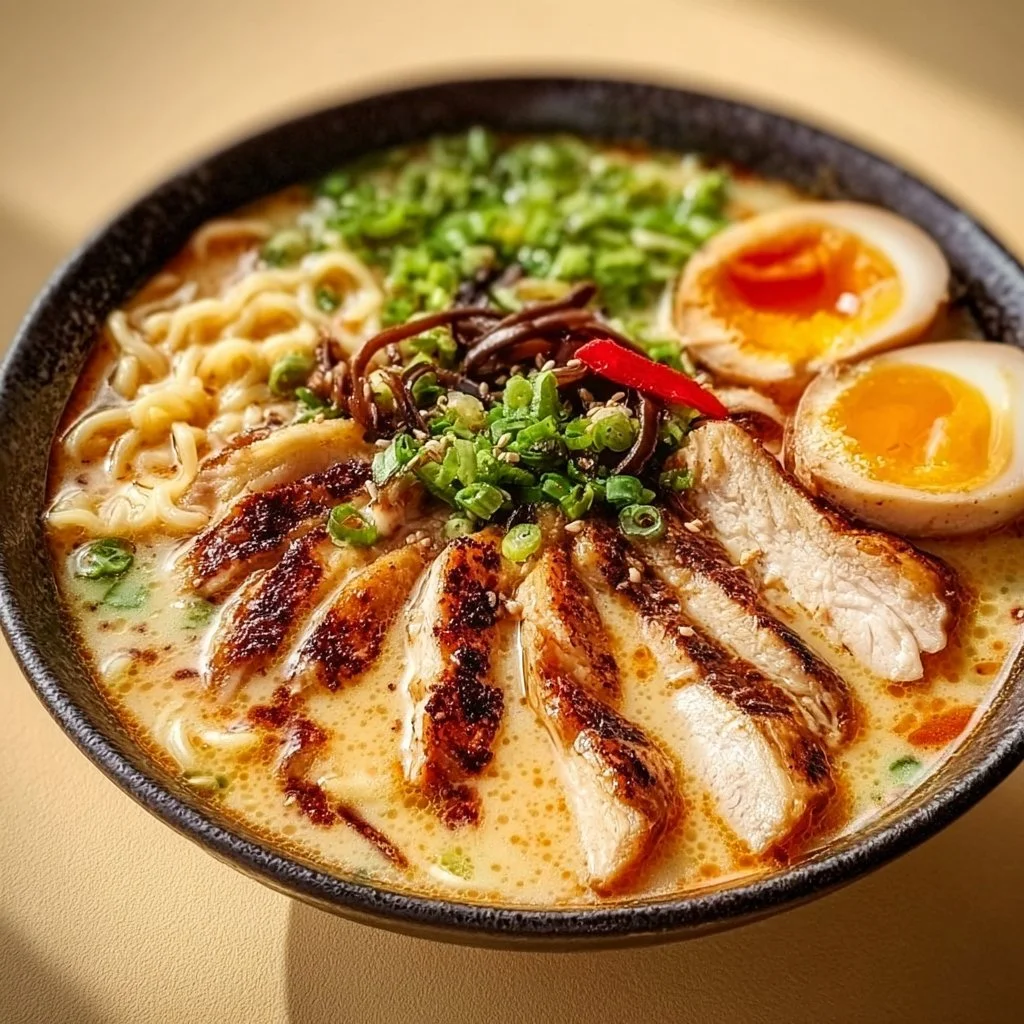
Creamy Garlic Chicken Ramen
Creamy Garlic Chicken Ramen – A Deliciously Cozy Bowl of Comfort
Welcome, foodies! Today, we’re diving into the world of creamy, savory goodness with a delightful dish that’s sure to warm your heart and fill your stomach — Creamy Garlic Chicken Ramen. Perfect for a cozy night in or impressing friends at your next gathering, this dish is the epitome of indulgence and comfort. Plus, I promise it’s easier than you might think!
Why Ramen, You Ask?
Oh boy, where do I even start? Ramen is the ultimate comfort food! It’s the dish you turn to when you’re in need of a warm hug in a bowl. The perfect balance of garlic aroma, creamy texture, and hearty flavors make this ramen a staple in my kitchen, especially when the weather turns chilly or when life just needs a sprinkle of something special.
Don’t let the eye-catching presentation fool you; it’s a recipe designed for real life. Seriously — if you’ve got a few ingredients and a little time, you’re on your way to crafting a meal that feels elegant but tastes like a warm and satisfying embrace.
My Personal Story
Ah, ramen! It brings back such warm memories. I remember my college days, hunched over a steaming bowl of instant ramen, feeling completely derailed by exams and late-night study sessions. Those days were simple, and they taught me the beauty of good food — even if it came from a plastic packet! But my love for ramen really blossomed during a winter gathering at a friend’s house. We had a ramen bar set up, complete with broth, proteins, and an array of toppings. I was charmed by the creative ways we could customize our bowls! From crunchy veggies to soft-boiled eggs, the options seemed endless.
When I returned home, I couldn’t stop thinking about how to elevate that basic concept into something a bit more indulgent — cue the creamy garlic chicken ramen! The delicate balance of flavors and textures, paired with the nostalgia of those simpler days, makes this dish a go-to favorite in my household!
Ingredients
Gathering quality ingredients makes all the difference. To create your creamy garlic chicken ramen, here’s what you’ll need:
-
2 chicken breasts, sliced
This lean protein is your star! Feel free to substitute with boneless thigh meat for extra flavor or use tofu for a vegetarian option. -
4 cups chicken broth
Homemade or store-bought, chicken broth adds depth to the ramen. Vegetarian broth works beautifully if you’re looking for a plant-based delight. -
2 packs of ramen noodles
You can use instant ramen, but consider upgrading to fresh or artisanal noodles for a restaurant-like experience. Just remember to cook them al dente! -
1 cup heavy cream
This is the secret to that luscious, creamy texture. If you want a lighter version, try half-and-half or coconut milk for a dairy-free twist. -
4 cloves garlic, minced
Garlic is the hero! Fresh garlic elevates the flavor to another level. For a milder taste, try roasted garlic instead. -
1 cup fresh vegetables (like spinach, carrots, and bell peppers)
Fresh veggies add not only nutrition but also vibrant colors. You can swap them with whatever you have on hand, like broccoli or snap peas. -
2 tablespoons soy sauce
This salty umami booster gives depth to the broth. Tamari or coconut aminos can replace traditional soy sauce for a gluten-free option. -
1 tablespoon olive oil
Extra virgin olive oil has that fruity character. Feel free to use sesame oil for a more pronounced flavor. -
Salt and pepper to taste
Always the essentials! Just remember to season gradually — you can always add more, but you can’t take it away. -
Chopped green onions for garnish
These tasty little notes bring brightness and a pop of color to your bowl!
Step-by-Step Instructions
Let’s get cooking! Here’s how to whip up this delicious creamy garlic chicken ramen, step by step.
-
Prep Your Ingredients
Before you hit the stove, take a moment to slice your chicken, mince your garlic, and chop those vibrant veggies. Always have everything prepped so you can move quickly! -
Sear the Chicken
In a large pot or Dutch oven, heat the olive oil over medium-high heat. Add the sliced chicken breasts, seasoning lightly with salt and pepper. Sear them for about 5-7 minutes, or until they are cooked through and have a lovely golden color. This adds a beautiful depth of flavor to your broth!Tip: Don’t overcrowd the pan. Work in batches if necessary to get that perfect sear!
-
Add Garlic and Veggies
Toss in the minced garlic right after the chicken is cooked. Sauté for about 30 seconds until it becomes aromatic. Add your fresh vegetables immediately and stir them together. The key is to heat the veggies just enough to make them tender yet vibrant!Chef Hack: If you want a sweet and savory touch, add a sprinkle of sugar to the veggies as they cook.
-
Pour in the Broth
Now, bring on that glorious chicken broth! Carefully pour it into the pot, scraping up any delightful brown bits stuck to the bottom from the chicken (that’s pure flavor!).Pro Tip: Taste your broth at this point. If it needs it, add a bit more soy sauce or seasoning.
-
Add the Ramen Noodles
Add the ramen noodles directly into the pot.Note: If you’re using fresh ramen, they may require just a couple of minutes to cook. Instant noodles will take just a couple of minutes, typically 3-4 minutes.
-
Incorporate the Cream
Once the noodles are cooked, it’s time to create that creamy goodness. Slowly and gently stir in the heavy cream and allow everything to simmer for an additional minute. The beautiful creamy texture will transform your broth into a delightful sauce!Chef Insight: If the sauce is too thick, you can always add a splash of more broth or water to reach your desired consistency.
-
Final Seasoning
Taste your ramen one last time before serving. Adjust the flavors as necessary — a little more soy sauce, salt, or pepper goes a long way! -
Serve
Ladle the ramen into bowls and top generously with chopped green onions. Optional: sprinkle with sesame seeds or chili flakes for added flair.
Serving Suggestions
Ramen is all about presentation. Serve each bowl with a few extra greens on top, perhaps a drizzle of sesame oil, and don’t forget to place your chopsticks stylishly on the side. Light a candle, play some soothing music, and you just might forget you’re dining at home!
Recipe Variations
Want to mix things up? Here are some creative spins on this creamy garlic chicken ramen:
-
Add a Soft-Boiled Egg: A perfectly-runny soft-boiled egg on top adds richness and a lovely texture contrast.
-
Spice It Up: Toss in some sriracha or chili oil to give your bowl a spicy kick!
-
Herb It Up!: Try adding fresh basil or cilantro for a lovely herbal note against the creaminess.
-
Ultimate Vegan Ramen: Replace the chicken with tofu or tempeh, use vegetable broth, and switch heavy cream for coconut cream.
-
Brothy Version: If you prefer a lighter dish, skip the cream altogether and enjoy a clear broth with tons of garlic and veggies!
Chef’s Notes
This creamy garlic chicken ramen has become a staple in my home. It has evolved since its inception; the more I cooked it, the more I played around with flavors and textures. I once accidentally added too much garlic, making it an instant hit for unexpected guests. They loved the warmth of its flavor and mouthed each modulated bite like poetry!
Remember, cooking is as much about experimentation as it is about following a recipe. Don’t shy away from making this dish your own!
FAQs and Troubleshooting
-
Can I make this ramen ahead of time?
Absolutely! Just store the broth and ingredients separately. The flavors will only get better with time! -
What if my broth is too salty?
Adding a bit of water or unsalted broth helps dilute the saltiness. Alternatively, you can toss in a chunk of raw potato for 10-15 minutes, which will absorb excess salt. -
How can I store leftovers?
Store the ramen in an airtight container in the refrigerator for up to 3 days. Reheat gently on the stovetop, adding a splash of broth to restore creaminess. -
Is it normal for ramen to get thick when stored?
Yes! Ramen noodles absorb the broth as they sit, thickening the dish. Always add a bit of broth or water while reheating to loosen it up.
Nutritional Info
(Optional; include if relevant)
- Calories: 450 per serving
- Protein: 30g
- Carbohydrates: 30g
- Fat: 20g
(Note: Nutritional values may vary based on specific ingredients used.)
Thank you for joining me on this creamy chicken ramen adventure! I hope you discover the joy of creating this cozy bowl of comfort and serve it with love to those around your table. Be sure to tag me (@IvoryApron.com) when you give it a try — I can’t wait to see your delicious creations! Happy cooking! 🥢
PrintCreamy Garlic Chicken Ramen

A deliciously cozy bowl of creamy garlic chicken ramen, perfect for warming your heart and filling your stomach.
- Prep Time: 15 minutes
- Cook Time: 30 minutes
- Total Time: 45 minutes
- Yield: 4 servings 1x
- Category: Main Course
- Method: Stovetop
- Cuisine: Japanese
- Diet: Non-Vegetarian
Ingredients
- 2 chicken breasts, sliced
- 4 cups chicken broth
- 2 packs of ramen noodles
- 1 cup heavy cream
- 4 cloves garlic, minced
- 1 cup fresh vegetables (like spinach, carrots, and bell peppers)
- 2 tablespoons soy sauce
- 1 tablespoon olive oil
- Salt and pepper to taste
- Chopped green onions for garnish
Instructions
- Prep your ingredients: Slice your chicken, mince your garlic, and chop the vegetables.
- Sear the chicken: Heat olive oil in a large pot and sear the chicken for 5-7 minutes.
- Add garlic and veggies: Sauté minced garlic and fresh vegetables for about 30 seconds.
- Pour in the broth: Add chicken broth and scrape up any bits from the pot.
- Add the ramen noodles: Stir noodles into the pot and cook according to package instructions.
- Incorporate the cream: Stir in heavy cream and simmer for an additional minute.
- Final seasoning: Adjust flavors with soy sauce, salt, or pepper as needed.
- Serve: Ladle ramen into bowls and top with chopped green onions.
Notes
This ramen can be customized with toppings like a soft-boiled egg, sriracha, or fresh herbs to elevate its flavor.
Nutrition
- Serving Size: 1 serving
- Calories: 450
- Sugar: 3g
- Sodium: 800mg
- Fat: 20g
- Saturated Fat: 10g
- Unsaturated Fat: 8g
- Trans Fat: 0g
- Carbohydrates: 30g
- Fiber: 3g
- Protein: 30g
- Cholesterol: 90mg
Keywords: ramen, creamy pasta, chicken ramen, comfort food, cozy meals