Beef and Cheese Chimichangas: A Family Favorite
Hey there, fellow food enthusiasts! Welcome back to Ivory Apron, your happy kitchen oasis where cooking feels elegant but never intimidating. Today, we’re diving into a dish that’s not just delicious—it’s packed with personal memories and a whole lot of flavor. Get ready to learn how to make the ultimate Beef and Cheese Chimichangas that will have everyone at your table asking for seconds.
Introduction
Chimichangas may have originated in the Southwestern United States, but in my kitchen, they feel like a warm embrace from the family. This dish is not just a recipe; it’s a celebration of flavors, people, and unforgettable moments. When you take a bite of a perfectly crispy chimichanga filled with seasoned beef, gooey cheese, and warm flavors, it’s a party in your mouth, and trust me, you’ll want to host this fiesta again and again!
Picture this: it’s Friday night, and my family gathers around the table, laughter bouncing off the walls, as I plate up golden, crispy chimichangas, fresh from the skillet. I’ve made a big batch, and each one is filled with ground beef, onions, cheese, and just the right amount of salsa to make things interesting. I remember my mom teaching me how to roll them just right, so the filling stays inside—that was the secret!
You can serve these beauties with a side of guacamole, a drizzle of sour cream, or even a fresh pico de gallo. They’re versatile, they’re comforting, and they turn any weeknight dinner into an occasion worth celebrating. Let’s not waste any time; grab your apron and let’s cook!
Personal Story
One of my fondest memories growing up involves my mom’s chimichangas. Every Sunday, she would pull out her trusty cast-iron skillet and set the mood with some tangy salsa and fresh guacamole ready to go. I remember standing on a tiny stool, my hands eagerly hovering around as I watched her expertly brown the tortillas, then filling them with seasoned beef and cheese before rolling them up like little warm presents.
My favorite part? The sizzle that filled the kitchen as they fried to a perfect golden brown! The best part was not just the eating (though that was certainly a highlight) but the stories shared around the table—stories of her childhood and mine, laughter and connection that lasted long after the plates were clean. These chimichangas weren’t just food; they were a symbol of home, comfort, and love. Now, I’m excited to share this joyful recipe with you so you can create those same happy memories in your kitchen!
Ingredients
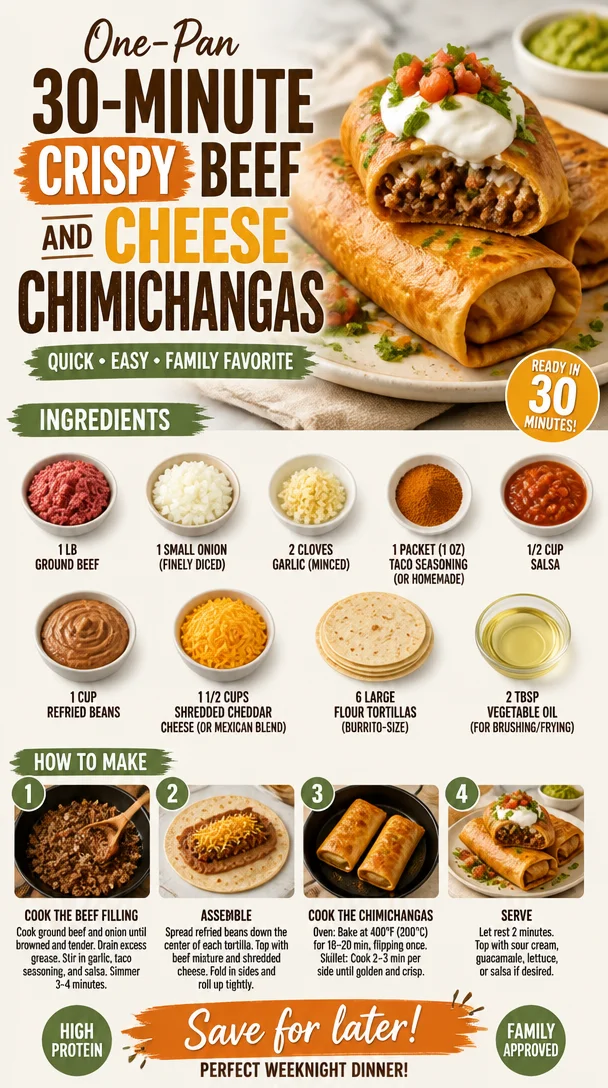
Here’s what you’ll need to make these irresistible Beef and Cheese Chimichangas:
-
1 lb ground beef
A classic filling that’s both hearty and satisfying. You can substitute with ground turkey or chicken for a lighter option. -
1 small onion (finely diced)
Onion adds great flavor and sweetness to the filling. If you’re in a pinch, you can use shallots or even onion powder. -
2 cloves garlic (minced)
Fresh garlic gives a beautiful aromatic touch. In a hurry? Garlic powder can serve in a pinch—just use about ½ teaspoon. -
1 packet (1 oz) taco seasoning (or homemade)
Taco seasoning brings a punch of flavor! You can either buy a packet or make your own with spices like cumin, chili powder, and paprika. -
½ cup salsa
Salsa adds moisture and tanginess. Feel free to use your favorite store-bought brand or homemade salsa for freshness! -
1 cup refried beans
These provide a creamy texture and a little protein boost! For a vegetarian option, you can substitute with black beans or additional veggies. -
1½ cups shredded cheddar cheese (or Mexican blend)
Cheese makes everything better! Feel free to experiment with other cheeses like Monterey Jack or even queso blanco. -
6 large flour tortillas (burrito-size)
A sturdy tortilla holds your fillings well. You can also opt for whole grain tortillas or corn tortillas if gluten is a concern. -
2 tbsp vegetable oil (for brushing/frying)
Oil creates that crispy texture we all crave. If you’re looking for healthier options, try using avocado oil or even baking them instead of frying!
Step-by-Step Instructions
Let’s get cooking! Follow these steps, and you’ll be enjoying delightful chimichangas in no time:
-
Cook the Beef Mixture
In a large skillet, heat a drizzle of oil over medium heat. Add the finely diced onion and sauté until soft and translucent (about 3-4 minutes). Then, add the minced garlic and cook for another minute until fragrant. -
Add the Ground Beef
Next, add your ground beef, breaking it apart with a spatula. Cook until browned and no longer pink (about 6-8 minutes). Don’t forget to drain any excess fat—nobody likes greasy chimichangas! -
Season the Beef
Once the beef is cooked, sprinkle your taco seasoning over it and mix well. Pour in the salsa and refried beans. Stir until combined and heated through. Let this savory mixture simmer for a couple of minutes, allowing the flavors to meld together beautifully. -
Add Cheese
Remove the skillet from heat and fold in 1 cup of the shredded cheese until it gets melty and gooey. This is where the magic happens! -
Prepare the Tortillas
Lay out your flour tortillas on a clean surface, and place about 1/3 cup of the beef mixture in the center of each one. Fold in the sides and then roll it up like a burrito, making sure it’s nice and snug—no one likes a leaky chimichanga! -
Fry or Bake?
Now, here comes the fun part! If you’re frying, heat vegetable oil in a large skillet over medium-high heat. Once hot, add the chimichangas seam side down and cook for about 3-4 minutes per side until they turn golden brown and crispy. If you prefer baking, brush them with a little oil and place them seam side down on a baking sheet in a preheated oven at 425°F (220°C) for 20-25 minutes, flipping halfway. -
Garnish and Serve
Once they’re perfectly golden, remove the chimichangas from the oil (or oven) and let them drain on a paper towel. Sprinkle any remaining cheese over the top while they’re still hot, and serve with your favorite sides!
Serving Suggestions
Now that you’ve made these crispy delights, it’s time to show them off! Place your chimichangas on a large, colorful platter and add toppings of your choice—think diced avocado, fresh cilantro, or a drizzle of sour cream. If you’re feeling fancy, a sprinkle of queso fresco or a squeeze of lime can elevate them even further. Enjoy them with a side of fresh salsa and chips, or serve them alongside a light salad for a balanced meal!
Recipe Variations
Don’t hesitate to get creative! Here are some fun twists you can try on these chimichangas:
- Vegetarian version: Swap the ground beef for a mixture of beans, lentils, and veggies such as bell peppers and zucchini for a hearty vegetarian option.
- Spicy kick: Add diced jalapeños or a splash of hot sauce to the filling for that extra heat!
- Cheesy delights: Mix in different cheeses like pepper jack for a bit of spice.
- Breakfast chimichangas: Fill them with scrambled eggs, spicy sausage, and cheese for a delicious breakfast treat!
- Sweet twist: Try a dessert version! Fill tortillas with nut butter, bananas, and chocolate chips, then fry and sprinkle with powdered sugar.
Chef’s Notes
Making chimichangas has always been a fun family affair in my kitchen. Sometimes I’ll invite friends over, and we’ll all take turns rolling them up, laughing and sharing stories about our cooking mishaps. Just the other day, I was trying a new folding technique I’d seen online, and it went all wrong—think of a comical kitchen disaster! But you know what? Even the mishaps lead to delicious outcomes. That’s the beauty of cooking!
As I’ve perfected this recipe over the years, I’ve learned that it’s all about having fun in the kitchen. Whether you’re making them for a special occasion or just a cozy weeknight dinner, know that the laughter and love you put into these chimichangas are the secret ingredients!
FAQs and Troubleshooting
1. My chimichangas fell apart while frying, what went wrong?
Make sure to roll them tightly and tuck in the sides as you roll to prevent leaks. If they’re not sealed well, they may break apart in the oil.
2. Can I make these ahead of time?
Absolutely! You can prepare the filling a day in advance and just roll and fry them when you’re ready. You could also freeze them after assembling—just fry directly from frozen, adding a couple of extra minutes to the cooking time.
3. Why are my chimichangas not crispy?
Ensure the oil is hot enough when you add the chimichangas—if it’s not, they tend to absorb the oil and become soggy. A proper frying temperature is key!
4. Can I bake chimichangas instead of frying?
Definitely! Baking is a healthier alternative. Just brush them with a little oil before placing them in the oven for that golden color.
Nutritional Info (if applicable)
These Beef and Cheese Chimichangas are hearty and fulfilling, making them a satisfying dinner option! On average, one chimichanga contains around 350–400 calories, depending on specific ingredient choices and portion sizes. Pair with veggies or a side salad to enhance your meal’s nutritional content.
So there you have it—everything you need to make your time in the kitchen unforgettable while enjoying every bite! I hope this Beef and Cheese Chimichanga recipe becomes a favorite in your own home, just like it is in mine. Happy cooking, and don’t forget to gather around your beautiful table with the people you love. Until next time, keep chasing those flavors!
PrintBeef and Cheese Chimichangas
Deliciously crispy chimichangas filled with seasoned ground beef and gooey cheese, perfect for family gatherings.
- Prep Time: 15 minutes
- Cook Time: 30 minutes
- Total Time: 45 minutes
- Yield: 6 servings 1x
- Category: Main Course
- Method: Frying or Baking
- Cuisine: Mexican
- Diet: None specified
Ingredients
- 1 lb ground beef
- 1 small onion (finely diced)
- 2 cloves garlic (minced)
- 1 packet (1 oz) taco seasoning
- ½ cup salsa
- 1 cup refried beans
- 1½ cups shredded cheddar cheese
- 6 large flour tortillas (burrito-size)
- 2 tbsp vegetable oil (for brushing/frying)
Instructions
- Cook the Beef Mixture: In a large skillet, heat a drizzle of oil over medium heat. Add the finely diced onion and sauté until soft and translucent (about 3-4 minutes). Then, add the minced garlic and cook for another minute until fragrant.
- Add the Ground Beef: Next, add your ground beef, breaking it apart with a spatula. Cook until browned and no longer pink (about 6-8 minutes). Don’t forget to drain any excess fat.
- Season the Beef: Once the beef is cooked, sprinkle taco seasoning over it and mix well. Pour in salsa and refried beans. Stir until combined and heated through.
- Add Cheese: Remove the skillet from heat and fold in 1 cup of the shredded cheese until it gets melty and gooey.
- Prepare the Tortillas: Lay out tortillas on a clean surface, and place about 1/3 cup of the beef mixture in the center of each. Fold in the sides and roll it up like a burrito.
- Fry or Bake: If frying, heat vegetable oil over medium-high heat and add chimichangas seam side down, cooking for about 3-4 minutes per side until golden brown. To bake, brush with oil and place seam side down on a baking sheet in a preheated oven at 425°F (220°C) for 20-25 minutes.
- Garnish and Serve: Once golden, remove chimichangas from the oil (or oven) and let drain on a paper towel. Sprinkle remaining cheese on top while hot and serve with your favorite sides.
Notes
Feel free to customize the filling with other ingredients or spices to suit your taste.
Nutrition
- Serving Size: 1 chimichanga
- Calories: 375
- Sugar: 3g
- Sodium: 500mg
- Fat: 20g
- Saturated Fat: 8g
- Unsaturated Fat: 7g
- Trans Fat: 0g
- Carbohydrates: 30g
- Fiber: 3g
- Protein: 20g
- Cholesterol: 60mg
Keywords: chimichangas, beef, cheese, Mexican cuisine, comfort food