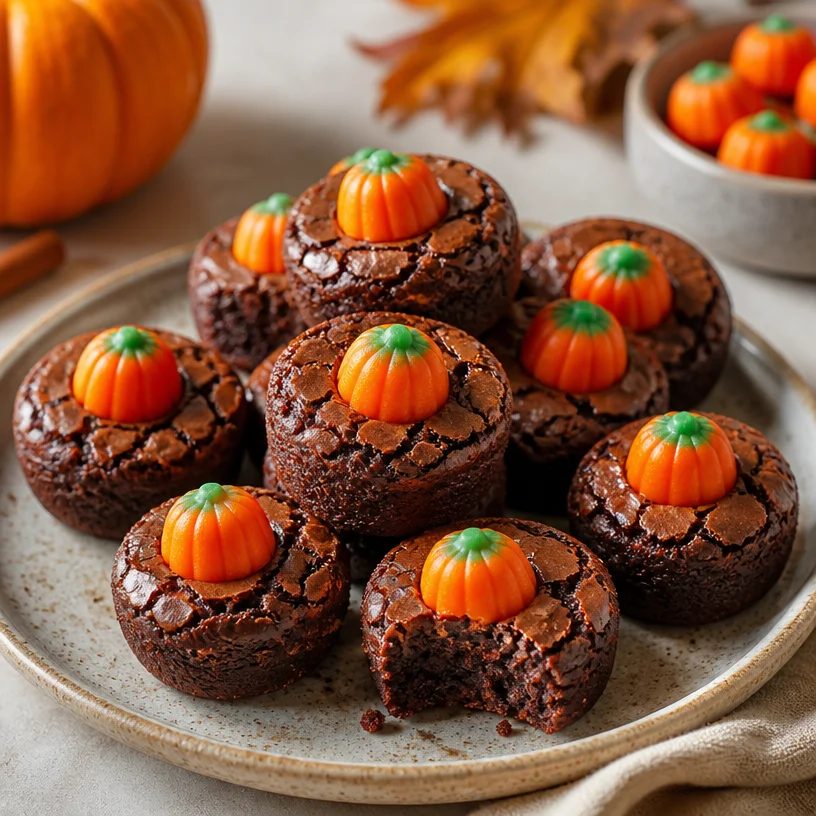
Pumpkin Brownie Bites: Quick Fall Treats for Busy Weeknights
Indulge in the Sweetness of Fall: Pumpkin Brownie Bites
Hello, fellow foodies! As the air turns crisp and the leaves begin to fall, there’s an undeniable shift that awakens my culinary curiosity. It’s the magical season of pumpkin spice, cozy sweaters, and heartwarming gatherings. Today, we’re diving into a delightful treat that brings together the rich, fudgy goodness of brownies with the festive charm of pumpkin: Pumpkin Brownie Bites.
Now, brownie lovers, get ready to elevate your dessert game! Picture this: fudgy brownie bites topped with adorable candy pumpkins, making them not just delicious but downright adorable. They’re perfect for autumn gatherings, Halloween parties, or just a cozy night in. Trust me, once you try these, you’ll want to make them a seasonal staple.
Let’s get started on this sweet adventure! Follow along as I guide you through my recipe, share some fun kitchen stories, and sprinkle in a few tips and tricks to ensure your pumpkin brownie bites come out perfectly every time.
A Slice of Nostalgia
I remember the first time I made brownies by myself. I must have been around 10 years old, pouring over my mom’s old recipe box, searching for the perfect dessert to surprise her after a long day. Little did I know I was setting the foundation for a lifelong love affair with chocolate!
As I mixed the ingredients together, there was something magical about watching that cocoa powder transform into a thick, velvety batter. The sweet aroma that filled the kitchen as they baked was pure heaven. Fast forward a few years to when the leaves turned golden and crisp—I discovered the intrigue of incorporating pumpkin into the mix. Even in the early days of my culinary journey, I understood the beauty of blending flavors and seasons.
Now, combining that childhood love of brownies with the creamy texture and warm spice of pumpkin feels like a celebration of all things cozy. With every bite, you’ll taste nostalgia, comfort, and a hint of seasonal magic. Let’s bring that feeling to life in your kitchen!
Ingredients
Here’s what you’ll need to whip up these delightful Pumpkin Brownie Bites:
-
1 cup unsweetened cocoa powder
A rich, dark cocoa powder yields the best flavor. If you’re in a pinch, you can substitute it with Dutch-process cocoa for a lighter touch. -
1 cup granulated sugar
This sweetens the brownies beautifully! For a twist, consider swapping half for brown sugar for a caramel-like complexity. -
1 cup all-purpose flour
Standard flour works best, but you can easily use a gluten-free mix if you’re accommodating those with dietary restrictions. Make sure it’s a blend specifically for baking. -
1/2 cup unsalted butter, melted
Butter adds a lovely richness to the brownies. You can substitute with coconut oil for a dairy-free option. -
3 large eggs
These give structure to your brownies. If vegan, consider using flax eggs (1 tablespoon ground flaxseed + 2.5 tablespoons water = 1 egg) instead. -
1 cup canned pumpkin puree
Look for pure pumpkin, not the spiced pie filling. This autumn staple adds moisture and flavor! -
1 teaspoon vanilla extract
Pure vanilla extract enhances all the flavors. For a fun twist, try using maple syrup instead. -
1 teaspoon baking powder
Ensures your brownies rise beautifully. If you’re out, baking soda can work as a substitute in half the amount. -
Pinch of salt
A little salt balances the sweetness. Trust me; it’s a game-changer! -
Candy pumpkins for decoration
These festive candies bring a pop of color and fun! Feel free to swap them with seasonal sprinkles or nuts for texture.
Step-by-Step Instructions
Now that we’ve gathered our ingredients, let’s bring these pumpkin brownie bites to life. Trust me, this process is just as enjoyable as the final product!
Step 1: Preheat and Prep
Preheat your oven to 350°F (175°C) and line a mini muffin tin with paper liners. If you don’t have liners, a quick spritz of non-stick spray will do the trick. This helps with easy removal later on!
Step 2: Mix Dry Ingredients
In a medium mixing bowl, whisk together the cocoa powder, granulated sugar, flour, baking powder, and salt. This step is crucial for ensuring that all the dry ingredients are well combined, promoting an even bake. Plus, it will smell heavenly!
Step 3: Blend Wet Ingredients
In another large bowl, combine your melted butter, eggs, pumpkin puree, and vanilla extract. Mix until everything is fully blended and looks smooth. This pumpkin mixture adds a warm, comforting element to your brownies.
Step 4: Combine
Pour the dry ingredients into the wet mixture and fold gently with a spatula. Be careful not to overmix; we just want everything to come together. If you see a few flour streaks—no worries! That little bit of flour will mix in when it bakes.
Step 5: Scoop and Fill
Using a small cookie scoop or spoon, fill each muffin tin cup about three-quarters of the way full. This way, they have room to rise while maintaining their bite-sized charm.
Step 6: Bake
Pop your tray into the preheated oven and bake for about 15 minutes. Keep an eye on them! You’ll know they’re ready when they puff slightly and a toothpick inserted comes out with a few moist crumbs—this will ensure that signature fudgy texture.
Step 7: Cool and Decorate
Let your brownie bites cool in the pan for 5-10 minutes before transferring them to a wire rack to cool completely. Once cooled, top each brownie with a candy pumpkin for that cute fall flair. Not only do they look great, but they add a sweet little crunch!
Serving Suggestions
To elevate your serving game, consider placing your pumpkin brownie bites on a beautiful platter adorned with autumn leaves or mini pumpkins. Drizzling a little chocolate ganache or a dusting of powdered sugar can add an extra touch of elegance. These treats can be a whimsical centerpiece at your next gathering, and trust me, they’ll disappear in a flash!
Recipe Variations
Don’t be afraid to experiment! Here are some fun twists to put your personal spin on these pumpkin brownie bites:
- Nutty Delight: Add chopped walnuts or pecans for a crunchy texture.
- Spiced Pumpkin: Mix in a teaspoon of pumpkin pie spice to intensify that fall flavor.
- Chocolate Chunk: Toss in some chocolate chips or chunks for a delightful melt-in-your-mouth experience.
- Frosted Bliss: Top them with a cream cheese frosting drizzle for a richer finish.
- Minty Fresh: Add a few drops of peppermint extract for a refreshing take when the holidays roll around.
Chef’s Notes
Every recipe tells a story, and this one is no exception! When I first combined pumpkin and brownie batter, it felt like magic in my kitchen. It’s incredible how two simple ingredients can create something so comforting and festive. Over the years, I’ve played around with spices and mix-ins, but the core joy of creating this treat has never changed. It’s like a hug in dessert form, and I can’t wait for you to experience that!
FAQs and Troubleshooting
Q1: My brownie bites are too dry. What happened?
A: This can happen if you overbake them. Be sure to check them a couple of minutes before the recommended time. The brownies will continue to set as they cool.
Q2: Can I use fresh pumpkin instead of canned?
A: Absolutely! Just make sure to cook and puree it, then drain out any excess moisture so your brownies don’t turn out soggy.
Q3: How do I ensure my brownie bites are fudgy?
A: Keep an eye on the baking time and don’t overmix the batter. Less mixing leads to a denser, fudgier texture!
Q4: Can I freeze these brownie bites?
A: Yes! They freeze wonderfully. Just ensure they’re in an airtight container, and they’ll keep for up to three months. Thaw them at room temperature before enjoying!
Nutritional Info
While I’m all about indulgence, I believe in balance too! These treats bring joy and are best enjoyed in moderation. A rough estimate is around 100 calories per brownie bite, depending on toppings and variations.
So there you have it! A fall-inspired treat that will bring warmth and joy to your gatherings and celebrations. I hope you feel inspired to tie on your apron and create these delightful Pumpkin Brownie Bites. Just remember, cooking should be fun, lighthearted, and always filled with love.
Let’s make something special together this season! Happy baking, and I can’t wait to hear how your pumpkin brownie bites turn out!
PrintPumpkin Brownie Bites
Delightfully fudgy brownie bites infused with pumpkin and topped with candy pumpkins, perfect for autumn gatherings.
- Prep Time: 15 minutes
- Cook Time: 15 minutes
- Total Time: 30 minutes
- Yield: 24 servings 1x
- Category: Dessert
- Method: Baking
- Cuisine: American
- Diet: Vegetarian
Ingredients
- 1 cup unsweetened cocoa powder
- 1 cup granulated sugar
- 1 cup all-purpose flour
- 1/2 cup unsalted butter, melted
- 3 large eggs
- 1 cup canned pumpkin puree
- 1 teaspoon vanilla extract
- 1 teaspoon baking powder
- Pinch of salt
- Candy pumpkins for decoration
Instructions
- Preheat your oven to 350°F (175°C) and line a mini muffin tin with paper liners.
- Mix together the cocoa powder, granulated sugar, flour, baking powder, and salt in a medium mixing bowl.
- Blend melted butter, eggs, pumpkin puree, and vanilla extract in another bowl until smooth.
- Combine the dry ingredients into the wet mixture and fold gently.
- Scoop and fill each muffin tin cup about three-quarters full.
- Bake in the preheated oven for about 15 minutes.
- Cool in the pan for 5-10 minutes before transferring to a wire rack and decorating with candy pumpkins.
Notes
For a vegan option, use flax eggs instead of regular eggs. You can also try using brown sugar for a caramel-like complexity.
Nutrition
- Serving Size: 1 brownie bite
- Calories: 100
- Sugar: 8g
- Sodium: 50mg
- Fat: 5g
- Saturated Fat: 2.5g
- Unsaturated Fat: 2.5g
- Trans Fat: 0g
- Carbohydrates: 13g
- Fiber: 1g
- Protein: 1g
- Cholesterol: 30mg
Keywords: pumpkin, brownies, fall dessert, Halloween treats, cozy baking
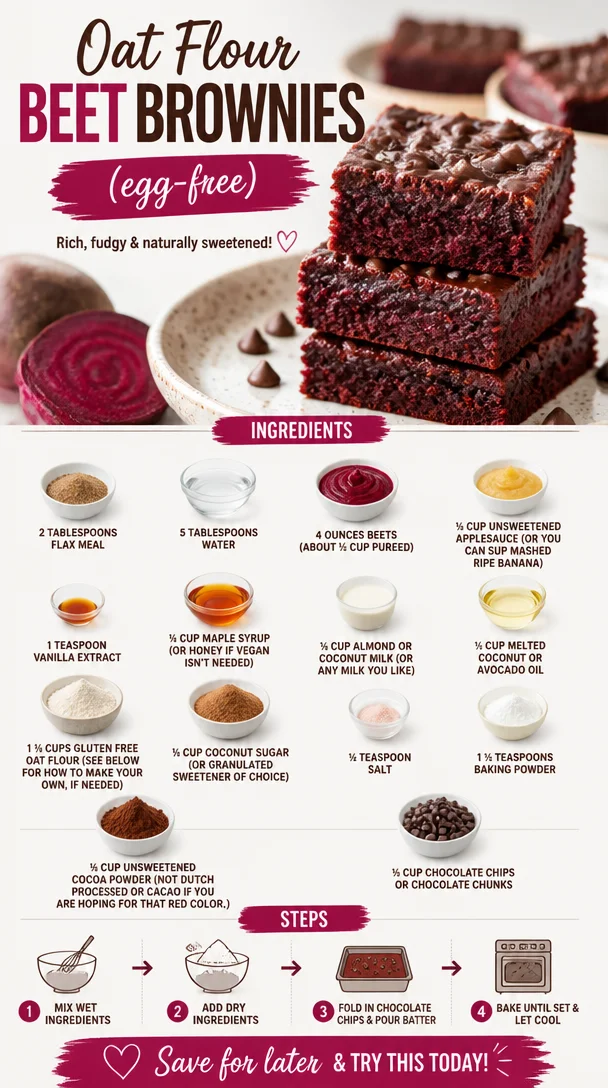
Oat Flour Beet Brownies (egg-free)
Oat Flour Beet Brownies: A Delicious Egg-Free Delight
Welcome to another delightful culinary adventure! Today, we’re diving into a recipe that combines the rich, fudgy goodness of brownies with the vibrant earthiness of beets. If you’ve ever wondered how to create a dessert that’s both indulgent and nutritious, look no further. These Oat Flour Beet Brownies are not only egg-free but also gluten-free, making them a fantastic option for friends and family with dietary restrictions or for anyone looking to enjoy a healthier treat. So, let’s roll up our sleeves, tie on our aprons, and bring some sweetness to our day!
A Taste of Nostalgia
Let me take you back to one of my fondest kitchen memories—baking brownies with my grandmother on rainy afternoons. The kitchen would fill with the rich aroma of chocolate, and we’d swap secrets about the best chocolate chips. But here’s the kicker—she had a quirky habit of sneaking in “mystery” ingredients that sent me on a detective quest to uncover hidden flavors. I remember finding out she added beet puree to her brownies for a subtle sweetness and a more decadent texture. At first, I wasn’t convinced. I thought, “Beets in brownies? No way!” But as soon as I had that first bite, I was hooked!
That’s the beauty of cooking—finding surprises that not only taste amazing but also nourish us. Finding creative, nutritious ways to enjoy sweets led me to perfect this Oat Flour Beet Brownies recipe. Don’t worry, I promise no one will guess that these decadently rich delights contain veggies! Grab your beets, and let’s get started!
Ingredients
Here’s what you’ll need to create these fabulous brownies—simple ingredients that you can easily find at your local grocery store. Each element plays a crucial role, so let’s break it down:
-
2 tablespoons flax meal: This is our egg replacer! When mixed with water, flax meal forms a gel that binds the brownies beautifully. For a bit of crunch, try using ground chia seeds as an alternative.
-
5 tablespoons water: This hydrates our flax meal, allowing it to work its binding magic. Simple, right?
-
4 ounces beets (about ½ cup pureed): Beets add natural sweetness and moisture, giving us that gorgeous fudgy texture. Canned beets work well here; just be sure they’re unsweetened!
-
½ cup unsweetened applesauce: This not only sweetens the batter but keeps the brownies moist. You can substitute it with mashed ripe banana for a different flavor.
-
1 teaspoon vanilla extract: A splash of vanilla enhances the chocolate flavor. You might even experiment with almond extract for a nutty twist!
-
¼ cup maple syrup: This natural sweetener adds depth to our brownie batter. If you’re not concerned about keeping it vegan, honey is a fine substitute.
-
¼ cup almond or coconut milk: Either works just fine; choose your favorite dairy or non-dairy milk!
-
¼ cup melted coconut or avocado oil: This adds a luscious quality and keeps the brownies moist. If that’s not your style, you can replace it with melted butter (non-vegan option).
-
1 ¼ cups gluten-free oat flour: You can easily make your own by blending rolled oats until fine! This is the base of our brownies.
-
¼ cup coconut sugar: This adds caramel notes to the sweetness. Granulated sugar will work too if that’s what you have on hand.
-
¼ teaspoon salt: Just a pinch enhances all flavors—even sweet ones!
-
1 ½ teaspoons baking powder: This helps our brownies rise a bit, making them fluffy yet fudgy.
-
¼ cup unsweetened cocoa powder: Key for that deep chocolate flavor. Make sure it’s not Dutch processed—we want to maintain that beautiful reddish color from the beets.
-
⅓ cup chocolate chips or chocolate chunks: Because you can never have too much chocolate! Feel free to use dairy-free options if you want to keep these vegan.
Step-by-Step Instructions
Ready to get your hands dirty? Here’s a simple guide to whip up your Oat Flour Beet Brownies. Each step includes some pro tips to make sure you’re on the right path!
-
Preheat Your Oven:
- Start by preheating your oven to 350°F (175°C). This ensures even baking, giving you perfectly fudgy brownies.
-
Prepare the Flax Egg:
- In a small bowl, combine the flax meal and water. Stir it well and let it sit for about 10 minutes. This is your egg substitute, and it’ll set nicely while we prep the other ingredients.
-
Combine the Wet Ingredients:
- In a large mixing bowl, add your pureed beets, applesauce, vanilla extract, maple syrup, almond or coconut milk, and melted coconut or avocado oil. Use a whisk to blend everything until it’s well combined and smooth. Feel free to get creative with flavors here—perhaps add a splash of coffee if you dare!
-
Mix in the Flax Egg:
- Once the flax mixture has thickened, fold it into the wet mixture. Give it a gentle stir, incorporating all those fabulous ingredients.
-
The Dry Ingredients Come Next:
- In another bowl, mix the oat flour, coconut sugar, salt, baking powder, and cocoa powder. Stir these together to ensure even distribution of the cocoa. This step is crucial!
-
Combine Wet and Dry:
- Gradually add the dry mixture to the wet ingredients, stirring until everything is just combined. Overmixing can lead to dense brownies, which isn’t the goal. The batter should be thick yet pourable.
-
Fold in the Chocolate Chips:
- Gently fold in your chocolate chips or chunks. This adds welcome pockets of melty goodness throughout your brownies.
-
Prepare Your Baking Dish:
- Line an 8×8 square baking pan with parchment paper or lightly grease it. This will help you lift the brownies out later, making for easy slicing!
-
Bake Those Brownies:
- Pour the batter into your prepared pan, spreading it evenly. Pop that masterpiece in the oven and bake for about 25–30 minutes. To test for doneness, insert a toothpick in the center—the brownies should seem set but moist without wet batter clinging to the toothpick.
-
Cool and Cut:
- Let the brownies cool in the pan for about 10–15 minutes before transferring them to a wire rack to cool completely. This final step is important—cooling enhances the flavor and texture!
Serving Suggestions
To serve these beauties, slice them into squares or rectangles—personal preference here! Dust them lightly with powdered sugar for a classic touch, or drizzle with melted chocolate for added flair. A scoop of vanilla ice cream on the side can elevate the experience! For a personal touch, consider garnishing with fresh mint or a sprinkle of sea salt for that extra wow factor. Whatever you choose, these brownies are bound to impress!
Recipe Variations
Want to mix things up? Here are a few variations to keep your brownies exciting:
-
Nutty Chocolate Brownies: Add ½ cup of chopped nuts (like walnuts or pecans) for extra texture and a wholesome crunch.
-
Spicy Choco-Brownies: Add a pinch of cayenne pepper or chili powder to the batter for a surprising kick.
-
Minty Delight: Stir in a few drops of peppermint extract for a refreshing mint chocolate flavor.
-
Choco-Coconut Swirl: Add shredded coconut to the batter or top the brownies with toasted coconut flakes.
-
Fruit Fusion: Toss in some chopped hazelnuts and dried cherries for a pop of flavor.
Chef’s Notes
These brownies have a special place in my heart because they embody the spirit of creativity in the kitchen! I started experimenting with veggie-based desserts to make treats healthier without compromising on taste. Each batch explores the balance between sweet and earthy, transforming ingredients like beets from the garden into something incredible. The first time I served these at a dinner party, guests were astounded when they discovered they were made with beets! If that’s not a kitchen success story, I don’t know what is!
FAQs and Troubleshooting
-
Can I replace the oat flour with all-purpose flour?
- Technically you can, but it might change the texture. Oat flour gives a lovely chewiness and is gluten-free, which suits many diets. If you use all-purpose flour, you may need to adjust the liquid.
-
My brownies came out too dense. What did I do wrong?
- Overmixing after adding the flour can lead to dense brownies. Just mix until everything is combined, and remember to bake right until your toothpick comes out clean or with a few moist crumbs.
-
How do I store leftovers?
- These brownies keep well in an airtight container in the fridge for about a week. You can also freeze them for longer storage—just make sure to wrap them tightly!
-
What if I don’t have flax meal?
- No worries! You can use chia seeds ground in a blender or food processor to make a "chia egg" as an alternative binder in the recipe.
Nutritional Info
While I don’t typically include nutritional info because it varies based on major brands and products used, I can confidently say these brownies provide a wholesome treat rich in fiber, antioxidants from the beets, and healthy fats from the coconut oil.
Ready to bake? Embrace your inner chef, gather those ingredients, and whip up a batch of these divine Oat Flour Beet Brownies. Dough may stick to your fingers and chocolate might smear across your palm, but once you take that first, glorious bite, you’ll agree—it’s all worth it! Happy baking!
PrintOat Flour Beet Brownies
Indulge in these light and fudgy Oat Flour Beet Brownies that are egg-free and gluten-free, perfect for a nutritious dessert.
- Prep Time: 15 minutes
- Cook Time: 30 minutes
- Total Time: 45 minutes
- Yield: 12 servings 1x
- Category: Dessert
- Method: Baking
- Cuisine: American
- Diet: Vegan, Gluten-Free
Ingredients
- 2 tablespoons flax meal
- 5 tablespoons water
- 4 ounces beets (about ½ cup pureed)
- ½ cup unsweetened applesauce
- 1 teaspoon vanilla extract
- ¼ cup maple syrup
- ¼ cup almond or coconut milk
- ¼ cup melted coconut or avocado oil
- 1 ¼ cups gluten-free oat flour
- ¼ cup coconut sugar
- ¼ teaspoon salt
- 1 ½ teaspoons baking powder
- ¼ cup unsweetened cocoa powder
- ⅓ cup chocolate chips or chocolate chunks
Instructions
- Preheat your oven to 350°F (175°C).
- Combine the flax meal and water in a small bowl; let it sit for about 10 minutes.
- Add the pureed beets, applesauce, vanilla extract, maple syrup, almond or coconut milk, and melted oil into a mixing bowl and whisk until smooth.
- Mix in the flax egg once it has thickened.
- Stir together the oat flour, coconut sugar, salt, baking powder, and cocoa powder in another bowl.
- Combine the dry ingredients with the wet mixture until just mixed.
- Fold in the chocolate chips or chunks.
- Prepare an 8×8 square baking pan by lining it with parchment paper.
- Bake for about 25-30 minutes or until a toothpick comes out mostly clean.
- Cool the brownies in the pan before transferring them to a wire rack to cool completely.
Notes
For a classic touch, dust with powdered sugar or drizzle with melted chocolate before serving.
Nutrition
- Serving Size: 1 brownie
- Calories: 200
- Sugar: 12g
- Sodium: 150mg
- Fat: 8g
- Saturated Fat: 6g
- Unsaturated Fat: 2g
- Trans Fat: 0g
- Carbohydrates: 30g
- Fiber: 3g
- Protein: 4g
- Cholesterol: 0mg
Keywords: vegan brownies, healthy dessert, gluten-free sweets, chocolate beets
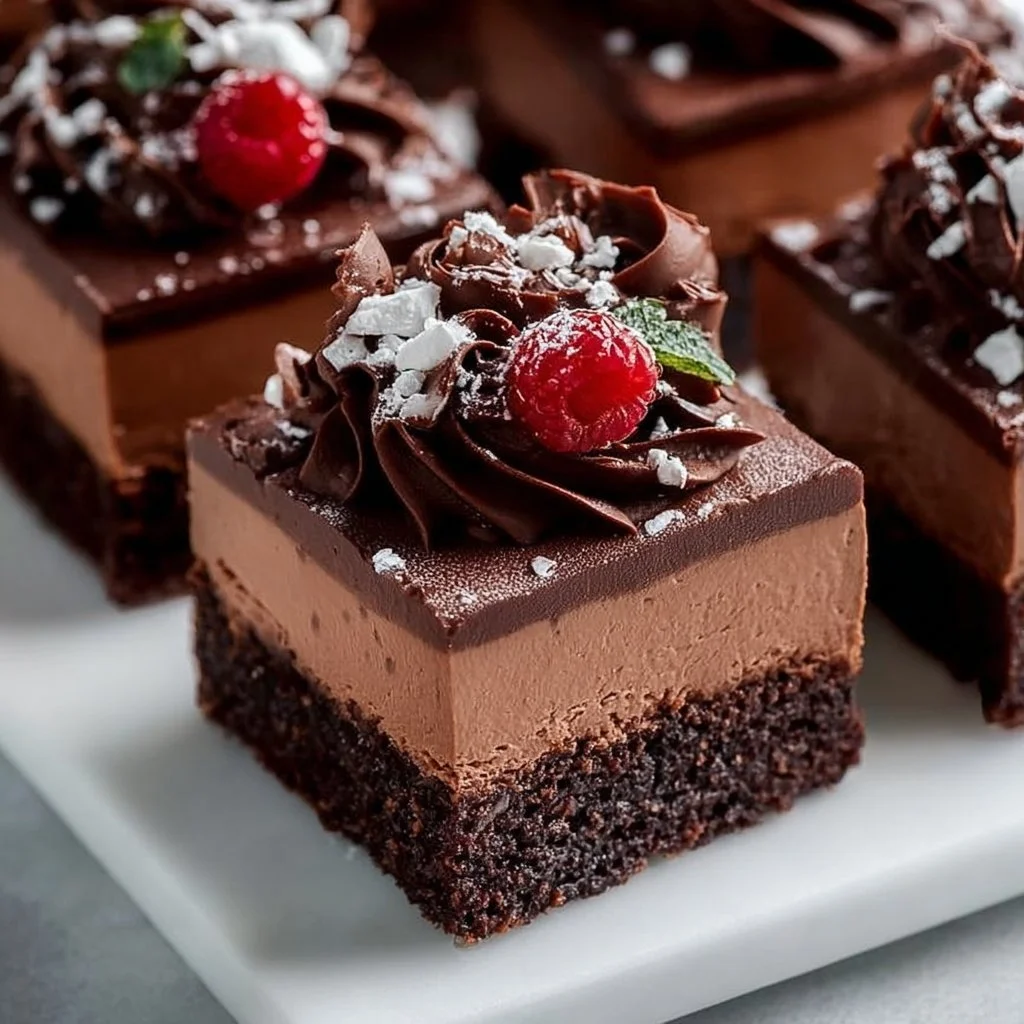
Chocolate Mousse Brownies
Indulge in Decadence: Chocolate Mousse Brownies Recipe
Welcome, fellow food lovers! Today, we’re diving into one of life’s simplest pleasures: chocolate. More specifically, we’re bringing together two crowd-pleasers in a luscious combination that will leave you weak in the knees—because nothing makes a bad day better than a rich, fudgy chocolate mousse brownie. Trust me; the only thing more tempting than the idea of these brownies is the act of making them.
When we think chocolate, we often imagine the sweet, silky taste melting in our mouths. But have you ever considered the magic of pairing rich brownies with an airy chocolate mousse? It’s pure alchemy in the kitchen, one that I fell in love with at a young age.
Let me take you on a little journey through my life: picture me as a young girl, smeared in flour and cocoa powder, bouncing around the kitchen as I tried to recreate my grandmother’s brownie recipe. As I stirred and combined, I’d sneak in bites of the mousse I had whipped up, only to find that blending the two could create something extraordinary! I remember the joy of serving my family these decadent treats and their wide-eyed amazement as they took their first bite. The laughter and smiles that surrounded the table are memories I cherish deeply, and are the essence behind why I share my recipes with you today.
Ingredients
Let’s gather our ingredients to create this chocolatey delight! Each one plays an essential role in crafting your perfect brownies:
-
1 cup unsweetened cocoa powder: This will be the base of our chocolate flavor. Opt for Dutch-processed cocoa for a richer taste, or substitute with an equal amount of carob powder for a caffeine-free version.
-
1 cup all-purpose flour: This provides structure. You can replace it with gluten-free flour to keep things friendly for those with dietary needs.
-
1 cup granulated sugar: For sweetness! Brown sugar can be used for a deeper flavor, but note that it may change the texture slightly.
-
1/2 cup unsalted butter, melted: This adds richness and moisture; coconut oil is a great dairy-free substitute.
-
3 large eggs: They bind everything together and contribute to the chewy texture. For a vegan option, use flax eggs (1 tablespoon ground flaxseed + 2.5 tablespoons water = 1 egg).
-
1 teaspoon vanilla extract: A must for elevating the overall flavor. If you’re out, almond extract makes a wonderful substitute.
-
1/2 cup heavy cream: This is for the mousse layer. If you need dairy-free, coconut cream works beautifully.
-
4 ounces semisweet chocolate, chopped: The star of the mousse! You can use dark chocolate if you prefer a more intense flavor, or swap with a flavored chocolate for a fun twist.
-
1/2 cup powdered sugar: To sweeten the mousse. For a lower sugar option, consider using stevia or another sugar substitute.
-
1/2 teaspoon salt: Salt enhances the sweetness of chocolate — trust me on this one! If you’re watching your sodium intake, a pinch of sea salt will do nicely.
Step-by-Step Instructions
Now, let’s get to the fun part: making our chocolate mousse brownies! Follow these steps for brownie bliss:
-
Preheat Your Oven: Preheat your oven to 350°F (175°C). This is the best way to ensure your brownies bake evenly and come out perfectly chewy. Don’t forget to line an 8×8-inch baking pan with parchment paper for easy removal!
-
Mix the Wet Ingredients: In a mixing bowl, whisk together the melted butter, granulated sugar, and vanilla extract until well combined. The mixture should look smooth and glossy. Make sure your butter isn’t too hot; warm is perfect but avoid cooking the eggs when you add them next.
-
Add the Eggs: Crack in the three large eggs and whisk until fully incorporated. You want the mixture to become a light, shiny batter. I have a little trick: after adding the eggs, whisk until the batter lightens a couple of shades to bring air into the mixture—this will result in a fluffier brownie.
-
Combine the Dry Ingredients: In another bowl, sift together the cocoa powder, flour, and salt. Sifting helps aerate the cocoa and flour, taking away any lumps for a smooth brownie. Gradually fold the dry ingredients into the wet mixture using a rubber spatula. Be gentle! Overmixing can create tough brownies. Stop when you no longer see dry flour.
-
Bake the Brownies: Pour your brownie batter into the prepared pan, smoothing it out with your spatula. Bake for 25-30 minutes, or until a toothpick inserted into the center comes out with moist crumbs (not wet batter). Ovens can vary, so keep an eye on them past the 25-minute mark.
-
Prepare the Chocolate Mousse: While the brownies are baking, it’s mousse time! Heat the heavy cream in a small saucepan over medium heat until just simmering. Pour it over the chopped semisweet chocolate in a mixing bowl and let stand for 5 minutes. This allows the chocolate to melt evenly.
-
Whisk Together: After 5 minutes, whisk the chocolate and cream together until smooth. Then beat in the powdered sugar until it’s creamy and luscious. This is where you can taste-test — quality control is crucial, my friends!
-
Chill the Mousse: Once mixed, refrigerate the mousse for about 30 minutes. It helps to thicken and sets up beautifully.
-
Assemble the Treat: Once the brownies are cool, spread the chocolate mousse evenly on top. You can get creative here; consider using a piping bag for a beautiful presentation!
-
Chill Again: This sweet delight benefits from a little more chilling. Place the brownies back in the fridge for at least an hour to set the mousse nicely before slicing.
Serving Suggestions
Now that you’ve created these divine chocolate mousse brownies, it’s time to serve them up right! Slice them into generous squares and serve them on a beautiful platter. For an elegant touch, dust with a bit of powdered sugar and a sprig of fresh mint. I also love pairing them with a scoop of vanilla ice cream or whipped cream—because, let’s be honest, chocolate deserves a companion!
Recipe Variations
Get creative with these brownies! Here’s how to put your spin on them:
-
Nutty Brownies: Fold in chopped nuts like walnuts or pecans into the brownie batter for added crunch.
-
Mint Chocolate Mousse: Add a few drops of peppermint extract to the mousse for a refreshing mint flavor that pairs perfectly with chocolate.
-
Fruit Topper: Fresh raspberries or strawberries on top of the mousse add a gorgeous pop of color and a little acidity to balance the richness.
-
Spicy Chocolate: Add a pinch of cayenne or chili powder to the brownie mix for a surprising kick that married beautifully with chocolate.
-
Vegan Delight: Follow earlier substitutions for a fully vegan recipe while adding silken tofu blended into the mousse for a creamy texture.
Chef’s Notes
This recipe has followed me through the years and has definitely evolved. I started with instant chocolate pudding mixed into the brownie batter (hey, we all have to learn somewhere!). But over time, I honed my skills and discovered that from-scratch mousse makes all the difference in flavor and texture!
If you ever find you’ve made a mess of the kitchen while creating (and believe me, I have!), just remember this: the messy ones often produce the most delicious results. And when all else fails, know that you can throw on a bit of powdered sugar for "decoration."
FAQs and Troubleshooting
1. My brownies came out cakey! What did I do wrong?
Overmixing can introduce too much air into the batter, leading to a cakey texture. Or, you may have baked them too long. Keep an eye on them after 25 minutes!
2. My mousse is too runny; how can I fix this?
This could be due to not letting the chocolate cool enough before mixing in the cream. Chill the mousse for a bit longer, and it’ll firm up beautifully.
3. The brownies stuck to the pan! Help!
Make sure you’ve lined your pan with parchment paper, and don’t skip the butter or oil to help them release easily.
4. Can I make the mousse ahead of time?
Absolutely! You can prepare the mousse a day in advance and store it in the fridge. Just give it a quick stir before spreading it on the brownies.
Nutritional Info
If you’re wondering about the nutritional value of these luscious brownies, here’s a quick breakdown (per serving, based on 16 servings):
- Calories: 300
- Total Fat: 18g
- Saturated Fat: 10g
- Cholesterol: 75mg
- Total Carbohydrates: 35g
- Dietary Fiber: 2g
- Sugars: 24g
- Protein: 4g
And there you have it! Chocolate mousse brownies that hit the sweet spot in every way. Whether you’re enjoying them at a dinner party, date night, or just a cozy evening at home, these brownies will surely impress. So, tie on your apron, friends, and dive into this sweet adventure — because life is too short for anything less than phenomenal desserts. Happy baking!
PrintChocolate Mousse Brownies
Indulge in the decadent combination of rich brownies topped with airy chocolate mousse for a delicious dessert.
- Prep Time: 15 minutes
- Cook Time: 30 minutes
- Total Time: 45 minutes
- Yield: 16 servings 1x
- Category: Dessert
- Method: Baking
- Cuisine: American
- Diet: Vegetarian
Ingredients
- 1 cup unsweetened cocoa powder
- 1 cup all-purpose flour
- 1 cup granulated sugar
- 1/2 cup unsalted butter, melted
- 3 large eggs
- 1 teaspoon vanilla extract
- 1/2 cup heavy cream
- 4 ounces semisweet chocolate, chopped
- 1/2 cup powdered sugar
- 1/2 teaspoon salt
Instructions
- Preheat your oven to 350°F (175°C).
- Mix the melted butter, granulated sugar, and vanilla extract until smooth.
- Add the eggs and whisk until fully incorporated.
- Combine the cocoa powder, flour, and salt in another bowl.
- Fold the dry ingredients into the wet mixture using a rubber spatula.
- Bake the brownie batter in the prepared pan for 25-30 minutes.
- Prepare the mousse by heating heavy cream until simmering, then pour over chopped chocolate.
- Whisk the chocolate and cream until smooth, then stir in powdered sugar.
- Chill the mousse for about 30 minutes.
- Assemble the mousse layer on top of the cooled brownies and chill again for at least an hour.
Notes
For variations, consider adding nuts, mint extract, or fruit on top.
Nutrition
- Serving Size: 1 brownie
- Calories: 300
- Sugar: 24g
- Sodium: 200mg
- Fat: 18g
- Saturated Fat: 10g
- Unsaturated Fat: 8g
- Trans Fat: 0g
- Carbohydrates: 35g
- Fiber: 2g
- Protein: 4g
- Cholesterol: 75mg
Keywords: brownies, chocolate mousse, dessert, baking, sweets