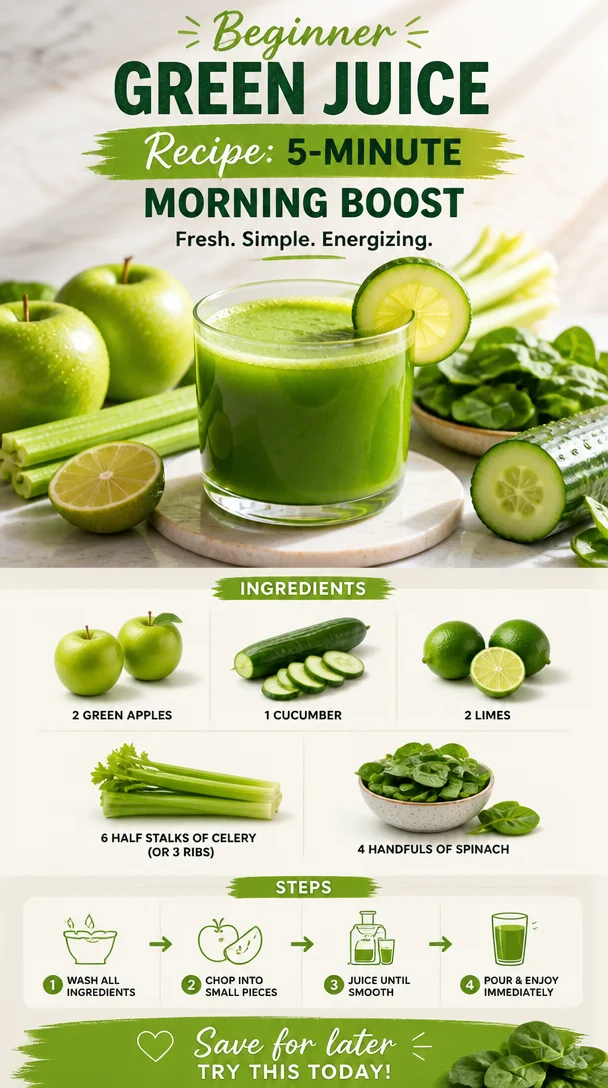
Beginner Green Juice Recipe: 5-Minute Morning Boost
The Ultimate Green Juice Recipe for Beginners: Fresh, Vibrant, and Packed with Goodness
Hello, fellow food lovers! Let’s dive into something refreshingly green: a delicious and nutrient-packed green juice that’s perfect for beginners. You know, that feeling when you’re too busy to sit down for a full meal, but you still want to get your daily dose of vitamins and minerals? That’s where green juice comes in — it’s like a garden in a glass!
This Green Juice Recipe is incredibly simple yet bursting with flavor and health benefits. Whether you’re looking to kickstart your morning, refresh after a workout, or simply add some greens into your day without the fuss, this juice is here to save the day. Trust me, once you try it, you’ll feel like a kitchen wizard, conjuring up magic in your blender!
Now, I’ll be your guide every step of the way — like a friendly fairy godmother of green goodness. So, roll up those sleeves, grab your apron (maybe even one that’s not too pristine!), and let’s get started.
A Trip Down Memory Lane: My First Green Juice Adventure
I still remember the first time I ever tried green juice. It was a bright summer day, and my best friend Lisa invited me over for a health kick. I was skeptical — "Celery and spinach in a drink? No thanks!" she gently insisted, coaxing me to take a sip of this bizarre concoction. And let me tell you, that first taste was a revelation. The bright green hue was like liquid sunshine, and to my surprise, it was refreshing and invigorating!
That day not only ignited my love for green juices, but it also cemented a beloved routine between Lisa and me. We ended up juicing together every Sunday afternoon. We swapped stories, laughter, and secrets of the kitchen while turning simple ingredients into vibrant elixirs. Now, green juice feels like a hug in a glass for me. And I hope to inspire you to form your own juicy traditions!
Ingredients for the Green Juice
Here’s what you’ll need for our refreshing green juice:
-
2 Green Apples: These add a natural sweetness and a wonderful zing. Feel free to substitute with other apple varieties like Fuji for a sweeter taste or Granny Smith for extra tartness.
-
1 Cucumber: Refreshing and hydrating, cucumbers are a perfect base ingredient. If you’re out of cucumbers, you can use zucchini or even celery for a different texture.
-
2 Limes (juiced): Their bright acidity brings the juice to life! If you’re in a pinch, you can use lemons instead, or even omit the citrus if you like it mellow.
-
6 Half Stalks of Celery (or 3 ribs): Celery provides a crisp texture and light flavor. It’s also great for hydration! No celery? No worries! You could substitute with kale for extra greens.
-
4 Handfuls of Spinach: Spinach is nutrient-dense and blends beautifully. If you want to mix things up, try kale or Swiss chard for a slightly different flavor profile.
Step-by-Step Instructions
-
Prepare Your Ingredients:
- Wash your fruits and veggies thoroughly. Remember, we want the freshest taste! Remove any stickers from the apples and chop them into quarters. No need to peel them; the skin is where a lot of nutrients are! Slice the cucumber into manageable pieces as well.
-
Juice the Apples and Cucumber:
- If you’re using a juicer, toss in the apple quarters and cucumber slices. If you don’t have a juicer, you can use a blender instead! Just blend them with a little water to help it blend smoothly.
-
Add Celery and Spinach:
- Next, add the celery and spinach to your juicer/blender. If you’re using a blender, you might want to add another splash of water to keep things moving. The green leaves and crunchy celery will enhance the freshness!
-
Squeeze in Lime Juice:
- After extracting the juice, don’t forget about those limes! Squeeze the juice from each lime right into the green mixture. It adds a lovely brightness that cuts through the sweetness.
-
Mix and Taste:
- If using a juicer, you might need to stir your juice a bit. In the case of a blender, pour the juice through a fine mesh strainer or cheesecloth into a large bowl or pitcher. This will separate the fiber from the liquid. You can skip this step if you love a thicker juice!
-
Serve and Enjoy:
- Pour your vibrant green juice into a glass and sip it right away for all those fabulous nutrients. Garnish with a slice of lime or an apple wedge for a pretty presentation!
Pro Tips:
-
Chill Your Ingredients: For an extra refreshing drink, chill your ingredients beforehand or serve over ice.
-
Experiment with Flavor: Don’t be afraid to play around with the ratios! If you’re feeling adventurous, throw in a small piece of ginger or a handful of fresh mint for a unique twist.
Serving Suggestions
Presentation matters! Pour your beautiful green juice into clear glasses to showcase that vibrant color. Consider serving with a colorful straw or alongside a light snack, like a handful of nuts or some whole grain crackers, for a lovely, balanced refreshment experience. Even a sprig of mint on top can elevate your serving!
Recipe Variations
Here are a few fun twists you can give your green juice:
-
Tropical Green Juice: Add pineapple or mango for a tropical flair that will transport you to summer vibes!
-
Herbal Boost: Toss in a handful of fresh basil or cilantro for a herbal kick!
-
Green Smoothie: Want to make it thicker? Toss in half a banana or a scoop of your favorite yogurt (dairy or non-dairy) for a smoothie-style treat.
-
Spicy Green Juice: Add a slice of jalapeño for a spicy kick that wakes up your taste buds!
-
Vegan Protein Boost: A scoop of plant-based protein powder can turn this juice into a satiating post-workout drink.
Chef’s Notes
This green juice recipe has evolved from those early kitchen experiments with Lisa. We started with whatever greens were in the fridge. Sometimes, we added herbs, sometimes we ended up with fruit combinations that made us laugh (like watermelon with spinach — note to self: it was not the best!). My advice? Embrace the process! Don’t worry if it doesn’t look perfect — what matters is that it tastes good, and you’re going to benefit from those healthy ingredients.
FAQs and Troubleshooting
1. Why is my juice foamier than expected?
Juicing fruits and veggies, especially leafy greens, can create foam due to air being incorporated. If you prefer a smoother juice, let it sit for a few moments, then skim off the foam before serving.
2. Can I store the juice for later?
Fresh juice is best consumed immediately for optimal nutrients. However, you can store it in an airtight container in the fridge for up to 24 hours. Just remember to give it a good shake before enjoying!
3. My juice tastes bitter; what went wrong?
Bitterness can sometimes come from using too much celery or over-juicing bitter greens like kale. Try balancing the flavor with more sweet fruits like apples, or a little extra lime or cucumber.
4. How do I clean my juicer/blender?
For easy cleaning, rinse immediately after use! If using a juicer, most parts are dishwasher safe. For blenders, blend a little soapy water for a few seconds, then rinse!
Nutritional Info (if applicable)
Plus, this green juice is not just delicious — it’s packed with nutrients! It contains antioxidants from apples, hydration from cucumbers, vitamins A and K from spinach, and nutrients from celery — making it a wonderful addition to a balanced diet.
So there you have it: a beginner-friendly green juice recipe that’s easy, flavorful, and downright invigorating! I hope this inspires you to step into the kitchen and create something you can sip on with joy. Happy juicing! 🍏🥒
PrintThe Ultimate Green Juice Recipe for Beginners
A delicious and nutrient-packed green juice that’s perfect for beginners, bursting with flavor and health benefits.
- Prep Time: 10 minutes
- Cook Time: 0 minutes
- Total Time: 10 minutes
- Yield: 2 servings 1x
- Category: Beverage
- Method: Juicing
- Cuisine: American
- Diet: Vegan
Ingredients
- 2 Green Apples
- 1 Cucumber
- 2 Limes (juiced)
- 6 Half Stalks of Celery (or 3 ribs)
- 4 Handfuls of Spinach
Instructions
- Prepare your ingredients: Wash your fruits and veggies thoroughly and chop apples into quarters. Slice the cucumber.
- Juice the apples and cucumber: Use a juicer or blender to blend with a little water if needed.
- Add celery and spinach: Blend or juice them in, adding water if necessary for a smooth mixture.
- Squeeze in lime juice: Add fresh lime juice for brightness.
- Mix and taste: Stir the juice if using a juicer or strain through a fine mesh strainer if using a blender.
- Serve and enjoy: Pour into a glass and garnish with lime or apple.
Notes
Chill your ingredients beforehand for a refreshing drink. Experiment with flavors by adding ginger or mint.
Nutrition
- Serving Size: 1 serving
- Calories: 150
- Sugar: 20g
- Sodium: 100mg
- Fat: 0g
- Saturated Fat: 0g
- Unsaturated Fat: 0g
- Trans Fat: 0g
- Carbohydrates: 35g
- Fiber: 3g
- Protein: 3g
- Cholesterol: 0mg
Keywords: green juice, healthy drink, juicing, vegan smoothie, beginner recipe

Pink Salt Diet Drink
Sip Your Way to Wellness: The Pink Salt Diet Drink
Hey there, fellow foodies and health enthusiasts! 🌼 Today, let’s dive into something refreshing, easy, and surprisingly beneficial for your wellness journey: the Pink Salt Diet Drink. This drink is not just another health trend but a delightful way to stay hydrated while giving your body a little boost. You may be surprised to learn that the humble pink Himalayan salt, with its gorgeous rosy hue, can benefit your health in various ways—anything from balancing hydration to supporting digestion.
Now, I know what you’re thinking: how can something as simple as salt and water be beneficial? Well, my friend, this isn’t just any salt. Pink Himalayan salt, mined from the mountains of Pakistan, is packed with minerals—over 80, to be exact! These essential minerals work harmoniously to help maintain your body’s pH and electrolyte balance while promoting fluid retention and proper hydration.
Imagine sipping on a warm glass of this magical drink in the morning, giving your body a gentle wake-up call as you soak in the hydration and minerals. You might want to add a splash of lemon juice or a drizzle of honey for flavor—make it your own! So, roll up your sleeves, and let’s whip up this delightful drink together. You’ll be amazed at how something so simple can make you feel so good!
Personal Story
Let’s rewind to a sun-kissed morning a few years ago. I remember sitting at my kitchen table with a splash of morning sun casting rays across my countertop, creating a warm and inviting atmosphere. My grandma always had a ritual she loved to share with me on lazy weekend mornings: sipping a glass of warm water with a pinch of salt to start the day. It was her version of a "wellness tonic," a practice she passed down from her grandmother.
At the time, I thought it was just a quirk of her generation, but I patiently listened as she explained its benefits—hydration, mineral balance, and even digestion! We would often chat about our plans for the day while I helped her squeeze the lemons for some zest. Little did I know that years later, this simple tradition would evolve into my fondness for the Pink Salt Diet Drink. Now, every time I sip on this magical mixture, I can hear her cheerful voice guiding me with kitchen wisdom. It’s not just a drink; it’s a warm embrace of nostalgia and a reminder to treat our bodies well.
Ingredients
Here’s what you’ll need to make this simple yet powerful drink:
-
1 teaspoon Pink Himalayan salt
- Chef Insight: This vibrant salt is different from regular table salt—it contains trace minerals that can help with hydration and electrolyte balance. You can find it at most grocery stores or online! If you don’t have pink salt, sea salt or kosher salt can be a workable substitute, but you’ll lose some of that gorgeous color and mineral benefits.
-
1 glass of warm water
- Substitution Tip: Use filtered water for the best taste and health benefits—bottled or tap water works, but warm water soothes the body and aids absorption. If you prefer keeping it cold, you can chill the drink after mixing, but warmth is key for the best effects.
-
1 tablespoon lemon juice (optional)
- Chef Insight: This adds a delightful tang and vitamin C. Freshly squeezed lemon juice is ideal, but if you have bottled lemon juice on hand, that works too! If citrus isn’t your thing, you can skip this altogether, although it does enhance the taste and health benefits.
-
Honey or natural sweetener (to taste, optional)
- Substitution Tip: If you like your drink a bit sweeter, drizzle in some honey, maple syrup, or agave. For a low-calorie option, try stevia or any other natural sweetener you prefer. Just be cautious not to overdo it; you want to enjoy the taste of the salt too!
Step-by-Step Instructions
-
Start with Your Ingredients
Gather and measure out your ingredients so you’re set up for success. Having everything at hand makes the process so much more enjoyable and allows you to focus on creating magic! -
Warm Your Water
Boil a kettle or heat a small pot of water until it’s comfortably warm—like a cozy blanket for your body! Don’t let it come to a boil; just remember: it should be warm but not scalding hot. That way, when you take a sip, it feels soothing on your throat. -
Mix in the Pink Himalayan Salt
Pour the warm water into a glass and add one teaspoon of pink Himalayan salt. Stir gently until the salt is completely dissolved. You should see a delightful swirl of color as the salt dissolves—like a little artistic moment in your day! If you’re a visual learner, keep an eye on that color change. -
Add Lemon Juice
If you’re opting for that zesty kick, now is the time to squeeze in a tablespoon of fresh lemon juice. Mix again! The brilliant acidity of the lemon will enhance the drink’s flavor and add even more nutrients. Citrus is a fabulous friend for digestion—a lovely sidekick to your salt. -
Sweeten It Up (Optional)
Taste your concoction. If you’d like to sweeten it, drizzle in a little honey or your choice of sweetener. Stir until everything is well combined. You want a slight sweetness to balance the salty flavor. Just remember: a little goes a long way! -
Serve and Enjoy!
Take a moment to pause, inhale the aroma, and appreciate your creation before taking that first sip. This drink is best enjoyed slowly, allowing your body to absorb those nutrients and savor the flavors.
Serving Suggestions
Serve your pink salt diet drink in your favorite glass for an extra touch of elegance! You might consider garnishing with a lemon wedge or a sprig of fresh mint for a beautiful presentation. If you enjoyed bringing friends together around the table, let them sip a glass too—you might just start a wholesome morning ritual together!
Recipe Variations
-
Citrus Salt Boost: Add a splash of orange or grapefruit juice for a delightful citrus medley!
-
Herbal Harmony: Infuse your drink with fresh herbs like mint or basil for an aromatic twist that feels refreshing.
-
Spicy Tang: For the adventurous, a pinch of cayenne pepper can ignite your senses and add a spicy kick!
-
Chilled Treat: Allow the drink to chill in the fridge for a refreshing summer evening sip.
-
Electrolyte Combo: Blend in a pinch of potassium-packed coconut water for an added hydration boost!
Chef’s Notes
You know, each time I make this drink, I can’t help but reflect on all the different variations and experiences I’ve had with it over the years. From cozy mornings alone at home to sunny patio brunches with friends, it seems to bring people together. I’ve played around with flavors and tried it numerous ways. There was that one time I topped it with a touch of ginger—which was a game-changer!
It’s interesting how simple ingredients can evolve together in different recipes while holding onto their foundational health benefits. Whether you prefer going classic or fancy, this drink is your canvas.
FAQs and Troubleshooting
-
What if the salt doesn’t dissolve completely?
If you’re having trouble getting the salt to dissolve, try stirring it in a bit longer or using water that’s hotter. Occasionally, the size of the salt crystals can affect how quickly they dissolve! -
Can I use regular table salt instead?
Yes, although I recommend staying true to pink Himalayan salt for the mineral benefits and its unique flavor—it really makes a difference in the drink’s essence! -
Is it safe to drink this daily?
For most people, a daily salt water drink is safe if done in moderation. It’s important to listen to your body—if you have any medical conditions that limit salt intake, consult with your healthcare provider. -
Why does my drink taste too salty?
You may have accidentally added too much salt or didn’t balance it with enough water. Feel free to adjust the salt level to your taste, starting with half a teaspoon if needed, and gradually increasing.
Nutritional Info (if applicable)
While specific nutritional calculations can vary, here’s a quick overview of what you’re getting from your pink salt diet drink:
- Hydration Boost: Warm water helps with digestion and hydration throughout the day.
- Electrolytes: Pink Himalayan salt is rich in minerals, which help maintain hydration and manage electrolyte levels.
- Antioxidant Benefits: Fresh lemon juice adds vitamin C and antioxidants, promoting overall health and well-being.
And there you have it—a beautiful, simple Pink Salt Diet Drink, complete with memories, tips, and variations to suit your personal flair! I’m excited for you to try this out and make it your own. Remember, cooking is all about experimentation and joy. So tie on that apron, pour yourself a glass, and let the wellness journey begin! Cheers to vibrant health and delightful flavors! 🥂
PrintPink Salt Diet Drink
A refreshing and beneficial drink made with pink Himalayan salt, warm water, and optional lemon juice or honey for flavor.
- Prep Time: 5 minutes
- Cook Time: 0 minutes
- Total Time: 5 minutes
- Yield: 1 serving 1x
- Category: Beverage
- Method: Mixing
- Cuisine: Health Drink
- Diet: Vegetarian
Ingredients
- 1 teaspoon Pink Himalayan salt
- 1 glass of warm water
- 1 tablespoon lemon juice (optional)
- Honey or natural sweetener (to taste, optional)
Instructions
- Gather your ingredients so you’re set up for success.
- Boil a kettle or heat a small pot of water until it’s comfortably warm.
- Pour the warm water into a glass and add one teaspoon of pink Himalayan salt. Stir gently until dissolved.
- Squeeze in a tablespoon of fresh lemon juice if desired.
- Taste your concoction and sweeten with honey or natural sweetener if preferred.
- Pause to appreciate your creation before taking a sip.
Notes
Enjoy variations like adding citrus juice or fresh herbs for added flavor!
Nutrition
- Serving Size: 1 serving
- Calories: 50
- Sugar: 5g
- Sodium: 400mg
- Fat: 0g
- Saturated Fat: 0g
- Unsaturated Fat: 0g
- Trans Fat: 0g
- Carbohydrates: 12g
- Fiber: 0g
- Protein: 0g
- Cholesterol: 0mg
Keywords: pink salt drink, wellness drink, hydration, healthy beverage, pink Himalayan salt