
Healthy Low Carb Chicken Broccoli Casserole
# Healthy Low Carb Chicken Broccoli Casserole: A Comforting Classic with a Twist

## Introduction

Hello, lovely food lovers! Welcome to my kitchen, where the aroma of deliciously prepared meals fills the air and every dish tells a story. Today, I'm thrilled to share one of my all-time favorites: **Healthy Low Carb Chicken Broccoli Casserole**. This dish isn't just another casserole; it's an epitome of comfort food that celebrates nutrition without sacrificing flavor. Whether you’re on a low-carb diet, looking for a quick weeknight meal, or aiming to impress your guests, this casserole checks all the boxes!

Imagine a cozy evening spent with family or friends, laughter echoing around the dinner table while this creamy, cheesy goodness fills your plates. The combination of tender chicken, vibrant green broccoli, and a sprinkle of cheesy goodness creates not only a delightful dish but also a snapshot of cherished moments spent around the table.

At Ivory Apron, I believe that every meal is an opportunity to create memories, and this casserole is perfect for that! So, roll up those sleeves and dust off your apron—let's dive into the heart of this wholesome yet indulgent recipe!

## Personal Story

The first time I made chicken broccoli casserole was during a chilly fall evening in college. My best friend, Sarah, and I were crammed into our tiny apartment kitchen, determined to whip up something magical with the random ingredients we had on hand. With limited funds and even fewer cooking skills, we grabbed some rotisserie chicken, a bag of frozen broccoli, and a hodgepodge of spices from the cupboard.

As we mixed everything together, the kitchen filled with laughter and the occasional “oops!” as we tried to navigate our way around the recipe. When it finally came out of the oven, bubbling and golden, we served it up on mismatched plates while enjoying a glass of the cheapest wine we could find! That night, the casserole was more than just food; it represented friendship, creativity, and the magic that happens when you put love into cooking. I’ve since worked on perfecting the recipe, swapping out high-carb ingredients for healthier ones, making it not only delicious but good for you!

## Ingredients

Here’s what you’ll need to make this fabulous **Healthy Low Carb Chicken Broccoli Casserole**. Let’s break it down:

- **2 cups cooked chicken, shredded**: You can use leftover rotisserie chicken or poach your chicken breasts. Need a quick sub? Turkey works great as well!

- **2 cups broccoli florets, steamed**: Fresh or frozen broccoli will do the trick. If you're feeling adventurous, try swapping it out for cauliflower or asparagus for a different taste.

- **1 cup shredded cheese (like cheddar or mozzarella)**: Cheese adds creaminess and flavor. Prefer a lighter option? Use part-skim mozzarella or a dairy-free cheese for a vegan version.

- **1 cup sour cream or Greek yogurt**: This adds creaminess and tang. Greek yogurt is the healthier choice, packed with protein. You can also try cottage cheese blended until smooth for a similar texture.

- **1 teaspoon garlic powder**: A great way to introduce flavor without being overpowering. If you prefer fresh, minced garlic works too!

- **1 teaspoon onion powder**: Another essential flavor booster that makes the casserole sing.

- **Salt and pepper to taste**: Season to your preference. Remember, seasoning is key!

- **1/2 cup grated Parmesan cheese (optional)**: Adds a delish crust on top! If you’re looking for a gluten-free option, make sure to check your cheese label.

- **1 tablespoon olive oil or butter (for greasing the casserole dish)**: Olive oil is a heart-healthy choice, but if you want a richer flavor, butter is the way to go!

## Step-by-Step Instructions

Ready to get cooking? Here’s how to put together this yummy casserole, step-by-step:

### 1. Preheat the Oven

Preheat your oven to 350°F (175°C). This step is crucial for even cooking—no one likes a cold center in their casserole!

### 2. Prepare the Ingredients

While your oven is warming up, gather your ingredients and get everything ready. If your chicken isn't shredded yet, do that now! Use two forks or your hands to shred it into bite-sized pieces. Also, steam your broccoli florets until they are bright green and just tender—around 2-3 minutes if using the microwave (just don't overcook them).

### 3. Grease the Casserole Dish

Grab a 9x13-inch casserole dish and coat it with olive oil or butter to prevent sticking. A little grease goes a long way, ensuring that your creamy casserole comes out effortlessly.

### 4. Mix the Ingredients

In a large mixing bowl, combine the shredded chicken, steamed broccoli, shredded cheese, sour cream or Greek yogurt, garlic powder, onion powder, salt, and pepper. Stir until everything is well incorporated. Pro tip: Use a spatula to fold the mixture gently to avoid breaking the broccoli florets further—nobody wants a mushy casserole!

### 5. Transfer to Casserole Dish

Scoop the mixture into your greased casserole dish and spread it evenly. This is where you can get creative: smooth it out with your spatula for that lovely surface area that will get all toasty in the oven.

### 6. Top with Parmesan

If you're feeling cheesy (and who isn't?), sprinkle the grated Parmesan on top for a wonderful golden crust. It’s a showstopper and adds an extra layer of flavor!

### 7. Bake It Up

Slide your casserole into the preheated oven and let it bake for about 30-35 minutes or until it's bubbly and golden on top. You’ll know it’s ready when you see that lovely cheese crust. Keep an eye on it—your kitchen will smell divine, and you might just accidentally start drooling!

### 8. Let It Rest

Once out of the oven, let your casserole sit for about 5-10 minutes. I know it’s hard to resist the tantalizing aroma, but letting it rest will help it firm up a bit, making it easier to serve.

## Serving Suggestions

Now it's the moment of truth! Serve your casserole straight from the dish, and don't be shy with those portions. A sprinkle of fresh herbs, like parsley or basil, on top adds a beautiful pop of color and freshness. Pairing it with a light salad or some crusty low-carb bread makes for a satisfying meal. Bon appétit!

## Recipe Variations

Looking to spice things up? Here are some creative twists you can try:

- **Add Spices**: Toss in some red pepper flakes for a kick or smoked paprika for a warm undertone.
- **Vegetable Medley**: Incorporate other veggies like spinach, bell peppers, or mushrooms for added nutrients and flavors.
- **Different Proteins**: Swap chicken with cooked shrimp or ground turkey for a change of pace.
- **Cheese Swap**: Experiment with different cheeses like pepper jack for extra heat or Swiss for a milder flavor.
- **Low-Carb Crust**: For a crispy topping, mix crushed pork rinds or almond flour with cheese as a substitute for traditional breadcrumbs.

## Chef’s Notes

Ah, this casserole has a special place in my heart. It has evolved from a college concoction to something special I serve during gatherings with friends and family. Sometimes I swap the broccoli for seasonal vegetables, and it never fails to surprise and delight! Plus, I love that it’s a one-dish wonder, which means less cleanup—yay!

If you ever catch yourself with leftover casserole (not likely!), it reheats beautifully and can be frozen for a rainy day. Trust me, you'll want to keep this recipe in your arsenal!

## FAQs and Troubleshooting

**1. Can I use raw chicken in the casserole?**
While pre-cooked chicken gives the best results, you can use raw chicken. Just ensure to cook it for about 45-50 minutes in the oven at 350°F (175°C).

**2. What if my casserole is too watery?**
If your casserole comes out watery, it may be due to excess moisture in the broccoli. Ensure to fully steam and drain the broccoli before adding it to the mixture. You can also add a tablespoon of flour or cornstarch to help thicken it.

**3. How should I store leftovers?**
Store any leftovers in an airtight container in the fridge for up to 3-4 days. To reheat, simply pop it back in the oven or microwave until warmed through.

**4. Is this dish kid-friendly?**
Absolutely! The creamy cheese and chicken make it appealing to kids, and the broccoli adds a nutritious crunch. You might even want to swap the broccoli for their favorite vegetable!

## Nutritional Info

(If applicable, this section can be created based on standard nutritional guidelines for the recipe. Here is a simple example that can be expanded upon.)

- Calories: Approximately 350 per serving
- Protein: 30g
- Carbohydrates: 8g
- Fat: 20g
- Fiber: 3g

---

And there you have it—your delicious and healthy low carb chicken broccoli casserole, ready to impress! I hope you'll invite your loved ones to join you on this culinary journey. Let’s create beautiful memories together because every meal counts. Enjoy your cooking adventure!

Happy Feasting,
Savannah Pierce
Healthy Low Carb Chicken Broccoli Casserole

A delicious and nutritious low-carb chicken and broccoli casserole that is creamy and comforting.
- Prep Time: 15 minutes
- Cook Time: 35 minutes
- Total Time: 50 minutes
- Yield: 4 servings 1x
- Category: Main Course
- Method: Baking
- Cuisine: American
- Diet: Low Carb
Ingredients
- 2 cups cooked chicken, shredded
- 2 cups broccoli florets, steamed
- 1 cup shredded cheese (like cheddar or mozzarella)
- 1 cup sour cream or Greek yogurt
- 1 teaspoon garlic powder
- 1 teaspoon onion powder
- Salt and pepper to taste
- 1/2 cup grated Parmesan cheese (optional)
- 1 tablespoon olive oil or butter (for greasing the casserole dish)
Instructions
- Preheat your oven to 350°F (175°C).
- Prepare your ingredients by shredding the chicken and steaming the broccoli until bright green.
- Grease a 9×13-inch casserole dish with olive oil or butter.
- Mix the chicken, steamed broccoli, cheese, sour cream or Greek yogurt, garlic powder, onion powder, salt, and pepper in a large bowl.
- Transfer the mixture to the greased casserole dish and spread it evenly.
- Top with grated Parmesan cheese if desired.
- Bake for about 30-35 minutes or until bubbly and golden.
- Let the casserole sit for 5-10 minutes before serving.
Notes
Pair with a light salad or low-carb bread for a complete meal. This dish is kid-friendly and can be adapted with different veggies or proteins.
Nutrition
- Serving Size: 1 serving
- Calories: 350
- Sugar: 3g
- Sodium: 400mg
- Fat: 20g
- Saturated Fat: 10g
- Unsaturated Fat: 8g
- Trans Fat: 0g
- Carbohydrates: 8g
- Fiber: 3g
- Protein: 30g
- Cholesterol: 80mg
Keywords: chicken, broccoli, casserole, low carb, healthy, comfort food

The Best Keto Brownie Recipe
The Best Keto Brownie Recipe: Indulge Without the Guilt
Hey there, lovely foodies! Today, we’re diving into a world of rich chocolatey goodness with a twist — a Keto Brownie recipe that will elevate your dessert game without the carb crash. Now, I know what you might be thinking: "Keto? Brownies? How can that possibly be delicious?" Trust me, my friend, I am here to assure you that these brownies are not only delicious but are also super easy to whip up!
When I first embarked on my culinary journey, I stumbled upon the idea of Keto cooking. I was intrigued by the challenge of creating decadent desserts without the traditional carbs. And then, out of sheer curiosity (and perhaps a craving for something a little sweet!), I made my first batch of Keto brownies. The kitchen filled with the warm, inviting scent of chocolate, and the result? Pure magic! Each bite was fudgy, rich, and utterly satisfying. I’m getting goosebumps just thinking about it!
So, whether you’re on a Keto journey, just looking to cut back on carbs, or craving something delightful, this recipe is here to save the day. Grab your apron and let’s make something that not only satisfies your sweet tooth but also allows you to enjoy a guilt-free treat!
Personal Story
Let me take you back to one of my fondest culinary memories. It was a rainy Saturday afternoon, and I had invited a few close friends over for a cozy gathering. We dished out hot tea and warm blankets while the soundtrack of the rain tickled our eardrums. My mission? To impress them with a homemade dessert.
Now, brownies were always a staple in my dessert repertoire. But this time, I wanted to switch things up, embrace the Keto lifestyle, and surprise everyone with a healthier yet delicious alternative. I set to work, heart racing with excitement, as I melted butter and whisked cocoa powder. Soon, the kitchen was alive with laughter and delightful chaos, friends peering over my shoulder to grab a taste of the batter.
When I finally cut into those gooey, chocolatey brownies, the room fell silent. The first bite brought smiles that said it all – I’d created something special. That day, we didn’t just enjoy dessert; we forged moments, sharing stories and laughter that would linger long after the last crumb had disappeared. And ever since, these Keto brownies have become my secret weapon for gatherings, proving that delicious treats can indeed be crafted with care and intention!
Ingredients
Now, let’s gather our star players for this mouthwatering Keto brownie recipe. Here’s what you’ll need:
-
1/2 cup almond flour
A fantastic low-carb alternative to traditional flour, almond flour provides a nutty flavor and moist texture to our brownies. If you don’t have almond flour, coconut flour can work, but use half the amount. -
1/2 cup cocoa powder
This is where the chocolate magic happens! Use unsweetened cocoa powder for that rich, deep chocolate flavor. If you’re a fan of dark chocolate, choose a higher cocoa percentage. -
1/4 cup erythritol (or your preferred sweetener)
Erythritol is a fantastic zero-calorie sweetener that mimics sugar’s sweetness without the carbohydrates. You can swap it out for other low-carb sweeteners like monk fruit or stevia; just check the conversion guidelines as sweetness levels vary. -
1/4 cup unsalted butter, melted
Butter adds richness and depth to the flavor. If you’re looking for a dairy-free option, coconut oil works beautifully here too! -
2 large eggs
Eggs bind the ingredients and give our brownies that delightful fudgy texture. If you’re vegan, flax eggs (1 tablespoon flaxseed meal mixed with 2.5 tablespoons water) can be an alternative. -
1 teaspoon vanilla extract
A dash of vanilla always enhances the flavor of chocolate. Use pure vanilla extract for the best results; it brings warmth and complexity to the recipe. -
1/2 teaspoon baking powder
This is our rising agent that helps create that lovely, soft texture. Ensure your baking powder is fresh for the best rise! -
1/4 teaspoon salt
A pinch of salt balances sweetness and brings out the flavor of the chocolate, so don’t skip this step!
Step-by-Step Instructions
Now that we have our ingredients ready, let’s get cooking! Here’s how to make these decadent Keto brownies step by step.
-
Preheat the Oven
Preheat your oven to 350°F (175°C). You want it nice and warm, setting the stage for our brownies to come to life! -
Prepare the Pan
Grab an 8×8 inch baking dish and line it with parchment paper, allowing some overhang. This will make it easy to lift the brownies out later. Lightly grease the parchment with a bit of coconut oil or cooking spray to prevent sticking. -
Combine the Dry Ingredients
In a medium bowl, whisk together the almond flour, cocoa powder, erythritol, baking powder, and salt. This ensures all of those dry ingredients are evenly distributed, creating a uniform batter. Plus, who doesn’t love the airy texture of freshly whisked dry goods? -
Mix the Wet Ingredients
In another bowl, beat the eggs, melted butter, and vanilla extract together until well combined. You want this mixture to be homogenous, giving you a rich base for your brownies. -
Blend It All Together
Gradually add the dry ingredients into the wet mixture. Stir gently to combine and form a thick batter. It’s okay if there are a few lumps; just ensure all the dry bits are incorporated! -
Pour and Spread
Transfer the brownie batter into your prepared baking dish, using a spatula to spread it evenly. Don’t be shy with that spatula — smooth it out for a beautiful finish! -
Bake
Pop the dish into your preheated oven and let it bake for 20–25 minutes. Your kitchen will soon be filled with the enchanting aroma of chocolate wafting through the air! -
Check for Doneness
The brownies are done when a toothpick inserted into the center comes out with a few moist crumbs (not wet batter!). This ensures that fudgy texture we’re after. If the toothpick comes out clean, you’ve overcooked them slightly. -
Cool and Slice
Let the brownies cool in the pan for about 10–15 minutes before lifting them out using the parchment paper. Place them on a wire rack to cool completely for the best slicing experience. Trust me, patience here pays off!
Serving Suggestions
Once your brownies have cooled, it’s time to serve up these delicious morsels. Cut into squares or bars, and for that extra flair, dust a little unsweetened cocoa powder on top or add a dollop of whipped cream (sweetened with a bit of erythritol, of course!). Serve them warm with a scoop of low-carb vanilla ice cream for an indulgent treat your friends will rave about!
Recipe Variations
Feeling adventurous? Here are a few creative twists you can try:
- Nutty Crunch: Fold in some chopped nuts like walnuts or pecans for added texture and flavor.
- Chocolate Chips: Stir in sugar-free chocolate chips if you want that extra gooeyness!
- Minty Fresh: Add a few drops of peppermint extract for a refreshing mint brownie twist.
- Spicy Kick: A pinch of cayenne or cinnamon can add a warm kick to your brownies.
- Swirls of Cream Cheese: Before baking, dollop cream cheese batter over the top and swirl it in for a cheesecake brownie hybrid!
Chef’s Notes
Over the years, this recipe has evolved to become my go-to treat for all occasions. Initially, I played around with different types of sweeteners, exploring what worked best for sweetness and texture. After a dozen variations, I settled on erythritol as the perfect fit.
Oh, and let me tell you about the time I invited some friends over for a game night and accidentally swapped the almond flour for coconut flour. The look on everyone’s faces when they took a bite was priceless! Surprise! Turns out that a dense coconut brownie wasn’t what I was aiming for. We laughed it off, but my friends have never let me live down that “experiment!”
FAQs and Troubleshooting
1. My brownies turned out dry. What went wrong?
Overbaking can easily dry out brownies. Make sure to check them a few minutes before the recommended baking time.
2. Can I use regular sugar instead of erythritol?
Absolutely! If you’re not concerned about carbs and prefer regular sugar, just substitute it in a 1:1 ratio — but remember, this won’t be Keto anymore.
3. Why are my brownies crumbly?
If your batter was too dry or you used too much almond flour, this might be the case. Ensure precise measurements, and remember, a little bit of wet will go a long way in keeping those brownies fudgy!
4. How do I store leftovers?
Store your brownies in an airtight container at room temperature for up to three days or in the fridge for a week. They also freeze well, so feel free to stash some away for later!
In the world of desserts, Keto brownies prove that you don’t have to sacrifice taste for health. So go ahead, whip up a batch, celebrate with friends, and relish the joy that comes from baking something truly special. Remember, good food isn’t just about the meal; it’s about the magic of sharing moments and creating memories. Happy baking, my fellow foodies! 🍫✨
PrintThe Best Keto Brownie Recipe: Indulge Without the Guilt

Delicious and fudgy Keto brownies that satisfy your sweet tooth without the carbs.
- Prep Time: 15 minutes
- Cook Time: 25 minutes
- Total Time: 40 minutes
- Yield: 16 servings 1x
- Category: Dessert
- Method: Baking
- Cuisine: American
- Diet: Keto, Gluten-Free
Ingredients
- 1/2 cup almond flour
- 1/2 cup cocoa powder
- 1/4 cup erythritol (or your preferred sweetener)
- 1/4 cup unsalted butter, melted
- 2 large eggs
- 1 teaspoon vanilla extract
- 1/2 teaspoon baking powder
- 1/4 teaspoon salt
Instructions
- Preheat your oven to 350°F (175°C).
- Grab an 8×8 inch baking dish and line it with parchment paper.
- In a medium bowl, whisk together the almond flour, cocoa powder, erythritol, baking powder, and salt.
- In another bowl, beat the eggs, melted butter, and vanilla extract together until well combined.
- Gradually add the dry ingredients into the wet mixture and stir gently to combine.
- Transfer the brownie batter into your prepared baking dish and smooth it out with a spatula.
- Pop the dish into your preheated oven and let it bake for 20–25 minutes.
- Check for doneness with a toothpick; it should come out with a few moist crumbs.
- Let the brownies cool for about 10–15 minutes before lifting them out and cooling completely on a wire rack.
Notes
Serve with a dusting of cocoa or whipped cream. Great for gatherings and can be stored for up to a week in an airtight container.
Nutrition
- Serving Size: 1 piece
- Calories: 150
- Sugar: 1g
- Sodium: 150mg
- Fat: 12g
- Saturated Fat: 5g
- Unsaturated Fat: 7g
- Trans Fat: 0g
- Carbohydrates: 8g
- Fiber: 3g
- Protein: 4g
- Cholesterol: 50mg
Keywords: Keto brownies, low-carb dessert, chocolate dessert, fudgy brownies

Best Keto Chicken Recipes
The Best Keto Chicken Recipes: Your Ultimate Guide to Flavorful Dinners
Welcome to the wonderful world of keto cooking, where flavor and health unite! Today, we’re diving into the best keto chicken recipes that will have your taste buds dancing while keeping you on track with your dietary goals. Whether you’re a seasoned cook or just starting to explore the benefits of keto, I’m here to walk you through every delicious step.
Why Chicken on Keto?
Chicken is a fantastic protein source that’s naturally low in carbohydrates, making it perfect for a ketogenic lifestyle. It’s versatile, easy to prepare, and can turn an ordinary weeknight dinner into a spectacular feast. Plus, there’s something comforting about a hearty chicken dish that warms the heart and fills the belly. So grab that apron, and let’s get started!
My Personal Story: The Night I Cracked the Perfect Spice Blend
I have to tell you about the first time I perfectly nailed my spice blend for roasted chicken. It was a cozy December evening, and friends were coming over to celebrate the holidays. The house was filled with the scent of fresh pine and the sound of crackling logs in the fireplace. I remember bustling around the kitchen—an eclectic mix of excitement and nervousness filling the air.
I had invited a group of my dearest friends over, and I wanted to impress them with something special yet comforting. As I tossed the chicken thighs in spices, I stumbled upon a unique combination of garlic, onion powder, and paprika. The aroma was intoxicating! As the chicken roasted in the oven, I set the table with my favorite dinnerware and lit candles that flickered like stars against the dark night.
When my friends arrived, the laughter and joy were contagious. Each bite of the tender, juicy chicken was met with delightful surprise—"Savannah, this is incredible!" they exclaimed. That night, we shared not only delicious food but beautiful moments, deep conversations, and lots of laughter—magic times that remain dear to my heart.
Ingredients
Let’s gather our ingredients! Here’s what you’ll need for our delicious keto chicken recipe:
-
2 lbs chicken thighs or breasts: Choose thighs for juiciness or breasts for leaner meat. Thighs are typically more forgiving in terms of moisture and flavor, while breasts can be great for a lighter option.
-
2 tablespoons olive oil: A fantastic source of healthy fats. You can substitute coconut oil or avocado oil if you prefer a different flavor or want to change the smoke point.
-
1 teaspoon garlic powder: This adds a warm depth of flavor that enhances the chicken. Fresh minced garlic can also be used if you want that vibrant taste—about 2 cloves should do.
-
1 teaspoon onion powder: Like garlic powder, it delivers a subtle sweetness and depth. You can also use fresh onions sautéed for a bit more flavor.
-
1 teaspoon paprika: Adds a beautiful color and a mild warmth. Consider smoked paprika for a deeper, smoky flavor twist.
-
Salt and pepper to taste: Essential for bringing out other flavors. I recommend using kosher salt for even seasoning.
-
Fresh herbs (optional, for garnish): Fresh parsley, thyme, or basil can elevate your dish. They’re more than a garnish—they add fresh flavor and a pop of color.
Step-by-Step Instructions
Now that we have everything ready, let’s get cooking! Follow these steps, and you’ll be amazed at how easy and delicious this keto chicken can be.
-
Preheat Your Oven: Set your oven to 400°F (200°C). This high heat allows the chicken to roast beautifully, giving you a perfect golden exterior while keeping the inside juicy and tender.
-
Prepare the Chicken: Place your chicken thighs or breasts in a large bowl. Drizzle with olive oil to coat them evenly. This oil not only adds flavor but keeps the chicken moist. Here’s a little tip: If you let the chicken marinate in the oil and spices for about 30 minutes to an hour before cooking, it’ll give you even better flavor!
-
Season Generously: Sprinkle your garlic powder, onion powder, paprika, salt, and pepper across the chicken. Toss the chicken until every piece is coated in these scrumptious seasonings. Don’t be shy! This is where the magic happens—your chicken will thank you later!
-
Arrange on a Baking Sheet: Line a baking sheet with parchment paper for easy cleanup. You’ll want to spread the chicken out in a single layer. Overcrowding will lead to steaming, and nobody likes soggy chicken!
-
Roast in the Oven: Roast your chicken in the preheated oven for about 25-30 minutes, flipping halfway through. You want your chicken to reach an internal temperature of 165°F (74°C). Not sure how to tell? An instant-read thermometer will be your best friend here!
-
Broil for a Perfect Finish: If you want that extra crispy skin (who doesn’t?), turn your oven to broil for the last 3-5 minutes. Just keep an eye on it to avoid burning—this is the time for that golden crust!
-
Let it Rest: Once the chicken is done, remove it from the oven and let it rest for 5-10 minutes. This allows the juices to redistribute, ensuring each bite is flavorful and juicy.
Serving Suggestions
Serving this keto chicken dish is all about presentation. I love to plate my chicken on a rustic wooden board with a healthy sprinkle of fresh herbs on top. You can also serve it alongside a vibrant salad or some roasted low-carb veggies like zucchini, bell peppers, or broccoli. Arrange the chicken pieces artistically and finish with a drizzle of extra virgin olive oil for that professional touch!
Recipe Variations
Let’s get creative! Here are a few variations to spice up your keto chicken game:
-
Lemon Herb Chicken: Before roasting, squeeze fresh lemon juice and add zest to the chicken for a bright, refreshing flavor. Pair with rosemary or thyme for an aromatic lift.
-
Creamy Mushroom Sauce: After removing the chicken, sauté mushrooms in the same pan. Add a splash of heavy cream, garlic, and cheese for a luscious sauce to pour over your chicken.
-
Spicy Chipotle Chicken: Incorporate chipotle powder or adobo sauce into your seasoning mix for a smoky, spicy twist.
-
Honey Garlic Glaze: If you’re not strictly adhered to fully keto, drizzle a bit of sugar-free honey or make a homemade caramelized garlic sauce to glaze your chicken before serving.
-
Mediterranean Chicken Bake: Top with feta cheese and olives, and roast it all together for a heartier meal that transports you to the Mediterranean.
Chef’s Notes
This recipe has evolved over the years based on my journey as a foodie. Initially, I would just toss whatever spices I could find together. As I learned more about flavor balance, each piece became a labor of love that reflects my cooking style: simpler yet more sophisticated. I still recall one dinner with that mishap when I accidentally reached for cayenne instead of paprika. Talk about spicy! My friends laughed so hard, but it turned into an unexpected favorite that night!
FAQs and Troubleshooting
1. My chicken is dry; what did I do wrong?
Dry chicken usually means it was overcooked. Be sure to check the internal temperature, and remember that letting it rest afterward helps maintain juiciness.
2. Can I use chicken breasts instead of thighs?
Absolutely! Just keep an eye on the cooking time, as breasts can dry out faster than thighs. Adjust your cooking time to around 20-25 minutes for breasts.
3. How do I know when my chicken is done?
The safest method is to use an instant-read thermometer, which should read 165°F (74°C) in the thickest part of the chicken.
4. What if I don’t have paprika?
If you’re out of paprika, chili powder is a fantastic substitute that adds a different yet delicious flavor. You can also mix a bit of cayenne for heat or rely on the garlic and onion powders for flavor.
Nutritional Info (Optional)
- Calories: 335
- Protein: 26g
- Fat: 25g
- Carbohydrates: 0g
- Fiber: 0g
Cooking should be fun and fulfilling, and my hope is that this keto chicken recipe inspires you to create something beautiful in your kitchen. Remember, it’s all about finding joy in the process of cooking and gathering around the table with those you love. So, tie on that ivory apron, pour yourself a refreshing beverage, and let’s whip up some delicious memories together. Happy cooking!
PrintKeto Roasted Chicken

A flavorful keto chicken recipe that’s easy to prepare and perfect for a hearty dinner.
- Prep Time: 30 minutes
- Cook Time: 30 minutes
- Total Time: 60 minutes
- Yield: 4 servings 1x
- Category: Main Course
- Method: Roasting
- Cuisine: Keto
- Diet: Keto
Ingredients
- 2 lbs chicken thighs or breasts
- 2 tablespoons olive oil
- 1 teaspoon garlic powder
- 1 teaspoon onion powder
- 1 teaspoon paprika
- Salt and pepper to taste
- Fresh herbs (optional, for garnish)
Instructions
- Preheat your oven to 400°F (200°C).
- Prepare the chicken by coating it in olive oil.
- Season the chicken with garlic powder, onion powder, paprika, salt, and pepper.
- Arrange the chicken on a parchment-lined baking sheet.
- Roast in the oven for 25-30 minutes, flipping halfway through.
- Broil for 3-5 minutes for extra crispy skin.
- Let it rest for 5-10 minutes before serving.
Notes
Optional garnishes include fresh parsley, thyme, or basil for added flavor and presentation.
Nutrition
- Serving Size: 1 serving
- Calories: 335
- Sugar: 0g
- Sodium: 500mg
- Fat: 25g
- Saturated Fat: 5g
- Unsaturated Fat: 20g
- Trans Fat: 0g
- Carbohydrates: 0g
- Fiber: 0g
- Protein: 26g
- Cholesterol: 80mg
Keywords: keto chicken, roasted chicken, low carb dinner, healthy chicken recipes
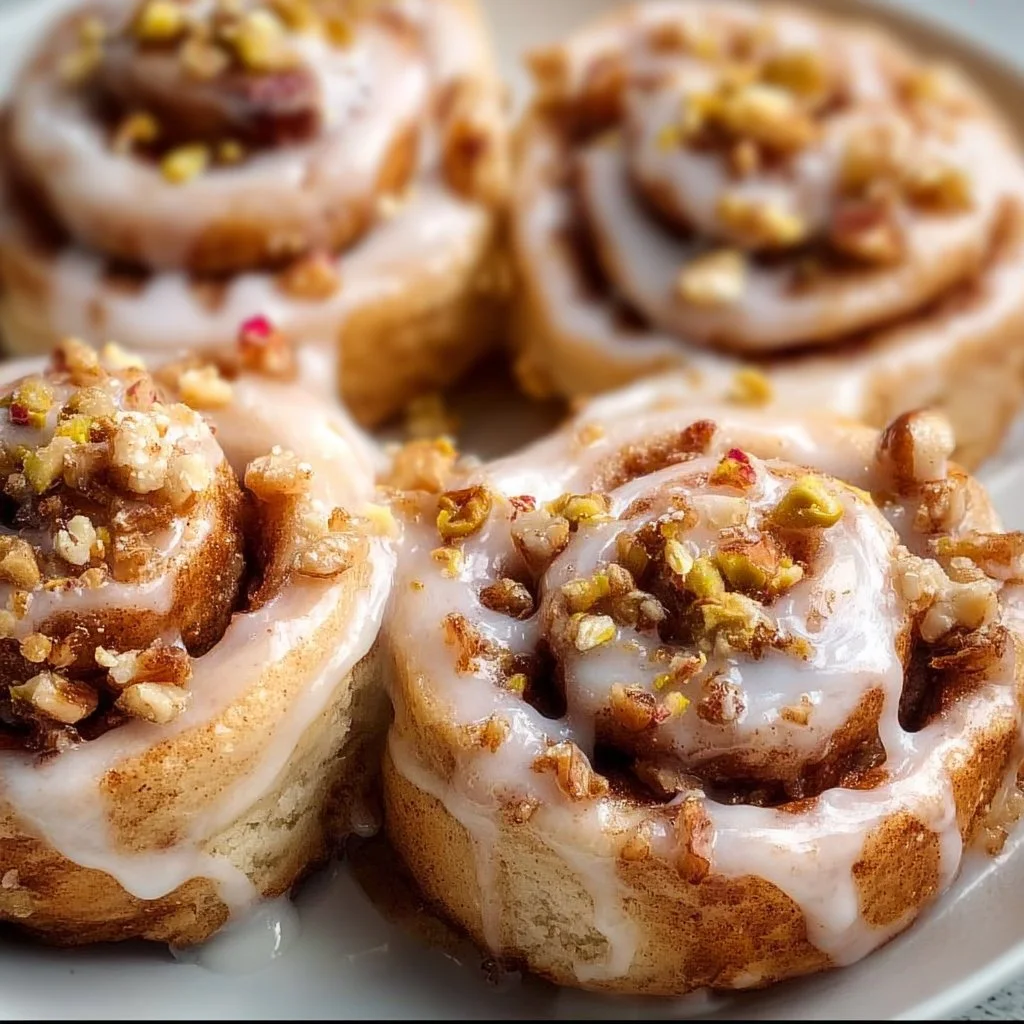
Keto Cinnamon Rolls
Keto Cinnamon Rolls: A Sweet Indulgence Without the Guilt
Hello, fellow food lovers! Today, I’m excited to share a recipe that takes your brunch game to a whole new level: Keto Cinnamon Rolls! Whether you’re on a keto journey or just looking for a deliciously low-carb treat, these rolls are sure to bring a smile to your face and a warm, cozy feeling to your kitchen.
Imagine pulling fresh, warm cinnamon rolls out of the oven, the sweet aroma wrapping around you like a soft hug. This recipe is not just any ordinary cinnamon roll; it’s a delightful blend of nutty almond flour and creamy butter, fused with the warm flavors of cinnamon and vanilla. And let’s not forget the sumptuous cream cheese icing that takes it over the top!
The beauty of these Keto Cinnamon Rolls lies in their balance. You get all the indulgent flavors without the carbs weighing you down. Fluffy, gooey, and oh-so-satisfying, this recipe embraces a healthier lifestyle while keeping your taste buds happy. So, take a deep breath, don your apron, and let’s dive into the world of cinnamon-infused goodness that beckons you from the oven!
Personal Story
Every time I make cinnamon rolls, I’m transported back to my grandmother’s kitchen. I remember those weekend mornings filled with laughter and the scent of freshly baked pastries wafting through the air. My grandma would roll out her dough with such precision, her hands dusted with flour, and the warm, buttery goodness would melt in our mouths as we devoured them—just a bite of sugary bliss.
Now that I’m all grown up, I wanted to recreate those nostalgic moments but with a fabulous twist to fit my lifestyle. That’s when these Keto Cinnamon Rolls came into the picture. With the same flavors that I loved as a kid, but crafted into a healthier version, these rolls have become a family favorite in my own home.
You see, baking has always been about more than just food for me; it’s about memories, connection, and the love we share over a meal. These rolls are a bridge connecting my cherished childhood moments and my contemporary culinary approach. So, let’s embrace this journey together and fill our homes with the warmth of baked cinnamon rolls!
Ingredients
Here’s what you’ll need to make these delicious Keto Cinnamon Rolls:
-
2 cups almond flour
This gluten-free flour gives the rolls a lovely nutty flavor and a moist texture. If you need a substitute, you can use sunflower seed flour, but you might need to adjust the moisture levels. -
1/4 cup coconut flour
Coconut flour adds a touch of sweetness and a little density to the dough. It’s highly absorbent, so be careful not to add too much liquid if you choose to substitute it. -
1/4 cup erythritol
This sugar alternative provides the sweetness without the added carbs. If you’re looking for a different sweetener, feel free to experiment with monk fruit or stevia, though the measurements may vary. -
1 tablespoon baking powder
This is essential for leavening your rolls, keeping them fluffy and light. -
1/2 teaspoon salt
Just a pinch of salt elevates the sweetness and balances the flavors beautifully. -
1/2 cup melted butter
Creamy and rich, the melted butter enriches the dough and brings it all together. Substitute with coconut oil for a dairy-free option, but the flavor may slightly differ. -
2 large eggs
Eggs are vital for binding the ingredients together. They create that delicious structure. For a vegan option, try using chia eggs (1 tablespoon chia seeds mixed with 2.5 tablespoons of water for each egg). -
1 tablespoon vanilla extract
Pure vanilla extract enhances the flavor profile, making your cinnamon rolls feel indulgent. -
1 tablespoon cinnamon
This is the star of the show! Use fresh ground cinnamon for the best aroma and flavor. -
1/4 cup cream cheese
Cream cheese in the dough adds creaminess and depth. If you want a dairy-free option, try using a dairy-free cream cheese or vegan alternative. -
1 tablespoon heavy cream
This adds a touch of richness to your icing. Swap it for coconut cream for a dairy-free alternative! -
1/4 cup powdered erythritol (for icing)
A sweet finishing touch that makes everything extra special without the carbs.
As you gather these ingredients, remember that high-quality ones will make all the difference, so choose wisely!
Step-by-Step Instructions
Step 1: Preheat Your Oven
Preheat your oven to 350°F (175°C). A warm oven helps the rolls rise beautifully and bake evenly.
Step 2: Prepare the Dough
In a mixing bowl, combine the almond flour, coconut flour, erythritol, baking powder, and salt. Mix them well with a whisk to ensure there are no clumps. Sifting the dry ingredients together helps achieve that light and fluffy texture, so don’t skip this step if you have a sifter!
Step 3: Add Wet Ingredients
In a separate bowl, whisk together the melted butter, eggs, and vanilla extract. Make sure the butter is warm but not hot; otherwise, it might scramble the eggs! Once well mixed, fold this wet mixture into your dry ingredients until fully combined. The dough might be a little sticky; that’s completely normal!
Step 4: Roll Out the Dough
Place the dough between two sheets of parchment paper and roll it out into a rectangle, about 1/4 inch thick. If the dough feels too sticky, you can dust your rolling pin and surface with a little almond flour to make it manageable.
Step 5: Prepare the Cinnamon Filling
In a small bowl, mix the cinnamon and erythritol. This delightful blend will be slathered over your rolled-out dough! Spread the softened cream cheese evenly over the surface of the dough, followed by the cinnamon sugar mixture. The cream cheese adds moisture and a lovely tang that complements the sweetness.
Step 6: Roll and Cut
Carefully roll up the dough from one side to the other, forming a tight log. Use the parchment paper to help guide you. Once rolled, slice the log into even pieces (about 1-inch thick). If the dough sticks to your knife, you can lightly grease it with butter or coconut oil.
Step 7: Place in the Baking Dish
Arrange the rolled slices, cut side up, in a greased 8×8-inch baking dish. The rolls will expand as they bake, so make sure they’re snugly placed.
Step 8: Bake
Pop the rolls in the preheated oven and bake for 20–25 minutes, or until they are golden brown on top. You want that lovely golden hue to signify their readiness. While they’re baking, take a moment to prepare your icing!
Step 9: Make the Icing
In a small bowl, whisk together the powdered erythritol, cream cheese, and heavy cream until smooth. You can adjust the thickness of the icing by adding more cream if needed. A thicker icing is perfect for drizzling!
Step 10: Drizzle and Serve
Once out of the oven, let the cinnamon rolls cool for a few minutes before drizzling the icing on top. The warmth of the rolls will slightly melt the icing, making it deliciously gooey!
Serving Suggestions
To serve your Keto Cinnamon Rolls, place them on a beautiful platter, dusted with a sprinkle of extra cinnamon or powdered erythritol for an aesthetic touch. You might consider pairing them with a steaming cup of coffee or herbal tea for the ultimate comfort food experience. If you’re feeling fancy, add a dollop of whipped coconut cream on the side for an exquisite touch!
Recipe Variations
-
Chocolate Chip Cinnamon Rolls: Fold in sugar-free chocolate chips into the dough for an exciting twist on the classic.
-
Nutty Swirl: Add chopped walnuts or pecans into the cinnamon filling for a delightful crunch.
-
Pumpkin Spice: Substitute half of the cinnamon with pumpkin pie spice for a fall-inspired treat.
-
Lemon Zest Icing: Add a touch of lemon zest to the icing for a citrusy brightness that balances the sweetness.
-
Frosting it Up: Mix in vanilla protein powder to the icing for added flavor and nutrition.
Chef’s Notes
Creating these Keto Cinnamon Rolls has truly been a journey! I started with an old recipe, reworking it until I found the perfect combination of ingredients. There were plenty of trials (and a few kitchen disasters), but I can assure you the final product is well worth it! I’ve even made these rolls for brunch parties, and they vanish faster than I can plate them.
A little tip I learned along the way: don’t be afraid to experiment! The kitchen should be a place of creativity and joy.
FAQs and Troubleshooting
1. Why are my cinnamon rolls dense?
If your rolls turn out dense, it might be due to overmixing the dough or not measuring the flour correctly. Make sure to use a kitchen scale for accuracy!
2. Can these be made ahead of time?
Absolutely! Prepare the rolls and place them in the baking dish. You can cover them and refrigerate overnight; just add a few minutes to the baking time in the morning.
3. How do I store leftovers?
Keep any leftover rolls in an airtight container in the fridge for up to 3 days. You can gently reheat them in the microwave or oven.
4. What can I use instead of erythritol?
You can use any low-carb sweetener that you prefer. Just make sure to check the conversion ratios, as some are sweeter than others!
Nutritional Info (Optional)
(Based on recipe serving size of approximately 12 rolls)
- Calories: 150 per roll
- Carbohydrates: 5g
- Fiber: 3g
- Protein: 4g
- Fat: 14g
These delicious Keto Cinnamon Rolls are a delightful way to embrace the sweet moments of life without the guilt. I hope you enjoy making and sharing these rolls as much as I do. Remember, it’s not just about making food; it’s about creating memories around your table where love and laughter abound. Happy baking! 🍽️✨
PrintKeto Cinnamon Rolls

Deliciously low-carb cinnamon rolls with a delightful blend of almond flour and creamy butter, topped with a rich cream cheese icing.
- Prep Time: 15 minutes
- Cook Time: 25 minutes
- Total Time: 40 minutes
- Yield: 12 servings 1x
- Category: Dessert
- Method: Baking
- Cuisine: American
- Diet: Keto
Ingredients
- 2 cups almond flour
- 1/4 cup coconut flour
- 1/4 cup erythritol
- 1 tablespoon baking powder
- 1/2 teaspoon salt
- 1/2 cup melted butter
- 2 large eggs
- 1 tablespoon vanilla extract
- 1 tablespoon cinnamon
- 1/4 cup cream cheese
- 1 tablespoon heavy cream
- 1/4 cup powdered erythritol (for icing)
Instructions
- Preheat your oven to 350°F (175°C).
- Combine almond flour, coconut flour, erythritol, baking powder, and salt in a mixing bowl.
- Whisk together melted butter, eggs, and vanilla extract in a separate bowl. Fold this mixture into the dry ingredients.
- Roll out the dough between two sheets of parchment paper into a rectangle, about 1/4 inch thick.
- Mix cinnamon and erythritol in a small bowl and prepare the cinnamon filling.
- Spread softened cream cheese over the dough and sprinkle the cinnamon sugar mixture on top.
- Roll up the dough tightly and slice into rolls.
- Arrange rolls in a greased 8×8-inch baking dish, cut side up.
- Bake for 20-25 minutes, or until golden brown.
- Whisk powdered erythritol, cream cheese, and heavy cream for the icing.
- Drizzle icing over warm rolls before serving.
Notes
Using high-quality ingredients will enhance your cinnamon rolls. Feel free to experiment with flavors and toppings.
Nutrition
- Serving Size: 1 roll
- Calories: 150
- Sugar: 1g
- Sodium: 100mg
- Fat: 14g
- Saturated Fat: 8g
- Unsaturated Fat: 6g
- Trans Fat: 0g
- Carbohydrates: 5g
- Fiber: 3g
- Protein: 4g
- Cholesterol: 70mg
Keywords: keto, cinnamon rolls, low-carb dessert, gluten-free baking, sweet treats

Low Carb Cabbage Soup
# Low Carb Cabbage Soup: A Warm Embrace in a Bowl

## Introduction

Hello, fellow food lovers! I'm so thrilled to have you here. Let’s talk about a dish that’s not just a meal but a warm embrace in a bowl: **Low Carb Cabbage Soup**. If you’re anything like me, you appreciate a recipe that’s comforting yet doesn’t skimp on the flavor. This one is a true winner!

Imagine it: a cool evening, maybe it’s raining outside, and you’re nestled in your cozy kitchen, ready to whip up something delightful. The aroma of sautéed onions and garlic begins to fill the room, wrapping you in a cocoon of comfort. This soup isn’t just low-carb; it’s about the joy of cooking and the warmth of home. Plus, it’s incredibly easy to make!

The beauty of this dish is its simplicity and versatility. Packed with nutrient-rich ingredients, this cabbage soup is perfect for those evenings when you want something hearty but not heavy. It’s a fantastic way to incorporate more vegetables into your diet without sacrificing flavor. Think of it as a flavor bomb that’s also a guilt-free indulgence! And believe me, once you make it, you'll find yourself turning to it time and time again.

Oh, and don’t get me started on the leftovers! They only taste better the next day, making it a meal prep superstar. So grab your apron, and let’s dive into this delightful recipe for Low Carb Cabbage Soup that will surely become a staple in your kitchen!

---

## Personal Story

Let me take you back to my childhood for a moment. I vividly remember weekends spent in my grandmother’s kitchen, where she would whip up her famous cabbage soup. The entire house would be filled with an intoxicating mix of savory scents: sautéed garlic, simmering vegetables, and spices that hinted at warmth and love.

I was her little helper, always perched on a stool, stirring a pot and listening to her stories of family dinners and cozy gatherings. It was during those moments that I learned the magic of food – it’s not just about the ingredients; it’s about connection and sharing. My grandmother would say, “A good meal brings people together, and laughter is the best seasoning.”

Years later, inspired by her kitchen wisdom, I set out to create my own version of cabbage soup that reflects both comfort and richness but aligns with more modern eating habits. This Low Carb Cabbage Soup is a nod to those cherished memories while having its unique flair. So let’s get cooking, shall we?

---

## Ingredients

### Here’s what you’ll need:

- **1 tbsp olive oil**
  *A heart-healthy fat that adds depth. You can substitute with avocado oil for a different flavor profile.*

- **1 large onion (finely chopped)**
  *Onions add sweetness and richness. Any onion works, but yellow or white onions lend the best flavor.*

- **2 cloves garlic (minced)**
  *Garlic is a must for that aromatic essence. Feel free to use garlic powder in a pinch (1/2 tsp for each clove).*

- **1 lb lean ground beef**
  *This adds protein and heartiness. Looking for a lighter option? Ground turkey or plant-based meat substitutes are great alternatives.*

- **Salt and black pepper (to taste)**
  *Essential for seasoning! Don’t shy away from fresh-ground pepper for extra kick!*

- **14 oz can chopped tomatoes**
  *Canned tomatoes provide acidity and sweetness. Fire-roasted tomatoes can elevate the flavor even more!*

- **6 cups shredded cabbage**
  *The star ingredient! Cabbage is low in calories and high in fiber. You can use savoy or green cabbage depending on your preference.*

- **1 tsp paprika**
  *This adds earthy sweetness. Smoked paprika can add a lovely depth if you’re feeling adventurous.*

- **1 tsp garlic powder**
  *A good complement to fresh garlic for a layered garlic flavor.*

- **1 tsp onion powder**
  *Another layer of flavor that enhances our soup’s base.*

- **1/2 tsp oregano**
  *A classic herb to give that Italian flair. Basil would be a delightful substitute if you want a sweeter note.*

- **1/2 tsp thyme**
  *An aromatic herb that pairs beautifully with the cabbage. If you have fresh thyme, definitely use that!*

- **1 bay leaf**
  *Adds a subtle depth to the soup. Don’t forget to remove it before serving!*

- **5 cups beef broth**
  *This is the liquid gold of our soup! You can use vegetable broth for a lighter, vegetarian version.*

- **Parsley (chopped)**
  *For garnish, adding freshness and a pop of color. Feel free to substitute with cilantro for a different taste profile!*

---

## Step-by-Step Instructions

### Let’s get cookin’!

1. **Heat Your Oil**
   In a large pot or Dutch oven, heat the olive oil over medium heat. *Chef Tip: Make sure it’s hot enough before adding the onions; this helps unlock their sweet flavor!*

2. **Sauté the Aromatics**
   Add the chopped onion and sauté for about 5 minutes until it softens and becomes translucent. Next, toss in the minced garlic and sauté for an additional 1-2 minutes. *You'll know it’s time to move on when that fragrant garlic aroma wafts through your kitchen!*

3. **Brown the Ground Beef**
   Stir in the ground beef, breaking it apart with a wooden spoon. Allow it to cook until it’s browned and no longer pink. *Make sure to drain any excess fat if it’s too greasy. A lean beef helps keep this dish healthy!*

4. **Season It Up**
   Sprinkle in the salt, pepper, paprika, garlic powder, onion powder, oregano, and thyme. Give it a good stir to coat the meat and onions well with all the spices. *This step is key for building layers of flavor!*

5. **Add the Canned Tomatoes**
   Pour in the chopped tomatoes, mixing them in with the beef and onions. This will add a wonderful tang to our soup. *Make sure to scrape the bottom of the pot for any bits stuck from browning – that’s where the flavor’s at!*

6. **In Go the Cabbage and Broth**
   Stir in the shredded cabbage and pour the beef broth over everything. Toss in the bay leaf. *If you feel the soup is too thick, don’t hesitate to add a bit more broth, adjusting to your liking!*

7. **Bring It to a Simmer**
   Increase the heat until the soup comes to a simmer, then reduce it to low. Cover and let it simmer gently for about 30 minutes or until the cabbage is tender. *Chef Hack: The longer you let it simmer, the more the flavors meld together – perfect for those who can wait!*

8. **Taste and Adjust**
   Remove the bay leaf and taste your creation. Adjust the seasoning with more salt and pepper if necessary. *Don't shy away from a bit of extra seasoning here; your palate will guide you!*

9. **Serve and Garnish**
   Ladle the soup into bowls and sprinkle some fresh parsley on top for a vibrant finish. *A squeeze of lemon will brighten up the flavors even more if you want to elevate that freshness!*

---

## Serving Suggestions

When it comes to serving this Low Carb Cabbage Soup, it’s all about comfort and warmth. My favorite way is to ladle it generously into a shallow bowl, garnishing with a fresh sprinkle of parsley. Pair it with some crusty whole-grain bread or, for a low-carb option, serve it alongside a mixed greens salad.

For a touch of elegance, you could also consider serving it in rustic bread bowls. Just hollow out small round loaves and ladle the soup right in—because who can resist edible bowls, right?

---

## Recipe Variations

Feeling adventurous? Here are some tasty twists you might consider:

- **Add a Kick:** Toss in some crushed red pepper flakes for a bit of heat.
- **Herbed Delight:** Experiment with fresh herbs such as dill or thyme for a refreshing twist.
- **Asian Fusion:** Incorporate ginger and soy sauce for an Asian-inspired version of cabbage soup.
- **Creamy Variation:** Stir in a dollop of sour cream or Greek yogurt before serving for added creaminess.
- **Vegetarian Option:** Substitute the ground beef with lentils or chickpeas for a hearty plant-based version!

---

## Chef’s Notes

This recipe truly has evolved over the years. I remember when I used to add a lot more ingredients—vegetables, different meats, you name it. But I found that the simplicity of cabbage, beef, and warming spices created the most excellent dish!

Oh, and here’s a funny story: one time, I got so caught up in cooking that I forgot to add the broth until the end. After browning the meat and sautéing the vegetables, I stood there wondering why it looked more like a stir-fry than soup! Lesson learned: double-check your ingredients! But in hindsight, that “mistake” led to an extraordinary creation of beef and cabbage that I still love today. Sometimes, the best flavors come from unexpected deviations!

---

## FAQs and Troubleshooting

1. **Can I freeze this soup?**
   Absolutely! This soup freezes beautifully. Just make sure to cool it completely before transferring it to an airtight container. It can last in the freezer for up to three months!

2. **What if my soup is too thick?**
   If you find your cabbage soup is thicker than you'd like, simply add more broth or water, bring it back to a simmer, and adjust the seasoning afterward.

3. **Can I use fresh cabbage instead of shredded?**
   Definitely! Just chop it into bite-sized pieces and adjust the cooking time accordingly to ensure it becomes tender.

4. **Is this soup suitable for meal prep?**
   Yes! It's great for meal prep since it holds up well in the fridge for several days. Just reheat on the stove or in the microwave before serving!

---

## Nutritional Info

*Note: Nutritional information can vary based on specific ingredients used, but here’s a quick estimate per serving (based on 6 servings):*

- **Calories:** 210
- **Protein:** 20g
- **Fat:** 11g
- **Carbohydrates:** 8g
- **Fiber:** 3g

---

So there you have it—my delightful take on Low Carb Cabbage Soup! Let me know how yours turns out! Remember, cooking is about the love you put into it and the joy you share with others. Happy cooking! 🥣✨
Low Carb Cabbage Soup

A comforting Low Carb Cabbage Soup packed with flavor and nutrient-rich ingredients. Perfect for chilly evenings or meal prep!
- Prep Time: 15 minutes
- Cook Time: 30 minutes
- Total Time: 45 minutes
- Yield: 6 servings 1x
- Category: Main Course
- Method: Stovetop
- Cuisine: American
- Diet: Low Carb
Ingredients
- 1 tbsp olive oil
- 1 large onion (finely chopped)
- 2 cloves garlic (minced)
- 1 lb lean ground beef
- Salt and black pepper (to taste)
- 14 oz can chopped tomatoes
- 6 cups shredded cabbage
- 1 tsp paprika
- 1 tsp garlic powder
- 1 tsp onion powder
- 1/2 tsp oregano
- 1/2 tsp thyme
- 1 bay leaf
- 5 cups beef broth
- Parsley (chopped, for garnish)
Instructions
- Heat your oil in a large pot or Dutch oven over medium heat.
- Sauté the chopped onion for about 5 minutes until it softens.
- Add the minced garlic and sauté for an additional 1-2 minutes.
- Stir in the ground beef, breaking it apart, and cook until browned.
- Sprinkle in the salt, pepper, paprika, garlic powder, onion powder, oregano, and thyme.
- Pour in the chopped tomatoes and mix with the beef and onions.
- Stir in the shredded cabbage and pour the beef broth over everything.
- Increase the heat until the soup comes to a simmer, then reduce to low.
- Cover and let it simmer for about 30 minutes or until the cabbage is tender.
- Remove the bay leaf and adjust seasoning if necessary.
- Serve the soup in bowls and garnish with chopped parsley.
Notes
Great for meal prep and tastes even better as leftovers! You can substitute ground beef with ground turkey or plant-based meat for a lighter option.
Nutrition
- Serving Size: 1 serving
- Calories: 210
- Sugar: 4g
- Sodium: 600mg
- Fat: 11g
- Saturated Fat: 4g
- Unsaturated Fat: 4g
- Trans Fat: 0g
- Carbohydrates: 8g
- Fiber: 3g
- Protein: 20g
- Cholesterol: 50mg
Keywords: low carb, cabbage soup, comfort food, meal prep, healthy soup