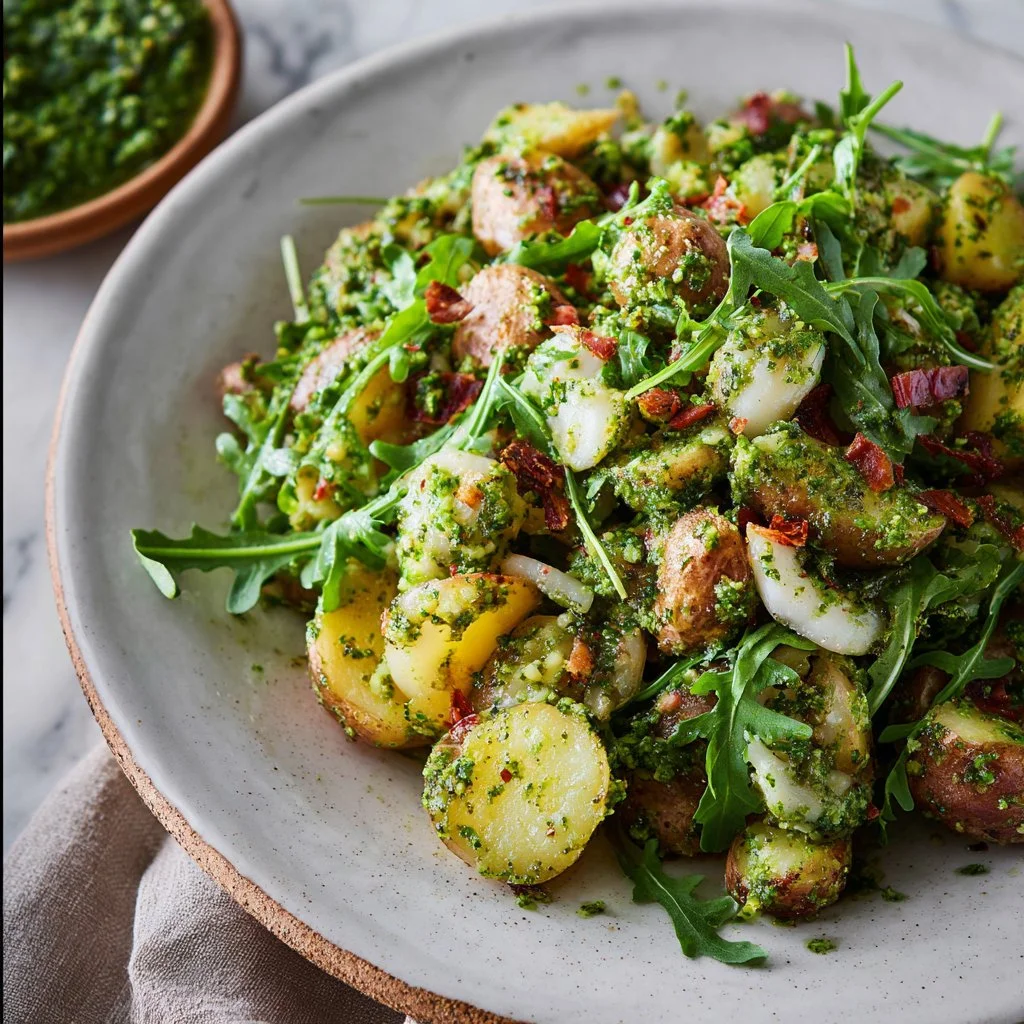
Arugula Pesto Potato Salad
Arugula Pesto Potato Salad: A Fresh Take on a Classic Dish
Hey there, kitchen enthusiasts! Today, we’re diving into a vibrant twist on an old favorite: Arugula Pesto Potato Salad. If you’re anything like me, potato salad has a special place in your heart. It’s versatile, comforting, and practically a staple at gatherings, barbecues, and family reunions. But let’s be honest: nobody wants the same ol’ mayo-laden version every time!
That’s where this fabulous arugula pesto comes in. With its peppery, fresh flavor, this bright green sauce will elevate your potato salad game to a whole new level. The best part? It’s uncomplicated enough to whip up on a weeknight yet elegant enough to wow your dinner guests. So, grab your apron and let’s get cooking!
In this blog post, I’ll share a delightful personal memory tied to this dish, guide you through the ingredients, and offer step-by-step instructions to ensure you nail this recipe. Plus, I’ll sprinkle in some serving suggestions and variations to help you tailor it to your taste. Let’s gather around the table and make some delicious food together!
Personal Story
I remember the first time I tried arugula pesto. It was a summer BBQ at my best friend’s house, and the sky was a perfect blue, the kind that makes everything feel brighter. She had spent the whole afternoon preparing dishes, turning her backyard into a haven of deliciousness. The moment I tasted this unique pesto, I was hooked. It was a little spicy, a little nutty, and paired perfectly with her grilled veggies and, of course, the potato salad she had made on a whim.
That day, we laughed until our sides hurt, shared stories under the warm sun, and of course, tasted everything on the table. The memory of that meal was sparked by a simple yet transformative ingredient – arugula. It reminded me of how food could create connections, evoke nostalgia, and even foster creativity in the kitchen. Fast forward to today, and I find joy in recreating that experience by sharing my version with all of you!
Ingredients
Key Ingredients for Arugula Pesto Potato Salad
-
2 lbs "pee wee" potatoes, halved
These small, tender potatoes cook quickly and have a creamy texture. You can substitute with fingerling or baby Yukon gold potatoes if you can’t find pee wees. -
Olive oil
A rich source of healthy fats, olive oil adds depth and flavor. Extra virgin olive oil is preferred for its robust taste, but a light olive oil works too. -
Kosher salt
Essential for enhancing the flavor in cooking. If you only have table salt, use about half the amount since it’s finer. -
Freshly cracked black pepper
A sprinkle of this adds a hint of warmth and complexity. Use freshly cracked for the best flavor! -
3 red spring onions, thinly sliced
These onions bring a mild sweetness and vibrant color. Chives or green onions are excellent substitutes if you can’t find red spring onions. -
2 cups packed arugula
This leafy green is peppery and full of nutrients. If you’re not a fan, spinach or kale can be blended in for a milder taste. -
6 radishes, thinly shaved on a mandolin
Radishes contribute crunch and earthiness. If you don’t have radishes, sliced cucumbers can add a different but refreshing crunch. -
1 cup packed basil leaves
Fresh basil adds a lovely aroma and flavor to the pesto. Feel free to mix in some parsley for a twist! -
1 small handful chives
They add a delicate onion flavor. If you’re out of chives, feel free to increase the amount of spring onions. -
2 garlic cloves, chopped
Garlic is essential for depth; it elevates the pesto. If you prefer a milder taste, you can roast the garlic in olive oil before adding it to the mix. -
⅓ cup toasted pine nuts
Pine nuts provide rich nuttiness and healthy fats. If you have a nut allergy, sunflower seeds or pumpkin seeds can work in a pinch. -
⅓ cup grated pecorino romano cheese
This cheese brings a sharp, salty kick. Parmesan can be used for a similar flavor. -
½ tsp lemon zest
Adding zest brightens the flavor of the pesto. Make sure to zest the lemon before juicing! -
2 tbsp lemon juice
Freshly squeezed lemon juice balances creamy and savory flavors beautifully. -
1 tbsp honey
A hint of sweetness smooths out the pesto’s flavors. Feel free to substitute with maple syrup for a vegan option! -
¾ cup extra virgin olive oil
This is the base for your pesto, providing richness and body.
Step-by-Step Instructions
Cooking the Potatoes
-
Boil the Potatoes
Fill a large pot with salted water and bring it to a boil. Add the halved pee wee potatoes and cook until fork-tender, about 15-20 minutes. Make sure to keep an eye on them! You want them soft but not mushy.Tip: To ensure even cooking, start with potatoes that are all similar in size.
-
Drain and Cool
Once tender, drain the potatoes in a colander and let them cool for about 10 minutes. Drizzling them with a little olive oil while they cool will prevent them from sticking together.
Making the Arugula Pesto
-
Blend the Pesto
In a food processor, combine 2 cups of arugula, basil leaves, chives, garlic, toasted pine nuts, and grated pecorino Romano cheese. Drizzle in the lemon juice and honey, and start adding olive oil. Blend until smooth but still slightly chunky for texture.Chef Hack: If your pesto is too thick, you can add more olive oil or a splash of water to achieve your desired consistency.
-
Season
Once blended, add the lemon zest, kosher salt, and freshly cracked black pepper to taste. Blend again briefly to combine. Give it a taste test—you want that perfect harmony of flavors!
Assembling the Salad
-
Combine Ingredients
In a large mixing bowl, gently toss the cooled potatoes with the arugula pesto until they’re nicely coated. Add in the thinly sliced red spring onions and shaved radishes.Tip: Don’t toss too vigorously; you want to keep the potatoes intact!
-
Final Adjustments
Take a moment to taste the salad once more. Add additional salt, pepper, or lemon juice to brighten things up if needed.
Serving the Salad
-
Plate
Transfer the potato salad to a serving dish. Make it visually appealing by artfully layering or arranging the salad, allowing the rainbow of colors to shine through.Presentation Tip: Garnish with additional arugula, basil leaves, or a sprinkle of pecorino cheese for that "wow" factor!
Recipe Variations
- Caprese Twist: Add cherry tomatoes and mozzarella balls for a Caprese-inspired salad!
- Vegan Twist: Substitute the cheese with nutritional yeast and the honey with agave syrup.
- Spicy Kick: Include red pepper flakes in the pesto for a spicy surprise!
- Mediterranean Flair: Toss in some marinated olives and roasted red peppers for a robust flavor.
- Herby Variation: Experiment with different herbs like dill or mint for a unique twist on flavor.
Chef’s Notes
This Arugula Pesto Potato Salad has become a staple in my kitchen, and I love how it evolves with the seasons. Sometimes, I swap in seasonal veggies to keep it fresh—just recently, I tossed in some blanched asparagus and snap peas! Also, remember that the pesto can be made ahead of time and stored in the fridge, so it’s perfect for meal prep.
Every time I serve this dish, I get stories from friends about their potato salad memories. I think it’s fascinating how food can stir nostalgia and even create new memories around the table!
FAQs and Troubleshooting
-
What if my potatoes are mushy?
If you accidentally over-boil the potatoes, try using them in a creamy mashed potato recipe instead! -
Can I make the pesto ahead of time?
Absolutely! Pesto can be stored in the fridge for up to a week. Just make sure to cover it with a thin layer of olive oil to avoid discoloration. -
Can I freeze the pesto?
Yes, you can freeze arugula pesto! Ice cube trays are great for portioning it out—just thaw in the fridge when you want to use it! -
Why is my pesto turning brown?
This often happens when it’s exposed to air. Be sure to store it airtight, and if some browning occurs, it’s still edible, but you can add a splash of lemon juice to brighten it up again.
Nutritional Info
This Arugula Pesto Potato Salad is packed with fresh greens, healthy fats, and earthy flavors—all while offering a delicious balance of carbs and nutrients. You can expect approximately:
- Calories: 350 per serving (1 cup)
- Protein: 8g
- Carbohydrates: 30g
- Fat: 24g
Whether you’re in need of an easy weeknight meal or an impressive dish for entertaining, this Arugula Pesto Potato Salad will not disappoint. Tie on your apron, enjoy your time in the kitchen, and let’s make beautiful memories—one delicious plate at a time!
PrintArugula Pesto Potato Salad
A vibrant twist on a classic potato salad featuring a peppery arugula pesto that elevates traditional flavors.
- Prep Time: 15 minutes
- Cook Time: 20 minutes
- Total Time: 35 minutes
- Yield: 4 servings 1x
- Category: Side Dish
- Method: Boiling and Blending
- Cuisine: Mediterranean
- Diet: Vegetarian
Ingredients
- 2 lbs “pee wee” potatoes, halved
- ⅓ cup olive oil
- 1 tsp kosher salt
- ½ tsp freshly cracked black pepper
- 3 red spring onions, thinly sliced
- 2 cups packed arugula
- 6 radishes, thinly shaved
- 1 cup packed basil leaves
- 1 small handful chives
- 2 garlic cloves, chopped
- ⅓ cup toasted pine nuts
- ⅓ cup grated pecorino romano cheese
- ½ tsp lemon zest
- 2 tbsp lemon juice
- 1 tbsp honey
- ¾ cup extra virgin olive oil
Instructions
- Boil the potatoes in salted water until fork-tender, about 15-20 minutes.
- Drain the potatoes and let them cool for about 10 minutes.
- Blend the pesto ingredients: arugula, basil, chives, garlic, pine nuts, and cheese with lemon juice and honey. Gradually add olive oil until smooth.
- Season the pesto with lemon zest, salt, and pepper. Blend briefly to combine.
- Combine the cooled potatoes with the arugula pesto, spring onions, and radishes in a large bowl.
- Final adjustments with salt, pepper, or lemon juice to taste.
- Plate the salad in a serving dish, garnishing as desired.
Notes
Pesto can be made ahead of time. Keep it in the fridge covered with olive oil to prevent discoloration. Customize with seasonal veggies and herbs!
Nutrition
- Serving Size: 1 serving
- Calories: 350
- Sugar: 5g
- Sodium: 400mg
- Fat: 24g
- Saturated Fat: 4g
- Unsaturated Fat: 16g
- Trans Fat: 0g
- Carbohydrates: 30g
- Fiber: 4g
- Protein: 8g
- Cholesterol: 10mg
Keywords: potato salad, pesto, arugula, summer recipes, vegetarian side dish
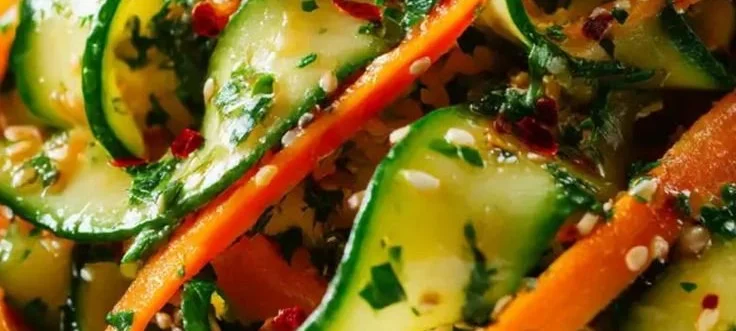
Asian Carrot Salad
Vibrant Asian Carrot Salad: A Feast for the Senses
Introduction
Welcome, fellow foodie! Today, we’re diving into the delightful world of fresh flavors with a dish that packs a vibrant punch: Asian Carrot Salad! Whether you’re looking for a refreshing side to accompany your favorite protein, a crisp crunch to elevate your weeknight meals, or the perfect dish to wow your guests at a gathering, this salad is sure to impress. Easy to whip up and bursting with color and flavor, it’s one of those recipes that’s become a staple in my kitchen—and I think it will be in yours too!
There’s something so satisfying about the combination of grated carrots and bright, zingy flavors. The nuttiness of sesame oil, the tang of rice vinegar, and the hint of sweetness from honey or maple syrup create a beautiful balance. What I love most about this salad is not just how tasty it is, but how it strikes a chord with memories of shared meals, laughter around the table, and the excitement of tasting another culture through food.
So grab your grater and your apron, and let’s get started on this quick yet elegant salad! By the end of this post, you’ll feel like a true culinary artist, creating beauty right in your kitchen.
Personal Story
Ah, carrots! They remind me of my childhood, especially those summers spent at my grandmother’s house. Every Wednesday, she would prepare a colorful salad to accompany the grilled chicken and steamed rice we would enjoy on her sunny patio. The salad was always different, but one ingredient remained constant: grated carrots.
She would toss the bright orange strands with some soy sauce, a drizzle of sesame oil, and a sprinkle of sesame seeds. And that was it! Even as a kid, I could tell that the simplicity of those ingredients celebrated the carrots’ natural sweetness. Now, whenever I prepare a carrot salad, it takes me back to those warm afternoons, surrounded by family, enjoying the fruits of our little garden.
Over the years, I’ve taken her simple recipe and added my personal flair, introducing new flavors that elevate it from everyday fare to something truly special. Let me share with you how to make a version that whispers nostalgia while being entirely your own!
Ingredients
For this gorgeous Asian Carrot Salad, you’ll need the following ingredients:
-
3 large carrots, grated
Bright and sweet, these carrots are the star of the dish. You can substitute with shredded or spiralized zucchini if you want to mix things up or make it gluten-free! -
2 tablespoons sesame oil
This oil adds a rich, nutty flavor. Feel free to replace it with sunflower oil or another neutral oil if you’re not a fan, but trust me, the sesame oil really brings depth! -
2 tablespoons rice vinegar
Light and slightly sweet, rice vinegar is a staple in Asian cuisine. You can substitute it with apple cider vinegar or white wine vinegar in a pinch, though the flavor will be a bit sharper. -
1 tablespoon soy sauce
Umami goodness! You can also use tamari for a gluten-free option or liquid aminos for a healthier twist. -
1 tablespoon honey or maple syrup (for vegan)
This sweetener adds a lovely balance to the tanginess of the salad. Agave syrup also works if you’re looking for a plant-based option. -
1 clove garlic, minced
The garlic adds great depth and fragrance. If you’re not a big fan, you can leave it out, but oh, the flavor it brings! -
1 teaspoon grated ginger
Fresh ginger is a necessity for that zing! However, if you don’t have fresh ginger on hand, powdered ginger can work too; just use a pinch. -
1 tablespoon sesame seeds
These little gems add a crunchy texture and a nutty flavor. Toast them lightly for an even deeper flavor! -
Salt and pepper to taste
Always essential! You can adjust to your palate. -
Green onions, chopped (for garnish)
Bright and fresh, they add a pop of color and taste at the end. Chives would work in a pinch if you’re looking for an alternative!
Step-by-Step Instructions
Ready to create this colorful deliciousness? Let’s cook!
-
Prep Your Carrots
Begin by peeling the carrots to remove any tough outer skin. A vegetable peeler does wonders here! Once peeled, grate them using a box grater or a food processor. This step will create those lovely, long strands that will soak up the dressing beautifully and provide a delightful crunch! Set aside in a large mixing bowl. -
Make the Dressing
In a small bowl, whisk together the sesame oil, rice vinegar, soy sauce, honey (or maple syrup), minced garlic, and grated ginger. This will create a balanced dressing that’s both vibrant and savory. Give it a taste and adjust — if you like it a bit sweeter, add more honey; if you crave more acidity, a splash of rice vinegar works wonders. -
Combine the Ingredients
Pour the dressing over the grated carrots. With clean hands (my preferred method!), toss everything together until the carrots are coated evenly. This is where the magic happens! The bright orange color of your carrots will begin to glisten, and your kitchen will start to smell divine. -
Season and Add Texture
Sprinkle in your sesame seeds, salt, and pepper. Toss again to combine evenly. The sesame seeds will add not just flavor but a lovely crunch, transforming your salad into a multi-sensory experience! -
Garnish and Let it Marinate
Transfer your beautifully tossed salad to a serving bowl and garnish with chopped green onions for that final touch. The green onions will not only add a pop of color but also a fresh bite that contrasts perfectly with the sweet carrots.The salad can be served immediately but, if time allows, let it sit for 10-15 minutes before serving. This allows the flavors to meld together beautifully!
Serving Suggestions
To present your Asian Carrot Salad, consider a wide, shallow bowl to showcase the vibrant colors. Drizzle a bit more sesame oil over the top and sprinkle extra sesame seeds just before serving for flair. Serve it alongside grilled chicken, fish, or tofu for a well-rounded meal, or enjoy it as a light standalone dish with some crusty bread.
Recipe Variations
-
Add Crunch: Throw in some chopped peanuts or almonds for extra crunch! A sprinkle of toasted nuts can really elevate the flavor profile.
-
Dried Fruit: Mix in some dried cranberries or raisins for a hint of sweetness that pairs beautifully with the savory elements.
-
Spicy Kick: If you’re a heat enthusiast, add a pinch of red pepper flakes or a drizzle of sriracha to the dressing for a spicy twist!
-
Switch Up the Greens: Mix in baby spinach or kale for a heartier salad that packs in more nutrients.
-
Limitless Veggies: Feel free to add thinly sliced bell peppers, sliced cucumbers, or shredded cabbage to your salad for added variety and textures.
Chef’s Notes
This recipe has truly evolved over time in my kitchen. Initially, it was just a quick side to accompany whatever I had grilled in the summer. But as I experimented with different dressings and add-ins, it became a beloved dish I’d serve to guests. There was one unforgettable gathering when I made this salad for a potluck, and it vanished in moments! I remember one friend asking for the recipe. She called it “a party in my mouth”—how fun is that?
One time, I forgot to add ginger and got caught up chatting with guests. To my surprise, no one even noticed. It’s a reminder that while we always aim for perfection in our dishes, the love and warmth of sharing food with others far outweigh the little mishaps.
FAQs and Troubleshooting
-
What if my dressing is too salty?
If you find the dressing too salty after combining it with the carrots, try adding a bit more honey to balance it out. You can also fold in more grated carrots to dilute the saltiness. -
Can I meal prep this salad?
Yes! This salad can store well in the fridge for about 2-3 days. However, for maximum freshness, consider adding the dressing right before serving, especially if you’re adding delicate ingredients like green onions. -
What if my salad is too sweet?
Sweetness can vary based on the type of honey/maple syrup used. If your salad is too sweet, add a splash more rice vinegar or a dash of salt to bring it back into balance. -
Can I make this salad in advance for a garden party?
Absolutely! This salad is perfect for making ahead. Just dress it right before serving to keep the carrots crisp and fresh.
Nutritional Info (optional)
Each serving of this vibrant salad offers a refreshing blend of vitamins and nutrients, thanks to the fresh carrots and simple ingredients. While I usually don’t focus heavily on nutrition, it’s worth noting that carrots are packed with beta-carotene, antioxidants, and essential vitamins. The healthy fats from sesame oil also provide satiation, making this salad a wholesome addition to any meal!
So there you have it! A delightful Asian Carrot Salad that dances with flavors, memories, and a touch of nostalgia. Tying on an apron has never felt so rewarding. I can’t wait to hear how you put your personal spin on this dish or any stories that come from your own kitchen adventures. Happy cooking, and remember—always invite joy to your table!
PrintVibrant Asian Carrot Salad
A colorful and refreshing salad featuring grated carrots, sesame oil, and rice vinegar — perfect as a side or a standalone dish.
- Prep Time: 15 minutes
- Cook Time: 0 minutes
- Total Time: 15 minutes
- Yield: 4 servings 1x
- Category: Salad
- Method: No Cooking
- Cuisine: Asian
- Diet: Vegan
Ingredients
- 3 large carrots, grated
- 2 tablespoons sesame oil
- 2 tablespoons rice vinegar
- 1 tablespoon soy sauce
- 1 tablespoon honey or maple syrup
- 1 clove garlic, minced
- 1 teaspoon grated ginger
- 1 tablespoon sesame seeds
- Salt and pepper to taste
- Green onions, chopped (for garnish)
Instructions
- Prep your carrots by peeling them to remove any tough outer skin. Grate the carrots using a box grater or a food processor, then set aside in a large mixing bowl.
- Make the dressing by whisking together the sesame oil, rice vinegar, soy sauce, honey (or maple syrup), minced garlic, and grated ginger in a small bowl.
- Combine the dressing with the grated carrots, tossing everything together with clean hands until the carrots are evenly coated.
- Season by adding sesame seeds, salt, and pepper, tossing again to combine.
- Garnish by transferring the salad to a serving bowl and topping with chopped green onions. Let it sit for 10-15 minutes before serving to allow the flavors to meld.
Notes
This salad can be made ahead of time and is best enjoyed fresh. Store in the fridge for about 2-3 days but add dressing just before serving for the best texture.
Nutrition
- Serving Size: 1 serving
- Calories: 150
- Sugar: 8g
- Sodium: 300mg
- Fat: 8g
- Saturated Fat: 1g
- Unsaturated Fat: 6g
- Trans Fat: 0g
- Carbohydrates: 18g
- Fiber: 3g
- Protein: 2g
- Cholesterol: 0mg
Keywords: carrot salad, Asian salad, vegan salad, healthy side, quick salad
Baked Parmesan Zucchini
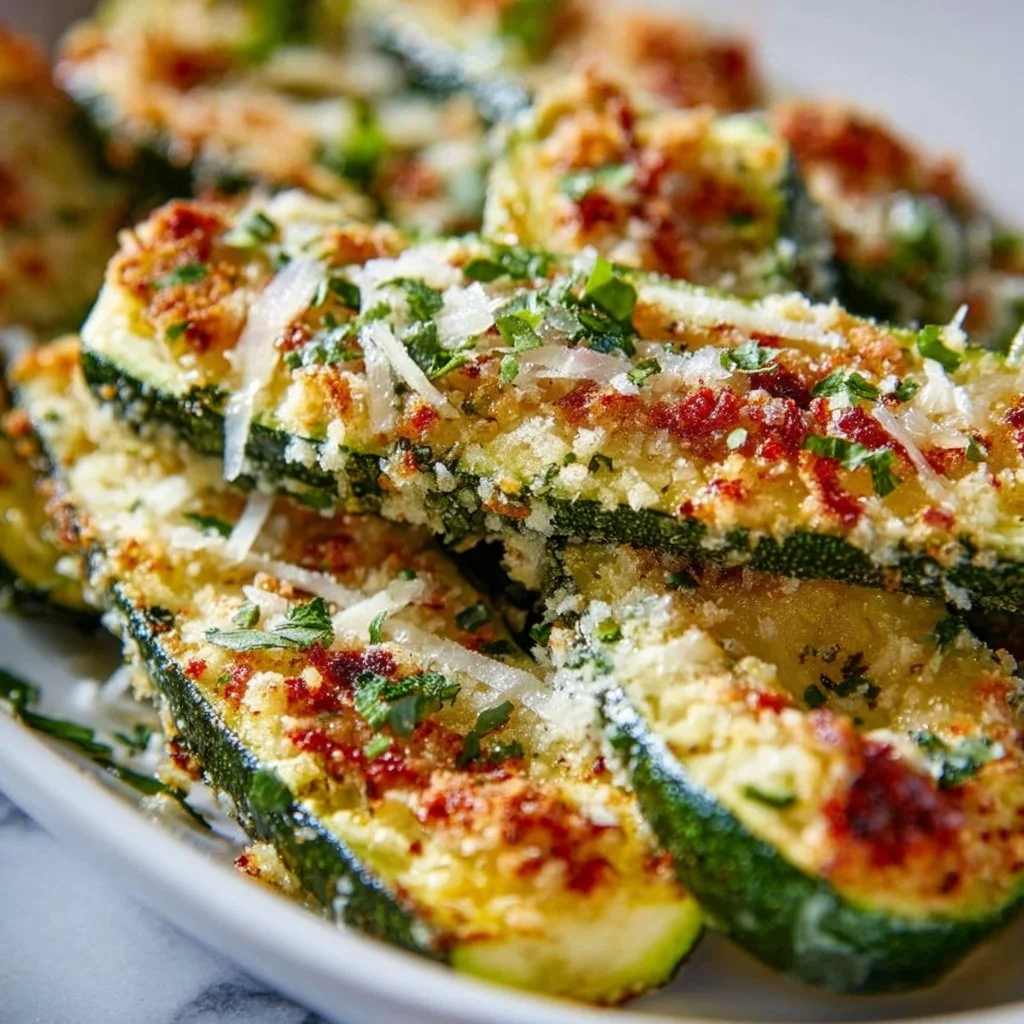
Baked Parmesan Zucchini: A Delightfully Easy Side Dish
When it comes to the kitchen, we all have that one dish that brings back extraordinary memories, right? For me, one of those cherished recipes is Baked Parmesan Zucchini. There’s something so satisfying about transforming simple zucchini into an impressive side dish that delights friends and family alike, all while embracing the essence of easy and elegant cooking.
Just picture this: It’s a warm summer evening, and I find myself at my parents’ house, the scent of fresh basil filling the air as our family gathers around the table. My mom is in the kitchen, expertly slicing zucchini from the garden. She hands me a bowl and offers a few of her kitchen tips about herbs and seasoning, and soon we are laughing and preparing a hearty meal together. Baked Parmesan Zucchini quickly became an essential part of those gatherings, effortlessly bridging the gap between effortless and delicious. It’s a dish that I’ve evolved over time—adding my own flair and discovering little tips and tricks to make it even more delightful.
This Baked Parmesan Zucchini is not just a side dish; it’s an invitation to gather around the dinner table and reminisce about cherished moments. Let’s dive into how to recreate this classic that’s bursting with flavor without overwhelming your kitchen workflow!
Ingredients
Here’s a rundown of what you’ll need—simple, accessible, and oh-so-delicious.
-
2 Medium Zucchinis, Sliced
Zucchini is the star of the show here! Choose firm zucchinis with vibrant skin. If you can find squash from a local farmer’s market, even better. You can also substitute yellow squash if that’s what you have on hand. -
1 Cup Parmesan Cheese, Grated
This ingredient adds richness and a delightful crunch. Opt for freshly grated Parm for maximum flavor. You can substitute with Pecorino Romano for a sharper bite or a dairy-free alternative if you’re going plant-based. -
1 Teaspoon Garlic Powder
Garlic powder packs a punch of flavor without the hassle of chopping fresh garlic. However, if you prefer a fresher taste, feel free to use 1-2 cloves of minced garlic instead. -
1 Teaspoon Italian Seasoning
This herb blend adds a lovely depth. You can always make your own blend using dried oregano, basil, and thyme for a personalized touch. -
Salt and Pepper to Taste
Essential for enhancing flavors. Remember, seasoning is key to making everything sing, so don’t skimp here! -
Olive Oil Spray
A light spritz of olive oil helps crisp up the zucchinis perfectly while keeping the dish elegant and healthy. If you don’t have an oil spray, just drizzle with a little olive oil, but make sure to toss the zucchini so it’s evenly coated.
Step-by-Step Instructions
Time to roll up those sleeves and get cooking! Follow these easy steps to create your Baked Parmesan Zucchini:
-
Preheat Your Oven
Preheat your oven to 400°F (200°C). This ensures that your zucchinis will bake evenly, giving you that delightful golden-brown finish. -
Prepare the Zucchini
Slice the zucchinis into ¼-inch thick rounds. Too thin, and they can get mushy; too thick, and they may not cook through. Aim for a nice, uniform cut for even cooking. -
Season the Zucchini
Place your zucchini slices on a parchment-lined baking sheet for easy cleanup (thank me later!). Spray them lightly with olive oil, then sprinkle with garlic powder, Italian seasoning, salt, and pepper. Toss them around with your hands to ensure they’re well-seasoned and coated with oil. -
Add the Parmesan
This is where the magic happens. Sprinkle the grated Parmesan cheese generously over the seasoned zucchini. If you’re feeling a little fancy, you can add a sprinkle of smoked paprika or red pepper flakes for an extra kick! -
Bake
Place the baking sheet in the oven and bake for about 20-25 minutes. Keep an eye on them! You want the zucchinis to be tender and the cheese to be bubbling and golden—not burnt. Give them a gentle shake halfway through to ensure even browning. -
Serve Warm
Once done, remove from the oven and let them cool for a couple of minutes. They’ll be scorching hot, so don’t rush to dig in! Serve them warm, and bask in the glory of your culinary triumph.
Serving Suggestions
To plate your Baked Parmesan Zucchini, simply transfer the slices thoughtfully onto a serving platter. Pair them with a drizzle of balsamic reduction for a sophisticated touch or get creative with a sprinkle of chopped fresh herbs like parsley or basil for that vibrant freshness. Not only do they taste divine, but they also look beautiful on your table. Bonus points for presentation!
Recipe Variations
Baked Parmesan Zucchini is wildly adaptable! Here are a few fun twists you can play with:
- Mediterranean Flair: Add some diced tomatoes and black olives before baking for a Mediterranean vibe.
- Zesty Lemon Zucchini: Squeeze some fresh lemon juice over the zucchinis just before serving for a bright, zesty kick.
- Cheesy Spinach Zucchini: Mix in some fresh spinach or other greens before adding the cheese for a nutrient boost.
- Herb-Infused: Swap in fresh garden herbs like thyme, rosemary, or oregano for a fresh twist.
- Spicy Zucchini: Toss in a pinch of cayenne pepper or crushed red pepper flakes if you’re feeling adventurous.
Chef’s Notes
Baked Parmesan Zucchini has been a staple in my kitchen for years, evolving each season as new ingredients become available. There was a phase where I experimented with adding breadcrumbs for crunch, but I found that the simple combination of cheese and zucchini really holds its own—sometimes, less is more! My favorite part about this recipe is how easily it invites conversation and enjoyment at the table, leading to laughter and camaraderie. I remember that one time I accidentally over salted them, and we all burst into laughter while trying to figure out how to save the dish—good times!
FAQs and Troubleshooting
Q: My zucchini came out soggy, what did I do wrong?
A: Soggy zucchini usually indicates they were too thickly sliced or overbaked. Make sure to slice them evenly and watch the baking time closely.
Q: Can I make this ahead of time?
A: While best enjoyed fresh, you can prep the zucchini and season it. Just bake it right before serving for the best texture.
Q: What should I do if I have leftovers?
A: Store them in an airtight container in the fridge for up to 3 days. Reheat them in the oven to restore their crispiness rather than the microwave.
Q: Can I freeze the Baked Parmesan Zucchini?
A: It’s not ideal, as freezing can impact texture, but if you must, freeze them after they’ve cooled completely. Reheat in the oven straight from the freezer, but they may not be as crisp.
Nutritional Information (Optional)
Per Serving (based on 4 servings):
- Calories: 150
- Protein: 9g
- Carbohydrates: 5g
- Fat: 10g
- Fiber: 1g
(Note: Nutritional values may vary based on specific ingredient brands used.)
Creating meals that spark joy and connection is the heart of what we do in the kitchen. This Baked Parmesan Zucchini is not just a recipe, but a beautiful way to bring a touch of warmth and elegance to your everyday table. So tie on your apron, invite a few friends over, and let’s make this simple-yet-delightful dish together. Happy cooking!
PrintBaked Parmesan Zucchini

A delightfully easy side dish transforming simple zucchini into an impressive dish that delights friends and family.
- Prep Time: 10 minutes
- Cook Time: 25 minutes
- Total Time: 35 minutes
- Yield: 4 servings 1x
- Category: Side Dish
- Method: Baking
- Cuisine: Italian
- Diet: Vegetarian
Ingredients
- 2 Medium Zucchinis, Sliced
- 1 Cup Parmesan Cheese, Grated
- 1 Teaspoon Garlic Powder
- 1 Teaspoon Italian Seasoning
- Salt and Pepper to Taste
- Olive Oil Spray
Instructions
- Preheat your oven to 400°F (200°C).
- Prepare the zucchinis by slicing them into ¼-inch thick rounds.
- Season the zucchini slices on a parchment-lined baking sheet, spraying them with olive oil and sprinkling with garlic powder, Italian seasoning, salt, and pepper.
- Add the grated Parmesan cheese generously over the seasoned zucchini.
- Bake for 20-25 minutes until tender and the cheese is bubbling and golden.
- Serve warm, optionally drizzling with balsamic reduction or garnishing with fresh herbs.
Notes
Best enjoyed fresh, but can be prepped ahead of time and baked right before serving.
Nutrition
- Serving Size: 1 serving
- Calories: 150
- Sugar: 2g
- Sodium: 300mg
- Fat: 10g
- Saturated Fat: 4g
- Unsaturated Fat: 5g
- Trans Fat: 0g
- Carbohydrates: 5g
- Fiber: 1g
- Protein: 9g
- Cholesterol: 20mg
Keywords: zucchini, parmesan, side dish, vegetarian, baked

Street Corn Pasta Salad
Street Corn Pasta Salad: A Flavorful Fusion of Fun and Freshness
Welcome to the world of flavor-packed recipes that blend nostalgia with creativity, just like my latest obsession—Street Corn Pasta Salad! If you’ve ever taken a trip to a fair or farmers’ market, "elote" or Mexican street corn likely caught your eye, with its tantalizing aroma and irresistible toppings. I was inspired to combine that vibrant flavor profile with pasta, resulting in a dish that’s not just delicious but also makes for a perfect potluck or summer gathering side. So grab your apron, pour yourself a refreshing drink, and let’s whip up this unforgettable dish!
This recipe encompasses everything I love about cooking: texture, freshness, and the joy of creating something that brings people together. Imagine sitting out on your patio, sun shining down, and digging into a bowl of this creamy, tangy pasta salad while sharing laughter and stories with friends. This is exactly the kind of meal that fuels not just our bodies but also our connections with one another.
A Walk Down Memory Lane 🌽
Reflecting on my childhood, one of my favorite family memories came from the summer fairs our town hosted. My siblings and I would beg our parents to take us to sample the local food stalls. Of all the decadent treats, nothing topped the street corn. My dad would always indulge us, and there we’d share corn cobs slathered with creamy, savory spreads and dusted with crumbled cheese, chili powder, and lime juice. As I grew older and gained confidence in the kitchen, I wanted to recreate that same joy at home.
This Street Corn Pasta Salad emerged from my adventures with pasta and a little culinary ingenuity. It’s a tribute to those fond memories and that unmistakable taste of summer, packed conveniently into a bowl—perfect for both intimate dinners and lively gatherings.
Ingredients
Here’s what you’ll need to pull this tasty dish together:
-
2 cups pasta
Use your favorite type of pasta, but short shapes like fusilli or rotini work best for holding onto all those delicious flavors. If you’re gluten-free, try a pasta made from legumes or rice. -
1 cup roasted corn
Fresh or frozen corn is great, but roasting it brings out that sweet depth of flavor. If you’re in a pinch, canned corn works, though it won’t have the same smokiness. -
1/2 cup cotija cheese, crumbled
Cotija adds a salty, crumbly texture. Feel free to substitute with feta or goat cheese if cotija is hard to find, but do taste as you go! -
1 lime, juiced
The fresh lime juice brightens up all the flavors—don’t skip this essential ingredient! You can substitute with lemon, but lime is traditional for that tangy kick. -
1 jalapeño, diced
This adds spice and kick! Remove the seeds for a milder taste or use bell peppers if you want to keep it sweet and mild. -
1/4 cup chili-lime dressing
A zesty dressing ties everything together! You can buy premade or whip up your own using mayo, lime juice, chili powder, garlic, and a touch of honey. -
Salt and pepper to taste
Always season to your liking. Adjust generously based on what you’re mixing in! -
Fresh cilantro for garnish (optional)
This adds a lovely herbaceous note. If cilantro isn’t your jam, parsley is a great alternative!
Step-by-Step Instructions
Now, let’s dive into the cooking process—a blend of tangy, creamy, and spicy that’s going to steal the show!
-
Cook the Pasta:
Start by boiling a large pot of salted water. Toss in your pasta and cook according to package directions until al dente—tender but still a bit firm. This will help your pasta hold up under all the delicious ingredients. Drain and rinse under cold water to stop the cooking process and cool it down. -
Roast the Corn:
If you’re using fresh corn, cut it off the cob and heat a skillet over medium-high heat. Sauté the kernels in a splash of olive oil, stirring occasionally, until they become slightly charred (about 5–7 minutes). The roasting is key for that robust flavor! If you’re using frozen corn, just pop it in the skillet until warmed through. -
Prep the Add-ins:
Dice the jalapeño and crumble the cotija cheese while the pasta and corn are cooking. Remember, if you want to control the heat, taste as you go. It’s all about balancing those flavors and heat levels! -
Mix the Dressing:
In a bowl, whisk together your chili-lime dressing ingredients or pour in the store-bought version. The zesty, spicy blend is what makes this pasta salad pop! -
Combine Everything:
In a large mixing bowl, combine the cooked pasta, roasted corn, jalapeño, and cotija cheese. Drizzle the chili-lime dressing over the top and gently toss everything together until well coated. The pasta will soak up the flavors, making each bite an explosion of deliciousness! -
Taste and Adjust:
Now comes the fun part—taste your salad! This is the moment to add salt, pepper, or even a splash more lime juice. Cooking is all about adjusting to YOUR palate. -
Chill:
Let your pasta salad sit in the fridge for at least 30 minutes to meld those flavors. It’s like letting a fine wine breathe; the wait will be worth it! -
Serve:
When you’re ready to impress your guests or family, give the salad one last gentle stir. Garnish with freshly chopped cilantro for that extra pop of color and flavor!
Serving Suggestions
To serve this Street Corn Pasta Salad, I love placing it in a vibrant bowl. If you’re feeling decorative, consider topping each serving with additional cotija, a lime wedge, or even some sliced jalapeños for a pop of color! Serve it chilled alongside grilled chicken, shrimp, or as part of a taco bar! Bon appétit!
Recipe Variations
If you’re feeling creative, here are some fun variations to switch things up:
-
Add Protein: Toss in some rotisserie chicken, shrimp, or black beans for a heartier option. This turns it into a complete meal!
-
Herb Infusion: Swap cilantro for fresh mint or dill for a unique herbal twist that changes the whole flavor profile!
-
Spicy Switch-Up: If you crave even more heat, consider adding diced serrano peppers or a splash of hot sauce.
-
Cheesy Crust: For a little indulgence, sprinkle some cheese on top and broil until bubbly. Instant comfort food!
-
Seasonal Veggies: Add in roasted bell peppers, summer squash, or avocado for bursts of color and nutrition!
Chef’s Notes
This recipe has transformed since its inception! Initially, I made it strictly in line with traditional street corn recipes, but over time, I experimented with adding pasta—that’s when I hit the jackpot! The flavor meld between creamy, tangy dressing and roasted corn creates a dish that feels like a summer fiesta in every bite. Plus, it’s a hit with kids and adults alike, making dinners delightful and healthy!
A little side note—once, I made this for a gathering with friends, and as we dug in, someone accidentally spilled chili-lime dressing all over the table! While we laughed, it felt like a scene straight out of a cooking show. Remember, cooking should be fun and joyous, even when things go slightly awry!
FAQs and Troubleshooting
1. Can I make this pasta salad ahead of time?
Absolutely! It’s perfect for meal prep. Just make sure to toss the salad again before serving to refresh the flavors.
2. How can I make it vegan?
Replace cotija cheese with a vegan alternative and swap the dressing with a dairy-free version. A cashew cream would work wonders!
3. What if I can’t find cotija cheese?
Feta or even Parmesan can work, but don’t hesitate to shop around local markets; you might just find some authentic alternatives!
4. Why does my pasta salad feel dry?
If it feels a bit dry after chilling, you can spritz in more lime juice or dressing before serving. The pasta will absorb moisture, and refreshing it will bring it back to life!
Nutritional Info (Optional)
This dish serves about 6 people. Each serving has approximately:
- Calories: 315
- Protein: 9g
- Carbs: 38g
- Fat: 15g
- Fiber: 3g
Cooking doesn’t have to be mundane—it’s an adventure! Remember, the kitchen is the heart of your home, and recipes like this Street Corn Pasta Salad make it easy to sprinkle love and creativity into every meal. Now, go out and create some magical moments around your table. Enjoy!
PrintStreet Corn Pasta Salad

A vibrant fusion of Mexican street corn and pasta, perfect for potlucks and summer gatherings.
- Prep Time: 15 minutes
- Cook Time: 15 minutes
- Total Time: 30 minutes
- Yield: 6 servings 1x
- Category: Salad
- Method: Mixing
- Cuisine: Mexican
- Diet: Vegetarian
Ingredients
- 2 cups pasta
- 1 cup roasted corn
- 1/2 cup cotija cheese, crumbled
- 1 lime, juiced
- 1 jalapeño, diced
- 1/4 cup chili-lime dressing
- Salt and pepper to taste
- Fresh cilantro for garnish (optional)
Instructions
- Cook the Pasta: Boil a large pot of salted water. Cook the pasta according to package directions until al dente, then drain and rinse under cold water.
- Roast the Corn: Cut fresh corn off the cob and sauté in a skillet over medium-high heat until slightly charred (about 5-7 minutes).
- Prep the Add-ins: Dice the jalapeño and crumble the cotija cheese.
- Mix the Dressing: Whisk together or pour your chili-lime dressing into a bowl.
- Combine Everything: In a large bowl, mix pasta, roasted corn, jalapeño, and cotija. Add the chili-lime dressing and gently toss.
- Taste and Adjust: Taste the salad and season with salt, pepper, or more lime juice as needed.
- Chill: Store in the fridge for at least 30 minutes to meld flavors.
- Serve: Give a gentle stir before serving and garnish with cilantro if desired.
Notes
This pasta salad can be made ahead of time and is great for meal prep.
Nutrition
- Serving Size: 1 serving
- Calories: 315
- Sugar: 4g
- Sodium: 300mg
- Fat: 15g
- Saturated Fat: 6g
- Unsaturated Fat: 8g
- Trans Fat: 0g
- Carbohydrates: 38g
- Fiber: 3g
- Protein: 9g
- Cholesterol: 30mg
Keywords: pasta salad, street corn, summer salad, potluck recipes, vegetarian recipes