
Minute Creamy American Potato Salad for Summer BBQ
Classic American Potato Salad: A Timeless Summer Staple
Hello, kitchen adventurers and fellow food lovers! Today, we’re diving into a dish that’s both a crowd-pleaser and a personal favorite: Classic American Potato Salad. Whether it’s a summer picnic, a barbecue with friends, or a simple family gathering, potato salad always makes a grand appearance. It’s creamy, savory, and just a little crispy from the celery—every bite sings of nostalgia and comfort.
A Taste of Nostalgia
Growing up, summer days were a blend of dirt bike rides through fields and laughter filling the air, but they were also about my Grandma May’s renowned potato salad. Every family gathering transformed into a festive showdown of who could get the first scoop! With her special recipe handed down through generations, each bowl was an intricate balance of flavors, a celebration of togetherness. Watching her whip up this salad was a lesson in ease and elegance, and I couldn’t wait to recreate it in my own kitchen. My first attempt wasn’t perfect—let’s just say there was more mustard than I bargained for! Through trial and error, I learned that cooking isn’t just about following a recipe; it’s about infusing your heart into every dish. So, gather around as we create a potato salad that would make Grandma May proud.
Ingredients
Here’s what you will need to whip up this delightful potato salad:
-
4-5 Small Russet Potatoes (peeled and cut into 1" cubes): Russets give a fluffy texture and hold up well in salads. If you’re in a pinch, Yukon golds work beautifully too!
-
1/4 cup Celery (sliced): Adds a satisfying crunch! You can substitute with fennel for a slightly different flavor or even omit it if you’re not a fan of crunch.
-
1/4 Onion (finely chopped): Use yellow onions for sweetness; if you prefer a milder taste, green onions or even shallots are a wonderful substitute.
-
1 tbsp Distilled Vinegar: This adds a tangy zing. Apple cider vinegar can be a nice, fruity alternative!
-
1/4 tsp Salt: Essential for enhancing all the flavors! Don’t skimp, but taste as you go to find your perfect balance.
-
Cracked Black Pepper (to taste): Feel free to get adventurous—try smoked paprika for a unique twist!
-
3 Hard Boiled Eggs (diced): They add richness and protein. If you’re avoiding eggs, you can skip them or try using a flax egg mixture for a vegan option.
-
1/3 cup Mayonnaise: The creamy base! For a lighter option, Greek yogurt works beautifully here. Want a tangier taste? A mix of mayo and sour cream will balance perfectly.
-
1 tsp Mustard: Adds zest and depth. Use Dijon for a sophisticated touch, or yellow mustard for that classic flavor.
-
2 tbsp Sweet Pickle Relish: This is the secret weapon for a dose of sweetness! You can mix in chopped dill pickles for a more tart flavor or even leave it out if sweetness isn’t your jam.
Step-by-Step Instructions
Ready to turn these fresh ingredients into a mouthwatering potato salad? Let’s get cooking!
-
Boil Those Potatoes: Place your cubed Russet potatoes in a large pot, cover with water, and bring to a boil. Add a pinch of salt to the water—which helps season the potatoes as they cook. Boil for about 10-12 minutes, or until fork-tender. Tip: Don’t overcook; no one enjoys mushy potatoes!
-
Cool Them Down: Drain your potatoes in a colander and rinse them with cold water to stop the cooking process. Let them hang out and cool down completely. Chef Hack: You can spread them out on a baking sheet to expedite the cooling process.
-
Prep the Veggies: While the potatoes cool, chop your celery and onion. The key here is to cut them finely so they disperse throughout the salad, creating pockets of flavor.
-
Make the Dressing: In a mixing bowl, combine the mayonnaise, mustard, distilled vinegar, salt, and cracked black pepper. This concoction will be the creamy goodness that ties everything together. Adjust the seasoning according to your taste—balance is king!
-
Combine Everything: In a large mixing bowl, combine your cooled potatoes, chopped celery, onion, diced eggs, and sweet pickle relish. Pour the dressing over the top and gently fold the ingredients together. Tip: Use a spatula instead of a spoon to keep your potatoes intact.
-
Taste and Adjust: Give your potato salad a taste! Now’s the time to sprinkle in more salt, pepper, or vinegar if needed. Each ingredient should shine!
-
Chill Out: Cover your potato salad with plastic wrap and let it chill in the refrigerator for at least 1 hour. This allows the flavors to mingle and develop further. Pro Tip: If you’re making this ahead of time for a gathering, it gets even better after a day in the fridge!
Serving Suggestions
When it’s time to serve, grab a beautiful serving bowl and scoop your creamy salad into it. A sprinkle of freshly cracked pepper on top adds a lovely finishing touch. Pair it with grilled meats, fresh salads, or just about anything from your summer kitchen table!
Recipe Variations
- Herbed Potato Salad: Toss in a handful of fresh herbs, such as dill or parsley, for an aromatic twist.
- Bacon-Lovers Delight: Add crumbled bacon for a smoky flavor that will have your guests coming back for seconds!
- Spicy Kick: Incorporate some chopped jalapeños or a splash of hot sauce into the dressing for heat.
- Mediterranean Twist: Swap out the mayo for Greek yogurt and add olives, feta, and cherry tomatoes for a refreshing variation.
- Vegan Option: Use vegan mayo and swap the eggs for a chickpea mix to create a “chickpea salad” vibe.
Chef’s Notes
This recipe has morphed over the years, and it’s fascinating how our tastes evolve. Originally, Grandma May’s version had a hearty slap of mustard, which didn’t quite sit right with my palate at first. But now? I crave that tangy flair! Sometimes I even throw in some crispy prosciutto for that delightful crunch. I adore how cooking allows us to improvise and make a recipe our own.
FAQs and Troubleshooting
1. My potatoes are mushy! What did I do wrong?
Ah, the classic potato dilemma. Cooking them too long in boiling water can lead to mushiness. Stick to around 10-12 minutes—keep an eye on them!
2. Can I make this ahead of time?
Absolutely! This salad gets even better after a day in the fridge. Just give it a stir and taste before serving—sometimes it needs a touch more seasoning after sitting.
3. What if I don’t like mayonnaise?
No worries! You can easily swap mayonnaise for Greek yogurt or even sour cream for a tangy flavor.
4. How can I make my potato salad creamy without all that mayo?
Try blending avocados into your dressing—this not only adds creaminess but also a delicious flavor!
Nutritional Info (Optional)
While I always advocate for thoughtful eating over strict dieting, awareness is key! Potato salad can vary widely in calories depending on the ingredients, but on average, a serving contains around 250 calories.
Let’s celebrate the fusion of tradition and creativity in the kitchen! When you tie on your apron for this classic American potato salad, remember the joy of sharing meals with loved ones. Dive in, share your twists, and soak in the moments around your table. Happy cooking!
PrintClassic American Potato Salad

A creamy, savory potato salad that’s a timeless summer staple, perfect for picnics and gatherings.
- Prep Time: 20 minutes
- Cook Time: 12 minutes
- Total Time: 1 hour 32 minutes
- Yield: 6 servings 1x
- Category: Side Dish
- Method: Boiling
- Cuisine: American
- Diet: Vegetarian
Ingredients
- 4–5 Small Russet Potatoes (peeled and cut into 1″ cubes)
- 1/4 cup Celery (sliced)
- 1/4 Onion (finely chopped)
- 1 tbsp Distilled Vinegar
- 1/4 tsp Salt
- Cracked Black Pepper (to taste)
- 3 Hard Boiled Eggs (diced)
- 1/3 cup Mayonnaise
- 1 tsp Mustard
- 2 tbsp Sweet Pickle Relish
Instructions
- Boil those potatoes: Place your cubed Russet potatoes in a large pot, cover with water, and bring to a boil. Add a pinch of salt to the water, and boil for about 10-12 minutes, or until fork-tender.
- Cool them down: Drain your potatoes, rinse them with cold water to stop the cooking process, and let them cool completely.
- Prep the veggies: While the potatoes cool, chop the celery and onion finely.
- Make the dressing: In a mixing bowl, combine the mayonnaise, mustard, distilled vinegar, salt, and cracked black pepper. Adjust the seasoning according to your taste.
- Combine everything: In a large mixing bowl, combine the cooled potatoes, chopped celery, onion, diced eggs, and sweet pickle relish. Pour the dressing over and gently fold to combine.
- Taste and adjust: Give your salad a taste and sprinkle in more salt, pepper, or vinegar if needed.
- Chill out: Cover your salad with plastic wrap and let it chill in the refrigerator for at least 1 hour.
Notes
For variations, consider adding fresh herbs, crumbled bacon, or a spicy kick with jalapeños.
Nutrition
- Serving Size: 1 serving
- Calories: 250
- Sugar: 3g
- Sodium: 300mg
- Fat: 10g
- Saturated Fat: 1.5g
- Unsaturated Fat: 7g
- Trans Fat: 0g
- Carbohydrates: 32g
- Fiber: 2g
- Protein: 6g
- Cholesterol: 70mg
Keywords: potato salad, classic, summer side dish, American, creamy salad
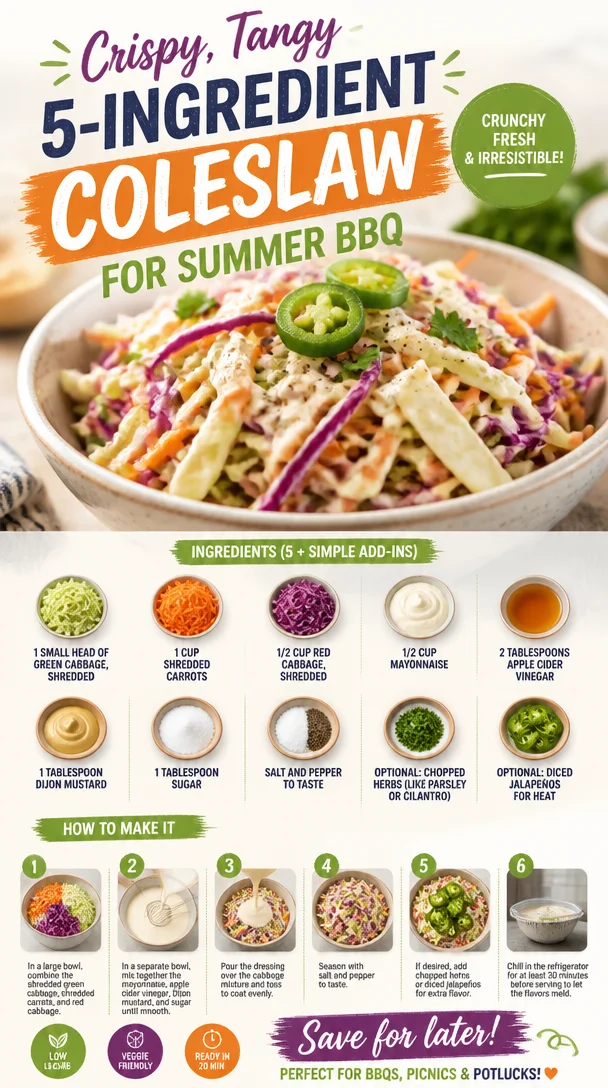
Crispy, Tangy 5-Ingredient Coleslaw for Summer BBQ
A Crunchy Symphony: Bold Flavor-Packed Coleslaw
Welcome back, fellow food enthusiasts! Today, we’re diving into the crunchy, vibrant world of coleslaw—a dish that’s often overlooked but absolutely deserves the spotlight. This isn’t just your typical side dish; we’re talking about a bold flavor-packed coleslaw that’s refreshing, zesty, and completely customizable. It’s perfect for summer barbecues, family gatherings, or even a cozy weeknight dinner. So grab your apron, and let’s create something delicious together!
A Trip Down Memory Lane
When I think about coleslaw, I can’t help but recall the summer picnics at my grandparents’ house. Every year, they hosted a neighborhood barbecue where the vibrant colors of freshly grilled meats mingled with the laughter of friends and family. Coleslaw was always a staple at those gatherings. My grandmother made it from scratch, pouring her heart into the dressing, which I’ve since learned was the secret to her beloved recipe.
I remember sneaking spoonfuls of that creamy goodness while she prepared the food—sometimes, I would sneak an extra dollop when no one was watching! It was that perfect balance of crunch and cream that made it irresistible. This experience taught me how food could hold so much nostalgia and joy. It’s not just what’s on the plate; it’s about the memories we create while we share a meal with those we love. Now, as I put my own spin on coleslaw, I hope to capture that same delight and share it with all of you.
Ingredients
Let’s gather our fresh ingredients! Here’s what you’ll need for this flavor-packed coleslaw:
-
1 small head of green cabbage, shredded
The heart of our coleslaw! Green cabbage adds crunch and a subtle sweetness. If you prefer a lighter version, Napa cabbage is a great alternative. -
1 cup shredded carrots
Carrots not only add color but also a natural sweetness. You can use pre-shredded carrots for convenience, or even swap with shredded radishes for a peppery kick! -
1/2 cup red cabbage, shredded
This gives a beautiful pop of color and a slightly more robust flavor compared to green cabbage. If you’re avoiding red cabbage, you can stick with all green cabbage for simplicity. -
1/2 cup mayonnaise
The creamy base that ties everything together! For a healthier twist, you can use Greek yogurt instead; it’ll give you that creamy texture with a protein boost. -
2 tablespoons apple cider vinegar
This adds a tangy zing that brightens up the whole dish. If you’re out of apple cider vinegar, white wine vinegar or rice vinegar can work as substitutes. -
1 tablespoon Dijon mustard
A touch of zesty flavor! You can swap it for yellow mustard if that’s what you have, but Dijon adds a sophisticated note. -
1 tablespoon sugar
Just a hint of sweetness! Feel free to adjust the amount based on your taste or use honey for a natural alternative. -
Salt and pepper to taste
Essential for enhancing all the flavors. Don’t skip on the seasoning! -
Optional: chopped herbs, like parsley or cilantro, for garnish
Fresh herbs add a burst of color and freshness. Use whatever you have on hand, or totally skip it if you’re not a fan. -
Optional: diced jalapeños for heat
For those who like a little kick, adding jalapeños can elevate your coleslaw to the next level!
Step-by-Step Instructions
Now that we have our ingredients ready, let’s get cooking! This coleslaw is quick to whip up, making it a perfect last-minute side dish. Follow these steps:
-
Shred the Cabbage
Start by carefully shredding the green cabbage and red cabbage. You can use a sharp knife, a box grater, or a food processor. If using a processor, be sure to pulse gently to avoid over-processing. You want that perfect crunch!Chef Tip: For an even more delicate texture, sprinkle some salt on the cabbage after shredding and let it sit for 10 minutes. This process will draw out excess moisture and enhance the crunch.
-
Prepare the Carrots
If you’re shredding fresh carrots, get them on the coarse grater side for maximum crunch. Mix them into your mound of shredded cabbage.Little Hack: You can also julienne the carrots for a more sophisticated look. Just remember, the goal is a balance of colors and textures!
-
Make the Dressing
In a separate bowl, whisk together the mayonnaise, apple cider vinegar, Dijon mustard, and sugar until fully combined. This is where the magic happens! Taste the dressing and adjust the seasoning with salt and pepper.Chef Insight: If you like a creamier coleslaw, feel free to add a tad more mayo. But remember, too much can overpower the lovely crunch of the veggies!
-
Combine the Mixture
Pour the dressing over the shredded veggies. With clean hands or a spatula, mix everything together gently. You want to ensure every piece of cabbage and carrot gets coated without crushing them.Tip on Mixing: If you let the mixture sit in the fridge for about 30 minutes before serving, the flavors will meld beautifully, and the cabbage will soften slightly without losing its crunch.
-
Final Touches
If you’re using optional ingredients like chopped herbs or jalapeños, fold them in at this stage. It will add that extra flair to your coleslaw!
Serving Suggestions
Now that your coleslaw is perfectly mixed and flavorful, it’s time to serve! You can plate it in a large, beautiful bowl for family-style sharing or serve individual portions on crisp lettuce leaves for a fresh presentation. A sprinkle of fresh herbs on top adds a touch of elegance and color.
Recipe Variations
This coleslaw is versatile, and there are plenty of ways to give it your unique twist! Here are a few ideas:
-
Tropical Twist: Add diced pineapple or mango for a fruity, summery flavor. You can also swap half the mayo for coconut yogurt for a tropical vibe.
-
Spicy Kick: Toss in some thinly sliced jalapeños or a dash of hot sauce for those spice lovers in your life.
-
Asian-Inspired: Substitute the mayo with sesame oil and add thinly sliced bell peppers, snow peas, and a drizzle of soy sauce for an Asian coleslaw.
-
Crunchy Additions: Throw in some sunflower seeds, pumpkin seeds, or toasted almonds for an extra crunch and a delightful nutty flavor.
-
Vegan Option: Use vegan mayo and add a splash of plant-based milk to keep it creamy and satisfying without any animal products.
Chef’s Notes
This coleslaw recipe has evolved over the years, just like my cooking skills. I once made a colossal mistake by forgetting to season the dressing, and let me tell you, a bland coleslaw is a sad story! Learning from my failures, I now emphasize how crucial it is to taste and adjust along the way. Let those flavors shine!
As I experiment more with my recipes, I often find new inspiration in the vegetables I have waiting for me. Coleslaw is forgiving and adaptable, which is what makes it so fun to make. And honestly, the more you make it, the easier it gets to play around with flavors!
FAQs and Troubleshooting
1. My coleslaw turned out too watery. What went wrong?
This could be due to sweat from the cabbage. Remember my tip about salting the shredded cabbage? This helps prevent excess water release. If it happens, just drain the excess liquid before serving.
2. Can I make coleslaw in advance?
Absolutely! Making it a day ahead can deepen the flavors. Just give it a good stir before serving. However, if you add herbs or other greens, wait to mix them in until right before serving to keep everything fresh.
3. What can I serve coleslaw with?
Coleslaw pairs beautifully with grilled meats, sandwiches, or as a topping for tacos! It’s a versatile companion that can elevate almost any dish.
4. How can I store leftover coleslaw?
Keep it in an airtight container in the fridge. It should last for about 3 days. Just note that the longer it sits, the softer it becomes! Sometimes I like to turn leftovers into a vibrant wrap by adding it to a tortilla with some grilled chicken or roasted vegetables.
Nutritional Info
While I won’t dive into specific numbers, it’s worth noting that coleslaw can be a healthy addition to your meals, packed with vitamins from the veggies. Using Greek yogurt instead of mayo can lower the calories while adding protein.
There you have it—your very own recipe for bold flavor-packed coleslaw! This dish isn’t just about ingredients on a list; it’s about creating moments around the table, just like my grandmother did. I hope this recipe brings you as much joy as it brings me. Remember, cooking is all about creativity and connection. So tie on that apron, have some fun, and let’s make memories together at the kitchen table!
PrintCrunchy Symphony: Bold Flavor-Packed Coleslaw
A refreshing, zesty coleslaw that’s perfect for summer gatherings, featuring green and red cabbage, shredded carrots, and a creamy dressing.
- Prep Time: 15 minutes
- Cook Time: 0 minutes
- Total Time: 15 minutes
- Yield: 4 servings 1x
- Category: Side Dish
- Method: Mixing
- Cuisine: American
- Diet: Vegetarian
Ingredients
- 1 small head of green cabbage, shredded
- 1 cup shredded carrots
- 1/2 cup red cabbage, shredded
- 1/2 cup mayonnaise
- 2 tablespoons apple cider vinegar
- 1 tablespoon Dijon mustard
- 1 tablespoon sugar
- Salt and pepper to taste
- Optional: chopped herbs, like parsley or cilantro, for garnish
- Optional: diced jalapeños for heat
Instructions
- Shred the cabbage: Start by carefully shredding the green cabbage and red cabbage.
- Prepare the carrots: If you’re shredding fresh carrots, get them on the coarse grater side for maximum crunch.
- Make the dressing: In a separate bowl, whisk together the mayonnaise, apple cider vinegar, Dijon mustard, and sugar until fully combined.
- Combine the mixture: Pour the dressing over the shredded veggies and mix everything together gently.
- Final touches: If you’re using optional ingredients like chopped herbs or jalapeños, fold them in at this stage.
- Serve: Plate it in a large bowl or serve individual portions on crisp lettuce leaves.
Notes
For a creamier coleslaw, feel free to add a tad more mayo. If you want a healthier twist, substitute Greek yogurt for mayonnaise.
Nutrition
- Serving Size: 1 serving
- Calories: 150
- Sugar: 3g
- Sodium: 200mg
- Fat: 10g
- Saturated Fat: 1.5g
- Unsaturated Fat: 8g
- Trans Fat: 0g
- Carbohydrates: 15g
- Fiber: 2g
- Protein: 2g
- Cholesterol: 5mg
Keywords: coleslaw, side dish, summer salad, crunchy, vegetarian, barbecue, homemade
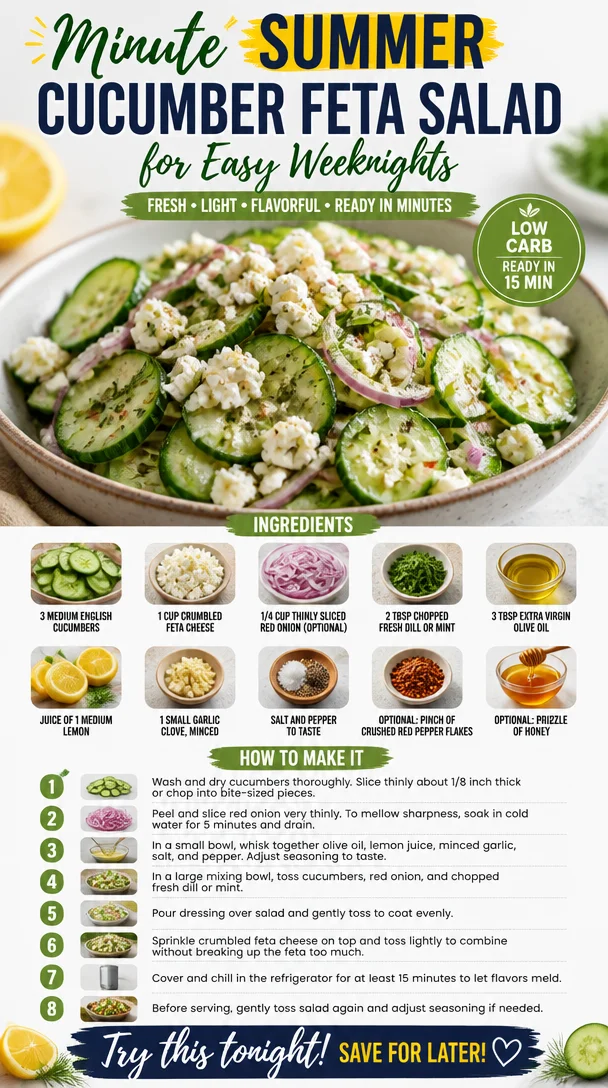
Minute Summer Cucumber Feta Salad for Easy Weeknights
The Ultimate Classic Cucumber Feta Salad Recipe: A Refreshing Summer Delight
Hello there, fellow food lovers! Today, we’re diving into a recipe that’s one of my all-time favorites: the Classic Cucumber Feta Salad. Not only is this dish a vibrant celebration of fresh ingredients, but it’s also incredibly simple to make. Perfect for summer picnics, effortless dinners, or just to brighten up your weeknight meals, this salad is sure to impress. So grab your apron and let’s get started on this tasty journey!
A Taste of Nostalgia
Growing up, summer weekends at my grandmother’s house were sacred. The sun would shine brightly, the garden was bursting with life, and the air was filled with laughter and the sizzling sounds of the grill. One particularly vivid memory is of my grandmother whipping up her famous cucumber salad. She’d take the freshest cucumbers from her garden, paired with a sprinkling of salty feta cheese and a drizzle of good olive oil. The combination was simple yet delightful, and it embodied everything great about summer—the warmth, the sunshine, and the joy of being together.
Now, every time I make this Classic Cucumber Feta Salad, I’m transported back to those carefree days, sharing stories and enjoying the simple flavors of fresh ingredients. It’s more than just a salad; it’s a reminder to cherish those moments spent around the table. Plus, it’s a recipe that anyone can make, and I’m excited to help you recreate this summer staple.
Ingredients
Here’s a list of all the ingredients you’ll need for this refreshing salad, along with some helpful notes:
-
3 medium English cucumbers: English cucumbers are perfect for this salad because they have a thinner skin and fewer seeds, making them ideal for slicing. If you can’t find them, you can use regular cucumbers; just peel them if the skin is too thick.
-
1 cup crumbled feta cheese: Feta adds a creamy and salty kick to the salad. You can substitute it with goat cheese or even a dairy-free cheese option if you want to keep it vegan.
-
1/4 cup thinly sliced red onion (optional): Red onion offers a mild, sweet crunch. If you’re not a fan of onion, feel free to leave it out, or replace it with green onions for a milder flavor.
-
2 tablespoons chopped fresh dill or mint: Fresh herbs elevate this salad beautifully. Dill adds a classic flavor reminiscent of summertime, while mint brings a refreshing twist. Use whatever you have on hand or prefer!
-
3 tablespoons extra virgin olive oil: This will serve as the base of your dressing. A good-quality olive oil will enhance the flavors and add richness. If you prefer, you can substitute with avocado oil for a different taste.
-
Juice of 1 medium lemon (about 2 tablespoons): Fresh lemon juice brightens the salad and balances the creaminess of the feta. If you’re in a pinch, bottled lemon juice will work, but fresh is always best!
-
1 small garlic clove, minced: Garlic adds wonderful flavor. If you’re sensitive to raw garlic, you can reduce the amount or omit it altogether.
-
Salt and pepper to taste: Seasoning is essential! Don’t forget to taste as you go.
-
Optional: pinch of crushed red pepper flakes: If you like a little heat, this is a perfect addition!
-
Optional: drizzle of honey: For those who enjoy a sweet twist, a bit of honey can offset the saltiness of the feta beautifully.
Step-by-Step Instructions
Now that we have our ingredients ready, let’s jump into making this gorgeous salad! Follow these steps, and I promise you’ll surprise yourself with your kitchen prowess.
-
Prepare the cucumbers: Start by washing your cucumbers thoroughly. Slice them thinly using a sharp knife or a mandolin for uniformity. If you prefer, you can also chop them into bite-size pieces for a more casual vibe. Set them aside in a large mixing bowl.
-
Add the onion (if using): If you opted for red onion, add the thinly sliced pieces to the bowl with the cucumbers. This adds a lovely crunch and sweetness. If the flavor is too strong for your taste, soaking the onion slices in water for a few minutes can help mellow them out!
-
Mix in the feta: Crumble the feta cheese over the cucumbers and onion. The creamy texture of the cheese will blend wonderfully with the other ingredients, providing that signature salty flavor.
-
Chop the herbs: Roughly chop the fresh dill or mint (or both!). Add the herbs to the salad mix, giving it that colorful burst of green while infusing fresh flavors.
-
Make the dressing: In a small bowl, whisk together the extra virgin olive oil, lemon juice, minced garlic, salt, and pepper. If you’re feeling adventurous, you can also mix in the crushed red pepper flakes and honey at this stage.
-
Combine everything: Drizzle the dressing over the cucumber mixture and gently toss until everything is evenly coated. Be careful not to mash the feta; you still want those lovely crumbles to shine through!
-
Taste and adjust: Now’s your chance to taste your salad! Add more salt, pepper, or lemon juice as needed. It should be a delightful balance of fresh, crunchy, salty, and savory.
-
Chill: For the best flavor, let the salad sit in the fridge for about 30 minutes. This allows all the flavors to meld beautifully.
Serving Suggestions
Once your salad has chilled and is ready to serve, it’s time to plate! This Cucumber Feta Salad is as beautiful as it is delicious. Serve it in a large bowl for family-style dining or portion it into individual servings for a more formal gathering. Drizzle with a little extra olive oil and sprinkle some fresh herbs on top for a lovely presentation. It pairs wonderfully with grilled meats, crusty bread, or even as a stand-alone light lunch!
Recipe Variations
Now that you know the classic recipe, why not get a bit creative? Here are a few fun variations you can try:
-
Mediterranean Twist: Add kalamata olives and cherry tomatoes for a colorful Mediterranean vibe.
-
Spicy Kick: Toss in some sliced jalapeños or a diced red chili for a spicy twist!
-
Fruit Fusion: Add diced watermelon or strawberries for a sweet and refreshing take.
-
Quinoa Boost: Mix in some cooked quinoa for added texture and heartiness.
-
Vegan Delight: Swap feta for soaked cashews blended with nutritional yeast, lemon juice, and a pinch of salt for a vegan-friendly version.
Chef’s Notes
Every recipe has its journey, and this Cucumber Feta Salad has evolved over the years. Initially, I kept it super simple, just cucumbers and feta. But as I’ve grown to appreciate the flavors and textures that different ingredients bring, I’ve added herbs, spices, and even fruits to make this dish my own. One of my kitchen stories involves an impromptu summer barbecue where I forgot the lemon! Instead, I used some balsamic vinegar—totally unexpected, yet surprisingly delightful. Cooking is all about the spirit of experimentation, so don’t shy away from making this salad your own.
FAQs and Troubleshooting
-
Can I make this salad ahead of time?
Absolutely! This salad can be made a day in advance. Just make sure to store it in an airtight container in the fridge. The flavors will deepen, but be cautious with cucumbers as they may release water, making the salad a bit soggy. -
What if my cucumbers are bitter?
If your cucumbers taste bitter, it could be due to a harsh skin. Peeling them before using can help reduce bitterness. Also, scrubbing them under cold water before slicing can improve flavor! -
How long will this salad last?
This salad is best enjoyed fresh but can typically last 2-3 days in the fridge. Just remember that the cucumbers will lose some of their crunch over time. -
What can I serve with this salad?
This cucumber feta salad is incredibly versatile! It pairs well with grilled chicken, steak, seafood, or even some hearty pasta dishes. Perfect alongside anything hot off the grill!
Nutritional Information
While this recipe is also about flavor, it’s good to know what you’re enjoying! Each serving of this Classic Cucumber Feta Salad is packed with refreshing veggies and heart-healthy fats from olive oil. It’s low in calories, making it a guilt-free addition to any meal!
There you have it, my dear friends! The Classic Cucumber Feta Salad is not just a dish; it’s a summer experience waiting to happen. I hope you try this recipe and make your own cherished memories around the table. Remember, cooking should be fun and fulfilling, so enjoy every moment in your kitchen. Happy cooking! 🍽️
PrintClassic Cucumber Feta Salad
A refreshing summer salad made with fresh cucumbers, crumbled feta cheese, and herbs.
- Prep Time: 15 minutes
- Cook Time: 0 minutes
- Total Time: 30 minutes
- Yield: 4 servings 1x
- Category: Salad
- Method: No-Cook
- Cuisine: Mediterranean
- Diet: Vegetarian
Ingredients
- 3 medium English cucumbers
- 1 cup crumbled feta cheese
- 1/4 cup thinly sliced red onion (optional)
- 2 tablespoons chopped fresh dill or mint
- 3 tablespoons extra virgin olive oil
- Juice of 1 medium lemon (about 2 tablespoons)
- 1 small garlic clove, minced
- Salt and pepper to taste
- Optional: pinch of crushed red pepper flakes
- Optional: drizzle of honey
Instructions
- Prepare the cucumbers: Start by washing your cucumbers thoroughly. Slice them thinly using a sharp knife or a mandolin for uniformity. Set them aside in a large mixing bowl.
- Add the onion (if using) to the bowl with the cucumbers.
- Mix in the feta cheese over the cucumbers and onion.
- Chop the fresh dill or mint and add to the salad.
- Make the dressing by whisking together olive oil, lemon juice, minced garlic, salt, and pepper.
- Combine everything by drizzling the dressing over the salad and gently tossing.
- Taste and adjust seasoning as needed.
- Chill in the fridge for about 30 minutes.
Notes
Great for summer picnics and pairs well with grilled meats.
Nutrition
- Serving Size: 1 serving
- Calories: 200
- Sugar: 3g
- Sodium: 450mg
- Fat: 15g
- Saturated Fat: 4g
- Unsaturated Fat: 10g
- Trans Fat: 0g
- Carbohydrates: 10g
- Fiber: 2g
- Protein: 6g
- Cholesterol: 15mg
Keywords: cucumber, salad, feta, summer, healthy
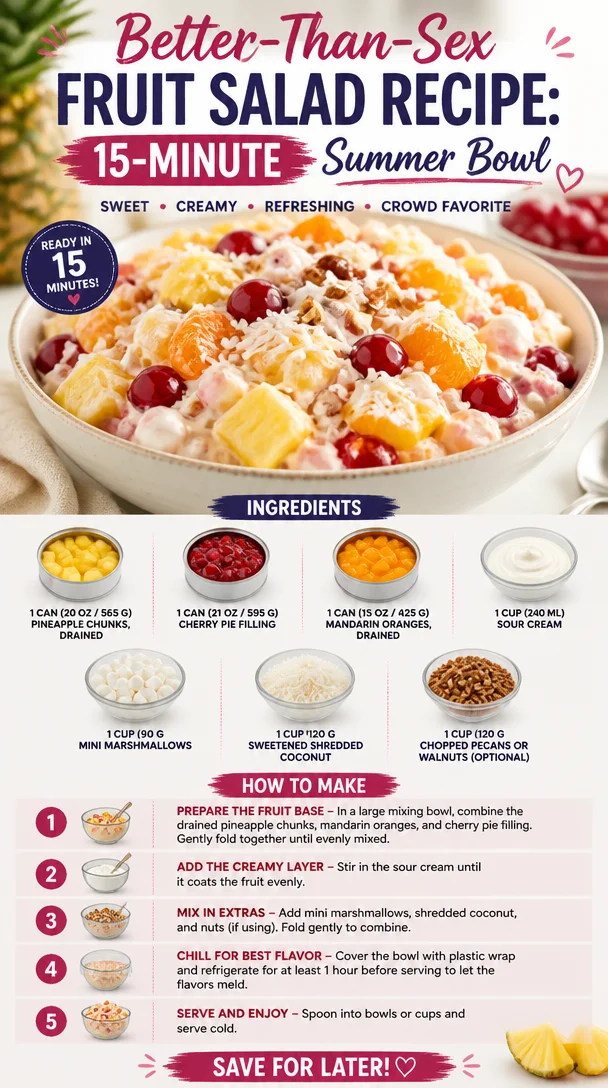
Better-Than-Sex Fruit Salad Recipe: 15-Minute Summer Bowl
Better Than Sex Fruit Salad: A Sweet Indulgence for Every Occasion
Hello, my lovely foodies! Today, I am bursting with excitement to share a recipe that never fails to bring smiles and giggles to the table. We’re diving into the delightful world of Better Than Sex Fruit Salad – a dish so tempting, you’ll wonder how something so simple can bring such joy!
Now, let’s get real here. Who wouldn’t want to enjoy a fruit salad that combines fun, nostalgia, and a hint of cheeky humor? This salad has garnered a reputation for being the star of barbecues, potlucks, and family feasts alike. It’s fruity, creamy, and sweet – all the things we love in a dessert as we gather with friends and family.
Let’s set the scene: Imagine a vibrant, sunny day with laughter echoing as you flip burgers on the grill. The air is tinged with the sweet scent of summer, and you reach for the dish that ties it all together – this luscious fruit salad. A harmonious blend of flavors and textures, garnished with a sprinkle of laughter, it becomes a centerpiece everyone wants to dig into second and third servings.
Let me take you back to the first time I tasted Better Than Sex Fruit Salad. It was at my Aunt Clara’s backyard barbecue. She always had a flair for dramatic cooking, and this dish was no exception. As soon as she plopped that giant bowl on the table, the crowd erupted with oohs and aahs. I remember sneaking a few spoonfuls before dinner, captivated by the combination of juicy fruits, creamy sour cream, and crunchy nuts. It was a simple dish that ignited a whirlwind of joy, and I was hooked.
Fast forward to today, and I’ve made my own tweaks while keeping the essence of Aunt Clara’s creation alive. It remains a family favorite, proving that great food truly brings us together. So, are you ready to make magic happen in your kitchen? Let’s roll up those sleeves and get to it!
Ingredients
To whip up your own Better Than Sex Fruit Salad, you’ll need the following ingredients:
-
1 can (20 oz / 565 g) pineapple chunks, drained
Fresh or canned, pineapple adds a tropical sweetness. If you prefer fresh, just chop up an equivalent amount, and grab a ripe pineapple for that extra zing! -
1 can (21 oz / 595 g) cherry pie filling
This is one of the stars of the show! You can find it in the baking aisle. Don’t fancy cherries? Swap with strawberry pie filling for a berry twist. -
1 can (15 oz / 425 g) mandarin oranges, drained
These little gems add a burst of color and flavor. You can use fresh mandarin oranges, but peeling those little guys takes patience. -
1 cup (240 ml) sour cream
The creamy dressing that ties everything together. Greek yogurt works well as a health-conscious alternative, offering a similar texture with extra protein. -
1 cup (90 g) mini marshmallows
Adding a hint of nostalgia, these soft bites bring sweetness. Swap with chopped dates or dried fruit if you prefer a healthier option that still satisfies that sweet tooth. -
1 cup (120 g) sweetened shredded coconut
Coconut adds a tropical flair and a chewy texture. Unsweetened coconut works too, especially for those who want to dial down the sweetness. -
1 cup (120 g) chopped pecans or walnuts (optional)
A nutty crunch elevates the dish. Don’t have nuts on hand? Try sunflower seeds or omit them entirely for a nut-free treat.
Step-by-Step Instructions
Now that we’re prepped and excited, let’s dive into making this luscious fruit salad!
-
Prepare the Fruits
Start by draining the canned fruits. This step is key to avoiding a watery salad. Make sure your pineapple, cherries, and mandarin oranges are all well-drained. Use a fine mesh strainer if you have one. Place them in a large mixing bowl with enough space for stirring. -
Add the Cherry Pie Filling
Next, scoop in that cherry pie filling. The tartness of the cherries pairs beautifully with the sweetness of the pineapple and oranges. Gently fold it into the fruits, being careful not to break up the oranges too much. It should feel like a delightful, colorful mashup! -
Incorporate the Sour Cream
Time to introduce the star dressing! Add the cup of sour cream to the bowl and start folding it in. This is where the magic happens—the creamy texture envelops the fruits, creating a luscious filling. Make sure every piece of fruit gets kissed by that creamy goodness! -
Mix in the Mini Marshmallows and Coconut
Sprinkle in the mini marshmallows and sweetened shredded coconut. Again, fold them in gently. This is where the texture of the salad starts to shine! Don’t forget to taste the mixture at this stage—oh, the sweetness will have you swooning. -
Add the Chopped Nuts
If you’re opting for those delicious pecans or walnuts, now is the time to add them. Stir lightly to distribute evenly. This crunch factor makes this fruit salad a must-have on your table! Plus, it adds that lovely contrast in texture. -
Chill Before Serving
Cover the mixing bowl with plastic wrap or transfer the salad to a serving bowl with a lid. Refrigerate for at least 30 minutes before serving to let the flavors meld together. Trust me; this waiting game is worth it! -
Serve and Enjoy
When you’re ready to serve, give it a quick stir to mix any settling. Scoop it into individual bowls or let guests serve themselves from a big, beautiful platter. Don’t forget to go in for seconds!
Serving Suggestions
When it comes to plating, simplicity is key. Use a chilled glass bowl to showcase the vivid colors of the salad, or opt for individual dessert cups for a more polished presentation. Garnish each serving with a light sprinkle of coconut on top and a few extra pecans for that added crunch.
Serve alongside grilled meat or barbecue for a satisfying contrast, or enjoy it as a stand-alone light dessert. Either way, don’t forget the spoons and enjoy every spoonful!
Recipe Variations
Want to play around with flavors? Here are a few ideas:
- Tropical Twist: Add banana slices and swap out the cherry pie filling for mango puree.
- Berry Delight: Replace the cherries with mixed berries for a fresh take filled with seasonal flavors.
- Creamy Dream: Stir in a splash of vanilla extract for a deeper flavor profile, elevating the creamy aspect.
- Nut-Free Option: Omit the nuts and double down on the marshmallows for that added sweetness, perfect for those with allergies.
- Healthy Spin: Use low-fat Greek yogurt instead of sour cream and ditch the mini marshmallows. Add a handful of fresh berries for extra color and flavor!
Chef’s Notes
Oh, the stories I could tell you about this fruit salad! Over the years, I’ve seen it grace countless tables – from birthday parties to holiday feasts. Once, I absentmindedly added a sprinkle of cinnamon, and you wouldn’t believe the compliments that rolled in! It prompted a new trend among my friends, who now swear by the addition.
This recipe has evolved but kept its roots firmly planted in joy and comfort. Keep it playful, get your little ones involved by letting them pour the ingredients in, and don’t shy away from making it your own. Every kitchen holds a unique flavor story, and this dish can be a memory waiting to happen.
FAQs and Troubleshooting
-
Can I make this fruit salad ahead of time?
Absolutely! It can be prepared the day before; just keep it covered in the fridge. The flavors deepen and become even more delightful! -
What if my fruit salad seems too sweet?
Balance is key! You can add a squeeze of lemon or lime juice to offset the sweetness. Plus, it adds a refreshing zing! -
How long will leftovers last?
If stored properly, this fruit salad can last 2-3 days in the fridge. Just keep in mind that the fruits may soften over time. -
Can I change the base?
Definitely! Greek yogurt or light cream cheese blended with a little whipped cream will give you different textures and flavors while keeping it creamy.
Nutritional Info
While I typically focus on joy rather than counting calories, it’s helpful to know that each serving packs a punch of vitamins from the fruits, healthy fats from the nuts, and a touch of sweetness from the sour cream and marshmallows.
And there you have it, friends! Your ultimate guide to making a Better Than Sex Fruit Salad that’s sure to impress and satisfy. I hope you have as much fun making it as I do. Here’s to countless delicious memories around the table—grab that apron and let’s create something beautiful together!
PrintBetter Than Sex Fruit Salad
A creamy, fruity salad that combines tropical flavors and textures for a delightful dessert perfect for any occasion.
- Prep Time: 15 minutes
- Cook Time: 0 minutes
- Total Time: 30 minutes
- Yield: 8 servings 1x
- Category: Dessert
- Method: No Cooking
- Cuisine: American
- Diet: Vegetarian
Ingredients
- 1 can (20 oz / 565 g) pineapple chunks, drained
- 1 can (21 oz / 595 g) cherry pie filling
- 1 can (15 oz / 425 g) mandarin oranges, drained
- 1 cup (240 ml) sour cream
- 1 cup (90 g) mini marshmallows
- 1 cup (120 g) sweetened shredded coconut
- 1 cup (120 g) chopped pecans or walnuts (optional)
Instructions
- Prepare the Fruits: Start by draining the canned fruits and place them in a large mixing bowl.
- Add the Cherry Pie Filling: Scoop in the cherry pie filling and gently fold it into the fruits.
- Incorporate the Sour Cream: Add the sour cream and fold it in until every piece of fruit is coated.
- Mix in the Mini Marshmallows and Coconut: Sprinkle in the mini marshmallows and sweetened shredded coconut, folding gently to combine.
- Add the Chopped Nuts: If using, stir in the pecans or walnuts evenly.
- Chill Before Serving: Cover with plastic wrap and refrigerate for at least 30 minutes before serving.
- Serve and Enjoy: Give it a quick stir before serving in individual bowls or on a platter.
Notes
This fruit salad can be made a day in advance for deeper flavors. Add a squeeze of lemon to balance sweetness if desired.
Nutrition
- Serving Size: 1 serving
- Calories: 320
- Sugar: 22g
- Sodium: 200mg
- Fat: 15g
- Saturated Fat: 5g
- Unsaturated Fat: 10g
- Trans Fat: 0g
- Carbohydrates: 48g
- Fiber: 2g
- Protein: 4g
- Cholesterol: 10mg
Keywords: fruit salad, dessert, summer recipe, easy recipe, potluck dish
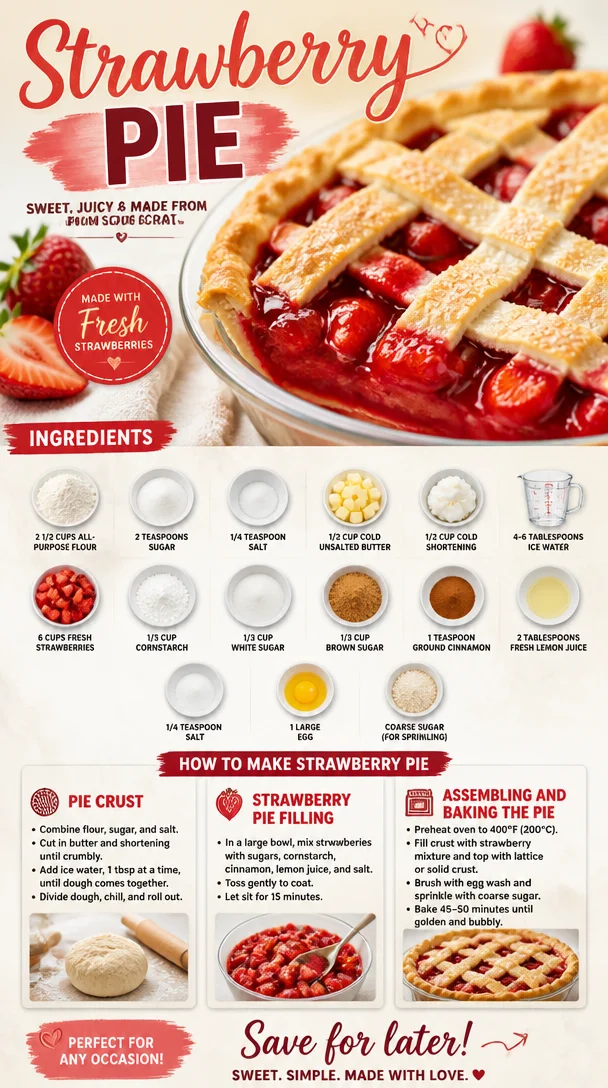
Strawberry Pie
Delightful Strawberry Pie: A Sweet Slice of Summer
Welcome to the world of vibrant flavors and joyous gatherings! If you’re anything like me, there’s something magical about biting into a slice of homemade strawberry pie—especially when the berries are at their juicy peak. This delightful dessert is not just a treat but a joyful experience that brings back memories of sun-soaked days spent under the warm sun, surrounded by friends and family.
Strawberry pie is one of those desserts that feels like a hug in a slice. It’s light yet rich with natural sweetness, a perfect expression of summer that servers can appreciate whether they are at a cozy picnic or a festive dinner gathering. Plus, its brilliant red hue makes it a showstopper on any dessert table!
Join me as we embark on a journey to create a luscious strawberry pie that captivates your tastebuds and warms your heart. So, dust off your apron, gather the ingredients, and let’s make some memories together in the kitchen!
A Nostalgic Slice of Life
Let me take you back to a summer afternoon at my grandmother’s house, when the air was fragrant with blooming flowers and ripe strawberries. She had this incredible garden, brimming with juicy berries that glistened in the sun. Each year, when it was time to harvest, I’d be her little helper, gathering baskets filled with the freshest strawberries.
One day, after a particularly bountiful harvest, we rolled up our sleeves and made our famous strawberry pie. The kitchen filled with laughter as we mixed the juicy strawberries with sugar and cinnamon, and I remember my grandma’s secret ingredient—love, of course! Little did I know that those moments would shape my love for cooking and for bringing people together around the table.
As the pie baked, the sweet aroma wafted through the house, making the anticipation all the more delightful. I could hardly wait for it to cool, but my grandma taught me the importance of patience. Finally, we enjoyed our treat—each bite bursting with goodness and nostalgia. That, my friends, is the magic of a homemade strawberry pie. Let’s recreate that same magic in your kitchen today!
Ingredients
Here’s what you’ll need to whip up your own stunning strawberry pie:
-
2 1/2 cups all-purpose flour: This will be the base for your pie crust. For a healthier option, you can substitute with whole wheat flour, but the texture will change a bit.
-
2 teaspoons sugar: This adds a little sweetness to the crust itself. You can use coconut sugar for a slightly deeper flavor.
-
1/4 teaspoon salt: A must-have for enhancing flavors and balancing the sweetness.
-
1/2 cup cold unsalted butter: Butter gives the crust its flaky texture. If you want a dairy-free option, use 1/2 cup of cold coconut oil instead.
-
1/2 cup cold shortening: Helps achieve that wonderful flaky quality. You can use lard for a more traditional flavor or stick to butter for a completely butter-based crust.
-
4–6 tablespoons ice water: Essential to bring the dough together without melting the butter.
-
6 cups fresh strawberries: Haul ’em and slice ’em! The star of the show. Frozen strawberries can work too, but fresh is always better for this pie.
-
1/3 cup cornstarch: This will help thicken your filling. You may substitute it with arrowroot for a gluten-free version.
-
1/3 cup white sugar: This gives sweetness to your filling without altering the color. Feel free to reduce this if your berries are super sweet.
-
1/3 cup brown sugar: Adds a rich, caramel-like flavor. If you don’t have brown sugar, a light drizzle of honey can work too!
-
1 teaspoon ground cinnamon: Just a hint of spice to complement the strawberries. You can also experiment with nutmeg for a different flavor.
-
2 tablespoons fresh lemon juice: Brightens up the flavors of the filling and keeps those strawberries fresh. Lime juice works in a pinch!
-
1/4 teaspoon salt: Enhances the overall flavor of the filling, balancing the sweetness.
-
1 large egg: This will help bind the crust together. For a vegan version, substitute it with a flaxseed egg (1 tablespoon ground flaxseed mixed with 2.5 tablespoons water).
-
Coarse sugar: For sprinkling on top of the pie, giving it a delightful crunch! You can use sparkling sugar for extra flair.
Step-by-Step Instructions
Now that we have our ingredients, let’s dive into the magic of making this pie!
Step 1: Making the Crust
-
Prep your workspace: Start by cleaning the countertop (or your kitchen table). You want a clean, organized area to create your pie magic!
-
Mix the dry ingredients: In a large bowl, whisk together the flour, sugar, and salt until fully blended.
-
Cut in the butter and shortening: Add the cold butter and shortening to the bowl, and using a pastry cutter or your fingers, work the fats into the flour mixture. You want a crumbly texture with some pea-sized pieces remaining. This is the secret to a flaky crust!
-
Add ice water: Slowly drizzle in the ice water, one tablespoon at a time, mixing until the dough just comes together. Be careful not to overwork it—want that tenderness!
-
Chill the dough: Form the dough into a disc, wrap it in plastic wrap, and refrigerate for at least 30 minutes. This is crucial for those flavors to meld and for the butter to firm up again.
Step 2: Prepare the Filling
-
Slice the strawberries: While the dough chills, haul and slice your strawberries. Place them in a large mixing bowl.
-
Mix the filling ingredients: In another bowl, combine the cornstarch, white sugar, brown sugar, cinnamon, lemon juice, and salt. Pour this over the strawberries and gently toss to coat. Let this mixture sit for about 15-20 minutes to allow the juices to start mixing with the sugars.
Step 3: Roll Out the Crust
-
Preheat your oven: Turn on your oven to 425°F (220°C) so it’s hot and ready when your pie is prepared.
-
Roll out the dough: After the dough has chilled, lightly flour your surface. Roll out your dough to about 1/8 inch thickness with a rolling pin, ensuring it’s big enough to fit your pie dish.
-
Transfer to the pie dish: Gently place the rolled-out dough into your pie dish. Trim the excess dough hanging over the edges and press it down gently into place. Poking holes in the crust helps prevent bubbling.
Step 4: Assemble the Pie
-
Add the filling: Pour the strawberry mixture into the prepared crust, spreading it out evenly. Make sure every bit of that sweet goodness is distributed!
-
Top the pie: Roll out any remaining dough for a lattice top or simply use additional dough to cover the pie. Create slits in the top crust if you’re making it solid to allow the steam to escape. Brush the top with a beaten egg for that beautiful golden sheen.
Step 5: Bake
-
Sprinkle with coarse sugar: Before placing it in the oven, sprinkle some coarse sugar over the top for that enticing crunch.
-
Bake: Pop the pie into your preheated oven and bake for about 40-45 minutes or until the crust is golden brown and the filling is bubbly. Keep an eye on it; if the edges brown too quickly, cover them with foil!
Step 6: Cool and Serve
- Cool: Once out of the oven, let the pie cool for at least 2 hours before slicing. This allows the filling to set up so that first slice is picture-perfect!
Serving Suggestions
When it’s finally time to serve, slice your strawberry pie and plate it with a scoop of vanilla ice cream or a dollop of whipped cream on the side. Drizzle with a bit of strawberry sauce for extra flair, and don’t forget a sprig of mint for color!
Recipe Variations
Here are some fun twists you can try with the classic strawberry pie:
-
Mixed Berry Pie: Instead of just strawberries, try combining raspberries, blueberries, and blackberries for a delightful mixed berry pie!
-
Chocolate Drizzle: Add a rich chocolate drizzle over the top of each slice for a decadent addition.
-
Lemon Basil Pie: Incorporate fresh basil with the strawberries for a surprising twist of flavor. It gives the pie an herby freshness that’s out of this world!
-
Portable Strawberry Hand Pies: Use the same filling, but make small hand-held pies by folding the dough over the filling and sealing the edges.
-
Gluten-Free Version: Use a gluten-free flour blend to make the crust. It works beautifully!
Chef’s Notes
As I look back on my love for strawberry pie, it’s evolved over the years. There are so many moments tied to this simple dish—family gatherings, summer barbecues, or cozy evenings under the stars. Each iteration teaches me something new in the kitchen, like mastering the balance between sweetness and tartness or the art of the perfect crust.
I’ll let you in on a little secret: I always keep a stash of frozen berries in my freezer. Life gets busy, and sometimes you just want that pie-decadence without a long prep time. No one has to know, right?
FAQs and Troubleshooting
Q: Why is my pie crust soggy?
A: This can occur if your filling is too watery or if the crust isn’t pre-baked. Make sure to bake the crust until it’s firm before adding the filling, and consider draining some of those strawberry juices before pouring them in!
Q: How can I prevent my pie from burning?
A: If the crust edges start to brown too fast, cover them with strips of aluminum foil for the remainder of baking.
Q: Can I make this pie ahead of time?
A: Absolutely! You can prep the filling a day ahead and store it in the fridge. Just assemble and bake the pie when you’re ready!
Q: What if I don’t have fresh strawberries?
A: Frozen strawberries can be used, but you may need to adjust the sugar and cook the filling for a few minutes on the stovetop to thicken it properly.
Nutritional Info
While I believe in enjoying dessert in moderation, here’s a basic breakdown of nutritional values per slice of strawberry pie (assuming 8 slices):
- Calories: 250
- Total Fat: 12g
- Saturated Fat: 5g
- Carbohydrates: 34g
- Fiber: 2g
- Sugar: 15g
- Protein: 3g
Enjoy this delightful strawberry pie, and remember, it’s not just about the food; it’s about gathering together, sharing stories, and creating moments that matter. So, let’s celebrate the sweetness of life, one slice at a time—happy baking!
PrintDelightful Strawberry Pie

A sweet and nostalgic homemade strawberry pie that celebrates summer with its burst of flavors and vibrant colors.
- Prep Time: 30 minutes
- Cook Time: 45 minutes
- Total Time: 75 minutes
- Yield: 8 servings 1x
- Category: Dessert
- Method: Baking
- Cuisine: American
- Diet: Vegetarian
Ingredients
- 2 1/2 cups all-purpose flour
- 2 teaspoons sugar
- 1/4 teaspoon salt
- 1/2 cup cold unsalted butter
- 1/2 cup cold shortening
- 4–6 tablespoons ice water
- 6 cups fresh strawberries
- 1/3 cup cornstarch
- 1/3 cup white sugar
- 1/3 cup brown sugar
- 1 teaspoon ground cinnamon
- 2 tablespoons fresh lemon juice
- 1/4 teaspoon salt
- 1 large egg
- Coarse sugar for sprinkling
Instructions
- Prep your workspace: Start by cleaning the countertop.
- Mix the dry ingredients: In a large bowl, whisk together the flour, sugar, and salt until blended.
- Cut in the butter and shortening: Work the fats into the flour mixture until crumbly.
- Add ice water: Slowly drizzle in the ice water, mixing until the dough just comes together.
- Chill the dough: Form into a disc, wrap, and refrigerate for at least 30 minutes.
- Slice the strawberries: After the dough chills, slice your strawberries and place in a large bowl.
- Mix the filling ingredients: Combine cornstarch, white sugar, brown sugar, cinnamon, lemon juice, and salt; pour over strawberries and toss.
- Preheat your oven: Turn on to 425°F (220°C).
- Roll out the dough: On a floured surface, roll out the dough to about 1/8 inch thickness.
- Transfer to the pie dish: Place the rolled-out dough into the pie dish, trimming edges.
- Add the filling: Pour the strawberry mixture into the prepared crust.
- Top the pie: Create a lattice top or cover the pie, making slits in the top crust.
- Sprinkle with coarse sugar: Before baking, sprinkle sugar on top.
- Bake: Bake for about 40-45 minutes until the crust is golden and filling is bubbly.
- Cool and serve: Let cool for at least 2 hours before slicing.
Notes
Serve with vanilla ice cream or whipped cream. You can create variations by adding different berries or flavors.
Nutrition
- Serving Size: 1 slice
- Calories: 250
- Sugar: 15g
- Sodium: 200mg
- Fat: 12g
- Saturated Fat: 5g
- Unsaturated Fat: 5g
- Trans Fat: 0g
- Carbohydrates: 34g
- Fiber: 2g
- Protein: 3g
- Cholesterol: 30mg
Keywords: strawberry pie, summer dessert, homemade pie

Ingredient No-Bake Mango Cheesecake: Creamy Summer Dream
Indulge in Tropical Bliss: A Mango Cheesecake Recipe
Hello, fellow food enthusiasts! Today, we’re diving into a dessert that’s as vibrant as a tropical sunset: Mango Cheesecake. Picture this: a smooth, creamy cheesecake with the bright, fruity essence of mango. This delightful treat not only enchants the taste buds, but it also makes a stunning centerpiece for any gathering. Let me take you on a culinary journey where we’ll explore how to create this luscious dessert from scratch, complete with some personal anecdotes, tips, and plenty of kitchen wisdom. Let’s put on those aprons and get started!
A Mango Moment: My Love for Cheesecake
I’ve always loved desserts that tell a story, and for me, mango cheesecake has a special place in my heart. Growing up, my family had a tradition of visiting a small bakery nestled in our neighborhood. Every Saturday, we would stroll down with the sun warming our faces and anticipation bubbling in our bellies. One particular visit stands out in my memory: the first time I tasted mango cheesecake.
I remember the moment vividly—the aroma of fresh mangoes wafting through the air as I took the first bite. The creamy texture combined with the tropical sweetness transported me to a beachside paradise. From that day on, making mango cheesecake at home became my mission. This recipe isn’t just about food; it’s about creating memories, embracing the flavors of fun, and sharing that joy with loved ones. So let’s harness that inspiration and jump into a world of creamy deliciousness!
Ingredients: A Taste of Paradise
Here’s what you’ll need to whip up your very own mango cheesecake. Each ingredient plays an important role, so let’s explore them:
-
14-16 Graham crackers (or plain cookies): These create the perfect crunchy base. You can also use digestive biscuits, almond cookies, or even gluten-free options.
-
50 grams butter, melted: Butter binds your crust together and adds rich flavor. For a lighter option, try coconut oil for a tropical twist!
-
400 grams cream cheese (at room temperature): The heart of your cheesecake, cream cheese gives it that creamy, rich texture. You can substitute it with mascarpone or vegan cream cheese for a dairy-free option.
-
2 tablespoons cornstarch: This helps stabilize the cheesecake, ensuring it holds its shape. If you’re avoiding cornstarch, arrowroot powder works great too!
-
½ cup sugar: Sweetness is essential! You can swap this for coconut sugar or a sugar substitute like stevia if you prefer a low-calorie treat.
-
Pinch of sea salt/kosher salt: Just a hint of salt enhances the flavors in your cheesecake. Don’t skip this step—it’s like magic for taste!
-
2 ripe mangoes, peeled and chopped (or 1 cup store-bought mango puree): Fresh mangoes bring brightness and freshness. If mangoes aren’t in season, frozen mango works, too, just ensure it’s fully thawed and drained.
-
2 eggs (at room temperature): They add richness and help bind everything together. For a vegan option, you could use aquafaba (chickpea brine) or flax eggs.
-
Pinch of cardamom powder (optional): This adds a warm, aromatic twist. If you’re a fan of spice, go for it! Otherwise, feel free to leave it out.
Step-by-Step Instructions: Creating Your Masterpiece
Now that we have all our ingredients ready, let’s get our hands a little messy, shall we?
-
Preheat your oven: Preheat your oven to 325°F (160°C). This is an essential step to ensure your cheesecake bakes evenly.
-
Prepare the crust: In a food processor, blend the graham crackers until finely crushed. You can also place them in a zip-top bag and crush them with a rolling pin for some hands-on fun! Add in the melted butter and a sprinkle of salt, mixing until the crumbs resemble wet sand.
-
Shape the crust: Press this mixture firmly into the bottom of a springform pan. Use the back of a measuring cup to get an even layer—it makes a difference! Bake it in the preheated oven for about 8-10 minutes until it’s set and slightly golden. Let it cool while you prepare the filling.
-
Blend the cheesecake filling: In a large mixing bowl, beat the cream cheese until creamy and smooth—this usually takes about 2-3 minutes with a hand mixer on medium speed. Add in the sugar and cornstarch, mixing until thoroughly combined.
-
Incorporate the eggs and mango: One at a time, add the eggs to the mixture, blending well after each addition. Then, fold in the chopped mango or mango puree. (Fun tip: reserve a bit of mango for topping your cheesecake later!) If you’re using cardamom, add it in now for that extra aromatic touch.
-
Pour and bake: Pour the creamy filling over your cooled crust, smoothing it out gently with a spatula. Bake for 45-55 minutes, or until the edges are set and the center is slightly wobbly. Don’t be alarmed by the wobble! It will firm up as it cools—trust me!
-
Cool down: Once done, turn off the oven and crack the oven door open for the cheesecake to gently cool down. Let it cool in the oven for an hour to prevent cracking.
-
Chill: After it has cooled, refrigerate the cheesecake for at least 4 hours, or preferably overnight. This patient’s wait will reward you with a perfectly set cheesecake!
Serving Suggestions: Plating to Impress
When it’s finally time to serve your mango cheesecake, let’s make it visually stunning! Carefully run a knife around the edge of the springform pan before releasing the sides. Slice your cheesecake into wedges and arrange it on a beautiful plate. Drizzle with a mango puree or a sprinkle of fresh herbs like mint for contrast. The vibrant colors and smooth textures will dazzle your guests and make your cheesecake all the more inviting.
Recipe Variations: A Twist on Tradition
Feeling adventurous? Here are a few variations to give your mango cheesecake a personalized touch:
-
Coconut Mango Cheesecake: Keep the mango but add shredded coconut to the crust for an added tropical flair. You can also use coconut milk in the filling!
-
Chocolate Swirl: Add chocolate to the mix! Swirl in melted dark or milk chocolate into the mango filling before baking for a decadent chocolate-mango experience.
-
Berry Delight: Top your cheesecake with seasonal berries for a color burst and added freshness. Strawberries, raspberries, or blueberries pair beautifully!
-
Spiced Mango Cheesecake: Add a pinch of cinnamon along with the cardamom for a warm, spiced cheesecake experience—perfect for cozy gatherings.
-
Nutty Crust: Substitute some of the graham crackers with crushed nuts like pecans or walnuts for a different texture and flavor.
Chef’s Notes: A Touch of Personal Flavor
Over the years, I’ve tinkered with this recipe and found joy in sharing it with family and friends. Each time I make it, I feel like I’m not just creating a dessert, but a piece of love to share around the table. There was that one time I tried to impress my in-laws, and as I pulled the cheesecake from the refrigerator, it had magically transformed into this tall, creamy tower of perfection—only to have it topple over right before serving due to overzealous slicing! Laughter filled the kitchen, and I served the ‘deconstructed’ mango cheesecake instead. We all enjoyed it more than any picture-perfect slice; after all, sharing laughter over dessert is the true win!
FAQs and Troubleshooting: Your Cheesecake Questions Answered
-
Why does my cheesecake have cracks?
Cracks can form from sudden temperature changes or overbaking. To minimize this, cool your cheesecake gradually in the oven and avoid opening the door too soon. -
How can I tell if my cheesecake is done?
The cheesecake should be slightly wobbly in the center but set around the edges. It’ll firm up as it cools, so don’t worry if it jiggles a bit! -
Can I freeze this cheesecake?
Absolutely! Wrap individual slices tightly in plastic wrap, then in foil, and freeze for up to three months. Just thaw in the fridge before serving. -
What if I can’t find fresh mango?
No worries—canned or frozen mango is a great alternative! Just ensure it’s well-drained before using to prevent a soggy cheesecake.
Nutritional Info: Deliciously Indulgent
While indulgent desserts are meant to be enjoyed, it’s always nice to have a rough idea of the nutritional aspects. This mango cheesecake per slice (based on 12 slices) contains roughly:
- Calories: 350
- Total Fat: 22g
- Saturated Fat: 12g
- Cholesterol: 80mg
- Carbohydrates: 30g
- Sugars: 20g
- Protein: 6g
Conclusion: Let’s Celebrate with Mango Cheesecake!
And there you have it, my friends—a mango cheesecake that’s sure to impress and create beautiful memories around your table. Cooking is all about connecting with the ingredients and sharing love through food. I hope this recipe inspires you to sprinkle a bit of joy in your kitchen and share the sweet rewards with those you cherish.
So grab those ripe mangoes, tie on your apron, and let’s jump into a world of flavor! Happy baking!
PrintMango Cheesecake

A smooth, creamy cheesecake infused with the vibrant essence of mango, perfect for any gathering.
- Prep Time: 20 minutes
- Cook Time: 55 minutes
- Total Time: 4 hours 15 minutes
- Yield: 12 servings 1x
- Category: Dessert
- Method: Baking
- Cuisine: Tropical
- Diet: Vegetarian
Ingredients
- 14–16 Graham crackers (or plain cookies)
- 50 grams butter, melted
- 400 grams cream cheese, at room temperature
- 2 tablespoons cornstarch
- ½ cup sugar
- Pinch of sea salt/kosher salt
- 2 ripe mangoes, peeled and chopped (or 1 cup store-bought mango puree)
- 2 eggs, at room temperature
- Pinch of cardamom powder (optional)
Instructions
- Preheat your oven to 325°F (160°C).
- Blend the graham crackers until finely crushed in a food processor.
- Press the mixture into the bottom of a springform pan and bake for 8-10 minutes.
- Beat the cream cheese in a mixing bowl until creamy and smooth.
- Add the sugar and cornstarch, mixing until combined.
- Incorporate the eggs one at a time, blending well after each addition.
- Fold in the chopped mango or mango puree.
- Pour the filling over the cooled crust and smooth it out.
- Bake for 45-55 minutes or until the edges are set and the center is slightly wobbly.
- Cool in the oven with the door cracked open for an hour.
- Chill in the refrigerator for at least 4 hours before serving.
Notes
For a twist, consider adding shredded coconut to the crust or topping with seasonal berries.
Nutrition
- Serving Size: 1 slice
- Calories: 350
- Sugar: 20g
- Sodium: 250mg
- Fat: 22g
- Saturated Fat: 12g
- Unsaturated Fat: 8g
- Trans Fat: 0g
- Carbohydrates: 30g
- Fiber: 2g
- Protein: 6g
- Cholesterol: 80mg
Keywords: mango cheesecake, dessert, tropical dessert, cheesecake recipe, fruity cheesecake
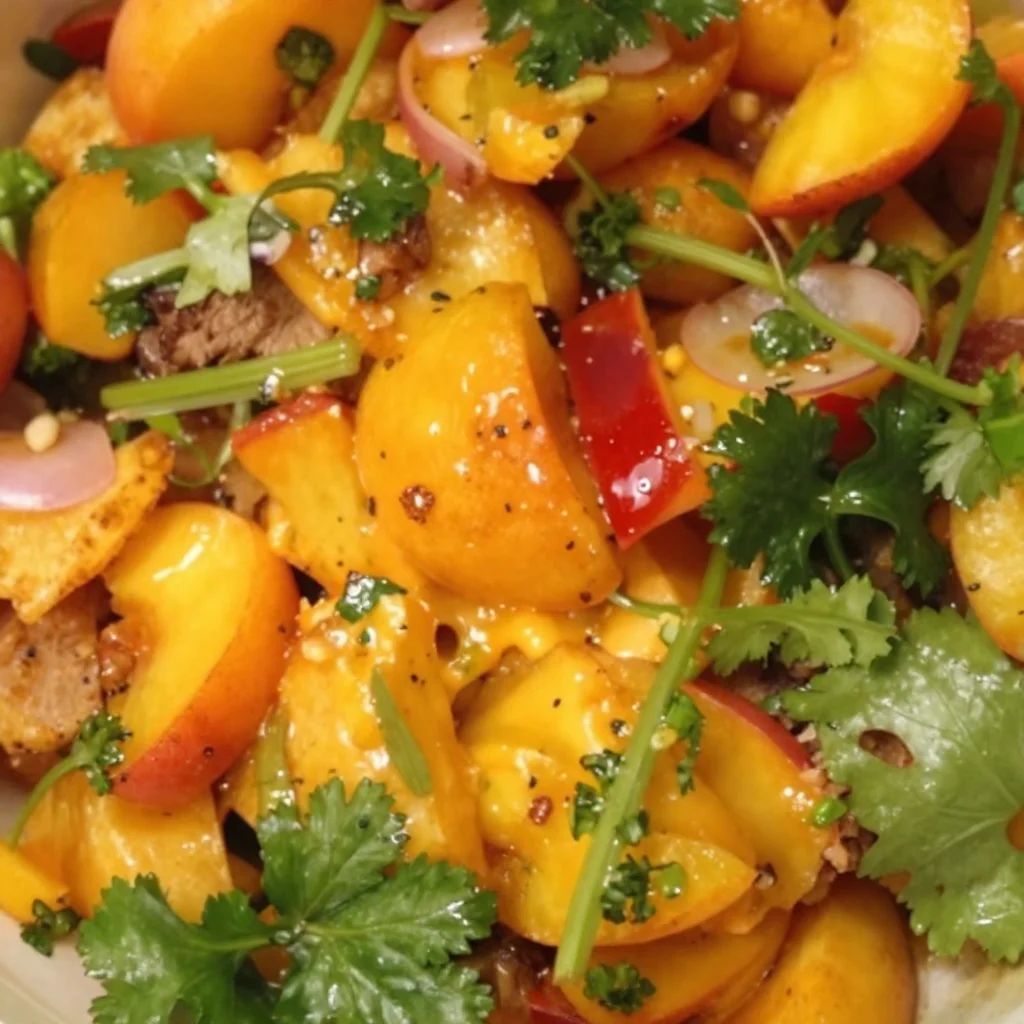
Nectarine Salsa
Nectarine Salsa: A Sweet & Spicy Adventure for Your Palate
Hello, fellow food lovers! Welcome back to my culinary corner, where we celebrate the joy of cooking together. Today, I’m excited to share a delightful recipe that bursts with flavor and color—Nectarine Salsa! This refreshing and zesty salsa is perfect for summer barbecues, taco nights, or just enjoying with tortilla chips on a sunny afternoon.
What I love about this dish is not just its vibrant taste but also the memories it brings back. I remember the first time I made this salsa at a family gathering. It was one of those steamy summer evenings, filled with laughter, delicious food, and a warm breeze. I had a couple of friends over, and we decided to fire up the grill. As we prepped the meal, I wanted something that could stand out as more than just a usual side. So, after a quick rummage through my fridge, I spotted some juicy nectarines and bursting tomatoes. Voilà! Nectarine Salsa was born.
So, let’s dive into this easy-to-make recipe that captures the essence of summer on your plate. Get your aprons on, and let’s have some fun in the kitchen!
My Nectarine Salsa Memory: A Family Gathering
It was a sun-drenched afternoon at my aunt’s house, and the backyard was a flurry of activity. Children were running about, laughter echoed, and the smell of grilled chicken wafted through the air. As we gathered around the dining table, I proudly presented my first attempt at making Nectarine Salsa.
I remember stepping outside, feeling the warmth on my back, and nervously setting the bowl down next to the grilled goodies. I was unsure how the flavors would be received, but once the first scoop was taken, the faces around the table lit up with delight! My uncle declared it “the perfect summer accompaniment”, and I felt a rush of joy—who knew? The sweet nectarines mixed with the heat of the chili and the crunch of fresh veggies could create such a buzz!
That day marked a special occasion for me, as it was one of the first times I felt truly proud of a dish I had created. Since then, it has become a staple at every family gathering, enjoyed by everyone and always devoured within minutes. Now, it’s time for you to create some memories of your own with this delicious Nectarine Salsa!
Ingredients You’ll Need
To whip up this vibrant salsa, gather the following ingredients:
-
2-3 nectarines, diced (about 2 cups)
Sweet, juicy nectarines are the star here. Look for ones that yield slightly to gentle pressure for optimal ripeness. If you can’t find nectarines, peaches are a fantastic substitution! -
1 tomato, diced (about 1 cup)
A ripe tomato adds freshness. You can use Roma or vine-ripened tomatoes for best flavor. For a low-carb twist, consider swapping with diced cucumber. -
1 cup cilantro, minced
This herb brings a burst of freshness. If cilantro isn’t your friend, try swapping it with finely chopped mint for a unique flavor. -
1/4 cup shallot, diced (or substitute red onion)
Shallots provide a milder taste than onions. If you relish a bolder flavor, use red onion. Sweet onion also works well if you prefer something less sharp. -
1 bird’s eye chili, seeds removed, finely diced
Also known as Thai red chilies, they offer a spicy kick! For those who prefer milder salsa, jalapeños are a great substitute, or simply leave them out altogether. -
1 tablespoon lime juice (plus more to taste)
Lime juice adds brightness. Freshly squeezed is always best. If you’re in a bind, bottled lime juice will suffice. -
1 teaspoon honey or sugar
Just a touch of sweetness balances the acidity. For a vegan version, stick with agave syrup.
Step-By-Step Instructions
Now that you have your ingredients ready, let’s dive into making your Nectarine Salsa! Follow along with these step-by-step instructions, and don’t forget to taste as you go!
-
Prep Your Ingredients
Start by washing your fruits and vegetables under cold water. This ensures any dirt or pesticides are washed away. Slice the nectarines in half, remove the pits, and dice them into small, even pieces. Don’t stress about perfection—the rustic feel adds charm! -
Dice the Tomato
Next, grab your tomato and cut out the stem. Dice it just like you did with the nectarines! If you’re feeling fancy, you can even remove the seeds for a tidier salsa, but it’s not necessary if you don’t mind a bit of extra juiciness. -
Finely Chop the Cilantro
Cilantro can be a polarizing herb, but it’s essential in this recipe. Rinse it well, and then chop it roughly before mincing it finely. The smaller the pieces, the more flavor it releases! -
Chop the Shallot
Peel and mince the shallot. If you find shallots too mild, slicing a red onion into small pieces will work just as well. Take care to avoid any tears—try chilling the onion for a while or cutting it under running water! -
Prepare the Chili
For some heat, take your bird’s eye chili, slice it in half, and carefully remove the seeds. Mince it finely. More heat means more spice, so adjust according to your taste! If you’re unsure, start with half the chili to test. -
Mix It Up!
In a mixing bowl, combine the diced nectarines, tomato, minced cilantro, chopped shallot, and minced chili. Use a spatula or spoon to gently fold the ingredients together while being careful not to mash the nectarines. -
Dress It Up
Add in the lime juice and honey (or sugar). Stir to combine everything, allowing the flavors to meld beautifully. Give it a taste and adjust with more lime juice or honey as needed. You want a balance of sweet, tangy, and spicy flavors! -
Let It Chill
For the best flavor, let your salsa sit in the fridge for about 30 minutes before serving. This resting period allows all the flavors to blend. Just like a good glass of wine, time makes it better! -
Final Taste Test
Right before serving, give it one last taste to see if it needs any additional lime juice or salt. Adjust as necessary, and then it’s ready to rock on your table!
Serving Suggestions
Your Nectarine Salsa is ready to shine! Serve it in a vibrant bowl with colorful tortilla chips on the side for some crunch. If you’re feeling festive, you can pair it with grilled chicken or fish, or even spoon it over tacos or burrito bowls for a punch of fresh flavor. Presentation is everything, so don’t forget to sprinkle some extra cilantro on top for that “wow” factor!
Recipe Variations
Let’s shake things up! Here are a few creative twists to keep your Nectarine Salsa exciting:
- Spicy Pineapple Delight: Swap out nectarines for diced fresh pineapple for a tropical twist.
- Chunky Avocado Salsa: Add in diced avocado for a creamy texture and extra health benefits. Just be sure to eat it right away to prevent browning!
- Sweet and Savory: Toss in some crumbled feta cheese for a contrasting flavor.
- Herby Infusion: Experiment with other herbs such as basil or parsley to change up the flavor profile.
- Fruit Fiesta: Combine nectarines with additional fruits like mango or kiwi for a colorful mix!
Chef’s Notes
This Nectarine Salsa is one of those magical recipes that evolves every time I make it. Depending on what’s in season or available, it turns into a new creation each time. I once added some diced bell peppers, and it gave the salsa a fun crunch! It’s incredible how something so simple can be dressed up in so many ways.
Oh, and I have to share this—a friend of mine once tried to impress a date by making this salsa but accidentally added too much heat! Let’s just say, laughter filled the air, alongside their search for milk to cool things down. We still chuckle about that fiery evening every time he brings it up!
FAQs and Troubleshooting
1. My salsa is too spicy! What can I do?
If your salsa turns out too spicy, add more diced tomatoes and nectarines to dilute the heat. A dash of sugar can also help counteract the spice.
2. Can I make this salsa ahead of time?
Absolutely! This salsa can be made a day in advance. Just store it in an airtight container in the fridge. Just remember that the flavors meld and develop over time, but the fresh texture is always best eaten within 2-3 days!
3. What if I can’t find nectarines?
No problem! Peaches or even a combination of ripe mango and pineapple can work wonders for a delightful twist.
4. How can I store leftover salsa?
Store any leftovers in a sealed container in the refrigerator for up to three days. The salsa may soften as it sits, but the flavor will still be delicious! Just give it a gentle stir before serving.
Nutritional Info
While I don’t dive too deep into nutritional info typically, I know many of you care about that! This Nectarine Salsa is not only refreshing but also packed with vitamins and antioxidants, thanks to the fresh fruits and veggies. It’s naturally low in calories and a great addition to any healthy meal!
And there you have it—a delightful Nectarine Salsa that brings sunshine and flavor to your table! I hope it inspires you to gather your friends or family and create lasting memories just like I did. So tie on your apron, get cooking, and let’s keep spreading the love through good food. Happy cooking!
PrintNectarine Salsa

A delightful and refreshing salsa bursting with flavor, perfect for summer barbecues or as a side with tortilla chips.
- Prep Time: 15 minutes
- Cook Time: 0 minutes
- Total Time: 15 minutes
- Yield: 4 servings 1x
- Category: Appetizer
- Method: Mixing
- Cuisine: Mexican
- Diet: Vegan
Ingredients
- 2–3 nectarines, diced (about 2 cups)
- 1 tomato, diced (about 1 cup)
- 1 cup cilantro, minced
- 1/4 cup shallot, diced (or substitute red onion)
- 1 bird’s eye chili, seeds removed, finely diced
- 1 tablespoon lime juice (plus more to taste)
- 1 teaspoon honey or sugar
Instructions
- Prep your ingredients by washing the fruits and vegetables under cold water.
- Dice the tomato by cutting out the stem and dicing it like the nectarines.
- Finely chop the cilantro, rinsing it well before mincing.
- Chop the shallot by peeling and mincing it, or use red onion if preferred.
- Prepare the chili by slicing it in half, removing seeds, and mincing it finely.
- Mix the diced nectarines, tomato, cilantro, shallot, and chili in a mixing bowl.
- Dress it up by adding lime juice and honey (or sugar) and mixing well.
- Let it chill in the fridge for about 30 minutes for flavors to meld.
- Final taste test before serving, adjusting lime juice or salt as needed.
Notes
Serve with tortilla chips or as a topping for grilled chicken or fish. Adjust ingredients to personal taste.
Nutrition
- Serving Size: 1 serving
- Calories: 180
- Sugar: 10g
- Sodium: 5mg
- Fat: 1g
- Saturated Fat: 0g
- Unsaturated Fat: 1g
- Trans Fat: 0g
- Carbohydrates: 40g
- Fiber: 4g
- Protein: 3g
- Cholesterol: 0mg
Keywords: nectarine salsa, summer recipe, fresh salsa, vegan appetizer, colorful salsa
Minute Summer Nectarine Spice Butter for Toast & Scones
The Sweet Symphony of Nectarine Spice Butter: A Perfect Summer Treat
Hello, my lovely kitchen enthusiasts! It’s Savannah from Ivory Apron, and today, I’m excited to share a recipe that screams summer: Nectarine Spice Butter. This spread is fruity, sweet, and spiced just right — perfect for slathering on toast, drizzling on pancakes, or enjoying with a cheese platter. Prepare for a delightful adventure in preserving summer’s bounty while filling your kitchen with warming aromas.
A Slice of Nostalgia: My Nectarine Memories
Growing up, my family’s summer ritual always included an annual trip to the local orchard. The sweet scent of ripe stone fruits filled the air, and we would race to fill our baskets with the juiciest nectarines we could find. The size of our haul always far surpassed our ability to eat them fresh, and there was always that moment of panic when we realized we had too many nectarines on the brink of turning.
That’s when my mother would gather us in the kitchen for the much-awaited nectarines and spice butter-making session. Armed with pots, spoons, and an arsenal of spices, we would transform those sweet nectarines into a buttery concoction that would lead to endless summer memories. I can still hear her laughter and feel the warmth of the kitchen while we created a heavenly spread — the Nectarine Spice Butter.
Now, each time I make this recipe, I’m transported back to those sunny orchard afternoons, making it not just a delicious treat, but a heartwarming experience. Ready to create your own summer memories? Let’s dive into making this delightful Nectarine Spice Butter!
Ingredients
Here’s what you’ll need to whip up this tasty spread:
-
9 cups ripe nectarines, pitted and chopped
Juicy, fragrant nectarines are the star of this recipe! Choose nectarines that yield gently to pressure for optimal sweetness. If nectarines are out of season, peaches or apricots work as fabulous substitutes, giving a different yet equally delicious flavor profile. -
4 cups sugar
Sugar helps to preserve the butter and balance the tartness of the nectarines. If you’re looking for a lower-sugar option, try using an equal amount of a sugar substitute like erythritol or coconut sugar, adjusting to taste. -
1/4 cup lemon juice
The acidity of lemon juice is essential for both flavor and preservation. Freshly squeezed lemon juice will provide the best flavor. If you’re in a pinch, bottled juice will do. -
1 tablespoon butter
Butter adds richness and smoothness to the spread. If you’re going for a vegan version, try coconut or vegan butter—it’ll still yield a delightful consistency. -
1 tablespoon cinnamon
Ground cinnamon brings warmth and a lovely spice note. If you’re feeling adventurous, swap in other spices like nutmeg or ginger for a unique twist.
Now that we have our ingredients ready, it’s time to bring this luscious Nectarine Spice Butter to life!
Step-by-Step Instructions
Let’s get cooking! Follow these steps to create your very own Nectarine Spice Butter.
-
Prep the Nectarines:
Start by washing the nectarines thoroughly. Once clean, slice them in half and remove the pits. Chop the fruit into small pieces. The smaller the pieces, the easier they’ll break down while cooking. Ensure you have about 9 cups — this may take a bit of time, but trust me, it’s worth it!Chef’s Tip: If you’re short on time, you can use fresh or frozen nectarines, though fresh fruit will give you a better flavor and texture!
-
Combine Ingredients in a Pot:
In a large heavy-bottomed pot, combine your chopped nectarines, sugar, lemon juice, butter, and cinnamon. Stir everything together until the nectarines are well-coated with sugar, creating a beautiful blend of colors.Chef’s Hack: Let the mixture sit for about 10-15 minutes. This will allow the nectarines to release some of their natural juices, making the cooking process smoother and easier.
-
Cook the Mixture:
Place the pot over medium heat. Stir frequently as the mixture begins to cook, scraping the bottom to prevent it from sticking. As the nectarines soften, your kitchen will fill with a heavenly sweet aroma. Continue cooking for about 30-40 minutes until the mixture thickens to a spreadable consistency.Pro Tip: If you’re uncertain about doneness, use an immersion blender to achieve your desired texture. Just blend it a little for a smooth consistency, or leave it slightly chunky for more texture.
-
Check for Consistency:
To check the butter’s consistency, place a spoonful on a cold plate and let it sit for a minute. Run your finger through the spread; if it holds its shape, it’s ready to be jarred! If it’s still too runny, cook a bit longer.Chef’s Insight: Keep in mind that the butter will thicken more as it cools, so don’t worry too much if it’s a little loose at this stage!
-
Jar the Butter:
Carefully transfer your nectarines spice butter into freshly sterilized jars. Make sure to leave some airspace at the top. Seal tightly. If you want to can them for longer storage, I recommend processing them in a water bath for about 10 minutes.Little Kitchen Secret: Label each jar with the date so you can savor your summer memories all year long!
Serving Suggestions
Once your Nectarine Spice Butter is ready, there’s no shortage of delightful ways to savor this treat! Spread it generously on warm, buttery toast or croissants, drizzle it over pancakes or waffles, or pair it with a nice charcuterie board alongside cheeses for a burst of flavor.
Don’t forget — it also makes for a lovely gift! Imagine presenting a beautifully wrapped jar of your homemade nectarines spice butter to a friend. It’s a sweet way to spread joy!
Recipe Variations
Looking to change things up? Here are a few fun variations to consider:
-
Spiced Twist: Add a hint of allspice or cardamom for an exotic flavor twist that pairs beautifully with the nectarines.
-
Citrus Burst: Mix in some orange zest for a bright, zesty kick that elevates the flavor even more.
-
Savory Addition: For a twist, consider adding a pinch of sea salt to enhance the sweetness and create a savory surprise!
-
No-Sugar Version: Use honey, agave syrup, or maple syrup instead of sugar for a naturally sweetened butter.
Chef’s Notes
This Nectarine Spice Butter has a special place in my heart, as it combines cherished family memories with the thrill of creating in the kitchen. Over the years, I’ve experimented with different fruits, spices, and textures. Each batch seems to carry its own story, and no two jars are ever quite the same.
One of my favorite kitchen mishaps happened when I accidentally left a delicious jar of this butter out on the counter overnight — I found it, and had to figure out how to incorporate the caramelized goodness into a dessert! Sometimes, accidents can lead to the most delightful discoveries.
FAQs and Troubleshooting
-
What if my spice butter is too runny?
If your nectarines spice butter didn’t thicken as you expected, simply return it to the pot and simmer a bit longer, stirring frequently. -
Can I freeze Nectarine Spice Butter?
Absolutely! It freezes beautifully. Just make sure to store it in airtight containers or freezer-safe jars, leaving a little space at the top for expansion. -
What’s the shelf life of this butter?
When properly sealed and stored, Nectarine Spice Butter can last up to a year in a cool, dark place. Once opened, keep it in the refrigerator and use it within 2-3 weeks. -
Can I use other stone fruits?
Yes, nectarines are versatile! Try peaches, plums, or apricots for variations on this recipe. Each will bring its unique flavor profile to the table.
Nutritional Info
Nutritional information is not typically included in my recipes since everyone has different dietary needs, but I understand how helpful it can be! On average, one serving (1 tablespoon) of Nectarine Spice Butter contains approximately 40-60 calories with a bit of carbohydrate power mainly from the fruit and sugar.
And there you have it! You’re now armed with the knowledge to create your own Nectarine Spice Butter, honoring summer’s sweetness while making beautiful cooking memories. Don’t forget to share your creations with me — I’d love to see how you put your spin on it!
So grab your apron, create some sweet magic, and always remember: cooking is as much about the love you put into it as the food itself. Welcome to the world of Nectarine Spice Butter. Enjoy!
PrintNectarine Spice Butter

A fruity and spiced spread perfect for toasts, pancakes, or a cheese platter, capturing the essence of summer.
- Prep Time: 30 minutes
- Cook Time: 40 minutes
- Total Time: 70 minutes
- Yield: 20 servings 1x
- Category: Condiment
- Method: Cooking
- Cuisine: American
- Diet: Vegetarian
Ingredients
- 9 cups ripe nectarines, pitted and chopped
- 4 cups sugar
- 1/4 cup lemon juice
- 1 tablespoon butter
- 1 tablespoon cinnamon
Instructions
- Prep the nectarines: Wash the nectarines thoroughly, slice them in half, remove the pits, and chop into small pieces.
- Combine ingredients in a pot: In a large heavy-bottomed pot, mix the nectarines, sugar, lemon juice, butter, and cinnamon.
- Cook the mixture: Place the pot over medium heat, stirring frequently for about 30-40 minutes until it thickens.
- Check for consistency: Place a spoonful on a cold plate; if it holds shape, it’s ready.
- Jar the butter: Transfer the mixture into sterilized jars, leaving airspace at the top, and seal tightly.
Notes
Label each jar with the date to savor the summer memories all year long.
Nutrition
- Serving Size: 1 tablespoon
- Calories: 50
- Sugar: 10g
- Sodium: 5mg
- Fat: 1g
- Saturated Fat: 0g
- Unsaturated Fat: 1g
- Trans Fat: 0g
- Carbohydrates: 13g
- Fiber: 0g
- Protein: 0g
- Cholesterol: 0mg
Keywords: nectarine, spice butter, summer recipe, fruit spread, homemade preserves
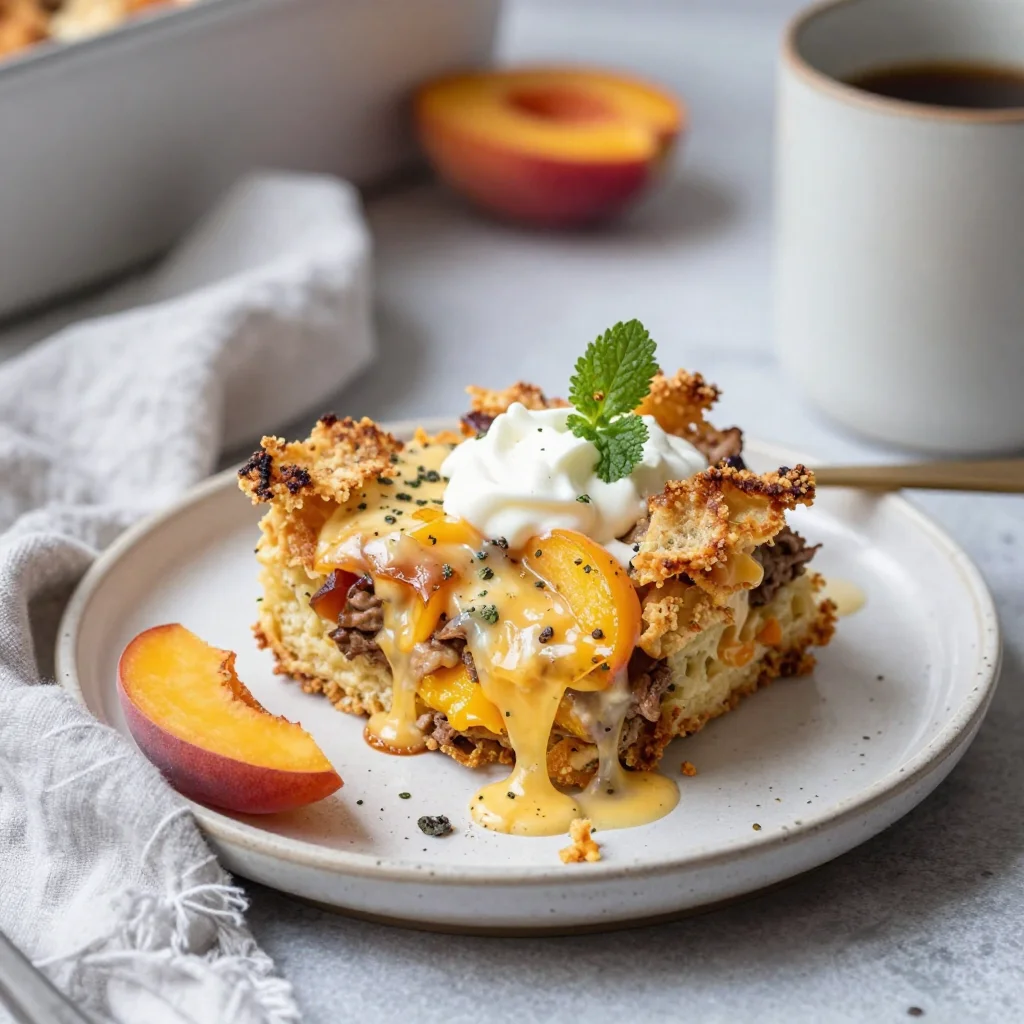
Ingredient Peach Breakfast Bake for Quick Summer Mornings
Peach Breakfast Bake: Easy, Healthy, and Perfect for Summer Mornings
Hello, food lovers! I’m so glad you’re here because today we’re diving into a delightful dish that’s as easy to make as it is delicious. I can’t wait to share my recipe for a Peach Breakfast Bake! Perfect for lazy summer mornings or those hectic weekdays when you want a nourishing meal without putting in too much effort, this breakfast bake is bound to become a staple in your kitchen.
Introduction
Picture this: It’s a sunny Saturday morning. You pour yourself a cup of freshly brewed coffee, and the scent of sweet peaches wafts through the air. You step into the kitchen, the sunlight dancing across the countertops, and you’re ready to whip up something special for breakfast. The excitement of cooking is palpable!
This Peach Breakfast Bake is not only quick and healthy but also incredibly versatile. Made with wholesome ingredients like cottage cheese, fresh peaches, and rolled oats, this dish is packed with protein and flavor, making it the perfect way to fuel your day. And the best part? You can throw it in the oven and enjoy your morning coffee while it bakes to golden perfection.
Summer is all about enjoying fresh, juicy fruits, and what better way to incorporate them into your breakfast than with this peach bake? It’s light, satisfying, and absolutely perfect for serving friends and family or indulging in a quiet morning alone. Trust me, once you take that first bite of warm, gooey peach goodness, you’re going to love it!
So, grab your apron, and let’s bake this delicious breakfast together!
Personal Story
I remember the first time I made this Peach Breakfast Bake. It was during a family gathering at my grandmother’s house. We were surrounded by a bounty of peaches fresh from the farmer’s market, and I was determined to make something that would showcase their sweet flavor.
As I assembled the ingredients, my little cousins dashed in and out of the kitchen, their giggles filling the air. I decided to involve them in the process, letting them sprinkle in the oats and mix the batter. Their eyes sparkled with excitement as they watched the peaches transform into this delightful bake in the oven.
When we finally gathered around the table, the aroma was intoxicating. My grandmother served the dish with a dollop of yogurt and a drizzle of honey, and I could see my family’s faces light up with joy. That moment reminded me of the true essence of cooking: it’s about nurturing relationships and creating beautiful memories. Now, every time I make this dish, those sweet summer mornings come flooding back.
Ingredients
To make this scrumptious Peach Breakfast Bake, you’ll need:
-
2 cups cottage cheese
A great source of protein and calcium! If you prefer a dairy-free option, try using silken tofu blended until smooth for a similar texture. -
3 large eggs
These act as the binding agent and provide richness. For a vegan alternative, you can use flax eggs: 1 tablespoon of ground flaxseed mixed with 2.5 tablespoons of water equals one egg when left to sit for about 5 minutes. -
2 medium ripe peaches, peeled and diced
Fresh, juicy peaches are the star of this dish! If peaches aren’t in season, feel free to substitute with nectarines or even canned peaches (drained) for the same wonderful flavor. -
1/2 cup rolled oats or almond flour
Rolled oats add a nice texture while being heart-healthy. If you want a gluten-free option, almond flour works beautifully, giving the bake a lovely nutty flavor. -
1/4 cup honey or maple syrup
Sweeteners help to enhance the natural sweetness of the peaches. Maple syrup offers a rich flavor, while honey adds a delicate sweetness. For a low-calorie version, try stevia or agave syrup. -
1 tsp vanilla extract
A simple addition that enhances all the other flavors! Use pure vanilla extract for the best taste — imitation vanilla just doesn’t cut it. -
1/2 tsp ground ginger or cinnamon
Both spices provide warmth and depth to your bake. Cinnamon pairs wonderfully with peaches, but if you want a zesty twist, fresh grated ginger is a delightful surprise! -
1 tsp baking powder
This is the leavening agent that gives the bake a lovely rise. If you’re out of baking powder, combining 1/2 tsp baking soda with 1/2 tsp vinegar can be a suitable substitute.
Step-by-Step Instructions
Now that we’ve gathered our ingredients, let’s dive into the step-by-step process of making this mouthwatering Peach Breakfast Bake!
-
Preheat Your Oven
Start by preheating your oven to 350°F (175°C). This step is essential! A hot oven allows your bake to rise beautifully and develop that golden crust on top. -
Prepare Your Baking Dish
Grab an 8×8-inch baking dish (or similar size) and grease it lightly with cooking spray or a little coconut oil. This will help your bake come out easily once it’s done! -
Mix the Wet Ingredients
In a large mixing bowl, combine the cottage cheese, eggs, honey (or maple syrup), and vanilla extract. Whisk these together until smooth and creamy. A tip here: if you want an extra fluffier texture, you can beat the eggs separately before adding them to the mixture. -
Incorporate the Dry Ingredients
Next, gently fold in the rolled oats (or almond flour), ground ginger (or cinnamon), and baking powder into the wet mixture. You want everything to blend smoothly without overmixing it — think of it as a lovely dance in the bowl! -
Add the Peaches
Time to fold in those diced peaches! Gently stir them into the batter, distributing them evenly throughout. The joy of this dish is those bursts of juicy peaches with each bite. -
Pour and Spread
Pour the mixture into the prepared baking dish. Use a spatula to spread it out evenly. It should look delightful already, but wait until it bakes! -
Bake to Perfection
Place your dish in the preheated oven and bake for about 30–35 minutes. Keep an eye on it in the last few minutes. You want a golden top and a toothpick inserted in the center to come out clean. -
Cool and Serve
Once it’s out of the oven, let it cool for about 10 minutes. This allows it to set up nicely and makes it easier to serve. Plus, your kitchen will smell heavenly!
Serving Suggestions
To plate your Peach Breakfast Bake, cut it into squares and serve warm. A sprinkle of cinnamon on top is a lovely finishing touch. I recommend adding a dollop of Greek yogurt or a scoop of vanilla ice cream if you’re feeling indulgent. Drizzle with a bit of honey or maple syrup for an extra touch of sweetness.
Gather around the table with family or friends, and enjoy this dish as a delightful morning treat. Trust me; it’ll brighten anyone’s day!
Recipe Variations
- Berry Blast: Swap out the peaches for mixed berries (strawberries, blueberries, raspberries) for a delicious berry breakfast bake.
- Nutty Delight: Toss in some chopped nuts — pecans or almonds work beautifully for added crunch and healthy fats.
- Coconut Twist: Add some shredded coconut for a tropical flair; it pairs beautifully with the peaches.
- Gluten-Free: Use gluten-free rolled oats or all almond flour for a delicious gluten-free version.
- Savory Spin: Feeling adventurous? Consider adding sautéed spinach and feta cheese for a savory take on breakfast baking!
Chef’s Notes
This Peach Breakfast Bake has evolved over the years in my kitchen. I’ve tested it in so many ways, and I love how forgiving it is! You can really play with the ingredients based on what you have on hand. I once made it with a friend who was excited about using ripe bananas instead of peaches, and it turned out extraordinary!
And here’s a funny kitchen story: I remember trying to multitask while making this dish. I had a pot of coffee brewing, fresh fruit on the counter, and something else cooking in another pan. I turned back to the bowl, only to find that I had mistakenly grabbed a cup of salt instead of sugar! Thankfully, I caught it just in time and added sweetness instead — phew! Always a good reminder to read your measuring cups carefully!
FAQs and Troubleshooting
1. Can I make this ahead of time?
Absolutely! You can prepare the mixture the night before, store it in the fridge, and simply pour it into the baking dish in the morning.
2. Can I freeze leftovers?
Definitely. Cut the bake into squares, place them in an airtight container, and freeze for up to three months. Reheat in the microwave or oven before serving!
3. My bake didn’t rise as expected. What could be wrong?
This can happen if your baking powder is expired or hasn’t been mixed thoroughly into the batter. Make sure to check the freshness of your ingredients!
4. Is it normal for the bake to sink a little as it cools?
Yes, it’s perfectly normal! This dish can deflate slightly as it cools; it’s still delicious and safe to eat!
Nutritional Info
While I typically focus on deliciousness, here’s a little breakdown that might interest you:
- Calories: Approximately 180 calories per serving (based on 8 servings).
- Protein: About 10g protein, thanks to the cottage cheese!
- Carbs: Roughly 22g, mostly from the fruit and oats.
- Fats: About 5g, depending on whether you choose to add nuts.
Conclusion
There you have it, my lovely foodies! This Peach Breakfast Bake recipe is easy to make, full of fresh flavors, and perfect for starting your day with a smile. It’s not just a recipe; it’s an experience — a way to bring people together and create memories around the table. So tie on your apron, get your ingredients ready, and let’s share in the joy of cooking!
I hope you enjoy making this delightful breakfast bake just as much as I do. Happy baking, and may your mornings be joyful and delicious!
PrintPeach Breakfast Bake
A delightful and healthy breakfast bake made with cottage cheese, fresh peaches, and rolled oats, perfect for summer mornings.
- Prep Time: 15 minutes
- Cook Time: 35 minutes
- Total Time: 50 minutes
- Yield: 8 servings 1x
- Category: Breakfast
- Method: Baking
- Cuisine: American
- Diet: Vegetarian
Ingredients
- 2 cups cottage cheese
- 3 large eggs
- 2 medium ripe peaches, peeled and diced
- 1/2 cup rolled oats or almond flour
- 1/4 cup honey or maple syrup
- 1 tsp vanilla extract
- 1/2 tsp ground ginger or cinnamon
- 1 tsp baking powder
Instructions
- Preheat your oven to 350°F (175°C).
- Prepare your baking dish by greasing it lightly with cooking spray or coconut oil.
- Mix the cottage cheese, eggs, honey (or maple syrup), and vanilla extract until smooth and creamy.
- Incorporate the rolled oats (or almond flour), ground ginger (or cinnamon), and baking powder gently into the wet mixture.
- Add the diced peaches, folding them into the batter evenly.
- Pour the mixture into the prepared baking dish and spread it evenly.
- Bake for about 30–35 minutes until golden and a toothpick comes out clean.
- Cool for about 10 minutes before serving.
Notes
Serve warm with a dollop of Greek yogurt or ice cream, and drizzle with honey or maple syrup for extra sweetness.
Nutrition
- Serving Size: 1 square
- Calories: 180
- Sugar: 12g
- Sodium: 350mg
- Fat: 5g
- Saturated Fat: 2g
- Unsaturated Fat: 3g
- Trans Fat: 0g
- Carbohydrates: 22g
- Fiber: 3g
- Protein: 10g
- Cholesterol: 60mg
Keywords: peach breakfast bake, healthy breakfast, summer recipe, easy bake, cottage cheese recipe

Summer Nectarine Muffins: Easy One-Bowl Recipe for Beginners
Heavenly Nectarine Muffins: A Bite of Summer in Every Bite
Hello, my lovely food enthusiasts! Today, we’re diving into the bubbly world of baking with a recipe that’s like a warm hug on a sunny day—Nectarine Muffins! These delectable treats are the perfect blend of sweet, juicy nectarines and fluffy, buttery goodness. Whether you enjoy them with your morning coffee or as a delightful afternoon snack, they bring a touch of summer to your kitchen all year round.
I’m so excited to share this recipe with you, especially since nectarines hold a special place in my heart. They remind me of those lazy summer afternoons spent picking ripe fruit straight from the orchard with family. The smell of sun-kissed fruit, laughter echoing in the air, and the sweet satisfaction of a juicy bite—it all comes flooding back every time I bake these muffins. It’s like encapsulating a sunny day into each fluffy morsel!
But let’s not just reminisce—let’s roll up our sleeves and create something magical! Whether you’re a baking aficionado or just starting out, I promise you’ll feel like a pro by the end of this one. So tie on your apron, grab your favorite mixing bowl, and let’s get started on these delightful nectarines muffins!
A Sweet Memory Worth Sharing
Growing up, I was surrounded by the vibrant colors and mouthwatering scents of fresh fruits in our family garden. But, there was something extra special about the nectarines. I vividly remember the summer when we decided to host a family gathering in our backyard. My grandmother had just baked a batch of her famous nectarines muffins, and the aroma wafted through the whole neighborhood.
Guests arrived, and you could see their faces light up as they sunk their teeth into those moist, fruity delights. Laughter and chatter filled the air, but it was the muffins that truly stole the show. I found myself whisking up that old recipe, adding a modern twist of my own—a drizzle of sweet glaze that made them even more irresistible. The joy I felt in sharing those muffins was a pivotal moment in my culinary journey, igniting my passion for creating and sharing delicious food with others.
Ingredients
Let’s gather the stars of our show! Here’s what you’ll need for your delightful nectarines muffins:
-
2 cups all-purpose flour: This is the backbone of the muffins, providing that fluffy texture we all love. You can substitute it with whole wheat flour for a nuttier flavor and healthier option.
-
1/2 cup sugar: This adds the right amount of sweetness to keep our muffins delightful. For a less refined option, feel free to use coconut sugar or a sugar substitute.
-
1 tablespoon baking powder: This is our leavening agent, making the muffins rise beautifully. Always check it’s fresh for optimal fluffiness!
-
1/2 teaspoon salt: Salt enhances the flavors and balances the sweetness. Don’t skip it!
-
1/2 cup unsalted butter, melted: Butter brings richness and moisture. You can substitute with coconut oil or even applesauce for a lighter version.
-
1 cup milk: Milk makes the batter smooth and helps create tender muffins. You can use almond milk for a dairy-free option.
-
2 large eggs: These bind the ingredients and add richness. For a vegan twist, try flax eggs or applesauce.
-
1 teaspoon vanilla extract: This adds a lovely depth of flavor. Homemade vanilla extract is a dream!
-
1 1/2 cups diced nectarines: The star ingredient! Choose ripe nectarines to pack in all the juicy goodness. You can substitute with peaches if nectarines are out of season.
-
1/2 teaspoon cinnamon: Cinnamon will give our muffins a warm, cozy flavor. Feel free to adjust based on your taste preference.
-
1/4 cup brown sugar: This will add a delightful caramel-like sweetness. If you’re looking for a lighter option, you could use maple syrup instead.
-
1/4 cup flour (for topping): Tossing a bit of flour with the brown sugar creates a lovely crunchy topping. Oats can make a great swap for a heartier texture.
-
1 cup powdered sugar (for glaze): The glaze adds a touch of sweetness and a glossy finish to our muffins. For a healthier option, you can drizzle with honey instead.
-
1-2 tablespoons milk (for glaze): This will help achieve that perfect glaze consistency. Non-dairy milk works well too!
Step-by-Step Instructions
Alright, let’s turn those beautiful ingredients into heavenly muffins:
-
Preheat and Prep: Preheat your oven to 350°F (175°C). Line a muffin tin with paper liners or grease it with a touch of cooking spray. This step is key to ensuring our muffins pop out effortlessly when they’re done!
-
Mix Dry Ingredients: In a large mixing bowl, whisk together the flour, sugar, baking powder, cinnamon, and salt. Make sure everything is well combined—this helps our muffins rise evenly.
-
Combine Wet Ingredients: In another bowl, melt the unsalted butter (let it cool slightly), then whisk in the milk, eggs, and vanilla extract. As you mix, you’ll notice that lovely aroma wafting through your kitchen—it’s pure bliss!
-
Merge the Mixtures: Gradually pour the wet ingredients into the dry mix. Stir gently until just combined; it’s okay if there are a few lumps. Over-mixing will result in tough muffins—nobody wants that!
-
Gently Fold in Nectarines: Now, fold in those diced nectarines with care. The vibrant colors and aroma of the fruit make you feel like a true kitchen artist!
-
Prepare the Topping: In a small bowl, combine the brown sugar, flour, and a dash of cinnamon. This mixture will create a lovely crumbly topping that adds texture and sweetness.
-
Fill the Muffin Tin: Divide the batter evenly among the muffin cups—fill them about two-thirds full. Sprinkle the brown sugar topping generously over each muffin.
-
Bake to Perfection: Pop the muffins into your preheated oven and bake for about 18-22 minutes, or until a toothpick inserted into the center comes out clean. Keep an eye on them; every oven can be a bit different!
-
Cool and Glaze: Once they’re perfectly golden brown, remove them from the oven and let them cool in the pan for about 5 minutes before transferring them to a wire rack. While they cool, whisk together your glaze ingredients until smooth. Drizzle that sweet glaze over the muffins for that extra touch of indulgence.
-
Serve and Savor: Let them cool a bit longer (if you can resist) and then enjoy them fresh from the oven, or store them in an airtight container to enjoy later. Trust me, they won’t last long!
Serving Suggestions
Presentation adds to the experience! When serving your nectarines muffins, you can stack them on a beautiful cake stand or arrange them on a large platter with fresh mint leaves for color. A dusting of powdered sugar on top, paired with a cup of freshly brewed coffee or tea, makes for a simple yet elegant display. Add a few extra diced nectarines alongside for that show-stopping summer vibe!
Recipe Variations
- Nutty Crunch: Add 1/2 cup of chopped nuts (like almonds or walnuts) into the batter for an added crunch and richness.
- Berry Blast: Swap half of the nectarines for fresh blueberries or raspberries for a fruity twist.
- Zesty Citrus: Add the zest of one lemon or orange to the batter for a refreshing citrus note.
- Cream Cheese Swirl: Swirl in a mixture of cream cheese with a hint of vanilla and sugar for a decadent surprise in every bite.
- Spiced Delights: Add a pinch of nutmeg and allspice for a deeper, warming flavor profile—perfect for those cozy days.
Chef’s Notes
Oh, how these nectarines muffins have evolved! Initially, I found myself overwhelmed with the process and the plethora of options available for mixing and matching flavors. Through trial and error, I learned to keep things simple and focused on one star ingredient—the nectarines. A funny story from my kitchen: One batch ended up with a handful of crushed cookies mixed in, which I didn’t realize until my friends were raving about the unexpected “cookie crunch.” Sometimes the mishaps lead to delightful surprises!
FAQs and Troubleshooting
Q: My muffins came out dense and heavy. What happened?
A: This could be due to over-mixing the batter. Gentle folds are key! Also, ensure your baking powder is fresh; its effectiveness declines over time.
Q: How can I keep my muffins moist?
A: Avoid overbaking and check for doneness around the 18-minute mark. Storing them in an airtight container once fully cooled will also help maintain moisture.
Q: Can I freeze the muffins?
A: Absolutely! Simply wrap each muffin individually in plastic wrap and store in a zip-top bag. They’ll last for about three months in the freezer. Thaw and enjoy whenever you want a taste of summer!
Q: Can I make these muffins without eggs?
A: Definitely! Substitute each egg with 1/4 cup of applesauce or a flax egg (1 tablespoon flaxseed meal + 2.5 tablespoons water). They’ll bake beautifully!
Nutritional Info
While I won’t nerd out too much on the numbers, here’s a rough idea per muffin, if you make 12:
- Calories: 200
- Fat: 8g
- Carbohydrates: 30g
- Protein: 3g
- Sugar: 12g
(Keep in mind, using alternative ingredients will change these numbers!)
And voila! Your kitchen is now filled with the heavenly aroma of freshly baked nectarines muffins. I hope this recipe brings a little extra joy to your day and inspires you to keep gathering around that table, creating meaningful memories together. Remember, it’s not just about the food; it’s about those beautiful moments of connection we create over delicious dishes. Happy baking, and don’t forget to enjoy every crumb!
PrintHeavenly Nectarine Muffins

Delightful nectarines muffins that capture the essence of summer in each fluffy bite.
- Prep Time: 15 minutes
- Cook Time: 20 minutes
- Total Time: 35 minutes
- Yield: 12 servings 1x
- Category: Dessert
- Method: Baking
- Cuisine: American
- Diet: Vegetarian
Ingredients
- 2 cups all-purpose flour
- 1/2 cup sugar
- 1 tablespoon baking powder
- 1/2 teaspoon salt
- 1/2 cup unsalted butter, melted
- 1 cup milk
- 2 large eggs
- 1 teaspoon vanilla extract
- 1 1/2 cups diced nectarines
- 1/2 teaspoon cinnamon
- 1/4 cup brown sugar
- 1/4 cup flour (for topping)
- 1 cup powdered sugar (for glaze)
- 1–2 tablespoons milk (for glaze)
Instructions
- Preheat your oven to 350°F (175°C). Line a muffin tin with paper liners or grease it with cooking spray.
- Mix the flour, sugar, baking powder, cinnamon, and salt in a large mixing bowl.
- Combine the melted unsalted butter, milk, eggs, and vanilla extract in another bowl.
- Merge the wet ingredients into the dry mix, stirring gently until just combined.
- Gently fold in the diced nectarines.
- Prepare the topping by combining brown sugar, flour, and a dash of cinnamon.
- Fill the muffin cups with batter and sprinkle the brown sugar topping over each muffin.
- Bake for about 18-22 minutes, or until a toothpick comes out clean.
- Cool the muffins for 5 minutes, then drizzle with glaze before serving.
Notes
For a twist, try adding nuts or swapping nectarines for other fruits.
Nutrition
- Serving Size: 1 muffin
- Calories: 200
- Sugar: 12g
- Sodium: 185mg
- Fat: 8g
- Saturated Fat: 5g
- Unsaturated Fat: 3g
- Trans Fat: 0g
- Carbohydrates: 30g
- Fiber: 1g
- Protein: 3g
- Cholesterol: 40mg
Keywords: nectarine, muffins, summer, baking, dessert