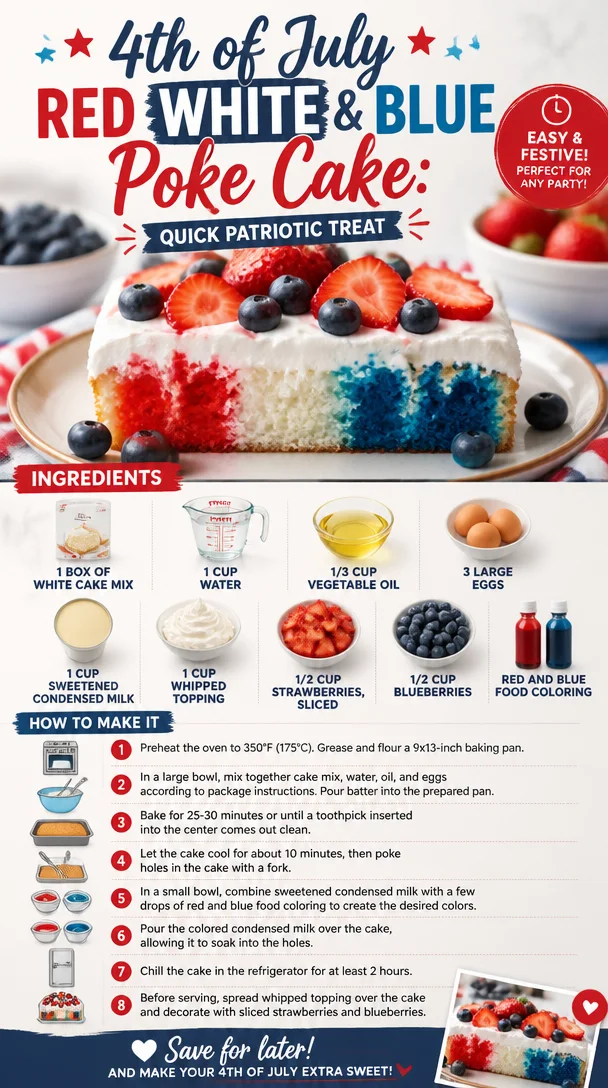
4th of July Red White & Blue Poke Cake: Quick Patriotic Treat
Celebrate in Style with a Red, White, and Blue Patriotic Poke Cake
Hello, fellow food lovers! With summer festivities around the corner—think Fourth of July barbecues, Memorial Day gatherings, or just a sunny afternoon picnic—there’s no better way to celebrate than with a delightful Red, White, and Blue Patriotic Poke Cake! This cake is not just festive and fun; it’s a true showstopper that will have your friends and family gathering around the table with smiles all around.
There’s something magical about a poke cake. The concept is simple: poke holes in a baked cake and let it soak up a delicious mixture, usually sweet, to create layers of flavor. It’s effortless elegance in dessert form! Today, I’m here to guide you through crafting this stunning cake that is as easy as putting on your apron and tying it up. Let’s make some magic happen in the kitchen!
A Sweet Memory to Cherish
Whenever I think about festive treats, I am transported back to the summers of my childhood, spending weekends at my grandma’s house. She had a knack for bringing everyone together with her delicious desserts. One summer, she decided to celebrate the Fourth of July with a poke cake adorned in red and blue, topped with fluffy whipped topping and a sprinkle of berries. I vividly remember the excitement of poking holes into the cake with her and pouring that sweet, vibrant mixture over it. The anticipation of the first bite was palpable!
As the cake chilled in the refrigerator, we gathered outside, the warm sun kissing our skin while we sipped lemonade and chatted about fireworks and family stories. When that cake finally made its grand entrance, it was the highlight of our gathering. Each slice was a burst of flavors, and I realized that dessert has a way of stitching hearts together.
Fast forward to today, I carry that nostalgic joy in every poke cake I create. Let’s recreate some of that magic together as we whip up our Red, White, and Blue Patriotic Poke Cake!
Ingredients
-
1 box of white cake mix
This serves as the cake’s base. Grab your favorite brand! You can also use a homemade white cake recipe if you want to take it to the next level. For a gluten-free option, consider using a gluten-free cake mix. -
1 cup water
The liquid that comes together with the cake mix to give it a lovely moist texture. You can swap it with milk for a richer flavor. -
1/3 cup vegetable oil
Oil keeps the cake tender. If you’re feeling fancy, try melted coconut oil for a subtle tropical twist. -
3 large eggs
Eggs provide structure and moisture. If you’re looking for an egg-free version, you can replace each egg with 1/4 cup unsweetened applesauce or a flax egg (1 tablespoon of ground flaxseed mixed with 2.5 tablespoons of water). -
1 cup sweetened condensed milk
This rich milk adds indulgent sweetness and creaminess. If you prefer a dairy-free option, look for coconut condensed milk. -
1 cup whipped topping
A fluffy topping that crowns your cake beautifully. You can use homemade whipped cream if you’re feeling inspired. Homemade is always a bit more special! -
1/2 cup strawberries, sliced
Beautiful red berries bursting with flavor. If strawberries are out of season, you can use raspberries or cherries. -
1/2 cup blueberries
Sweet, succulent, and perfect for our blue layer. You can also play around with blackberries or even diced kiwi for a twist. -
Red and blue food coloring
Essential for creating that gorgeous patriotic effect! Feel free to use natural food colorings for a healthier option.
Step-by-Step Instructions
-
Preheat the Oven
Preheat your oven to 350°F (175°C). This step is crucial for a perfectly baked cake. While the oven heats up, gather your ingredients to streamline the process! -
Mix the Cake Batter
In a large mixing bowl, combine the cake mix, water, vegetable oil, and eggs. Using an electric mixer, beat on medium speed until smooth (about 2-3 minutes). Here’s a handy tip: Be sure to scrape the sides of the bowl for a uniform batter; those little flour pockets try to hide and can lead to a lumpy cake! -
Bake the Cake
Pour the cake batter into a greased 9×13-inch baking pan. Bake in your preheated oven for 30-35 minutes, or until a toothpick inserted in the center comes out clean. Enjoy that delightful smell wafting through your kitchen! -
Cool and Poke
Once baked, allow the cake to cool in the pan for about 10 minutes. After that, grab a wooden spoon or a straw and poke holes all over the cake—not too deep, just enough to make openings for the sauce. This part is fun! It’s like giving the cake a bit of a massage. -
Prepare the Soaking Mixture
In a medium bowl, combine your sweetened condensed milk with 1/2 cup of whipped topping. For a colorful twist, divide this mixture into two separate bowls. Add red food coloring to one bowl and blue to the other. Stir until you achieve your desired colors. -
Soak the Cake
Begin by pouring the red mixture over the cake, letting it sink into those lovely holes. Use a spatula to spread any remaining mixture evenly. Repeat the process with the blue mixture. -
Chill the Cake
Cover the cake with plastic wrap (or just a clean kitchen towel if you want to keep it rustic) and chill in the refrigerator for at least 2 hours. This step is crucial for all those flavors to meld together beautifully! -
Top the Cake
Once chilled, it’s time to spread the remaining whipped topping over the cake. Be generous—this is the creamy crown that takes your poke cake to the next level! -
Add the Berries
Finally, arrange your sliced strawberries and blueberries on top of the whipped topping. Create patterns, make designs—be as creative as you like! Let your festive spirit shine.
Serving Suggestions
When it’s time to serve, slice the cake into squares and present them on a bright platter. You might want to garnish also with a sprig of mint for that refreshing touch. The stunning red, white, and blue layers shining through will have your guests reaching for their forks!
Recipe Variations
-
Add a Layer of Lemon
Consider making a zesty lemon syrup to drizzle over the cake before adding the whipped topping. It adds a refreshing twist that brightens up the flavors! -
Chocolate Charm
Add cocoa powder to your cake mix for a chocolate sponge and pair with dark chocolate ganache on top. The combination of chocolate, fruit, and whipped cream? Simply delectable. -
Dairy-Free Delight
Swap the whipped topping for coconut whipped cream and use plant-based condensed milk. You won’t miss a beat with this scrumptious alternative! -
Nutty Crunch
Toasted almond or pecan pieces sprinkled on top before serving will introduce a crispy texture that complements the cake’s moisture beautifully. -
Ice Cream Surprise
Why not serve individual pieces with a scoop of vanilla ice cream? It’s a match made in summer heaven!
Chef’s Notes
I absolutely adore how poke cakes have an element of surprise; each bite has a burst of flavor, and there’s just something special about the way it brings layers of delight.
Over the years, I’ve adapted the recipe in numerous ways, experimenting with different flavor combinations. I once made a tropical version with pineapple and coconut that stole the show at a summer gathering. Every poke cake I bake feels like a canvas for creativity!
FAQs and Troubleshooting
Q: Why did my cake fall flat?
A: This can happen if your eggs weren’t fresh or if the batter was overmixed. Always check the date on your eggs and mix just until combined for best results.
Q: Can I make this cake ahead of time?
A: Absolutely! The cake keeps well in the fridge for 3-4 days. Just be mindful of adding the whipped topping and fruit closer to serving time to keep them fresh.
Q: Could I make this gluten-free?
A: Yes! You can substitute the white cake mix with a gluten-free blend. Just check that your other ingredients are gluten-free too (some whipped toppings may not be!).
Q: What should I do if I run out of sweetened condensed milk?
A: You can create a quick alternative by simmering 2 cups of milk with 2/3 cup of sugar until it thickens (about 30 minutes); just remember to stir frequently!
Nutritional Info
While I like to focus on indulging in delicious food rather than strict dietary guidelines, here’s a rough idea (per slice, based on 12 servings):
- Calories: 270
- Fat: 10g
- Carbohydrates: 39g
- Protein: 3g
Enjoy this cake as a treat, and remember, it’s all about balance in life.
Well, there you have it—a deliciously festive Red, White, and Blue Patriotic Poke Cake that’s perfect for any celebration! I hope this recipe brings you as much joy as it has brought me over the years. Now, tie your apron and let’s get baking! Happy celebrating!
PrintRed, White, and Blue Patriotic Poke Cake
A festive and delightful poke cake perfect for summer celebrations, layered with a sweet filling and topped with fresh berries.
- Prep Time: 15 minutes
- Cook Time: 35 minutes
- Total Time: 50 minutes
- Yield: 12 servings 1x
- Category: Dessert
- Method: Baking
- Cuisine: American
- Diet: Vegetarian
Ingredients
- 1 box of white cake mix
- 1 cup water
- 1/3 cup vegetable oil
- 3 large eggs
- 1 cup sweetened condensed milk
- 1 cup whipped topping
- 1/2 cup strawberries, sliced
- 1/2 cup blueberries
- Red and blue food coloring
Instructions
- Preheat your oven to 350°F (175°C).
- Mix the cake batter by combining the cake mix, water, vegetable oil, and eggs in a large mixing bowl.
- Beat on medium speed for 2-3 minutes until smooth.
- Pour the cake batter into a greased 9×13-inch baking pan.
- Bake for 30-35 minutes or until a toothpick inserted comes out clean.
- Cool the cake in the pan for about 10 minutes.
- Poke holes all over the cake using a wooden spoon or straw.
- Prepare the soaking mixture by combining sweetened condensed milk with 1/2 cup of whipped topping, dividing into two bowls and adding food coloring.
- Pour the red mixture over the cake, followed by the blue mixture.
- Chill the cake in the refrigerator for at least 2 hours.
- Spread remaining whipped topping over the cake.
- Add sliced strawberries and blueberries on top for decoration.
Notes
This cake can be made ahead of time and stored in the fridge for 3-4 days. Add fresh fruit closer to serving time for optimal freshness.
Nutrition
- Serving Size: 1 slice
- Calories: 270
- Sugar: 22g
- Sodium: 180mg
- Fat: 10g
- Saturated Fat: 4g
- Unsaturated Fat: 6g
- Trans Fat: 0g
- Carbohydrates: 39g
- Fiber: 1g
- Protein: 3g
- Cholesterol: 30mg
Keywords: poke cake, patriotic cake, Fourth of July dessert, summer dessert, festive cake
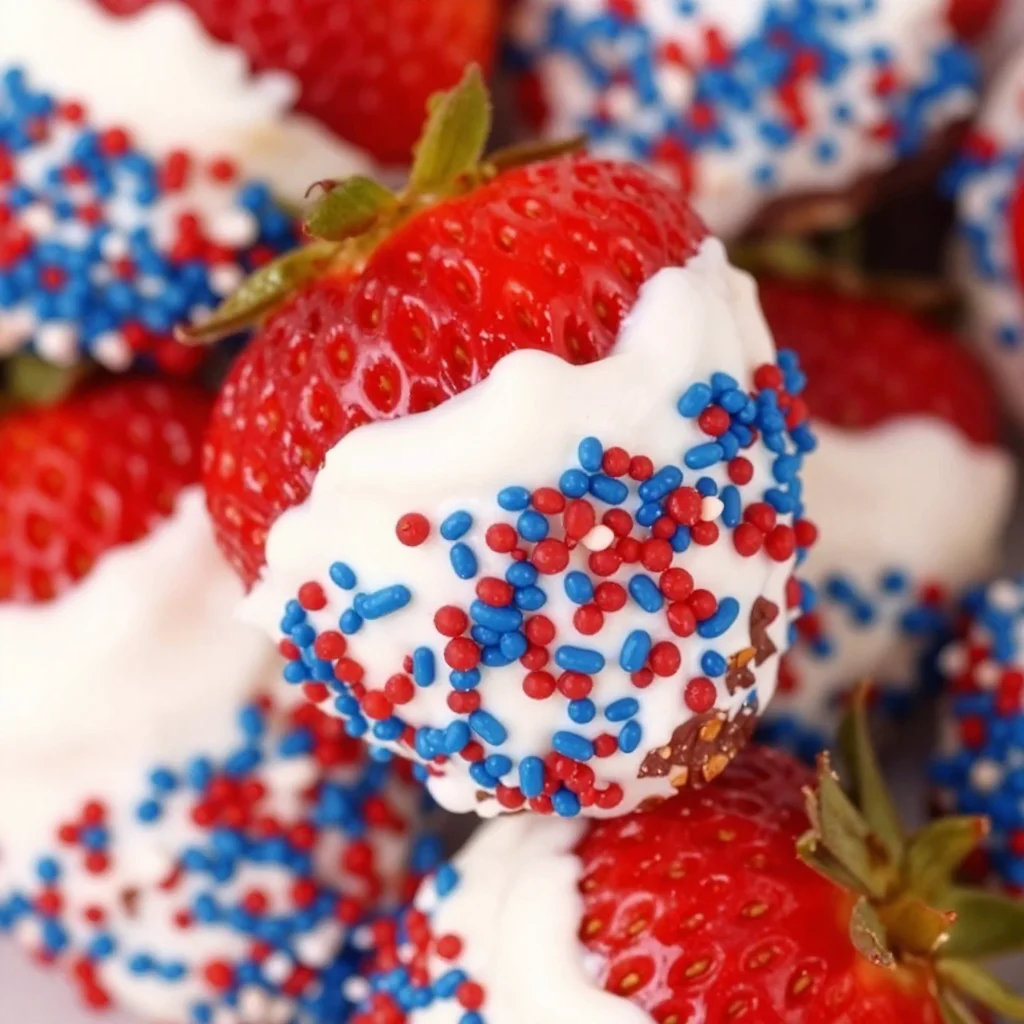
4th of July Chocolate-Covered Strawberries: 15-Minute Treat
Celebrate Independence Day with 4th of July Chocolate Covered Strawberries
Hello, fellow food lovers! Savannah here from Ivory Apron, and with the 4th of July just around the corner, it’s time to whip up something delicious and festive. What better way to celebrate this day of independence than with a delightful treat that’s as sweet as a summer afternoon? We’re diving into the world of Chocolate Covered Strawberries, decked out in red, white, and blue to make your holiday sparkle.
A Sweet Summer Memory
When I think back to the 4th of July, my mind floods with memories of warm evenings spent outdoors, the smell of barbecues wafting through the air, and laughter echoing around our picnic table. One such summer, I decided to surprise my family with dessert. I was young, maybe ten or eleven, and brimming with enthusiasm.
I can still picture the pristine strawberries basking in the sun as I dipped them in melted chocolate. It felt like magic—a simple act of dipping transformed these berries into a celebration all on their own. I topped them generously with bright sprinkles and presented them on a classic white platter. When they were unveiled, gasps of excitement filled the air! Those bright, shiny strawberries became the star of the evening.
That moment inspired my love for cooking—a reminder that you don’t need extravagant ingredients or expensive kitchen gadgets to create joy. Sometimes, all it takes is a little creativity and a desire to share delightful tastes with loved ones.
What You’ll Need
Ready to create your own festive 4th of July Chocolate Covered Strawberries? Let’s gather our ingredients!
-
24 Strawberries: Look for bright red, firm strawberries with fresh green tops. They should be plump and as free from blemishes as possible. If you can’t find strawberries, ripe bananas or other fruits also work beautifully for dipping!
-
1 Cup White Candy Melts or White Chocolate Melting Wafers: Candy melts are great for those beautiful, smooth coatings. If you prefer white chocolate, make sure to get high-quality chocolate for better melting and that delightful sheen. Dark or milk chocolate can also be tempting alternatives!
-
1/2 Cup Red, White, and Blue Nonpareil Sprinkles: What’s a 4th of July treat without a bit of festive flair? These sprinkles add fun color and texture! If you can’t find them, use finely crushed nuts or other colored sprinkles you have on hand.
Step-by-Step Instructions
Now that we’ve got our ingredients, let’s jump into the process!
-
Prepare Your Strawberries:
- Rinse the strawberries under cold water, then gently pat them dry with a paper towel. Ensure they are completely dry; any moisture can hinder the chocolate from adhering properly.
-
Melt the Candy Melts:
- In a microwave-safe bowl, place the white candy melts. Microwave them in 30-second intervals, stirring between each until they are fully melted and smooth. This is where a bit of patience pays off—don’t be tempted to rush this step!
-
Dip the Strawberries:
- Hold a strawberry by the green tops and dip it into the melted chocolate, swirling it around to coat it evenly. You want a beautiful, thick layer so that the chocolate stands out. Lift it up and let the excess chocolate drip off back into the bowl.
-
Add Sprinkles:
- Before the chocolate sets, immediately liberally sprinkle your festive decorations onto the chocolate-dipped strawberries. This is where you can get creative!
-
Set the Strawberries:
- Place the dipped strawberries on a parchment-lined baking sheet. Once you’ve dipped all your strawberries, put them in the refrigerator for about 30 minutes or until the chocolate hardens completely.
-
Serve These Delightful Treats:
- Arrange the strawberries on a platter and watch as they transform from simple berries to the centerpiece of your holiday dessert table!
Serving Suggestions
When it’s time to serve your gorgeous chocolate-covered strawberries, arrange them on a nice platter, perhaps in the shape of a flag or a simple circular design. For an extra touch, sprinkle some fresh mint leaves around the base for color and flavor. Don’t forget to garnish with a few extra sprinkles for that added festive pop!
Recipe Variations
- Flavor Enhancements: Try infusing your melted candy melts with a drop of peppermint or almond extract for a unique twist.
- Darker Appeal: Swap the white chocolate for dark or milk chocolate if you prefer a richer taste.
- Fruity Toppings: Drizzle with a contrasting color by melting some dark chocolate or use a pop of color with colorful edible glitter.
- Nutty Crunch: Roll the dipped strawberries in chopped nuts (like pistachios or walnuts) for added texture and flavor.
- Make it a Brownie Treat: Place a small brownie bite at the base of each strawberry for added sweetness and structure.
Chef’s Notes
Chocolate-dipped strawberries are one of those recipes that evolve beautifully with each passing season. I’ll never forget the time I decided to make a batch for a holiday party but accidentally left the chocolate in the microwave a tad too long. The chocolate seized, leaving me with a clumpy mess. While it was a bit of a catastrophe, I learned two lessons: always keep an eye on the microwave and, secondly, those mangled berries were still gobbled up by guests who declared them “rustic” strawberry bites!
Over the years, I’ve experimented with different toppings and flavors, but no matter how they turn out, they always bring smiles to faces. That’s what cooking is all about, isn’t it?
FAQs and Troubleshooting
-
Why is my chocolate not smooth when melted?
- If your chocolate seizes and turns clumpy, it’s likely that water got into it. Make sure your bowls, utensils, and strawberries are completely dry!
-
Can I make these ahead of time?
- Yes! You can make them a day in advance and store them in an airtight container in the fridge. Just keep in mind that they lose a bit of that fresh plump look after a day, so make them close to your event if you can!
-
What if I don’t have nonpareil sprinkles?
- No problem! Use any type of sprinkle you have, or even crushed graham crackers for a different look. Get creative!
-
How can I get a perfect chocolate coating?
- Dip quickly, and don’t linger! Swirl the strawberry to ensure an even coating. Remember, practice makes perfect, and every try will get you closer!
Nutritional Info
While I won’t be providing exact nutritional stats for these festive strawberries, they are a fun treat that can fit in moderately as part of a balanced diet. Strawberries are rich in antioxidants and vitamins, while the light coating of chocolate makes for a sweet indulgence!
I hope these 4th of July Chocolate Covered Strawberries ignite your creativity in the kitchen! Whether you’re hosting a big family celebration or enjoying a quiet evening watching fireworks, these beauties will elevate your dessert game. So go ahead, tie on your apron, and let’s create something delicious together! Cheers to sweet summer nights and beautiful memories made around the table!
Print4th of July Chocolate Covered Strawberries
Delicious and festive chocolate-covered strawberries perfect for celebrating Independence Day.
- Prep Time: 15 minutes
- Cook Time: 5 minutes
- Total Time: 20 minutes
- Yield: 12 servings 1x
- Category: Dessert
- Method: Dipping
- Cuisine: American
- Diet: Vegetarian
Ingredients
- 24 Strawberries
- 1 Cup White Candy Melts or White Chocolate Melting Wafers
- 1/2 Cup Red, White, and Blue Nonpareil Sprinkles
Instructions
- Prepare your strawberries: Rinse the strawberries under cold water, then gently pat them dry with a paper towel. Ensure they are completely dry.
- Melt the candy melts: In a microwave-safe bowl, place the white candy melts. Microwave them in 30-second intervals, stirring until fully melted and smooth.
- Dip the strawberries: Hold a strawberry by the green tops and dip it into the melted chocolate, swirling it around for an even coat.
- Add sprinkles: Before the chocolate sets, immediately sprinkle your festive decorations onto the dipped strawberries.
- Set the strawberries: Place dipped strawberries on a parchment-lined baking sheet and refrigerate for about 30 minutes or until chocolate hardens.
- Serve these delightful treats: Arrange the strawberries on a platter for a beautiful presentation.
Notes
These chocolate-covered strawberries can be made a day in advance. They are best enjoyed fresh for optimal appearance.
Nutrition
- Serving Size: 2 strawberries
- Calories: 150
- Sugar: 20g
- Sodium: 25mg
- Fat: 8g
- Saturated Fat: 5g
- Unsaturated Fat: 3g
- Trans Fat: 0g
- Carbohydrates: 18g
- Fiber: 2g
- Protein: 1g
- Cholesterol: 0mg
Keywords: 4th of July, chocolate covered strawberries, festive dessert