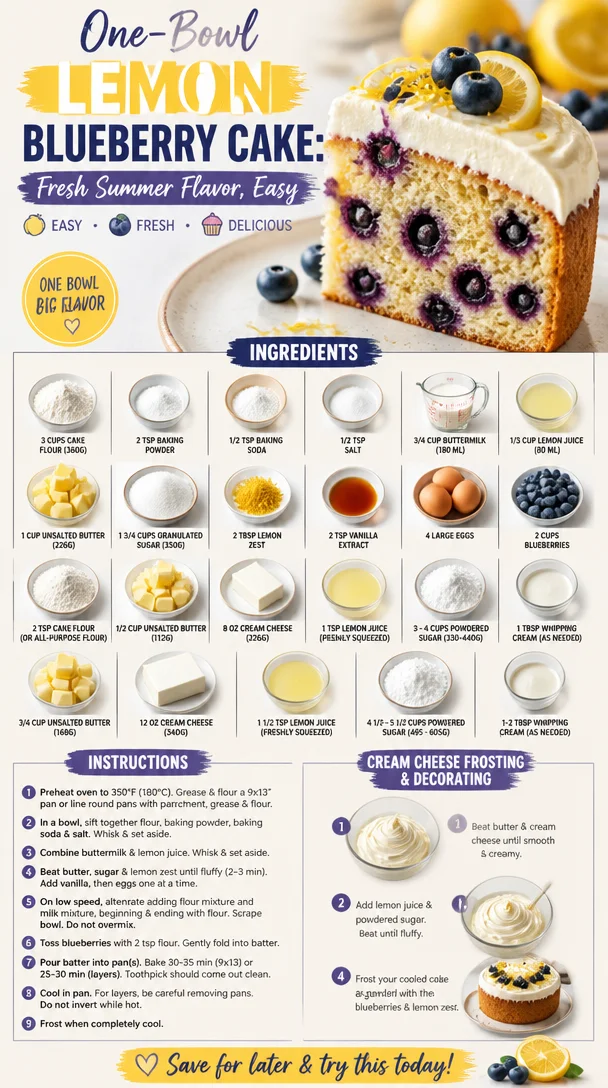
One-Bowl Lemon Blueberry Cake: Fresh Summer Flavor, Easy
The Delightful Union of Lemon and Blueberry: A Cake to Cherish
Hello fellow food lovers! Today, I am absolutely thrilled to share a recipe that has been a staple in my kitchen and a true crowd-pleaser — the Lemon Blueberry Cake. This cake beautifully captures the bright essence of lemon paired with the sweet, juicy burst of blueberries, resulting in a dessert that is simply irresistible. Whether it’s a casual Tuesday night or a festive celebration, this cake will bring a touch of elegance and joy to your table.
Let’s dive into this delightful journey filled with flavors, stories, and, of course, a sprinkling of love. I promise, making this Lemon Blueberry Cake will be as enjoyable as tasting it!
A Sweet Memory Wrapped in Citrus
When I think of lemon blueberry cake, I flash back to the summers of my childhood. My grandmother had this tiny garden behind her quaint little house, brimming with blueberries and a lemon tree that looked like it had jumped straight out of a storybook. Every summer, we would gather the ripe blueberries and slice fresh lemons from her garden, spending afternoons creating various treats. One particular day, we decided to bake a lemon blueberry cake — an experiment that turned out to be deliciously memorable!
I can still feel the warm sunshine on my back and smell the zesty aroma wafting through the kitchen. As we whisked together our ingredients, there was laughter, stories filled with joy, and those occasional flour dust clouds that reminded me how inviting and messy the kitchen can be. As the cake rose in the oven, the scents mingled in the air, and we couldn’t wait for that first bite. From that day forward, lemon blueberry cake became a family tradition, a recipe I am passionate about sharing with you all.
Ingredients You’ll Need
To craft this delightful Lemon Blueberry Cake, you’ll need a handful of ingredients — most of which you might already have in your pantry. Here’s the list:
-
3 cups cake flour (360 grams)
Cake flour gives the cake a light and airy texture. If you don’t have cake flour, you can substitute it with all-purpose flour; just add an extra tablespoon per cup. -
2 teaspoons baking powder
This is essential for lift. Make sure it’s fresh for the best results! -
1/2 teaspoon baking soda
This helps balance the acidity of the lemon, giving your cake an extra rise. -
1/2 teaspoon salt
Salt is the secret ingredient that enhances all the flavors in your cake. Don’t skip it! -
3/4 cup buttermilk (180 ml, room temperature)
If you don’t have buttermilk, you can create a substitute by mixing 3/4 cup of milk with 1 tablespoon of vinegar or lemon juice. Let it sit for a few minutes until it curdles slightly. -
1/3 cup lemon juice (80 ml, freshly squeezed)
Freshly squeezed lemon juice is a must! The store-bought kind just doesn’t have the same punch of flavor. -
1 cup unsalted butter (226 grams, softened to room temperature)
Room temperature butter ensures a creamy mixture with no lumps. For a dairy-free option, you can use a plant-based butter. -
1 3/4 cups granulated sugar (350 grams)
This is the magic sweetener! You can substitute part of this with honey or maple syrup for a different flavor profile, but remember to adjust the wet ingredients accordingly. -
2 tablespoons lemon zest
Grate the yellow part of the lemon skin to get that essential aroma and flavor! A microplane works wonders for this. -
2 teaspoons vanilla extract
A staple in many desserts! Opt for pure vanilla extract for a deeper flavor. -
4 large eggs (room temperature)
Eggs act as a binder. Make sure they’re room temperature to help with emulsification! -
2 cups blueberries
Fresh blueberries are best, but you can use frozen. Just keep them frozen until you’re ready to use them to prevent the cake from turning blue! -
2 teaspoons cake flour (or all-purpose flour)
Dust the blueberries with flour to help distribute them evenly throughout the cake batter.
For the Cream Cheese Frosting:
-
1/2 cup unsalted butter (112 grams, softened)
Just like the cake, ensure this is soft for easy mixing. -
8 oz brick-style cream cheese (226 grams)
Full-fat cream cheese gives the frosting both texture and flavor. Avoid using spreadable cream cheese. -
1 teaspoon lemon juice (freshly squeezed)
A touch of acid enhances the flavor of the frosting. -
3 – 4 cups powdered sugar (330-440 grams, sifted)
Sifting eliminates lumps and leads to a smooth frosting. -
1 tablespoon whipping cream (as needed)
Use this to adjust the consistency of the frosting. -
3/4 cup unsalted butter (168 grams, softened)
Another lovely butter addition for creamier frosting! -
12 ounces brick-style cream cheese (340 grams, full fat)
Ensures your frosting is rich and decadent. -
1 1/2 teaspoons lemon juice (freshly squeezed)
Just like before, don’t skimp on freshness here. -
4 1/2 – 5 1/2 cups powdered sugar (495 – 605 grams, sifted)
Adjust according to your preferred sweetness and stability. -
1-2 tablespoons whipping cream (as needed)
This will help to achieve the desired texture of your frosting.
Step-by-Step Instructions
Alright, let’s roll up those sleeves and get baking! Follow these easy steps:
-
Preheat your oven to 350°F (175°C). This is where the magic begins!
-
Prep your pans: Grease and flour two 9-inch round cake pans. You can also line the bottoms with parchment paper for easier release later.
-
Combine dry ingredients: In a mixing bowl, whisk together the cake flour, baking powder, baking soda, and salt. This ensures they’re evenly distributed, which leads to a consistent rise. Set aside.
-
Get your liquids ready: In another bowl, whisk the buttermilk, lemon juice, and lemon zest until combined. The acidity of the lemon juice coupled with the buttermilk will make your cake tender and flavorful.
-
Cream the butter and sugar: In your stand mixer, beat the softened unsalted butter and granulated sugar until it’s light and fluffy, about 3-4 minutes. This step is key for a light cake texture, so take your time!
-
Add eggs: One at a time, add the room temperature eggs, mixing well after each addition. Scrape down the sides of the bowl as needed. This ensures all ingredients are well incorporated.
-
Add vanilla: Mix in the vanilla extract — oh, that aroma is heavenly!
-
Combine wet and dry ingredients: Gradually add the flour mixture into the butter mixture, alternating with the buttermilk mixture. Start and end with the dry ingredients. Mix until just combined; avoid overmixing!
-
Toss the blueberries: In a small bowl, toss the fresh blueberries with 2 teaspoons of cake flour. This will help them not sink to the bottom. Gently fold them into the batter, being careful not to break them apart.
-
Pour and bake: Divide the batter evenly between your prepared cake pans and smooth the tops with a spatula. Bake in the preheated oven for about 25-30 minutes, or until a toothpick inserted into the center comes out clean.
-
Cool the cakes: Once baked, remove from the oven and allow the cakes to cool in the pans for 10 minutes. Then turn them out onto a wire rack to cool completely. Patience is key here!
-
Prepare the frosting: In a mixing bowl, beat together the softened cream cheese and butter until fluffy. Gradually add in sifted powdered sugar and mix until smooth. Finally, mix in the lemon juice and whip until light and airy. If it’s too thick, add a bit of whipping cream to achieve your desired consistency.
-
Frost the cakes: Once the cakes are completely cool, spread a generous layer of frosting between the two cake layers. Place the second layer on top and frost the top and sides of the cake. Decorate with fresh blueberries if you desire — it adds a lovely touch!
Serving Suggestions
Let the cake chill in the refrigerator for about an hour before serving, as this helps the frosting set a bit. Slice and serve on pretty plates with a garnish of lemon slices or extra blueberries on top. A refreshing cup of herbal tea or a sparkling lemonade pairs beautifully, elevating your dessert presentation even further.
Recipe Variations
Here are a few fun variations to help you make this recipe your own:
- Lemon Poppy Seed Twist: Add 2 tablespoons of poppy seeds to the batter for an added crunch.
- Berry Medley: Substitute some blueberries with raspberries or blackberries for an extra burst of flavor and color.
- Lemon Curd Filling: For an extra tangy surprise, layer some lemon curd between the cake layers, then frost as usual.
- Gluten-Free Option: Substitute regular flour with a gluten-free all-purpose blend. Just make sure it contains xanthan gum for the best results.
- Vegan Makeover: Replace eggs with flax eggs and use a dairy-free butter substitute along with plant-based cream cheese for a delightful vegan dessert.
Chef’s Notes
It’s funny — as much as I strive for perfection in the kitchen, things sometimes do go awry! I’ll never forget the time I misread my grandmother’s old recipe and added a whole cup of baking soda instead of baking powder. The resulting cake was a disaster! But mistakes like those are what you learn from. They make cooking an adventure and a rich, personal experience. Over the years, my lemon blueberry cake has transformed from a messy kitchen masterpiece to a cherished family recipe. Each time I bake it, I feel like I’m bringing a part of my history to the table.
FAQs and Troubleshooting
Q: My cake is too dense; what went wrong?
A: There could be a few reasons for this. Make sure that you’re not overmixing your batter after adding the flour. Also, double-check that you’re using fresh baking powder and baking soda.
Q: Why did my blueberries sink to the bottom?
A: Dusting the blueberries in flour helps prevent sinking. If they still sink, it may be due to the batter being too runny. Make sure to check your measurements!
Q: How do I store leftover cake?
A: Store any leftovers in an airtight container in the fridge for up to 5 days. You can also freeze individual slices wrapped tightly in plastic wrap for up to 3 months!
Q: Can I make this cake ahead of time?
A: Absolutely! You can bake the cake ahead of time and freeze the layers without frosting. When you’re ready to serve, thaw them, frost, and enjoy!
Nutritional Info
While I won’t dive deep into technical nutritional breakdowns, it’s essential to remember that desserts are meant for enjoyment! That said, treat yourself, savor each bite, and share with your loved ones. Cooking and eating should be a celebration of life, not a stressor!
So there you have it, my dear friends! A delightful journey through the zesty and sweet creation of Lemon Blueberry Cake. I encourage you to try this recipe, make it your own, and perhaps create your cherished memories in the kitchen.
Remember to tie on your apron, enjoy the process, and allow the warm essence of home cooking to fill your heart and the hearts of those you love. Happy Baking!
PrintLemon Blueberry Cake
A delightful and moist cake that combines the brightness of lemon with the sweetness of blueberries, perfect for any occasion.
- Prep Time: 20 minutes
- Cook Time: 30 minutes
- Total Time: 50 minutes
- Yield: 10 servings 1x
- Category: Dessert
- Method: Baking
- Cuisine: American
- Diet: Vegetarian
Ingredients
- 3 cups cake flour (360 grams)
- 2 teaspoons baking powder
- 1/2 teaspoon baking soda
- 1/2 teaspoon salt
- 3/4 cup buttermilk (180 ml, room temperature)
- 1/3 cup lemon juice (80 ml, freshly squeezed)
- 1 cup unsalted butter (226 grams, softened to room temperature)
- 1 3/4 cups granulated sugar (350 grams)
- 2 tablespoons lemon zest
- 2 teaspoons vanilla extract
- 4 large eggs (room temperature)
- 2 cups blueberries
- 2 teaspoons cake flour (or all-purpose flour)
- For the Cream Cheese Frosting:
- 1/2 cup unsalted butter (112 grams, softened)
- 8 oz brick-style cream cheese (226 grams)
- 1 teaspoon lemon juice (freshly squeezed)
- 3 – 4 cups powdered sugar (330–440 grams, sifted)
- 1 tablespoon whipping cream (as needed)
Instructions
- Preheat your oven to 350°F (175°C).
- Prep your pans: Grease and flour two 9-inch round cake pans.
- Combine dry ingredients: In a mixing bowl, whisk together the cake flour, baking powder, baking soda, and salt. Set aside.
- Get your liquids ready: In another bowl, whisk the buttermilk, lemon juice, and lemon zest until combined.
- Cream the butter and sugar: In your stand mixer, beat the softened unsalted butter and granulated sugar until light and fluffy.
- Add eggs: One at a time, add the room temperature eggs, mixing well after each addition.
- Add vanilla: Mix in the vanilla extract.
- Combine wet and dry ingredients: Gradually add the flour mixture into the butter mixture, alternating with the buttermilk mixture.
- Toss the blueberries: Dust the fresh blueberries with 2 teaspoons of cake flour and fold them into the batter.
- Pour and bake: Divide the batter between your prepared cake pans and bake for about 25-30 minutes.
- Cool the cakes: Let the cakes cool in the pans for 10 minutes before turning them out onto a wire rack to cool completely.
- Prepare the frosting: Beat together softened cream cheese and butter until fluffy, then gradually add sifted powdered sugar.
- Frost the cakes: Spread frosting between the two layers and on top and sides of the cooled cake.
Notes
For a gluten-free option, substitute regular flour with a gluten-free blend. A vegan version can be made using flax eggs and dairy-free ingredients.
Nutrition
- Serving Size: 1 slice
- Calories: 400
- Sugar: 30g
- Sodium: 150mg
- Fat: 18g
- Saturated Fat: 10g
- Unsaturated Fat: 6g
- Trans Fat: 0g
- Carbohydrates: 50g
- Fiber: 2g
- Protein: 4g
- Cholesterol: 80mg
Keywords: lemon, blueberry, cake, dessert, sweet, baking
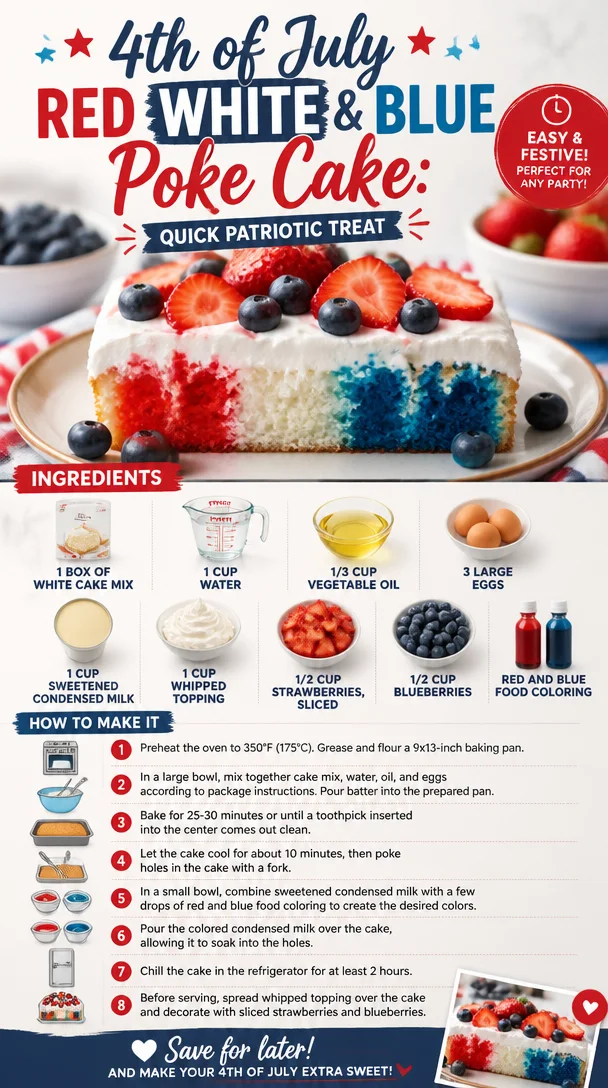
4th of July Red White & Blue Poke Cake: Quick Patriotic Treat
Celebrate in Style with a Red, White, and Blue Patriotic Poke Cake
Hello, fellow food lovers! With summer festivities around the corner—think Fourth of July barbecues, Memorial Day gatherings, or just a sunny afternoon picnic—there’s no better way to celebrate than with a delightful Red, White, and Blue Patriotic Poke Cake! This cake is not just festive and fun; it’s a true showstopper that will have your friends and family gathering around the table with smiles all around.
There’s something magical about a poke cake. The concept is simple: poke holes in a baked cake and let it soak up a delicious mixture, usually sweet, to create layers of flavor. It’s effortless elegance in dessert form! Today, I’m here to guide you through crafting this stunning cake that is as easy as putting on your apron and tying it up. Let’s make some magic happen in the kitchen!
A Sweet Memory to Cherish
Whenever I think about festive treats, I am transported back to the summers of my childhood, spending weekends at my grandma’s house. She had a knack for bringing everyone together with her delicious desserts. One summer, she decided to celebrate the Fourth of July with a poke cake adorned in red and blue, topped with fluffy whipped topping and a sprinkle of berries. I vividly remember the excitement of poking holes into the cake with her and pouring that sweet, vibrant mixture over it. The anticipation of the first bite was palpable!
As the cake chilled in the refrigerator, we gathered outside, the warm sun kissing our skin while we sipped lemonade and chatted about fireworks and family stories. When that cake finally made its grand entrance, it was the highlight of our gathering. Each slice was a burst of flavors, and I realized that dessert has a way of stitching hearts together.
Fast forward to today, I carry that nostalgic joy in every poke cake I create. Let’s recreate some of that magic together as we whip up our Red, White, and Blue Patriotic Poke Cake!
Ingredients
-
1 box of white cake mix
This serves as the cake’s base. Grab your favorite brand! You can also use a homemade white cake recipe if you want to take it to the next level. For a gluten-free option, consider using a gluten-free cake mix. -
1 cup water
The liquid that comes together with the cake mix to give it a lovely moist texture. You can swap it with milk for a richer flavor. -
1/3 cup vegetable oil
Oil keeps the cake tender. If you’re feeling fancy, try melted coconut oil for a subtle tropical twist. -
3 large eggs
Eggs provide structure and moisture. If you’re looking for an egg-free version, you can replace each egg with 1/4 cup unsweetened applesauce or a flax egg (1 tablespoon of ground flaxseed mixed with 2.5 tablespoons of water). -
1 cup sweetened condensed milk
This rich milk adds indulgent sweetness and creaminess. If you prefer a dairy-free option, look for coconut condensed milk. -
1 cup whipped topping
A fluffy topping that crowns your cake beautifully. You can use homemade whipped cream if you’re feeling inspired. Homemade is always a bit more special! -
1/2 cup strawberries, sliced
Beautiful red berries bursting with flavor. If strawberries are out of season, you can use raspberries or cherries. -
1/2 cup blueberries
Sweet, succulent, and perfect for our blue layer. You can also play around with blackberries or even diced kiwi for a twist. -
Red and blue food coloring
Essential for creating that gorgeous patriotic effect! Feel free to use natural food colorings for a healthier option.
Step-by-Step Instructions
-
Preheat the Oven
Preheat your oven to 350°F (175°C). This step is crucial for a perfectly baked cake. While the oven heats up, gather your ingredients to streamline the process! -
Mix the Cake Batter
In a large mixing bowl, combine the cake mix, water, vegetable oil, and eggs. Using an electric mixer, beat on medium speed until smooth (about 2-3 minutes). Here’s a handy tip: Be sure to scrape the sides of the bowl for a uniform batter; those little flour pockets try to hide and can lead to a lumpy cake! -
Bake the Cake
Pour the cake batter into a greased 9×13-inch baking pan. Bake in your preheated oven for 30-35 minutes, or until a toothpick inserted in the center comes out clean. Enjoy that delightful smell wafting through your kitchen! -
Cool and Poke
Once baked, allow the cake to cool in the pan for about 10 minutes. After that, grab a wooden spoon or a straw and poke holes all over the cake—not too deep, just enough to make openings for the sauce. This part is fun! It’s like giving the cake a bit of a massage. -
Prepare the Soaking Mixture
In a medium bowl, combine your sweetened condensed milk with 1/2 cup of whipped topping. For a colorful twist, divide this mixture into two separate bowls. Add red food coloring to one bowl and blue to the other. Stir until you achieve your desired colors. -
Soak the Cake
Begin by pouring the red mixture over the cake, letting it sink into those lovely holes. Use a spatula to spread any remaining mixture evenly. Repeat the process with the blue mixture. -
Chill the Cake
Cover the cake with plastic wrap (or just a clean kitchen towel if you want to keep it rustic) and chill in the refrigerator for at least 2 hours. This step is crucial for all those flavors to meld together beautifully! -
Top the Cake
Once chilled, it’s time to spread the remaining whipped topping over the cake. Be generous—this is the creamy crown that takes your poke cake to the next level! -
Add the Berries
Finally, arrange your sliced strawberries and blueberries on top of the whipped topping. Create patterns, make designs—be as creative as you like! Let your festive spirit shine.
Serving Suggestions
When it’s time to serve, slice the cake into squares and present them on a bright platter. You might want to garnish also with a sprig of mint for that refreshing touch. The stunning red, white, and blue layers shining through will have your guests reaching for their forks!
Recipe Variations
-
Add a Layer of Lemon
Consider making a zesty lemon syrup to drizzle over the cake before adding the whipped topping. It adds a refreshing twist that brightens up the flavors! -
Chocolate Charm
Add cocoa powder to your cake mix for a chocolate sponge and pair with dark chocolate ganache on top. The combination of chocolate, fruit, and whipped cream? Simply delectable. -
Dairy-Free Delight
Swap the whipped topping for coconut whipped cream and use plant-based condensed milk. You won’t miss a beat with this scrumptious alternative! -
Nutty Crunch
Toasted almond or pecan pieces sprinkled on top before serving will introduce a crispy texture that complements the cake’s moisture beautifully. -
Ice Cream Surprise
Why not serve individual pieces with a scoop of vanilla ice cream? It’s a match made in summer heaven!
Chef’s Notes
I absolutely adore how poke cakes have an element of surprise; each bite has a burst of flavor, and there’s just something special about the way it brings layers of delight.
Over the years, I’ve adapted the recipe in numerous ways, experimenting with different flavor combinations. I once made a tropical version with pineapple and coconut that stole the show at a summer gathering. Every poke cake I bake feels like a canvas for creativity!
FAQs and Troubleshooting
Q: Why did my cake fall flat?
A: This can happen if your eggs weren’t fresh or if the batter was overmixed. Always check the date on your eggs and mix just until combined for best results.
Q: Can I make this cake ahead of time?
A: Absolutely! The cake keeps well in the fridge for 3-4 days. Just be mindful of adding the whipped topping and fruit closer to serving time to keep them fresh.
Q: Could I make this gluten-free?
A: Yes! You can substitute the white cake mix with a gluten-free blend. Just check that your other ingredients are gluten-free too (some whipped toppings may not be!).
Q: What should I do if I run out of sweetened condensed milk?
A: You can create a quick alternative by simmering 2 cups of milk with 2/3 cup of sugar until it thickens (about 30 minutes); just remember to stir frequently!
Nutritional Info
While I like to focus on indulging in delicious food rather than strict dietary guidelines, here’s a rough idea (per slice, based on 12 servings):
- Calories: 270
- Fat: 10g
- Carbohydrates: 39g
- Protein: 3g
Enjoy this cake as a treat, and remember, it’s all about balance in life.
Well, there you have it—a deliciously festive Red, White, and Blue Patriotic Poke Cake that’s perfect for any celebration! I hope this recipe brings you as much joy as it has brought me over the years. Now, tie your apron and let’s get baking! Happy celebrating!
PrintRed, White, and Blue Patriotic Poke Cake
A festive and delightful poke cake perfect for summer celebrations, layered with a sweet filling and topped with fresh berries.
- Prep Time: 15 minutes
- Cook Time: 35 minutes
- Total Time: 50 minutes
- Yield: 12 servings 1x
- Category: Dessert
- Method: Baking
- Cuisine: American
- Diet: Vegetarian
Ingredients
- 1 box of white cake mix
- 1 cup water
- 1/3 cup vegetable oil
- 3 large eggs
- 1 cup sweetened condensed milk
- 1 cup whipped topping
- 1/2 cup strawberries, sliced
- 1/2 cup blueberries
- Red and blue food coloring
Instructions
- Preheat your oven to 350°F (175°C).
- Mix the cake batter by combining the cake mix, water, vegetable oil, and eggs in a large mixing bowl.
- Beat on medium speed for 2-3 minutes until smooth.
- Pour the cake batter into a greased 9×13-inch baking pan.
- Bake for 30-35 minutes or until a toothpick inserted comes out clean.
- Cool the cake in the pan for about 10 minutes.
- Poke holes all over the cake using a wooden spoon or straw.
- Prepare the soaking mixture by combining sweetened condensed milk with 1/2 cup of whipped topping, dividing into two bowls and adding food coloring.
- Pour the red mixture over the cake, followed by the blue mixture.
- Chill the cake in the refrigerator for at least 2 hours.
- Spread remaining whipped topping over the cake.
- Add sliced strawberries and blueberries on top for decoration.
Notes
This cake can be made ahead of time and stored in the fridge for 3-4 days. Add fresh fruit closer to serving time for optimal freshness.
Nutrition
- Serving Size: 1 slice
- Calories: 270
- Sugar: 22g
- Sodium: 180mg
- Fat: 10g
- Saturated Fat: 4g
- Unsaturated Fat: 6g
- Trans Fat: 0g
- Carbohydrates: 39g
- Fiber: 1g
- Protein: 3g
- Cholesterol: 30mg
Keywords: poke cake, patriotic cake, Fourth of July dessert, summer dessert, festive cake
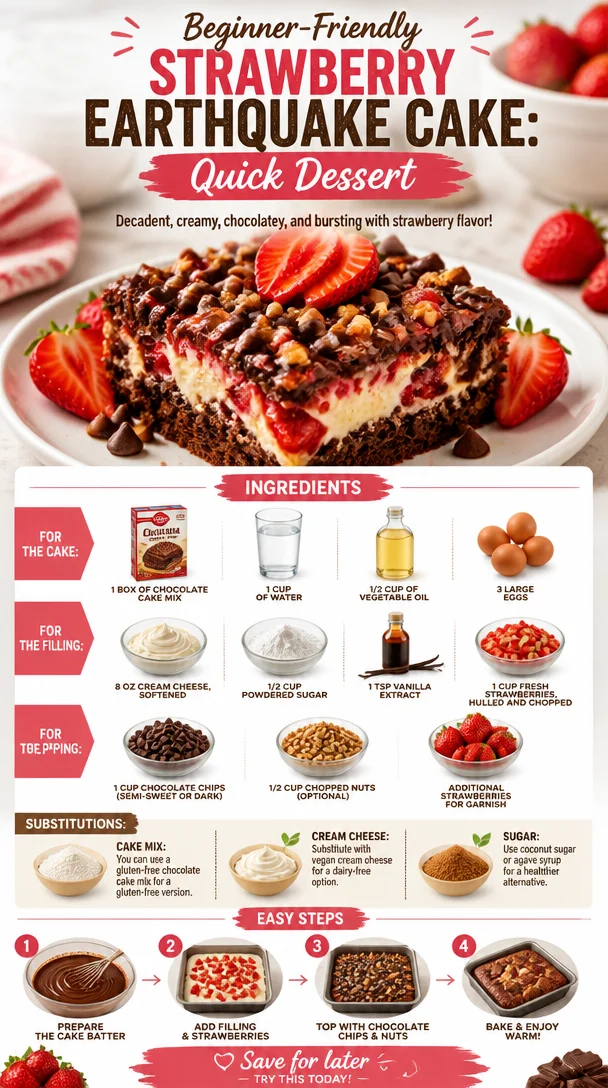
Beginner-Friendly Strawberry Earthquake Cake: Quick Dessert
Strawberry Earthquake Cake: A Deliciously Unique Dessert
Hello, fellow food lovers! I’m so excited to share a delightful treat that’s just bursting with flavors and memories—my delicious Strawberry Earthquake Cake! This cake is a delightful mix of melt-in-your-mouth chocolate, creamy filling, and fresh strawberries, creating a dessert that’s truly unforgettable.
But before we dive into the recipe, let me take you on a little journey down memory lane, back to a time when flavors were bold, and desserts were the pièce de résistance of every gathering.
Personal Story
One of my favorite childhood memories revolves around summer BBQs at my grandparents’ house. The backyard was filled with the smell of grilled vegetables, and laughter echoed around as family and friends came together. But what truly brought everyone together at the end of the meal was my grandma’s famous cake. She had a special recipe that combined chocolate and fresh strawberries, and it was always the star of the show.
I still remember the anticipation as the cake cooled down on the counter, the aroma wafting through the air, making our mouths water. When Grandma sliced into that cake, it was like an earthquake—rich chocolate and creamy layers would ooze out, making everyone gasp. That moment of delight has stuck with me, and it inspired this Strawberry Earthquake Cake. Let’s create that same magic together in your kitchen!
Ingredients
To get started on your Strawberry Earthquake Cake, here’s what you’ll need:
For the Cake:
-
1 box of chocolate cake mix (or homemade chocolate cake)
You can use any chocolate cake mix you love or make your chocolate cake from scratch for an enhanced flavor. -
1 cup of water
Just tap water will do the trick. You could also use milk for a richer flavor. -
1/2 cup of vegetable oil
Vegetable oil keeps the cake moist. Olive oil adds a delicious twist, but it may alter the flavor slightly. -
3 large eggs
Room temperature eggs blend better and help the cake rise higher.
For the Filling:
-
8 oz cream cheese, softened
Gives a wonderfully creamy texture. For a dairy-free option, choose vegan cream cheese. -
1/2 cup powdered sugar
Sweetens the filling without the graininess of granulated sugar. You can use coconut sugar for a more natural alternative. -
1 tsp vanilla extract
Enhances the flavor beautifully. A splash of almond extract adds a unique twist too! -
1 cup fresh strawberries, hulled and chopped
Fresh strawberries give the filling a juicy, fruity burst. You can substitute with other berries if you prefer.
For the Topping:
-
1 cup chocolate chips (semi-sweet or dark)
Chocolate chips add that gooey chocolatey goodness. Swap with butterscotch chips for a different flavor profile! -
1/2 cup chopped nuts (optional)
Nuts give a delightful crunch. Walnuts or pecans work wonderfully, but leave them out if you have nut allergies. -
Additional strawberries for garnish
Always a classic touch to decorate your dessert and add a pop of color!
Step-by-Step Instructions
Now that you’ve gathered your ingredients, let’s get down to the nitty-gritty of making this showstopper!
-
Preheat Your Oven
Set your oven to 350°F (175°C). This is always the key first step—your oven needs to be nice and hot when your cake is ready to go in! -
Prepare Your Baking Pan
Grease a 9×13 inch baking dish with butter or non-stick spray. This will prevent any sticky situations later on! -
Mix the Cake Batter
In a large mixing bowl, combine the chocolate cake mix with 1 cup of water, 1/2 cup of vegetable oil, and 3 large eggs. Whisk until everything is combined and smooth. You can use an electric mixer for a fluffier texture, but a hand whisk works just fine too. A little elbow grease never hurt anybody! -
Pour and Bake
Pour half of the cake batter into your prepared baking dish and smooth it out evenly. Now comes the fun part—set it aside and let’s make the filling. -
Prepare the Cream Cheese Filling
In a separate bowl, mix the softened cream cheese, powdered sugar, and vanilla extract until creamy and combined. You can use a fork or an electric mixer—whichever you have handy works. -
Layer It Up
Spoon dollops of the cream cheese mixture over the cake batter, followed by the chopped fresh strawberries. You want to create pockets of sweetness that will erupt like an earthquake when the cake bakes! -
Top with Remaining Batter
Carefully pour the remaining cake batter over the cream cheese and strawberries. It doesn’t need to cover completely—some filling peeking through is just what we want. -
Sprinkle on Chocolate Chips and Nuts
Now sprinkle those chocolate chips and nuts over the top. Those chocolate morsels are going to melt down into the cake, creating delicious pockets of gooeyness. -
Bake
Pop your cake into the oven and let it bake for about 30-35 minutes, or until a toothpick inserted in the center comes out clean. The tops should be slightly cracked (hence the ‘earthquake’ effect!). -
Cool
Let the cake cool in the pan for at least 10-15 minutes. It’ll be hot and bubbly, full of delicious flavors waiting to meld together.
Serving Suggestions
When it comes time to serve, here’s a tip: Slice your Strawberry Earthquake Cake into generous squares and plate each piece with a sprinkle of powdered sugar on top. Add a fresh strawberry or two for garnish, and if you’re feeling fancy, a scoop of vanilla ice cream on the side will elevate your presentation and taste to new heights.
Recipe Variations
Looking to switch things up? Here are some fun variations to try:
-
Chocolate Lovers Delight: Swap out the vanilla extract in the filling for a bit of chocolate extract, giving you a double chocolate punch!
-
Add a Zesty Twist: Mix in a little zest from an orange or lemon into the cream cheese filling for a zesty, refreshing flavor.
-
Berry Bonanza: Replace the strawberries with a mix of your favorite berries (like blueberries, raspberries, or blackberries) for a burst of color and flavor.
-
Nutty for Nuts: If you love nuts, try adding some pecans or walnuts to your filling, too—they’ll add a delightful crunch against the creaminess.
-
Gluten-Free Goodness: Use a gluten-free chocolate cake mix to make this delightful dessert gluten-free — trust me, no one will be able to tell the difference!
Chef’s Notes
Over the years, this Strawberry Earthquake Cake has evolved from my grandmother’s original recipe into my very own creation. Each time I make it, I find myself reminiscing about those warm summer nights filled with family laughter and delicious desserts. It’s become a staple in my home, and my friends can’t get enough of it.
Don’t worry if it isn’t perfect – remember, it’s all about the journey in the kitchen and the memories you create along the way. I once accidentally added double the amount of strawberries to the filling, and while it didn’t look quite right, the taste was phenomenal! That’s the beauty of cooking: you’re always learning and adjusting.
FAQs and Troubleshooting
1. Why is my cake too dense?
If the cake feels dense, it’s possible you overmixed the batter. Mixing just until everything is incorporated helps keep it light and fluffy.
2. Can I make this ahead of time?
Absolutely! You can bake the cake a day ahead and store it covered in the refrigerator. Just let it come to room temperature before serving.
3. How do I store leftovers?
Keep any leftover cake covered at room temperature for a day or two or in the refrigerator for longer storage. Just remember to enjoy it within a week!
4. My chocolate chips sank to the bottom; what happened?
This happens sometimes when the batter is too thin. Next time, consider chilling the chocolate chips in the fridge before sprinkling them on. It helps them stay suspended in the batter!
Nutritional Info
While I believe in enjoying dessert in moderation, if you’re curious, here’s a quick overview of the nutritional benefits of this delightful cake—especially when made with fresh strawberries! They provide Vitamin C, antioxidants, and have relatively low calories. Pair that with the rich chocolate cake, and you find both comfort and joy in every delicious bite.
And there you have it! Your very own Strawberry Earthquake Cake awaits. I’m thrilled you joined me on this tasty adventure, and I can’t wait to hear how your baking turns out. So, tie on that ivory apron, pour a glass of something bubbly, and let’s create more magical moments around our tables! Happy baking!
PrintStrawberry Earthquake Cake
A delightful mix of melt-in-your-mouth chocolate, creamy filling, and fresh strawberries that creates a dessert truly unforgettable.
- Prep Time: 15 minutes
- Cook Time: 35 minutes
- Total Time: 50 minutes
- Yield: 12 servings 1x
- Category: Dessert
- Method: Baking
- Cuisine: American
- Diet: Vegetarian
Ingredients
- 1 box chocolate cake mix
- 1 cup water
- 1/2 cup vegetable oil
- 3 large eggs
- 8 oz cream cheese, softened
- 1/2 cup powdered sugar
- 1 tsp vanilla extract
- 1 cup fresh strawberries, hulled and chopped
- 1 cup chocolate chips (semi-sweet or dark)
- 1/2 cup chopped nuts (optional)
- Additional strawberries for garnish
Instructions
- Preheat your oven to 350°F (175°C).
- Prepare a 9×13 inch baking dish by greasing it with butter or non-stick spray.
- Mix the chocolate cake mix with 1 cup of water, 1/2 cup of vegetable oil, and 3 large eggs in a large mixing bowl until smooth.
- Pour half of the cake batter into the prepared baking dish and smooth it out evenly.
- Prepare the cream cheese filling by mixing softened cream cheese, powdered sugar, and vanilla extract until creamy.
- Layer dollops of the cream cheese mixture over the cake batter, followed by the chopped fresh strawberries.
- Top with the remaining cake batter over the cream cheese and strawberries.
- Sprinkle chocolate chips and nuts over the top.
- Bake for 30-35 minutes, or until a toothpick comes out clean.
- Cool the cake in the pan for at least 10-15 minutes before serving.
Notes
For variations, consider adding a zesty twist with citrus zest or using a gluten-free chocolate cake mix.
Nutrition
- Serving Size: 1 slice
- Calories: 350
- Sugar: 20g
- Sodium: 450mg
- Fat: 15g
- Saturated Fat: 6g
- Unsaturated Fat: 7g
- Trans Fat: 0g
- Carbohydrates: 45g
- Fiber: 2g
- Protein: 6g
- Cholesterol: 70mg
Keywords: cake, dessert, chocolate, strawberries, family recipe, baking
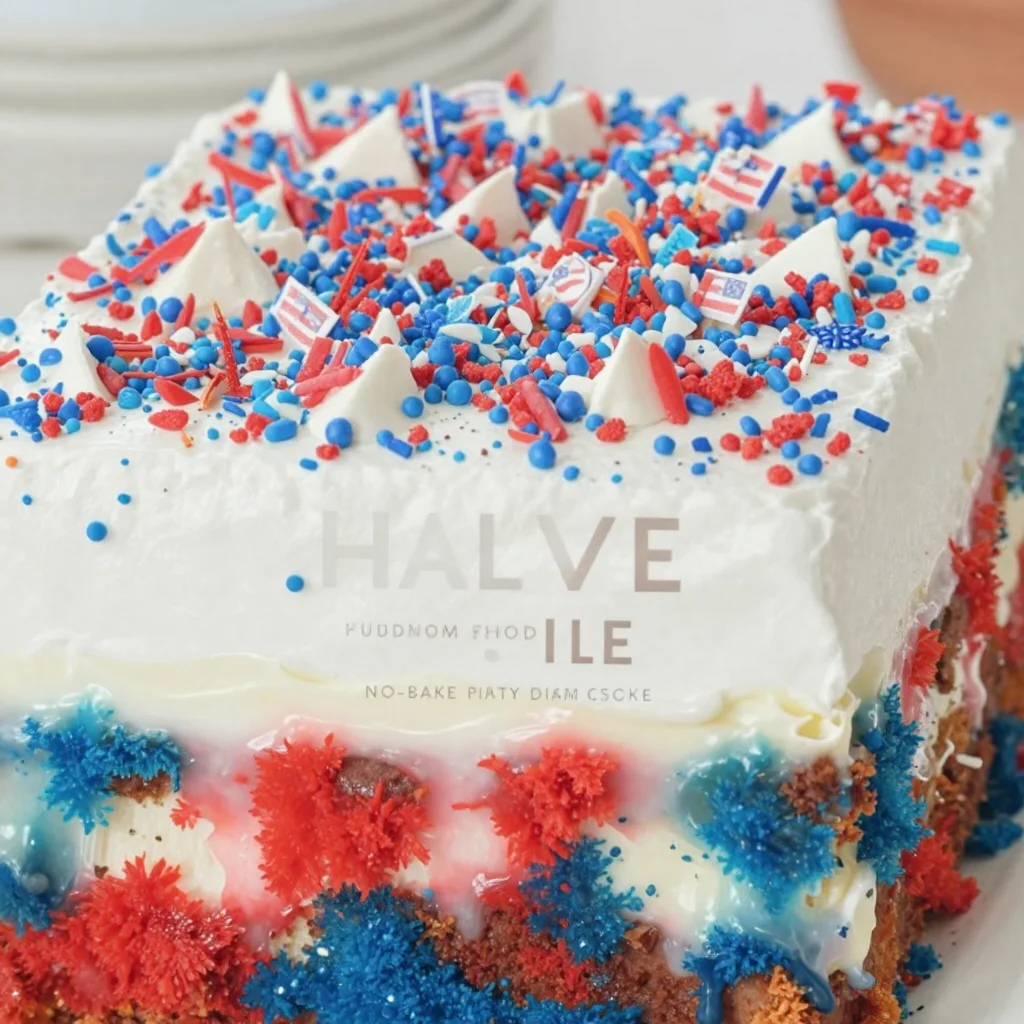
Patriotic Poke Cake: No-Bake Party Dessert for 4th of July
Celebrate with a Patriotic Poke Cake: A Festive Treat for Every Occasion
Hello, darling foodies! Today, we’re diving into a recipe that’s as vibrant as the flag itself — the Patriotic Poke Cake! This delightful dessert is perfect for any summer celebration, whether it’s the Fourth of July, a backyard barbecue, or simply a Sunday dinner that calls for something sweet. The beauty of a poke cake is in its simplicity and approachability. With just a few ingredients, we can create a show-stopper that’ll impress your friends and family, all while bringing a burst of color to the table. So let’s roll up those sleeves, tie on our aprons, and get baking!
A Sweet Slice of Nostalgia
Growing up, many of my fondest memories were shaped around the dinner table during the summer. Our family would gather at my grandmother’s house, where the air was filled with laughter, the sound of sizzling grilled meats, and, of course, the delicious aroma of her famous poke cake. My grandmother had this way of making everything feel special, and her poke cake was a staple for every celebration. I can still see her in her worn apron, gently poking holes into the cake with the end of a wooden spoon, explaining how each hole would capture sweet flavor and moisture.
I love how a poke cake took something simple and let it shine in its own way. The layers of sweetened condensed milk soaking into the delicate cake made it moist and decadent. Topped with fresh strawberries and blueberries, it became a festive masterpiece to celebrate our American spirit. This is a dish that takes me back to those cherished moments, reminding me how good food creates an atmosphere of togetherness.
Ingredients You’ll Need:
Here are your star ingredients for the Patriotic Poke Cake:
-
1 Box of White Cake Mix: The base of our cake. You can use any brand you prefer; just make sure you follow the package instructions for baking.
-
1 Cup Water: Adds moisture to the cake; using room-temperature water helps achieve a fluffy texture.
-
1/3 Cup Vegetable Oil: This keeps the cake tender and moist. If you want a flavor twist, feel free to substitute with melted coconut oil!
-
3 Large Eggs: Eggs help bind the ingredients together and provide a rich flavor. If you’re making it vegan, you can replace each egg with 1/4 cup unsweetened applesauce.
-
1 Cup Sweetened Condensed Milk: The magic ingredient! This rich and creamy milk adds sweetness and moisture. If you prefer a dairy-free option, look for coconut condensed milk.
-
1 Cup Strawberries (sliced): These provide a sweet and fresh flavor — plus, they add a pop of red goodness.
-
1 Cup Blueberries: Another fruit that adds sweetness and provides that beautiful blue hue. Frozen blueberries can be a substitute, just drain them well.
-
1 Cup Whipped Topping: For that final creamy layer, you can use store-bought or homemade whipped cream. If you’re avoiding dairy, a coconut whipped topping works wonderfully.
-
Red and Blue Food Coloring: To enhance those patriotic colors! You can skip this if you prefer the natural look, but a little color never hurts for some festive fun!
Step-By-Step Instructions
Now that we have our ingredients ready, let’s get into the cooking. This cake is a breeze to whip up!
-
Preheat the Oven: Start by preheating your oven to 350°F (175°C). This ensures your cake bakes evenly.
-
Prepare Your Cake Batter: In a large mixing bowl, combine the white cake mix, water, vegetable oil, and eggs. [Chef tip: Mix this on medium speed for about 2 minutes until the batter is smooth and well combined.]
-
Bake the Cake: Pour the batter into a greased 9×13 inch baking dish. [Here’s a little hack: Make sure you spread the batter evenly to avoid uneven baking.] Bake according to the package directions, usually around 30-35 minutes, or until a toothpick comes out clean.
-
Cool the Cake: Once your cake is done baking, let it cool in the pan for about 10-15 minutes. After that, take a skewer or the handle of a wooden spoon and poke holes all over the top of the cake, about an inch apart. This is where all the flavor magic happens!
-
Add the Sweetened Condensed Milk: Carefully pour the sweetened condensed milk over the warm cake, ensuring that it seeps into the holes. [Chef insight: Letting the cake soak while it’s still warm will help it absorb more moisture.]
-
Chill Your Cake: Cover your cake with plastic wrap and pop it in the refrigerator for at least 2 hours, or overnight if you can wait! This step is crucial for flavor development.
-
Top It Off: Once chilled, spread your whipped topping evenly across the cake. Now, here comes the fun part — let’s decorate!
-
Create a Patriotic Design: Arrange the sliced strawberries and blueberries on top of the whipped topping to showcase those red, white, and blue colors. You can create a flag design or any pattern that excites you!
Serving Suggestions
To serve this lovely cake, slice it generously into squares, and plate each piece with a dollop of extra whipped topping and a fresh berry on top for a beautiful presentation. Don’t forget to set the mood! Scented candles, colorful plates, and maybe even some festive napkins will enhance the experience and make your guests feel special.
Recipe Variations
Feel free to get creative with this cake! Here are a few ideas:
-
Layered Poke Cake: Consider making two layers of cake and sandwiching the filling between them for a show-stopping effect.
-
Flavor Twist: Instead of white cake, use lemon or almond cake mix for an unexpected yet delightful flavor.
-
Dietary Swaps: Try a gluten-free cake mix for a gluten-free option or make mini poke cakes in muffin tins for single-serving treats.
-
Fruit Mix-up: Swap the strawberries and blueberries with your favorite seasonal fruits — think peaches or kiwi for a tropical twist!
-
Chocolate Sprinkle: Want to tempt chocolate lovers? Add cocoa powder to the cake mix or use chocolate whipped topping!
Chef’s Notes
I have to tell you, this recipe has evolved beautifully over the years. The first time I made it was quite a spectacle! I forgot to poke holes in the cake, and let me tell you, it turned out like a dense sponge. Lesson learned, but that’s the beauty of cooking — we learn from our moments in the kitchen, and each mistake leads to greater adventures! Now, it’s one of my go-to desserts when I want to impress someone (and, let’s be real, it always gets rave reviews!).
FAQs and Troubleshooting
-
Why did my poke cake turn out dry? Make sure to pour the sweetened condensed milk while the cake is warm. Additionally, letting it chill for at least 2 hours is essential for moistened goodness!
-
Can I freeze my poke cake? Absolutely! Just be sure to wrap it tightly in plastic wrap. It can be frozen for up to three months. Just thaw it in the fridge overnight before serving.
-
My cake fell while baking. What happened? This can happen if you opened the oven door too soon. Always wait for at least the first 20 minutes before peeking!
-
Can I use cool whip instead of whipped topping? Yes! If you’re looking for convenience, Cool Whip is a great alternative, just be sure to defrost it properly before spreading.
Nutritional Info
While nutrition details can vary, a serving of this Patriotic Poke Cake typically contains about 250-300 calories. Remember, it’s all about enjoying the moment around the table!
So, there you have it — a vibrant and delicious Patriotic Poke Cake that will have everyone asking for seconds. Whether it’s for a holiday or a casual gathering, this cake is your ticket to creating wonderful memories. I hope you try it out and make it your own. Happy baking, and let’s raise a slice to all the beautiful moments that food can share!
PrintPatriotic Poke Cake

A festive poke cake topped with strawberries and blueberries, perfect for summer celebrations.
- Prep Time: 15 minutes
- Cook Time: 35 minutes
- Total Time: 50 minutes
- Yield: 12 servings 1x
- Category: Dessert
- Method: Baking
- Cuisine: American
- Diet: Vegetarian
Ingredients
- 1 Box of White Cake Mix
- 1 Cup Water
- 1/3 Cup Vegetable Oil
- 3 Large Eggs
- 1 Cup Sweetened Condensed Milk
- 1 Cup Strawberries (sliced)
- 1 Cup Blueberries
- 1 Cup Whipped Topping
- Red and Blue Food Coloring
Instructions
- Preheat the oven to 350°F (175°C).
- Combine the white cake mix, water, vegetable oil, and eggs in a large mixing bowl, mixing for about 2 minutes until smooth.
- Pour the batter into a greased 9×13 inch baking dish and bake according to package directions for 30-35 minutes.
- Cool the cake in the pan for 10-15 minutes, then poke holes all over the top.
- Pour the sweetened condensed milk over the warm cake.
- Chill the cake covered with plastic wrap in the refrigerator for at least 2 hours.
- Spread whipped topping evenly across the chilled cake.
- Arrange sliced strawberries and blueberries on top in a patriotic design.
Notes
Letting the cake soak while still warm helps absorb more moisture. For different flavors, try lemon or almond cake mix.
Nutrition
- Serving Size: 1 slice
- Calories: 275
- Sugar: 23g
- Sodium: 320mg
- Fat: 9g
- Saturated Fat: 2g
- Unsaturated Fat: 7g
- Trans Fat: 0g
- Carbohydrates: 40g
- Fiber: 1g
- Protein: 4g
- Cholesterol: 50mg
Keywords: poke cake, patriotic dessert, summer cake, festive dessert, easy cake recipe
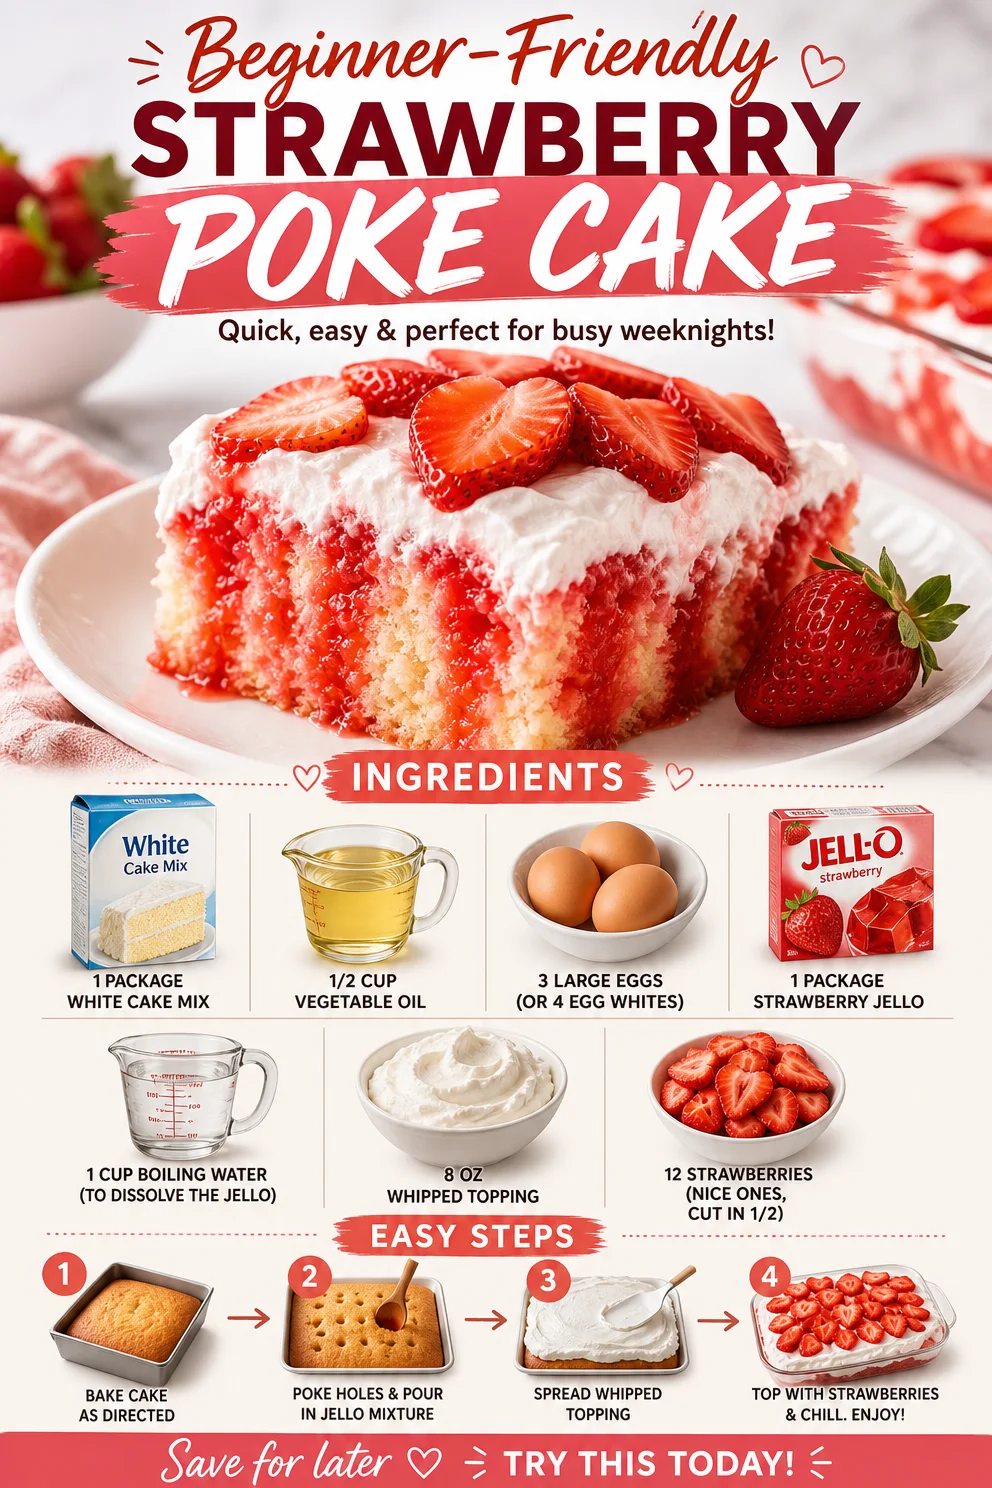
Beginner-Friendly Strawberry Poke Cake (Quick Weeknight)
Easy Strawberry Poke Cake: A Slice of Joy
Hello, fellow food lovers! Today, we’re diving into a delightful dessert that’s as colorful as it is delicious: the Easy Strawberry Poke Cake. This cake has a special place in my heart—not just because it’s incredibly easy to whip up (hello, who doesn’t love a no-fuss dessert?), but also because it brings back those beautiful, sun-soaked summer days when my family would gather in the backyard to celebrate every little thing.
Imagine a warm afternoon, the scent of fresh strawberries filling the air, kids giggling in the background, and the table set with laughter and joy. That’s what this cake embodies. The bright strawberries peeking through a fluffy layer of whipped topping invite everyone to take a slice, making it impossible to resist! So, grab your apron, and let’s create some mouthwatering memories with this strawberry poke cake that’s sure to impress your friends and family.
My Strawberry Cake Memory
Let me take you back to one of those summer afternoons when I first discovered this recipe. My grandmother had a knack for creating simple yet sensational desserts. One day, she decided to make her famous poke cake after everyone had devoured a hearty barbecue feast. As a kid, I remember being fascinated by how she would poke holes into the cake and let fruity flavors seep into every slice. It’s like magic, but with food!
The delightful aroma of strawberries mixed with the sweetness of whipped topping made the kitchen feel warm and inviting. Once it was time to serve, I watched as she cut into that delightful cake, and my heart raced with anticipation. Every bite was a blissful explosion of flavor, and I fondly recall sneaking seconds… and maybe thirds! It’s one of those recipes that has been passed down through generations—a real testament to how food can create a sense of togetherness. Today, we’re going to recreate that joyful experience, one slice at a time!
Ingredients
To bring this Easy Strawberry Poke Cake to life, you’ll need the following ingredients:
-
1 package white cake mix
This is your base! Any brand will do, but I love a good classic Betty Crocker or Duncan Hines for reliability. If you want to switch things up, a lemon cake mix can add a tangy twist! -
1/2 cup vegetable oil
This keeps the cake moist and tender. Canola or sunflower oil work just as well if you don’t have vegetable oil on hand. -
3 large eggs (or 4 egg whites)
Eggs are essential for the cake’s structure and moisture. If you’re looking to cut some calories, just swapping for egg whites is a smart option! -
1 package Strawberry Jell-O
This is where the magic happens! It gives flavor and that oh-so-pretty color. If strawberries aren’t your jam, feel free to swap for raspberry or cherry Jell-O for a different color and taste. -
1 cup boiling water
This helps to dissolve the Jell-O completely, ensuring a smooth blend of flavors. If you want to make this step faster, boiling water from an electric kettle works wonders! -
8 oz whipped topping
This is the fluffy topping that’s sure to steal the show. If you prefer, you can whip up some heavy cream with a bit of sugar for a fresher alternative. -
12 strawberries (nice ones, cut in half)
Use the freshest strawberries you can find! Look for vibrant red berries with fresh green tops; they truly elevate the dish. Want a fun twist? Replace with halved peaches or even raspberries for different seasonal vibes.
Step-by-Step Instructions
-
Preheat your oven to 350°F (175°C). This may seem like a no-brainer, but starting with a preheated oven ensures that your cake bakes evenly and beautifully!
-
Prepare the cake mix according to the package instructions. Combine the white cake mix, vegetable oil, and eggs in a bowl. Mix well until just combined but don’t overmix—some lumps are perfectly fine! Pour the batter into a greased 9×13 inch baking pan.
-
Bake the cake in the preheated oven for 25-30 minutes or until a toothpick inserted into the center comes out clean. As the cake bakes, your kitchen will start smelling heavenly!
-
Cool the cake for about 15 minutes before the next step. This cooling period is essential because it allows the cake to settle and makes it easier to poke holes without tearing it apart.
-
Prepare the Jell-O by mixing the package with 1 cup of boiling water in a bowl. Stir until the Jell-O is fully dissolved. This bright, vibrant mixture is going to color and flavor our cake in such a fun way!
-
Poke holes in the cake using the end of a wooden spoon or a fork. Aim for about 20 holes evenly spaced throughout. Get excited—the more holes, the more the flavors will soak in!
-
Pour the dissolved Jell-O over the cake, making sure to cover every hole. Allow it to seep in fully—this is how we achieve that delicious layer of flavor that makes this cake truly special.
-
Refrigerate the cake for at least 3 hours (or preferably overnight) to allow the Jell-O to set completely. This is the hardest part—waiting!
-
Top the cake with whipped topping once you’re ready to serve. You can spread it evenly or get creative by creating peaks with a spatula.
-
Garnish with strawberries. Place the halved strawberries on top of the whipped topping for that pop of freshness and color. A sprinkle of mint leaves can add a lovely touch, too!
Serving Suggestions
When it comes to serving this delightful cake, presentation is key! Slice into squares, and make sure each piece gets a delectable layer of strawberries, with the sparkling colors of your Jell-O peeking through. Serve on a pretty plate with a sprig of mint for an added touch, and don’t forget to have forks ready! It’s the kind of dessert that brings everyone together, igniting conversations and smiles.
Recipe Variations
Looking to shake things up? Here are a few fun variations to try:
-
Lemon Poke Cake: Use lemon cake mix and lemon Jell-O for a zesty alternative that’s refreshing and perfect for summer!
-
Chocolate Strawberry Delight: Swap the white cake mix for chocolate cake and use strawberry Jell-O. The rich chocolate pairs beautifully with the berries!
-
Gluten-Free Option: Use a 1:1 gluten-free cake mix and ensure your Jell-O is gluten-free.
-
Coconut Twist: Add unsweetened shredded coconut to the whipped topping for a tropical vibe, or mix it into the cake batter before baking!
Chef’s Notes
One of my favorite things about this recipe is its versatility. It’s a blank canvas that you can dress up however you like! I’ve even hosted a “poke cake competition” at my home, encouraging friends to bring their unique spin on this beloved treat. Each version was delightful, leading to laughter and friendly debate over whose was best. Spoiler alert: it was always mine! (Just kidding—everyone did well. It’s tough to compete when it’s all about flavor and fun!)
FAQs and Troubleshooting
-
What if my cake falls apart when poking holes?
- No worries! Just be gentle when poking the holes. If your cake becomes crumbly, try using a skewer instead of a fork, which will create more precise holes.
-
How long can I store the leftovers?
- Covered in the fridge, this cake lasts for about 3-4 days. Just make sure to keep it sealed, so it stays fresh!
-
Can I make this cake a day in advance?
- Absolutely! In fact, letting it sit overnight allows the flavors to blend beautifully, so it’s often even better the day after.
-
Can I freeze the cake?
- Yes! Just be sure to freeze it before adding the whipped topping. Wrap it tightly in plastic wrap and foil; it can be stored for up to 3 months.
Nutritional Info
While I always recommend enjoying food in moderation, here’s a rough idea of the nutritional info per serving (based on 12 servings):
- Calories: 220
- Fat: 8g
- Carbohydrates: 35g
- Protein: 2g
- Sugar: 15g
Remember, these are estimated values and can vary depending on the specific ingredients you choose!
I hope this Easy Strawberry Poke Cake brings you as much joy and deliciousness as it has to me for all these years. It’s perfectly casual for any gathering and truly celebrates the sweetness of life. So, tie on that apron, dive into your kitchen, and let’s make some unforgettable moments and mouthwatering memories together! Happy baking!
PrintEasy Strawberry Poke Cake

A delightful dessert that layers fresh strawberries and fluffy whipped topping over a moist poke cake, perfect for summer gatherings.
- Prep Time: 15 minutes
- Cook Time: 30 minutes
- Total Time: 195 minutes
- Yield: 12 servings 1x
- Category: Dessert
- Method: Baking
- Cuisine: American
- Diet: Vegetarian
Ingredients
- 1 package white cake mix
- 1/2 cup vegetable oil
- 3 large eggs (or 4 egg whites)
- 1 package Strawberry Jell-O
- 1 cup boiling water
- 8 oz whipped topping
- 12 strawberries, cut in half
Instructions
- Preheat your oven to 350°F (175°C).
- Prepare the cake mix according to the package instructions by combining the white cake mix, vegetable oil, and eggs in a bowl. Mix well until just combined.
- Pour the batter into a greased 9×13 inch baking pan.
- Bake in the preheated oven for 25-30 minutes or until a toothpick inserted comes out clean.
- Cool the cake for about 15 minutes.
- Prepare the Jell-O by mixing with 1 cup of boiling water in a bowl until fully dissolved.
- Poke holes in the cake using the end of a wooden spoon or a fork, aiming for about 20 holes.
- Pour the dissolved Jell-O over the cake, making sure to cover every hole.
- Refrigerate for at least 3 hours (or overnight) to allow the Jell-O to set completely.
- Top the cake with whipped topping once ready to serve.
- Garnish with halved strawberries on top of the whipped topping.
Notes
This cake can be made a day in advance for better flavor absorption. Store leftovers in the fridge for 3-4 days.
Nutrition
- Serving Size: 1 slice
- Calories: 220
- Sugar: 15g
- Sodium: 200mg
- Fat: 8g
- Saturated Fat: 1g
- Unsaturated Fat: 7g
- Trans Fat: 0g
- Carbohydrates: 35g
- Fiber: 0g
- Protein: 2g
- Cholesterol: 30mg
Keywords: strawberry, poke cake, dessert, summer cake, easy cake
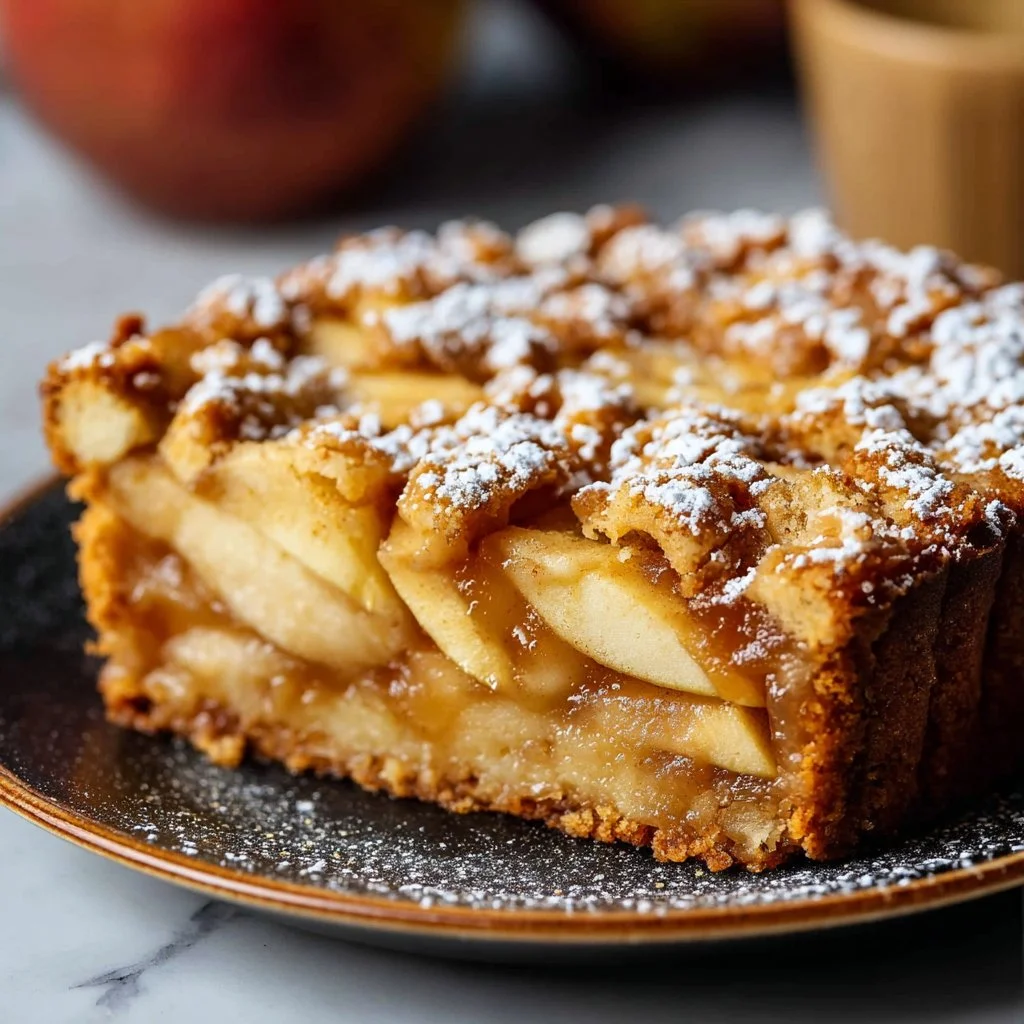
Jamie Oliver Apple Pie Cake Recipe
Jamie Oliver’s Apple Pie Cake: A Sweet Slice of Nostalgia
Hello, food lovers! If you’ve ever wandered through the sweet aroma of a bustling bakery or basked in the warm glow of a family kitchen, then you know that nothing quite compares to the comfort of homemade treats. Today, I’m excited to share a recipe that not only tastes divine but also comes with a sprinkle of sweet nostalgia: Jamie Oliver’s Apple Pie Cake.
Imagine this: a cozy autumn afternoon, the leaves are rustling outside, and all you can smell is the delightful scent of baked apples wafting through your home. This cake is not just a dessert; it’s a warm hug on a plate — perfect for gatherings, celebrations, or simply savoring during a moment of solitude with a good book. With its tender cake surrounding soft, spiced apples, each slice tells a story of comfort and care.
What makes this recipe even better is its approachability. You don’t need to be a pastry chef to whip up this delightful treat. It’s designed for everyone, from novice bakers to seasoned pros, ensuring that anyone can achieve that “wow” factor with ease. And who doesn’t love a recipe that brings people together? So, grab your apron, and let’s dive into the heart of this delicious journey!
Personal Story
Let me take you back to my childhood. Picture this: I’m a little girl, eagerly peeking over the kitchen counter, watching my grandmother transform a humble pile of apples into something magical. She had a way of turning the ordinary into the extraordinary. As she peeled, sliced, and mixed, there was an enchanting rhythm to her movements. The smell of cinnamon and sugar dancing in the air always made my heart skip a beat.
Every Sunday, without fail, she would bake her famous apple pie. It was our family tradition, and as I helped her toss the apple slices in brown sugar and spices, I felt I was part of something truly special. When it was time to taste, we would gather around the table, laughter and stories flowing freely as we savored every bite of that warm pie. Those moments instilled in me a love for cooking and the significance of sharing food with loved ones.
That’s why when I discovered Jamie Oliver’s Apple Pie Cake, it felt like a wonderful way to recreate those cherished memories. With a few simple ingredients and a little love, we can all bring a taste of nostalgia and joy to our tables!
Ingredients
Let’s talk about what you’ll need to create this scrumptious cake. Here’s your shopping list:
-
1 box (425g) yellow cake mix
A convenient base for this recipe, yellow cake mix provides a light, fluffy texture. You can use white cake mix if you prefer a subtler flavor. -
1½ cups (360ml) water
Essential for mixing with the cake mix, water adds moisture. You can swap it with apple juice for an extra fruity twist! -
⅓ cup (80ml) vegetable oil
This helps keep the cake moist. Canola oil or melted coconut oil also works well as substitutes. -
3 large eggs
Eggs add richness and stability to the cake. For a vegan option, use flax eggs (1 tablespoon of ground flaxseed mixed with 2.5 tablespoons of water per egg) instead. -
6 apples, peeled and sliced
A mix of tart and sweet apples like Granny Smith and Fuji adds depth. You can also use pears for a delightful twist. -
3 tbsp (45g) brown sugar
Adds a caramel-like sweetness that pairs beautifully with apples. White sugar can be used in a pinch but lacks that deep flavor. -
1 tsp cinnamon
This warm spice elevates the apple’s natural sweetness. Feel free to add nutmeg or allspice for a more complex flavor profile. -
1 tbsp (15ml) lemon juice
Brightens the flavors and prevents the apples from browning. Substitute with lime juice if needed. -
¾ cup (95g) all-purpose flour
Helps create the cake structure. For a gluten-free option, use a 1:1 gluten-free blend. -
½ cup (100g) brown sugar
Used for the crumb topping, it gives a nice crunch. You can also mix in some oats for added texture! -
¼ tsp salt
Just a pinch to enhance all the other flavors! -
½ cup (115g) cold butter, cubed
This forms the delicious crumble on top. You can substitute with cold margarine or a vegan butter alternative if you’re looking for a dairy-free version.
Step-by-Step Instructions
Ready to bake? Let’s walk through the steps together!
-
Preheat Your Oven
Start by preheating your oven to 350°F (175°C). This ensures that your cake bakes evenly. -
Prepare the Cake Mixture
In a large mixing bowl, combine the yellow cake mix, water, vegetable oil, and eggs. Mix until just combined, being careful not to overmix. Overmixing can lead to a dense cake, and I like my cakes light and airy! -
Slice Those Apples
While the cake batter rests for a moment, grab your apples! Peel and slice them into thin wedges. The thinner, the better—they’ll soften beautifully while baking. -
Toss with Brown Sugar and Cinnamon
In a separate bowl, combine your sliced apples with 3 tablespoons of brown sugar, cinnamon, and lemon juice. Toss until all the apple slices are evenly coated. Feel free to sneak a slice or two; quality control is important! -
Layer the Cake and Apples
Pour half of the cake batter into a greased 9×13-inch baking pan. Then, layer on your delicious apple mixture, spreading it evenly over the batter. Pour the remaining cake batter on top of the apples, ensuring they’re covered. -
Make the Crumble Topping
In a small bowl, combine the flour, brown sugar, and pinch of salt. Add your cold cubed butter and use your fingers to work it into the dry ingredients until it resembles coarse crumbs. Sprinkle this topping generously over the cake batter. -
Bake to Perfection
Place your cake in the preheated oven and bake for 45-50 minutes, or until a toothpick comes out clean from the center. The top should be golden brown and the kitchen should be filled with irresistible aromas! -
Cool and Serve
Allow the cake to cool for about 15 minutes in the pan, then slice it into squares and serve warm. Trust me, the warm apples and buttery crumble are a match made in heaven!
Serving Suggestions
To make your presentation truly stunning, consider serving this cake with a dollop of whipped cream or a scoop of vanilla ice cream. Drizzle some caramel sauce on top for even more decadence. Make it festive by garnishing with fresh mint leaves or a sprinkle of powdered sugar. Your guests will think they’re at a fancy bakery!
Recipe Variations
Here are some fun twists to keep things fresh:
- Nutty Banana Twist: Add a mashed ripe banana to the batter for a delicious banana-apple flavor combo.
- Caramel Delight: Swirl in a cup of caramel sauce into the apple layer for a decadent touch.
- Spiced Up: Experiment with different spices like cardamom or ginger for a warming aromatic kick.
- Berry Bliss: Mix in a cup of fresh berries for added color and tartness.
- Vegan-Friendly: Substitute eggs with flax eggs and use plant-based butter to make this cake vegan!
Chef’s Notes
This recipe has evolved from being a family favorite to a staple at my dinner parties. The first time I made it, I discovered the magic of combining spices with sweet fruits. If you find yourself with an abundance of apples, this recipe is your go-to! I still giggle thinking about the time I accidentally used baking soda instead of baking powder. The cake rose like a mountain! Thankfully, it still tasted divine.
FAQs and Troubleshooting
1. Why is my cake dense?
Dense cakes often come from overmixing the batter or using too much flour. Make sure to mix just until combined and measure flour correctly.
2. Can I make this ahead of time?
Absolutely! You can prepare the cake a day ahead and store it covered at room temperature. Just warm it up in the oven before serving.
3. My apples are floating. What went wrong?
Floating apples can indicate that the cake batter was too thin, or the apples were too juicy. Ensure your batter is thicker and a good ratio of dry to wet ingredients.
4. Can I freeze the leftovers?
Yes! This cake freezes wonderfully. Just wrap it tightly in plastic wrap and then foil. Defrost in the fridge before enjoying.
Nutritional Info
(Optional – adjust as needed)
- Servings: 12
- Calories: 320
- Carbohydrates: 45g
- Protein: 3g
- Fat: 14g
- Sugar: 22g
There you have it! Jamie Oliver’s Apple Pie Cake, a delightful treat that brings smiles, warmth, and a dash of nostalgia to every gathering. I hope you feel inspired to tie your apron and bring this delicious recipe to life in your own kitchen. Happy baking, and remember: good food isn’t just about the recipe; it’s about the love and intention you put into making it!
PrintJamie Oliver’s Apple Pie Cake
A delightful cake surrounded by soft, spiced apples, perfect for gatherings and cozy moments.
- Prep Time: 20 minutes
- Cook Time: 50 minutes
- Total Time: 70 minutes
- Yield: 12 servings 1x
- Category: Dessert
- Method: Baking
- Cuisine: American
- Diet: Vegetarian
Ingredients
- 1 box (425g) yellow cake mix
- 1½ cups (360ml) water
- ⅓ cup (80ml) vegetable oil
- 3 large eggs
- 6 apples, peeled and sliced
- 3 tbsp (45g) brown sugar
- 1 tsp cinnamon
- 1 tbsp (15ml) lemon juice
- ¾ cup (95g) all-purpose flour
- ½ cup (100g) brown sugar
- ¼ tsp salt
- ½ cup (115g) cold butter, cubed
Instructions
- Preheat your oven to 350°F (175°C).
- Combine the yellow cake mix, water, vegetable oil, and eggs in a large mixing bowl. Mix until just combined.
- Peel and slice the apples into thin wedges.
- Toss the sliced apples with brown sugar, cinnamon, and lemon juice.
- Pour half of the cake batter into a greased 9×13-inch baking pan and layer the apple mixture on top.
- Pour the remaining cake batter on top of the apples.
- Mix flour, brown sugar, and salt in a small bowl. Add cold cubed butter and work it into the dry ingredients to form crumbs.
- Sprinkle the crumble topping over the cake batter.
- Bake for 45-50 minutes, or until a toothpick comes out clean.
- Cool for about 15 minutes in the pan, then slice and serve warm.
Notes
Serve with whipped cream or vanilla ice cream and drizzle with caramel sauce for extra decadence.
Nutrition
- Serving Size: 1 slice
- Calories: 350
- Sugar: 22g
- Sodium: 200mg
- Fat: 14g
- Saturated Fat: 8g
- Unsaturated Fat: 6g
- Trans Fat: 0g
- Carbohydrates: 45g
- Fiber: 3g
- Protein: 5g
- Cholesterol: 30mg
Keywords: apple pie cake, dessert, baking, Jamie Oliver, cozy dessert, fall recipes