
Peach Cobbler Cheesecake Bars
Peach Cobbler Cheesecake Bars: A Slice of Summer Bliss
Hello, fellow food lovers! Today, we’re diving into a delightful fusion of two beloved desserts—peach cobbler and cheesecake—creating a dessert that is perfect for any gathering. Peach Cobbler Cheesecake Bars are where creamy, rich cheesecake meets the sweet, warm flavors of summer peaches, all sitting atop a buttery graham cracker crust. These bars are not just a treat for the taste buds; they evoke memories of family gatherings, picnics at the park, and the joyous essence of summertime.
Personal Story
I remember one vibrant summer evening when my family gathered for our annual peach-picking trip. There’s something magical about roaming through rows of sun-kissed peach trees, the air filled with the sweet, fragrant aroma of ripe fruit. We picked peaches to our hearts’ content, laughing and sharing stories, as tiny drops of sweat trickled down our brows under the bright sun.
Once we were home, we had a grand feast, and my mom was determined to showcase our haul. That’s when she introduced the idea of combining peach cobbler and cheesecake. The first bite was pure bliss—the creamy cheesecake elevating the sweet, juicy peaches. That summer treat became a family staple, and now I’m thrilled to share my version of this flavor-packed dessert in a convenient bar format.
Ingredients
Let’s gather our ingredients! Here’s what you’ll need to make these Peach Cobbler Cheesecake Bars shine:
-
2 cups graham cracker crumbs
These form the base of our bars. If you’re feeling adventurous, try using crushed cookies like Oreos for a chocolatey twist! -
1/4 cup sugar
This will sweeten the crust just a tad. Feel free to adjust the quantity based on your desired sweetness. -
1/2 cup butter, melted
The butter brings richness to the crust. For a healthier alternative, you can use coconut oil. -
2 (8 oz) packages cream cheese, softened
Cream cheese provides that luxurious texture we love in cheesecake. Make sure it’s softened to avoid lumps! -
1 cup sugar
This is for the cheesecake filling itself. You can use brown sugar for a caramel-like flavor. -
2 large eggs
These help bind everything together. If you’re looking for an egg-free option, you can use flax eggs (1 tablespoon ground flaxseed + 2.5 tablespoons water = 1 egg). -
1 teaspoon vanilla extract
Vanilla enhances all the delicious flavors; use a high-quality extract for the best taste. -
2 cups fresh peaches, sliced
Fresh is best! However, you can also use frozen peaches—just make sure to thaw and drain them well. -
1 teaspoon cinnamon
Cinnamon adds warmth and pairs beautifully with the peaches. Feel free to experiment with other spices like nutmeg! -
1/4 cup brown sugar
Sprinkled on top, this creates a delightful caramelized finish. You can also swap it with maple syrup for a different flair.
Step-by-Step Instructions
Alright, let’s get cooking! Follow these easy steps to create your Peach Cobbler Cheesecake Bars:
-
Preheat Your Oven
Start by preheating your oven to 325°F (160°C). This allows for an even bake and ensures your bars set perfectly. -
Make the Crust
In a mixing bowl, combine 2 cups of graham cracker crumbs, 1/4 cup of sugar, and 1/2 cup of melted butter. Mix until all crumbs are coated, and the mixture resembles wet sand.
Chef Tip: If you want a little extra flavor, consider adding a pinch of salt to your mixture. -
Press the Mixture
Press the crumb mixture firmly into the bottom of a lined 9×13-inch baking pan. Make sure to create an even layer using the back of a measuring cup.
Camera Tip: Grab that measuring cup and make it your best friend here; a smooth crust is essential! -
Bake the Crust
Bake the crust in the preheated oven for about 10 minutes, just until it’s lightly golden. This step locks in that buttery goodness. Once baked, let it cool slightly. -
Prepare the Cheesecake Filling
While the crust cools, beat 2 packages of softened cream cheese and 1 cup of sugar in a bowl until smooth and creamy. Add in 2 large eggs, 1 teaspoon of vanilla extract, and mix until everything is well combined.
Hacks: Use an electric mixer or a hand whisk, but don’t overmix—just until combined is perfect! -
Fold in the Peaches
Gently fold in 2 cups of sliced fresh peaches and 1 teaspoon of cinnamon into the cheesecake mixture.
Peach Hint: If your peaches are too firm, try letting them ripen for a day or two before using them. -
Pour and Spread
Pour the peach cheesecake filling over the cooled crust, spreading it evenly across the top. -
Top with Brown Sugar
Sprinkle 1/4 cup of brown sugar on top of the filling for a sweet, caramelized finish. This is where it really gets exciting! -
Bake Again
Return the pan to the oven and bake for about 40-45 minutes, or until the center is set and slightly jiggles when you tap the pan.
It’s tempting, but avoid opening the oven door too often to prevent any sinking! -
Cool and Chill
Let the bars cool at room temperature for about an hour, then refrigerate them for at least 4 hours—overnight is even better—to ensure they set.
Serving Suggestions
When you’re ready to serve, lift the bars out of the pan using the parchment paper. Cut them into squares and serve them chilled or at room temperature. For a finishing touch, consider topping each bar with a dollop of whipped cream or a scoop of vanilla ice cream. Drizzle a bit of caramel sauce over the top for added decadence!
Recipe Variations
Looking to mix things up? Here are a few delicious variations:
- Berry Cobbler Cheesecake Bars: Swap the peaches for a mix of fresh berries like blueberries and raspberries for a colorful twist.
- Nutty Additions: Fold in some crushed pecans or walnuts into the cheesecake for extra crunch and a bit more flavor.
- Spiced Peach: Add a dash of nutmeg or ginger to the peach filling for a cozy, spiced-up variation.
- Vegan Version: Use vegan cream cheese, flax eggs, and coconut oil to make this treat plant-based and just as delightful!
Chef’s Notes
This Peach Cobbler Cheesecake Bar recipe has been a labor of love, evolving over the years just like my own cooking journey. I remember the first few tries when the filling would spill over, or the crust was too crumbly. No matter, each mishap in the kitchen was just a fun kitchen adventure waiting to happen! Now, I blend nostalgia with innovation—always pushing to make it easier without losing the elegant charm we love.
FAQs and Troubleshooting
Q: Why did my cheesecake crack?
A: Cracks often happen due to rapid temperature changes or overmixing. When baking cheesecakes, aim for a gentle mix and cool gradually with the oven off.
Q: Can I use frozen peaches instead of fresh?
A: Absolutely! Just make sure to thaw and drain them well to avoid excess moisture in the filling.
Q: How do I know when the cheesecake bars are done?
A: A slight jiggle in the center is your friend! It’ll continue to set as it cools down, so don’t worry if it looks a bit wobbly!
Q: Can I make these bars ahead of time?
A: Yes! These cheesecake bars are great for make-ahead desserts. Just store them in the fridge for up to 3 days, or you can freeze them for up to a month.
Nutritional Info
While I focus on helping you create beautiful, delightful meals, if you’re interested in a general idea of the nutrition content per serving, these bars are packed with deliciousness and joy—not to mention a little bit of sugar and fat that makes life sweeter!
Now, dear reader, I invite you to tie on your apron and step into your own kitchen adventures! I can’t wait to see you whip up these Peach Cobbler Cheesecake Bars and create new memories around your table. Remember, it’s not just about the food; it’s about the connections you create—and that’s where the real magic happens. Happy baking!
PrintPeach Cobbler Cheesecake Bars

Delightful Peach Cobbler Cheesecake Bars are a fusion of creamy cheesecake and sweet summer peaches atop a buttery graham cracker crust.
- Prep Time: 15 minutes
- Cook Time: 55 minutes
- Total Time: 70 minutes
- Yield: 12 servings 1x
- Category: Dessert
- Method: Baking
- Cuisine: American
- Diet: Vegetarian
Ingredients
- 2 cups graham cracker crumbs
- 1/4 cup sugar
- 1/2 cup butter, melted
- 2 (8 oz) packages cream cheese, softened
- 1 cup sugar
- 2 large eggs
- 1 teaspoon vanilla extract
- 2 cups fresh peaches, sliced
- 1 teaspoon cinnamon
- 1/4 cup brown sugar
Instructions
- Preheat your oven to 325°F (160°C).
- Combine 2 cups of graham cracker crumbs, 1/4 cup of sugar, and 1/2 cup of melted butter in a bowl.
- Press the mixture firmly into the bottom of a lined 9×13-inch baking pan.
- Bake the crust in the preheated oven for about 10 minutes until lightly golden.
- Beat 2 packages of softened cream cheese and 1 cup of sugar until smooth and creamy.
- Add in 2 large eggs and 1 teaspoon of vanilla extract; mix until well combined.
- Fold in 2 cups of sliced peaches and 1 teaspoon of cinnamon.
- Pour the peach cheesecake filling over the cooled crust.
- Sprinkle 1/4 cup of brown sugar on top.
- Bake again for about 40-45 minutes, or until the center is set.
- Cool at room temperature for about an hour, then refrigerate for at least 4 hours.
Notes
For best results, refrigerate overnight before serving. Top with whipped cream or caramel sauce for added decadence.
Nutrition
- Serving Size: 1 bar
- Calories: 320
- Sugar: 20g
- Sodium: 300mg
- Fat: 18g
- Saturated Fat: 10g
- Unsaturated Fat: 6g
- Trans Fat: 0g
- Carbohydrates: 36g
- Fiber: 1g
- Protein: 5g
- Cholesterol: 50mg
Keywords: peach cobbler, cheesecake, summer dessert, bars
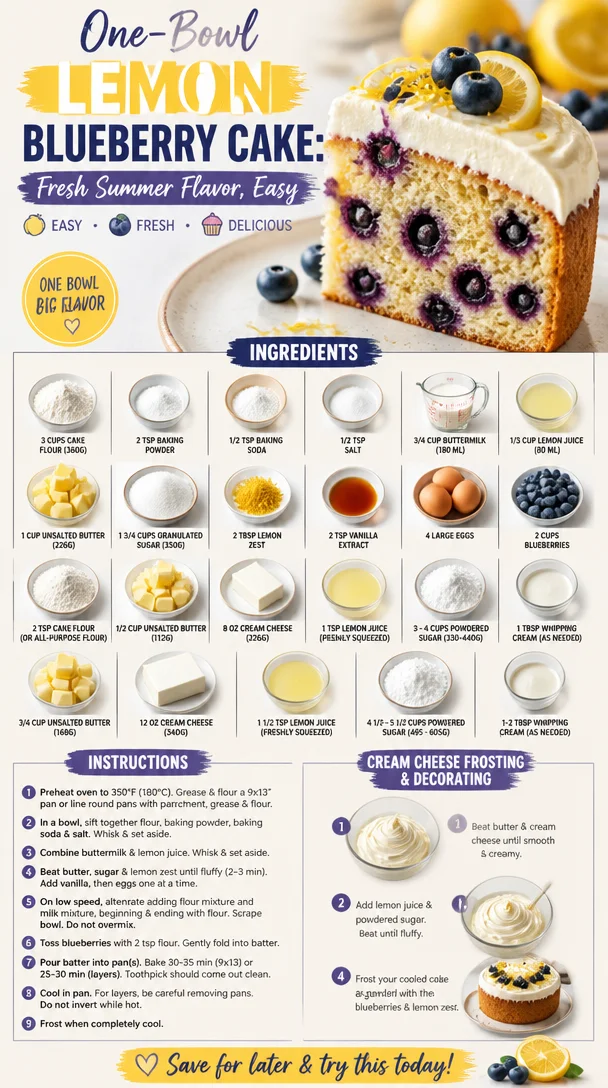
One-Bowl Lemon Blueberry Cake: Fresh Summer Flavor, Easy
The Delightful Union of Lemon and Blueberry: A Cake to Cherish
Hello fellow food lovers! Today, I am absolutely thrilled to share a recipe that has been a staple in my kitchen and a true crowd-pleaser — the Lemon Blueberry Cake. This cake beautifully captures the bright essence of lemon paired with the sweet, juicy burst of blueberries, resulting in a dessert that is simply irresistible. Whether it’s a casual Tuesday night or a festive celebration, this cake will bring a touch of elegance and joy to your table.
Let’s dive into this delightful journey filled with flavors, stories, and, of course, a sprinkling of love. I promise, making this Lemon Blueberry Cake will be as enjoyable as tasting it!
A Sweet Memory Wrapped in Citrus
When I think of lemon blueberry cake, I flash back to the summers of my childhood. My grandmother had this tiny garden behind her quaint little house, brimming with blueberries and a lemon tree that looked like it had jumped straight out of a storybook. Every summer, we would gather the ripe blueberries and slice fresh lemons from her garden, spending afternoons creating various treats. One particular day, we decided to bake a lemon blueberry cake — an experiment that turned out to be deliciously memorable!
I can still feel the warm sunshine on my back and smell the zesty aroma wafting through the kitchen. As we whisked together our ingredients, there was laughter, stories filled with joy, and those occasional flour dust clouds that reminded me how inviting and messy the kitchen can be. As the cake rose in the oven, the scents mingled in the air, and we couldn’t wait for that first bite. From that day forward, lemon blueberry cake became a family tradition, a recipe I am passionate about sharing with you all.
Ingredients You’ll Need
To craft this delightful Lemon Blueberry Cake, you’ll need a handful of ingredients — most of which you might already have in your pantry. Here’s the list:
-
3 cups cake flour (360 grams)
Cake flour gives the cake a light and airy texture. If you don’t have cake flour, you can substitute it with all-purpose flour; just add an extra tablespoon per cup. -
2 teaspoons baking powder
This is essential for lift. Make sure it’s fresh for the best results! -
1/2 teaspoon baking soda
This helps balance the acidity of the lemon, giving your cake an extra rise. -
1/2 teaspoon salt
Salt is the secret ingredient that enhances all the flavors in your cake. Don’t skip it! -
3/4 cup buttermilk (180 ml, room temperature)
If you don’t have buttermilk, you can create a substitute by mixing 3/4 cup of milk with 1 tablespoon of vinegar or lemon juice. Let it sit for a few minutes until it curdles slightly. -
1/3 cup lemon juice (80 ml, freshly squeezed)
Freshly squeezed lemon juice is a must! The store-bought kind just doesn’t have the same punch of flavor. -
1 cup unsalted butter (226 grams, softened to room temperature)
Room temperature butter ensures a creamy mixture with no lumps. For a dairy-free option, you can use a plant-based butter. -
1 3/4 cups granulated sugar (350 grams)
This is the magic sweetener! You can substitute part of this with honey or maple syrup for a different flavor profile, but remember to adjust the wet ingredients accordingly. -
2 tablespoons lemon zest
Grate the yellow part of the lemon skin to get that essential aroma and flavor! A microplane works wonders for this. -
2 teaspoons vanilla extract
A staple in many desserts! Opt for pure vanilla extract for a deeper flavor. -
4 large eggs (room temperature)
Eggs act as a binder. Make sure they’re room temperature to help with emulsification! -
2 cups blueberries
Fresh blueberries are best, but you can use frozen. Just keep them frozen until you’re ready to use them to prevent the cake from turning blue! -
2 teaspoons cake flour (or all-purpose flour)
Dust the blueberries with flour to help distribute them evenly throughout the cake batter.
For the Cream Cheese Frosting:
-
1/2 cup unsalted butter (112 grams, softened)
Just like the cake, ensure this is soft for easy mixing. -
8 oz brick-style cream cheese (226 grams)
Full-fat cream cheese gives the frosting both texture and flavor. Avoid using spreadable cream cheese. -
1 teaspoon lemon juice (freshly squeezed)
A touch of acid enhances the flavor of the frosting. -
3 – 4 cups powdered sugar (330-440 grams, sifted)
Sifting eliminates lumps and leads to a smooth frosting. -
1 tablespoon whipping cream (as needed)
Use this to adjust the consistency of the frosting. -
3/4 cup unsalted butter (168 grams, softened)
Another lovely butter addition for creamier frosting! -
12 ounces brick-style cream cheese (340 grams, full fat)
Ensures your frosting is rich and decadent. -
1 1/2 teaspoons lemon juice (freshly squeezed)
Just like before, don’t skimp on freshness here. -
4 1/2 – 5 1/2 cups powdered sugar (495 – 605 grams, sifted)
Adjust according to your preferred sweetness and stability. -
1-2 tablespoons whipping cream (as needed)
This will help to achieve the desired texture of your frosting.
Step-by-Step Instructions
Alright, let’s roll up those sleeves and get baking! Follow these easy steps:
-
Preheat your oven to 350°F (175°C). This is where the magic begins!
-
Prep your pans: Grease and flour two 9-inch round cake pans. You can also line the bottoms with parchment paper for easier release later.
-
Combine dry ingredients: In a mixing bowl, whisk together the cake flour, baking powder, baking soda, and salt. This ensures they’re evenly distributed, which leads to a consistent rise. Set aside.
-
Get your liquids ready: In another bowl, whisk the buttermilk, lemon juice, and lemon zest until combined. The acidity of the lemon juice coupled with the buttermilk will make your cake tender and flavorful.
-
Cream the butter and sugar: In your stand mixer, beat the softened unsalted butter and granulated sugar until it’s light and fluffy, about 3-4 minutes. This step is key for a light cake texture, so take your time!
-
Add eggs: One at a time, add the room temperature eggs, mixing well after each addition. Scrape down the sides of the bowl as needed. This ensures all ingredients are well incorporated.
-
Add vanilla: Mix in the vanilla extract — oh, that aroma is heavenly!
-
Combine wet and dry ingredients: Gradually add the flour mixture into the butter mixture, alternating with the buttermilk mixture. Start and end with the dry ingredients. Mix until just combined; avoid overmixing!
-
Toss the blueberries: In a small bowl, toss the fresh blueberries with 2 teaspoons of cake flour. This will help them not sink to the bottom. Gently fold them into the batter, being careful not to break them apart.
-
Pour and bake: Divide the batter evenly between your prepared cake pans and smooth the tops with a spatula. Bake in the preheated oven for about 25-30 minutes, or until a toothpick inserted into the center comes out clean.
-
Cool the cakes: Once baked, remove from the oven and allow the cakes to cool in the pans for 10 minutes. Then turn them out onto a wire rack to cool completely. Patience is key here!
-
Prepare the frosting: In a mixing bowl, beat together the softened cream cheese and butter until fluffy. Gradually add in sifted powdered sugar and mix until smooth. Finally, mix in the lemon juice and whip until light and airy. If it’s too thick, add a bit of whipping cream to achieve your desired consistency.
-
Frost the cakes: Once the cakes are completely cool, spread a generous layer of frosting between the two cake layers. Place the second layer on top and frost the top and sides of the cake. Decorate with fresh blueberries if you desire — it adds a lovely touch!
Serving Suggestions
Let the cake chill in the refrigerator for about an hour before serving, as this helps the frosting set a bit. Slice and serve on pretty plates with a garnish of lemon slices or extra blueberries on top. A refreshing cup of herbal tea or a sparkling lemonade pairs beautifully, elevating your dessert presentation even further.
Recipe Variations
Here are a few fun variations to help you make this recipe your own:
- Lemon Poppy Seed Twist: Add 2 tablespoons of poppy seeds to the batter for an added crunch.
- Berry Medley: Substitute some blueberries with raspberries or blackberries for an extra burst of flavor and color.
- Lemon Curd Filling: For an extra tangy surprise, layer some lemon curd between the cake layers, then frost as usual.
- Gluten-Free Option: Substitute regular flour with a gluten-free all-purpose blend. Just make sure it contains xanthan gum for the best results.
- Vegan Makeover: Replace eggs with flax eggs and use a dairy-free butter substitute along with plant-based cream cheese for a delightful vegan dessert.
Chef’s Notes
It’s funny — as much as I strive for perfection in the kitchen, things sometimes do go awry! I’ll never forget the time I misread my grandmother’s old recipe and added a whole cup of baking soda instead of baking powder. The resulting cake was a disaster! But mistakes like those are what you learn from. They make cooking an adventure and a rich, personal experience. Over the years, my lemon blueberry cake has transformed from a messy kitchen masterpiece to a cherished family recipe. Each time I bake it, I feel like I’m bringing a part of my history to the table.
FAQs and Troubleshooting
Q: My cake is too dense; what went wrong?
A: There could be a few reasons for this. Make sure that you’re not overmixing your batter after adding the flour. Also, double-check that you’re using fresh baking powder and baking soda.
Q: Why did my blueberries sink to the bottom?
A: Dusting the blueberries in flour helps prevent sinking. If they still sink, it may be due to the batter being too runny. Make sure to check your measurements!
Q: How do I store leftover cake?
A: Store any leftovers in an airtight container in the fridge for up to 5 days. You can also freeze individual slices wrapped tightly in plastic wrap for up to 3 months!
Q: Can I make this cake ahead of time?
A: Absolutely! You can bake the cake ahead of time and freeze the layers without frosting. When you’re ready to serve, thaw them, frost, and enjoy!
Nutritional Info
While I won’t dive deep into technical nutritional breakdowns, it’s essential to remember that desserts are meant for enjoyment! That said, treat yourself, savor each bite, and share with your loved ones. Cooking and eating should be a celebration of life, not a stressor!
So there you have it, my dear friends! A delightful journey through the zesty and sweet creation of Lemon Blueberry Cake. I encourage you to try this recipe, make it your own, and perhaps create your cherished memories in the kitchen.
Remember to tie on your apron, enjoy the process, and allow the warm essence of home cooking to fill your heart and the hearts of those you love. Happy Baking!
PrintLemon Blueberry Cake
A delightful and moist cake that combines the brightness of lemon with the sweetness of blueberries, perfect for any occasion.
- Prep Time: 20 minutes
- Cook Time: 30 minutes
- Total Time: 50 minutes
- Yield: 10 servings 1x
- Category: Dessert
- Method: Baking
- Cuisine: American
- Diet: Vegetarian
Ingredients
- 3 cups cake flour (360 grams)
- 2 teaspoons baking powder
- 1/2 teaspoon baking soda
- 1/2 teaspoon salt
- 3/4 cup buttermilk (180 ml, room temperature)
- 1/3 cup lemon juice (80 ml, freshly squeezed)
- 1 cup unsalted butter (226 grams, softened to room temperature)
- 1 3/4 cups granulated sugar (350 grams)
- 2 tablespoons lemon zest
- 2 teaspoons vanilla extract
- 4 large eggs (room temperature)
- 2 cups blueberries
- 2 teaspoons cake flour (or all-purpose flour)
- For the Cream Cheese Frosting:
- 1/2 cup unsalted butter (112 grams, softened)
- 8 oz brick-style cream cheese (226 grams)
- 1 teaspoon lemon juice (freshly squeezed)
- 3 – 4 cups powdered sugar (330–440 grams, sifted)
- 1 tablespoon whipping cream (as needed)
Instructions
- Preheat your oven to 350°F (175°C).
- Prep your pans: Grease and flour two 9-inch round cake pans.
- Combine dry ingredients: In a mixing bowl, whisk together the cake flour, baking powder, baking soda, and salt. Set aside.
- Get your liquids ready: In another bowl, whisk the buttermilk, lemon juice, and lemon zest until combined.
- Cream the butter and sugar: In your stand mixer, beat the softened unsalted butter and granulated sugar until light and fluffy.
- Add eggs: One at a time, add the room temperature eggs, mixing well after each addition.
- Add vanilla: Mix in the vanilla extract.
- Combine wet and dry ingredients: Gradually add the flour mixture into the butter mixture, alternating with the buttermilk mixture.
- Toss the blueberries: Dust the fresh blueberries with 2 teaspoons of cake flour and fold them into the batter.
- Pour and bake: Divide the batter between your prepared cake pans and bake for about 25-30 minutes.
- Cool the cakes: Let the cakes cool in the pans for 10 minutes before turning them out onto a wire rack to cool completely.
- Prepare the frosting: Beat together softened cream cheese and butter until fluffy, then gradually add sifted powdered sugar.
- Frost the cakes: Spread frosting between the two layers and on top and sides of the cooled cake.
Notes
For a gluten-free option, substitute regular flour with a gluten-free blend. A vegan version can be made using flax eggs and dairy-free ingredients.
Nutrition
- Serving Size: 1 slice
- Calories: 400
- Sugar: 30g
- Sodium: 150mg
- Fat: 18g
- Saturated Fat: 10g
- Unsaturated Fat: 6g
- Trans Fat: 0g
- Carbohydrates: 50g
- Fiber: 2g
- Protein: 4g
- Cholesterol: 80mg
Keywords: lemon, blueberry, cake, dessert, sweet, baking
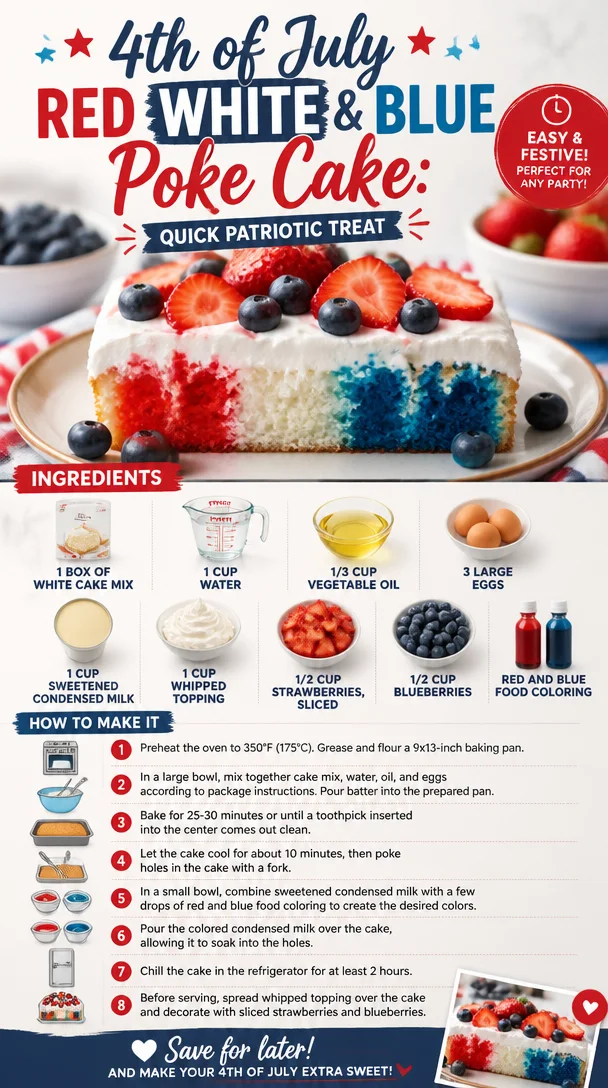
4th of July Red White & Blue Poke Cake: Quick Patriotic Treat
Celebrate in Style with a Red, White, and Blue Patriotic Poke Cake
Hello, fellow food lovers! With summer festivities around the corner—think Fourth of July barbecues, Memorial Day gatherings, or just a sunny afternoon picnic—there’s no better way to celebrate than with a delightful Red, White, and Blue Patriotic Poke Cake! This cake is not just festive and fun; it’s a true showstopper that will have your friends and family gathering around the table with smiles all around.
There’s something magical about a poke cake. The concept is simple: poke holes in a baked cake and let it soak up a delicious mixture, usually sweet, to create layers of flavor. It’s effortless elegance in dessert form! Today, I’m here to guide you through crafting this stunning cake that is as easy as putting on your apron and tying it up. Let’s make some magic happen in the kitchen!
A Sweet Memory to Cherish
Whenever I think about festive treats, I am transported back to the summers of my childhood, spending weekends at my grandma’s house. She had a knack for bringing everyone together with her delicious desserts. One summer, she decided to celebrate the Fourth of July with a poke cake adorned in red and blue, topped with fluffy whipped topping and a sprinkle of berries. I vividly remember the excitement of poking holes into the cake with her and pouring that sweet, vibrant mixture over it. The anticipation of the first bite was palpable!
As the cake chilled in the refrigerator, we gathered outside, the warm sun kissing our skin while we sipped lemonade and chatted about fireworks and family stories. When that cake finally made its grand entrance, it was the highlight of our gathering. Each slice was a burst of flavors, and I realized that dessert has a way of stitching hearts together.
Fast forward to today, I carry that nostalgic joy in every poke cake I create. Let’s recreate some of that magic together as we whip up our Red, White, and Blue Patriotic Poke Cake!
Ingredients
-
1 box of white cake mix
This serves as the cake’s base. Grab your favorite brand! You can also use a homemade white cake recipe if you want to take it to the next level. For a gluten-free option, consider using a gluten-free cake mix. -
1 cup water
The liquid that comes together with the cake mix to give it a lovely moist texture. You can swap it with milk for a richer flavor. -
1/3 cup vegetable oil
Oil keeps the cake tender. If you’re feeling fancy, try melted coconut oil for a subtle tropical twist. -
3 large eggs
Eggs provide structure and moisture. If you’re looking for an egg-free version, you can replace each egg with 1/4 cup unsweetened applesauce or a flax egg (1 tablespoon of ground flaxseed mixed with 2.5 tablespoons of water). -
1 cup sweetened condensed milk
This rich milk adds indulgent sweetness and creaminess. If you prefer a dairy-free option, look for coconut condensed milk. -
1 cup whipped topping
A fluffy topping that crowns your cake beautifully. You can use homemade whipped cream if you’re feeling inspired. Homemade is always a bit more special! -
1/2 cup strawberries, sliced
Beautiful red berries bursting with flavor. If strawberries are out of season, you can use raspberries or cherries. -
1/2 cup blueberries
Sweet, succulent, and perfect for our blue layer. You can also play around with blackberries or even diced kiwi for a twist. -
Red and blue food coloring
Essential for creating that gorgeous patriotic effect! Feel free to use natural food colorings for a healthier option.
Step-by-Step Instructions
-
Preheat the Oven
Preheat your oven to 350°F (175°C). This step is crucial for a perfectly baked cake. While the oven heats up, gather your ingredients to streamline the process! -
Mix the Cake Batter
In a large mixing bowl, combine the cake mix, water, vegetable oil, and eggs. Using an electric mixer, beat on medium speed until smooth (about 2-3 minutes). Here’s a handy tip: Be sure to scrape the sides of the bowl for a uniform batter; those little flour pockets try to hide and can lead to a lumpy cake! -
Bake the Cake
Pour the cake batter into a greased 9×13-inch baking pan. Bake in your preheated oven for 30-35 minutes, or until a toothpick inserted in the center comes out clean. Enjoy that delightful smell wafting through your kitchen! -
Cool and Poke
Once baked, allow the cake to cool in the pan for about 10 minutes. After that, grab a wooden spoon or a straw and poke holes all over the cake—not too deep, just enough to make openings for the sauce. This part is fun! It’s like giving the cake a bit of a massage. -
Prepare the Soaking Mixture
In a medium bowl, combine your sweetened condensed milk with 1/2 cup of whipped topping. For a colorful twist, divide this mixture into two separate bowls. Add red food coloring to one bowl and blue to the other. Stir until you achieve your desired colors. -
Soak the Cake
Begin by pouring the red mixture over the cake, letting it sink into those lovely holes. Use a spatula to spread any remaining mixture evenly. Repeat the process with the blue mixture. -
Chill the Cake
Cover the cake with plastic wrap (or just a clean kitchen towel if you want to keep it rustic) and chill in the refrigerator for at least 2 hours. This step is crucial for all those flavors to meld together beautifully! -
Top the Cake
Once chilled, it’s time to spread the remaining whipped topping over the cake. Be generous—this is the creamy crown that takes your poke cake to the next level! -
Add the Berries
Finally, arrange your sliced strawberries and blueberries on top of the whipped topping. Create patterns, make designs—be as creative as you like! Let your festive spirit shine.
Serving Suggestions
When it’s time to serve, slice the cake into squares and present them on a bright platter. You might want to garnish also with a sprig of mint for that refreshing touch. The stunning red, white, and blue layers shining through will have your guests reaching for their forks!
Recipe Variations
-
Add a Layer of Lemon
Consider making a zesty lemon syrup to drizzle over the cake before adding the whipped topping. It adds a refreshing twist that brightens up the flavors! -
Chocolate Charm
Add cocoa powder to your cake mix for a chocolate sponge and pair with dark chocolate ganache on top. The combination of chocolate, fruit, and whipped cream? Simply delectable. -
Dairy-Free Delight
Swap the whipped topping for coconut whipped cream and use plant-based condensed milk. You won’t miss a beat with this scrumptious alternative! -
Nutty Crunch
Toasted almond or pecan pieces sprinkled on top before serving will introduce a crispy texture that complements the cake’s moisture beautifully. -
Ice Cream Surprise
Why not serve individual pieces with a scoop of vanilla ice cream? It’s a match made in summer heaven!
Chef’s Notes
I absolutely adore how poke cakes have an element of surprise; each bite has a burst of flavor, and there’s just something special about the way it brings layers of delight.
Over the years, I’ve adapted the recipe in numerous ways, experimenting with different flavor combinations. I once made a tropical version with pineapple and coconut that stole the show at a summer gathering. Every poke cake I bake feels like a canvas for creativity!
FAQs and Troubleshooting
Q: Why did my cake fall flat?
A: This can happen if your eggs weren’t fresh or if the batter was overmixed. Always check the date on your eggs and mix just until combined for best results.
Q: Can I make this cake ahead of time?
A: Absolutely! The cake keeps well in the fridge for 3-4 days. Just be mindful of adding the whipped topping and fruit closer to serving time to keep them fresh.
Q: Could I make this gluten-free?
A: Yes! You can substitute the white cake mix with a gluten-free blend. Just check that your other ingredients are gluten-free too (some whipped toppings may not be!).
Q: What should I do if I run out of sweetened condensed milk?
A: You can create a quick alternative by simmering 2 cups of milk with 2/3 cup of sugar until it thickens (about 30 minutes); just remember to stir frequently!
Nutritional Info
While I like to focus on indulging in delicious food rather than strict dietary guidelines, here’s a rough idea (per slice, based on 12 servings):
- Calories: 270
- Fat: 10g
- Carbohydrates: 39g
- Protein: 3g
Enjoy this cake as a treat, and remember, it’s all about balance in life.
Well, there you have it—a deliciously festive Red, White, and Blue Patriotic Poke Cake that’s perfect for any celebration! I hope this recipe brings you as much joy as it has brought me over the years. Now, tie your apron and let’s get baking! Happy celebrating!
PrintRed, White, and Blue Patriotic Poke Cake
A festive and delightful poke cake perfect for summer celebrations, layered with a sweet filling and topped with fresh berries.
- Prep Time: 15 minutes
- Cook Time: 35 minutes
- Total Time: 50 minutes
- Yield: 12 servings 1x
- Category: Dessert
- Method: Baking
- Cuisine: American
- Diet: Vegetarian
Ingredients
- 1 box of white cake mix
- 1 cup water
- 1/3 cup vegetable oil
- 3 large eggs
- 1 cup sweetened condensed milk
- 1 cup whipped topping
- 1/2 cup strawberries, sliced
- 1/2 cup blueberries
- Red and blue food coloring
Instructions
- Preheat your oven to 350°F (175°C).
- Mix the cake batter by combining the cake mix, water, vegetable oil, and eggs in a large mixing bowl.
- Beat on medium speed for 2-3 minutes until smooth.
- Pour the cake batter into a greased 9×13-inch baking pan.
- Bake for 30-35 minutes or until a toothpick inserted comes out clean.
- Cool the cake in the pan for about 10 minutes.
- Poke holes all over the cake using a wooden spoon or straw.
- Prepare the soaking mixture by combining sweetened condensed milk with 1/2 cup of whipped topping, dividing into two bowls and adding food coloring.
- Pour the red mixture over the cake, followed by the blue mixture.
- Chill the cake in the refrigerator for at least 2 hours.
- Spread remaining whipped topping over the cake.
- Add sliced strawberries and blueberries on top for decoration.
Notes
This cake can be made ahead of time and stored in the fridge for 3-4 days. Add fresh fruit closer to serving time for optimal freshness.
Nutrition
- Serving Size: 1 slice
- Calories: 270
- Sugar: 22g
- Sodium: 180mg
- Fat: 10g
- Saturated Fat: 4g
- Unsaturated Fat: 6g
- Trans Fat: 0g
- Carbohydrates: 39g
- Fiber: 1g
- Protein: 3g
- Cholesterol: 30mg
Keywords: poke cake, patriotic cake, Fourth of July dessert, summer dessert, festive cake
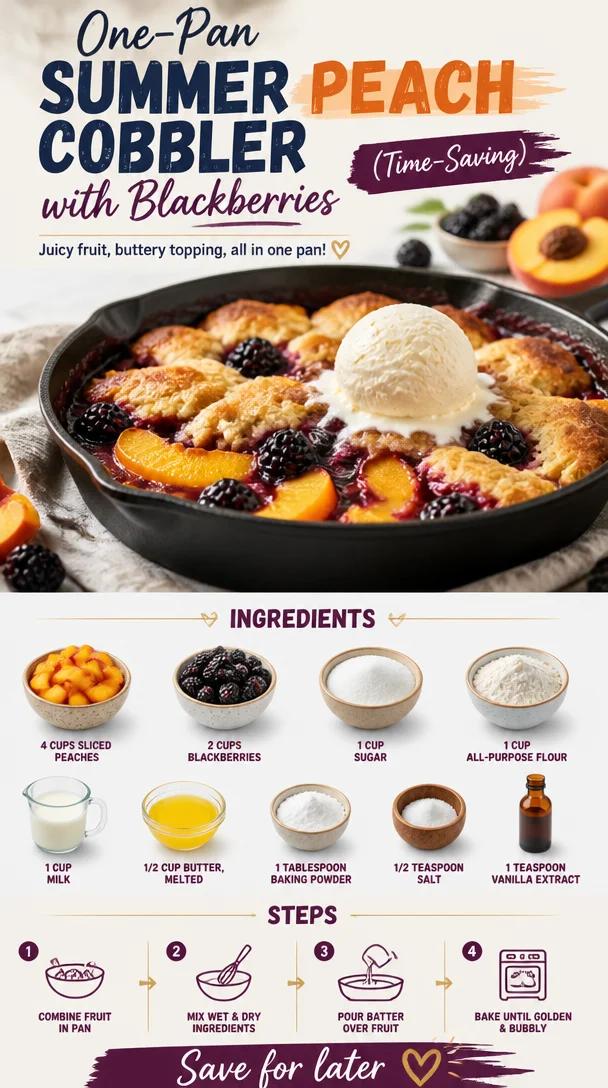
One-Pan Summer Peach Cobbler with Blackberries (Time-Saving)
A Warm Welcome to My Kitchen: Peach Cobbler with Blackberries
Hello, fellow food lovers! Today, we’re diving into one of my absolute favorite desserts—Peach Cobbler with Blackberries. This dish doesn’t just bring a cascade of summer flavors; it’s a beautiful reminder of family gatherings, lazy afternoons, and those moments when you catch the scent of something baking and your entire spirit just lifts. I can feel the warmth of those sun-soaked days just thinking about it!
Now, imagine this: It’s a golden afternoon, your kitchen is filled with the intoxicating aroma of ripe peaches and sweet blackberries bubbling away in the oven. The cobbler is golden, and you can hear that satisfying sizzle as it begins to cool. And when it’s finally time to serve up, everyone gathers around the table with eager eyes and spoons at the ready. This is the magic of peach cobbler, and that’s exactly what we’re creating today!
My love for cobblers, especially this peach and blackberry version, goes way back to summer visits at my grandmother’s house. She’d have baskets of fresh fruit from her garden, and the moment those peaches ripened, we knew what was coming—her famous cobbler! I still recall how we would race to the kitchen, excited to help mix and pour, tasting the luscious filling straight from the bowl. Those moments of pure joy—sticky fingers and laughter—are etched in my memory, and they inspire me to recreate this dish and share that same warmth through my cooking.
Ingredients
Let’s gather everything we need to whip up this fabulous dessert! Here are the ingredients and a bit of chef insight to help you make the best cobbler ever.
-
4 cups sliced peaches
Fresh peaches are key! Make sure they’re juicy and ripe for the best flavor. If you can’t find fresh peaches, you can substitute with frozen (just thaw them first). -
2 cups blackberries
These little gems add a delightful tartness that perfectly complements the sweetness of the peaches. If blackberries are out of season, raspberries or blueberries work just as well! -
1 cup sugar
This is your ticket to sweetness! Feel free to adjust to your taste. If you’re looking to cut back on sugar, coconut sugar or a sugar substitute can also work—just keep in mind the flavor profiles might change slightly. -
1 cup all-purpose flour
The foundation of our cobbler topping. If you’re looking for a gluten-free option, you could use a gluten-free all-purpose blend, though results may vary slightly. -
1 cup milk
Whole milk provides the best richness, but feel free to swap it with almond milk or oat milk if you’re going dairy-free. -
1/2 cup butter, melted
Nothing beats the flavor of good old-fashioned butter. If you’re vegan or dairy-free, coconut oil can be an excellent substitute. -
1 tablespoon baking powder
This is what makes our cobbler rise beautifully! Double check your baking powder is fresh for optimal fluffiness. -
1/2 teaspoon salt
A pinch of salt elevates all the sweet flavors. Never skip it! -
1 teaspoon vanilla extract
Vanilla adds a depth of flavor that’s absolutely divine. Make sure it’s pure vanilla extract for the best results—no imitators here!
Step-by-Step Instructions
Alright, my culinary companions, let’s get started on this delicious Peach Cobbler with Blackberries! Here’s how to make it happen, step-by-step.
1. Preheat Your Oven:
Start by preheating your oven to 375°F (190°C). This is a crucial step; we want that oven nice and hot when we pop our cobbler in for that perfect golden crust!
2. Prepare the Fruit Filling:
In a mixing bowl, combine the sliced peaches and blackberries. Sprinkle 1/2 cup of sugar over the fruit. Let it sit for about 10 minutes to allow the juices to mingle. You’ll be amazed at how flavorful this mixture becomes!
Chef Tip: If you like a little spice, feel free to add a dash of cinnamon or nutmeg to this mix for an extra flavor boost!
3. Make the Batter:
In another bowl, whisk together the flour, remaining 1/2 cup of sugar, baking powder, and salt. Create a well in the center and add the melted butter, milk, and vanilla extract. Mix until just combined—don’t overdo it; a few lumps are okay!
Chef Hack: To incorporate air into your batter for a lighter cobbler, consider folding in the flour and liquid rather than stirring vigorously.
4. Assemble the Cobbler:
Grease a baking dish (a 9×13 works beautifully) and pour the batter evenly into the bottom. Spoon the peach and blackberry mixture over the batter, trying to distribute the fruit evenly. Don’t worry if it looks a bit messy; that’s part of the charm!
Pro Tip: Patience is key! Resist the urge to stir the fruit into the batter. The fruit will sink as it bakes, resulting in a lovely layered effect.
5. Bake:
Pop your baking dish into the oven and let it bake for about 40-45 minutes. You’ll know it’s ready when the top is golden brown and a toothpick inserted into the batter comes out clean.
6. Cool and Serve:
Once it’s out of the oven, allow the cobbler to cool for about 10-15 minutes. It will continue to set as it cools, giving you a more scoop-able dessert.
Serving Suggestions
When it comes to serving your Peach Cobbler with Blackberries, I like to keep it simple yet elegant. Serve warm, straight from the dish, and don’t forget a generous scoop of vanilla ice cream on top! The warm cobbler pairs perfectly with the cold, creamy ice cream, creating a delightful contrast. Also, you can sprinkle a bit of fresh mint on top for that pop of color and freshness!
Recipe Variations
Let’s mix it up a little! Here are some fun variations you can try:
-
Add Spices:
Throw in a dash of cinnamon, nutmeg, or even ginger for those spicy notes that warm your heart. -
Crispy Topping:
For a crunchy twist, sprinkle some rolled oats or crushed nuts over the batter before baking. -
Fruit Swap:
If peaches or blackberries aren’t your jam, try mixing it up with apples and cranberries or pears and blueberries! -
Zesty Lemon:
Grate in some lemon zest into the batter for a bright, zesty touch that cuts through the sweetness. -
Vegan Twist:
Swap the butter for coconut oil and use plant-based milk to make this dish vegan-friendly.
Chef’s Notes
Oh, I can’t help but share a little kitchen story as I reflect on this recipe! The first time I attempted this cobbler on my own, I miscounted the sugar. Can you imagine? Instead of 1 cup, I added 2! Let’s just say it was a pretty sweet experience—literally! Everyone teased me about creating a “dessert with a side of fruit,” but I ended up adjusting the recipe and making it even better over time. Sometimes, those little kitchen flukes lead to the best culinary creations!
This recipe has evolved, much like my cooking style. It has gone from a simple family dish shared around the table to a cherished favorite that warms hearts at gatherings, celebrating everything from summer BBQs to cozy fall evenings.
FAQs and Troubleshooting
-
Can I use frozen fruit instead of fresh?
Yes, you can! Just make sure to thaw and drain excess liquid from the fruit before using it in the recipe. -
What if my cobbler is too watery?
If you find your cobbler is overly juicy, it might be from too much fruit or not enough baking time. Next time, consider reducing the fruit quantity or letting it bake a little longer. -
How do I store leftovers?
Store any leftovers in an airtight container in the fridge for up to 3 days. Reheat in the oven for that fresh-out-of-the-oven taste! -
Can I prepare this ahead of time?
You can prepare the fruit filling a day in advance and store it in the fridge. Just make the batter fresh when you’re ready to bake.
Nutritional Info
(If applicable, please include specific nutritional value, like calories, fat, sugars, etc., for this cobbler.)
And there you have it, my friends! A warm, delicious Peach Cobbler with Blackberries that’s not just a dessert but a delightful experience filled with nostalgia and joy. I hope you feel inspired to gather your loved ones around the table and create your own sweet memories. Don’t forget to tie on that apron, pour something sparkling, and enjoy every moment in the kitchen. Happy cooking!
PrintPeach Cobbler with Blackberries

A delightful summer dessert featuring juicy peaches and tart blackberries, topped with a golden cobbler crust.
- Prep Time: 15 minutes
- Cook Time: 45 minutes
- Total Time: 60 minutes
- Yield: 8 servings 1x
- Category: Dessert
- Method: Baking
- Cuisine: American
- Diet: Vegetarian
Ingredients
- 4 cups sliced peaches
- 2 cups blackberries
- 1 cup sugar
- 1 cup all-purpose flour
- 1 cup milk
- 1/2 cup butter, melted
- 1 tablespoon baking powder
- 1/2 teaspoon salt
- 1 teaspoon vanilla extract
Instructions
- Preheat your oven to 375°F (190°C).
- Combine the sliced peaches and blackberries in a mixing bowl. Sprinkle 1/2 cup of sugar over the fruit and let sit for about 10 minutes.
- Whisk together the flour, remaining 1/2 cup of sugar, baking powder, and salt in another bowl. Create a well in the center and add the melted butter, milk, and vanilla extract. Mix until just combined.
- Grease a 9×13 baking dish and pour the batter evenly into the bottom. Spoon the peach and blackberry mixture over the batter.
- Bake for 40-45 minutes until the top is golden brown.
- Cool for about 10-15 minutes before serving.
Notes
Serve warm with vanilla ice cream for a delightful treat. You can also add a sprinkle of fresh mint on top for garnish.
Nutrition
- Serving Size: 1 serving
- Calories: 380
- Sugar: 22g
- Sodium: 300mg
- Fat: 18g
- Saturated Fat: 10g
- Unsaturated Fat: 8g
- Trans Fat: 0g
- Carbohydrates: 49g
- Fiber: 3g
- Protein: 5g
- Cholesterol: 40mg
Keywords: peach cobbler, blackberry dessert, summer recipe, fruit cobbler
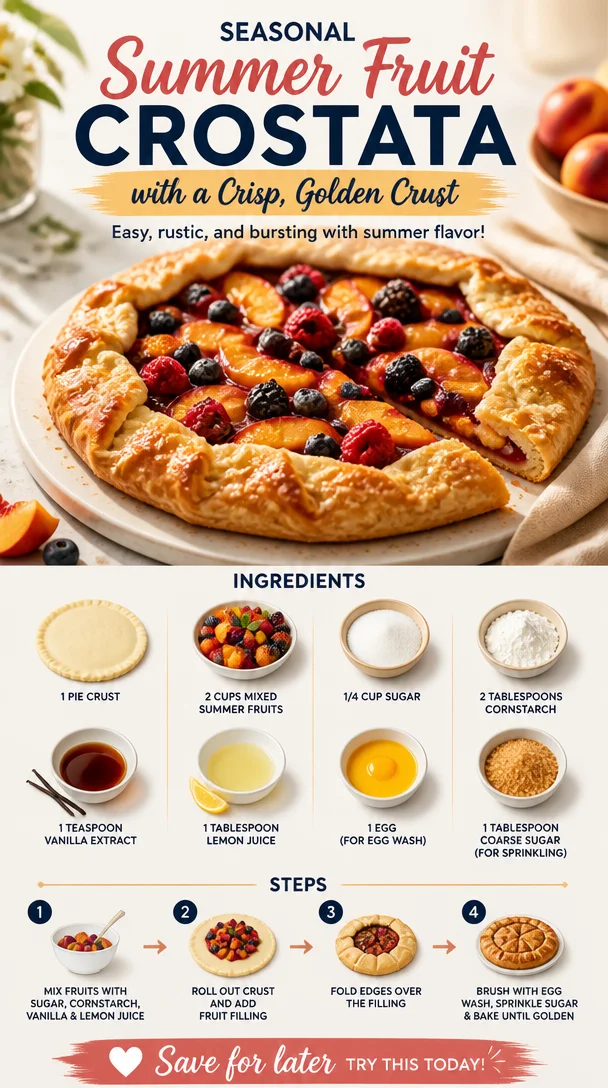
Seasonal Summer Fruit Crostata with a Crisp, Golden Crust
A Slice of Summer: Crafting the Perfect Fruit Crostata
Introduction
Welcome to the sun-kissed days of summer, the season where vibrant fruits burst with flavor and our taste buds come alive! There’s something truly magical about this time of year when you can wander through local farmers’ markets or even your backyard and gather a stunning array of juicy peaches, succulent berries, and fragrant apricots. Today, I’m thrilled to share with you my beloved recipe for a Summer Fruit Crostata with a Crispy Crust—a dish that not only celebrates summer’s bounty but also brings warmth, laughter, and a sense of nostalgia to any gathering.
Imagine gathering your friends or family around a table adorned with twinkling fairy lights, slices of golden crostata glistening in the evening sun, and the sweet aroma of baked fruit wafting through the air. This crostata is an ode to relaxed summer evenings and the joy of sharing desserts with loved ones, each bite awakening memories of sun-soaked picnics and long lazy days.
Let’s roll up our sleeves and dive into creating this delicious masterpiece, perfect for both seasoned chefs and curious kitchen novices alike!
Personal Story
Summer fruit crostata reminds me of my childhood summers spent at my grandmother’s house. She had this lovely kitchen that was always filled with the sweet scents of baking. I can still hear her laughter as she handed me a rolling pin, encouraging me to help her make the pastry for her famous fruit galette. We’d always race to the Farmers’ Market each Saturday morning to pick out the freshest fruits—peaches with their fuzzy skins, tart berries bursting with juice, and golden apricots that seemed to glow under the summer sun.
I can vividly recall her gentle guidance as we pulled together ingredients, covered the kitchen in flour, and danced to the tunes of her favorite oldies station. The best part, however, was the impatient wait while the crostata baked, the aroma enveloping us like a warm hug. Each bite was a reminder of the love and care we poured into it. It’s not just dessert; it’s a treasure trove of memories. Now, I love recreating that joy with friends, bringing those cherished moments full circle right in my own kitchen!
Ingredients
Let’s gather our ingredients! Here’s what you’ll need to craft your stunning summer fruit crostata:
-
1 pie crust
Tip: Feel free to use store-bought for convenience or make your own with a simple flour and butter mixture. A homemade crust adds to the nostalgia, while a store-bought one saves time! -
2 cups mixed summer fruits (e.g., peaches, berries, apricots)
Substitution tips: Don’t hesitate to experiment! Cherries, plums, or even tropical fruits like mango can add a fun twist. Just remember to adjust the sugar based on the fruit’s sweetness. -
1/4 cup sugar
Quick insight: This not only sweetens the filling but helps in drawing out the fruit juices, creating a luscious filling. You can use coconut sugar or honey for a different flavor profile. -
2 tablespoons cornstarch
Chef insight: Cornstarch is key in thickening the juicy filling without making it soupy. If you’re in a pinch, flour can also work, but I recommend sticking with cornstarch for the best texture. -
1 teaspoon vanilla extract
Tip: Use pure vanilla extract for the best flavor. If you have some on hand, a splash of almond extract can bring out an incredible depth to the fruits. -
1 tablespoon lemon juice
Chef hack: This brightens the flavors of the fruit. If you don’t have fresh lemons, a little splash of apple juice can also do the trick. -
1 egg (for egg wash)
Tip: The egg wash gives the crust that beautiful golden finish. If you want a vegan option, a splash of plant-based milk works too! -
1 tablespoon coarse sugar (for sprinkling)
Insight: Coarse sugar adds that perfect crunch on top. If you can’t find it, granulated sugar works just fine too!
Step-by-Step Instructions
Now, let’s bring this crostata to life step-by-step, shall we? Roll up those sleeves and let’s get cooking!
-
Prepare the Pie Crust
If you’re making your own crust, start by combining 1 1/4 cups of flour, 1/2 teaspoon of salt, and 1/2 cup of cold butter in a food processor until crumbly. Add cold water, one tablespoon at a time, until it forms a dough. Wrap it in plastic wrap and chill for at least 30 minutes. If using store-bought, let it sit at room temperature while you prep your filling. -
Preheat the Oven
Preheat your oven to 375°F (190°C). This ensures a crispy, golden crust! -
Prepare Your Fruits
While the pie crust chills, prepare your fruits! Slice your peaches, wash your berries, and chop apricots. If you’re using stone fruits, be sure to remove the pits. Combine your fruit in a large bowl. -
Make the Filling
Sprinkle the sugar, cornstarch, vanilla extract, and lemon juice over the fruit. Toss gently to coat. This not only sweetens the fruit but also creates a delicious syrup as it bakes. -
Roll Out the Pie Crust
Flour your work surface and gently roll out your chilled pie crust into a rough circle, about 12 inches in diameter. Don’t worry about perfection! This rustic look is part of its charm. -
Transfer to Baking Sheet
Carefully transfer the rolled dough to a parchment-lined baking sheet. You can use the rolling pin to help move it without tearing. -
Add the Filling
Spoon the fruit mixture into the center of the crust, leaving about a 2-inch border around the edges. This will be your crust edge. -
Fold the Crust Over
Gently fold the edges of the dough over the fruit, crimping or pleating it slightly as you go. This makes it look beautiful! -
Brush with Egg Wash
Using a pastry brush, apply the egg wash over the crust. This gives it a gorgeous golden color when baked. -
Sprinkle with Coarse Sugar
Finally, sprinkle the coarse sugar over the crust to give it some crunchy sweetness. -
Bake
Pop the crostata into the preheated oven and bake for 30-35 minutes, until the crust is golden and the fruit bubbly. If the edges brown too quickly, cover them with a bit of foil. -
Cool and Serve
Allow the crostata to cool on a wire rack for at least 15 minutes. This waiting period will make slicing a lot easier!
Serving Suggestions
When it comes to serving your Summer Fruit Crostata, simplicity is the name of the game. Slice it into wedges and serve each piece warm (or at room temperature) with a scoop of vanilla ice cream or a dollop of freshly whipped cream. If you’re feeling fancy, top it with a sprinkle of fresh mint leaves to add a pop of color and freshness.
Recipe Variations
Want to mix things up? Here are some fun variants and tips to try:
-
Berry Delight: Use only mixed berries like strawberries, blueberries, and raspberries for a berry-focused crostata. Adjust the sugar according to the tartness of the berries.
-
Tropical Twist: Add diced mango and pineapple for a vibrant tropical fruit crostata. A hint of coconut in the crust can enhance the island vibes.
-
Spiced Autumn Version: As summer transitions to fall, consider adding a pinch of cinnamon or nutmeg to your filling for a warm, spicy twist.
-
Nutty Crust: Incorporate ground almonds or pecans into your crust for an added layer of flavor and crunch.
-
Gluten-Free Option: Swap the regular pie crust with a gluten-free pie crust made from almond flour or gluten-free all-purpose flour for a gluten-free adaptation.
Chef’s Notes
Creating this Summer Fruit Crostata has been a delightful journey over the years. I’ve experimented with various fruits and crusts, and each time, the joy of watching friends and family gather around, savoring every bite, is what keeps me going. One time, I even served a berry crostata at a summer gathering, and the aftermath was a flurry of laughter and “can I have the recipe?” requests. Nothing beats the gratitude of sharing a piece of your heart (and your kitchen) with others.
As you make this crostata, don’t stress about it being perfect. Cooking is about connection and joy, not rigid perfection! Embrace the quirks of your baking, and remember: that’s where the magic happens!
FAQs and Troubleshooting
Q: My crust looks too thick; how can I make it thinner?
A: If your dough feels thick, simply roll it out gently with a rolling pin. Remember, it’s okay if it’s not perfectly even—rustic is charming!
Q: What should I do if the filling turns out too watery?
A: Make sure to use cornstarch as indicated and consider leaving your crostata in the oven for a few extra minutes. The cornstarch should help bind everything together. Let it cool slightly to help thicken the juices.
Q: Can I make this ahead of time?
A: Absolutely! You can prepare the filling and store it in the refrigerator for a day or two. Just assemble and bake when you’re ready to enjoy!
Q: How do I store leftovers?
A: The crostata can be stored at room temperature for up to 2 days, or you can refrigerate it for up to a week. Just be sure to cover it to keep it from drying out.
Making a Summer Fruit Crostata is not just about creating a dish; it’s about weaving together the flavors of summer, the joy of cooking, and the beauty of sharing. So tie on that apron, gather your friends, and let’s create something timeless together!
Welcome to the world of Ivory Apron—let’s cook up some memories!
PrintSummer Fruit Crostata

A delightful crostata filled with vibrant summer fruits, perfect for sharing at gatherings.
- Prep Time: 15 minutes
- Cook Time: 35 minutes
- Total Time: 50 minutes
- Yield: 8 servings 1x
- Category: Dessert
- Method: Baking
- Cuisine: Italian
- Diet: Vegetarian
Ingredients
- 1 pie crust
- 2 cups mixed summer fruits (e.g., peaches, berries, apricots)
- 1/4 cup sugar
- 2 tablespoons cornstarch
- 1 teaspoon vanilla extract
- 1 tablespoon lemon juice
- 1 egg (for egg wash)
- 1 tablespoon coarse sugar (for sprinkling)
Instructions
- Prepare the pie crust
- Preheat the oven to 375°F (190°C)
- Prepare your fruits
- Make the filling
- Roll out the pie crust
- Transfer to a baking sheet
- Add the filling
- Fold the crust over
- Brush with egg wash
- Sprinkle with coarse sugar
- Bake for 30-35 minutes
- Cool and serve
Notes
Serve warm with a scoop of vanilla ice cream or whipped cream for the perfect touch.
Nutrition
- Serving Size: 1 slice
- Calories: 280
- Sugar: 12g
- Sodium: 150mg
- Fat: 10g
- Saturated Fat: 4g
- Unsaturated Fat: 5g
- Trans Fat: 0g
- Carbohydrates: 36g
- Fiber: 2g
- Protein: 3g
- Cholesterol: 40mg
Keywords: crostata, summer dessert, fruit tart, easy baking, Italian dessert
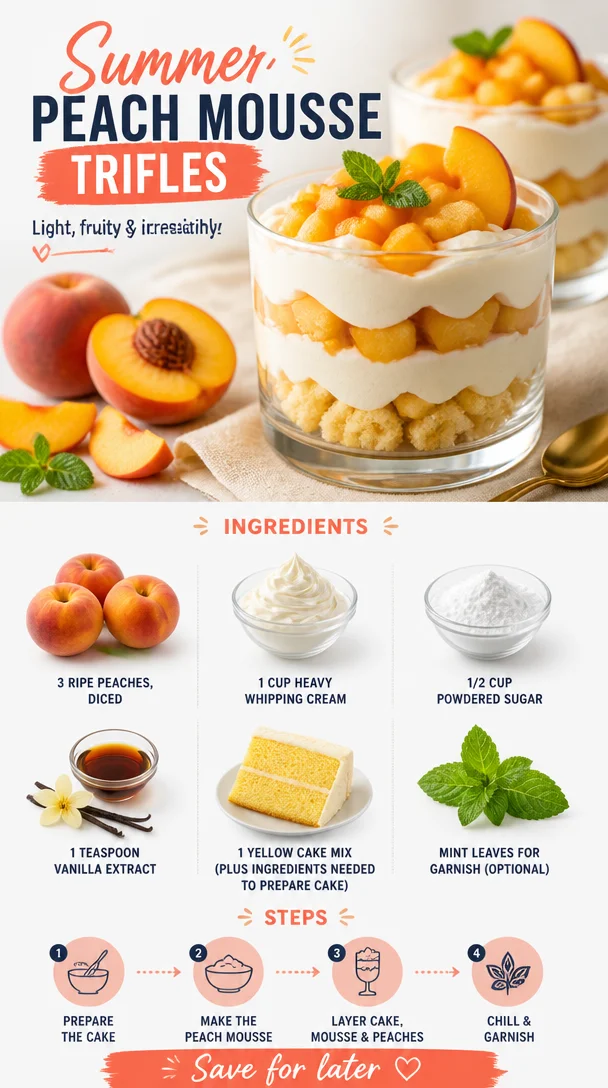
Summer Peach Mousse Trifles
Sweet Summertime Delight: Summer Peach Mousse Trifles
Hello, food lovers! Today, I’m excited to share a recipe that’s as vibrant as a summer sunset and as refreshing as a breeze on a hot afternoon. Summer Peach Mousse Trifles are the perfect way to showcase those juicy, sun-ripened peaches that tempt you at every farmer’s market. This dessert is all about layering flavors and textures—light, fluffy mousse meets moist cake, and fresh fruity goodness. So grab a spoon (and maybe a friend or two), and let’s get started!
Personal Story
Growing up, summers in my family were synonymous with afternoons spent in my grandmother’s sun-drenched kitchen, where stone fruits were in their prime. One memory that stands out is the time my grandma and I ‘borrowed’ a few peaches from our neighbor’s tree (with their permission, of course!) and turned them into a sweet treat. With the radio softly playing oldies in the background, we experimented with ingredients, laughter echoing as we stumbled through each step together.
It wasn’t just about the food; it was about the connection—the joy of creation, the anticipation of that first bite, and the warm satisfaction of sharing something homemade. That day, we whipped up a light peach mousse layered with fluffy cake, a dish that would become a family favorite. These trifles evoke those cherished memories and carry a piece of my heart with every lovely bite.
Ingredients
Here’s what you’ll need to whip up these delightful Summer Peach Mousse Trifles:
-
3 ripe peaches, diced
Choose firm peaches that yield slightly to pressure. If they’re not in season, feel free to use canned peaches (in syrup or juice) as a substitute. -
1 cup heavy whipping cream
This is essential for that luscious mousse texture. If you’re looking for a lighter version, you can use coconut cream or a whipped topping, but I highly recommend the real deal! -
1/2 cup powdered sugar
Perfect for sweetening your mousse without grit. Don’t have powdered sugar? You can easily blend granulated sugar in a food processor until fine. -
1 teaspoon vanilla extract
A splash of this extract adds warmth and elevates the overall flavor. For a twist, try almond extract instead! -
1 yellow cake mix
I love the convenience here, but you can make your favorite homemade cake if you’re feeling adventurous! Just remember to prepare it according to the package instructions. -
Mint leaves for garnish (optional)
Fresh mint adds a pop of color and a fragrant touch to your dessert. Plus, it’s a great way to impress your guests!
Step-by-Step Instructions
Now, let’s dive into the cooking process! Here’s how to create these beautiful trifles.
-
Bake the Cake:
Preheat your oven to the temperature indicated on the cake mix package (usually around 350°F/175°C). Prepare the yellow cake mix according to the package instructions. Pour it into a greased baking pan and bake until golden brown and a toothpick inserted in the center comes out clean—about 25 to 30 minutes. Once baked, let it cool in the pan for about 10 minutes before transferring it to a wire rack. -
Prepare the Peaches:
While the cake cools, let’s make use of those gorgeous peaches! Start by dicing them into small, bite-sized pieces. If you find that your peaches are a little tart, feel free to sprinkle them with a bit of sugar and let them sit for about 10 minutes. This will draw out their natural juices and enhance their sweetness. -
Whip the Cream:
In a large mixing bowl, pour in the heavy whipping cream and add the powdered sugar and vanilla extract. Using a hand mixer or a stand mixer, whip the cream on medium-high speed until it forms soft peaks. Be careful not to over-whip—you want it fluffy, not grainy! This step is where the magic happens, transforming simple cream into a cloud-like topping. -
Fold in the Peaches:
Gently fold the diced peaches into the whipped cream. The goal is to combine them without deflating the whipped cream—think light and airy! If you want a more peachy flavor throughout, save a few peach pieces for layering later. -
Assemble the Trifles:
Now it’s time to combine everything! Start with a layer of cake at the bottom of your trifle glass or a small dessert bowl. Top with a generous dollop of the peach mousse, followed by a layer of any leftover diced peaches. Repeat the layers until each glass is full, finishing with a generous swirl of mousse on top. -
Chill:
Once assembled, place the trifles in the refrigerator for at least 30 minutes to set. This helps meld the flavors beautifully! -
Garnish and Serve:
Just before serving, top with fresh mint leaves for that extra visual appeal and a burst of freshness.
Serving Suggestions
Serve your Summer Peach Mousse Trifles chilled, either individually in glasses or as a large trifle in a beautiful bowl for family-style sharing. Presenting them in clear glasses really showcases the gorgeous layers! Feel free to serve alongside extra peach slices or a drizzle of honey for a little added elegance.
Recipe Variations
Feeling adventurous? Here are a few twists you can try with your trifles:
-
Berry Blush: Substitute peaches with fresh strawberries, blueberries, or raspberries for a berry trifle. You could even mix in some lemon zest for a refreshing twist!
-
Chocolate Delight: Combine cubes of chocolate cake with the peach mousse instead of yellow cake. Chocolate and peach are a surprisingly delightful combo!
-
Nutty Crunch: Add a layer of crushed cookies or nuts between the mousse and cake for some texture—think graham crackers, almonds, or vanilla wafers.
-
Dairy-Free Version: Use coconut cream and a dairy-free cake mix to make these trifles suitable for those with dietary restrictions.
-
Spiced Up: Sprinkle a little cinnamon or nutmeg into the mousse for warmth and added flavor dimensions.
Chef’s Notes
Creating this recipe takes me back to that sun-soaked kitchen with my grandmother, pouring love into every scoop and layer. I remember one of our trials—my grandma accidentally added too much sugar to the mousse, and while we thought we had ruined it, the overly sweet dessert ended up being a hit! It just goes to show there are no mistakes in the kitchen—only delicious surprises. This recipe has evolved along with my culinary journey, and each time I make it, it feels like rekindling those joyful memories.
FAQs and Troubleshooting
1. My mousse turned out runny; what did I do wrong?
This could happen if you overwhip the cream initially, or if your peaches are too juicy. Make sure to whip the cream just to soft peaks and drain any excess juice from the peaches before folding them in.
2. Can I prepare these trifles in advance?
Absolutely! You can assemble them a day ahead. Just make sure to keep them refrigerated until you’re ready to serve.
3. What if I can’t find ripe peaches?
If fresh peaches aren’t available, you can use canned peaches or switch to another fruit like nectarines or plums. Just make sure to adjust the sweetness if they’re tinned in syrup!
4. Can I use a different type of cake?
Yes! Feel free to get creative. Pound cake, sponge cake, or even a brownie base would work beautifully with this mousse. Just keep the layers light and playful!
Nutritional Info
While I won’t provide exact numbers this time, remember that moderation is key when indulging! The trifles are rich from the cream and cake but packed with wholesome fruit. Enjoy them as a treat, and live a little!
And there you have it, my culinary friends! My Summer Peach Mousse Trifles are more than just a dessert; they are a celebration of summer flavors and sweet memories. So, gather your ingredients, don your favorite apron, and let the kitchen adventures begin!
PrintSummer Peach Mousse Trifles
A vibrant and refreshing dessert featuring layers of light peach mousse, moist cake, and fresh diced peaches, perfect for summer gatherings.
- Prep Time: 15 minutes
- Cook Time: 30 minutes
- Total Time: 45 minutes
- Yield: 4 servings 1x
- Category: Dessert
- Method: No-Bake
- Cuisine: American
- Diet: Vegetarian
Ingredients
- 3 ripe peaches, diced
- 1 cup heavy whipping cream
- 1/2 cup powdered sugar
- 1 teaspoon vanilla extract
- 1 yellow cake mix
- Mint leaves for garnish (optional)
Instructions
- Preheat your oven to the temperature indicated on the cake mix package (usually around 350°F/175°C). Prepare the yellow cake mix according to the package instructions. Pour it into a greased baking pan and bake until golden brown and a toothpick inserted in the center comes out clean—about 25 to 30 minutes. Once baked, let it cool in the pan for about 10 minutes before transferring it to a wire rack.
- While the cake cools, start by dicing the peaches into small, bite-sized pieces. If they are a little tart, sprinkle them with a bit of sugar and let them sit for about 10 minutes.
- In a large mixing bowl, pour in the heavy whipping cream and add the powdered sugar and vanilla extract. Beat on medium-high speed until soft peaks form.
- Gently fold the diced peaches into the whipped cream, saving a few pieces for later layering if desired.
- Start by layering cake at the bottom of your trifle glass or dessert bowl, followed by a generous layer of the peach mousse, and diced peaches. Repeat layers until glasses are full.
- Once assembled, place the trifles in the refrigerator for at least 30 minutes to set.
- Just before serving, top with fresh mint leaves.
Notes
Feel free to prepare the trifles a day in advance and keep them refrigerated. Variations include using different fruits or types of cake.
Nutrition
- Serving Size: 1 serving
- Calories: 350
- Sugar: 20g
- Sodium: 100mg
- Fat: 24g
- Saturated Fat: 14g
- Unsaturated Fat: 6g
- Trans Fat: 0g
- Carbohydrates: 36g
- Fiber: 2g
- Protein: 4g
- Cholesterol: 80mg
Keywords: peach mousse, summer dessert, trifles, peach dessert, layered dessert
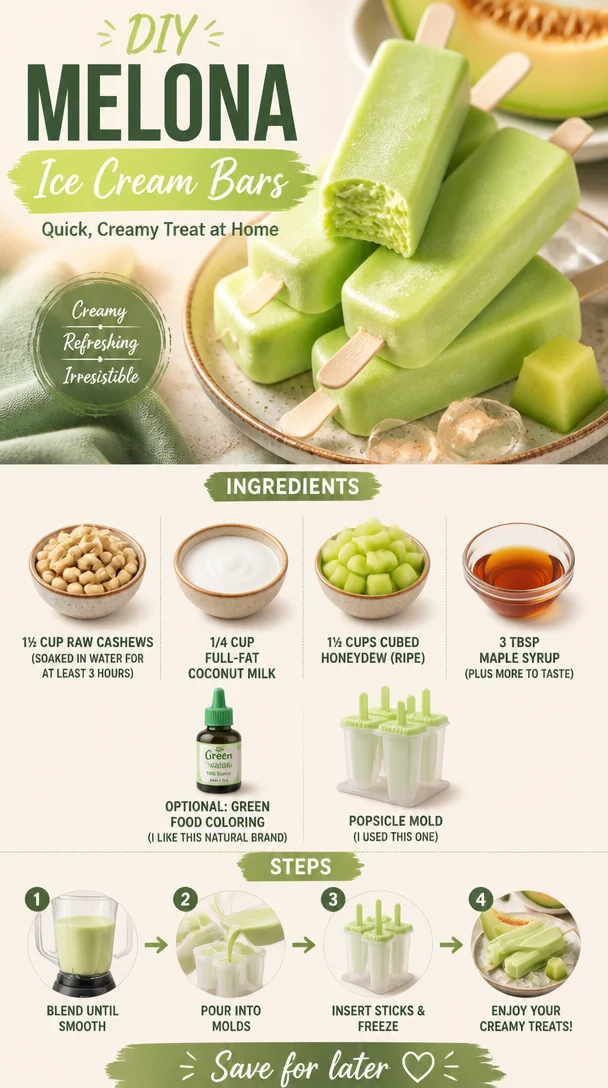
DIY Melona Ice Cream Bars: Quick, Creamy Treat at Home
Homemade Melona Ice Cream Bars: A Cool Treat to Beat the Heat
Hello, ice cream lovers! If you’re anything like me, the mere thought of warm sunshine, lazy afternoons, and the sound of kids laughing can only mean one thing: it’s ice cream season! Nothing quite hits the spot during those long, sunny days like a creamy, sweet homemade ice cream bar. Today, I’m excited to share with you my version of the delightful Melona Ice Cream Bar, a frozen treat inspired by the beloved South Korean dessert.
Imagine biting into a cold, refreshing honeydew ice cream bar—sweet, creamy, and oh-so-satisfying! But the best part? We’re making it completely dairy-free and using wholesome ingredients that will have your taste buds dancing. Trust me; you won’t need to head to the grocery store for those pre-packaged bars again after you whip these up in your kitchen. With just a few simple ingredients and a little bit of patience, you’ll create something that’s indulgent yet guilt-free. Ready to dive in? Let’s get started!
My Sweet Memory with Melona
Growing up, summers meant family road trips and roadside snack stops. One of my favorite treats was pausing at a little convenience store where we’d discover all sorts of goodies, including the iconic Melona bars. The first time I took a bite of that vibrant green ice cream wrapped in shiny packaging, it was pure magic! The coolness quenched my thirst while the sweet, fruity flavor almost felt like summer in every lick.
Each bite was a reminder of those carefree summer days and the joy of sharing simple pleasures with loved ones. Fast forward to today, and I’m thrilled to bring that nostalgic flavor to my kitchen in a way that feels fresh, fun, and completely healthy! Get ready to recreate those cherished memories and create new ones around your own table!
Ingredients
Here are the ingredients you’ll need to create these dreamy Melona ice cream bars:
-
1½ cup raw cashews (soaked in water for at least 3 hours): Cashews provide the creamy base for your ice cream, creating that rich texture we love while being dairy-free. Don’t have cashews? You can swap them for blanched almonds or macadamia nuts for a different flavor profile!
-
1/4 cup full-fat coconut milk: This luscious coconut cream sweetens and enriches the mixture, giving it a tropical feel. If you’re not a fan of coconut, you can use almond or oat milk for a lighter option.
-
1½ cups cubed honeydew (ripe): Honeydew is the star of the show here, and it adds that refreshing sweetness we cherished in those Melona bars. If honeydew is out of season, cantaloupe or ripe watermelon can serve as creative substitutes.
-
3 tbsp maple syrup (plus more to taste): Maple syrup sweetens the mixture naturally, making it light and flavorful. Agave syrup or date syrup can be fantastic substitutes too!
-
Optional: Green food coloring: For that iconic vibrant green color reminiscent of traditional Melona bars. I like a natural brand, but feel free to skip this if you prefer the natural hue.
-
Popsicle mold: This is where the magic happens! I used a silicone mold for easy release, but feel free to use whatever you have on hand.
Step-by-Step Instructions
Now that we have our ingredients ready, let’s get down to the delicious business of making these Melona ice cream bars!
-
Soak the Cashews: Start by soaking your raw cashews in water for at least three hours, or overnight if you can. This process softens the nuts, making them blend beautifully into the creamy base. Don’t skip this step—your ice cream’s texture will thank you!
-
Blend the Base: Once your cashews are nice and soft, drain and rinse them well. Toss them into a high-speed blender with the full-fat coconut milk, 1½ cups of cubed honeydew, and 3 tablespoons of maple syrup. Blend until smooth and creamy, scraping down the sides as needed. The consistency should be incredibly velvety, so take your time on this step for the best result. If you need a sweeter kick, taste the mixture and add more maple syrup as desired!
-
Add Color: If you’re feeling fancy and want that green hue to pop, add a few drops of green food coloring at this point. Blend again until you achieve your desired shade. Remember, natural color can be beautiful too—embrace the honeydew’s own soft tones!
-
Pour Into Molds: Carefully pour the creamy mixture into your popsicle molds. Leave a bit of space at the top for expansion when they freeze. If you have room, feel free to sprinkle in a few small pieces of fresh honeydew for added texture and surprise!
-
Insert Sticks: Follow the instructions for your molds to insert sticks. If they don’t hold up, you can freeze them for about an hour till the ice cream is slightly set before inserting the sticks.
-
Freeze: Pop the molds into the freezer for about 4-6 hours, or until fully frozen. It’s hard to wait, I know, but trust me—the anticipation will be worth it!
-
Unmold and Enjoy!: Once frozen, take the molds out and let them sit for a couple of minutes at room temperature for easy release. Gently wiggle the sticks to dislodge the bars, and they should slide right out! Now it’s time to enjoy!
Serving Suggestions
To serve, simply place your Melona ice cream bars on a cute plate or a popsicle stick holder for a fun, summery presentation. Drizzle them with a bit of melted dark chocolate or sprinkle some crushed nuts over the top for added texture. And if you’re feeling extra indulgent, serve them alongside some fresh fruit slices for a gorgeous spread!
Recipe Variations
Here are a few fun twists to make this recipe your own:
-
Tropical Melona: Add some crushed pineapple or mango instead of honeydew for a tropical vibe. You can also blend in a splash of coconut extract!
-
Minty Fresh: Toss in a handful of fresh mint before blending for a refreshing peppermint flavor.
-
Chocolate Dive: Make a chocolate version by swapping out part of the honeydew for cocoa powder or melted dark chocolate. Yum!
-
Raspberry Ripple: Before pouring the mixture into molds, fold in some homemade raspberry sauce for a fruity swirl!
-
Nut-Free Version: Replace the cashews with silken tofu for a soy-based alternative that’s rich and creamy without nuts.
Chef’s Notes
These Melona ice cream bars have been a fun addition to our family traditions. I love experimenting with flavors and colors, especially when kids get involved. My daughter is a pro at adding ingredients to the blender—though sometimes we end up with unexpected surprises! Like that one time I was aiming for chocolate mint and ended up with a green kale monstrosity! (Let’s just say we didn’t serve those at the dinner party!)
In any case, these bars are versatile! Over the years, I’ve transformed the original recipe countless times, always with delicious results! So don’t be shy—make them your own and share the love!
FAQs and Troubleshooting
1. My ice cream bars aren’t freezing properly. What did I do wrong?
This can happen if the mixture is too watery. Ensure that your cashews are well-soaked and blend until completely smooth. Also, check your freezer temperature—if it’s not cold enough, they may take longer to freeze.
2. Can I make these without a blender?
While I highly recommend a blender for the smoothest texture, you can mash the ingredients by hand if necessary, but the result will be chunkier. A food processor can also work if you have one!
3. How long can I store these ice cream bars?
They can be stored in an airtight container in the freezer for up to one month. However, they’re best enjoyed within a week for optimal flavor and texture!
4. What if I don’t have popsicle molds?
No popsicle molds? No problem! You can use small paper cups filled with the mixture and stick a toothpick in the center for a makeshift popsicle. Just freeze until solid!
Nutritional Info
Here’s a quick breakdown of the nutritional content for each Melona ice cream bar (approximation based on using cashews and honeydew):
- Calories: 150
- Protein: 3g
- Fat: 9g
- Carbohydrates: 14g
- Fiber: 1g
- Sugar: 7g
(Note: Nutritional values may vary based on exact ingredients and amounts used.)
Thank you for joining me on this cooling journey of Homemade Melona Ice Cream Bars! I hope this recipe inspires you to create beautiful, sweet moments in your kitchen. If you give it a try, be sure to share your creations with me—I’d love to see your delicious results! Cheers to summer and indulging (in moderation, of course) in this delightful frozen treat!
PrintHomemade Melona Ice Cream Bars
Refreshing homemade Melona ice cream bars made with wholesome, dairy-free ingredients that capture the iconic Korean dessert’s flavor.
- Prep Time: 15 minutes
- Cook Time: 0 minutes
- Total Time: 360 minutes
- Yield: 6 servings 1x
- Category: Dessert
- Method: Freezing
- Cuisine: Korean
- Diet: Vegan
Ingredients
- 1½ cup raw cashews (soaked in water for at least 3 hours)
- 1/4 cup full-fat coconut milk
- 1½ cups cubed honeydew (ripe)
- 3 tbsp maple syrup (plus more to taste)
- Optional: Green food coloring
- Popsicle mold
Instructions
- Soak the cashews in water for at least three hours, or overnight.
- Blend the soaked cashews, coconut milk, honeydew, and maple syrup until smooth and creamy.
- Add green food coloring if desired and blend again.
- Pour the mixture into popsicle molds, leaving space for expansion.
- Insert sticks into the molds as per the instructions, freezing slightly if needed.
- Freeze the molds for about 4-6 hours until fully frozen.
- Unmold the bars and enjoy!
Notes
For serving, drizzle melted dark chocolate or sprinkle crushed nuts on top. Enjoy these bars with fresh fruit slices for a delightful treat!
Nutrition
- Serving Size: 1 bar
- Calories: 150
- Sugar: 7g
- Sodium: 5mg
- Fat: 9g
- Saturated Fat: 7g
- Unsaturated Fat: 2g
- Trans Fat: 0g
- Carbohydrates: 14g
- Fiber: 1g
- Protein: 3g
- Cholesterol: 0mg
Keywords: Melona, ice cream, dairy-free, vegan, dessert, summer treats, popsicles
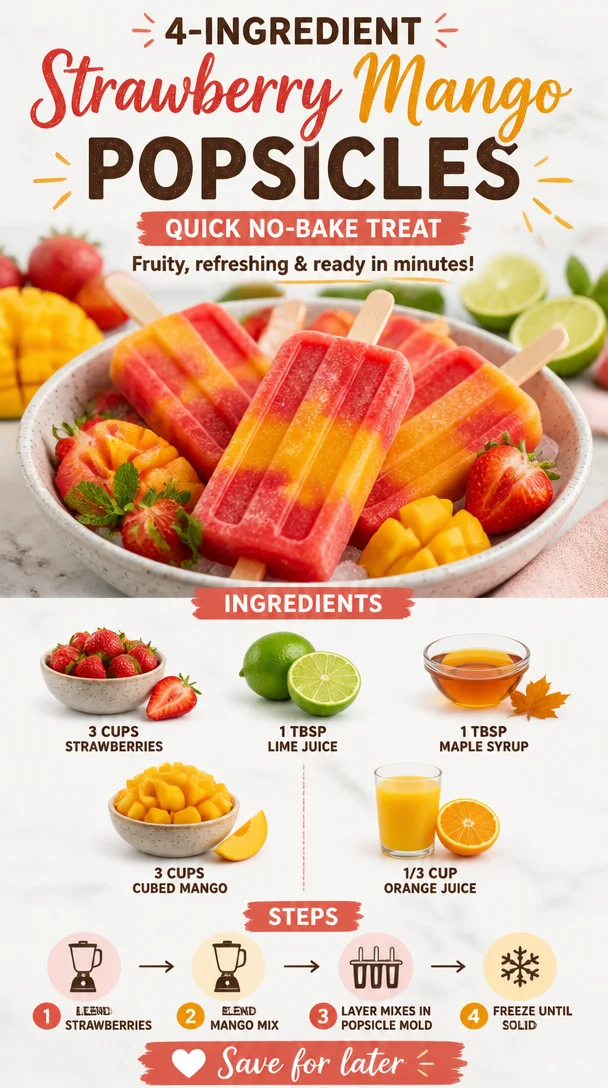
Ingredient Strawberry Mango Popsicles: Quick No-Bake Treat
Cool Off This Summer with Homemade Strawberry Mango Popsicles
Are you looking for a fabulous way to beat the heat? These strawberry mango popsicles are just what you need! This recipe not only delivers a burst of tropical flavor but also fills your kitchen with nostalgia, fun, and vibrant colors. Trust me, nothing screams summer quite like fresh fruit popsicles, and once you whip up a batch, you’ll be wishing you’d done it sooner!
Popsicles have been a part of my summer since childhood. I fondly remember those hot afternoons when my siblings and I would race to the freezer, anticipating the moment we could sink our teeth into something cool and sweet. These strawberry mango popsicles are my adult twist on those cherished memories. They’re simple enough to whip up in a jiffy but elegant enough to impress your guests at a garden party. Plus, you can feel good about the ingredients you’re using!
Now, gather your trusty apron, because we’re about to embark on a fruity adventure that’ll have everyone chewing their way to the bone—er, popsicle stick! The combination of strawberries and mango is a tropical paradise on a stick, balanced perfectly with a splash of lime and a touch of maple syrup. Believe me, you’ll want to keep these in your freezer year-round!
A Sweet Taste of Nostalgia
Every summer, my family took a road trip to the beach, and one of the highlights was always stopping at a little roadside stand selling fresh fruit and homemade popsicles. I can still hear the distant laughter of children and the sizzle of snacks being fried in the background. The sweet, tart flavor of strawberries, alongside the lush pulp of sun-ripened mango, became my go-to treat. Back then, nothing was more refreshing than biting into a colorful popsicle while feeling the ocean breeze tousle my hair.
Fast forward to today, and I find that blending those childhood memories with my love for cooking yields a tasty, magical treat. When I make these strawberry mango popsicles, it’s like I’m instantly transported back to those carefree summers, the warm sun on my skin, and the excitement of sharing popsicles with friends and family. Now, let’s pack those sweet memories into a mold and make some magic!
Ingredients
To create these delightful strawberry mango popsicles, here’s what you will need:
-
3 cups strawberries: Use fresh, ripe strawberries for the best flavor! If you can’t find them, you can substitute with frozen strawberries, but be sure to thaw and drain them before blending.
-
1 tbsp lime juice: A splash of lime juice brightens up the flavors and balances sweetness. If you don’t have lime, lemon juice works great too for a zesty kick!
-
1 tbsp maple syrup: This natural sweetener adds depth and a hint of earthiness. Honey or agave syrup can be a perfect alternative—just tweak the quantity to your taste.
-
3 cups cubed mango: Fresh mango adds a tropical twist, but feel free to use frozen mango if that’s more accessible. Make sure to allow it to thaw a bit for easier blending!
-
1/3 cup orange juice: It’s the perfect refresher! If you’re not fond of orange juice, pineapple juice can also elevate those tropical notes.
Get ready to experience the essence of summer in every bite. If you’ve got everything prepped, let’s dive into making our popsicles!
Step-by-Step Instructions
-
Preparation: Begin by washing your strawberries thoroughly and hulling them. This means removing the green tops and any white parts underneath. Surprisingly, having super ripe strawberries makes a world of difference in flavor!
-
Blend the Strawberries: Toss the strawberries into your blender. Add the lime juice and maple syrup. Blend until smooth. Don’t be afraid to pause and taste! The sweetness of the strawberries should shine through. If they aren’t sweet enough, a little more maple syrup won’t hurt!
-
Set Aside: Once blended, pour the strawberry mixture into a bowl and set it aside. You’ll want to keep the strawberry mix separate for layering that beautiful popsicle effect.
-
Blend the Mango: Rinse the blender (no one wants a strawberry-mango mix just yet!). Add the cubed mango and orange juice. Blend until creamy and smooth. You’re going to love how vibrant and silky this mixture is!
-
Layer the Molds: Now for the fun part! Grab your popsicle molds. Start by adding a layer of the strawberry mixture to each mold, about a third of the way full. Use a spoon to tap the bottom gently, which helps eliminate air bubbles.
-
Add the Mango Mixture: Follow up with a layer of mango blend on top of the strawberry. You can alternate the layers until the molds are full. I usually end with the mango for that stunning golden top!
-
Insert Sticks and Freeze: If your molds come with stick holders, insert them now. Place the molds in the freezer and allow them to chill for at least 4-6 hours. Overnight is even better if you can wait!
-
Pop and Enjoy: Once frozen solid, remove the popsicles. If they’re hard to get out, run some warm water over the outside of the molds for a few seconds. Enjoy your homemade popsicles as a sweet afternoon treat!
Serving Suggestions
There’s something visually stunning about a beautiful popsicle! For serving, you could plate these popsicles on a vibrant plate and surround them with fresh strawberries and mango slices for that wow factor. Drizzle over a bit of melted dark chocolate for a gourmet touch, or serve with a dollop of coconut whipped cream on the side for those who appreciate fluffy indulgence.
Recipe Variations
-
Berry Blast: Combine strawberries with other berries like blueberries or raspberries for a mixed-berry treat. Toss in a few basil leaves for an unexpected twist!
-
Creamy Delight: Add a layer of Greek yogurt or coconut cream between the fruit layers for a creamy variation. It adds a lovely texture that contrasts beautifully with the fruit.
-
Chili-Lime Popsicle: Spice things up! Blend a pinch of chili powder into the lime juice mix. It adds a tangy, spicy surprise that kicks every bite up a notch.
-
Chocolate-Dipped: After freezing, dip your pops in melted dark chocolate and immediately roll in crushed nuts or sprinkles for a delightful crunch.
-
Herbal Infusion: Try blending some mint or basil with the mango for a refreshingly herbaceous flavor that delights the palate!
Chef’s Notes
Ah, the popsicle journey! When I first developed this recipe, I made so many fruity concoctions that my kitchen looked like a fruit explosion—everywhere you looked, it was a cascade of colors! The first batch turned out too icy because I didn’t use enough sweetener. Lesson learned!
Now, I like to experiment with the layering, making sure each color stands out while still blending harmoniously once bitten into. It’s all about finding that balance between the textures and flavors. And honestly, the best part? Watching my nieces and nephews devour them with smiles on their little faces. There’s no better joy than creating something that brings people together, don’t you think?
FAQs and Troubleshooting
1. My popsicles are too hard! What did I do wrong?
If your popsicles come out rock-solid, this usually means they might have been in the freezer for too long or didn’t have enough sweetener. If they’re too hard, just let them sit at room temperature for a minute or run some warm water over the mold to help release them.
2. Can I use other fruits?
Absolutely! You can blend any fruit of your choice. Just ensure they are ripe for optimal flavor. Fruits like kiwi, bananas, and peaches work wonderfully too.
3. Are these popsicles healthy?
Yes! They’re made with whole fruits and natural sugars, making them a healthier choice compared to store-bought popsicles. You can modify the sweetener to your taste and use all organic ingredients if you prefer!
4. How long do these popsicles last in the freezer?
Homemade popsicles typically last about 2-3 months in the freezer. Just be sure to keep them stored in a sealed container or bag to avoid freezer burn!
These strawberry mango popsicles are sure to be a summer staple at your home. Simple, refreshing, and vibrant—they capture that warm weather vibe perfectly! I hope you’ll enjoy making these as much as I do. Now, let’s share some popsicle love with family and friends, shall we? Cheers to sweet and sunny days ahead!
PrintStrawberry Mango Popsicles
Delightful strawberry mango popsicles that capture the essence of summer with fresh fruits and a dash of lime.
- Prep Time: 15 minutes
- Cook Time: 0 minutes
- Total Time: 15 minutes
- Yield: 8 servings 1x
- Category: Dessert
- Method: Freezing
- Cuisine: American
- Diet: Vegetarian
Ingredients
- 3 cups strawberries, hulled
- 1 tbsp lime juice
- 1 tbsp maple syrup
- 3 cups cubed mango
- 1/3 cup orange juice
Instructions
- Wash your strawberries thoroughly and hull them.
- Toss the strawberries into your blender. Add the lime juice and maple syrup.
- Pour the strawberry mixture into a bowl and set it aside.
- Rinse the blender and add the cubed mango and orange juice.
- Grab your popsicle molds and add a layer of the strawberry mixture.
- Follow up with a layer of mango blend on top of the strawberry.
- Insert sticks if your molds come with holders and freeze for at least 4-6 hours.
- Once frozen solid, remove the popsicles and enjoy!
Notes
For serving, plate popsicles with fresh fruit and drizzle with chocolate or coconut whipped cream.
Nutrition
- Serving Size: 1 popsicle
- Calories: 80
- Sugar: 10g
- Sodium: 5mg
- Fat: 0g
- Saturated Fat: 0g
- Unsaturated Fat: 0g
- Trans Fat: 0g
- Carbohydrates: 22g
- Fiber: 2g
- Protein: 1g
- Cholesterol: 0mg
Keywords: popsicles, summer dessert, strawberry mango, homemade ice pops, healthy treats
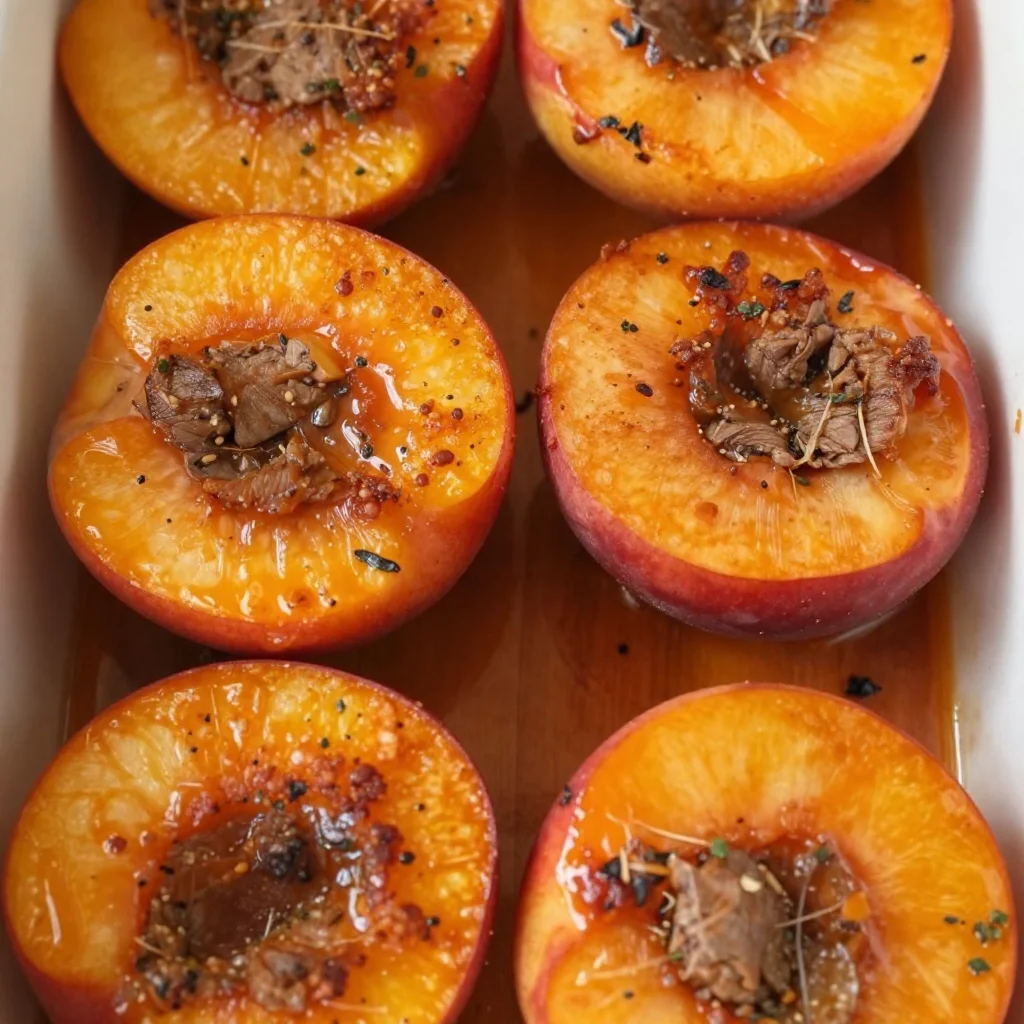
Summer-Ready Baked Nectarines with Vanilla Ice Cream
Baked Nectarines with Vanilla Ice Cream: A Summer Delight
Summer is the season that brings a wonderful cascade of vibrant fruits bursting with flavor—hydration, sweetness, and sunshine in every bite. Among those refreshing gifts of nature, nectarines hold a special place in my heart. Their delicate skin hides juicy, fragrant flesh that can transform effortlessly from a simple snack into an elegant dessert. Today, I’m thrilled to share my favorite recipe for Baked Nectarines with Vanilla Ice Cream that is sure to impress and delight your family and friends or serve as a special treat for yourself!
A Sweet Memory
I remember summer evenings at my grandmother’s house, where the air would be filled with the scent of freshly baked goods. Every Saturday, we’d gather in her kitchen, where we rolled up our sleeves and dug into batches of fruit crisps, pies, and all kinds of goodies. One summer, she introduced us to her baked nectarines, which she’d drizzle with honey and sprinkle with cinnamon—a combination that ignited my taste buds with joy.
Watching the nectarines caramelize in the oven made the anticipation even sweeter. And when she served them warm with a scoop of creamy vanilla ice cream, it was like magic on a spoon! Those cherished memories of laughter, learning, and indulging in summer’s bounty are why I adore this dessert. Today, I continue that tradition, making it for my family and friends, inviting them to create their own sweet memories around the table.
Ingredients
Here’s everything you’ll need for this delightful dish:
-
Nectarines: The stars of this dessert! Choose ripe, firm nectarines for the best flavor. If nectarines are hard to find, peaches make an excellent substitute.
-
Cinnamon: This warm spice adds a cozy, aromatic depth. If you’re not a fan, nutmeg or allspice are great alternatives.
-
Honey: A natural sweetener that enhances the nectarines’ flavor profile. You can swap it with maple syrup or agave nectar for a vegan option.
-
Vanilla Ice Cream: The rich creaminess balances out the warm, baked nectarines. For a dairy-free option, consider coconut or almond milk ice cream.
Step-by-Step Instructions
Now let’s get cooking! Follow these steps, and we’ll have those baked nectarines ready in no time!
-
Preheat Your Oven: Start by preheating your oven to 375°F (190°C). This will provide the perfect climate for our nectarines to become tender and caramelized.
-
Prepare the Nectarines: Wash your nectarines thoroughly and cut them in half. Remove the pit and place the halves cut side up in a baking dish. As you cut, let your knife glide through the flesh with ease, enjoying the vibrant juice that drips from each slice.
-
Sprinkle with Cinnamon: Generously sprinkle ground cinnamon over the nectarines. This spice not only enhances flavor but also creates a lovely aroma that will fill your kitchen. If you’re feeling adventurous, consider adding a tiny pinch of cayenne pepper for a surprising twist!
-
Drizzle with Honey: Now, take your honey and drizzle it all over the nectarines. Make sure to coat them generously, as it will create a delicious caramelization during baking. Remember, a little honey goes a long way in sweetening the dish, but feel free to adjust to taste.
-
Bake: Slide the baking dish into your preheated oven and bake for 20 to 25 minutes. Keep an eye on them; you want them to become soft and bubbly, with caramelizing edges—but not mushy! The nectarines are ready when they yield easily to a fork.
-
Serve: Remove the baking dish from the oven and let it cool for a few minutes. For the final touch, scoop a generous serving of vanilla ice cream on top of each warm nectarine half. The ice cream will melt into the warm fruit—pure bliss!
Serving Suggestions
To make this dish visually stunning, serve the baked nectarines on individual dessert plates. Don’t forget to drizzle some of the delicious syrup from the baking dish over the top and finish with a fresh mint leaf for a pop of color. It’s an elegant touch that elevates even the simplest dessert!
Recipe Variations
- Nutty Crumble: Add a sprinkle of granola or chopped nuts like almonds or pecans over the nectarines before baking for added crunch.
- Alcoholic Twist: Drizzle some bourbon over the nectarines before baking for an adult version that adds sophistication.
- Different Fruits: Feel free to mix it up! Try using plums, peaches, or even apples or pears for a delightful twist on this recipe.
- Herbal Infusion: Infuse your honey with fresh lavender or rosemary to add a unique herbal note!
- Vegan Delight: Swap the vanilla ice cream with a coconut or almond-based ice cream for a completely dairy-free treat.
Chef’s Notes
This isn’t just any ordinary dessert—it’s a canvas for creativity! Each time I make this recipe, I find myself experimenting with new combinations of spices and toppings. I’ve even served it with a splash of dessert wine for a fun weekend gathering. Plus, it’s super adaptable to whatever fruit is in season! So don’t hesitate to play and make this dessert your own.
FAQs and Troubleshooting
1. How ripe should my nectarines be?
You want them slightly firm but not hard—like with peaches, go for a little give when you gently squeeze them. Avoid completely squishy ones, as they’ll turn to mush in the oven.
2. Can I make this dish in advance?
While baked nectarines are best served fresh, you can prepare them up to the baking step and store them in the fridge. When you’re ready, just pop them in the oven!
3. My nectarines turned out mushy. What did I do wrong?
Overbaking can cause your nectarines to become mushy. Keep a close eye on them during the cooking process; once fork-tender and bubbly, it’s time to take them out!
4. Can I use frozen nectarines?
While fresh is ideal, you can indeed use frozen ones! Just be sure to thaw them and drain off excess liquid before proceeding with the recipe to avoid a soggy result.
Nutritional Info
This dessert is all about balance. Each serving offers a delightful combination of fresh fruit, natural sugars, and creamy goodness. While I won’t dive into specific nutritional values today, it’s safe to say that this sweet treat is a lovely way to indulge while enjoying the health benefits of fruit!
Conclusion
As summer reaches its peak, delight in the pleasures of simple, beautiful desserts that bring joy to your table. Baked Nectarines with Vanilla Ice Cream showcase the best of summer flavors while being easy enough for any culinary enthusiast! Remember, this recipe is all about the experience—so gather your loved ones, tie on your apron, and let the good times roll!
I can’t wait to hear your stories as you bring this recipe to life. Remember, cooking is about connection, sharing, and those beautiful moments that make life richer. Happy cooking!
PrintBaked Nectarines with Vanilla Ice Cream
A delicious dessert featuring juicy nectarines baked to perfection and served warm with creamy vanilla ice cream.
- Prep Time: 15 minutes
- Cook Time: 25 minutes
- Total Time: 40 minutes
- Yield: 4 servings 1x
- Category: Dessert
- Method: Baking
- Cuisine: American
- Diet: Vegetarian
Ingredients
- 4 ripe nectarines
- 1 tsp ground cinnamon
- 2 tbsp honey
- Vanilla ice cream for serving
Instructions
- Preheat your oven to 375°F (190°C).
- Prepare the nectarines by washing them and cutting them in half; remove the pit.
- Sprinkle ground cinnamon over the nectarines.
- Drizzle honey all over the nectarines.
- Bake for 20 to 25 minutes until soft and bubbly.
- Serve with a generous scoop of vanilla ice cream on top.
Notes
For a vegan option, substitute honey with maple syrup or agave nectar, and use dairy-free ice cream.
Nutrition
- Serving Size: 1 serving
- Calories: 280
- Sugar: 22g
- Sodium: 25mg
- Fat: 8g
- Saturated Fat: 4g
- Unsaturated Fat: 3g
- Trans Fat: 0g
- Carbohydrates: 49g
- Fiber: 3g
- Protein: 3g
- Cholesterol: 30mg
Keywords: baked nectarines, dessert, summer recipe, vanilla ice cream, easy dessert
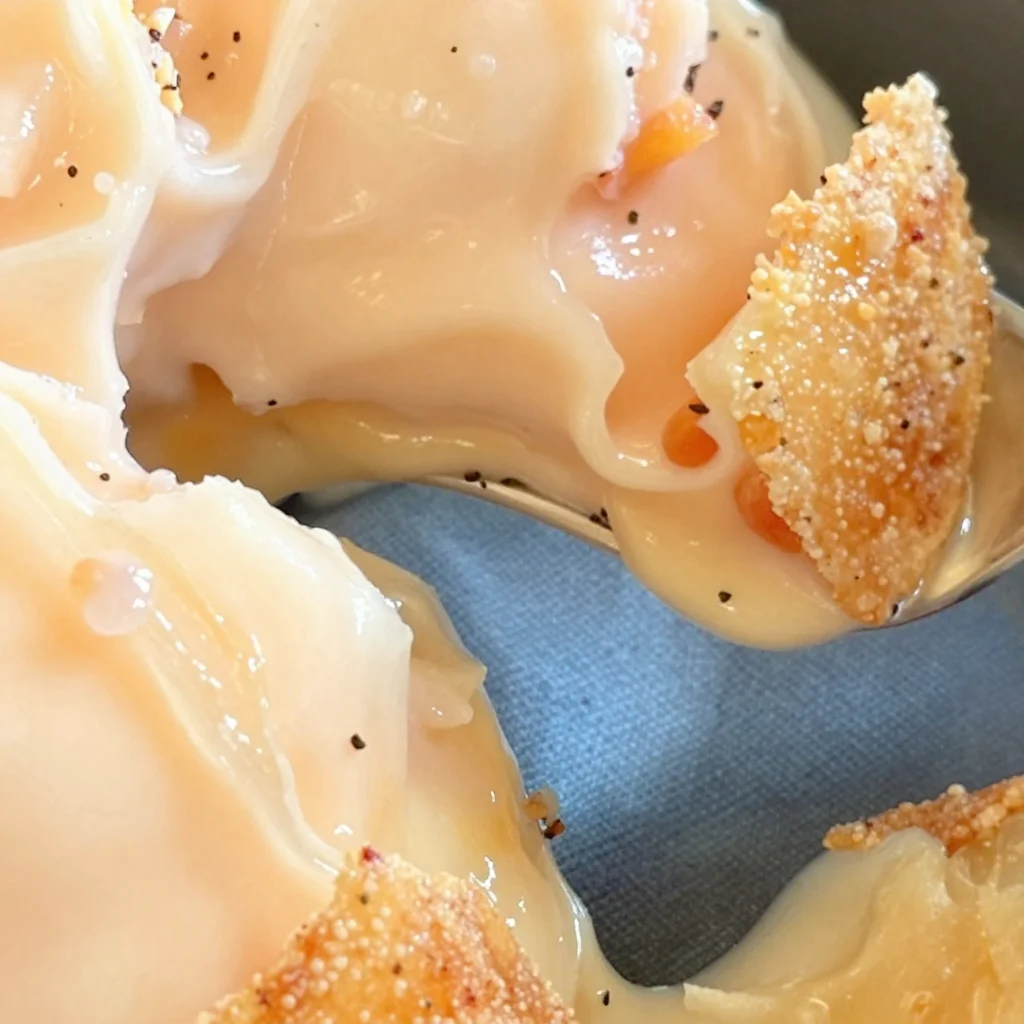
Summer Nectarine Frozen Yogurt: 5-Minute No-Churn Recipe
Whip Up a Delightful Nectarine Frozen Yogurt: A Sweet Summer Treat
Hello, friend! If you’re craving something cool, creamy, and absolutely delightful, then you’ve stumbled upon the right recipe! Today, we’re diving into the luscious world of Nectarine Frozen Yogurt, a treat that’s as refreshing as a summer breeze and just as bright in flavor. This isn’t just your everyday frozen dessert; it’s a vibrant showcase of fresh nectarines, tangy Greek yogurt, and a touch of sweetness—perfect to beat that summer heat!
Picture this: you’re lounging on your porch, basking in the golden sunshine, and you realize you need a sweet treat to cool you down. That’s where this easy, elegant recipe comes in. With only a handful of ingredients and a little bit of your precious time, you’ll create a frozen yogurt that’s bursting with juicy nectarines and creamy goodness. Trust me; it’s going to be a new favorite in your kitchen!
Time to Get Nostalgic
Let me take you back to a sun-soaked summer day in my childhood. My family had a lovely little orchard we frequented every July, where juicy nectarines hung from the branches like little golden gems waiting to be plucked. The excitement of wandering through those rows, sunlight filtering through the leaves, and tasting the sweet nectarines straight off the tree was indescribable.
One summer afternoon, my mom decided she wanted to try her hand at making a fruity frozen treat. We sliced those nectarines, mixed them with some yogurt, and poured everything into our old-fashioned ice cream maker. Oh, the pure joy of churning it by hand while eagerly anticipating that frozen delight! When we finally indulged, the creamy, fruity goodness melting on our tongues was sheer bliss. That simple, playful memory is the inspiration behind today’s Nectarine Frozen Yogurt.
Ingredients You’ll Need
Here’s what you’ll need for this refreshing treat:
-
Fresh Nectarines:
- The star of the show! Aim for ripe, sweet nectarines—perfectly aromatic and juicy. You can substitute them with peaches or plums if you’d like a little twist.
-
Greek Yogurt:
- For that creamy base! Choose plain, full-fat Greek yogurt for the best flavor and texture. If you prefer a dairy-free option, coconut yogurt works just as well.
-
Honey or Sugar (optional):
- This is to enhance the sweetness. Adjust based on the sweetness of your nectarines. Maple syrup is a great alternative if you want a different flavor profile.
-
Lemon Juice:
- A splash of acidity to balance the sweetness. Freshly squeezed is best. Feel free to use lime juice for a zesty kick!
Step-by-Step Instructions
So, how do we turn these simple ingredients into a creamy, dreamy frozen yogurt? Let’s break it down step by step:
-
Wash and Cut the Nectarines:
- Begin by giving your nectarines a good rinse under cool water. Slice them in half, removing the pit, and then chop them into chunks. The smaller the pieces, the easier they’ll blend up!
-
Blend the Nectarines:
- Toss those chunks into a blender or food processor. Add the lemon juice and, if you’re using it, honey or sugar. Blend until smooth! Don’t be afraid to scrape down the sides to ensure everything is well mixed.
Chef Tip: If your nectarines are a bit firm and not as juicy, try adding a splash of water to help with blending.
-
Incorporate the Greek Yogurt:
- Once your nectarines are pureed to perfection, add the Greek yogurt. Pulse a few times until everything is nicely combined. You want it to be light and fluffy, not over-blended.
-
Taste and Adjust:
- Here’s a chance to be the chef! Taste your mixture and see if it needs a pinch more sweetness. This varies based on how ripe your nectarines are.
-
Chill the Mixture:
- Transfer your mixture into an airtight container, and pop it in the freezer for about an hour. This helps it firm up a bit and makes it easier to churn later.
-
Churn the Frozen Yogurt:
- If you have an ice cream maker, this is where the magic happens! Churn the mixture according to the manufacturer’s instructions until it’s nice and fluffy. If you don’t have an ice cream maker, no worries! Just take the container out of the freezer every 30 minutes and stir vigorously with a fork until it’s smooth and creamy.
Chef Hack: If you skip the ice cream maker, aim to do this for about 2-3 hours to ensure the frozen yogurt stays creamy and doesn’t become a solid block.
-
Freeze until Firm:
- Once you’ve achieved that lovely, soft-serve-like consistency, transfer the yogurt back into your container. Freeze it for another 3-4 hours until it’s fully set.
Serving Suggestions
When you’re ready to serve your fresh Nectarine Frozen Yogurt, scoop it into chilled bowls. For a delightful presentation, you could drizzle a bit of honey on top, sprinkle some chopped nuts, or toss on fresh mint leaves. Pair it with a slice of almond torte or a shortbread cookie for a gourmet dessert experience.
Recipe Variations
Want to jazz things up? Here are some ideas!
- Berry Bliss: Mix in fresh blueberries or strawberries for a vibrant color and flavor change.
- Minty Fresh: Add a handful of fresh mint leaves while blending for an aromatic twist.
- Creamsicle Dream: Combine with a splash of orange juice for a refreshing citrus note.
- Nutty Crunch: Stir in some crushed nuts or granola just before serving for added texture.
Chef’s Notes
This recipe has become a staple in my kitchen, and it’s so versatile! I’ve played with various flavors—adding in spices like cinnamon or even a bit of vanilla always brings a new dimension. I once tried making it at a friend’s gathering, and it turned into a fun taste test with everyone contributing their favorite toppings.
One little story that cracks me up: the first time I made this without proper measuring, I tossed in extra nectarines that actually turned into a delightful nectar intake! Though it didn’t match my original plan, it taught me the beauty of experimenting in the kitchen—sometimes, you discover a gem you never thought you’d create.
FAQs and Troubleshooting
Can I use frozen nectarines instead of fresh?
Absolutely! Just remember to let them thaw a bit before blending for the best results.
My frozen yogurt is too hard; how can I fix it?
If your yogurt is too hard after freezing, let it sit at room temperature for about 10 minutes before scooping, or give it a good stir to break up any icy texture!
Can I make this dairy-free?
Yes! Substitute Greek yogurt with coconut yogurt or another plant-based yogurt. Adjust the sweetness as some plant-based yogurts can vary in taste.
How long does it keep in the freezer?
For optimal freshness, consume your Nectarine Frozen Yogurt within a week or two, but it can last longer in the freezer (though it may lose some creaminess).
Nutritional Info
If you’re counting calories or looking to maintain a healthy balance, this delightful frozen yogurt boasts a load of nutrients! Greek yogurt provides protein and probiotics, while nectarines are rich in vitamins A and C. You can tweak the sweetness depending on your diet—using less or no sweetener will keep it light and refreshing.
So there you have it! A beautiful, creamy bowl of Nectarine Frozen Yogurt, perfect for cooling down on a warm day or impressing friends at your next gathering. It’s simple, stunning, and packed with nostalgia. I can’t wait for you to give it a try. Tie on your apron, blend those flavors, and let’s create some delicious memories together! Enjoy every bite!
PrintNectarine Frozen Yogurt

Refreshing Nectarine Frozen Yogurt made with ripe nectarines and creamy Greek yogurt—a perfect summer treat!
- Prep Time: 15 minutes
- Cook Time: 120 minutes
- Total Time: 135 minutes
- Yield: 4 servings 1x
- Category: Dessert
- Method: Freezing
- Cuisine: American
- Diet: Vegetarian
Ingredients
- 4 ripe Fresh Nectarines
- 2 cups Greek Yogurt (plain, full-fat)
- 2 tablespoons Honey or Sugar (optional)
- 2 tablespoons Lemon Juice (freshly squeezed)
Instructions
- Wash and cut the nectarines into chunks.
- Blend the nectarines with lemon juice and honey or sugar until smooth.
- Incorporate Greek yogurt into the mixture and pulse until combined.
- Taste the mixture and adjust the sweetness if necessary.
- Chill the mixture in an airtight container for about 1 hour.
- Churn the mixture in an ice cream maker according to instructions or stir every 30 minutes if using a container.
- Freeze for another 3-4 hours until firm.
Notes
Drizzle with honey and top with nuts or mint leaves before serving. Various flavor additions like berries or spices can enhance it further.
Nutrition
- Serving Size: 1 serving
- Calories: 220
- Sugar: 12g
- Sodium: 40mg
- Fat: 8g
- Saturated Fat: 4g
- Unsaturated Fat: 4g
- Trans Fat: 0g
- Carbohydrates: 30g
- Fiber: 2g
- Protein: 8g
- Cholesterol: 20mg
Keywords: nectarine, frozen yogurt, summer dessert, healthy dessert, easy recipes