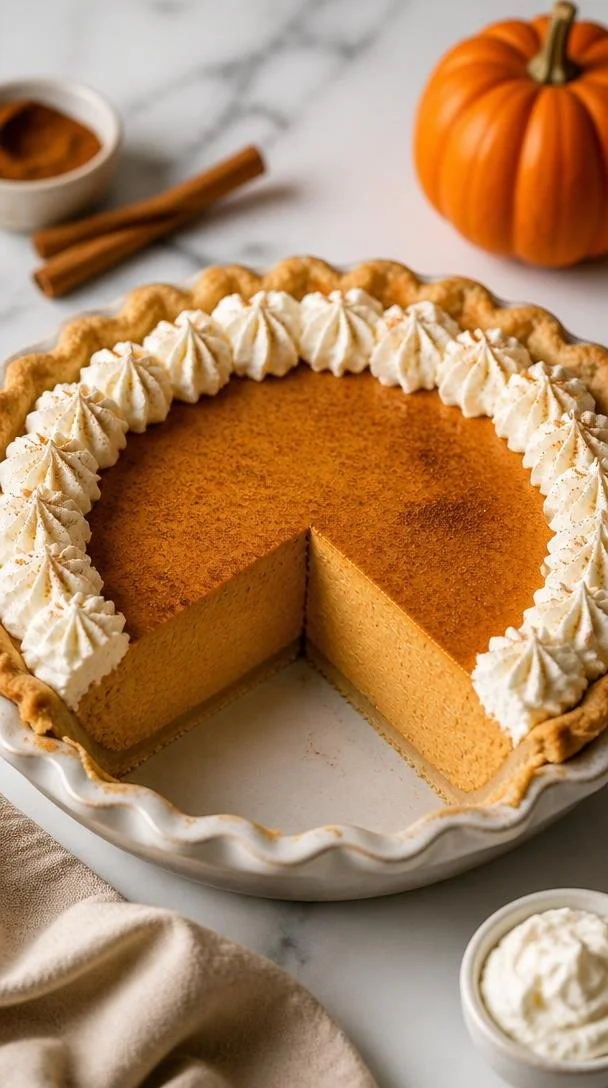
Beginner-Friendly Pumpkin Chiffon Pie: Fluffy & Creamy
The Irresistible Charm of Pumpkin Chiffon Pie
Hello pumpkin lovers! Today, we’re diving into a dessert that beautifully captures the essence of fall—Pumpkin Chiffon Pie. If you’re looking to impress guests or simply want a slice of nostalgia, this light and airy dessert is a must-try!
A Slice of Nostalgia
Growing up, Thanksgiving was the backdrop for a treasure trove of flavors. Mounds of mashed potatoes, succulent turkey, and the pièce de résistance—pumpkin pie. But I’ll never forget the first time I tasted a pumpkin chiffon pie. It was at my Aunt Muriel’s, where the air was filled with laughter and the scent of spices mingling with freshly baked goods.
I can still picture her kitchen, fragrant with the aroma of cinnamon and nutmeg, as I walked through the door, eye level with a table full of pies. She pointed me to a slice of pumpkin chiffon pie and urged me to dig in. The moment my fork glided through the fluffy filling and crisp crust, I was hooked! Light as a feather yet packed with rich flavors, that pie was an unforgettable revelation—one that has become a holiday tradition in my own home. Now, I’d love to share this delightful recipe with you!
Ingredients
Here’s what you’ll need to make a heavenly Pumpkin Chiffon Pie that not only tastes divine but also looks the part:
-
1 ½ cups pumpkin puree
Opt for the good stuff—canned pumpkin puree works well and saves time! If you’re feeling adventurous, you can roast your own pumpkin. Just peel, deseed, roast, and blend until smooth. -
1 cup heavy cream
This adds that luscious creaminess. If you’re looking for a lighter version, you can use whipped coconut cream or Greek yogurt. -
½ cup sugar
Regular granulated sugar is perfect, but feel free to use brown sugar for a deeper flavor. Honey or maple syrup can also be delicious alternatives—just adjust for sweetness. -
2 tsp gelatin
This helps give the pie its light, airy texture. If you need a vegetarian option, try using agar-agar instead, but follow the packaging instructions for the correct amount. -
1 tsp ground cinnamon
The spice of the season! Use fresh cinnamon for the best flavor. -
½ tsp ground ginger
A little zing goes a long way! Ground ginger lends a warm, spicy touch. Fresh ginger can be used as well; just grate a teaspoon. -
¼ tsp ground nutmeg
Nutmeg adds a lovely fragrance. Be sure to use freshly grated nutmeg if possible—it’s a game changer! -
¼ tsp salt
A pinch of salt enhances the flavors beautifully. -
1 tsp vanilla extract
Vanilla awakens the other flavors and provides a warm undertone. -
1 pre-baked pie crust
You can use store-bought or make your own. A graham cracker crust works wonderfully for this recipe, adding extra flavor and texture.
Step-by-Step Instructions
Are you ready to make pie magic? Let’s get started!
-
Prepare the Gelatin:
In a small bowl, sprinkle the gelatin over 2 tablespoons of cold water. It should bloom and absorb the water. Let it sit for about 5 minutes until it thickens. This step is essential for that fluffy texture! -
Heat the Pumpkin Mixture:
In a saucepan, combine the pumpkin puree, sugar, cinnamon, ginger, nutmeg, and salt. Add ½ cup of water and whisk everything together over medium heat. Cook for about 5 minutes, allowing the mixture to bubble lightly. This melds the flavors beautifully! -
Add the Gelatin:
Once heated, remove the pumpkin mixture from the heat. Add the bloomed gelatin and stir until fully dissolved. This gives your pie that incredible, fluffy texture. -
Cool the Mixture:
Allow the pumpkin mixture to cool for about 10-15 minutes. We don’t want to scramble the eggs in the next step, so make sure it’s just warm, not hot! -
Whip the Cream:
In a mixing bowl, whip the heavy cream to stiff peaks while keeping your eye on it! We want it fluffy, not whipped butter. Reserve about a quarter of the whipped cream for topping later. -
Fold in the Cream:
Once the pumpkin mixture is cooled, gently fold in the whipped cream until there’s no streakiness. This is where the magic happens—the mixture should be airy and light! -
Transfer to the Crust:
Spoon the airy mixture into your pre-baked pie crust, spreading it evenly. You can use a spatula to make it look pretty on top. -
Chill:
Cover the pie with plastic wrap and refrigerate for at least 4 hours, preferably overnight. This allows the flavors to deepen, and sets the filling to perfection! -
Serve and Enjoy:
When you’re ready to serve, pull out the reserved whipped cream, dollop it on each slice, and perhaps sprinkle a little extra cinnamon or nutmeg on top for that Instagram-worthy look!
Serving Suggestions
When serving Pumpkin Chiffon Pie, a dollop of fresh whipped cream is non-negotiable. Consider adding a sprinkle of crushed gingersnaps or pecans on top for some crunch and to add a little flair to your presentation. You can slice the pie into wedges and lightly drizzle with caramel sauce for an exquisite touch. Remember, we want it to look enticing yet effortless!
Recipe Variations
-
Chocolate Pumpkin Chiffon:
Add 2-3 tablespoons of unsweetened cocoa powder to the pumpkin mixture for a decadent chocolate twist. -
Maple Pumpkin Chiffon:
Substitute half of the sugar with pure maple syrup for a delightful maple flavor. -
Nutty Crust:
Use crushed pecans or walnuts combined with graham crackers for the crust to add extra flavor and texture. -
Spiced Rum:
Add 1 tablespoon of spiced rum to the filling for an adult twist! -
Dairy-Free Version:
Use coconut cream instead of heavy cream and a dairy-free alternative for the pie crust.
Chef’s Notes
This recipe has been in my collection for years, and it holds a special place in my heart. I love how it’s easy enough for weeknight adventures and elegant enough for special gatherings. I still chuckle at the time I mistook “tablespoons” for “teaspoons” and ended up with an extra-sweet pie! Lesson learned: always read the recipe twice!
Making this pie is a delightful process, so don’t shy away from letting your personality shine through your cooking. Remember, it’s about creating beautiful moments around your table—and nothing brings people together like pie!
FAQs and Troubleshooting
1. Can I make this pie ahead of time?
Absolutely! This pie tastes best after chilling for several hours or overnight, making it perfect for parties or holidays.
2. What should I do if my pie filling is too runny?
If your filling doesn’t set, it may be due to not heating the gelatin enough. Make sure to dissolve it completely in the warm pumpkin mixture. If you’re in a hurry, you can add a bit more gelatin.
3. I don’t have pumpkin puree. Can I use fresh pumpkin?
Yes, you can! Just roast and puree your pumpkin until smooth. Ensure to drain excess moisture to avoid a soggy pie.
4. Can I use a different type of crust?
Definitely! Feel free to swap the traditional crust for a graham cracker or even an almond flour crust—your choice will bring different flavors and textures to the table!
Nutritional Info
While I believe in enjoying every bite guilt-free, if you’re curious, a slice of this delectable Pumpkin Chiffon Pie typically contains around 250-300 calories, depending on the crust and whipped cream you use.
Now that you’ve got the inside scoop on this fantastic dessert, it’s time to tie on that apron, take a deep breath, and create some pumpkin-flavored magic in your kitchen. Celebrate the joy of cooking! I can’t wait to hear how your Pumpkin Chiffon Pie turns out! Happy baking!
PrintPumpkin Chiffon Pie
A light and airy pumpkin chiffon pie that’s perfect for fall gatherings, filled with rich flavors and nostalgic memories.
- Prep Time: 20 minutes
- Cook Time: 5 minutes
- Total Time: 245 minutes
- Yield: 8 servings 1x
- Category: Dessert
- Method: Chilling
- Cuisine: American
- Diet: Vegetarian
Ingredients
- 1 ½ cups pumpkin puree
- 1 cup heavy cream
- ½ cup sugar
- 2 tsp gelatin
- 1 tsp ground cinnamon
- ½ tsp ground ginger
- ¼ tsp ground nutmeg
- ¼ tsp salt
- 1 tsp vanilla extract
- 1 pre-baked pie crust
Instructions
- Prepare the gelatin: In a small bowl, sprinkle the gelatin over 2 tablespoons of cold water. Let it sit for about 5 minutes until it thickens.
- Heat the pumpkin mixture: In a saucepan, combine the pumpkin puree, sugar, cinnamon, ginger, nutmeg, and salt with ½ cup of water. Cook for about 5 minutes over medium heat.
- Add the gelatin: Remove the pumpkin mixture from heat. Add the bloomed gelatin and stir until fully dissolved.
- Cool the mixture: Allow the pumpkin mixture to cool for about 10-15 minutes.
- Whip the cream: In a mixing bowl, whip the heavy cream to stiff peaks, reserving a quarter for topping.
- Fold in the cream: Gently fold in the whipped cream into the cooled pumpkin mixture.
- Transfer to the crust: Spoon the airy mixture into the pre-baked pie crust.
- Chill: Cover and refrigerate for at least 4 hours, preferably overnight.
- Serve and enjoy: Top each slice with reserved whipped cream and a sprinkle of cinnamon or nutmeg.
Notes
Serve with a dollop of whipped cream and consider adding crushed gingersnaps or pecans for garnish.
Nutrition
- Serving Size: 1 slice
- Calories: 275
- Sugar: 25g
- Sodium: 150mg
- Fat: 18g
- Saturated Fat: 10g
- Unsaturated Fat: 8g
- Trans Fat: 0g
- Carbohydrates: 30g
- Fiber: 2g
- Protein: 3g
- Cholesterol: 70mg
Keywords: pumpkin pie, dessert, fall recipes, chiffon pie, holiday baking

Easy Classic Strawberry Rhubarb Pie
The Essence of Flavor: Easy Classic Strawberry Rhubarb Pie
Hello there, fellow food lovers! Today, I’m excited to whisk you away on a delicious journey into the world of baking with my beloved Easy Classic Strawberry Rhubarb Pie. This pie isn’t just a dessert; it’s a nostalgic trip down memory lane, bursting with flavors that scream summer and warmth.
Imagine this: a golden-brown flaky crust cradling a vibrant, bubbling filling of sweet strawberries and tart rhubarb. Every slice is a celebration of contrasts — the sweetness of the strawberries mingling beautifully with the slight tang of the rhubarb, all enhanced by a hint of citrus. And the flaky crust? It’s just the cherry on top! This recipe is a staple in my kitchen and a crowd-pleaser at any gathering. Not only is it incredibly elegant for entertaining, but it also holds a special place in my heart, reminding me of sunny afternoons spent with loved ones.
Now, whether you’re a seasoned baker or just starting to explore the world of pie-making, fear not! I’ll guide you through every step, sharing tips and stories along the way. You won’t need a culinary degree to impress your friends or family with this stunning dessert. So, tie on your apron, grab your mixing bowl, and let’s make some magic happen in the kitchen!
Personal Story
Growing up, my family had a tradition of gathering in the kitchen every summer. I can still picture my grandmother, apron tied snugly around her waist, presiding over a countertop laden with fresh produce. Rhubarb was her star ingredient, and every year she’d whip up a batch of strawberry rhubarb pie that seemed to disappear faster than it was made. I remember the way the warm aroma would waft through the house, drawing everyone in like moths to a flame. She taught me that baking was more than just a process; it was about love, family, and shared memories.
One summer afternoon, determined to prove I was ready to tackle the pie on my own, I gathered the ingredients, following her handwritten recipe with much excitement. The pie made it into the oven, and all that was left was the waiting — the hardest part! When I finally pulled it out, golden and bubbly, I felt like a kitchen magician. That first slice took me right back to those sunlit afternoons, and the joy on my family’s faces was all the affirmation I needed. From that moment on, each pie I made carried a piece of that memory, inviting everyone to linger a little longer around the table.
Ingredients
Here’s what you’ll need to make this scrumptious Easy Classic Strawberry Rhubarb Pie:
For the Pie Crust:
-
1 cup (2 sticks) unsalted butter, cold and diced
Tip: Unsalted butter allows you to control the salt content in your pie. For a richer flavor, you can use European-style butter. -
2½ cups all-purpose flour
Substitution: For a nutty flavor, try using half whole wheat flour. -
1 Tablespoon sugar
Chef Insight: A hint of sugar in the crust enhances its flavor, making it perfect for sweet fillings. -
1 teaspoon salt
Tip: This balances the sweetness of the filling, ensuring every bite is seasoned well. -
½ cup ice water or buttermilk (plus more if needed)
Chef Insight: Ice water keeps the butter cold, which helps form a flaky crust. Buttermilk adds a tangy flavor if you want something unique!
For the Filling:
-
3 cups sliced rhubarb (½ inch slices)
Tip: Fresh rhubarb is ideal, but you can use frozen as well—just thaw and drain excess moisture. -
2½ cups chopped strawberries
Substitution: Swap with raspberries for a deeper flavor or blueberries for something a bit sweeter. -
⅓ cup granulated sugar
Chef Insight: Adjust the sugar to taste based on the sweetness of your fruits. -
⅓ cup brown sugar
Tip: Brown sugar adds a depth of flavor that granulated sugar lacks. -
¼ cup cornstarch
Substitution: You can use flour as a thickener, but cornstarch gives a clearer filling. -
¼ teaspoon salt
Tip: This enhances the natural flavors of the fruits. -
Zest of 1 orange
Chef Insight: A zest of citrus brightens up the filling and balances the tartness of the rhubarb. -
1 Tablespoon orange juice or orange liqueur
Tip: Use liqueur for an adult twist—Grand Marnier is a great option! -
1 teaspoon sugar (for assembling pie)
Tip: Sprinkle this over the crust for a nice caramelized finish. -
1 teaspoon flour (for assembling pie)
Chef Insight: This absorbs excess moisture and helps the filling set nicely. -
2 Tablespoons unsalted chilled butter, cubed (for assembling pie)
Tip: This little touch ensures a rich filling. -
1 large egg, whisked (for egg wash)
Tip: An egg wash gives the crust a beautiful golden color. -
1 Tablespoon milk or cream (for egg wash)
Substitution: You can also use a plant-based milk if you prefer. -
Coarse sugar (for sprinkling)
Tip: A sprinkle of coarse sugar adds a delightful crunch and sparkle!
Step-by-Step Instructions
-
Make the Pie Crust:
Start by grabbing a large mixing bowl. Combine the flour, sugar, and salt. Add the cold, diced butter, using your fingers or a pastry cutter to incorporate it until the mixture resembles coarse crumbs. Remember: the colder the butter, the flakier your crust. -
Add the Ice Water:
Gradually add the ice water (or buttermilk), stirring gently until the dough begins to hold together. Be careful not to overwork it; we want to keep those delicious butter chunks intact. If it needs more moisture, add a little more water, one tablespoon at a time. -
Chill the Dough:
Divide the dough into two parts, shape them into disks, wrap in plastic, and chill in the refrigerator for at least 1 hour. Chilling helps stabilize the dough and makes it easier to roll out. -
Prepare the Filling:
In a large bowl, combine the sliced rhubarb, chopped strawberries, granulated sugar, brown sugar, cornstarch, salt, orange zest, and orange juice (or liqueur). Gently toss everything together until the fruit is well coated. Allow it to sit for about 15 minutes while the juices develop. -
Preheat the Oven:
Preheat your oven to 425°F (220°C). A hot oven is crucial for a beautifully baked crust. -
Roll out the Dough:
On a lightly floured surface, roll out one disk of dough into a circle roughly 12 inches in diameter. Transfer it to a 9-inch pie dish. Don’t be shy; use your fingers to press it into the dish and crimp the edges stylishly. -
Assemble the Pie:
Pour the fruit filling into the prepared pie crust, ensuring it’s evenly distributed. Sprinkle the additional teaspoon of flour over the filling, followed by the cubed butter. -
Roll the Top Crust:
Roll out the second disk of dough and place it over the filling. You can slice some ventilation slits or create a lattice top for that classic pie look. If you’re going for the classic full crust, make sure to cut slits for steam to escape! -
Brush and Sprinkle:
Brush the top crust with the whisked egg and milk mixture. Sprinkle with coarse sugar for that lovely sparkle. -
Bake:
Bake the pie for 15 minutes at 425°F (220°C), then reduce the oven temperature to 350°F (175°C) and bake for an additional 35-45 minutes, or until the filling is bubbly and the crust is golden brown. Tip: If the edges brown too quickly, shield them with aluminum foil. -
Cool and Serve:
Once out of the oven, let your pie cool completely for at least 2 hours. The filling will set properly as it cools.
Serving Suggestions
Slice up that heavenly pie and serve it warm or at room temperature, perhaps with a scoop of vanilla ice cream or a dollop of freshly whipped cream. For an extra touch, garnish each slice with fresh mint leaves or sprinkle a little more orange zest on top. Remember, presentation matters, but it doesn’t have to be perfect — a rustic charm can be just as inviting!
Recipe Variations
-
Add a Crunch: Throw in some chopped nuts like pecans or walnuts to the filling for added texture.
-
Berry Mix-Up: Use a combination of different berries like blueberries or blackberries if strawberries aren’t available.
-
Spice It Up: Add a pinch of cinnamon or nutmeg to the filling for a hint of warmth; it complements the fruit beautifully.
-
Zesty Lemon Twist: Substitute lemon juice for orange juice to give a bright flavor contrast to the pie.
-
Gluten-Free Crust: For a gluten-free option, replace all-purpose flour with a gluten-free blend specifically designed for baking.
Chef’s Notes
This pie has seen many iterations in my kitchen, adapting to what’s in season or what I have on hand. I fondly recall one Thanksgiving when I decided to add a touch of maple syrup to the filling for a fall twist—let me tell you, it was a hit! Each time I make this easy classic strawberry rhubarb pie, I’m reminded not only of my grandmother but of the joy of experimenting in the kitchen. Embrace your own twists; there’s no wrong way to share the love when it comes to baking!
FAQs and Troubleshooting
Q: Why is my pie crust tough?
A: This usually happens when the dough is overworked or too much water is added. Aim for a light hand and keep that butter cold!
Q: My filling is runny. What went wrong?
A: Ensure you’re using enough cornstarch or flour to thicken your filling, especially if the fruit is exceptionally juicy. Letting the pie cool for a couple of hours helps it set as well!
Q: Can I freeze the pie?
A: Absolutely! You can freeze unbaked pies or baked ones. Just ensure it’s well-wrapped. Thaw in the fridge before baking or serving.
Q: What if I don’t have rhubarb?
A: No worries! You can replace it with more strawberries or use other tart fruits like cherries or tart apples.
Nutritional Info
(Note: Nutritional info is approximate and varies based on the specific ingredients and brands you use.)
- Calories per slice (1/8 of the pie): 290
- Total Fat: 15g
- Saturated Fat: 9g
- Cholesterol: 50mg
- Sodium: 150mg
- Total Carbohydrates: 37g
- Dietary Fiber: 2g
- Sugars: 15g
- Protein: 3g
So there you have it! Your guide to creating an Easy Classic Strawberry Rhubarb Pie that’ll have everyone singing your praises. Make sure to invite friends over because this pie is best when shared. Happy baking, and as always, let’s make beautiful memories around the table!
PrintEasy Classic Strawberry Rhubarb Pie

A nostalgic pie featuring a flaky crust filled with sweet strawberries and tart rhubarb.
- Prep Time: 20 minutes
- Cook Time: 50 minutes
- Total Time: 70 minutes
- Yield: 8 servings 1x
- Category: Dessert
- Method: Baking
- Cuisine: American
- Diet: Vegetarian
Ingredients
- 1 cup (2 sticks) unsalted butter, cold and diced
- 2½ cups all-purpose flour
- 1 tablespoon sugar
- 1 teaspoon salt
- ½ cup ice water or buttermilk (plus more if needed)
- 3 cups sliced rhubarb (½ inch slices)
- 2½ cups chopped strawberries
- ⅓ cup granulated sugar
- ⅓ cup brown sugar
- ¼ cup cornstarch
- ¼ teaspoon salt
- Zest of 1 orange
- 1 tablespoon orange juice or orange liqueur
- 1 teaspoon sugar (for assembling pie)
- 1 teaspoon flour (for assembling pie)
- 2 tablespoons unsalted chilled butter, cubed (for assembling pie)
- 1 large egg, whisked (for egg wash)
- 1 tablespoon milk or cream (for egg wash)
- Coarse sugar (for sprinkling)
Instructions
- Make the Pie Crust: Combine flour, sugar, and salt, then add cold butter and mix until coarse.
- Add the Ice Water: Gradually mix in ice water until dough holds together.
- Chill the Dough: Divide, wrap in plastic, and chill for at least 1 hour.
- Prepare the Filling: Toss together rhubarb, strawberries, sugars, cornstarch, salt, orange zest, and orange juice.
- Preheat the Oven: Heat to 425°F (220°C).
- Roll out the Dough: Roll one disk into a 12-inch circle and place in a pie dish.
- Assemble the Pie: Fill with fruit mixture, sprinkle with flour and butter.
- Roll the Top Crust: Cover with second disk, slice ventilation slits.
- Brush and Sprinkle: Add egg wash and sprinkle coarse sugar on top.
- Bake: Bake for 15 minutes at 425°F, then reduce to 350°F and bake for 35-45 minutes.
- Cool and Serve: Let cool for at least 2 hours before serving.
Notes
Serve with vanilla ice cream or whipped cream for a delightful dessert.
Nutrition
- Serving Size: 1 slice
- Calories: 290
- Sugar: 15g
- Sodium: 150mg
- Fat: 15g
- Saturated Fat: 9g
- Unsaturated Fat: 6g
- Trans Fat: 0g
- Carbohydrates: 37g
- Fiber: 2g
- Protein: 3g
- Cholesterol: 50mg
Keywords: pie, strawberry, rhubarb, dessert, summer