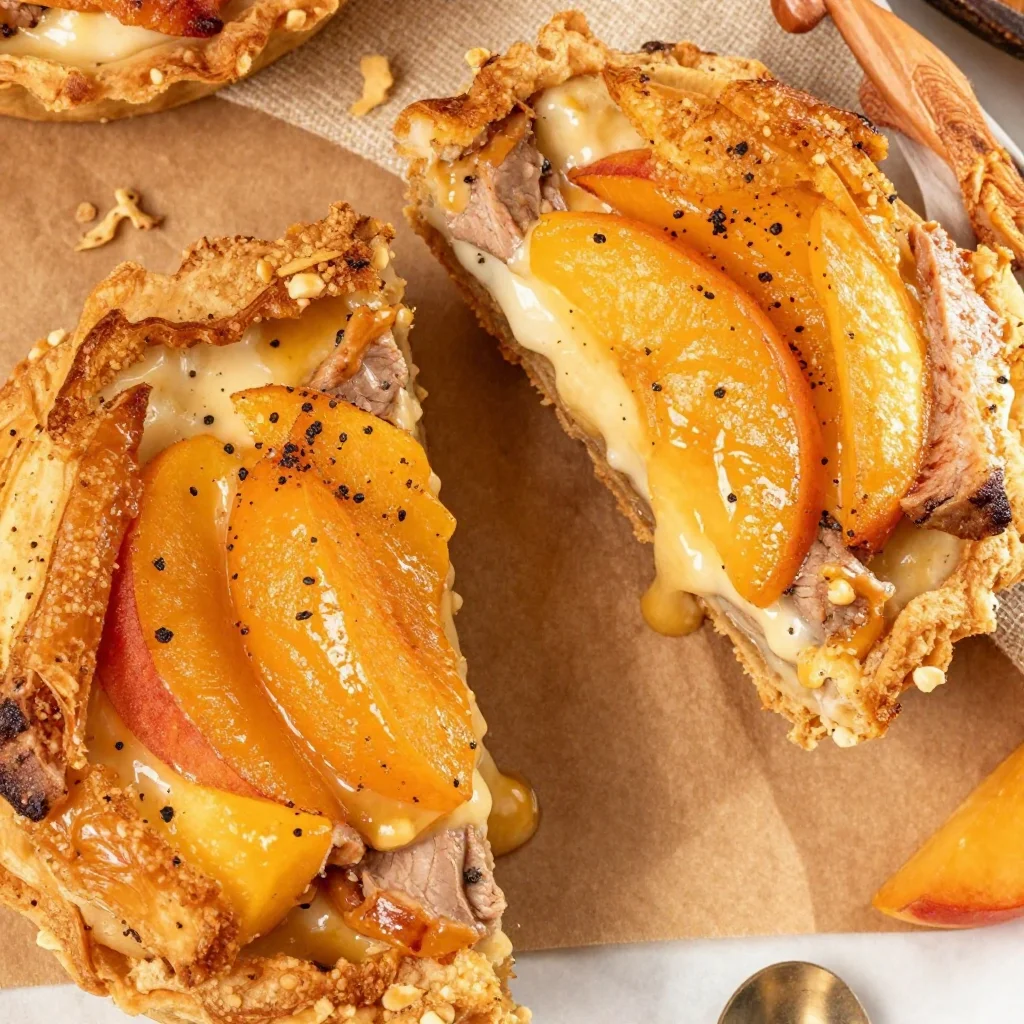
Ingredient Mini Peach Cream Cheese Tarts in 20 Minutes
Mini Peach and Cream Cheese Tarts: A Slice of Summer Bliss
Hello, my dear friends! Today, I’m thrilled to share a delightful treat that embodies summer sweetness and a touch of elegance: Mini Peach and Cream Cheese Tarts. These tarts are the perfect marriage of rich cream cheese and juicy, ripe peaches, all wrapped up in flaky puff pastry. Imagine your kitchen filled with the aroma of baked pastry and cinnamon while you indulge in these bite-sized delights.
Cooking is all about creating memories, and I’m excited to take you on this journey. So, tie on your apron, grab your favorite drink, and let’s dive into this scrumptious recipe that’ll have your taste buds singing!
A Slice of My Childhood
Growing up, summer meant peach season. Our local farm would host a peach-picking day, and I can still recall the thrill of plucking those fuzzy gems right from the tree. As we loaded up our baskets, my mother would talk about her favorite peach desserts, each story woven with laughter and love. One afternoon, after a long day of picking, she surprised us all with a batch of mini tarts, topped with fresh fruit and a creamy filling.
Those tarts were little miracles! Each bite was a memory, a warm hug on a sunny afternoon. As I watched my family gather around the table, enjoying those tarts, I realized that food has an incredible power to connect us. That’s why I wanted to recreate something similar here—an easy yet impressive treat that encourages you to gather your loved ones and share stories over something delicious.
Ingredients
For these Mini Peach and Cream Cheese Tarts, you’ll need the following ingredients:
-
Puff Pastry: This flaky pastry is the perfect base for our tarts. If you don’t have puff pastry on hand, you can use pie crust or even phyllo dough for a different texture. Just remember to pre-bake it according to the package instructions.
-
Fresh Peaches, Sliced: The star of the show! Ripe, juicy peaches bring sweetness and color. If peaches are out of season, feel free to use nectarines or even canned peaches (drained) in a pinch.
-
Cream Cheese Slices: Cream cheese adds that luscious, creamy texture we all crave. For a lighter option, consider using Neufchâtel cheese or a vegan cream cheese alternative.
-
Cinnamon: This spice not only warms the flavor but also enhances the natural sweetness of peaches. For a twist, you could try nutmeg or allspice instead.
-
Lemon Juice: A splash of lemon juice brightens up the flavors and keeps the peaches from browning. If you don’t have lemon, lime juice works nicely too.
-
Honey: This natural sweetener adds a touch of sweetness without overwhelming the dish. Maple syrup or agave nectar can be good substitutes if you prefer.
Each ingredient works together harmoniously, creating a balance of flavors that’s absolutely irresistible.
Step-by-Step Instructions
Now, let’s get down to business! Follow these steps for crafting your Mini Peach and Cream Cheese Tarts:
-
Preheat Your Oven: Start by preheating your oven to 400°F (200°C). The warm air will help your tarts puff up beautifully, creating that flaky texture we love.
-
Prepare the Puff Pastry: Roll out your puff pastry on a lightly floured surface. It should be about ¼ inch thick. Using a round cutter (or a glass), cut out circles—about 3 to 4 inches in diameter. You should have enough for a dozen mini tarts. Place the pastry circles on a parchment-lined baking sheet.
Chef’s Tip: If you want an extra golden finish, brush the edges of the pastry with an egg wash (1 beaten egg mixed with a splash of water).
-
Pre-bake the Pastry: Prick the centers of each pastry circle with a fork to prevent it from puffing up too much. Bake in the preheated oven for 8-10 minutes, or until they are lightly golden.
-
Craft the Filling: While the pastry is baking, it’s time to prep the filling. In a small bowl, combine your cream cheese, honey, and a splash of lemon juice. Beat everything together until smooth. You want it to be creamy and spreadable.
Little Hack: If your cream cheese is too firm, pop it in the microwave for a few seconds to soften it up!
-
Slice the Peaches: Take your fresh peaches and slice them into thin wedges. If peaches are really ripe, you might want to chill them slightly to make slicing easier.
-
Assemble the Tarts: Once the pastry is done and has cooled for a few moments, spread a generous layer of cream cheese mixture in the center of each tart. Then, carefully arrange the peach slices on top in a circular pattern. Sprinkle a light dusting of cinnamon over the peaches for that warm spice flavor.
-
Final Bake: Return the tarts to the oven and bake for an additional 5-7 minutes, until everything is warmed through and your kitchen is filled with an intoxicating aroma. The peaches should be tender but not mushy.
-
Cool and Serve: Let the tarts cool on the baking sheet before transferring them to a serving platter. Drizzle a little extra honey on top for that added touch of sweetness.
Serving Suggestions
To make your presentation shine, serve these Mini Peach and Cream Cheese Tarts on a beautiful platter, garnished with fresh mint leaves or edible flowers for that touch of whimsy. Pair them with a scoop of vanilla ice cream or a dollop of whipped cream for an extra indulgent experience. Perfect for a summer gathering or a cozy family dessert night!
Recipe Variations
Feel free to get creative with this recipe! Here are a few variations you might enjoy:
-
Berry Medley: Swap out the peaches for mixed berries like strawberries, blueberries, and raspberries for a delightful twist.
-
Spiced Up: Add a pinch of cardamom to the cream cheese filling for an exotic flavor profile.
-
Nutty Delight: Top the tarts with crushed almonds or pecans before baking for added crunch.
-
Chocolate Drizzle: Finish with a drizzle of melted chocolate for something truly decadent.
-
Gluten-Free Option: Use gluten-free puff pastry to make this treat accessible for everyone.
Chef’s Notes
As always, each time I whip up these tarts, I remember that sunny day in the orchard with my family. Cooking isn’t just about food; it’s about those feelings of nostalgia and connection. These Mini Peach and Cream Cheese Tarts have become a summer staple in my kitchen, and I hope they will become a cherished recipe in yours too!
FAQs and Troubleshooting
-
What if my puff pastry gets soggy?
- Make sure to prick the pastry before baking and avoid overloading with the cream cheese filling.
-
Can I make the filling ahead of time?
- Absolutely! Prepare the cream cheese mixture a day in advance, but keep it stored in the fridge, covered. Assemble the tarts just before baking.
-
How do I store leftover tarts?
- Store any leftover tarts in an airtight container in the fridge for up to 2 days. They taste best fresh, so enjoy them ASAP!
-
How do I know when the peaches are ripe?
- Look for peaches that are slightly soft to the touch but not mushy. They should have a fragrant aroma, signaling sweetness!
Nutritional Info
While I won’t bore you with all the numbers, these Mini Peach and Cream Cheese Tarts are a lovely balance of indulgence and fresh ingredients. Each tart is a delightful treat and can definitely be enjoyed in moderation as part of a balanced diet!
I hope you enjoyed this culinary journey into my kitchen! These Mini Peach and Cream Cheese Tarts are not just about satisfying your sweet tooth; they’re about making memories, sharing love, and connecting with the people around you. So gather your ingredients, bring your friends together, and let’s create something beautiful. Happy baking, friends! 🍑✨
PrintMini Peach and Cream Cheese Tarts

A delightful treat that combines rich cream cheese with juicy peaches wrapped in flaky puff pastry.
- Prep Time: 15 minutes
- Cook Time: 20 minutes
- Total Time: 35 minutes
- Yield: 12 servings 1x
- Category: Dessert
- Method: Baking
- Cuisine: American
- Diet: Vegetarian
Ingredients
- 1 sheet Puff Pastry
- 2 Fresh Peaches, sliced
- 4 oz Cream Cheese, sliced
- 1 tsp Cinnamon
- 1 tbsp Lemon Juice
- 2 tbsp Honey
Instructions
- Preheat your oven to 400°F (200°C).
- Prepare the puff pastry by rolling it out to ¼ inch thickness and cutting circles of 3 to 4 inches.
- Pre-bake the pastry circles for 8-10 minutes until lightly golden.
- Craft the filling by combining the cream cheese, honey, and lemon juice until smooth.
- Slice your peaches into thin wedges.
- Assemble the tarts by spreading the cream cheese mixture on each pastry and topping with peach slices.
- Return the tarts to the oven and bake for an additional 5-7 minutes.
- Cool the tarts on a baking sheet before serving.
Notes
Serve with mint leaves or edible flowers and pair with ice cream or whipped cream for a perfect treat.
Nutrition
- Serving Size: 1 tart
- Calories: 200
- Sugar: 10g
- Sodium: 150mg
- Fat: 10g
- Saturated Fat: 5g
- Unsaturated Fat: 4g
- Trans Fat: 0g
- Carbohydrates: 22g
- Fiber: 1g
- Protein: 3g
- Cholesterol: 15mg
Keywords: peach tarts, cream cheese, dessert, summer, baking
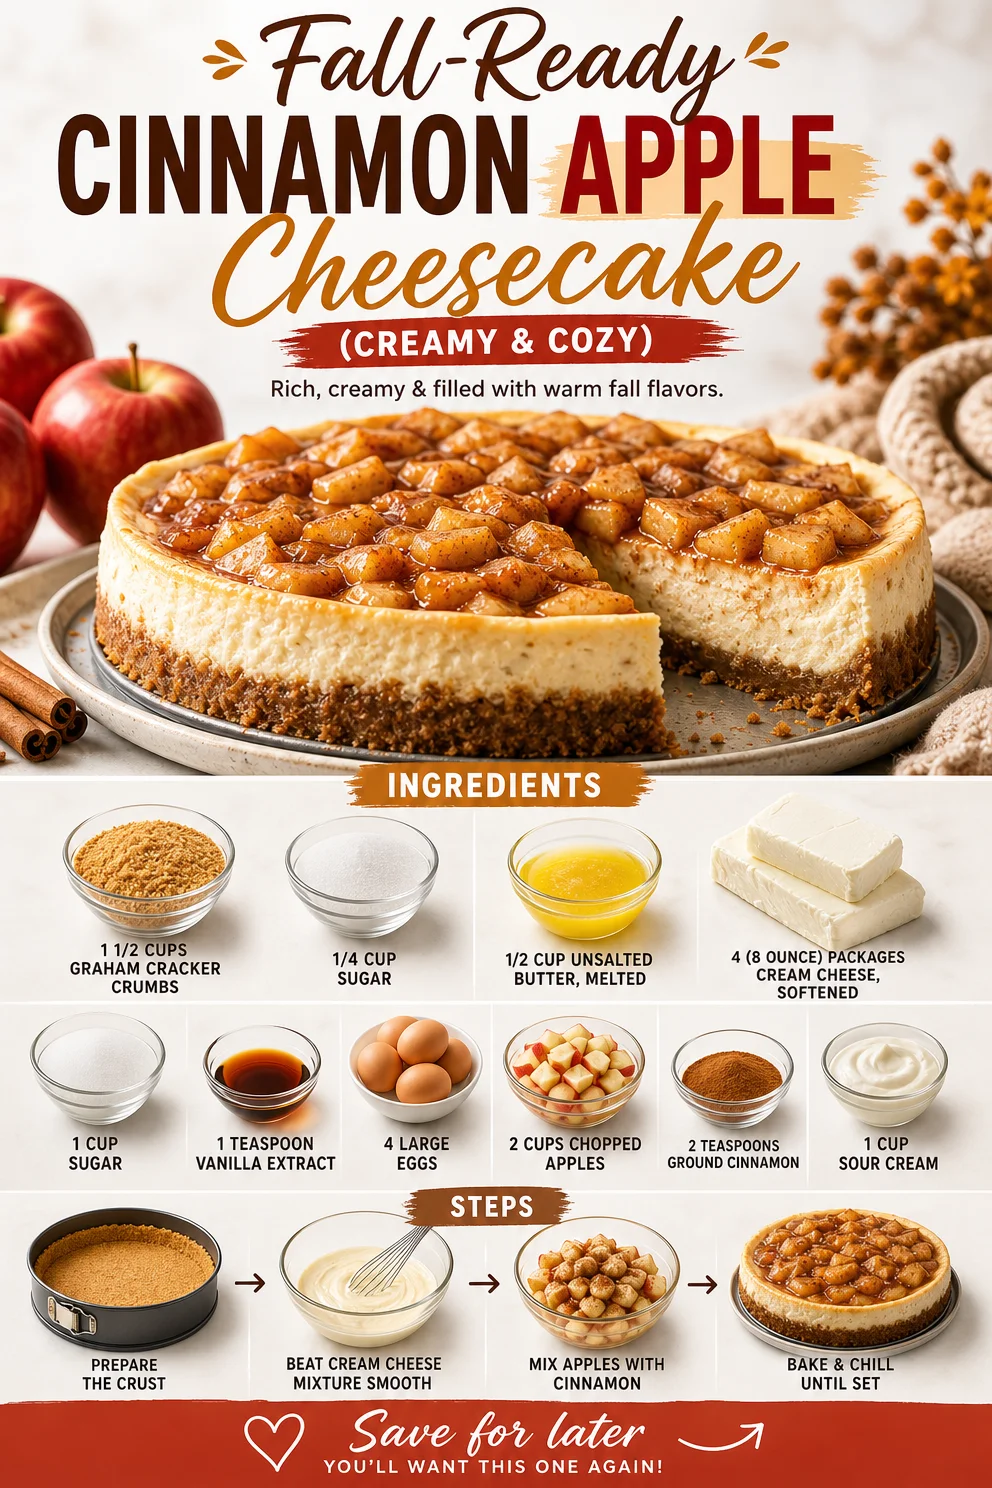
Fall-Ready Cinnamon Apple Cheesecake (Creamy & Cozy)
The Comfort of Home: A Slice of Cinnamon Apple Cheesecake
Let’s talk about one of my all-time favorite desserts: Cinnamon Apple Cheesecake. Picture this: you’re on a crisp autumn day, the smell of cinnamon wafting through your kitchen, and the sound of laughter and conversation fills your home. This cheesecake isn’t just a dessert; it’s an experience, a hug for your taste buds, and the perfect centerpiece for gatherings, from cozy family dinners to festive holiday celebrations.
Growing up, my grandmother was the queen of baking, especially when apples were in season. I often spent afternoons in her kitchen, standing on a stool so I could reach the counter, marveling as she turned simple ingredients into magic. One blustery October day, she decided we were making her famous apple cheesecake. I can still hear her chuckling as she tossed in a generous sprinkle of cinnamon, claiming it was “the secret to my success.” We layered thick creamy cheesecake over a crisp graham cracker crust, adorned with tender, spiced apples. Each bite was like tasting a slice of home, and I became convinced that this dessert held a touch of magic.
Years later, I’ve made this cherished recipe my own, adding my touch while cherishing my grandmother’s essence in every slice. Each time I share this cheesecake, I’m inviting you into that sweet memory. So, gather your ingredients, preheat your oven, and let’s create something that’s not just about food—it’s about love, laughter, and those small moments around the table that matter most.
Ingredients
Before we dive into making this decadent dessert, let’s gather our ingredients. Here’s what you’ll need:
-
1 1/2 cups graham cracker crumbs
This will serve as the base of your cheesecake. If you can’t find graham crackers, try digestive biscuits or vanilla wafer cookies for a unique twist. -
1/4 cup sugar
A little sweetness to enhance the crust. You can swap it for brown sugar for a deeper flavor or even coconut sugar for a more natural sweetener. -
1/2 cup unsalted butter, melted
Butter brings richness to the crust. If you’re looking for a dairy-free option, coconut oil works beautifully here. -
4 (8-ounce) packages cream cheese, softened
The star of the dessert, making it creamy and rich. For a lower-fat option, you can use reduced-fat cream cheese, though it may slightly change the texture. -
1 cup sugar
This will sweeten the cheesecake filling. Once again, feel free to experiment with brown sugar or a sugar substitute if you’re watching your intake. -
1 teaspoon vanilla extract
Just a smidgen of vanilla enhances all the flavors. Make sure you use pure vanilla extract if you can; it makes a world of difference. -
4 large eggs
Eggs provide structure and stability to your cheesecake. If you want to make it egg-free, consider using a flax egg mixture or unsweetened applesauce per egg. -
2 cups chopped apples
Fresh apples for that delightful texture and flavor! I love Granny Smith for their tartness, but Honeycrisp or Fuji can add a lovely sweetness. -
2 teaspoons ground cinnamon
Cinnamon is the spice that gives this dish its warm, comforting flavor. Feel free to add a pinch of nutmeg for extra warmth! -
1 cup sour cream
This adds a tangy richness to the filling. You can substitute plain Greek yogurt for a healthier alternative that maintains creaminess.
Step-by-Step Instructions
Ready to get started? Let’s go through this process together. This cheesecake may take a little time, but trust me, every moment will be worth it.
-
Preheat your oven to 325°F (160°C).
Begin by preheating your oven. This ensures that your cheesecake bakes evenly. Make sure to adjust your oven racks to the middle position, allowing the cheesecake to cook evenly without browning too much on the top. -
Prepare the crust.
In a mixing bowl, combine the graham cracker crumbs, sugar, and melted butter. Stir until the mixture resembles wet sand. Here’s a pro tip: use a fork or your hands to make sure the crumbs are well coated—this will help your crust hold together beautifully once baked! -
Press the crust into a springform pan.
Firmly press the crumb mixture into the base of your springform pan, creating an even layer. You can use the bottom of a measuring cup to pack it down, ensuring it’s compact for a sturdy base. -
Bake the crust.
Pop the crust into your preheated oven and bake for about 10 minutes. This step not only sets the base but also gives it a delightful crunch. Let it cool slightly on a wire rack while we prepare the filling. -
Make the cheesecake batter.
In your stand mixer (or a large bowl with a hand mixer), beat the softened cream cheese and sugar on medium speed until smooth and creamy. This should take about 2-3 minutes. Make sure there are no lumps; you want it silky! -
Add in the vanilla and eggs.
Add the vanilla extract, then one by one, add the eggs, mixing well after each addition. Here’s a chef hack: scrape down the sides of the bowl to ensure all ingredients are well combined. -
Stir in the apples and cinnamon.
Gently fold in the chopped apples and ground cinnamon into the cream cheese mixture. Be careful not to over-mix; you want the apples evenly distributed without breaking them down too much! -
Pour the filling into the crust.
Carefully pour the cheesecake batter onto your cooled crust, smoothing the top with a spatula. Don’t worry if it’s not perfect—the cheesecake will set beautifully in the oven. -
Bake the cheesecake.
Bake in the oven for about 50-60 minutes, or until the edges are set but the center still has a slight jiggle. The jiggle is normal; it will continue to firm up as it cools. -
Cool and chill.
Once out of the oven, let the cheesecake cool in the pan on a wire rack for about an hour. This slow cooling prevents cracks. Then, refrigerate it for at least 4 hours, or preferably overnight. Patience, my friend; good things come to those who wait!
Serving Suggestions
Now comes the best part—serving! When you’re ready to indulge, carefully remove the cheesecake from the springform pan. I recommend serving it with a dollop of whipped cream, a sprinkle of cinnamon, or a drizzle of caramel sauce for that extra touch of elegance. You can slice it up neatly, revealing the creamy filling and those delightful bits of spiced apples peeking through.
Recipe Variations
Want to mix things up a bit? Here are a few creative twists on this classic recipe:
-
Nutty Crust: Add 1/2 cup of finely chopped nuts (like pecans or walnuts) to the graham cracker crust for an extra crunch and depth of flavor.
-
Flavor Flair: Experiment with flavors by adding a tablespoon of lemon zest for brightness or swapping out cinnamon for pumpkin pie spice.
-
Fruit Fusion: Consider using different fruits like pears or berries in place of apples for a unique take each season.
-
Chocolate Drizzle: Drizzle melted chocolate over the cheesecake before serving for a delightful contrast to the spiced apples.
-
Dairy-Free Option: Substitute the cream cheese and sour cream with vegan alternatives made from cashews or tofu to cater to dietary preferences.
Chef’s Notes
Every recipe tells a story—this cheesecake is no exception. When I first adapted my grandmother’s recipe, I had a kitchen disaster that left me giggling more than I should have. I accidentally used salt instead of sugar in the filling. Let’s just say the look on my friend’s face when she took a bite was priceless! From that day on, I became the ‘sugar fairy’ of the kitchen, double-checking my ingredients. Thankfully, this cheesecake has since become a staple at family gatherings and a go-to recipe for entertaining friends.
FAQs and Troubleshooting
1. Why did my cheesecake crack?
Cracking is often due to sudden temperature changes. To prevent this, bake at a low temperature and avoid opening the oven door frequently. Additionally, cooling the cheesecake gradually will help.
2. How do I know when my cheesecake is done?
Look for the edges to be set, and the center should still have a slight jiggle. It will firm up as it cools, so don’t worry if it seems a bit soft.
3. Can I freeze cheesecake?
Yes! Once cooled and set, wrap it tightly in plastic wrap and then in aluminum foil. It should keep well in the freezer for up to 3 months. Thaw it in the fridge overnight when you’re ready to enjoy!
4. What if my cheesecake doesn’t set?
If the cheesecake hasn’t set after baking, it may need more baking time. Make sure to check again in 10-minute increments until it firms up!
Nutritional Info (Optional)
While this recipe is a delightful treat to enjoy occasionally, here’s a rough nutritional breakdown per slice (based on 12 slices):
- Calories: 350
- Total Fat: 25g
- Saturated Fat: 15g
- Sodium: 200mg
- Total Carbohydrate: 30g
- Sugars: 20g
- Protein: 6g
Indulge in a slice, savor the warmth, and take a moment to appreciate the love that fills your kitchen. Now, it’s time to tie on that apron, gather your loved ones, and create your own memories with this Cinnamon Apple Cheesecake. Bon appétit!
PrintCinnamon Apple Cheesecake

A delightful cheesecake layered with creamy filling and spiced apples, perfect for autumn gatherings.
- Prep Time: 20 minutes
- Cook Time: 60 minutes
- Total Time: 80 minutes
- Yield: 12 servings 1x
- Category: Dessert
- Method: Baking
- Cuisine: American
- Diet: Vegetarian
Ingredients
- 1 1/2 cups graham cracker crumbs
- 1/4 cup sugar
- 1/2 cup unsalted butter, melted
- 4 (8-ounce) packages cream cheese, softened
- 1 cup sugar
- 1 teaspoon vanilla extract
- 4 large eggs
- 2 cups chopped apples
- 2 teaspoons ground cinnamon
- 1 cup sour cream
Instructions
- Preheat your oven to 325°F (160°C).
- Prepare the crust by combining graham cracker crumbs, sugar, and melted butter.
- Press the crust into a springform pan.
- Bake the crust for about 10 minutes and let it cool.
- Make the cheesecake batter by beating cream cheese and sugar until smooth.
- Add in the vanilla and eggs one by one, mixing well.
- Stir in the chopped apples and cinnamon.
- Pour the filling into the crust.
- Bake for about 50-60 minutes, until edges are set.
- Cool and chill for at least 4 hours before serving.
Notes
Serve with whipped cream and a sprinkle of cinnamon for a delightful touch.
Nutrition
- Serving Size: 1 slice
- Calories: 350
- Sugar: 20g
- Sodium: 200mg
- Fat: 25g
- Saturated Fat: 15g
- Unsaturated Fat: 8g
- Trans Fat: 0g
- Carbohydrates: 30g
- Fiber: 1g
- Protein: 6g
- Cholesterol: 90mg
Keywords: cheesecake, apple dessert, autumn recipes
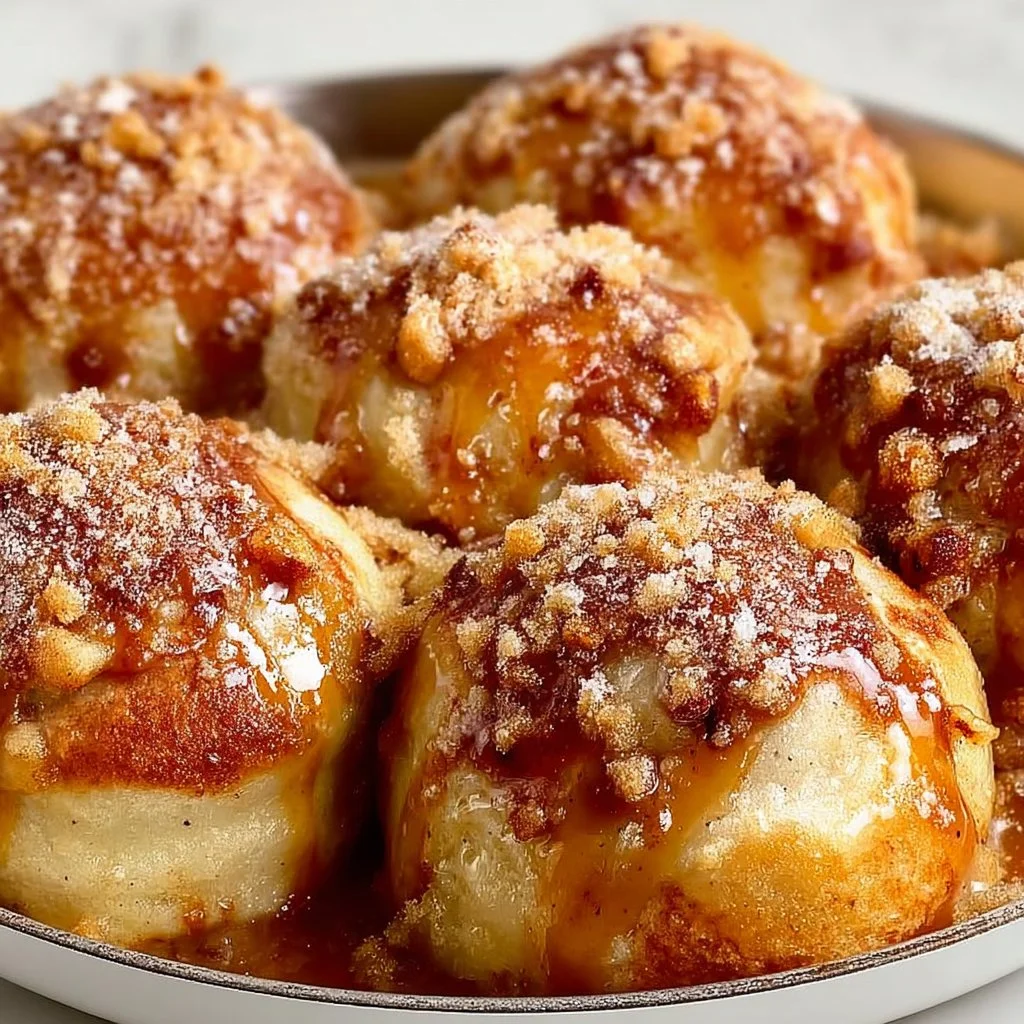
Simple Caramel Apple Pie Bombs
Simple Caramel Apple Pie Bombs: A Nostalgic Delight
Hello, and welcome back to my kitchen! Today, we’re diving into a dessert that merges nostalgia with absolute deliciousness — Simple Caramel Apple Pie Bombs. Picture this: sweet, tender apples enveloped in a buttery pie crust, drizzled with warm caramel, and baked to golden perfection. 🍏✨
Let’s face it; we all have those cherished memories of autumn gatherings filled with laughter, warm cider, and, of course, delicious treats. Caramel apple pie has always been a family favorite. It’s the kind of dessert that brings everyone together, a symbol of comfort and joy. And while we could whip up a traditional apple pie, sometimes, we crave something that’s bit-sized, portable, and oh-so-fun to eat! That’s where these delightful bombs come in!
As I was recalling my childhood, I remembered making caramel apples with my grandma during those cool fall afternoons. We’d dip crisp apples into rich, gooey caramel, relishing every sticky moment. Fast forward to today, and I’ve taken that classic idea and turned it into these irresistible pie bombs. They encapsulate that same joy, making them perfect for any occasion — from cozy nights at home to festive gatherings with friends.
So, grab your apron, and let’s create some sweetness that’s sure to put a smile on your face and warmth in your heart!
Personal Story
I vividly remember the yearly family tradition of baking pies with my grandma. Each fall, we’d gather in her sunny kitchen, surrounded by the sweet aroma of baking apples, cinnamon, and a hint of caramel wafting through the air. Those afternoons were filled with laughter as we would mix flour, sugar, and spice while sharing stories about our day.
One particular year, I can recall our experiment with caramel apples — we had so much fun dipping each apple in the warm, gooey caramel, and inevitably, we ended up with sticky fingers and lots of giggles. It was truly a cherished memory, and I believe that my love for baking was born in those moments spent with her.
When I came up with the idea for these Simple Caramel Apple Pie Bombs, I couldn’t help but smile at the nostalgia. They’re a fun and modern twist on our classic recipe, bringing back those sweet memories while allowing us to enjoy them in a delightful little package. Every bite sings of those warm afternoons shared over baked treats, reminding us that food is more than just sustenance — it’s about creating bonds and celebrating life’s small joys.
Ingredients
Here’s what you’ll need to create these delectable bites:
-
1 package refrigerated pie crusts: Convenient and time-saving, these crusts provide a flaky, buttery base. If you want to go homemade, a buttery flaky crust works beautifully as well!
-
2 cups peeled and diced apples: Choose your favorite apples! Tart varieties like Granny Smith bring a lovely contrast to the sweet caramel. Honeycrisp adds a delightful crunch. You can substitute them with pears for a different flavor profile.
-
1 cup caramel sauce: This is where the magic happens! You can use store-bought caramel for convenience, or if you’re feeling adventurous, I’ll share a quick recipe for a homemade caramel sauce later.
-
1 teaspoon cinnamon: A warm spice that complements apples wonderfully. If you’re a cinnamon lover, feel free to add a dash more. Alternatively, you could use apple pie spice!
-
1/4 cup sugar: This enhances the sweetness of the apples, balancing out the flavors. Consider swapping granulated sugar for brown sugar to add a touch of molasses flavor.
-
1 egg (for egg wash): This gives your pie bombs that beautiful golden finish when baked. If you’re avoiding eggs, a splash of milk or a vegan butter rub can work too!
-
Flour (for dusting): Just a little sprinkle to keep everything from sticking while you’re rolling out your crust.
With these ingredients, you’re well on your way to creating a delightful treat that’s sure to impress.
Step-by-Step Instructions
Now, let’s get cooking! Follow these detailed steps for creating your Simple Caramel Apple Pie Bombs:
-
Preheat the Oven: Start by preheating your oven to 375°F (190°C). This is the perfect temperature for crisping up your pastry. While the oven warms, lay your pie crusts on a lightly floured surface.
-
Roll Out the Crusts: If your refrigerated pie crusts are a bit thick, use a rolling pin to gently roll them out until they’re about 1/8 inch thick. This ensures every bite is flaky. Don’t have a rolling pin? A wine bottle works in a pinch!
-
Prepare the Filling: In a mixing bowl, combine the peeled and diced apples, sugar, cinnamon, and caramel sauce. Stir everything together until the apples are well-coated. Let it sit for about 10 minutes; this allows the flavors to mingle and the apples to release some juices.
-
Cut the Crusts: Using a round cookie cutter or a large glass, cut the pie crust into circles — about 4 to 5 inches in diameter. This will be the base of our bombs. Gather the scraps, reroll them, and cut out more circles!
-
Fill the Crusts: Place about a tablespoon of the apple filling in the center of each circle of pie crust. Be cautious not to overfill! You want these bombs to close up easily.
-
Seal It Up: Brush the edges of the pie crust circles with the beaten egg (this acts as glue!). Then, fold the crust over the filling, forming a half-moon shape. Use a fork to crimp the edges tightly, ensuring they are well-sealed. This is where you can get creative; use your fingers to pinch or twist the edges for a fun design!
-
Egg Wash and Bake: Place your sealed bombs on a parchment-lined baking sheet. Brush the tops with the egg wash to achieve a beautiful golden color when baked. Pop them in the oven and bake for about 20-25 minutes or until they are golden brown and bubbly.
-
Let Them Cool: Once baked, remove your pie bombs from the oven and let them cool for about 5-10 minutes. The caramel will be molten and can cause a little splatter!
-
Serve Warm: Drizzle some extra caramel sauce over the top for that little extra touch of sweetness!
And voila! You’ve created your very own Simple Caramel Apple Pie Bombs that are not only delicious but also a total crowd-pleaser!
Serving Suggestions
To serve, present your pie bombs on a rustic wooden board or a classic white platter – it’s all about that beautiful contrast! Drizzle some caramel sauce, and add a scoop of vanilla ice cream or a dollop of whipped cream on the side. Consider garnishing with a sprinkle of cinnamon or a sprinkle of chopped pecans for added texture and flavor. Trust me, your guests will be asking for seconds!
Recipe Variations
Feeling adventurous? Here are a few ways to change up your Caramel Apple Pie Bombs:
-
Add Nuts: Incorporate chopped walnuts or pecans into your filling for an extra crunch.
-
Spiced Up Flavor: Add a pinch of nutmeg or ginger to the apple filling for a spiced twist.
-
Chocolate Drizzle: Drizzle melted chocolate over the tops for a decadent finish. Chocolate and caramel are a match made in heaven!
-
Savory Edition: Swap out apples for cooked diced butternut squash and add sage or rosemary for a savory take.
-
Mini Versions: Use mini-muffin tins to create bite-sized bombs. Just adjust your baking time accordingly!
Chef’s Notes
One of my favorite adaptations of this recipe is swapping out traditional caramel sauce for salted caramel. Crisp, tart apples paired with the complexity of sea salt take these bombs to a whole new level. And speaking of adaptations, if you end up with extra filling, don’t throw it away! It’s perfect for topping yogurt, pancakes, or even just spooning straight from the bowl. Trust me, it’s that good!
Every time I make these pie bombs, I think back to those afternoons with my grandma. The excitement of pulling golden, bubbling bites from the oven — it never gets old! Kitchen messes may happen (I once spilled a full bowl of caramel on the counter), but it’s those little mishaps that make cooking memorable and fun.
FAQs and Troubleshooting
1. What if my pie bombs are leaking during baking?
This can happen if they’re overfilled or not sealed properly. Make sure to crimp the edges well and leave some space for expansion when filling.
2. How do I store leftovers?
Keep them in an airtight container in the fridge for up to 3 days. Reheat in the oven for a few minutes to regain that crispy texture.
3. Can I make these in advance?
Absolutely! You can prepare and seal them a day ahead, store them in the fridge, and bake them fresh right before serving!
4. What if I don’t have pie crust?
You can replace it with puff pastry, crescent roll dough, or even biscuit dough in a pinch. Each gives a unique texture and flavor!
Creating Simple Caramel Apple Pie Bombs is more than just a recipe; it’s an experience filled with laughter, warmth, and delicious memories. So, tie on your apron, gather your loved ones, and let’s bake something beautiful together! Happy cooking! 🍏❤️
PrintSimple Caramel Apple Pie Bombs
A fun and modern twist on the classic caramel apple pie, these bite-sized bombs are filled with tender apples and warm caramel, all encased in a flaky pie crust.
- Prep Time: 15 minutes
- Cook Time: 25 minutes
- Total Time: 40 minutes
- Yield: 4 servings 1x
- Category: Dessert
- Method: Baking
- Cuisine: American
- Diet: Vegetarian
Ingredients
- 1 package refrigerated pie crusts
- 2 cups peeled and diced apples
- 1 cup caramel sauce
- 1 teaspoon cinnamon
- 1/4 cup sugar
- 1 egg (for egg wash)
- Flour (for dusting)
Instructions
- Preheat the oven to 375°F (190°C).
- Roll out the refrigerated pie crusts on a lightly floured surface.
- Combine the diced apples, sugar, cinnamon, and caramel in a mixing bowl.
- Cut the pie crust into circles using a round cutter.
- Place about a tablespoon of filling in the center of each crust circle.
- Brush the edges with beaten egg and fold over to seal.
- Place on a baking sheet and brush tops with egg wash.
- Bake for 20-25 minutes until golden brown.
- Let cool for 5-10 minutes before serving.
Notes
For an extra touch, drizzle additional caramel sauce over the top before serving. Leftover filling works well as a topping for yogurt or pancakes.
Nutrition
- Serving Size: 1 serving
- Calories: 320
- Sugar: 20g
- Sodium: 150mg
- Fat: 14g
- Saturated Fat: 4g
- Unsaturated Fat: 9g
- Trans Fat: 0g
- Carbohydrates: 40g
- Fiber: 2g
- Protein: 3g
- Cholesterol: 37mg
Keywords: caramel, apple, pie, dessert, fall treats, nostalgic, baking
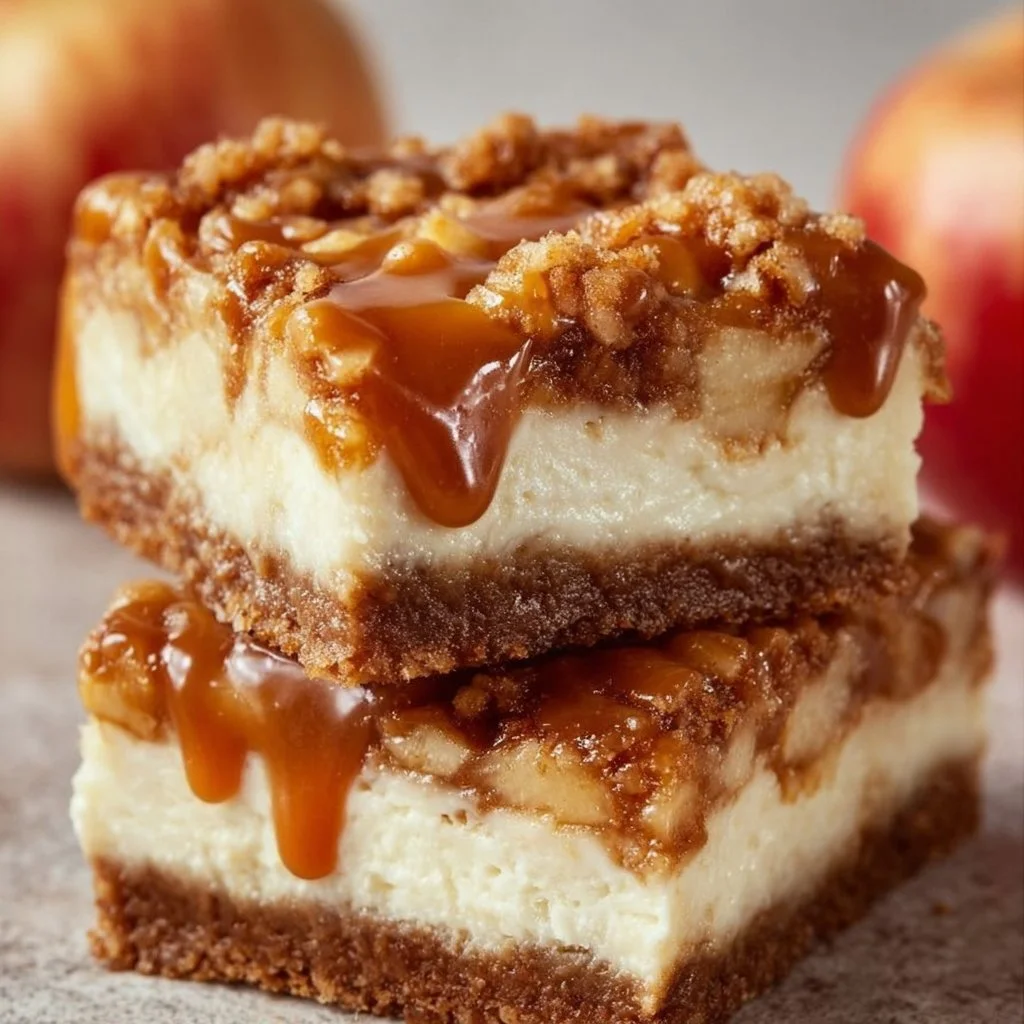
Caramel Apple Cheesecake Bars
Caramel Apple Cheesecake Bars: A Sweet Slice of Nostalgia
Welcome to my kitchen, fellow foodies! Today, we’re diving into a recipe that perfectly captures the essence of cozy autumn afternoons, family gatherings, and sweet nostalgia—Caramel Apple Cheesecake Bars. If you’re anything like me, you appreciate a dessert that feels both indulgent and comforting, a slice of something exquisite that can brighten an ordinary day. Well, grab your aprons, because we’re about to whip up a delightful treat that’s bound to become a family favorite.
Imagine this: it’s a crisp fall day, the leaves are turning brilliant shades of gold and crimson, and the air is filled with the sweet scent of cinnamon and baked apples. That’s the moment I want to recreate with these cheesecake bars. As a child, I would often help my grandma in the kitchen, and one of the recipes that we made together was her famous apple pie. The combination of tart apples, warm spices, and silky creaminess of cheesecake always made my heart flutter. That special connection to my grandma and those priceless moments inspired me to create this recipe—merging that classic apple pie charm with the creamy comfort of cheesecake!
These Caramel Apple Cheesecake Bars are not only easy to make, but they also pack a flavor punch that will have your friends and family clamoring for seconds. Each bar features a buttery graham cracker crust topped with a smooth cream cheese mixture, fresh apples, a hint of cinnamon, and a luscious caramel drizzle. It’s the perfect balance of creamy, crunchy, sweet, and spiced—making it the ultimate crowd-pleaser for any occasion.
Let’s get cooking and create a dessert that you can serve proudly at your next gathering (or just enjoy all to yourself).
Personal Story
Growing up in a bustling household, our kitchen was always the heart of our home. My fondest memories revolve around baking with family, especially during the fall. One autumn, my grandmother decided to surprise us with an apple dessert that would leave a lasting imprint on my heart: her incredible apple cheesecake—much like what we are making today.
She passed down not just her recipe but also her incredible spirit of hospitality. I remember watching her dance around in the kitchen, the leaves fluttering outside the window as she hummed softly while she worked. The moment she pulled that creamy cheesecake out of the oven, the sweet aroma wafted through the house. We gathered around the table, beaming with delight and anticipation, ready to dive into a slice of warm comfort.
Those moments crafted not only delicious memories but also instilled in me a deep passion for creating meals that pull loved ones together. Now, every time I make these Caramel Apple Cheesecake Bars, I remember my grandma and the love she poured into her cooking. It’s not just about the food; it’s about nurturing connections and celebrating life’s sweet moments, one slice at a time.
Ingredients
Before we jump into the cooking, let’s gather our ingredients. Here’s what you’ll need:
-
2 cups of graham cracker crumbs
These crumbs form the sturdy base of our cheesecake bars. If you don’t have graham crackers, you can substitute with crushed vanilla wafers or even chocolate cookie crumbs for a unique twist! -
1/2 cup of unsalted butter, melted
The butter adds richness and helps bind the graham cracker crumbs together. Make sure it’s unsalted; otherwise, you might tip the flavor balance! -
1/4 cup of granulated sugar
Just a bit of sugar helps sweeten the crust. If you’d like an alternative, coconut sugar works nicely to retain that sweet element with a slight caramel flavor. -
2 (8-ounce) packages of cream cheese, softened
Cream cheese is the star of the cheesecake mix, giving it that rich, velvety texture. Soften it up by leaving it out for about an hour before you start. -
1/2 cup of granulated sugar
This sugar sweetens our filling. Again, if you’re watching your sugar intake, feel free to use a sugar substitute like erythritol. -
1 teaspoon of vanilla extract
Vanilla adds depth of flavor and enhances the sweetness. Always opt for pure vanilla extract if possible; it makes a world of difference! -
2 large eggs
The eggs provide structure to your cheesecake. If you are vegan or allergic, a substitute can include 1/4 cup of unsweetened applesauce per egg. -
2 cups of peeled, diced apples
Apples give this dessert its signature flavor! Granny Smith apples work great for their tartness, but feel free to mix and match your favorites. -
1 teaspoon of cinnamon
Cinnamon adds warmth and that cozy, fall-like essence. Ground nutmeg can make a delightful addition for extra spice! -
1/2 cup of caramel sauce
A decadent finish! You can purchase caramel sauce from the store or make your own if you’re feeling adventurous (it’s easier than it sounds!).
Step-by-Step Instructions
Ready to make some magic in the kitchen? Let’s roll up our sleeves and get started on these Caramel Apple Cheesecake Bars!
Step 1: Preheat the Oven
Preheat your oven to 325°F (163°C). This is an essential step so that your cheesecake will bake evenly and turn out just right—nothing worse than a soggy bottom!
Step 2: Prepare the Graham Cracker Crust
- In a mixing bowl, combine the graham cracker crumbs, melted butter, and 1/4 cup of sugar. Mix until the crumbs are well-coated and the mixture resembles wet sand.
- Chefs Tip: If the mixture feels too dry and crumbly, add a splash more melted butter. You want it to hold together when pressed!
Step 3: Press the Crust Into the Pan
- Grab a 9×13 inch baking dish and line it with parchment paper. This will help you remove the bars easily after they’re baked.
- Press the mixture evenly into the bottom of the prepared pan. Use the back of a measuring cup to pack it down firmly.
- Pop it in the oven for about 10 minutes. We want the crust to set and become a bit golden.
Step 4: Prepare the Cheesecake Filling
- While the crust is baking, let’s whip up that luscious filling! In a large mixing bowl, add the softened cream cheese and 1/2 cup of granulated sugar.
- Use an electric mixer on medium speed until it’s smooth and creamy. This is not the time for lumps!
- Next, add in the vanilla extract and eggs, one at a time, mixing after each addition until combined.
- Chefs Insight: Avoid overmixing the batter to keep your bars from cracking – we want a smooth finish, not an earthquake!
Step 5: Mix in the Apples and Cinnamon
- Add in the diced apples and cinnamon, stirring gently until everything is just combined. Your kitchen is going to start smelling divine right about now!
Step 6: Pour the Batter Over the Crust
- Once the crust is done par-baking, remove it from the oven and pour the cream cheese and apple mixture over the crust. Spread it evenly with a spatula.
- Chef Hack: Tap the pan on the counter a few times to release any air bubbles that might have formed!
Step 7: Bake the Cheesecake Bars
- Return the pan to the oven and bake for 30-35 minutes. The edges should look set, but the center will still have a slight jiggle (it will firm up as it cools!).
- Important Note: If you notice the tops browning too much, place a piece of foil gently over the top for the final few minutes of baking.
Step 8: Cool and Chill
- Remove the bars from the oven and let them cool at room temperature for about 30 minutes. Transfer them to the fridge for at least 2 hours (or overnight) to chill fully. Patience is key here!
Step 9: Drizzle with Caramel
- Once they’re set, take them out of the fridge and use the parchment paper to lift them out. Cut them into squares and drizzle with caramel sauce before serving.
- Serving Tip: You can warm up the caramel slightly for an ooey-gooey drizzle that everyone will love!
Serving Suggestions
To elevate your presentation, place the caramel apple cheesecake bars on a beautiful platter. You can garnish each square with extra diced apples, a sprinkle of cinnamon, or even some chopped nuts for texture. If you’re feeling extra fancy, serve them alongside a scoop of vanilla ice cream or a dollop of whipped cream! Trust me, this will make your dessert even more irresistible.
Recipe Variations
Looking to switch things up? Here are a few fun variations you can try with these Caramel Apple Cheesecake Bars:
- Nutty Pecan Crust: Replace graham cracker crumbs with ground pecans for a nutty twist.
- Mixed Fruit Filling: Substitute half of the apples with pears or pears for an interesting flavor profile.
- Caramel Swirl: Drizzle caramel sauce straight into the cheesecake batter before baking for a delightful caramel ribbon effect.
- Spiced Apples: Add a pinch of nutmeg or ginger to the apple mixture for an extra layer of warmth.
- Sugar-Free Option: Use a sugar substitute in the crust and filling to create a guilt-free treat!
Chef’s Notes
Every time I make these Caramel Apple Cheesecake Bars, I think about how food serves as a love language. It brings people together, creates memories, and nourishes our souls. Plus, I can’t help but laugh every time I remember my first attempt at making a cheesecake—it was a glorious failure! The crust crumbled, the opening was a disaster! But it taught me valuable lessons about patience and practice. So don’t worry if your first attempt isn’t perfect; just keep at it!
Over the years, this recipe has evolved from my grandma’s apple pie into these bars. I like to think she’d be proud of this scrumptious homage to our shared kitchen adventures.
FAQs and Troubleshooting
1. Why did my cheesecake bars crack?
Cracking can happen for a few reasons: overmixing the eggs or baking at too high a temperature. Always keep your mixer on medium speed and ensure you don’t bake them too long!
2. My crust is too crumbly; what should I do?
If your crust won’t hold together, it likely needs more butter. Add a tablespoon at a time until it reaches the right consistency.
3. Can I freeze these bars?
Absolutely! Cut them into squares and then freeze them in an airtight container for up to 2 months. Thaw in the fridge before serving.
4. What if I can’t find caramel sauce?
No problem! You can make your own caramel sauce by melting sugar over low heat until it’s golden, then whisking in heavy cream until smooth. It’s simpler than you think!
Nutritional Info (Optional)
A quick note for those interested in the nutritional aspect: Each serving of Caramel Apple Cheesecake Bars (based on 12 servings) contains approximately:
- Calories: 320
- Protein: 4g
- Carbohydrates: 34g
- Fat: 20g
- Sugar: 18g
(Note: These numbers can vary based on ingredient choices and portion size.)
There you have it, a delicious journey into the world of Caramel Apple Cheesecake Bars! I hope you’re inspired to create this warm, comforting dessert that spreads joy and connection. As you gather around the table with loved ones, sharing stories and laughter, remember that cooking is not just about the food itself; it’s the love and intention behind it that makes it truly special. Happy baking, and until next time—let’s keep the good food flowing!
PrintCaramel Apple Cheesecake Bars
Indulge in these creamy Caramel Apple Cheesecake Bars, perfect for autumn gatherings, featuring a buttery graham cracker crust, smooth cream cheese filling, fresh apples, and a luscious caramel drizzle.
- Prep Time: 15 minutes
- Cook Time: 40 minutes
- Total Time: 55 minutes
- Yield: 12 servings 1x
- Category: Dessert
- Method: Baking
- Cuisine: American
- Diet: Vegetarian
Ingredients
- 2 cups of graham cracker crumbs
- 1/2 cup of unsalted butter, melted
- 1/4 cup of granulated sugar
- 2 (8-ounce) packages of cream cheese, softened
- 1/2 cup of granulated sugar
- 1 teaspoon of vanilla extract
- 2 large eggs
- 2 cups of peeled, diced apples
- 1 teaspoon of cinnamon
- 1/2 cup of caramel sauce
Instructions
- Preheat your oven to 325°F (163°C).
- Combine the graham cracker crumbs, melted butter, and sugar in a bowl.
- Press the mixture into a 9×13 inch baking dish and bake for 10 minutes.
- Add softened cream cheese and sugar in a bowl and mix until smooth.
- Add vanilla extract and eggs, mixing after each addition.
- Mix in diced apples and cinnamon gently.
- Pour the mixture over the crust and spread it evenly.
- Bake for 30-35 minutes until the edges are set.
- Cool at room temperature for 30 minutes, then refrigerate for at least 2 hours.
- Drizzle with caramel sauce before serving.
Notes
For added richness, you can warm the caramel slightly before drizzling. Try adding chopped nuts as a garnish for extra texture.
Nutrition
- Serving Size: 1 piece
- Calories: 320
- Sugar: 18g
- Sodium: 200mg
- Fat: 20g
- Saturated Fat: 12g
- Unsaturated Fat: 8g
- Trans Fat: 0g
- Carbohydrates: 34g
- Fiber: 1g
- Protein: 4g
- Cholesterol: 100mg
Keywords: cheesecake, apple dessert, caramel, fall recipes, autumn desserts, family gatherings