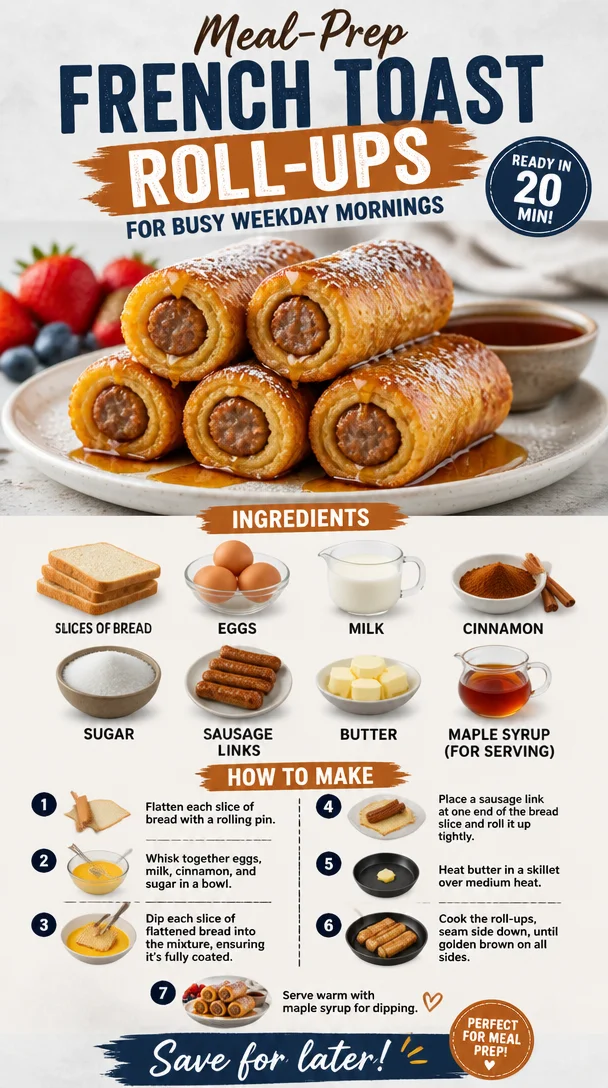
Meal-Prep French Toast Roll-Ups for Busy Weekday Mornings
Deliciously Fun French Toast Roll-Ups: A Breakfast to Remember
Hello food lovers! Today, I’m thrilled to dive into one of my all-time favorite breakfast treats: French Toast Roll-Ups. Not only are they a feast for the eyes with their whimsical appearance, but they also take the classic comfort of French toast and elevate it to a whole new level of deliciousness. Picture this: crispy, golden-brown rolls filled with sweet goodness, drizzled with maple syrup, and served up alongside some savory sausage links. Oh, yes, please!
A Toast to Nostalgia: My French Toast Adventure
I’ll never forget the magical mornings of my childhood, lounging in my pajamas as the smells of breakfast wafted through the air. My mom would whip up a variety of breakfast delights, but nothing garnered more excitement than her French toast. However, one day, she introduced a twist that changed the game forever: French Toast Roll-Ups!
There I was, sitting at the table, wide-eyed and excited as she used slices of white bread, rolled them out, filled them with a delightful mixture of cream cheese and cinnamon sugar, and dipped them in an egg-milk mixture. It felt like magic! As we rolled the slices up and cooked them to perfection, the anticipation grew. The crispy texture combined with the gooey, sweet filling was an instant hit!
Fast forward to now, and those happy memories remain alive and well in my heart — and in my kitchen! This dish has become a staple at our family gatherings, where everyone eagerly looks forward to munching on these delicious French toast roll-ups. So, grab your apron, and let’s recreate this delightful memory together!
Ingredients
- Slices of bread: Any type you love will work! A classic white bread is perfect, but whole grain and brioche add a unique flavor. You can even use gluten-free bread if needed.
- Eggs: This is the binding agent that gives our roll-ups their delicious custardy texture. Using large eggs is ideal, but feel free to substitute with egg whites or flaxseed meal as a vegan option.
- Milk: Whole milk gives a creamier texture. You can swap this for almond milk, oat milk, or any dairy-free alternative — just be aware that it may slightly alter the flavor.
- Cinnamon: A warm, aromatic spice that brings comfort to your taste buds. You can also play around with nutmeg or even allspice for a fun twist.
- Sugar: Regular granulated sugar sweetens the filling nicely. If you’re looking for a healthier alternative, try coconut sugar or a sugar substitute like Stevia.
- Sausage links: A savory pairing! Finish off the meal with pork, turkey, or plant-based sausage for a delicious contrast.
- Butter: You’ll want this for cooking for that rich flavor and beautiful golden crust. Consider using olive oil or vegan margarine for a lighter option.
- Maple syrup (for serving): The pièce de résistance! It ties all flavors together. If you’re feeling adventurous, try flavored syrups, like vanilla or cinnamon.
Step-by-Step Instructions
-
Prep Your Bread: Start by taking your slices of bread and rolling them out gently with a rolling pin. This will make them easier to fill and roll. Get those muscles working — it’s a mini workout! If you don’t have a rolling pin handy, a wine bottle works just as well in a pinch!
-
Make the Filling: In a small bowl, combine a generous couple of tablespoons of cream cheese — softened to room temperature — with a sprinkle of cinnamon and sugar. Mix well until creamy. This step is crucial; it’s what makes our roll-ups decadent! If you really want to make it a party, add a few mini chocolate chips for a surprise inside.
-
Fill and Roll: Take your rolled-out slice of bread, spread a tablespoon of the cream cheese mixture down the center, and roll it up tightly, tucking in the ends to seal. It’s a bit of a rolling adventure — just make sure they don’t unravel! You might feel like a sushi chef; just keep those rolls secure, friends!
-
Prepare the Egg Mixture: In a shallow bowl, whisk together eggs and milk. This combination will coat the roll-ups, enriching them with that classic French toast flavor. Add a pinch of salt, and let’s get dipping!
-
Heat the Pan: In a non-stick skillet or griddle, melt a bit of butter over medium heat. This is where the magic begins! You want that butter to foam slightly but not burn, just like the perfect backdrop for your culinary masterpiece.
-
Dunk and Cook: Take each rolled-up piece and dip it into the egg mixture, ensuring it’s well-coated. Gently place it in the hot skillet seam side down. Allow them to cook for about 2-3 minutes on each side until they’re golden brown and crispy.
-
Serve with Flair: Once cooked, carefully transfer your gorgeous roll-ups to a plate. Top them with a dusting of powdered sugar and, why not, a drizzle of warm maple syrup. Serve with some sausage links on the side, and voilà — breakfast is served!
Serving Suggestions
When it comes to plating, go for a rustic vibe. Arrange the French Toast Roll-Ups diagonally on a large platter. Finish with a light dusting of powdered sugar and a glorious drizzle of maple syrup for that ooey-gooey effect. You can even add a sprig of mint for a pop of color — it’s the little things that count!
Recipe Variations
- Berry Bliss: Add fresh berries into the filling for a burst of fruity flavor! Strawberries, blueberries, or raspberries work beautifully.
- Chocolate Indulgence: Swap out the cream cheese filling for Nutella or peanut butter for a rich, chocolaty alternative. Talk about over-the-top!
- Savory Spin: Transform your roll-ups into a savory dish by including scrambled eggs and sautéed veggies in the filling. Top with avocado for extra creaminess!
- Overnight Option: Prepare everything the night before, pop them in the fridge, and just cook them up in the morning for a seamless breakfast experience.
Chef’s Notes
Oh, how this recipe has evolved! Years ago, it started as a simple breakfast favorite to accommodate my family’s sweet cravings. Since then, it’s become a canvas for creativity in my kitchen! I’ve experimented with flavors, fillings, and assorted toppings. My daughters even started making their own versions, and I couldn’t be prouder! Every roll-up has its own story and providing this dish to friends or family always sparks joy.
FAQs and Troubleshooting
1. Why did my roll-ups unravel while cooking?
- Make sure to roll them tightly and seal the ends before dipping. If it’s still happening, try using a bit of the egg mixture to seal the seam more securely.
2. My filling is oozing out. What happened?
- This usually happens if the filling is too generous or if it’s not rolled tightly enough. Next time, opt for smaller amounts of filling, and be sure to press the rolls firmly together.
3. Can I use whole grain bread?
- Absolutely! Whole grain bread will add a nutty flavor and make it a bit healthier. Just keep in mind that different breads may absorb the egg mixture differently.
4. Can I make these ahead of time?
- Yes! Feel free to prep them the night before and store them in the fridge. Just pop them in the skillet in the morning for a quick breakfast!
Now that you have the recipe to create these scrumptious French Toast Roll-Ups, I hope you’ll adventure into your kitchen with glee! Remember, cooking is all about the joy of creating and sharing with loved ones. So, tie that apron, gather your ingredients, and let’s make some magic happen. Your breakfast table is about to be transformed!
Welcome to your new breakfast tradition. Happy cooking!
PrintDeliciously Fun French Toast Roll-Ups

These French Toast Roll-Ups are crispy, golden-brown rolls filled with a sweet cream cheese mixture, drizzled with maple syrup for an unforgettable breakfast treat.
- Prep Time: 15 minutes
- Cook Time: 10 minutes
- Total Time: 25 minutes
- Yield: 4 servings 1x
- Category: Breakfast
- Method: Pan-frying
- Cuisine: American
- Diet: Vegetarian
Ingredients
- Slices of bread (white, whole grain, brioche, or gluten-free)
- 4 large Eggs
- 1 cup Whole milk (or dairy-free alternative)
- 1 tsp Cinnamon
- 1/4 cup Sugar
- Sausage links (pork, turkey, or plant-based)
- Butter (for cooking)
- Maple syrup (for serving)
Instructions
- Prep your bread by rolling it out gently with a rolling pin.
- Make the filling by mixing cream cheese, cinnamon, and sugar until creamy.
- Fill each slice of bread with the cream cheese mixture and roll it up tightly.
- Prepare the egg mixture by whisking together eggs and milk with a pinch of salt.
- Heat a non-stick skillet or griddle over medium heat and melt some butter.
- Dunk each roll-up in the egg mixture and cook seam side down until golden brown.
- Serve with a dusting of powdered sugar and warm maple syrup.
Notes
Feel free to experiment with different fillings, such as berries or chocolate, and serve with a side of sausage for a complete meal.
Nutrition
- Serving Size: 1 serving
- Calories: 350
- Sugar: 10g
- Sodium: 300mg
- Fat: 15g
- Saturated Fat: 8g
- Unsaturated Fat: 7g
- Trans Fat: 0g
- Carbohydrates: 45g
- Fiber: 2g
- Protein: 12g
- Cholesterol: 150mg
Keywords: French toast, breakfast, roll-ups, sweet treat
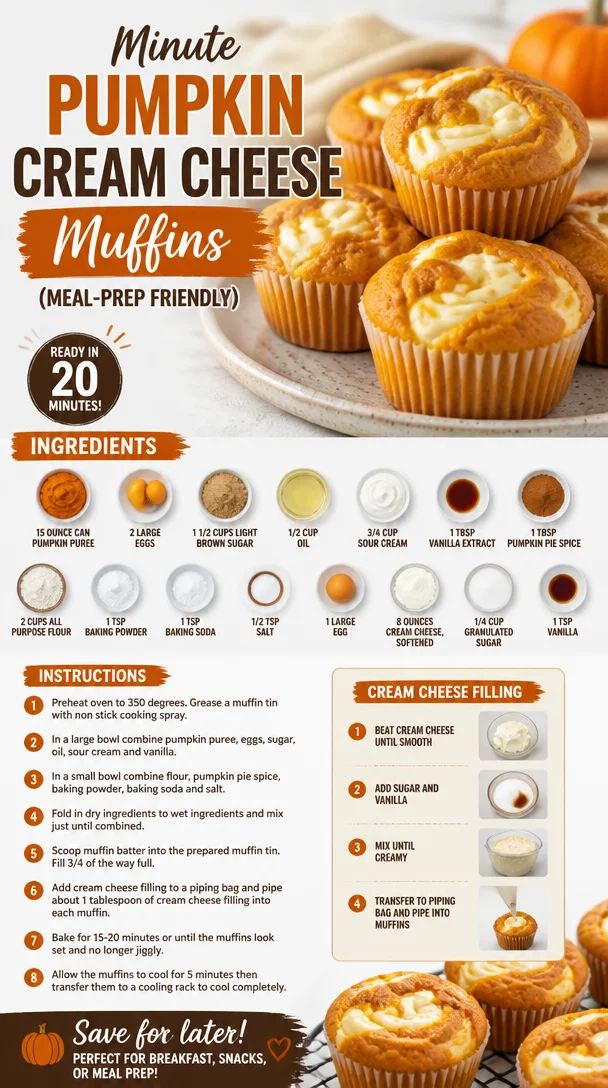
Minute Pumpkin Cream Cheese Muffins (Meal-Prep Friendly)
Pumpkin Cream Cheese Muffins: The Cozy, Fall-Inspired Treat You Need
Hello, my dear culinary adventurers! Today, we’re diving deep into the soft, aromatic world of Pumpkin Cream Cheese Muffins. Imagine waking up to a warm, spiced kitchen, the scent of baked pumpkin wafting through the air, and you, savoring a remarkable muffin that’s everything you love about fall wrapped into each delicious bite. Whether you’re enjoying it with your morning coffee or as an afternoon snack, these muffins promise to be the cozy hug you’ve been craving.
To me, the act of baking muffins feels like wrapping yourself in your favorite blanket on a crisp autumn day. There’s something profoundly comforting about measuring out ingredients, mixing them together, and coaxing them into golden perfection in the oven. And let’s face it: who doesn’t love a delectable pumpkin treat topped with a lusciously creamy filling?
A Little Slice of My Pumpkin Love Story
Let me take you back to a beautiful fall afternoon that forever changed my relationship with pumpkin baked goods. It was a few years ago, and I’d decided to host a casual get-together for my friends. Armed with my trusty recipe book and a mind buzzing with inspirations, I needed something that would delight their taste buds and warm their hearts.
As I flipped through the pages, I spotted a recipe for pumpkin muffins. Instantly, nostalgia washed over me. I recalled my grandmother’s kitchen filled with laughter, candlelight, and the heavenly scents of spiced desserts. Baking with her was pure magic; I had memories of her teaching me to mix ingredients as she told stories about her own kitchen adventures.
Determined to bring a bit of that warmth into my gathering, I put on my apron and got to work. The highlight was undoubtedly the cream cheese filling—an unexpected twist that left my friends begging for the recipe. That day defined my culinary journey, leading me to create my signature Pumpkin Cream Cheese Muffins.
Now, let’s roll up those sleeves and make some magic happen in your kitchen!
Ingredients
-
15-ounce can pumpkin puree: This is the star of our muffins. Look for 100% pumpkin puree, not pumpkin pie filling. You can use homemade puree if you’re feeling ambitious!
-
2 large eggs: They help bind the ingredients, adding moisture and richness. If you’re out of eggs, you can substitute each egg with 1/4 cup unsweetened applesauce.
-
1 ½ cups light brown sugar: This gives our muffins a warm, caramel-like sweetness. If brown sugar isn’t handy, you can use granulated sugar, but consider adding a tablespoon of molasses for that depth of flavor!
-
½ cup oil: I recommend vegetable or canola oil for that nice moisture. You can switch it with melted coconut oil or even unsweetened applesauce for a healthier alternative.
-
¾ cup sour cream: This adds moistness and a slight tang. Greek yogurt works just as well as a substitute!
-
1 tbsp vanilla extract: To brighten flavors, add complexity. Use pure vanilla for the best results; imitation can be a bit one-note.
-
1 tbsp pumpkin pie spice: This blend of fall spices elevates our recipe. If you don’t have this on hand, mix your own with equal parts cinnamon, nutmeg, and ginger.
-
2 cups all-purpose flour: A must for structure, making our muffins fluffy. For a whole grain option, try swapping half with whole wheat flour.
-
1 tsp baking powder: This is key for creating lightness. Always check the date; expired baking powder won’t give you the rise you need.
-
1 tsp baking soda: Helps with the rise and gives our muffins that lovely texture.
-
½ tsp salt: Balance is essential; it helps enhance all the flavors.
-
1 large egg (for cream cheese filling): We’ll use this to bind our delicious filling together.
-
8 ounces cream cheese, softened: The rich, velvety filling that takes these muffins to the next level.
-
¼ cup granulated sugar (for filling): To sweeten the cream cheese and pair perfectly with the pumpkin.
-
1 tsp vanilla (for filling): Just like in the muffin batter, this enhances the flavors beautifully.
Step-by-Step Instructions
Step 1: Preheat your oven to 350°F (175°C). This is the perfect temp for ensuring those muffins bake evenly and come out perfectly golden.
Step 2: In a large mixing bowl, whisk together the pumpkin puree, eggs, brown sugar, oil, sour cream, and vanilla. Make sure everything is well combined—this is crucial for a uniform batter. Feel free to use a hand mixer for about 1–2 minutes if you want to make it easy.
Step 3: In a separate bowl, combine the flour, baking powder, baking soda, pumpkin pie spice, and salt. This step is essential for evenly distributing the leavening agents. Gradually fold this dry mixture into the wet ingredients. Use a spatula or wooden spoon, and be gentle! Overmixing can lead to dense muffins.
Step 4: Prepare the cream cheese filling! In another bowl, mix the softened cream cheese, egg, granulated sugar, and vanilla until it’s smooth and well combined. You want it to be fluffy and creamy.
Step 5: Line your muffin tin with paper liners and fill each liner halfway with pumpkin batter. Next, add a dollop (about a tablespoon) of the cream cheese filling on top of this layer. Finally, top it with another spoonful of the pumpkin batter. Do a gentle swirl with a toothpick or knife to create beautiful marbled muffins.
Step 6: Bake in the preheated oven for 20-25 minutes or until a toothpick inserted into the center comes out clean. Be sure to keep an eye on them after the 20-minute mark; we want them fluffy and moist, not overdone.
Step 7: Once done, remove them from the oven and let them cool in the pan for about 5–10 minutes before transferring them to a wire rack. The cooling step is important; it allows the muffins to continue baking slightly while they cool down!
Serving Suggestions
These muffins are best enjoyed warm, lightly dusted with powdered sugar or drizzled with maple glaze for that extra flair. Pair them with a hot cup of coffee, a spiced chai, or even a cozy tea for the ultimate fall experience. If you want to get creative, try adding a sprinkle of chopped nuts or chocolate chips on top before baking for added texture.
Recipe Variations
- Nutty Pumpkin Muffins: Add about 1/2 cup of chopped walnuts or pecans to the batter for a delightful crunch.
- Chocolate Chip Pumpkin Cream Cheese Muffins: Fold in a handful of semisweet or dark chocolate chips for a decadent twist.
- Gluten-Free Option: Replace the all-purpose flour with a good gluten-free baking mix to indulge without worry.
- Sugar-Free Version: Use a sugar substitute like monk fruit sweetener in place of granulated and brown sugar.
Chef’s Notes
This recipe has evolved over time—it started as a basic pumpkin muffin but blossomed into this rich, creamy masterpiece that has graced many of my gatherings. I’ll admit, the first time I made these with a friend, the excitement got to us, and we ‘taste-tested’ quite a few before they even made it to the party itself. We couldn’t resist the fluffy, warm muffins, fresh from the oven!
FAQs and Troubleshooting
1. My muffins didn’t rise! What happened?
- Ensure your baking powder and baking soda are fresh, as old leavening agents won’t provide the rise needed. Also, avoid overmixing your batter.
2. Can I make the muffins in advance?
- Absolutely! These muffins store well in an airtight container for about 3-4 days at room temperature. You can also freeze them for up to 3 months. Just make sure to wrap them tightly!
3. My cream cheese filling oozed out during baking. What went wrong?
- Oozing usually happens when the filling is too liquidy. Make sure to mix the cream cheese filling until it’s well blended and fluffy without over-mixing.
4. Can I substitute the pumpkin?
- In a pinch, sweet potato puree works beautifully as an alternative. Just be cautious with the moisture levels; sweet potatoes can be creamier than pumpkin.
Nutritional Info
Note: Nutritional values can vary based on the exact ingredients used, but here’s a rough estimate per muffin:
- Calories: 210
- Carbohydrates: 30g
- Protein: 3g
- Fat: 9g
- Fiber: 1g
- Sugar: 12g
So there you have it! Whip up a batch of these Pumpkin Cream Cheese Muffins, pour yourself that comforting drink, and enjoy every moment spent in your kitchen. Good food isn’t just about the ingredients—it’s about the moments we create around it. Let’s set that table and bring people together, one muffin at a time! Happy baking!
PrintPumpkin Cream Cheese Muffins
Cozy, fall-inspired muffins filled with creamy pumpkin and spice, perfect for any occasion.
- Prep Time: 15 minutes
- Cook Time: 25 minutes
- Total Time: 40 minutes
- Yield: 12 servings 1x
- Category: Dessert
- Method: Baking
- Cuisine: American
- Diet: Vegetarian
Ingredients
- 1 (15-ounce) can pumpkin puree
- 2 large eggs
- 1 ½ cups light brown sugar
- ½ cup vegetable oil
- ¾ cup sour cream
- 1 tbsp vanilla extract
- 1 tbsp pumpkin pie spice
- 2 cups all-purpose flour
- 1 tsp baking powder
- 1 tsp baking soda
- ½ tsp salt
- 1 large egg (for cream cheese filling)
- 8 ounces cream cheese, softened
- ¼ cup granulated sugar (for filling)
- 1 tsp vanilla (for filling)
Instructions
- Preheat your oven to 350°F (175°C).
- In a large mixing bowl, whisk together the pumpkin puree, eggs, brown sugar, oil, sour cream, and vanilla.
- In a separate bowl, combine the flour, baking powder, baking soda, pumpkin pie spice, and salt.
- Prepare the cream cheese filling by mixing softened cream cheese, egg, granulated sugar, and vanilla until smooth.
- Line your muffin tin with paper liners and fill each liner halfway with pumpkin batter, then add a dollop of cream cheese filling.
- Top with another spoonful of pumpkin batter and swirl with a toothpick.
- Bake for 20-25 minutes or until a toothpick inserted comes out clean.
- Remove from oven and cool in the pan for 5-10 minutes before transferring to a wire rack.
Notes
These muffins are best enjoyed warm, optionally dusted with powdered sugar or drizzled with maple glaze.
Nutrition
- Serving Size: 1 muffin
- Calories: 210
- Sugar: 12g
- Sodium: 300mg
- Fat: 9g
- Saturated Fat: 3g
- Unsaturated Fat: 4g
- Trans Fat: 0g
- Carbohydrates: 30g
- Fiber: 1g
- Protein: 3g
- Cholesterol: 50mg
Keywords: pumpkin muffins, cream cheese muffins, fall baking, pumpkin recipes, cozy desserts
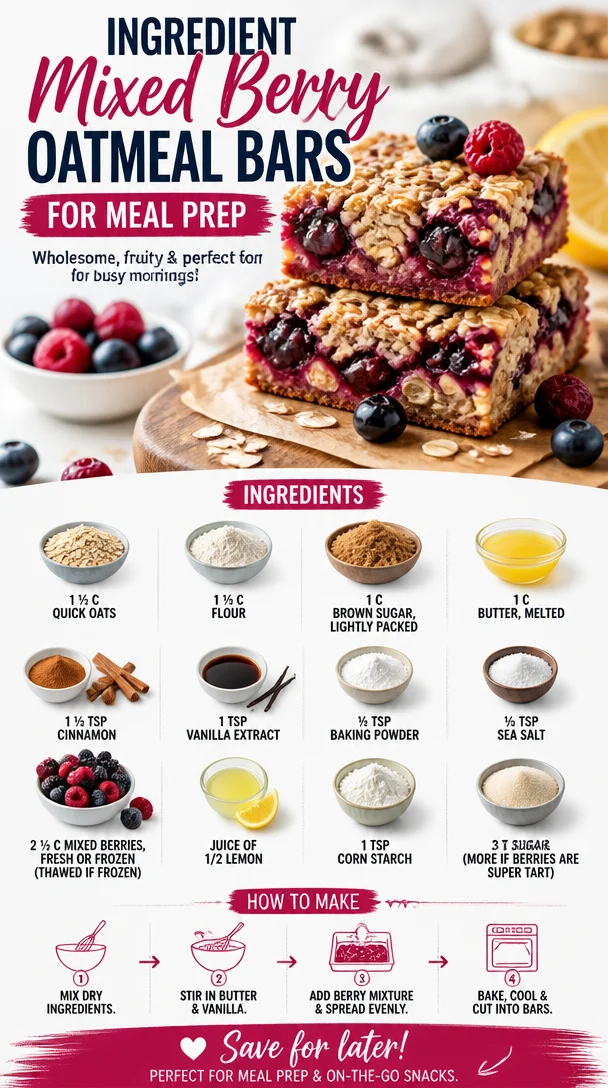
Ingredient Mixed Berry Oatmeal Bars for Meal Prep
Mixed Berry Oatmeal Bars: A Taste of Nostalgia
Hello, lovely foodies! Grab your aprons and get ready to embark on a delicious journey into the world of Mixed Berry Oatmeal Bars. There’s something incredibly special about a recipe that combines simplicity with nostalgia, and these bars do just that. Whether you’re looking for a delightful breakfast treat, a snack for your afternoon tea, or a sweet indulgence to satisfy your dessert cravings, these oatmeal bars are here to steal the show!
Personal Story: A Whiff of Summer
Growing up, my summers were all about vibrant berries. My family had a tradition of heading to the local farm where we’d pick fresh strawberries, blueberries, and raspberries until our baskets overflowed. There was something magical about stepping into those sun-drenched fields, with the air filled with the sweet aroma of ripening fruit. We’d pick, laugh, and eat berries until our fingers (and faces) were stained a deep crimson or azure.
After our adventures, my mother would become our family’s kitchen magician. One of her favorite recipes was a berry crumble that then inspired these oatmeal bars. I can still hear the bubbling sound of berries simmering on the stovetop, mixed with the warm notes of cinnamon wafting through our home. We would gather around the table, eagerly awaiting the first cut into that gorgeous, gooey dessert. It was during those cherished moments that I realized how food could create such lasting connections and memories with loved ones.
So, in the spirit of those beautiful summer days, let’s create a recipe that embodies joy, simplicity, and an abundance of flavor! Here’s how you can make these Mixed Berry Oatmeal Bars at home.
Ingredients
It doesn’t take much to bring these delicious bars to life! Let’s go over the ingredients you’ll need:
-
1 ½ cups quick oats
These oats provide the chewy base for our bars. Quick oats cook faster and offer a delightful texture. If you prefer, you can swap them with rolled oats for a heartier bite. -
1 ½ cups all-purpose flour
This is the foundation of the bars, lending them structure. If you’re going for a gluten-free option, almond flour or a gluten-free flour blend works wonders! -
1 cup brown sugar, lightly packed
Brown sugar gives a lovely depth of flavor, thanks to its molasses content. You can use coconut sugar for a healthier twist or even replace it with granulated sugar if you’re in a pinch. -
1 cup butter, melted
Melting the butter brings richness and helps bind the ingredients together. For a lighter option, substitute half of the butter with unsweetened applesauce! -
1 ½ teaspoon cinnamon
This warm spice adds warmth and depth to our bars. You could swap it out for nutmeg for a completely different spice profile. -
1 teaspoon vanilla extract
Vanilla enhances all the flavors in these bars. Feel free to use almond extract for a nutty flavor! -
½ teaspoon baking powder
This helper gives our bars a slight rise, making them soft and fluffy. Baking soda can be used instead; just remember to decrease the amount slightly! -
½ teaspoon sea salt
Salt balances the sweetness and elevates the overall taste. If you’re watching sodium, kosher salt is a great substitute! -
2 ½ cups mixed berries (fresh or frozen)
The star of the show! Use whatever berries you love. If you’re using frozen, don’t forget to thaw and drain them first. -
Juice of ½ lemon
A splash of lemon juice brightens the berry flavor and helps cut through the sweetness. Lime juice makes a zesty alternative! -
1 teaspoon cornstarch
This thickens the berry mixture, ensuring your bars hold together beautifully. If you don’t have cornstarch, flour will do in a pinch! -
3 tablespoons sugar (more if berries are super tart)
A touch of sugar sweetens the berry filling just right. Adjust based on the sweetness of your berries!
Step-by-Step Instructions
Alright, let’s get cookin’! Follow these simple steps, and soon enough, you’ll have a batch of these scrumptious bars cooling on your counter.
-
Preheat Your Oven
Preheat your oven to 350°F (175°C). This step ensures your bars bake evenly. While the oven warms up, you can prepare your baking pan! -
Grease Your Baking Pan
Grease a 9×13 inch baking pan with butter or line it with parchment paper for easy removal. The parchment will give you crisp edges and prevent any sticky moments. Trust me; it’s worth it! -
Mix the Dry Ingredients
In a large bowl, combine the quick oats, flour, cinnamon, baking powder, and sea salt. Whisk them together until they are evenly mixed. This ensures the flavors distribute evenly throughout the bars. -
Combine the Wet Ingredients
In another bowl, whisk together the melted butter, brown sugar, and vanilla extract until smooth and creamy. Now, here’s a little chef hack: don’t let the butter cool too much before mixing with the sugar; warm butter helps dissolve the sugar, making for a moist bar. -
Create the Oat Mixture
Pour the wet ingredients into the dry mixture and stir until just combined. Don’t overmix! We want a nice crumbly texture where you can see the oats. -
Set Aside for Filling
Reserve about 1 to 1 ½ cups of the oat mixture (we’ll use this for the topping). Press the rest into the bottom of your prepared baking pan. Use a spatula to spread it out evenly. -
Prepare the Berry Filling
In a medium bowl, toss your mixed berries with lemon juice, cornstarch, and sugar. This juicy goodness is what will make your bars sing! Even if I’m using frozen berries, I still love this step; it creates a sweet and zesty burst when baked. -
Spread the Berry Mixture
Carefully spread the berry mixture over the pressed oat base. Don’t be shy; we want to maximize that berry goodness! -
Top It Off
Crumble the reserved oat mixture over the berry layer. There’s no need to cover it completely; let the berries peek through for that gorgeous rustic vibe! -
Bake Until Golden
Pop the pan in the oven and bake for 25-30 minutes, or until the top is golden and the berries are bubbling. The smell that’ll fill your kitchen will make it hard to wait, but trust me; it’s worth it! -
Cool and Cut
Once baked, let the bars cool in the pan for at least 10 minutes, then lift them out with the parchment paper. Cool completely before cutting into squares (if you can resist the temptation!).
Serving Suggestions
When it comes to serving these Mixed Berry Oatmeal Bars, a simple presentation can go a long way. Slice them into squares or rectangles and place them on a beautiful platter. For an elegant touch, dust them with powdered sugar or serve with a dollop of whipped cream or a scoop of vanilla ice cream. They’re perfect for brunch gatherings, afternoon tea, or just as an after-dinner sweet. Pair them with a cup of chamomile tea or a latte, and you’ll be set for a lovely experience!
Recipe Variations
These oatmeal bars are so versatile; you can mix things up with some creative twists!
- Nutty Delight: Add in ½ cup of chopped nuts like almonds or walnuts for an extra crunch.
- Tropical Vibes: Swap the berries for mango and coconut for a tropical twist.
- Chocolate Chip Heaven: Stir in some chocolate chips for a dessert version that’s sure to please!
- Vegan Version: Replace butter with coconut oil and the eggs with flaxseed to make this recipe vegan-friendly.
- Spice It Up: Switch to pumpkin pie spice for a fall-inspired flavor that everyone will adore.
Chef’s Notes
Cooking is a delightful journey; I often find inspiration in the simplest of moments. The original recipe for these bars has evolved over the years, as I’ve experimented with different berries and flavor combinations. One funny kitchen story? Once, I accidentally grabbed cayenne pepper instead of cinnamon! Let’s just say—spicy oatmeal bars aren’t for the faint of heart!
These bars truly capture the essence of what home baking is about. They are comforting, delicious, and somehow remind me of those carefree childhood summers. I hope you create your own memories with this recipe!
FAQs and Troubleshooting
-
Why are my bars crumbly?
If your bars turn out crumbly, it could be due to not using enough butter or not compressing the oat mixture firmly enough into the pan. Make sure to pack the bottom layer down well! -
Can I use frozen berries?
Absolutely! Just remember to thaw them and drain any excess liquid to prevent soggy bars. Trust me, they’ll still be absolutely delicious! -
How do I store leftovers?
Store any leftovers in an airtight container in the fridge for up to a week. You can also freeze them for up to three months; just thaw before enjoying. -
Can I make these bars gluten-free?
Yes! Simply swap out regular flour for a gluten-free flour blend and ensure your oats are certified gluten-free. A marvelous treat for everyone!
Nutritional Info
Note: The nutritional information varies based on ingredient brands and specific substitutions used. Generally, each bar is a delightful balance of fiber, healthy fats, and a hint of sweetness with a burst of berry freshness!
Conclusion
I hope this Mixed Berry Oatmeal Bars recipe brightens your kitchen and brings a smile to your face. Engage your senses and savor the flavors, all while creating warm moments around your table. Let’s continue to celebrate the joy of cooking together, one recipe at a time!
Tie your apron, gather your loved ones, and embrace the warmth of home-baked goodness. Happy cooking!
PrintMixed Berry Oatmeal Bars
Delicious and nostalgic Mixed Berry Oatmeal Bars perfect for breakfast, snacks, or dessert.
- Prep Time: 15 minutes
- Cook Time: 30 minutes
- Total Time: 45 minutes
- Yield: 12 servings 1x
- Category: Snack
- Method: Baking
- Cuisine: American
- Diet: Vegetarian
Ingredients
- 1 ½ cups quick oats
- 1 ½ cups all-purpose flour
- 1 cup brown sugar, lightly packed
- 1 cup butter, melted
- 1 ½ teaspoon cinnamon
- 1 teaspoon vanilla extract
- ½ teaspoon baking powder
- ½ teaspoon sea salt
- 2 ½ cups mixed berries (fresh or frozen)
- Juice of ½ lemon
- 1 teaspoon cornstarch
- 3 tablespoons sugar (more if berries are super tart)
Instructions
- Preheat your oven to 350°F (175°C).
- Grease a 9×13 inch baking pan with butter or line with parchment paper.
- Mix the dry ingredients: oats, flour, cinnamon, baking powder, and sea salt.
- Combine the wet ingredients: whisk together melted butter, brown sugar, and vanilla extract.
- Create the oat mixture by pouring wet ingredients into the dry and stir until just combined.
- Set aside about 1 to 1 ½ cups of the oat mixture for the topping; press the rest into the bottom of your baking pan.
- Prepare the berry filling: mix berries with lemon juice, cornstarch, and sugar.
- Spread the berry mixture over the pressed oat base.
- Top with the reserved oat mixture, crumbling it over the berries.
- Bake for 25-30 minutes until golden and bubbly.
- Cool for at least 10 minutes before lifting out and slicing.
Notes
Store leftovers in an airtight container for up to a week. Can be frozen for three months.
Nutrition
- Serving Size: 1 serving
- Calories: 200
- Sugar: 10g
- Sodium: 150mg
- Fat: 9g
- Saturated Fat: 5g
- Unsaturated Fat: 2g
- Trans Fat: 0g
- Carbohydrates: 30g
- Fiber: 3g
- Protein: 3g
- Cholesterol: 30mg
Keywords: oatmeal bars, berry dessert, easy snack, healthy treats, summer recipes
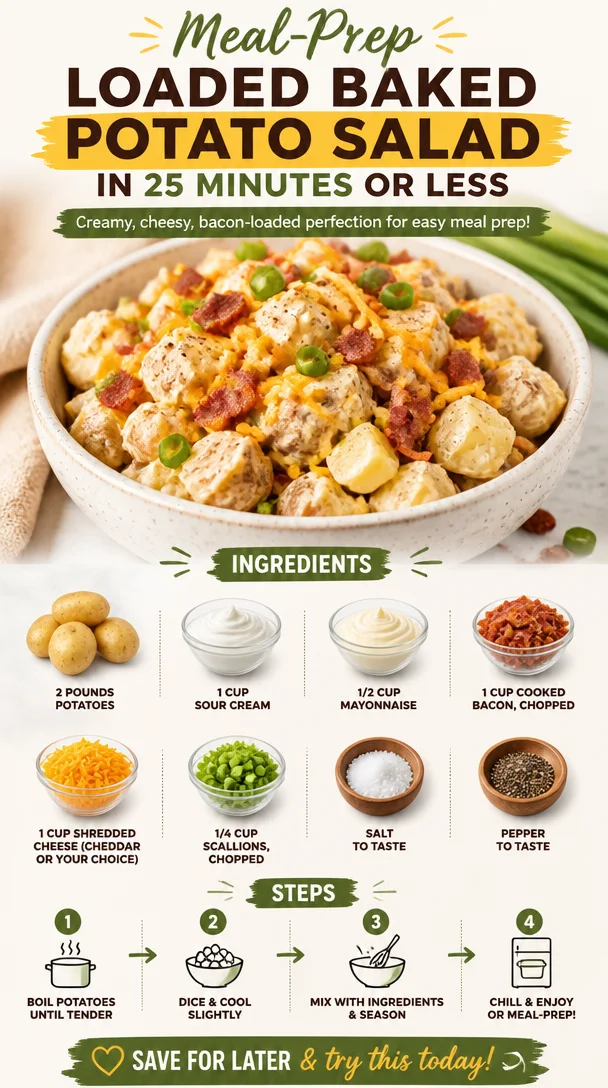
Meal-Prep Loaded Baked Potato Salad in 25 Minutes or Less
Loaded Baked Potato Salad: The Perfect Blend of Comfort and Flavor
Welcome, foodies! Today, we’re diving into one of the most heavenly combinations of flavors and textures: loaded baked potato salad. Yes, you heard that right—this dish merges the classic warmth of baked potatoes with the charm of potato salad, creating a unique and delicious experience that’s impossible to resist.
Picture this: a sunny afternoon, your friends gathered around the backyard table, laughter mingling with the aroma of grilled burgers wafting through the air. You reach for a bowl of this loaded potato salad, and suddenly, everything feels a little more celebratory. It’s that kind of dish that doesn’t just fill you up; it makes you feel connected, joyful, and deeply satisfied. Whether it’s a summer BBQ or a winter potluck, this loaded baked potato salad is the ultimate crowd-pleaser.
A Bite of Nostalgia
I can’t help but reminisce about the first time I made a version of this dish for a family gathering. My mom had always been the queen of summer picnics and potlucks—her coleslaw was legendary, and her mashed potatoes were sought after. One warm Saturday, we decided to get creative and whip up a salad that combined our love for her classic potato salad with the toppings of a loaded baked potato. Picture us, giggling, mixing ingredients, and sneaking bites of crispy bacon straight from the pan when we thought no one was looking! That day sparked a kitchen experiment that has become a staple in my repertoire.
Fast forward to today, and I’ve refined that childhood creation into the loaded baked potato salad I’m thrilled to share with you. It may evoke nostalgia for family gatherings and picnics, but it’s also a dish that feels fresh and exciting, inviting everyone to dig in and enjoy. Let’s roll up our sleeves and make some magic happen in your kitchen!
Ingredients
Here’s what you’ll need to create this incredible dish:
-
2 pounds potatoes
A good, starchy potato like Russets or Yukon Golds works best. They’re fluffy once cooked and hold up to mixing without turning mushy. If you’re looking to cut carbs, try using cauliflower instead! -
1 cup sour cream
This creamy base is essential for flavor and texture. If you want a lighter option, Greek yogurt can be a fantastic substitute—it adds tanginess and creaminess without all the calories. -
1/2 cup mayonnaise
Adds a bit more creaminess to the mix. For a lighter alternative, use a vegan mayo, or for extra zing, try adding a tablespoon of Dijon mustard. -
1 cup cooked bacon, chopped
You can use turkey bacon for a leaner option or even crispy shallots for a vegetarian version. The smokiness of bacon is hard to beat, though! -
1 cup shredded cheese (cheddar or your choice)
Cheddar is a classic choice here, but feel free to experiment! Pepper jack will add a nice kick, or a sharp gouda can provide a rich, buttery depth. -
1/4 cup scallions, chopped
These add a fresh, onion-y crunch, but you could easily swap them for chives or even red onions for a more robust flavor. -
Salt and pepper to taste
Essential seasoning that will enhance every bite. Don’t skip this step—season to your palate, my friends!
Step-by-Step Instructions
Ready to create this masterpiece? Let’s get cooking!
Step 1: Boil the Potatoes
Start by washing and peeling (if desired) your potatoes. Cut them into uniform chunks—about 1-inch pieces work well. Place them in a large pot and cover them with cold, salted water. It’s essential to use cold water, as this helps cook the potatoes evenly.
Chef Tip: Use a generous amount of salt in the water. It helps season the potatoes from the inside out, making every bite flavorful!
Bring the pot to a boil over high heat, then reduce the heat and allow the potatoes to simmer. Cook them until fork-tender, which typically takes about 12-15 minutes. Drain and let them cool slightly before handling them.
Step 2: Mix the Creamy Base
While the potatoes are cooling, in a large mixing bowl, combine the sour cream and mayonnaise. Stir until smooth, and add a sprinkle of salt and pepper.
Little Chef Hack: If you want an extra layer of flavor, toss in a teaspoon of garlic powder or a splash of hot sauce—trust me, it elevates the whole dish!
Step 3: Combine Ingredients
Once the potatoes are cool enough to handle, gently fold them into your creamy mixture. You want to be gentle here so you don’t mush the potatoes. Carefully incorporate the cooked bacon, shredded cheese, and chopped scallions.
Chef’s Insight: If you want to prep this dish ahead of time, consider doing this step a few hours before your gathering. It allows the flavors to meld beautifully in the fridge!
Step 4: Taste and Adjust
Give your salad a final seasoning check by tasting it and adjusting the salt and pepper as needed.
Step 5: Chill and Serve
Cover the bowl with plastic wrap and let it chill in the fridge for at least an hour. This time lets the flavors marry, and trust me, the waiting is worth it.
Serving Suggestions
When serving, opt for a beautiful bowl that highlights the hearty, colorful ingredients. Consider a sprinkle of fresh scallions or additional cheese on top for that extra touch of elegance. This potato salad pairs wonderfully with grilled meats, burgers, or on its own at a picnic. Enjoy it garnished with a few fresh herbs like parsley or chives for a lovely pop of color.
Recipe Variations
Feeling adventurous? Try these exciting twists on the classic loaded baked potato salad:
-
Southwestern Flair: Add black beans, corn, and diced jalapeños for a zesty, southwestern spin. Toss in a bit of lime juice for brightness!
-
Herby Delight: Swap out the cheddar for feta and add fresh herbs like dill or basil for a herbaceous version.
-
Smoky BBQ: Mix in some BBQ sauce for an extra smoky kick. You can also top with crispy fried onions for crunch!
-
Mediterranean Medley: Incorporate olives, sun-dried tomatoes, and a sprinkle of za’atar for a unique twist.
-
Vegan Style: Use plant-based sour cream and mayo, add extra veggies like cucumber, and you’ve got a gorgeous vegan option!
Chef’s Notes
Over the years, this recipe has evolved from a sweet memory of cooking with my mother into my own celebrated dish. I love how adaptable it is—there’s always room for experimentation! I remember one time at a family reunion, I made a huge batch, and it vanished in minutes! I guess it became the star of the show. Plus, seeing my family dig in and enjoy something I made fills my heart with joy.
FAQs and Troubleshooting
1. Can I make this potato salad ahead of time?
Absolutely! This salad actually tastes better after sitting in the fridge for a few hours. Just cover it tightly to keep it fresh.
2. What type of potatoes should I use?
Russets are ideal for creamy mashed textures, but Yukon Golds also work great if you prefer a slightly richer flavor.
3. How do I prevent the potatoes from turning mushy?
Make sure to keep an eye on the potatoes as they boil, testing them with a fork for doneness. Once they’re fork-tender, drain them immediately!
4. Can I add more vegetables?
Definitely! Chopped bell peppers, celery, or even pickles can add a fresh crunch and vibrant flavor to your salad.
Conclusion
There you have it, my fellow kitchen adventurers! This loaded baked potato salad is destined to be a staple in your culinary repertoire. It beautifully blends comfort with elegance, making any gathering or dinner feel special and inviting. Remember, cooking is about connection, joy, and creativity. Each bite tells a story, allowing you to share a slice of your culinary journey with others. So grab your apron, get your friends involved, and let’s make some delicious memories together! Happy cooking!
PrintLoaded Baked Potato Salad
A delicious blend of classic baked potatoes and potato salad, perfect for any gathering.
- Prep Time: 15 minutes
- Cook Time: 15 minutes
- Total Time: 30 minutes
- Yield: 6 servings 1x
- Category: Side Dish
- Method: Boiling
- Cuisine: American
- Diet: Vegetarian
Ingredients
- 2 pounds potatoes (Russets or Yukon Golds)
- 1 cup sour cream
- 1/2 cup mayonnaise
- 1 cup cooked bacon, chopped
- 1 cup shredded cheese (cheddar or your choice)
- 1/4 cup scallions, chopped
- Salt and pepper to taste
Instructions
- Boil the potatoes: Wash and peel the potatoes if desired. Cut them into uniform chunks, about 1 inch. Place them in a large pot with cold, salted water. Bring to a boil and then simmer until fork-tender, about 12-15 minutes. Drain and cool.
- Mix the creamy base: In a large bowl, combine sour cream and mayonnaise. Stir until smooth, then add salt and pepper.
- Combine ingredients: Once potatoes are cool, fold them gently into the creamy mixture along with the bacon, cheese, and scallions.
- Taste and adjust: Check the seasoning and add more salt and pepper if needed.
- Chill and serve: Cover the bowl and chill in the fridge for at least 1 hour before serving.
Notes
This potato salad tastes even better after sitting in the fridge for a few hours.
Nutrition
- Serving Size: 1 serving
- Calories: 350
- Sugar: 3g
- Sodium: 450mg
- Fat: 20g
- Saturated Fat: 7g
- Unsaturated Fat: 10g
- Trans Fat: 0g
- Carbohydrates: 40g
- Fiber: 3g
- Protein: 9g
- Cholesterol: 30mg
Keywords: potato salad, loaded baked potato, summer BBQ, picnic, comfort food
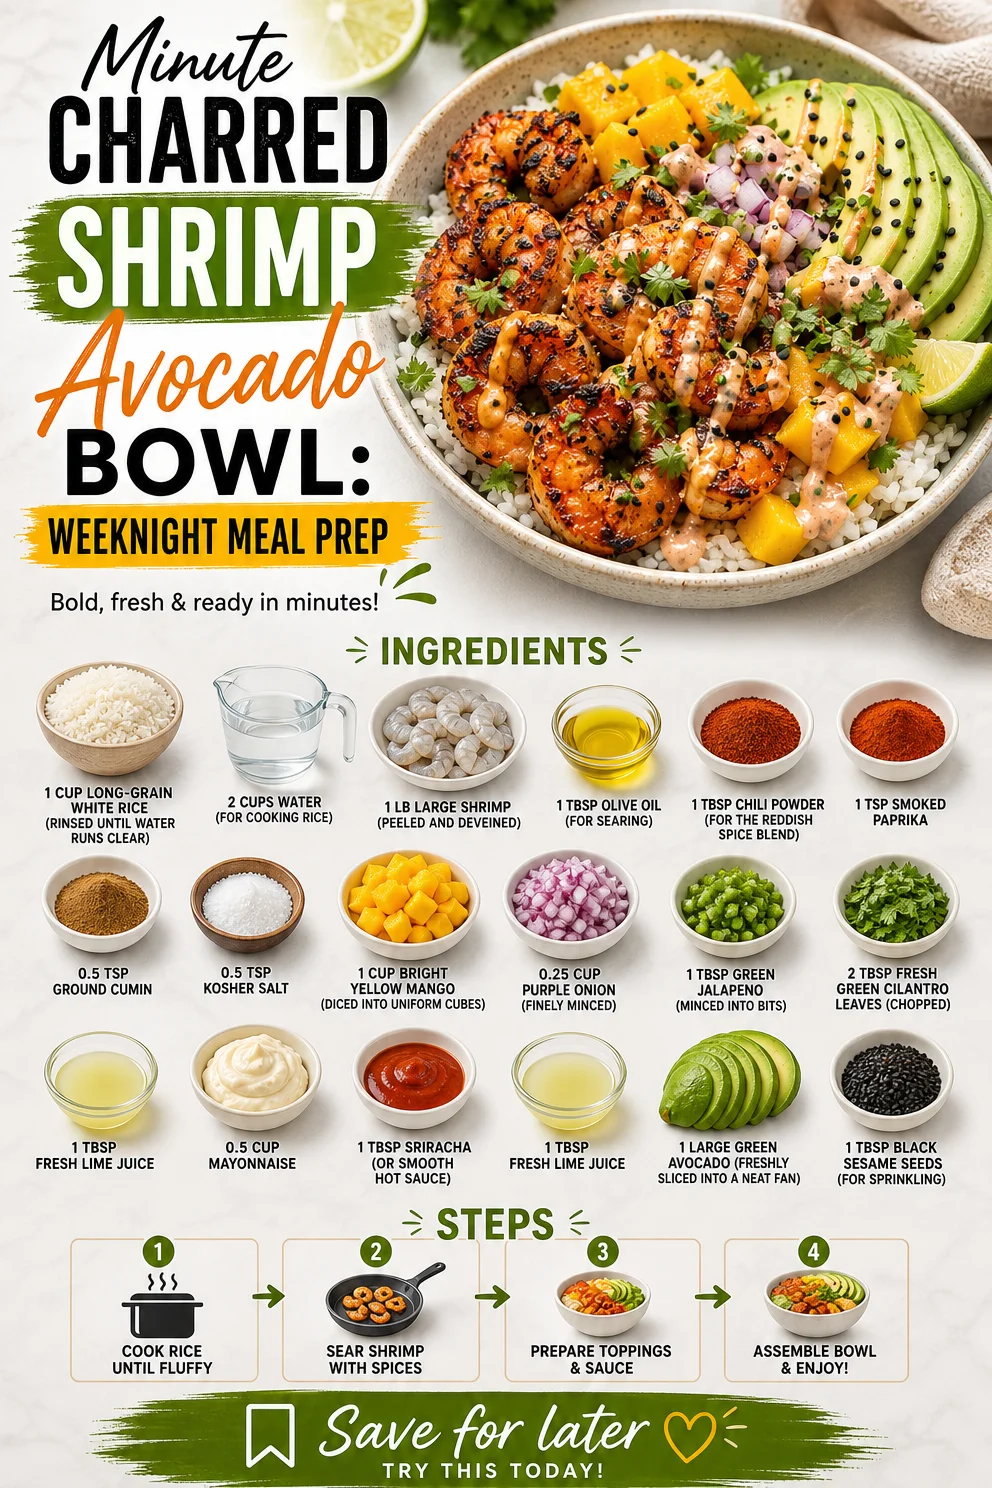
Minute Charred Shrimp Avocado Bowl: Weeknight Meal Prep
The Ultimate Charred Shrimp and Avocado Bowl: A Flavorful Journey
Hello, my fellow food lovers! Today, I’m thrilled to take you on a culinary adventure that stems from one of my absolute favorite dishes—the Charred Shrimp and Avocado Bowl. It’s colorful, packed with flavor, and oh-so satisfying, making it the perfect meal for any occasion. Whether you’re hosting a dinner party or simply looking to spice up your weekday dinner routine, this dish is bound to impress. So, roll up your sleeves, tie on that apron, and let’s get cooking!
A Taste of Nostalgia
Ah, shrimp! This little seafood gem has been a part of many delightful gatherings in my life. I vividly remember a sunny afternoon at my Aunt Mae’s beach house, where she would host fabulous summer cookouts. As children, we would run excitedly along the shoreline while the adults prepared a feast that filled the air with mouthwatering aromas.
One afternoon, Aunt Mae introduced us to her famous charred shrimp skewers, which she marinated in zesty spices and grilled to perfection. It was love at first bite! The smoky flavor combined with a hint of citrus is forever etched in my culinary heart. That experience sparked my passion for cooking and entertaining—teaching me that food is not just about sustenance; it’s about connection and creating cherished memories.
Fast forward to today, and I’ve transformed that memory into my own Charred Shrimp and Avocado Bowl. It brings together juicy shrimp, creamy avocado, and vibrant mango for a dish that sings with freshness and flavor. Are you ready to dive in? Let’s talk ingredients!
Ingredients
-
1 cup long-grain white rice
This serves as the hearty base of your bowl. Rinse the rice well until the water runs clear to remove excess starch for fluffier grains. If you prefer something different, substitute with quinoa or cauliflower rice for a low-carb option. -
2 cups water
Essential for cooking the rice. You can also infuse the water with a bay leaf or a garlic clove for extra flavor. -
1 lb large shrimp
Peeled and deveined, these beauties bring an excellent protein punch. If you’re not a fan of shrimp, feel free to swap in scallops or grilled chicken. -
1 tbsp olive oil
Perfect for searing the shrimp while adding a subtle richness. Don’t have olive oil? Avocado oil or melted butter work just as well. -
1 tbsp chili powder
This spice adds a delicious kick! If you prefer less heat, go easy on it or try a sweeter paprika blend instead. -
1 tsp smoked paprika
This gives a wonderful smoky flavor reminiscent of grill marks, enhancing our charred theme. You can use regular paprika if you prefer a milder taste. -
0.5 tsp ground cumin
Cumin adds warmth and depth. Feel free to experiment with different spices like coriander for an additional layer of flavor! -
0.5 tsp kosher salt
A must for flavor development! You can also try sea salt for a more delicate taste or skip it if you’re watching your sodium intake. -
1 cup bright yellow mango
Fresh mango adds a burst of sweetness and color! If mango isn’t in season, substitute it with peach or pineapple for an equally delightful twist. -
0.25 cup purple onion
Finely minced, this brings a sharp, slightly sweet flavor. Red onion is perfect, but you can also use green onion (scallions) or shallots if preferred. -
1 tbsp green jalapeño
Minced jalapeño adds a nice touch of heat. For those who prefer milder flavors, omit it or replace it with a sprinkle of red pepper flakes. -
2 tbsp fresh green cilantro leaves
Chopped cilantro ties the dish together with its bright herbal notes. If you’re not a fan of cilantro, fresh parsley works nicely! -
1 tbsp fresh lime juice
A splash of lime juice brightens all the flavors! You can substitute with lemon juice if that’s what you have on hand. -
0.5 cup mayonnaise
This creamy base helps create a luscious sauce for the shrimp. If you want to lighten it up, swap half for Greek yogurt or try a vegan mayo. -
1 tbsp sriracha
This adds an exciting heat to the sauce. For less heat, opt for sweet chili sauce or leave it out entirely. -
1 large green avocado
Sliced into a fan for that Instagram-worthy presentation! Make sure your avocado is ripe for that creamy texture. If avocados are scarce, try using sliced cucumbers. -
1 tbsp black sesame seeds
For a final decorative touch! They add a nice crunch and visual pop. White sesame seeds or crushed nuts are wonderful alternatives.
Step-by-Step Instructions
Step 1: Prepare the Rice
Begin by rinsing the 1 cup of long-grain white rice under cold water until the water runs clear. This will help remove excess starch and keep your rice fluffy. In a medium saucepan, combine rinsed rice and 2 cups of water. Bring to a boil over high heat, then reduce to a simmer. Cover and cook for about 18-20 minutes, or until the water is absorbed and the rice is tender. Once done, fluff it with a fork and set it aside.
Chef Tip: Letting the rice rest for a few minutes after cooking allows it to firm up and prevents clumping.
Step 2: Season the Shrimp
While the rice is cooking, let’s get the shrimp ready! In a bowl, combine the 1 lb shrimp with 1 tbsp olive oil, 1 tbsp chili powder, 1 tsp smoked paprika, 0.5 tsp ground cumin, and 0.5 tsp kosher salt. Mix well, ensuring all the shrimp are coated evenly with the spices.
Chef Insight: Don’t be afraid to let the shrimp marinate for 15-30 minutes if you want an extra flavor punch.
Step 3: Sear the Shrimp
Heat a skillet over medium-high heat. Once hot, add the seasoned shrimp in a single layer. Cook for about 2-3 minutes on each side, until they turn pink and opaque. You might want to do this in batches to avoid overcrowding the pan.
Chef Hack: For an extra layer of flavor, squeeze a little lime juice over the shrimp while they cook.
Step 4: Make the Sauce
In a small bowl, combine 0.5 cup mayonnaise, 1 tbsp sriracha, and 1 tbsp fresh lime juice. Mix until smooth and set aside. This sauce will elevate the shrimp and bring everything together.
Serving Suggestion: Try using Greek yogurt instead of mayo for a lighter option!
Step 5: Build Your Bowl
Now comes the fun part! In your serving bowls, start by adding a generous scoop of the fluffy rice. Top it with the charred shrimp, then layer on the diced mango, purple onion, minced jalapeño, chopped cilantro, and the sliced avocado.
Plating Tip: Arrange the avocado in a beautiful fan shape to impress your guests!
Step 6: Drizzle with Sauce and Garnish
Drizzle your spicy mayo sauce over the top, then finish with a sprinkle of black sesame seeds. Voila! You now have a stunning Charred Shrimp and Avocado Bowl.
Serving Suggestions
Presentation is key! Serve the Charred Shrimp and Avocado Bowl in bright, colorful bowls that highlight the dish’s freshness. A sprinkle of fresh herbs and a squeeze of lime on top will add an inviting touch. For a side, consider crunchy tortilla chips or a light salad for added texture.
Recipe Variations
- Spicy Mango Salsa: Swap the diced mango for a spicy mango salsa by mixing diced mango with jalapeños, red onion, and lime juice for a zesty twist.
- Coconut Rice: Replace the water used for cooking rice with coconut milk for a creamy, tropical vibe.
- Herbed Quinoa: Change up the base from rice to quinoa, and toss in fresh herbs for an earthy touch.
- Lime Cilantro Rice: Mix lime zest and chopped cilantro into your cooked rice for added flavor.
- Cauliflower Rice: For a low-carb option, use cauliflower rice instead of traditional grains for a new spin.
Chef’s Notes
As I reflect on the evolution of this dish, I remember the first time I attempted to prepare shrimp. It was a disaster, to say the least! Overcooked shrimp is the enemy—chewy and tough. I learned through countless tries and errors that timing is everything. The added layer of flavors came after experimenting endlessly with sauces and spices. My goal is to pass along these lessons to you and instill confidence in your cooking journey!
FAQs and Troubleshooting
Q: How do I know when shrimp are cooked?
A: Cooked shrimp should be opaque and pink. You can also give them a gentle squeeze; they should feel firm but still tender.
Q: What if I don’t have fresh lime juice?
A: Bottled lime juice can work in a pinch, but fresh is always best for flavor. If you need a substitute, lemon juice is a great alternative.
Q: How can I prevent the avocado from browning?
A: To keep your avocado fresh, sprinkle a little lime juice over the slices before serving.
Q: Can I make this dish ahead of time?
A: Yes! You can prepare the shrimp and rice in advance and store them in airtight containers in the fridge. Just assemble the bowl when you’re ready to enjoy!
Nutritional Info (Optional)
- Calories: 490
- Protein: 34g
- Fat: 26g
- Carbohydrates: 43g
- Fiber: 5g
There you have it! The Ultimate Charred Shrimp and Avocado Bowl is a delightful balance of textures and flavors that perfectly showcases fresh ingredients. It’s an ode to my past memories while being an accessible dish for any night of the week.
So, gather your friends, tie on your apron, and embark on this delicious culinary adventure. Because, at the end of the day, it’s all about sharing beautiful moments around the table over incredible food. Happy cooking!
PrintUltimate Charred Shrimp and Avocado Bowl
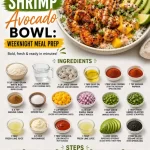
A colorful and flavorful bowl featuring charred shrimp, creamy avocado, and vibrant mango, perfect for any occasion.
- Prep Time: 15 minutes
- Cook Time: 20 minutes
- Total Time: 35 minutes
- Yield: 4 servings 1x
- Category: Main Course
- Method: Searing
- Cuisine: Mexican
- Diet: Seafood
Ingredients
- 1 cup long-grain white rice
- 2 cups water
- 1 lb large shrimp, peeled and deveined
- 1 tbsp olive oil
- 1 tbsp chili powder
- 1 tsp smoked paprika
- 0.5 tsp ground cumin
- 0.5 tsp kosher salt
- 1 cup bright yellow mango, diced
- 0.25 cup purple onion, finely minced
- 1 tbsp green jalapeño, minced
- 2 tbsp fresh green cilantro leaves, chopped
- 1 tbsp fresh lime juice
- 0.5 cup mayonnaise
- 1 tbsp sriracha
- 1 large green avocado, sliced
- 1 tbsp black sesame seeds
Instructions
- Prepare the Rice: Rinse the rice under cold water until the water runs clear. Combine the rinsed rice and water in a medium saucepan and bring to a boil. Reduce to a simmer, cover, and cook for about 18-20 minutes. Fluff with a fork and set aside.
- Season the Shrimp: In a bowl, combine the shrimp with olive oil, chili powder, smoked paprika, ground cumin, and kosher salt. Mix well to coat the shrimp evenly.
- Sear the Shrimp: Heat a skillet over medium-high heat and add the seasoned shrimp in a single layer. Cook for about 2-3 minutes on each side until cooked through and opaque.
- Make the Sauce: In a small bowl, combine mayonnaise, sriracha, and lime juice. Mix until smooth and set aside.
- Build Your Bowl: In serving bowls, add a scoop of rice, topped with charred shrimp, diced mango, purple onion, minced jalapeño, cilantro, and sliced avocado.
- Drizzle with Sauce: Drizzle the spicy mayo sauce over the top and sprinkle with black sesame seeds.
Notes
To prevent avocado from browning, sprinkle with lime juice before serving. This dish can be made ahead of time; just assemble when ready to eat.
Nutrition
- Serving Size: 1 bowl
- Calories: 490
- Sugar: 10g
- Sodium: 600mg
- Fat: 26g
- Saturated Fat: 4g
- Unsaturated Fat: 14g
- Trans Fat: 0g
- Carbohydrates: 43g
- Fiber: 5g
- Protein: 34g
- Cholesterol: 220mg
Keywords: shrimp bowl, avocado recipe, healthy seafood