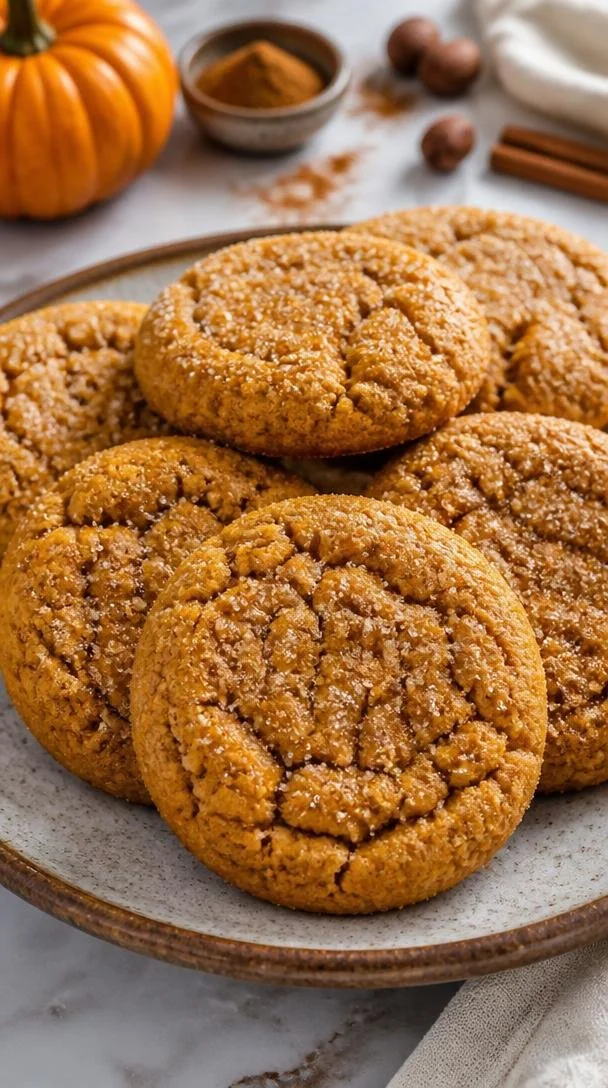
Easy One-Bowl Chewy Pumpkin Cookies in 25 Minutes Flat
Chewy Pumpkin Cookies: A Delicious Fall Treat
Welcome, food lovers! Today, we’re diving into the cozy world of baking with a recipe that brings a taste of autumn right into your kitchen: chewy pumpkin cookies. These delightful treats are perfect for crisp evenings when you want to enjoy something sweet that’s also a bit wholesome. Plus, they’re incredibly easy to whip up, making them a favorite around my table.
I remember the first time I tried a pumpkin cookie. It was at a friend’s autumn gathering, where the air was filled with the rich aroma of spices and baked goods. As soon as I took a bite, I was transported to a haven of fall flavors—the warm spices, the soft texture, and that subtly sweet pumpkin flavor all wrapped up in one cookie. It was love at first taste! Since then, I’ve perfected my chewy pumpkin cookie recipe, and I can’t wait to share it with you.
So, whether you’re cozying up at home, hosting a gathering, or just looking to satisfy a sweet tooth, let’s get started on these scrumptious chewy pumpkin cookies that will make your heart—and tummy—happy!
My Pumpkin Cookie Memory
One of my fondest memories is from a few years ago when I decided to host an impromptu pumpkin-themed gathering to celebrate the season. It was one of those crisp October days; the leaves were changing, and the sun was shining brightly. My friends and I gathered around the kitchen island, sipping spiced apple cider and sharing stories. The star of the show? My chewy pumpkin cookies, of course!
With laughter filling the room, we rolled out dough, sprinkled flour everywhere, and turned what could have been a stressful baking session into a joyful experience. When those cookies came out of the oven, we could hardly wait for them to cool! The sweet scent filled the house, and as we finally took our first bites, you could hear the “Mmm”s echoing through the room. Those cookies not only filled our stomachs but also created a warm atmosphere filled with connection and joy—reminding me that food truly brings people together.
Ingredients
Let’s gather our ingredients! Here’s what you’ll need for these gooey, chewy pumpkin cookies, along with some handy tips for each component:
-
1 cup pumpkin puree
(Canned or homemade, pumpkin puree is the star of the show. If you’re feeling adventurous, you can use butternut squash puree as a fantastic substitute!) -
1 cup brown sugar
(This adds moisture and rich flavor! For a lighter touch, you can swap half of this with coconut sugar or white sugar.) -
1/2 cup granulated sugar
(Gives just the right amount of sweetness without overpowering the pumpkin. Feel free to reduce this slightly for a less sweet cookie.) -
1/2 cup butter (softened)
(Butter contributes to that fabulous chewy texture. If you want to make it dairy-free, coconut oil or vegan butter works well!) -
1 egg
(This binds everything together. You can replace it with a flax egg for a vegan option: mix 1 tablespoon ground flaxseed with 2.5 tablespoons water and let it sit for a few minutes to thicken.) -
2 cups all-purpose flour
(Essential for structure! For a gluten-free version, feel free to use a 1:1 gluten-free flour blend.) -
1 teaspoon baking soda
(This helps the cookies rise and gives them a nice texture. Make sure it’s fresh for the best results!) -
1 teaspoon baking powder
(Works in conjunction with baking soda for extra fluffiness!) -
1 teaspoon pumpkin spice
(A blend of cinnamon, nutmeg, and clove that gives our cookies that wonderful autumn flavor. You can make your own mix too!) -
1/2 teaspoon salt
(Enhances all the flavors! Don’t skimp on this step.) -
1/4 cup granulated sugar (for topping)
(This gives the cookies a lovely sugary crust! You can opt for sparkling sugar for a little extra sparkle.)
Step-by-Step Instructions
Now that we have our ingredients ready, let’s get baking! Follow these steps carefully, and I promise you’ll have a batch of scrumptious pumpkin cookies in no time.
Step 1: Preheat Your Oven
First things first—let’s get the oven preheating! Set it to 350°F (175°C). This ensures our cookies bake evenly and come out perfectly chewy.
Step 2: Cream the Butter and Sugars
In a large mixing bowl, beat together the softened butter, brown sugar, and granulated sugar until the mixture is light and fluffy—about 2-3 minutes. Tip: Using a hand mixer or stand mixer can save you some elbow grease, but a good old wooden spoon works too!
Step 3: Add the Egg and Pumpkin
Next, crack in your egg and add the pumpkin puree, mixing until well combined. This is where the magic starts to happen. The pumpkin will add moisture and flavor, and your mix will have a beautiful orange hue. Chef’s Hack: For a hint of flavor, try adding a touch of vanilla extract to this mix!
Step 4: Dry Ingredients Unite
In another bowl, whisk together the all-purpose flour, baking soda, baking powder, pumpkin spice, and salt. This step ensures that all the leaveners and spices are evenly distributed throughout the flour. Tip: Sifting the flour can provide an even lighter cookie, but it’s not absolutely necessary.
Step 5: Combine Wet and Dry Ingredients
Slowly add the dry mixture to the pumpkin mixture in increments, gently folding until just combined. Pro Tip: Don’t overmix! We want those cookies to stay tender and chewy, and overworking the dough can lead to extra gluten formation.
Step 6: Scoop and Shape
Using a cookie scoop or a tablespoon, drop rounded mounds of dough onto a parchment-lined baking sheet, spacing them about 2 inches apart. This allows room for them to spread! If you want, you can slightly flatten the tops with your fingers for an even bake.
Step 7: Sugar Crust
Before popping them in the oven, sprinkle a little granulated sugar on top of each cookie. This not only gives them a lovely sweet crust but adds a festive touch. Remember to resist eating the dough—though it may be tempting!
Step 8: Bake
Bake your cookies in the preheated oven for 10-12 minutes or until they’re light golden around the edges but still soft in the center. Tip: They will continue to firm up as they cool, so don’t overbake!
Step 9: Cool and Enjoy!
Let the cookies cool on the baking sheet for about 5 minutes before transferring them to a wire rack to cool completely. This waiting period allows them to set while remaining soft and chewy. And now, patience is key, my friends!
Serving Suggestions
When you’re ready to serve, consider plating these cookies on a beautiful platter sprinkled with extra pumpkin spice or a drizzle of white chocolate for added flair. Pair them with a warm cup of spiced chai tea or a latte, and you’ll have an irresistible snack that’s perfect for sharing (if you’re feeling generous!).
Recipe Variations
Want to switch it up a bit? Here are a few ideas:
- Chocolate Chip Twist: Fold in a cup of chocolate chips for a classic combo!
- Nutty Delight: Add 1/2 cup of chopped walnuts or pecans for a crunchy texture.
- Gluten-Free: Use a gluten-free flour blend instead of all-purpose flour.
- Spiced Up: Increase the pumpkin spice to 1.5 teaspoons for an extra kick of flavor.
- Frosted Version: Top with a cream cheese frosting for a decadent dessert!
Chef’s Notes
Ah, these cookies have a special place in my heart! This recipe has evolved over time, adapted from my classic sugar cookie base to incorporate the deliciousness of pumpkin. I vividly remember my first attempt—I accidentally spilled too much pumpkin puree, and that batch turned out a bit too chewy for my liking. But guess what? They were still gobbled up by my friends! The lesson? Often, the best moments in the kitchen come from those happy accidents.
FAQs and Troubleshooting
1. Why are my cookies flat?
If your cookies spread too much, it could be due to too much butter or not enough flour. Always carefully measure your ingredients, and if your butter was too soft, try chilling the dough for 30 minutes before baking.
2. How do I store my pumpkin cookies?
These cookies can be stored in an airtight container at room temperature for up to a week. If you’d like them to last longer, freeze the baked cookies. Just be sure to let them cool completely before freezing and place parchment paper between layers.
3. Can I make these ahead of time?
Absolutely! You can whip up the dough ahead of time and refrigerate it for up to 3 days before baking. Alternatively, freeze the shaped cookie dough balls and bake them directly from the freezer—just add an extra minute or two to the baking time.
4. How do I know when they’re done?
Look for edges that are set and lightly golden; the centers will appear soft. Trust your instinct—it’s the best guide!
Nutritional Info
(For reference, here’s a high-level breakdown of the nutritional info per cookie if you make about 24 cookies—calories may vary.)
- Calories: 108
- Protein: 1.5g
- Fat: 4.5g
- Carbohydrates: 16g
- Fiber: 0.5g
- Sugar: 6g
And there you have it! Your guide to creating these delightful chewy pumpkin cookies. With a warm, inviting texture and a sprinkle of fall flavors, they’re bound to become a favorite in your baking repertoire. I can’t wait to hear about your own kitchen adventures and the wonderful moments these cookies help create. So, tie on your apron, grab that mixer, and let’s bake a batch together! Happy baking, friends!
PrintChewy Pumpkin Cookies

Delicious chewy pumpkin cookies that capture the essence of fall with warm spices and a soft texture.
- Prep Time: 15 minutes
- Cook Time: 12 minutes
- Total Time: 27 minutes
- Yield: 24 cookies 1x
- Category: Dessert
- Method: Baking
- Cuisine: American
- Diet: Vegetarian
Ingredients
- 1 cup pumpkin puree
- 1 cup brown sugar
- 1/2 cup granulated sugar
- 1/2 cup butter (softened)
- 1 egg
- 2 cups all-purpose flour
- 1 teaspoon baking soda
- 1 teaspoon baking powder
- 1 teaspoon pumpkin spice
- 1/2 teaspoon salt
- 1/4 cup granulated sugar (for topping)
Instructions
- Preheat your oven to 350°F (175°C).
- Cream the softened butter, brown sugar, and granulated sugar until light and fluffy.
- Add the egg and pumpkin puree, mixing until combined.
- Whisk together flour, baking soda, baking powder, pumpkin spice, and salt in another bowl.
- Combine the dry mixture with the pumpkin mixture until just mixed.
- Scoop rounded mounds of dough onto a parchment-lined baking sheet.
- Sprinkle granulated sugar on top of each cookie.
- Bake for 10-12 minutes until golden around the edges.
- Cool for 5 minutes on the baking sheet before transferring to a wire rack.
Notes
These cookies can be stored in an airtight container for up to a week. Dough can be refrigerated for up to 3 days or frozen for later use.
Nutrition
- Serving Size: 1 cookie
- Calories: 108
- Sugar: 6g
- Sodium: 200mg
- Fat: 4.5g
- Saturated Fat: 2.5g
- Unsaturated Fat: 2g
- Trans Fat: 0g
- Carbohydrates: 16g
- Fiber: 0.5g
- Protein: 1.5g
- Cholesterol: 30mg
Keywords: pumpkin cookies, fall cookies, chewy cookies, dessert, autumn treats
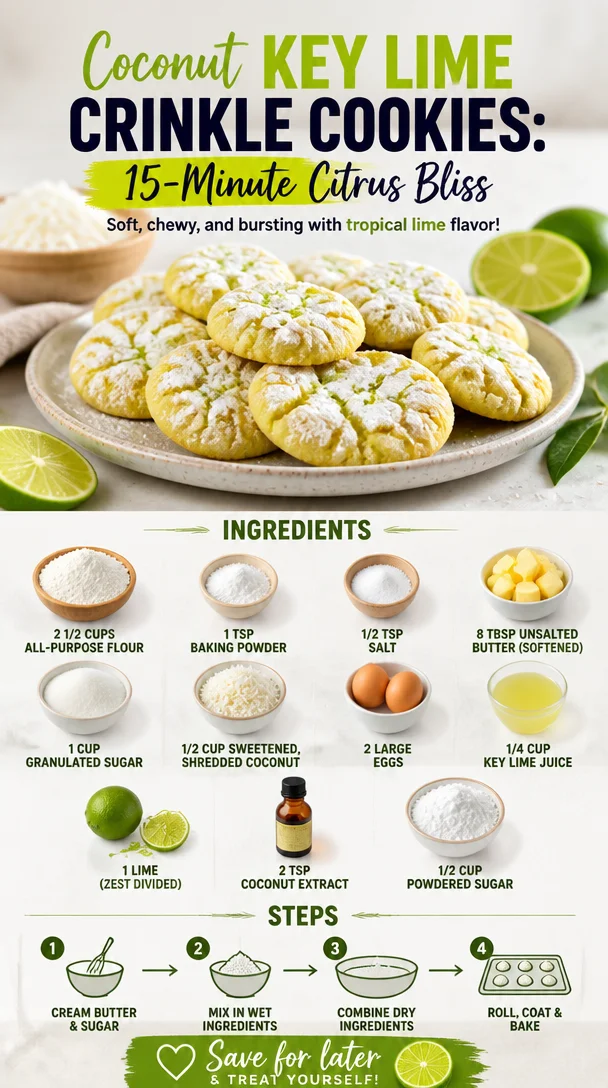
Coconut Key Lime Crinkle Cookies: 15-Minute Citrus Bliss
Coconut Key Lime Crinkle Cookies: A Tropical Delight
Hello, my fellow food lovers! Today, we are diving into a delightful recipe that brings a taste of the tropics right to your kitchen. We’re talking about Coconut Key Lime Crinkle Cookies—soft, chewy, and bursting with zesty lime goodness. Imagine biting into a cookie that melts in your mouth and the tropical flavors whisk you away to a sunny beach. Sounds heavenly, right? Let’s roll up our sleeves, tie on our aprons, and get started!
A Whisk of Nostalgia
I vividly remember the first time I tried my hand at baking cookies—specifically, these Coconut Key Lime Crinkle Cookies. It was a lazy summer afternoon, and my best friend and I decided to turn our small kitchen into a vibrant cookie factory. With flour dust dancing in the sunlight and laughter echoing off the walls, we whipped up a batch that would become a summer staple in our households.
As we mixed ingredients, we couldn’t stop dreaming up ways to elevate the classic cookie. Why not add a dash of coconut? Or make it bright with zesty key lime? The experimentation was half the fun! The cookies emerged from the oven—a little crinkle on top, golden on the edges, and soft in the middle. They were an instant hit! Each bite felt like a sunny escape, and before we knew it, we were sharing them with family and friends at every gathering.
Fast forward to today, and I’m thrilled to share this recipe with all of you, where every crumb carries a sprinkle of nostalgia and bliss.
Ingredients
Let’s gather our ingredients! Here’s what you’ll need to whip up these delightful Coconut Key Lime Crinkle Cookies:
-
2 1/2 cups all-purpose flour
This is the backbone of your cookies, providing structure. If you’re looking for a gluten-free option, try a 1:1 gluten-free flour blend! -
1 tsp baking powder
This little magic powder helps your cookies rise and become fluffy. Make sure it’s fresh for the best results! -
1/2 tsp salt
A pinch of salt enhances the sweetness and balances the flavors. Trust me; it’s essential. -
8 tbsp unsalted butter (softened)
Butter brings richness and flavor. If you’re in a pinch, you can use margarine or coconut oil for a dairy-free option! -
1 cup granulated sugar
This adds sweetness and helps with texture. Brown sugar can be subbed for a chewier cookie with a hint of caramel flavor. -
1/2 cup sweetened, shredded coconut
It gives the cookies that tropical flair! If you’d like less sweetness, try using unsweetened coconut. -
2 large eggs
Eggs bind the ingredients and provide moisture. You can replace each egg with 1/4 cup of applesauce for a vegan twist! -
1/4 cup key lime juice
The zingy star that brightens the cookies! Freshly squeezed is always best, but bottled works if that’s what you have. -
1 lime (zest divided)
The lime zest intensifies the lime flavor—don’t skip this step! Save half for decorating the cookies. -
2 tsp coconut extract
For a deeper coconut flavor, this extract is a game-changer. You can use vanilla extract if you’re out of coconut. -
1/2 cup powdered sugar
This is for rolling the cookies before baking, giving them their signature crinkle effect and a touch of sweetness!
Step-by-Step Instructions
Alright, my kitchen companions, let’s get baking!
-
Preheat Your Oven
Begin by preheating your oven to 350°F (175°C). This is the magic number for getting those cookies perfectly baked. -
Mix the Dry Ingredients
In a large bowl, whisk together the flour, baking powder, and salt. This ensures that your leavening and seasoning are evenly distributed. -
Cream the Butter and Sugar
In another bowl, beat the softened butter and granulated sugar until light and fluffy—about 3 minutes. This step is crucial; it helps incorporate air, leading to a lighter cookie! -
Add the Eggs and Flavorings
Next, beat in the eggs, key lime juice, coconut extract, and half of the lime zest. Mix until well combined, scraping down the sides of the bowl as needed. -
Combine Dry and Wet
Gradually add the dry ingredients to your wet mixture. Mix until just combined—don’t overmix! This will keep your cookies tender. -
Fold in the Coconut
Gently fold in the shredded coconut with a spatula until it’s evenly incorporated. This is where the fun begins—you can already smell the tropical goodness! -
Chill the Dough
Cover the bowl with plastic wrap and chill the dough for 30 minutes. This step helps prevent the cookies from spreading too much. -
Prepare for Baking
Line your baking sheets with parchment paper. Put the powdered sugar in a shallow bowl for rolling the cookies. -
Shape the Cookies
Once chilled, scoop out about two tablespoons of dough and roll them into balls. Next, roll each ball in powdered sugar until well coated. -
Bake the Cookies
Place the sugar-coated dough balls on your prepared baking sheet, leaving some space between them. Bake for 10-12 minutes or until the edges are lightly golden. -
Cool and Enjoy
Allow the cookies to cool on the baking sheet for a few minutes before transferring them to a wire rack. While they cool, sprinkle them with the remaining lime zest for a radiant touch.
Serving Suggestions
These Coconut Key Lime Crinkle Cookies are best served warm, with a refreshing glass of iced tea or a chilled coconut water. For a fun twist, serve them with a scoop of coconut ice cream on the side—talk about a tropical treat!
Recipe Variations
-
Chocolate Chip Twist: Add a cup of semi-sweet chocolate chips for a delightful contrast to the tartness of the lime.
-
Lemon Coconut Cookies: Substitute the key lime juice with freshly squeezed lemon juice for a zesty lemon version.
-
Nutty Coconut: Fold in 1/2 cup of chopped macadamia nuts for an extra crunch and a nutty flavor that complements the coconut!
-
Vegan Version: Use flax eggs (1 tablespoon of flaxseed meal mixed with 2.5 tablespoons of water for each egg) and coconut oil instead of butter.
-
Gluten-Free: Use almond flour or a gluten-free flour blend to make this cookie gluten-free without sacrificing taste.
Chef’s Notes
This recipe has evolved over the years, and I still remember the excitement when I decided to add shredded coconut and key lime into my cookie mix. Initially, my friends were skeptical—could a cookie be both tropical and comforting? But with the first bite of the warm, crinkly treat, they were converts!
Some days, I turn these cookies into an impromptu snack with a drizzle of white chocolate on top or even serve them as dessert for a dinner party, and they never fail to impress. Baking is all about experimentation; don’t be afraid to put your twist on it!
FAQs and Troubleshooting
-
Why are my cookies flat?
Check if your butter is too warm or if you skipped chilling the dough. Either can lead to flat cookies. Cooling helps them retain their shape. -
Can I use fresh key limes?
Absolutely! Fresh key limes provide a vibrant flavor. Just make sure you have enough on hand to get that 1/4 cup of juice. -
How do I store leftover cookies?
Store them in an airtight container at room temperature for up to a week, or freeze them for longer storage. Just ensure they’re completely cooled to keep that freshness! -
What if my dough is too sticky?
If the dough feels overly sticky, chill it a little longer or add a sprinkle of flour until you can easily handle it.
Nutritional Info
(If applicable—Feel free to modify based on data)
Per cookie (based on 24 cookies):
- Calories: 150
- Total Fat: 7g
- Saturated Fat: 4g
- Cholesterol: 20mg
- Sodium: 50mg
- Total Carbohydrates: 21g
- Dietary Fiber: 0.5g
- Sugars: 10g
- Protein: 2g
And there you have it, my lovely foodies—Coconut Key Lime Crinkle Cookies! I hope these cookies bring a sprinkle of sunshine into your day. Happy baking, and remember to gather around the table and share those delicious moments! 🍪🌴🍋
PrintCoconut Key Lime Crinkle Cookies
Soft, chewy cookies bursting with zesty lime and tropical coconut flavors, perfect for summer snacking.
- Prep Time: 15 minutes
- Cook Time: 12 minutes
- Total Time: 57 minutes
- Yield: 24 cookies 1x
- Category: Dessert
- Method: Baking
- Cuisine: American
- Diet: Vegetarian
Ingredients
- 2 1/2 cups all-purpose flour
- 1 tsp baking powder
- 1/2 tsp salt
- 8 tbsp unsalted butter (softened)
- 1 cup granulated sugar
- 1/2 cup sweetened, shredded coconut
- 2 large eggs
- 1/4 cup key lime juice
- 1 lime (zest divided)
- 2 tsp coconut extract
- 1/2 cup powdered sugar
Instructions
- Preheat your oven to 350°F (175°C).
- Mix the dry ingredients: whisk together the flour, baking powder, and salt.
- Cream the softened butter and granulated sugar until light and fluffy.
- Add in the eggs, key lime juice, coconut extract, and half of the lime zest.
- Combine the dry and wet ingredients, mixing until just combined.
- Fold in the shredded coconut.
- Chill the dough for 30 minutes covered with plastic wrap.
- Prepare your baking sheets with parchment paper and set aside powdered sugar in a shallow bowl.
- Shape the cookies by scooping two tablespoons of dough and rolling them in powdered sugar.
- Bake for 10-12 minutes or until the edges are lightly golden.
- Cool on the baking sheet for a few minutes before transferring to a wire rack and sprinkle with remaining lime zest.
Notes
Serve warm with iced tea or coconut water. For a fun twist, try them with coconut ice cream.
Nutrition
- Serving Size: 1 cookie
- Calories: 150
- Sugar: 10g
- Sodium: 50mg
- Fat: 7g
- Saturated Fat: 4g
- Unsaturated Fat: 3g
- Trans Fat: 0g
- Carbohydrates: 21g
- Fiber: 0.5g
- Protein: 2g
- Cholesterol: 20mg
Keywords: cookies, key lime, coconut