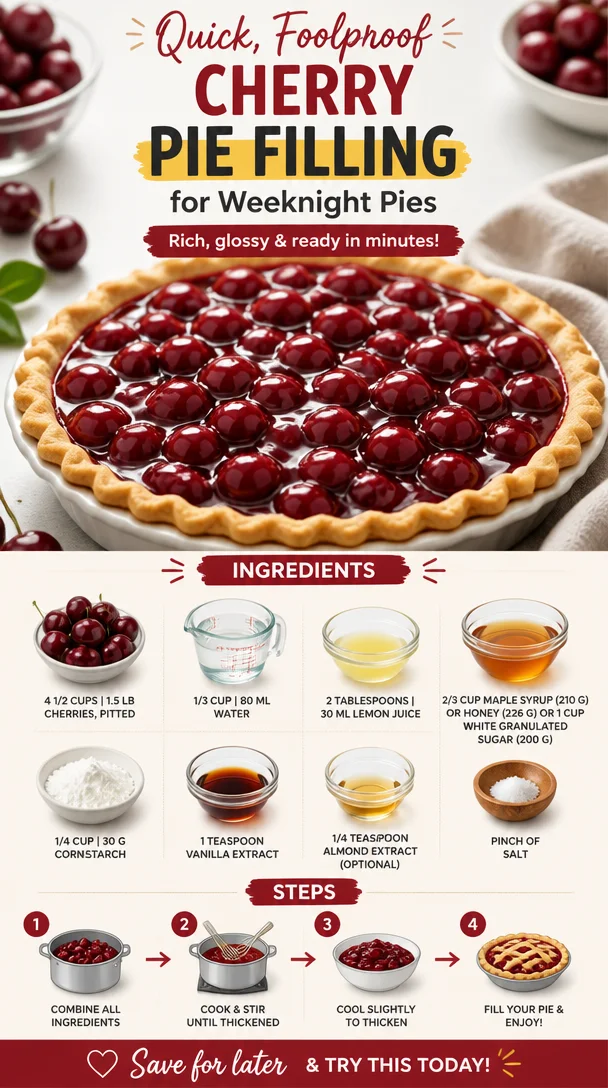
Quick, Foolproof Cherry Pie Filling for Weeknight Pies
The Sweet Symphony of Cherry Pie Filling
Welcome to my cozy corner of the kitchen, where the aroma of freshly baked pies dances through the air and memories linger like the sweetest notes of a favorite song. Today, we’re diving into the delightful world of Cherry Pie Filling. This luscious creation is not just a filling; it’s a story waiting to be told, a family tradition frosted with love, and a sprinkle of nostalgia.
Personal Story: The Cherry Pie that Stole My Heart
Growing up, my summers were filled with backyard barbecues, laughter, and the echo of my grandmother’s voice guiding me through the joyful chaos of the kitchen. One of my fondest memories is the annual cherry-picking expedition. My family and I would head to a local farm, baskets in hand, ready to pluck the brightest, juiciest cherries from the trees. The thrill of searching for the perfect cherries was only rivaled by the sweet reward that followed — Grandma’s famous cherry pie.
The process was magical. We’d sit together at the kitchen table, pitting cherries and sharing stories about our day. The kitchen would fill with the sound of laughter and the sugary scent of the pie crust baking in the oven. As the pie cooled, we’d gather around the table, savoring the fruits of our labor with whipped cream and smiles that could light up the room. It was in those moments that I learned not just how to bake but how to connect through food. And that, my friends, is what I want to share with you today — the joy of making your own cherry pie filling.
Ingredients
Let’s gather our ingredients! Here’s what you’ll need, along with some handy insights for each:
-
4 1/2 cups | 1.5 lbs cherries, pitted
Fresh cherries are ideal, but if they’re out of season, feel free to use frozen ones. Just make sure they are pitted and thawed before cooking! -
1/3 cup | 80 ml water
Water helps create the sauce for our filling. If you’re feeling adventurous, try swapping it with cherry juice for an extra flavor boost! -
2 tablespoons | 30 ml lemon juice
The zing of lemon juice balances the sweetness of the cherries. If you’re out of fresh lemons, bottled juice is a fine substitute, just watch for the acidity level! -
2/3 cup | 210 g maple syrup or honey (226 g) or 1 cup white granulated sugar (200 g)
Each sweetener gives a unique flavor — maple syrup adds a warm depth, while honey provides floral notes. Use what you have or mix and match for fun! -
1/4 cup | 30 g cornstarch
Cornstarch thickens the filling. For a gluten-free option, you can use tapioca starch instead — it works wonders! -
1 teaspoon vanilla extract
Vanilla enhances all the flavors beautifully. You can also experiment with almond extract for a delightful twist! -
1/4 teaspoon almond extract (optional)
This is where magic happens! It brings a lovely nutty flavor that complements the cherries perfectly. -
Pinch of salt
Don’t skip the salt — it enhances sweetness and balances flavors like a pro!
Step-by-Step Instructions
Ready to create your cherry pie filling? Let’s get cooking! Here’s how to whip this up, step by step:
-
Prep the Cherries
Start by washing and pitting your cherries. If you’re using fresh cherries, a good cherry pitter can save you time and keep your hands stain-free. Remember, it’s okay to mess up a bit; cooking is all about having fun! -
Combine Ingredients
In a medium saucepan, combine the pitted cherries, water, lemon juice, and half of your sweetener (maple syrup, honey, or sugar). Stir gently to mix — you want the cherries to feel embraced by the liquid warmth! -
Bring to a Simmer
Set your saucepan over medium heat. Bring the mixture to a simmer, allowing the cherries to release their juices and meld with the other ingredients. This step takes about 5-7 minutes. You’ll know it’s ready when the cherries start to bubble and fill your kitchen with a sweet aroma. -
Thicken the Filling
While stirring, mix your cornstarch with a little cold water in a small bowl to create a slurry. It’s important to get this right; it’s the secret to a silky-smooth filling! Gradually add this to the cherry mixture, stirring constantly. Continue cooking for another 2-3 minutes until the filling thickens. If it feels too thick, don’t panic; a splash of water can help loosen it. -
Add the Finishing Touches
Remove the saucepan from heat. Stir in the vanilla extract and almond extract, if using, along with that pinch of salt. Give it a taste — does it need a touch more sweetener? Adjust to your liking! Plus, if you want an even deeper cherry flavor, let it cool slightly before adding more extract. -
Cool and Enjoy
Transfer your cherry filling into a bowl and let it cool to room temperature. Trust me, the wait is worth it! Once it’s cool, it’s ready to be spooned into pies, slathered on pancakes, or enjoyed straight from the bowl (I won’t tell anyone!).
Serving Suggestions
When it comes to serving your cherry pie filling, the possibilities are endless! Whether you’re layering it into a flaky pie crust, drizzled over a scoop of vanilla ice cream, or even added to yogurt parfaits, make it beautiful. For that professional touch, consider placing it in a decorative dish and garnishing with a sprig of mint or a dusting of powdered sugar. You want to make it look as fabulous as it tastes!
Recipe Variations
Don’t be afraid to get creative with your cherry pie filling! Here are a few fun variations to try:
-
Berry Medley: Add raspberries or blueberries for a mixed berry flavor that’s bursting with summer vibes.
-
Spiced Up: Introduce cinnamon or nutmeg for a warm twist, making it perfect for fall desserts.
-
Zesty Citrus: Replace the lemon juice with fresh orange juice and zest for a bright, citrusy twist.
-
Chocolate Cherry: Stir in mini chocolate chips or cocoa powder for a decadent chocolate-cherry filling that’s perfect for a rich dessert.
-
Low-Sugar Option: Use a sugar substitute like erythritol or stevia for a guilt-free version!
Chef’s Notes
Ah, cherry pie filling — it’s been a beloved staple in my kitchen for years, and it never ceases to amaze me how the simplest ingredients can come together to create something so delectable. I still remember the first time I experimented with using honey instead of sugar. It took some trial and error, but that golden sweetness added a whole new dimension!
Another memory that always brings a smile is when I decided to surprise my friends with a cherry bake-off. Little did they know I had a few sneaky tricks up my apron’s sleeve! Watching their reactions to my secret almond extract was priceless.
FAQs and Troubleshooting
1. My filling turned out too runny. What went wrong?
Sometimes, it needs a little more cornstarch to thicken. Mix a teaspoon of cornstarch with cold water and add that to your simmering cherry mixture until it reaches the desired thickness.
2. Can I use frozen cherries?
Absolutely! Frozen cherries work beautifully. Just make sure they are pitted, and thaw them thoroughly — the juices will help flavor the filling.
3. How long does the cherry filling last?
Stored in an airtight container in the fridge, your cherry pie filling will last about 4-5 days. If you want to freeze it, just let it cool completely and place it in a freezer-safe container!
4. Can I use this filling for something other than pies?
Definitely! Cherry pie filling is versatile and can be used in parfaits, cheesecakes, pancakes, and even as a topping for yogurt or oatmeal.
Nutritional Info
(If applicable, please consult your nutritional database or calculating software based on your exact ingredients and portion sizes.)
In closing, I hope this cherry pie filling recipe inspires you to create cherished memories in your kitchen. Every bite tells a story, and I can’t wait for you to make this recipe your own. Tie on that apron and let’s get cooking. Cheers to sweet moments and beautiful gatherings around the table!
PrintSweet Symphony of Cherry Pie Filling
A delightful cherry pie filling recipe that brings nostalgia to every bite, perfect for enhancing pies, pancakes, or yogurt.
- Prep Time: 10 minutes
- Cook Time: 15 minutes
- Total Time: 25 minutes
- Yield: 2 cups 1x
- Category: Dessert
- Method: Stovetop
- Cuisine: American
- Diet: Vegetarian
Ingredients
- 4 1/2 cups (1.5 lbs) cherries, pitted
- 1/3 cup (80 ml) water
- 2 tablespoons (30 ml) lemon juice
- 2/3 cup (210 g) maple syrup or 1 cup (200 g) white granulated sugar
- 1/4 cup (30 g) cornstarch
- 1 teaspoon vanilla extract
- 1/4 teaspoon almond extract (optional)
- Pinch of salt
Instructions
- Prep the cherries by washing and pitting them.
- Combine ingredients in a medium saucepan: pitted cherries, water, lemon juice, and half of your sweetener.
- Bring the mixture to a simmer over medium heat, about 5-7 minutes.
- Thicken the filling by mixing cornstarch with cold water to create a slurry, then gradually add it to the cherry mixture.
- Add the finishing touches: stir in vanilla and almond extract, plus a pinch of salt.
- Cool the filling to room temperature before using.
Notes
For variations, try adding raspberries, cinnamon, or mini chocolate chips. Store in an airtight container for 4-5 days in the fridge.
Nutrition
- Serving Size: 1/4 cup
- Calories: 150
- Sugar: 28g
- Sodium: 5mg
- Fat: 0g
- Saturated Fat: 0g
- Unsaturated Fat: 0g
- Trans Fat: 0g
- Carbohydrates: 38g
- Fiber: 1g
- Protein: 1g
- Cholesterol: 0mg
Keywords: cherry pie filling, dessert, easy recipe, homemade cherry filling, summer recipe
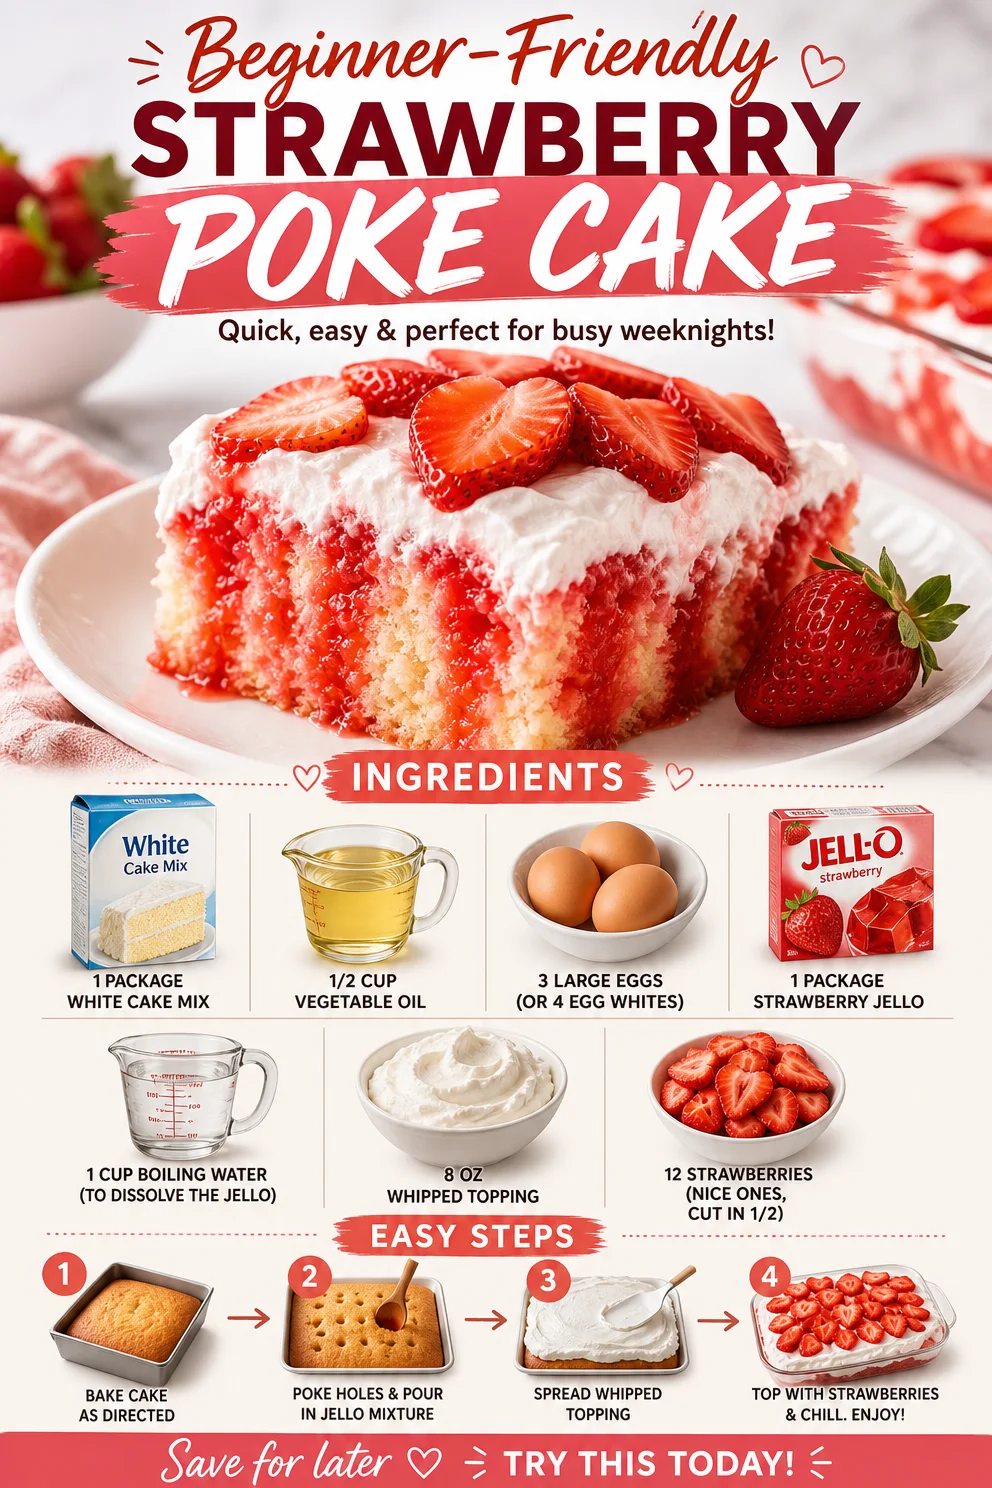
Beginner-Friendly Strawberry Poke Cake (Quick Weeknight)
Easy Strawberry Poke Cake: A Slice of Joy
Hello, fellow food lovers! Today, we’re diving into a delightful dessert that’s as colorful as it is delicious: the Easy Strawberry Poke Cake. This cake has a special place in my heart—not just because it’s incredibly easy to whip up (hello, who doesn’t love a no-fuss dessert?), but also because it brings back those beautiful, sun-soaked summer days when my family would gather in the backyard to celebrate every little thing.
Imagine a warm afternoon, the scent of fresh strawberries filling the air, kids giggling in the background, and the table set with laughter and joy. That’s what this cake embodies. The bright strawberries peeking through a fluffy layer of whipped topping invite everyone to take a slice, making it impossible to resist! So, grab your apron, and let’s create some mouthwatering memories with this strawberry poke cake that’s sure to impress your friends and family.
My Strawberry Cake Memory
Let me take you back to one of those summer afternoons when I first discovered this recipe. My grandmother had a knack for creating simple yet sensational desserts. One day, she decided to make her famous poke cake after everyone had devoured a hearty barbecue feast. As a kid, I remember being fascinated by how she would poke holes into the cake and let fruity flavors seep into every slice. It’s like magic, but with food!
The delightful aroma of strawberries mixed with the sweetness of whipped topping made the kitchen feel warm and inviting. Once it was time to serve, I watched as she cut into that delightful cake, and my heart raced with anticipation. Every bite was a blissful explosion of flavor, and I fondly recall sneaking seconds… and maybe thirds! It’s one of those recipes that has been passed down through generations—a real testament to how food can create a sense of togetherness. Today, we’re going to recreate that joyful experience, one slice at a time!
Ingredients
To bring this Easy Strawberry Poke Cake to life, you’ll need the following ingredients:
-
1 package white cake mix
This is your base! Any brand will do, but I love a good classic Betty Crocker or Duncan Hines for reliability. If you want to switch things up, a lemon cake mix can add a tangy twist! -
1/2 cup vegetable oil
This keeps the cake moist and tender. Canola or sunflower oil work just as well if you don’t have vegetable oil on hand. -
3 large eggs (or 4 egg whites)
Eggs are essential for the cake’s structure and moisture. If you’re looking to cut some calories, just swapping for egg whites is a smart option! -
1 package Strawberry Jell-O
This is where the magic happens! It gives flavor and that oh-so-pretty color. If strawberries aren’t your jam, feel free to swap for raspberry or cherry Jell-O for a different color and taste. -
1 cup boiling water
This helps to dissolve the Jell-O completely, ensuring a smooth blend of flavors. If you want to make this step faster, boiling water from an electric kettle works wonders! -
8 oz whipped topping
This is the fluffy topping that’s sure to steal the show. If you prefer, you can whip up some heavy cream with a bit of sugar for a fresher alternative. -
12 strawberries (nice ones, cut in half)
Use the freshest strawberries you can find! Look for vibrant red berries with fresh green tops; they truly elevate the dish. Want a fun twist? Replace with halved peaches or even raspberries for different seasonal vibes.
Step-by-Step Instructions
-
Preheat your oven to 350°F (175°C). This may seem like a no-brainer, but starting with a preheated oven ensures that your cake bakes evenly and beautifully!
-
Prepare the cake mix according to the package instructions. Combine the white cake mix, vegetable oil, and eggs in a bowl. Mix well until just combined but don’t overmix—some lumps are perfectly fine! Pour the batter into a greased 9×13 inch baking pan.
-
Bake the cake in the preheated oven for 25-30 minutes or until a toothpick inserted into the center comes out clean. As the cake bakes, your kitchen will start smelling heavenly!
-
Cool the cake for about 15 minutes before the next step. This cooling period is essential because it allows the cake to settle and makes it easier to poke holes without tearing it apart.
-
Prepare the Jell-O by mixing the package with 1 cup of boiling water in a bowl. Stir until the Jell-O is fully dissolved. This bright, vibrant mixture is going to color and flavor our cake in such a fun way!
-
Poke holes in the cake using the end of a wooden spoon or a fork. Aim for about 20 holes evenly spaced throughout. Get excited—the more holes, the more the flavors will soak in!
-
Pour the dissolved Jell-O over the cake, making sure to cover every hole. Allow it to seep in fully—this is how we achieve that delicious layer of flavor that makes this cake truly special.
-
Refrigerate the cake for at least 3 hours (or preferably overnight) to allow the Jell-O to set completely. This is the hardest part—waiting!
-
Top the cake with whipped topping once you’re ready to serve. You can spread it evenly or get creative by creating peaks with a spatula.
-
Garnish with strawberries. Place the halved strawberries on top of the whipped topping for that pop of freshness and color. A sprinkle of mint leaves can add a lovely touch, too!
Serving Suggestions
When it comes to serving this delightful cake, presentation is key! Slice into squares, and make sure each piece gets a delectable layer of strawberries, with the sparkling colors of your Jell-O peeking through. Serve on a pretty plate with a sprig of mint for an added touch, and don’t forget to have forks ready! It’s the kind of dessert that brings everyone together, igniting conversations and smiles.
Recipe Variations
Looking to shake things up? Here are a few fun variations to try:
-
Lemon Poke Cake: Use lemon cake mix and lemon Jell-O for a zesty alternative that’s refreshing and perfect for summer!
-
Chocolate Strawberry Delight: Swap the white cake mix for chocolate cake and use strawberry Jell-O. The rich chocolate pairs beautifully with the berries!
-
Gluten-Free Option: Use a 1:1 gluten-free cake mix and ensure your Jell-O is gluten-free.
-
Coconut Twist: Add unsweetened shredded coconut to the whipped topping for a tropical vibe, or mix it into the cake batter before baking!
Chef’s Notes
One of my favorite things about this recipe is its versatility. It’s a blank canvas that you can dress up however you like! I’ve even hosted a “poke cake competition” at my home, encouraging friends to bring their unique spin on this beloved treat. Each version was delightful, leading to laughter and friendly debate over whose was best. Spoiler alert: it was always mine! (Just kidding—everyone did well. It’s tough to compete when it’s all about flavor and fun!)
FAQs and Troubleshooting
-
What if my cake falls apart when poking holes?
- No worries! Just be gentle when poking the holes. If your cake becomes crumbly, try using a skewer instead of a fork, which will create more precise holes.
-
How long can I store the leftovers?
- Covered in the fridge, this cake lasts for about 3-4 days. Just make sure to keep it sealed, so it stays fresh!
-
Can I make this cake a day in advance?
- Absolutely! In fact, letting it sit overnight allows the flavors to blend beautifully, so it’s often even better the day after.
-
Can I freeze the cake?
- Yes! Just be sure to freeze it before adding the whipped topping. Wrap it tightly in plastic wrap and foil; it can be stored for up to 3 months.
Nutritional Info
While I always recommend enjoying food in moderation, here’s a rough idea of the nutritional info per serving (based on 12 servings):
- Calories: 220
- Fat: 8g
- Carbohydrates: 35g
- Protein: 2g
- Sugar: 15g
Remember, these are estimated values and can vary depending on the specific ingredients you choose!
I hope this Easy Strawberry Poke Cake brings you as much joy and deliciousness as it has to me for all these years. It’s perfectly casual for any gathering and truly celebrates the sweetness of life. So, tie on that apron, dive into your kitchen, and let’s make some unforgettable moments and mouthwatering memories together! Happy baking!
PrintEasy Strawberry Poke Cake

A delightful dessert that layers fresh strawberries and fluffy whipped topping over a moist poke cake, perfect for summer gatherings.
- Prep Time: 15 minutes
- Cook Time: 30 minutes
- Total Time: 195 minutes
- Yield: 12 servings 1x
- Category: Dessert
- Method: Baking
- Cuisine: American
- Diet: Vegetarian
Ingredients
- 1 package white cake mix
- 1/2 cup vegetable oil
- 3 large eggs (or 4 egg whites)
- 1 package Strawberry Jell-O
- 1 cup boiling water
- 8 oz whipped topping
- 12 strawberries, cut in half
Instructions
- Preheat your oven to 350°F (175°C).
- Prepare the cake mix according to the package instructions by combining the white cake mix, vegetable oil, and eggs in a bowl. Mix well until just combined.
- Pour the batter into a greased 9×13 inch baking pan.
- Bake in the preheated oven for 25-30 minutes or until a toothpick inserted comes out clean.
- Cool the cake for about 15 minutes.
- Prepare the Jell-O by mixing with 1 cup of boiling water in a bowl until fully dissolved.
- Poke holes in the cake using the end of a wooden spoon or a fork, aiming for about 20 holes.
- Pour the dissolved Jell-O over the cake, making sure to cover every hole.
- Refrigerate for at least 3 hours (or overnight) to allow the Jell-O to set completely.
- Top the cake with whipped topping once ready to serve.
- Garnish with halved strawberries on top of the whipped topping.
Notes
This cake can be made a day in advance for better flavor absorption. Store leftovers in the fridge for 3-4 days.
Nutrition
- Serving Size: 1 slice
- Calories: 220
- Sugar: 15g
- Sodium: 200mg
- Fat: 8g
- Saturated Fat: 1g
- Unsaturated Fat: 7g
- Trans Fat: 0g
- Carbohydrates: 35g
- Fiber: 0g
- Protein: 2g
- Cholesterol: 30mg
Keywords: strawberry, poke cake, dessert, summer cake, easy cake