
The Perfect 2-Ingredient Cookie Cups: A Deliciously Simple Treat
Hello, fellow foodies! Welcome back to Ivory Apron, where we’re all about making cooking feel elegant yet accessible. Today, I have a delightful treat that’s sure to leave your taste buds dancing: 2-Ingredient Cookie Cups! Yes, you heard that right—only two ingredients! This recipe is perfect for those hectic weeks when you crave something sweet but don’t have the time or energy to whip up a full-on patisserie display.
Imagine a warm, gooey cookie cup filled with your favorite treats, all baked in the comfort of your own kitchen. These little lovelies are not only easy to make but are also gluten-free and can be customized to fit any dietary need. Plus, they come together quicker than you can decide which movie to binge-watch next!
Now, let me share with you a little backstory. A few years back, I was hosting a last-minute gathering and realized I had a serious cookie craving but zero time to bake an intricate dessert. After rummaging through my pantry, I discovered I had two simple ingredients: peanut butter and brown sugar. It was a match made in heaven! The deliciousness that ensued made me realize that sometimes, simplicity can lead to the most flavorful outcomes. That evening, everyone raved about my quick-fix cookie cups, and I knew I had to share this easy recipe with all of you!
So, grab your apron, and let’s dive into the world of 2-ingredient cookie cups. Whether you’re treating yourself, hosting friends, or looking for a fun cooking project with the kids, these cookie cups are a perfect solution!
Personal Story
A few summers ago, my friend Jenna and I decided to have a bake-off at her place, armed with ingredients we could find in her kitchen. Picture this: flour dust swirling in the air, laughter bouncing off the walls, and a large bowl filled with all sorts of permissions—flour, sugar, chocolate chips you name it!
Halfway through our flour fight, we realized we were missing a crucial element: time! Our delicious dreams were quickly turning into panic. As we sifted through her pantry, we stumbled on a jar of natural peanut butter and a bag of brown sugar sitting innocuously on a high shelf. Jenna, ever the optimist, said, “Why not try it?” At that moment, I felt like a culinary magician as my mind raced with possibilities.
Within minutes, we had dollops of dough pressed into muffin tins, filling her kitchen with a warm, nutty aroma. When those cookie cups emerged golden-brown and perfectly formed, it felt like the universe was smiling down on us (or maybe it was just the smell of cookies). That simple concoction became our go-to recipe for lazy afternoons when the sweet tooth kicked in without a full cookie lineup. To this day, every bite brings back that joyous summer memory of fun, creativity, and tasty success!
Ingredients
Here’s the kicker—this cookie recipe uses just two ingredients! You probably have both of these in your pantry right now:
-
1 cup natural peanut butter
- Chef Insight: Go for the creamy stuff for a classic texture, but if you prefer chunky peanut butter, that works remarkably well too! It adds a delightful texture to your cookie cups. If you’re allergic or not a fan of peanuts, almond butter or cashew butter are fantastic alternatives. Just make sure they’re natural, meaning minimal added ingredients.
-
1 cup brown sugar
- Substitution Tip: If you’re out of brown sugar, you can easily make your own! Just mix white sugar with a tablespoon of molasses—voila! A great way to keep your baking running smooth! Light brown sugar lends a milder taste, while dark brown sugar gives a deeper molasses flavor, which can be a delicious twist on the classic.
These two simple ingredients create a soft, tender base that’s incredibly versatile!
Step-by-Step Instructions
Now, are you ready to whip these up? Let’s guide you through the process step by step!
Step 1: Preheat the Oven
Preheat your oven to 350°F (175°C). (Chef tip: This step is crucial to get your cookie cups perfectly baked with that delightful golden hue.)
Step 2: Combine the Ingredients
In a mixing bowl, combine 1 cup natural peanut butter and 1 cup brown sugar. You can use a spatula or, if you’re feeling adventurous, mix it by hand! Get in there, and don’t be afraid to embrace the sticky goodness. The mixture will be thick and a tad challenging to combine, but that’s part of the fun!
Step 3: Form Your Cookie Cups
Once you have a nice, cohesive dough, it’s time to form your cookie cups! Lightly grease a muffin tin with a touch of cooking spray or oil. Using a small scoop or your hands, create small balls of dough and press them into the bottom of each cup. Make sure to push down in the center to create a well for your desired filling.
Step 4: Bake
Place the muffin tin in the preheated oven and bake for about 10-12 minutes. Keep an eye out for them—your kitchen will smell amazing! When they are lightly golden and set, take them out and allow them to cool in the pan for a few minutes.
Step 5: Fill and Serve
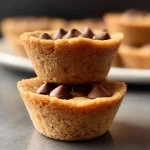
After a few minutes, gently remove the cookie cups from the muffin tin and place them on a cooling rack. Now is the fun part! Once they’ve cooled slightly, fill each cup with your favorite treats: chocolate chips, candy, fruit, or a dollop of jam. The options are endless!
Final Presentation
If you’re feeling fancy, a dusting of powdered sugar on top elevates the look without adding complexity. Place them on a beautiful platter and watch your guests’ eyes light up!
Serving Suggestions
These cookie cups are perfect for any occasion! Serve them warm with a scoop of vanilla ice cream on top for a delightful sundae-inspired treat. Alternatively, serve them alongside a cup of coffee or tea for a cozy afternoon. They’re undeniably fun to eat—bite into one, and you’ll find a soft center and delightful morsels waiting within!
Recipe Variations
The beauty of these 2-Ingredient Cookie Cups is their versatility! Here are a few tasty variations to try:
- Chocolate Drizzle: Melt some chocolate and drizzle it over the top for a decadent touch.
- Nut Medley: Mix in chopped nuts like walnuts or almonds into the dough for added crunch.
- Stuffed Surprise: Use a layer of Nutella or caramel sauce inside the cookie cups for a gooey center.
- Seasonal Touch: Add a pinch of cinnamon or pumpkin spice for a warm, autumn-inspired flavour.
Feel free to get creative—experimenting is half the fun!
Chef’s Notes
You know, baking has a funny way of teaching us patience, especially when it comes to not eating the finished product right away! I can’t tell you how many times I’ve tried to sneak a taste before they were fully cooled down. The first time I made these cookie cups, I definitely burned my tongue while trying to get that warm, gooey filling!
Over the years, I’ve played around with the recipe and found that chilling the dough slightly before baking creates a sturdier cup. So, if you’re in a hurry, just bake as is, but if you want that perfect form, let the dough chill for about 30 minutes in the fridge before forming your cookie cups.
And remember, if they don’t turn out as expected on your first try, don’t fret! Every kitchen adventure is a chance to learn. The best part is that even less-than-perfect cookie cups are still delicious!
FAQs and Troubleshooting
Q: Why aren’t my cookie cups holding their shape?
A: This can happen if the dough is too warm or if you didn’t press it firmly enough into the muffin tin. Try chilling the dough for 30 minutes before baking the next time!
Q: Can I use a different nut butter?
A: Absolutely! Almond butter and even sunflower seed butter can be great substitutes. Just make sure they’re of similar consistency to peanut butter for best results.
Q: How do I store leftover cookie cups?
A: Store them in an airtight container at room temperature for up to three days. If you want to keep them longer, refrigerate them—though I doubt they’ll last that long once you start eating them!
Q: Can I double the recipe?
A: For sure! This recipe is easy to scale up. Just remember to bake them in batches if your oven doesn’t fit more than one muffin tin!
Nutritional Info
(If applicable, feel free to add specific nutritional info based on the ingredients used, including calories, fat content, and other vitamins/minerals.)
So there you have it! A delicious and straightforward recipe for something that feels special, yet comes together in no time. I hope you enjoy making these 2-Ingredient Cookie Cups as much as I enjoyed sharing them with you. Remember, it’s not about culinary perfection but rather enjoying the process and the memories created along the way. Happy baking, and until next time—keep those aprons on and your hearts open to the joy of cooking!
Print2-Ingredient Cookie Cups
Easy and delicious cookie cups made with just two simple ingredients: natural peanut butter and brown sugar.
- Prep Time: 10 minutes
- Cook Time: 12 minutes
- Total Time: 22 minutes
- Yield: 12 servings 1x
- Category: Dessert
- Method: Baking
- Cuisine: American
- Diet: Gluten-Free
Ingredients
- 1 cup natural peanut butter
- 1 cup brown sugar
Instructions
- Preheat your oven to 350°F (175°C).
- Combine 1 cup natural peanut butter and 1 cup brown sugar in a mixing bowl.
- Form small balls of dough and press them into a greased muffin tin.
- Bake in the preheated oven for 10-12 minutes.
- Fill each cookie cup with your favorite treats once they have cooled slightly.
Notes
Chilling the dough before baking creates a sturdier cookie cup. Store leftovers in an airtight container at room temperature for up to three days.
Nutrition
- Serving Size: 1 cookie cup
- Calories: 200
- Sugar: 12g
- Sodium: 50mg
- Fat: 10g
- Saturated Fat: 2g
- Unsaturated Fat: 8g
- Trans Fat: 0g
- Carbohydrates: 20g
- Fiber: 1g
- Protein: 5g
- Cholesterol: 0mg
Keywords: cookie cups, two ingredient cookies, easy dessert, gluten-free treats, peanut butter cookies