
Crispy Chicken Wraps
Crispy Chicken Wraps: A Delightful Journey to Flavor Town
Hello, fellow foodies! If you’re searching for the perfect easy-to-make dish that delivers on both taste and texture, look no further! Today, we’re diving into the delightful world of Crispy Chicken Wraps, a dish that’s not only satisfying but also packed with crispy goodness, fresh vegetables, and your favorite sauces. Imagine biting into a warm, crunchy wrap filled with juicy chicken, crisp lettuce, and a zingy sauce—sounds divine, right? So grab your apron, and let’s make some delicious memories together!
A Nostalgic Culinary Adventure
As I reflect on the meals that have brought me the most joy, Crispy Chicken Wraps always sneak into my mind. I fondly remember summer nights spent with my family in our backyard, where laughter filled the air, and the grill was our favorite gathering spot. My dad would whip up his famous fried chicken, and we would all await the crunchy delight. Although my version is oven-baked and offers a healthier twist, the essence of crispy, juicy chicken is ever-present. I recall one particularly fun evening when we had a build-your-own wrap night, where everyone could customize their wraps with various toppings. Watching my younger siblings go wild with toppings was a cherished sight, and it made me appreciate how food can bring people together. Those wraps weren’t just meals; they were vessels of laughter and connection, a true celebration of simple joys.
Ingredients That Shine
Let’s gather our ingredients before we embark on this crispy journey! Here’s what you’ll need:
-
2 large chicken breasts (boneless, skinless)
The star of our dish! Chicken breasts are lean and easy to work with. You can also use chicken thighs for a juicier option. -
1 cup all-purpose flour
This helps create a crispy coating. For a gluten-free version, substitute with almond flour or gluten-free flour. -
2 large eggs
Acting as a binding agent for the coating—beaten well. Flaxseed meal mixed with water can serve as a vegan substitute. -
1 cup breadcrumbs (or panko)
These provide that crunch we crave! Panko creates a lighter, crispier texture, but regular breadcrumbs work just fine too. -
1 teaspoon salt
Essential for bringing out flavors. Feel free to experiment with flavored salts for an added twist. -
1 teaspoon black pepper
A classic pairing with chicken. You can swap this with cayenne pepper for a kick of heat! -
1 teaspoon garlic powder
For that savory depth! Fresh garlic can be used but will alter the texture slightly. -
1 teaspoon paprika
Adding subtle smokiness and color; smoked paprika can enhance the flavor even more. -
4 large tortillas
The vessel for our wrap! Whole wheat or spinach tortillas give a lovely flavor and color contrast. -
1 cup lettuce (shredded)
Adds a fresh crunch. You can swap for spinach or kale if you prefer. -
1 large tomato (sliced)
Brings juiciness and freshness. Any seasonal tomato will do, or even roasted tomatoes for a different take. -
1/2 cup mayonnaise or ranch sauce
For creamy goodness! Greek yogurt or a dairy-free option can replace it for a healthier variant. -
1/2 cup shredded cheddar cheese
Because cheese makes everything better! Feel free to substitute with your favorite cheese—feta or pepper jack can add other dimensions of flavor. -
1/2 cup cooking oil
To ensure that crispy exterior! Avocado oil or coconut oil also work well as healthier options.
Cooking Steps: Crispy Goodness Awaits
Now that we have our ingredients ready let’s dive into the cooking steps. Follow along, and I promise you’ll be thrilled with the results!
-
Prep Your Chicken: Start by slicing the chicken breasts into strips or bite-sized pieces. This not only cuts down on cooking time but also makes for easier wrapping later. If you want, you can marinate them in a mix of spices and a splash of buttermilk for extra tenderness!
-
Set Up Your Breading Station: In three separate bowls, arrange your flour mixed with salt, beaten eggs, and breadcrumbs. Set these up like a little assembly line. This step will make your life so much easier; no mess, no stress!
-
Coat the Chicken: Take each piece of chicken and dip it into the flour first, shaking off any excess. Next, dunk it into the eggs and then coat it thoroughly with breadcrumbs. Make sure each piece is well covered—this is where the crispy magic happens!
-
Heat the Oil: In a non-stick skillet, add enough cooking oil to cover the bottom. Heat it over medium heat until the oil is hot. You can test it by dropping a breadcrumb in; it should sizzle nicely. Keeping the oil at the right temperature is crucial to achieve that golden color without overcooking the chicken!
-
Fry the Chicken: Carefully place your breaded chicken pieces into the hot oil, giving them enough space to fry evenly. Don’t overcrowd the pan! Fry for about 4-5 minutes on each side or until golden and cooked through. A little tip: Avoid flipping too soon, or the coating may come off. Patience is a virtue!
-
Drain the Excess Oil: Once cooked, transfer your chicken to a plate lined with paper towels to absorb any excess oil. This ensures the chicken stays crispy and isn’t greasy.
-
Warm the Tortillas: While the chicken is draining, quickly warm your tortillas in a dry skillet over low heat for about 30 seconds on each side. Warming them makes them more pliable and helps prevent tearing.
-
Assemble Your Wraps: Now comes the fun part! Place a generous scoop of shredded lettuce in the center of the tortilla. Top with crispy chicken, sliced tomatoes, a drizzle of your sauce of choice, and sprinkle shredded cheese on top.
-
Wrap It Up: Fold the sides of the tortilla toward the center, then roll from the bottom up, tucking in all the delicious fillings. Use a toothpick to secure them if they’re uncooperative (no shame in that game!).
Serving Suggestions: Pretty on a Plate
Presentation is everything, my friends! Serve your Crispy Chicken Wraps on a beautiful platter, perhaps with a side of crispy sweet potato fries or a fresh garden salad. For an added touch, you can drizzle a little extra sauce over the top and garnish with fresh herbs like parsley or cilantro. It makes the dish pop visually and adds a splash of color!
Recipe Variations: Get Creative
Feel free to have fun with this recipe! Here are some delicious variations you can try:
-
Buffalo Chicken Wraps: Toss the cooked chicken in buffalo sauce before assembling for a spicy kick!
-
Veggie Wraps: Skip the chicken and load your wrap with grilled veggies like zucchini, bell peppers, and mushrooms for a hearty, vegetarian option.
-
Mediterranean Wraps: Add feta cheese, olives, and a drizzle of tzatziki sauce for a Mediterranean twist.
-
Southwestern Chicken Wraps: Mix black beans, corn, and avocado with the chicken for a fiesta of flavors!
-
Breakfast Wraps: Swap the chicken for scrambled eggs and add crumbled sausage, cheese, and a splash of hot sauce for a hearty breakfast option.
Chef’s Notes: Kitchen Shenanigans
Whenever I think of crispy chicken, I can’t help but recall a hilarious incident involving an oversized cooking spoon. Picture this: I was trying to coat the chicken in breadcrumbs, and the spoon flung across the kitchen, sending breadcrumbs everywhere while my mischievous dog darted in to "help." It’s moments like these that remind me cooking isn’t always about perfection; it’s about enjoying the process! Over time, my recipe has evolved with these little mishaps, perfecting the method and spreading a little joy in the kitchen with every wrap.
FAQs and Troubleshooting
Let’s address some common questions and potential hiccups you might encounter!
-
My chicken isn’t crispy! What went wrong?
Ensure your oil is hot enough before adding the chicken. If it’s not hot, the coating will absorb oil and become soggy rather than crispy. -
How do I stop my wraps from falling apart?
Properly wrapping the tortillas is crucial. Make sure you fold in the sides tightly while rolling. If it’s still an issue, using toothpicks can help secure them until you’re ready to serve. -
Can I bake these wraps instead?
Absolutely! Preheat your oven to 400°F (200°C), place your assembled wraps seam-side down on a baking sheet, and bake for about 15-20 minutes or until crispy. -
What can I serve as a side?
Sweet potato fries, carrot sticks, or a refreshing coleslaw make excellent companions to these wraps, balancing the meal beautifully.
Nutritional Info (Optional)
While indulgent, these wraps can fit into a balanced meal plan. Depending on the ingredients and sauces you select, each wrap gives approximately:
- Calories: ~450-500 per wrap
- Protein: 35g
- Carbohydrates: 35g
- Fat: 20g
Feel free to adjust the ingredients to meet your dietary needs!
And there you have it! A delightful journey through Crispy Chicken Wraps that will bring warmth and joy to your table. Cooking should be a celebration, so tie on that apron and let’s create beautiful moments, one delicious wrap at a time! Enjoy every crunchy, flavor-packed bite!
PrintCrispy Chicken Wraps

A delightful journey to flavor town with easy-to-make crispy chicken wraps packed with juicy chicken, fresh vegetables, and delicious sauces.
- Prep Time: 15 minutes
- Cook Time: 20 minutes
- Total Time: 35 minutes
- Yield: 4 servings 1x
- Category: Main Course
- Method: Frying
- Cuisine: American
- Diet: None
Ingredients
- 2 large chicken breasts (boneless, skinless)
- 1 cup all-purpose flour
- 2 large eggs (beaten)
- 1 cup breadcrumbs (or panko)
- 1 teaspoon salt
- 1 teaspoon black pepper
- 1 teaspoon garlic powder
- 1 teaspoon paprika
- 4 large tortillas
- 1 cup lettuce (shredded)
- 1 large tomato (sliced)
- 1/2 cup mayonnaise or ranch sauce
- 1/2 cup shredded cheddar cheese
- 1/2 cup cooking oil
Instructions
- Prep Your Chicken: Start by slicing the chicken breasts into strips or bite-sized pieces.
- Set Up Your Breading Station: In three separate bowls, arrange your flour mixed with salt, beaten eggs, and breadcrumbs.
- Coat the Chicken: Take each piece of chicken and dip it into the flour first, then dunk in the eggs and coat with breadcrumbs.
- Heat the Oil: In a non-stick skillet, add enough cooking oil and heat it over medium heat until hot.
- Fry the Chicken: Carefully place the breaded chicken pieces into the hot oil, frying for about 4-5 minutes on each side.
- Drain the Excess Oil: Transfer the cooked chicken to a plate lined with paper towels.
- Warm the Tortillas: Quickly warm your tortillas in a dry skillet over low heat for about 30 seconds on each side.
- Assemble Your Wraps: Place shredded lettuce in the center of the tortilla, topping with crispy chicken, sliced tomatoes, sauce, and cheese.
- Wrap It Up: Fold the sides of the tortilla toward the center, then roll from the bottom up, securing with a toothpick if needed.
Notes
Experiment with various sauces and toppings to customize your wraps. Serve with sides like sweet potato fries or garden salad for a complete meal.
Nutrition
- Serving Size: 1 wrap
- Calories: 450
- Sugar: 2g
- Sodium: 800mg
- Fat: 20g
- Saturated Fat: 5g
- Unsaturated Fat: 10g
- Trans Fat: 0g
- Carbohydrates: 35g
- Fiber: 2g
- Protein: 35g
- Cholesterol: 160mg
Keywords: crispy chicken wraps, easy chicken recipe, homemade wraps, chicken tortilla wraps, delicious chicken
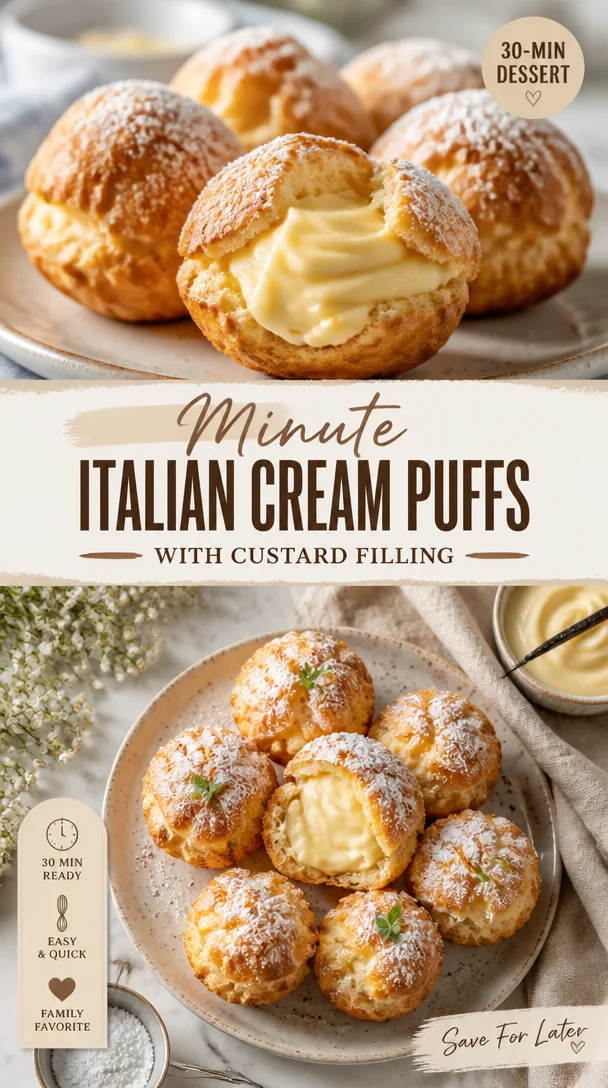
Minute Italian Cream Puffs with Custard Filling
The Sweetness of Italian Cream Puffs: A Culinary Adventure
Hello, foodies! Today, I’m so excited to whisk you away on a journey to Italy through one of my all-time favorite treats—Italian Cream Puffs with Custard Filling! Imagine airy, golden pastry puffs filled with luscious, creamy custard, and topped with a light whipped cream. If you haven’t had the pleasure of experiencing these delightful little bites yet, you’re in for a treat!
The beauty of these cream puffs is not just in their deliciousness but also in the memories they evoke. I can still picture the first time I had a cream puff. Picture this: bright summer day, a lively kitchen buzzing with laughter, and the aroma of freshly baked pastry dough wafting through the air. I must have been around eight years old—excitedly helping my grandmother in her quaint kitchen. She expertly piped the dough onto a baking sheet while I eagerly waited with a spatula in hand. Those were such precious moments of bonding, the best kind of culinary magic. As we sunk our teeth into those golden puffs, the world around us melted away.
Today, I want to share that memory and recipe with you, blending nostalgia and flavors to create an irresistible dessert that’s sure to make your gatherings even sweeter. Let’s don our aprons and dive right into making these beauties!
Ingredients
Here’s what you’ll need to create your Italian Cream Puffs:
-
1 cup water
The base for your dough. You can replace this with equal parts milk for a richer flavor or use chicken stock for a savory twist! -
1/2 cup unsalted butter
Adds richness to your dough. If you’re watching your salt intake, use a salted butter instead and reduce the added salt in the recipe. -
1 cup all-purpose flour
Essential for structure! Gluten-free flour blends work well as substitutes if you’re catering to gluten sensitivities. -
1/4 teaspoon salt
Enhances flavor and balances sweetness. Feel free to skip it if you’re going for a sugar-heavy version, but just a pinch can elevate the taste. -
4 large eggs
These are the binders that give your puffs their structure. You can substitute with 1/4 cup of aquafaba for a vegan version. -
2 cups milk
The base for your custard filling! Whole milk creates a creamier texture, but you can use a non-dairy alternative like almond or oat milk. -
1/2 cup granulated sugar
Sweetens your custard. Coconut sugar makes a great substitute if you want a less refined option. -
1/4 cup cornstarch
Essential for thickening your custard. Arrowroot powder works wonderfully in its place if you’re looking for a corn-free alternative. -
1 teaspoon vanilla extract
A must for flavoring your custard; homemade vanilla extract takes it to a whole new level. You can also experiment with almond extract for a unique twist! -
1/2 cup heavy cream (optional)
Whipped into a fluffy topping. For a lighter option, consider using coconut cream!
Step-by-Step Instructions
Step 1: Make the Pâte à Choux (Pastry Dough)
In a medium saucepan, combine your water and unsalted butter over medium heat. Bring it to a boil, allowing the butter to melt completely. This step is crucial because it creates the perfect texture for your dough.
Chef Tip: Keep the heat steady to prevent the butter from burning. Trust me; you don’t want that!
Step 2: Add the Flour
As soon as your mixture is boiling, quickly add the all-purpose flour and salt. Mix vigorously with a wooden spoon until the dough forms and pulls away from the sides of the pan, about 1-2 minutes. It should feel smooth and slightly sticky.
Chef Hack: If you find your dough is too stiff, add a bit more water—just a tablespoon at a time—until you achieve the right consistency.
Step 3: Cool It Down
Transfer your dough to a mixing bowl and let it cool for about 10 minutes. Then, start adding your eggs one at a time, mixing well after each addition. This step helps create those lofty, airy puffs!
Tip: The key here is to add the eggs gradually; if your dough is too hot, you risk scrambling the eggs. Be patient!
Step 4: Pipe the Puffs
Preheat your oven to 425°F (220°C) and line a baking sheet with parchment paper. Transfer your dough to a piping bag fitted with a round tip. Pipe mounds about 2 inches apart on the prepared baking sheet, aiming for a nice dome shape.
Pro Tip: Wet your fingers and smooth down any pointy tops to ensure your puffs rise evenly!
Step 5: Bake the Puffs
Bake for about 20-25 minutes until golden brown and puffed up. Avoid opening the oven door during the first 20 minutes of baking—it can cause your puffs to collapse!
Step 6: Prepare the Custard
While your puffs are baking, it’s time to make the custard. In a saucepan, combine the milk, granulated sugar, and cornstarch. Cook over medium heat while whisking constantly until it thickens and starts bubbling.
Chef Insight: The whisking is essential, as it ensures a silky-smooth custard with no lumps!
Step 7: Flavor It Up
Once your custard has thickened, remove it from heat and stir in the vanilla extract. Transfer to a bowl and cover the surface with plastic wrap to prevent a skin from forming.
Step 8: Assemble the Cream Puffs
Once your puffs are fully cooled, carefully slice them in half. Use a piping bag to fill them with custard, then replace the tops. You can add whipped cream on top for an extra touch of decadence.
Serving Suggestions
Plate your Italian cream puffs on a beautiful serving platter, dusted with powdered sugar for that extra touch of elegance. Pair them with fresh berries or a drizzle of chocolate sauce for a stunning presentation. Your guests will be swooning!
Recipe Variations
Let’s get creative! Here are a few fun twists to try with your cream puffs:
-
Lemon Zest Custard: Add the zest of one lemon to your custard for a refreshing citrus burst!
-
Chocolate Cream Filling: Stir in some melted chocolate into your custard for a rich chocolate experience.
-
Espresso Cream: Mix espresso powder into the whipped cream for a delightful coffee-flavored topping.
-
Fruit-Infused Cream: Incorporate mashed strawberries or blueberries into the whipped cream for a fruity twist!
-
Savory Spin: Swap the custard for a savory filling like garlic and herb cream cheese for an appetizer version!
Chef’s Notes
Italian cream puffs have a special place in my heart. They’ve evolved through the years in my kitchen; I remember my first batches came out flat and soggy because I was too eager to check on them. Now, I’ve perfected my technique, and every bite feels like a warm hug! These cream puffs are perfect for any occasion, from birthdays to casual family dinners. Don’t worry about perfection—focus on the joy of the process.
FAQs and Troubleshooting
Q: Why did my cream puffs not rise?
A: Only open the oven door after the initial baking to ensure they don’t collapse. Also, make sure the oven is fully preheated before baking!
Q: My custard is lumpy. What did I do wrong?
A: This might happen if the heat is too high or if the mixture wasn’t whisked enough. If you face this, consider straining it through a fine-mesh sieve to fix the lumps!
Q: Can I make these ahead of time?
A: Yes! The puffs can be baked in advance and stored in an airtight container at room temperature. The custard can be prepared a day ahead and kept in the fridge until ready to assemble.
Q: How do I know when my custard is ready?
A: It should be thick enough to coat the back of a spoon. When you run your finger through the custard, it should leave a line!
Nutritional Info
While I believe in indulgence, here’s a rough estimate for one cream puff filled with custard:
- Calories: 120
- Total Fat: 7g
- Carbohydrates: 12g
- Protein: 2g
Feel free to adjust portion sizes and toppings for your dietary needs, and remember—enjoying these sweet puffs is about balance and savoring each delicious bite!
So there you have it, my dear culinary companions—everything you need to master Italian Cream Puffs with Custard Filling! Gather your loved ones, make some memories, and savor every sweet moment around your table. Happy baking!
PrintItalian Cream Puffs with Custard Filling

Delightful Italian cream puffs filled with luscious custard and topped with whipped cream, perfect for any occasion.
- Prep Time: 15 minutes
- Cook Time: 30 minutes
- Total Time: 45 minutes
- Yield: 4 servings 1x
- Category: Dessert
- Method: Baking
- Cuisine: Italian
- Diet: Vegetarian
Ingredients
- 1 cup water
- 1/2 cup unsalted butter
- 1 cup all-purpose flour
- 1/4 teaspoon salt
- 4 large eggs
- 2 cups milk
- 1/2 cup granulated sugar
- 1/4 cup cornstarch
- 1 teaspoon vanilla extract
- 1/2 cup heavy cream (optional)
Instructions
- Combine water and unsalted butter in a saucepan over medium heat.
- Add the all-purpose flour and salt when the mixture boils.
- Transfer the dough to a bowl and let it cool for about 10 minutes.
- Preheat your oven to 425°F (220°C) and pipe mounds of dough onto a baking sheet.
- Bake for about 20-25 minutes until golden brown.
- Prepare custard by cooking milk, sugar, and cornstarch over medium heat.
- Stir in vanilla extract once custard thickens.
- Slice cooled puffs in half and fill with custard.
Notes
These cream puffs can be filled with various flavors and make excellent dessert options for gatherings.
Nutrition
- Serving Size: 1 serving
- Calories: 120
- Sugar: 5g
- Sodium: 100mg
- Fat: 7g
- Saturated Fat: 4g
- Unsaturated Fat: 3g
- Trans Fat: 0g
- Carbohydrates: 12g
- Fiber: 1g
- Protein: 2g
- Cholesterol: 50mg
Keywords: cream puffs, Italian dessert, custard filling, pastries, baking

Ingredient Coconut Popsicles: Quick Creamy Summer Treat
Beat the Heat with Irresistible Coconut Popsicles
Hello fellow food lovers! Today, I’m over the moon to share a recipe that not only cools you down on those sizzling summer days, but also transports you straight to a tropical paradise with every bite. Yes, you guessed it — we’re making luscious Coconut Popsicles! These delightful frozen treats are creamy, dreamy, and packed with sunshine flavors.
Imagine taking a bite of a coconut popsicle, and instantly feeling like you’re sipping a piña colada on a sun-drenched beach. This recipe brings back all those summer vibes! Whether you’re lounging by the pool, hosting a casual backyard gathering, or just want to treat yourself after a long day, these popsicles fit the bill beautifully.
Now, let’s roll up our sleeves and dive into the fun of making Coconut Popsicles. This recipe is not only simple but also customizable, so let’s get our ingredients lined up and our taste buds ready for some serious flavor-packed goodness!
A Sweet Tropical Memory
Let me take you back to a cherished summer memory of mine. I was visiting my grandmother on her little island, where the air was filled with the scent of salt and sunshine. Every afternoon, after a long day of beachcombing and collecting seashells, we would retreat to her quaint kitchen to make the most refreshing treats. My grandmother would whip up her famous coconut popsicles using fresh coconut milk, the kind that was creamy enough to make your taste buds do a happy dance.
I remember the joy on my cousin’s faces as they eagerly awaited the popsicles to freeze. We would choose our favorite toppings—chunks of fresh fruit, a sprinkle of shredded coconut—while giggling about the adventures we had that day. That sense of warmth, laughter, and shared moments is what inspired me to recreate that recipe and share it with you. Let’s make some sweet summer memories of our own with these Coconut Popsicles!
Ingredients You’ll Need
Before we get cooking, let’s gather everything we need to make these heavenly Coconut Popsicles! Here’s a quick rundown:
-
1 can coconut milk
A creamy base that gives these popsicles their indulgent texture. For a lighter version, you can substitute it with almond milk, although the flavor will be different. -
1/2 cup coconut cream
This adds richness and depth. If you can’t find it, you can use extra coconut milk, but the popsicles will be less creamy. -
1/4 cup agave syrup or maple syrup
A touch of sweetness to perfectly balance the flavors. Feel free to swap with honey, but keep in mind that the flavor will vary slightly. -
1/4 cup lime juice
Freshly squeezed lime juice enhances the tropical vibes and adds a zesty kick. You could even use lemon juice if that’s what you have on hand. -
Zest of 1 lime
This will elevate the lime flavor. Don’t skip it! If you love those bright notes, add zest from an extra lime for more flavor! -
Pinch of salt
Just a hint of salt rounds out the sweetness and makes the flavor pop.
Step-by-Step Instructions
Alright, let’s get to the fun part! Here’s how to bring these Coconut Popsicles to life:
-
Combine Ingredients
In a mixing bowl, combine the coconut milk, coconut cream, agave syrup (or maple syrup), lime juice, lime zest, and a pinch of salt. Whisk everything together until it’s smooth and well blended. Feel free to taste the mixture at this point. If you prefer it sweeter, add a tad more syrup! -
Pour into Molds
Once your mixture is perfectly creamy, slowly pour it into popsicle molds. Be careful not to overfill them, as the mixture will expand when freezing. Leave about half an inch of space at the top. If you don’t have molds, small paper cups work just as well. Just insert popsicle sticks (or even spoons) into the center. -
Freeze
Pop your molds into the freezer for about 4-6 hours, or until they’re completely frozen. To speed things up, you could freeze them overnight – that way, they’re all set for a daytime surprise! -
Unmold Your Popsicles
Once the popsicles are frozen solid, take them out and run warm water over the outside of the molds for a few seconds. This helps loosen them up. Gently pull on the sticks to remove them from the molds. -
Enjoy!
These popsicles are best enjoyed immediately, but you can store any extras in a zip-top freezer bag for a rainy day. Just make sure they’re well-wrapped so they don’t get icy!
As you enjoy your coconut popsicles, remember: the key is to savor each bite. These popsicles are not just a treat; they’re a reminder to take time for yourself and embrace the sweetness of life!
Serving Suggestions
To amp up the presentation, place your coconut popsicles on a tray lined with fresh tropical fruits like pineapple and mango. You can sprinkle shredded coconut on top, or drizzle with a bit of melted chocolate for an extra indulgent touch. Serve with a glass of refreshing coconut water or a fruity cocktail, and you’ve instantly elevated your gathering!
Recipe Variations
Get creative with these Coconut Popsicles! Here are a few fun twists to try:
-
Tropical Fruit Pops: Fold in small chunks of fruits like mango, pineapple, or berries before pouring the mixture into molds.
-
Chocolate Dipped Pops: After unmolding, dip your popsicles in melted dark or white chocolate and then roll them in shredded coconut or crushed nuts.
-
Minty Fresh: Add a handful of fresh mint leaves to the blender when making your coconut mixture for an invigorating twist.
-
Fruity Swirl: Mix pureed fruits like raspberries or strawberries into your coconut mixture for a beautiful swirl effect.
-
Dairy-Free Option: Substitute the coconut cream with cashew cream for a nutty flavor and creamy consistency.
Now, the possibilities are endless! The only limit is your imagination!
Chef’s Notes
These Coconut Popsicles have come a long way since my grandmother’s original recipe. I’ll never forget the first time I added lime juice — it was like fireworks exploded in my mouth! Over the years, I’ve adjusted the sweetness and experimented with different fruits and flavors, but the heart of the recipe remains the same — simplicity and a splash of joy.
A funny kitchen story: One summer, I decided to surprise my friends with these popsicles during a heatwave. I got so carried away with my blender that I forgot to secure the lid! You can guess what happened next—let’s say my kitchen looked like a coconut hurricane had swept through! Lesson learned: always remember to blend with the lid on!
FAQs and Troubleshooting
Q: How do I store leftover popsicles?
A: Simply place them in a zip-top freezer bag, removing as much air as possible to avoid freezer burn. They’ll keep well for up to a month!
Q: My popsicles are hard as rocks! What can I do?
A: If your popsicles freeze too hard, try letting them sit at room temperature for a few minutes before unmolding. This will soften the edges and make them easier to remove.
Q: Can I make these without coconut milk?
A: You can, though using a non-coconut dairy alternative might change the flavor profile. Almond, cashew, or soy milk can work, but the texture may be less creamy.
Q: How can I make these popsicles vegan?
A: Great question! Simply ensure that the sweetener used is agave syrup, as honey is not vegan. All other ingredients in this recipe are naturally vegan.
That’s it for our Coconut Popsicles — a simple, refreshing, and oh-so-delicious treat that will surely brighten your day. Whether you’re enjoying them on a sunny afternoon or sharing them at a gathering, these popsicles are bound to be a hit. So tie on your apron, grab your mixing bowl, and let’s create a little tropical magic together! Cheers to summer!
PrintCoconut Popsicles

Delicious and creamy coconut popsicles that transport you to a tropical paradise, perfect for summer days.
- Prep Time: 15 minutes
- Cook Time: 0 minutes
- Total Time: 240 minutes
- Yield: 8 servings 1x
- Category: Dessert
- Method: Freezing
- Cuisine: Tropical
- Diet: Vegan
Ingredients
- 1 can coconut milk
- 1/2 cup coconut cream
- 1/4 cup agave syrup or maple syrup
- 1/4 cup lime juice
- Zest of 1 lime
- Pinch of salt
Instructions
- Combine ingredients in a mixing bowl: coconut milk, coconut cream, agave syrup, lime juice, lime zest, and a pinch of salt. Whisk until smooth.
- Pour the mixture into popsicle molds, leaving space at the top.
- Freeze the molds for about 240-360 minutes, or until completely frozen.
- Unmold the popsicles by running warm water over the outside of the molds and gently pulling on the sticks.
- Enjoy! Best served immediately, but can be stored in a zip-top freezer bag for later.
Notes
For added creativity, try folding in chunks of fruits or dipping in chocolate!
Nutrition
- Serving Size: 1 popsicle
- Calories: 150
- Sugar: 8g
- Sodium: 5mg
- Fat: 9g
- Saturated Fat: 8g
- Unsaturated Fat: 1g
- Trans Fat: 0g
- Carbohydrates: 16g
- Fiber: 0g
- Protein: 1g
- Cholesterol: 0mg
Keywords: coconut, popsicles, summer, dessert, vegan, tropical
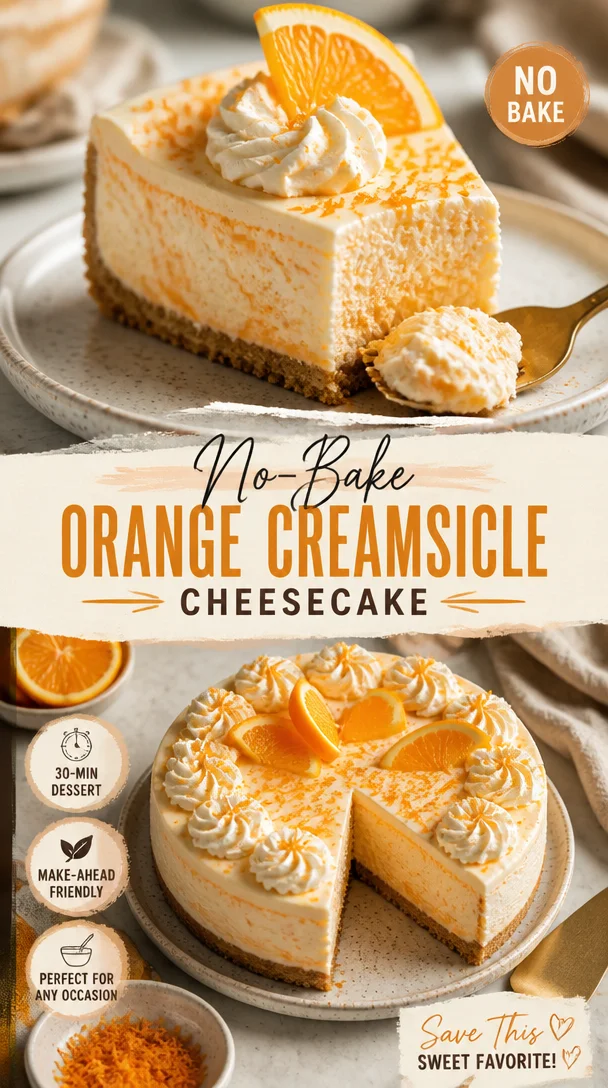
No-Bake Orange Creamsicle Cheesecake
No-Bake Orange Creamsicle Cheesecake: A Deliciously Nostalgic Treat
Hello, fellow food lovers! Today, we’re diving into the sunny world of desserts with a delightful No-Bake Orange Creamsicle Cheesecake. This sweet treat takes me back to lazy summer days filled with the joyful scents of citrus and the satisfying crunch of a graham cracker crust. If you’ve ever enjoyed the nostalgia of an ice cream truck rolling down your street on a hot summer day, this cheesecake might just be your new favorite dessert. So grab your apron, because we’re about to create something wonderfully refreshing and dreamy!
Personal Story
Growing up, my summers were always marked by the sound of the ice cream truck. Like most kids, I raced to the front yard, hoping to snag some pocket change from my parents to grab a cool treat. The creamsicle was a standout, with its bright orange exterior and creamy, dreamy center. It was a flavor that seemed to capture sunshine—totally irresistible! Fast forward to my kitchen adventures as an adult, I wanted to recreate that same joy, but with a twist. Thus, the No-Bake Orange Creamsicle Cheesecake was born! It’s an embodiment of those blissful days—the perfect refreshment for a summer gathering, or really any occasion that calls for a taste of nostalgia. Trust me, when you make this for your friends and family, you’ll not only fill their bellies, but you’ll also warm their hearts!
Ingredients
Here’s what you’ll need to whip up this beautiful cheesecake:
-
1 (3 ounce) box orange jello
The secret to that zesty orange flavor! If you don’t have jello on hand, a little orange juice concentrate can be a substitute. -
1 cup boiling water
This helps dissolve the jello easily. No boiling water? Hot tap water will work in a pinch, but it’s not quite as effective. -
2 cups Graham Cracker crumbs (about 14 sheets)
These form the crispy base of the cheesecake—a must-have! For a gluten-free option, use gluten-free graham crackers. -
6 tablespoons unsalted butter, melted
Butter brings richness and binds the crumbs together. Coconut oil can serve as a dairy-free alternative! -
Pinch of salt
A little pinch lifts the flavors and balances the sweetness. You could use a tiny bit of sea salt or even omit it if you prefer. -
2 (8 ounce) blocks cream cheese, softened
Bring this to room temperature for a creamy texture. Neufchâtel cheese can lighten up the recipe if you’d like! -
1 1/2 cups powdered sugar, divided
This sweetens the mixture—definitely a key ingredient! If you want a less sweet version, you can reduce this amount. -
2 cups heavy whipping cream
Whipping cream makes the cheesecake light and fluffy—so dreamy! If you want a non-dairy option, coconut cream works wonders. -
1/2 teaspoon vanilla extract
For that little extra depth of flavor! You can use almond extract for a unique twist. -
Zest of 1 orange (optional)
This adds an extra burst of orange flavor and color! Feel free to skip if you’re in a rush; this cheesecake is plenty delicious as is.
Step-by-Step Instructions
Let’s get into the heart of this recipe! Follow these steps for a perfectly creamy, light cheesecake that captures all that orange dreams are made of:
-
Dissolve the Jello
In a small mixing bowl, combine the orange jello powder with the boiling water. Stir until the mixture is fully dissolved. This will be your flavor powerhouse! Set it aside to cool slightly while we prepare the crust. -
Prepare the Crust
In a medium mixing bowl, combine the Graham cracker crumbs, melted butter, and a pinch of salt. Mix until the crumbs are fully coated and resemble wet sand. Transfer this mixture to a 9-inch springform pan. Press firmly into the bottom to create an even layer. Use the bottom of a measuring cup to help you get a sturdy crust! -
Beat the Cream Cheese
In a large mixing bowl, beat the softened cream cheese with an electric mixer on medium speed until smooth and creamy. This process is key—overlook it, and you might have lumps. Remember to scrape down the sides of the bowl periodically to ensure everything is evenly incorporated. -
Sweeten It Up
Gradually add in 1 cup of powdered sugar while continuing to mix. Beat until fully combined and creamy. Taste it here! You can adjust the sweetness if needed. -
Incorporate the Whipping Cream
In a separate bowl, whip the heavy cream until stiff peaks form—that’s your perfect whipped cream! Use a spatula to fold this into your cream cheese mixture gently; it will lighten up the texture beautifully. Aim for a light, airy mix, but be careful not to deflate it! -
Add the Jello Mixture
Now, gently fold in the cooled jello mixture and the vanilla extract. This step is where the magic happens! Combine thoroughly, but be gentle—this is what keeps your cheesecake fluffy. -
Zest it Up (Optional)
If you’re feeling adventurous, add the orange zest here for an extra citrusy kick. Fold it in carefully to maintain that lightness. -
Pour and Chill
Transfer the cheesecake mixture into the prepared crust, smoothing the top with a spatula. Cover it with plastic wrap and refrigerate for at least 4 hours, or ideally overnight. This will set it to perfection!
Serving Suggestions
When it’s time to unveil your masterpiece, carefully remove the springform pan. You can serve it as-is for a simple presentation, or dress it up a bit! Garnish slices with fresh orange slices, a dollop of whipped cream, or even a sprinkle of extra orange zest for a dazzling finish. You might even consider pairing this cheesecake with a refreshing herbal tea or a glass of sparkling water to balance the sweetness.
Recipe Variations
- Fruit Toppings: Top each slice with fresh berries or a citrus salad for a colorful burst of flavor.
- Chocolate Drizzle: For a fun twist, drizzle melted chocolate over the top before serving. Orange and chocolate are a match made in heaven!
- Coconut Cream: Replace half the cream cheese with coconut cream for a tropical vibe.
- Lower Sugar: Swap out the powdered sugar for a sugar substitute if you’re monitoring your sugar intake.
- Add Spice: Try adding a pinch of nutmeg or cinnamon to the cream cheese mixture for a different flavor profile that complements the orange beautifully!
Chef’s Notes
This No-Bake Orange Creamsicle Cheesecake is not only delicious but incredibly versatile! While I’ve used orange jello for that nostalgic flavor, experimenting with lemon or even cherry jello can yield fantastic results. It’s transformed at the drop of a hat, and I love introducing new flavors based on the season or my mood! One time, I used leftover summer fruit to make a layer on top, which turned out to be a delightful surprise for my dinner guests. Just remember, while this cheesecake looks elegant, the simplicity of making it is part of the charm. Enjoy the process as much as the result!
FAQs and Troubleshooting
1. Why is my cheesecake not setting?
If your cheesecake isn’t setting, it may need more time in the fridge. Make sure you let it chill for at least 4 hours, but overnight is best for ideal firmness.
2. Can I use a different type of crust?
Absolutely! You can use any cookie crust or even a nut crust. Just make sure to adjust the butter accordingly depending on your choice.
3. My cream cheese is lumpy; what did I do wrong?
To prevent lumpy cream cheese, make sure it’s at room temperature before beating. Cold cream cheese doesn’t blend well!
4. How long will this cheesecake last in the refrigerator?
The No-Bake Orange Creamsicle Cheesecake will keep well covered in the fridge for about 4-5 days—perfect for keepers of leftovers!
Nutritional Info
(Nutritional content will vary based on portion size and ingredient brands, so it’s always good to calculate it based on your specific ingredients.)
So, there you have it! A No-Bake Orange Creamsicle Cheesecake that’s as easy to make as it is joyful to eat. Invite your friends over, savor a slice, and relive the carefree delight of summer all year long. Happy baking, and remember: good food is best shared! Cheers!
PrintNo-Bake Orange Creamsicle Cheesecake

A delightful and nostalgic no-bake cheesecake that captures the refreshing flavors of orange creamsicles, perfect for summer gatherings.
- Prep Time: 20 minutes
- Cook Time: 0 minutes
- Total Time: 240 minutes
- Yield: 8 servings 1x
- Category: Dessert
- Method: No-Bake
- Cuisine: American
- Diet: Vegetarian
Ingredients
- 1 (3 ounce) box orange jello
- 1 cup boiling water
- 2 cups graham cracker crumbs (about 14 sheets)
- 6 tablespoons unsalted butter, melted
- Pinch of salt
- 2 (8 ounce) blocks cream cheese, softened
- 1 1/2 cups powdered sugar, divided
- 2 cups heavy whipping cream
- 1/2 teaspoon vanilla extract
- Zest of 1 orange (optional)
Instructions
- Dissolve the Jello: In a small mixing bowl, combine the orange jello powder with the boiling water. Stir until fully dissolved and set aside to cool.
- Prepare the Crust: In a medium mixing bowl, combine the graham cracker crumbs, melted butter, and a pinch of salt. Mix until the crumbs resemble wet sand, then press firmly into a 9-inch springform pan.
- Beat the Cream Cheese: In a large mixing bowl, beat the softened cream cheese until smooth. Scrape down the sides to ensure an even texture.
- Sweeten It Up: Gradually add 1 cup of powdered sugar and mix until fully combined and creamy. Adjust sweetness if necessary.
- Incorporate the Whipping Cream: In a separate bowl, whip the heavy cream until stiff peaks form. Gently fold into the cream cheese mixture.
- Add the Jello Mixture: Gently fold in the cooled jello mixture and vanilla extract, combining thoroughly yet gently.
- Zest it Up (Optional): Fold in orange zest for an extra burst of flavor, if using.
- Pour and Chill: Transfer the cheesecake mixture into the prepared crust, smoothing the top. Cover and refrigerate for at least 4 hours, preferably overnight.
Notes
Garnish slices with fresh orange slices or a dollop of whipped cream for extra flair. This cheesecake can also be varied with different jello flavors and toppings.
Nutrition
- Serving Size: 1 slice
- Calories: 400
- Sugar: 27g
- Sodium: 300mg
- Fat: 28g
- Saturated Fat: 16g
- Unsaturated Fat: 8g
- Trans Fat: 0g
- Carbohydrates: 38g
- Fiber: 1g
- Protein: 4g
- Cholesterol: 65mg
Keywords: cheesecake, no-bake, orange, dessert, summer, creamy, nostalgic

Minute Baked Apple Fritter Bites for Cozy Mornings
Heavenly Baked Apple Fritter Bites for Cozy Mornings
There’s something undeniably magical about crisp autumn mornings. The air is tinged with a hint of spice, and the hues of red and gold from the trees create a picturesque backdrop. If you’re anything like me, those mornings call for a special breakfast that’s warm, comforting, and laden with the joyful essence of fall. Enter my Heavenly Baked Apple Fritter Bites — the perfect treat to cuddle up with as you sip your coffee or tea.
These delightful fritters are like little bites of heaven, bursting with juicy apple goodness and warm spices. The best part? They’re baked, not fried, making them a guilt-free indulgence for your cozy mornings. Trust me, once you whip these up and the enticing aroma fills your kitchen, you’ll find yourself wishing every day was breakfast day!
When I first began making these fritters, it was after a particularly crisp evening spent at an apple orchard. There’s something so nostalgic about wandering through rows of apple trees, picking the perfect fruit, and dreaming up all the delicious things you can do with them. As I brought home bags of Honeycrisp apples, the wheels in my head turned faster than a whirring mixer. I was determined to craft a light, fluffy fritter that channeled all the warm, cozy vibes of fall — and boy, did I succeed! These bites are now a go-to for any morning gathering, proving that sometimes, inspiration strikes at the most unexpected moments.
So, grab your apron, and let’s make some magical kitchen memories together with these Heavenly Baked Apple Fritter Bites!
Personal Story
A childhood favorite of mine was always my grandmother’s apple pie, which would fill her home with sweetness every harvest season. I remember sneaking into the kitchen, trying to grab some of the warm, spiced filling when she wasn’t looking, and being promptly caught — a tender moment now stored in my heart forever. As we sat at her wooden table, sharing stories and laughter, I realized that food was beyond just sustenance; it was a way to connect and create memories.
Years later, I found myself in a similar scene, only this time, I was the one in the kitchen, surrounded by friends, baking these apple fritter bites while the sweet scent danced through the air. Just like my grandmother had done for me, I was sharing not only food but comfort, laughter, and warmth. These fritter bites became more than just a recipe; they carried on a legacy of love, just like her cherished apple pie.
Ingredients
Let’s take a look at what you’ll need to create these delectable bites. Each ingredient plays a vital role, and I’ve added some tips along the way to help you customize and elevate your fritters.
-
1 1/2 cups all-purpose flour
This is the backbone of your batter! For a gluten-free alternative, you can use a 1:1 gluten-free flour blend. It will yield great results while keeping everything light and fluffy. -
2 tsp baking powder
This little powerhouse works to lift your fritters, giving them that delightful fluffiness we all crave. -
1/2 tsp kosher salt
A touch of salt enhances the sweetness and balances the flavors. If you’re out of kosher salt, sea salt works just as well. -
2 tsp ground cinnamon
This warm spice adds all the cozy vibes. Feel free to adjust the amount based on your preference — I won’t judge if you want to sprinkle a little extra for that autumnal kick! -
1/4 cup unsalted butter (melted)
This adds richness to the batter. Dairy-free? Just swap it with melted coconut oil for a plant-based option! -
1/4 cup granulated sugar
It sweetens the batter, but if you’re aiming for a healthier twist, coconut sugar can be an excellent substitute. -
1 large egg
This acts as a binding agent that helps bring everything together. For a vegan option, just use a flax egg (1 tbsp ground flaxseed mixed with 2.5 tbsp water). -
1/2 tsp vanilla extract
Vanilla brings a lovely depth of flavor to the fritters, though you can omit it if you’re in a pinch. -
1/2 cup unsweetened applesauce
This keeps your fritters moist and adds an extra apple flavor! Want more texture? You can substitute it with additional diced apples. -
1 1/2 cups finely diced Honeycrisp or Gala apples
These sweet varieties hold their shape well and add a delightful juiciness. You could experiment with whatever sweet, firm apples you have on hand. -
2 cups powdered sugar
A must for that classic sugary glaze! Adjust the quantity to your taste, but trust me, there’s no such thing as too much powdered sugar for fritters. -
1/3 cup apple cider or juice
Freshly pressed apple cider enhances the flavor and adds a nice, tangy taste to the fritters. -
2 tbsp apple cider or juice (to add to the glaze)
It complements the sweetness of the powdered sugar, making the glaze absolutely divine.
Step-by-Step Instructions
Now that we have our ingredients ready, let’s dive into the lovely world of cooking these fritters. Follow along with these step-by-step instructions, and I’ll sprinkle in some chef commentary to make the process delightful and easy!
Step 1: Preheat the Oven
Start by preheating your oven to 350°F (175°C). While your oven warms up, it gives you some time to prepare your baking sheet!
Step 2: Prepare Your Baking Sheet
Line a baking sheet with parchment paper. This prevents sticking and makes for super easy cleanup — a win-win situation! If you’re feeling fancy, you might want to use a silicone baking mat for a reusable option that’s eco-friendly.
Step 3: Mix the Dry Ingredients
In a large mixing bowl, whisk together the flour, baking powder, salt, and cinnamon until well combined. By mixing these dry ingredients first, you help to evenly distribute the leavening agents, which will help your fritters rise beautifully!
Step 4: Combine Wet Ingredients
In another bowl, mix together the melted butter, granulated sugar, egg, vanilla extract, and applesauce until smooth. You want to ensure it’s creamy and well mixed. This is where all the flavors start to blend beautifully!
Step 5: Combine Wet and Dry Mixtures
Pour your wet mixture into the bowl with the dry ingredients. Gently fold the mixtures together using a spatula or a wooden spoon. Don’t overmix; a few lumps are perfectly okay! The key to tender fritters is ensuring you don’t develop too much gluten.
Step 6: Add the Diced Apples
Now for the best part — fold in those diced apples! Ensure they’re evenly distributed throughout the batter, providing sweet bites in every fritter.
Step 7: Portion the Batter
Using a cookie scoop or spoon, drop generous mounds of the batter onto your prepared baking sheet, spaced a couple of inches apart. This way, they have room to puff up beautifully as they bake.
Step 8: Bake
Pop the baking sheet into the oven and bake for 15–20 minutes, or until the fritters are golden brown and a toothpick inserted in the center comes out clean. Oh, the smell! It’s going to be heavenly.
Step 9: Prepare the Glaze
While your fritters are baking, whisk together the powdered sugar and apple cider to create a smooth glaze. Feel free to adjust the consistency: if it’s too thick, just add a tad more cider, and if it’s too thin, add more powdered sugar.
Step 10: Glaze and Serve
Once your fritters are out of the oven and have cooled slightly, it’s time to dip! Generously drizzle the glaze over the fritters or dip the tops for an extra dose of sweetness.
Step 11: Enjoy!
Serve these delightful fritters warm with a lovely cup of coffee or tea, and watch as smiles light up around your table.
Serving Suggestions
To plate your Heavenly Baked Apple Fritter Bites, simply stack them on a beautiful cake stand or a decorative plate. A light dusting of powdered sugar on top can add a real aesthetic charm. Provide small bowls of extra glaze for dipping or drizzling, and garnish with a sprinkle of cinnamon or even a few thinly sliced apple pieces for visual appeal. This presentation not only celebrates the dish but also enhances the inviting atmosphere you create around your table.
Recipe Variations
- Spiced Pumpkin Fritters: Add pumpkin puree and swap out the apples for pumpkin pie spice for a delightful fall twist.
- Maple Glaze: Replace the apple cider in your glaze with pure maple syrup for a sweet and earthy flavor.
- Nutty Addition: Toss in some chopped walnuts or pecans for crunch and added texture!
- Chocolate Drizzle: For the chocolate lovers, drizzle a melted chocolate ganache over the fritters instead of glaze.
- Berry Fritter Bites: Substitute apples with blueberries or cranberries for a slightly tart flavor that’s equally delicious.
Chef’s Notes
These fritter bites were born from my love for apples and the magical memories of fall. Over the years, this recipe has transformed into a cherished favorite in my home. I’ve played around with flavors and textures, and I really encourage you to make it your own!
One of my funniest kitchen experiences when making these fritters was having my dog, Oliver, watch me as I prepared them — he is convinced that flour is meant for him! Imagine a white dog with a floury face; it was irresistible! As I transformed moments like this into laughter and shared delicious bites, I realized that cooking isn’t just about creating a meal; it’s about crafting memories and smiles.
FAQs and Troubleshooting
-
Why didn’t my fritters rise?
- Ensure that your baking powder is fresh! If it’s been sitting in the pantry for a while, it might lose its strength. Additionally, make sure you’re properly measuring your ingredients.
-
How do I know my fritters are done?
- Inserting a toothpick is the best test! If it comes out clean or with a few moist crumbs, you’re good to go. The tops should also be golden brown.
-
Can I freeze these fritters?
- Yes, they freeze beautifully! Let them cool completely, then store in airtight containers. When ready to enjoy, just pop them in the toaster oven to reheat — they’ll get crispy again!
-
How can I store leftover fritters?
- Store your fritters in an airtight container at room temperature for up to two days. For longer freshness, keep them in the fridge for up to a week (though I doubt they’ll last that long!).
Nutritional Info
While the nutritional information may vary based on specific ingredients and serving sizes, a rough estimate for each fritter — not including glaze — is about:
- Calories: 150
- Protein: 2 g
- Carbohydrates: 20 g
- Fat: 6 g
Conclusion
There you have it — the recipe for my Heavenly Baked Apple Fritter Bites that bring all the cozy vibes to your mornings! Once you try these, I guarantee you’ll find an excuse to make them more often. Whether you’re hosting friends or simply treating yourself, these fritters are an ode to the simpler, beautiful moments life has to offer. So go ahead, tie on that apron, and let’s create something divine together!
Happy cooking! Here’s to cozy mornings filled with love, laughter, and delicious fritters!
PrintHeavenly Baked Apple Fritter Bites

Delightful bites of heaven, bursting with juicy apple goodness and warm spices, perfect for cozy mornings.
- Prep Time: 15 minutes
- Cook Time: 20 minutes
- Total Time: 35 minutes
- Yield: 12 servings 1x
- Category: Dessert
- Method: Baking
- Cuisine: American
- Diet: Vegetarian
Ingredients
- 1 1/2 cups all-purpose flour
- 2 tsp baking powder
- 1/2 tsp kosher salt
- 2 tsp ground cinnamon
- 1/4 cup unsalted butter (melted)
- 1/4 cup granulated sugar
- 1 large egg
- 1/2 tsp vanilla extract
- 1/2 cup unsweetened applesauce
- 1 1/2 cups finely diced Honeycrisp or Gala apples
- 2 cups powdered sugar
- 1/3 cup apple cider or juice
- 2 tbsp apple cider or juice (for glaze)
Instructions
- Preheat the oven to 350°F (175°C).
- Line a baking sheet with parchment paper.
- Whisk together flour, baking powder, salt, and cinnamon in a large bowl.
- Mix melted butter, granulated sugar, egg, vanilla extract, and applesauce in another bowl until smooth.
- Pour the wet mixture into the dry ingredients and gently fold them together.
- Fold in diced apples until evenly distributed.
- Drop mounds of batter onto the prepared baking sheet, spaced apart.
- Bake for 15–20 minutes or until golden brown.
- Whisk together powdered sugar and apple cider to create a glaze.
- Drizzle or dip fritters in the glaze.
- Serve warm with coffee or tea.
Notes
For a gluten-free option, substitute flour with a 1:1 gluten-free flour blend. To enhance the glaze, you can use maple syrup instead of apple cider.
Nutrition
- Serving Size: 1 fritter
- Calories: 150
- Sugar: 20g
- Sodium: 100mg
- Fat: 6g
- Saturated Fat: 3g
- Unsaturated Fat: 3g
- Trans Fat: 0g
- Carbohydrates: 20g
- Fiber: 1g
- Protein: 2g
- Cholesterol: 35mg
Keywords: apple fritters, baked fritters, autumn breakfast, cozy mornings, fall recipes
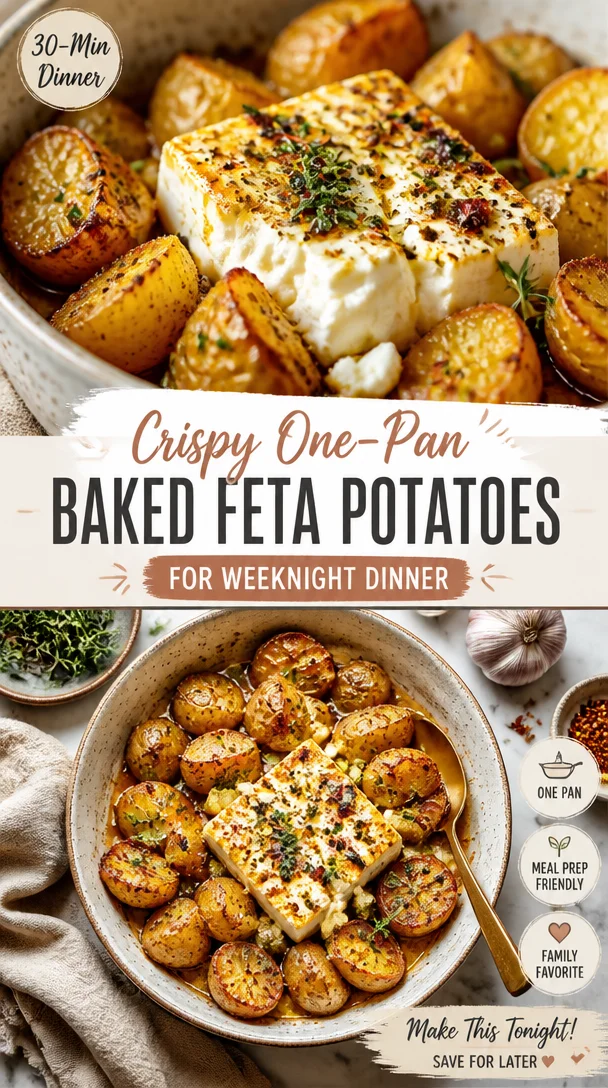
Crispy One-Pan Baked Feta Potatoes for Weeknight Dinner
Baked Feta Potatoes – A Comforting Culinary Hug
Hello, fellow food lovers! Today, we’re diving into the realm of comfort food that warms your heart and fills your belly – Baked Feta Potatoes! This dish is both simple and elegant, perfect for cozy nights in or impressing your friends at a dinner party. Who knew a potato could be so versatile and delicious?
Picture this: it’s a chilly evening, and you’re nestled in your kitchen, fragrant herbs wafting in the air, while you prepare a meal that not only nourishes your body but also your soul. Grab your apron, and let’s get started on this delightful dish that can transform ordinary ingredients into an extraordinary experience!
Personal Story
This Baked Feta Potatoes recipe holds a special place in my heart. I remember the first time I made it during a cozy get-together with friends. We had gathered for a casual dinner party, and I wanted to try something new. With the potatoes and the block of feta cheese sitting in my fridge, I decided to whip up this dish, inspired by the deliciousness I had seen scrolling through my feeds.
As the potatoes roasted in the oven, the aroma filled the room, inviting all of us to the kitchen. We laughed, told stories, and eagerly anticipated the meal. When I pulled the bubbling tray out of the oven, adorned with golden potatoes, creamy melted feta, and fragrant garlic, it felt like a warm culinary hug. From that day on, this dish became a staple for gatherings and has accompanied many joyous moments in my home. I can’t wait to share it with you!
Ingredients
Let’s get to the good stuff! Here’s what you’ll need for Baked Feta Potatoes:
- 2 large baking potatoes: The stars of the dish! Choose Russet or Idaho potatoes for their fluffy interiors. If you’re in a pinch, sweet potatoes work great too.
- 200g block of feta cheese: Creamy and tangy, feta adds a unique flavor. If you can’t find feta, goat cheese will give you a similar creamy texture and a slightly different flavor twist.
- 2 tbsp olive oil: A must-have for drizzling on potatoes. It not only adds richness but helps achieve a lovely golden crust. Avocado oil can be a great substitute if you prefer.
- 1 tsp dried thyme: This herb lends a beautiful aroma and pairs well with the other ingredients. Fresh thyme works too; just double the amount!
- 1 tsp dried oregano: A classic herb that adds depth and warmth. You can substitute with Italian seasoning if you have it.
- 1 head of garlic (top cut off): Roasting garlic brings out its sweetness and mellows its sharpness. If you’re short on garlic, you can use garlic powder, but roasted garlic really elevates this dish!
- 1 lemon (quartered): The zesty freshness of lemon brightens up the flavors. If you’re not a lemon lover, a splash of balsamic vinegar can give a different yet delightful tang.
- 1 tbsp honey: Just a touch of sweetness balances the saltiness of the feta. Maple syrup can be used for a vegan alternative.
- Fresh basil for garnish: Adds a pop of color and a fresh herbaceous note. If basil isn’t handy, feel free to use parsley or chives!
Step-by-Step Instructions
Alright! It’s time to roll up our sleeves and get cooking. Here’s how to create these mouthwatering Baked Feta Potatoes:
-
Preheat the Oven: Preheat your oven to 400°F (200°C). This ensures a nice, hot environment for roasting. While the oven is heating up, wash and scrub the potatoes thoroughly under running water to remove any dirt.
-
Prepare the Baking Dish: Drizzle a tablespoon of olive oil on a baking sheet or an oven-safe dish. This will prevent the potatoes from sticking and add a lovely flavor.
-
Prep the Potatoes: Pat the potatoes dry and poke them a few times with a fork. This helps steam escape during baking, preventing them from bursting. Rub the potatoes with the remaining olive oil, and sprinkle them with the thyme and oregano.
-
Roast: Place the potatoes on the baking sheet and add the garlic head (top cut off) and lemon wedges around them. Roast in the preheated oven for about 45-50 minutes or until the potatoes are fork-tender and the skin is crisp. This roasting process caramelizes the edges, making them super flavorful.
-
Add the Feta: After 30 minutes, add the block of feta cheese to the baking dish, tucking it right in with the potatoes. Drizzle the honey over the feta to caramelize it as it bakes.
-
The Final Bake: Return everything to the oven for an additional 15-20 minutes, until the feta is golden and soft, and the potatoes are delectably crispy.
-
Garnish and Serve: Once out of the oven, squeeze the roasted garlic cloves out of their skins, into a bowl. Mash them up with a fork, mixing it with the melted feta and the juices from the lemons for a pillowy spread. Serve the potatoes hot, garnished with fresh basil.
Chef’s Tip: Keep an eye on the feta during the last few minutes of baking, as it can go from golden to overly browned quite quickly!
Serving Suggestions
Plating is where the magic truly unfolds! Serve your Baked Feta Potatoes family-style on a large platter, drizzled with any leftover honey and olive oil from the baking dish for added richness. Don’t forget to top it off with a generous handful of fresh basil – it adds a burst of color and flavor!
These potatoes are fantastic on their own or paired with a fresh side salad or roasted vegetables for a complete meal. You can even serve them with a dollop of yogurt for added creaminess and a little zing!
Recipe Variations
While this recipe is delectable on its own, why not mix things up a bit? Here are some creative twists you can try:
- Spicy Kick: Add red pepper flakes or a sprinkle of cayenne pepper to the oil before roasting for a spicy finish.
- Mediterranean Style: Toss in chopped Kalamata olives or sundried tomatoes for a Mediterranean flair.
- Vegan Option: Swap the feta cheese with a vegan cheese alternative or a cashew cream topping.
- Herby Delight: Experiment with fresh herbs like rosemary or dill for different flavor profiles.
- Comforting Addition: Sprinkle crispy bacon bits or sautéed mushrooms on top before serving for a savory crunch!
Chef’s Notes
Baked Feta Potatoes are a wonderfully adaptable dish. In my kitchen, I often use whatever herbs or add-ins I have on hand, making them a great go-to for last-minute meals. They pair great with wine, laughter, and good conversation.
One fun memory I have is when I was recipe-testing in my tiny apartment, and the aroma brought my neighbor knocking on my door to check if I was cooking something special. We ended up sharing a plate, bonding over flavors and laughs. That’s the essence of cooking – it connects us and creates lasting memories.
FAQs and Troubleshooting
-
What if my potatoes aren’t tender after the cooking time?
No worries! Just pop them back in the oven for an extra 10-15 minutes and check them again. Oven times can vary based on size and type of potatoes. -
Can I make this dish ahead of time?
Yes! Pre-cook the potatoes and add the feta just before serving – just warm them back in the oven when you’re ready to eat. -
How do I know if my garlic is roasted perfectly?
Roasted garlic should be soft and lightly caramelized. If you see it turning too dark, it might taste bitter, so keep an eye on its color! -
What are some great side dishes to pair with Baked Feta Potatoes?
A fresh arugula salad with lemon vinaigrette or grilled veggies complement this dish beautifully. You can also serve it alongside grilled chicken or fish for a complete feast.
Nutritional Info
While I love sharing the flavor experiences, I also believe in enjoying food without obsessing over the numbers! Each serving of Baked Feta Potatoes can be balanced with wholesome side dishes – just remember to savor the moment rather than tallying up the calories.
And there you have it, my friends! Dive into this comforting, chic recipe that proves you can elevate simplicity without the stress. Tie on that apron, gather your ingredients, and let’s elevate dinner time into a beautiful experience. Happy cooking!
PrintBaked Feta Potatoes

A comforting dish featuring roasted potatoes with creamy feta cheese, garlic, and fresh herbs.
- Prep Time: 15 minutes
- Cook Time: 50 minutes
- Total Time: 65 minutes
- Yield: 4 servings 1x
- Category: Main Course
- Method: Baking
- Cuisine: Mediterranean
- Diet: Vegetarian
Ingredients
- 2 large baking potatoes (Russet or Idaho)
- 200g block of feta cheese
- 2 tbsp olive oil
- 1 tsp dried thyme
- 1 tsp dried oregano
- 1 head of garlic (top cut off)
- 1 lemon (quartered)
- 1 tbsp honey
- Fresh basil for garnish
Instructions
- Preheat the oven to 400°F (200°C).
- Drizzle a tablespoon of olive oil on a baking sheet.
- Pat the potatoes dry and poke them with a fork.
- Rub the potatoes with olive oil, thyme, and oregano.
- Place the potatoes on the baking sheet with garlic and lemon.
- Roast for 45-50 minutes or until fork-tender.
- Add feta cheese after 30 minutes and drizzle honey.
- Return to oven for an additional 15-20 minutes.
- Garnish with mashed roasted garlic, feta, and serve with fresh basil.
Notes
Keep an eye on the feta during the last few minutes to prevent over-browning.
Nutrition
- Serving Size: 1 serving
- Calories: 350
- Sugar: 5g
- Sodium: 400mg
- Fat: 12g
- Saturated Fat: 4g
- Unsaturated Fat: 6g
- Trans Fat: 0g
- Carbohydrates: 45g
- Fiber: 3g
- Protein: 15g
- Cholesterol: 30mg
Keywords: baked feta potatoes, comfort food, Mediterranean recipe, vegetarian dish, easy dinner
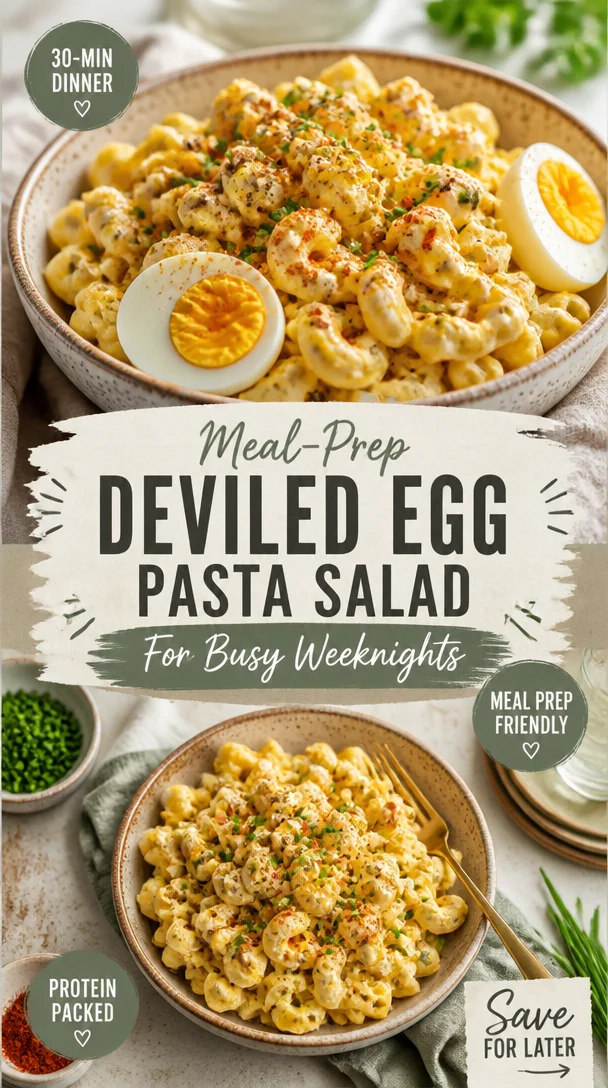
Meal-Prep Deviled Egg Pasta Salad for Busy Weeknights
Deviled Egg Pasta Salad: A Recipe with Heart and Flavor
Hello, food lovers! Today we’re diving into a recipe that’s both nostalgic and oh-so-delicious: Deviled Egg Pasta Salad. Picture this: it’s a sunny afternoon, the kitchen is filled with laughter, and the table is set for a gathering of friends and family. With every bite of this creamy, tangy pasta salad, you’ll be reminded of picnics in the park, summer barbecues, and the joy of simply being together. Ready to whip up something that brings back all those warm memories? Let’s get cooking!
Personal Story
Growing up, my family had a tradition: every summer, we’d host a neighborhood cookout where everyone brought their favorite dish. There was always a beautiful array of food—grilled burgers, charred veggies, and of course, my mom’s famous deviled eggs. She’d whip them up with a dash of pickle juice and a sprinkle of paprika. But one year, she decided to transform these beloved egg bites into something even more spectacular—a pasta salad that combined all the goodness of her deviled eggs with the comforting heartiness of pasta.
That day, the sun was shining bright, and as we gathered around the picnic table adorned with checkered tablecloths, I remember the laughter erupting with every forkful of that pasta salad. It was a serious culinary breakthrough that brought everyone together, both in the kitchen and at the table. Since then, this Deviled Egg Pasta Salad has become my go-to dish for parties, potlucks, and every gathering where I want to spread a little love and a lot of flavor.
Ingredients
Here’s what you’ll need to whip up this delightful dish:
-
8 ounces small pasta (like elbows or ditalini): Choose any shape you love! Small pasta is great for holding onto the creamy dressing. If you’re gluten-free, feel free to substitute with a gluten-free pasta version.
-
3/4 cup mayonnaise: The creamy base that brings it all together! If you prefer a lighter option, substitute half of it with Greek yogurt for a delicious twist.
-
1 tablespoon pickle juice: This adds that tangy kick you find in traditional deviled eggs. Don’t have pickle juice? Lemon juice works just as well.
-
1 tablespoon Dijon mustard: For that perfect balance of tanginess. If you want to swap it out, yellow mustard works in a pinch.
-
6 hard-boiled eggs, peeled and diced: The heart of our dish! You can use store-bought hard-boiled eggs or boil them yourself. Just remember, the fresher, the better!
-
1/2 cup red onion, finely diced: This adds a sweet crunch. If you prefer a milder flavor, try using green onions or scallions.
-
1/3 cup chopped pickles: Dill or sweet, whichever you fancy! If you don’t like pickles, try chopped olives or capers for a briny flavor.
-
1 teaspoon garlic powder: For that subtle depth. Fresh garlic can work too, but go with half a clove minced for the same flavor punch.
-
1/2 teaspoon paprika: This adds flavor and a lovely color. Don’t skip this—it’s a deviled egg staple!
-
Salt and pepper: Essential for enhancing all the flavors. Season to taste!
-
Green onions, sliced, for serving: Fresh and vibrant, these add a finishing touch!
Step-by-Step Instructions
Now that we’ve gathered our ingredients, let’s get to the fun part—cooking!
-
Cook the Pasta: Bring a large pot of salted water to a boil. Add in your pasta and cook according to package instructions until al dente, usually about 8-10 minutes. Remember, we want that perfect bite—not too mushy! Once it’s done, drain it and give it a quick rinse under cold water to stop the cooking process. This also helps the pasta to cool down for our salad.
-
Prepare the Eggs: If you’re making your hard-boiled eggs, place them in a pot and cover them with cold water. Bring the water to a boil, then remove from heat, cover, and let them sit for about 12 minutes. Afterward, cool them under cold running water and peel! For our salad, we want them diced into hearty pieces.
-
Mix the Dressing: In a large mixing bowl, combine the mayonnaise, pickle juice, and Dijon mustard. Use a whisk to blend well—this is where all that creamy goodness starts to come together. Season with salt, pepper, and the garlic powder. Give it a taste—if you love more tang, sprinkle in extra pickle juice!
-
Toss in the Ingredients: Once the pasta is cooled, add it to the bowl with your creamy dressing. Then, gently fold in the diced hard-boiled eggs, red onion, and chopped pickles. Be gentle here, as we don’t want to mash the eggs—mix the salad until everything is coated in that lovely dressing.
-
Season and Chill: Now, sprinkle in your paprika and mix again. Taste the pasta salad and adjust the seasoning if needed. If it seems a bit dry, adding a splash more mayo or pickle juice can work wonders! Cover the bowl with plastic wrap and let it chill in the refrigerator for at least 30 minutes. This allows all those flavors to meld together beautifully.
-
Garnish and Serve: Before serving, give it a good stir and taste once more. Adjust the seasoning and add any additional green onions for a vibrant pop! You can serve it chilled or at room temperature—both are delicious!
Serving Suggestions
When it comes to plating your Deviled Egg Pasta Salad, simplicity is key. A large, shallow bowl showcases its creamy, pastel tones beautifully. You can sprinkle extra paprika on top for a pop of color, or lay a few sliced green onions over the salad for a fresh touch. Pair it with crusty bread or a fresh green salad for an extra layer of delight.
Recipe Variations
Let’s get a little creative with this base recipe! Here are some fun variations to consider:
-
Bacon Deviled Egg Pasta Salad: Add crispy bacon bits for a smoky flavor. Who doesn’t love the combo of bacon and eggs?
-
Spicy Deviled Egg Pasta Salad: Mix in some chopped jalapeños or a dash of hot sauce for a kick that’ll wake up your taste buds.
-
Herbed Deviled Egg Pasta Salad: Fold in fresh herbs like dill, chives, or parsley to brighten the flavors. It’ll feel like summer in every bite!
-
Mediterranean Twist: Swap out pickles for chopped sun-dried tomatoes and add olives for a different flavor profile entirely.
-
Vegan Deviled Egg Pasta Salad: Use vegan mayo and substitute the eggs with diced avocado or chickpeas for the creamy element—goodness knows you won’t miss the eggs!
Chef’s Notes
Over the years, I’ve played around with this recipe and made it a staple in my kitchen. I’ll never forget the first time I made it for a big family gathering. I underestimated how quickly it would disappear! Everyone came back for seconds—or even thirds! The beauty of this pasta salad is how it’s traveled with me through different phases of life. Each gathering, every cookout, and every picnic has allowed it to evolve, always bringing a smile to faces. And that’s what cooking is all about—creating memories, one dish at a time!
FAQs and Troubleshooting
1. Can I make this recipe ahead of time?
Absolutely! In fact, it’s best to let it chill for a bit before serving. You can make it up to a day in advance, just remember to keep it chilled in the refrigerator.
2. What can I substitute if I don’t like mayonnaise?
No worries! You can use Greek yogurt, sour cream, or a dairy-free mayo if you prefer. Just mix with the other ingredients to maintain that creamy texture.
3. How can I store leftovers?
Keep any leftovers in an airtight container in your refrigerator for up to 3 days. The salad may thicken as it sits, so feel free to add a bit more mayo or pickle juice when serving again.
4. What if my pasta is sticky?
If your pasta clumps together after cooking, be sure to rinse it well with cold water before mixing it with the other ingredients. Adding a small drizzle of olive oil can also keep it from sticking together.
Creating Deviled Egg Pasta Salad is more than just a recipe; it’s about inviting people into your home, sharing flavors, and making memories. So tie on that apron, crank up some music, and don’t forget—cooking is supposed to be fun! I can’t wait to hear how your pasta salad turns out. Happy cooking!
PrintDeviled Egg Pasta Salad

A creamy and tangy pasta salad that combines the flavors of deviled eggs with comforting pasta for a delightful dish perfect for gatherings.
- Prep Time: 15 minutes
- Cook Time: 20 minutes
- Total Time: 35 minutes
- Yield: 6 servings 1x
- Category: Salad
- Method: Mixing
- Cuisine: American
- Diet: Vegetarian
Ingredients
- 8 ounces small pasta (like elbows or ditalini)
- 3/4 cup mayonnaise
- 1 tablespoon pickle juice
- 1 tablespoon Dijon mustard
- 6 hard-boiled eggs, peeled and diced
- 1/2 cup red onion, finely diced
- 1/3 cup chopped pickles
- 1 teaspoon garlic powder
- 1/2 teaspoon paprika
- Salt and pepper to taste
- Green onions, sliced, for serving
Instructions
- Cook the pasta: Bring a large pot of salted water to a boil. Add in your pasta and cook according to package instructions until al dente, usually about 8-10 minutes. Drain and rinse under cold water.
- Prepare the eggs: If making your hard-boiled eggs, place them in a pot, cover with cold water, boil, cover, and let sit for about 12 minutes. Cool under cold running water and peel. Dice into hearty pieces.
- Mix the dressing: In a large mixing bowl, combine mayonnaise, pickle juice, and Dijon mustard. Whisk well. Season with salt, pepper, and garlic powder.
- Toss in the ingredients: Add cooled pasta into the dressing bowl, fold in diced hard-boiled eggs, red onion, and chopped pickles.
- Season and chill: Sprinkle in paprika, adjust seasoning if needed, and let chill in the refrigerator for at least 30 minutes.
- Garnish and serve: Stir, taste, and adjust seasoning if needed before serving chilled or at room temperature.
Notes
Best served chilled, can be made a day in advance. Remember to keep chilled in the refrigerator.
Nutrition
- Serving Size: 1 serving
- Calories: 450
- Sugar: 3g
- Sodium: 300mg
- Fat: 30g
- Saturated Fat: 5g
- Unsaturated Fat: 20g
- Trans Fat: 0g
- Carbohydrates: 45g
- Fiber: 2g
- Protein: 12g
- Cholesterol: 170mg
Keywords: deviled eggs, pasta salad, picnic salad, creamy salad, side dish
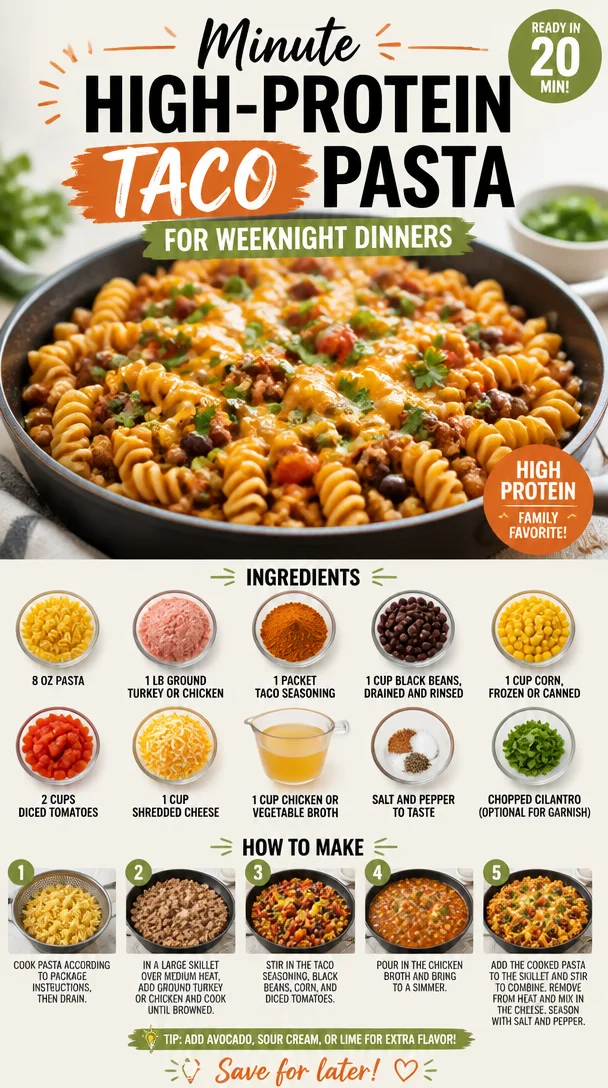
Minute High-Protein Taco Pasta for Weeknight Dinners
High Protein Taco Pasta: A Flavorful, Comforting Bowl of Joy
Hello, food lovers! Today, I’m thrilled to share a recipe that brings together the joy of tacos and the comforting heart of pasta. Yes, you guessed it right—I’m talking about High Protein Taco Pasta! This dish is not only packed with flavor, but it’s also a fantastic way to sneak in some extra protein. Let’s dive in and create a bowl of goodness that’s bound to impress.
A Little Story to Set the Mood
Let me take you back to my childhood, where food wasn’t just about sustenance but also about experiences. Every Friday night was taco night at my house, and my mom was the reigning queen of the taco. We’d gather around the table, ingredients spread out like a colorful canvas—crunchy tortillas, seasoned meat, loads of toppings, and always a story or two that went along with them. That’s where my love for mixing flavors and creating something new began, leading me to concoct this amazing taco pasta dish.
One night, in a moment of creativity (or maybe it was just hunger), I decided to swap tortillas for pasta! The result was a flavor explosion that combined my love for both. My friends and family were skeptical at first, but once they tried it, it was love at first bite. This dish quickly became a staple in my home, reminding me that food is always more than just ingredients—it’s about gathering, sharing, and creating memories.
Now, it’s your turn to create your own taco night twist, and I promise—this bowl of High Protein Taco Pasta will be the star of your table!
The Ingredients You’ll Need
Here’s what you’ll need to whip up this magical dish:
- 8 oz pasta: Any type you love works well! Whole wheat or protein-enriched pasta can boost the health benefits.
- 1 lb ground turkey or chicken: Lean and high in protein; you can also use plant-based options like lentils for a vegetarian version.
- 1 packet taco seasoning: Store-bought is convenient, but you can make your own with chili powder, cumin, garlic powder, and a pinch of salt.
- 1 cup black beans: Rinsed and drained for a tasty protein punch. Feel free to swap them for kidney beans if you prefer.
- 1 cup corn: Frozen, canned, or fresh—just make sure it’s sweet and delicious!
- 2 cups diced tomatoes: Fresh is great, but canned works too. Opt for fire-roasted tomatoes for extra flavor!
- 1 cup shredded cheese: I recommend cheddar or Mexican blend. Use a dairy-free cheese for a lactose-free twist.
- 1 cup chicken or vegetable broth: This elevates the dish’s base. Homemade broth makes all the difference, but store-bought is super convenient.
- Salt and pepper to taste: Don’t be shy! Seasoning is key to bringing flavors alive.
- Chopped cilantro (optional for garnish): A fresh touch that livens up the flavors. Skip it if you’re not a fan!
With these beautiful ingredients on your counter, let’s get ready to cook!
Step-by-Step Instructions
-
Boil the Pasta: Begin by bringing a pot of salted water to a rolling boil. Once it’s bubbling, add your choice of pasta and cook according to package instructions until al dente (usually 7-9 minutes). Remember to stir occasionally to prevent sticking. Chef’s tip: save about half a cup of pasta water before draining! It’ll help bring everything together later.
-
Cook the Meat: In a large skillet, heat a drizzle of olive oil over medium heat. Add the ground turkey or chicken, and break it apart with a wooden spoon. Sauté until browned and no longer pink, about 5-7 minutes. Hot tip: Add a pinch of salt while cooking to enhance the meat’s flavor right from the start!
-
Taco Seasoning Time: After the meat is browned, sprinkle in the taco seasoning and mix well. Cook for another 1-2 minutes to let the spices bloom. A little secret: If you have some extra heat-loving friends, add a dash of cayenne pepper for some spice!
-
Add The Goodies: Toss in the black beans, corn, and diced tomatoes into the skillet. Pour in the broth and stir everything together. Cheesy hack: If you want creaminess, you can add a bit of cream cheese or sour cream at this point for a richer dish!
-
Combine the Pasta: Now, add that glorious pasta you cooked earlier to the skillet. Toss everything together gently, and if it looks a bit dry, add some of that reserved pasta water. The goal is a deliciously cohesive mixture that clings to the noodles. Chef’s note: don’t be afraid to mix it up! Use a pair of tongs or even your hands for the best combination!
-
Cheesy Finish: Before serving, sprinkle the shredded cheese on top, cover with a lid, and let it sit for a few minutes on low heat until the cheese is melted and gooey. This takes the dish to the next level.
Serving Suggestions
To plate, spoon the cheesy taco pasta into vibrant bowls and garnish with the optional chopped cilantro. A little sprinkle of extra cheese on top never hurts! Serve it alongside a simple salad or some tortilla chips for a crunchy contrast. Don’t forget to pour yourself a refreshing drink to accompany this delightful dish. Cheers!
Recipe Variations
Here are some fun twists you can try with this recipe:
- Spicy Taco Pasta: Add jalapeños or diced green chilies for an extra kick!
- Vegetarian Version: Swap the meat for textured vegetable protein (TVP) or chickpeas for a delicious plant-based option.
- Creamy Taco Pasta: Mix in a cup of cream cheese or Greek yogurt before serving for a creamy texture.
- Mexican Street Corn Style: Stir in some crumbled feta, lime juice, and cilantro for a fun take on Elote (Mexican street corn).
- Zucchini Noodles: Replace pasta with spiralized zucchini for a low-carb alternative that’s equally delicious.
Chef’s Notes
This recipe has traveled with me through many occasions—family dinners, gatherings with friends, and even second-day lunches where it tastes even better! I often switch up the beans and add whatever veggies I have lying around, which makes this recipe versatile and adaptable to what’s in your pantry. I once used leftover roasted chicken, and it turned out fabulous!
Remember, cooking is all about experimenting, and something delicious often comes from what might seem like an accident. The kitchen is your playground—don’t be afraid to get a little messy and creative!
FAQs and Troubleshooting
Q: Can I use gluten-free pasta?
Absolutely! Gluten-free pasta works well in this recipe. Just pay attention to the cooking times, as they can vary.
Q: What if I don’t have taco seasoning?
No worries! You can make your own using chili powder, cumin, garlic powder, onion powder, and a bit of salt. Adjust to taste!
Q: How can I store leftovers?
Keep any leftovers in an airtight container in the fridge for up to 4 days. Just reheat gently when you’re ready to enjoy.
Q: My pasta turned out too mushy, what happened?
This can happen if the pasta is overcooked or if you didn’t reserve enough cooking water. Make sure to keep an eye on it during cooking and remember to save that starchy water for sauce consistency.
Nutritional Info
(Basic nutritional info per serving, based on the recipe as written:)
- Calories: 450
- Protein: 35g
- Carbohydrates: 45g
- Fat: 15g
Remember to adjust based on your specific ingredients!
Conclusion
There you have it—the perfect High Protein Taco Pasta that combines the rich flavors of taco night with the heartiness of pasta. I hope you enjoyed cooking along with me! Remember, as you gather around your table with friends and family, that love and intention are the secret ingredients in every meal. Until next time, happy cooking!
Let’s tie on our aprons and continue to create moments that bring us together. Cheers! 🍽️
PrintHigh Protein Taco Pasta

A flavorful twist combining the joys of tacos and pasta, packed with protein.
- Prep Time: 15 minutes
- Cook Time: 20 minutes
- Total Time: 35 minutes
- Yield: 4 servings 1x
- Category: Main Course
- Method: Cooking
- Cuisine: Mexican
- Diet: High Protein
Ingredients
- 8 oz pasta (whole wheat or protein-enriched recommended)
- 1 lb ground turkey or chicken (or lentils for vegetarian)
- 1 packet taco seasoning
- 1 cup black beans (rinsed and drained)
- 1 cup corn (frozen, canned, or fresh)
- 2 cups diced tomatoes (fresh or canned)
- 1 cup shredded cheese (cheddar or Mexican blend)
- 1 cup chicken or vegetable broth
- Salt and pepper to taste
- Chopped cilantro (optional for garnish)
Instructions
- Boil the pasta in salted water according to package instructions until al dente.
- Cook the meat in a skillet with olive oil until browned.
- Sprinkle in taco seasoning and cook for an additional 1-2 minutes.
- Add black beans, corn, diced tomatoes, and broth to the skillet, stirring together.
- Combine the cooked pasta with the mixture, adding reserved pasta water as needed.
- Sprinkle shredded cheese on top, cover, and let melt.
Notes
This dish is versatile and can be customized with ingredient swaps or additions like cream cheese for a creamy version.
Nutrition
- Serving Size: 1 serving
- Calories: 450
- Sugar: 5g
- Sodium: 600mg
- Fat: 15g
- Saturated Fat: 7g
- Unsaturated Fat: 5g
- Trans Fat: 0g
- Carbohydrates: 45g
- Fiber: 10g
- Protein: 35g
- Cholesterol: 70mg
Keywords: pasta, taco, high protein, comfort food, quick recipe

One-Bowl Lemon Loaf: Moist, Zesty, Ready in 30 Minutes
The Ultimate Easy Moist Lemon Loaf: Brighten Your Day with This Delightful Treat
Hello, lovely people! If you’re anything like me, there’s something undeniably uplifting about the aroma of fresh lemons wafting through the kitchen. Today, I’m thrilled to share with you the secret to creating an easy, moist Lemon Loaf that’s sure to brighten any day. Whether it’s a gray afternoon, a weekend brunch, or an unexpected visit from friends, this lemon loaf offers the perfect balance of sweetness and citrus tang, turning any moment into a celebration. So, let’s roll up our sleeves and dive in!
Personal Story: A Zesty Memory
Before I delve into the nitty-gritty of this delightful recipe, let me share a special memory that ties me to lemon loaf. Growing up, my grandmother had a knack for creating comfort with her baking—a warm loaf of lemony goodness was often on the kitchen counter when I visited. There was one summer when my cousins and I would race back from the pool, eager to see if that zesty scent was indeed wafting through the air. The moment we spotted the golden crust, we’d practically tackle each other in our quest for the first slice.
One sunny afternoon, I decided to surprise her and bake my own lemon loaf, using her trusty old recipe. With flour dust flying and laughter echoing throughout the kitchen, I learned not just about the ingredients but about joy, connection, and sharing good food with the people we love. Once the loaf slid out of the oven, its irresistible aroma brought everyone running, just like in the good old days. In that moment, I discovered my passion for baking—and the magic of lemons.
Ingredients
Now, let’s gather our ingredients for this beautifully simple Lemon Loaf:
- 1 1/2 cups all-purpose flour: This is the foundation of your cake. You can substitute it with gluten-free flour for a gluten-free option, just make sure to use a blend designed for baking.
- 1 cup granulated sugar: Provides just the right sweetness. For a healthier take, feel free to swap in coconut sugar or use a sweetener like stevia.
- 1/2 cup unsalted butter, softened: Adds moisture and rich flavor. If you’re looking for a dairy-free option, substitute with coconut oil or vegan butter.
- 2 large eggs: They bring structure and leavening to the loaf. For an egg-free option, use flax eggs (1 tablespoon ground flaxseed mixed with 3 tablespoons water per egg).
- 1/2 cup milk: This adds tenderness. You can use any milk of your choice — almond, oat, or soy — for a non-dairy alternative.
- 1/4 cup fresh lemon juice: This is where the magic happens! For the best flavor, always use fresh lemon juice instead of bottled.
- Zest of 1 lemon: The zest enhances the lemon flavor and gives a lovely fragrance. If you can’t find fresh lemons, try using lemon extract, but use it sparingly.
- 1 1/2 teaspoons baking powder: This helps the loaf rise. If you’re in a pinch, baking soda can work too—just adjust the acidity by adding a little vinegar or yogurt.
- 1/2 teaspoon salt: Balances the sweetness and enhances flavor.
- 1 cup powdered sugar (for glaze): Smooth and sweet, this glaze takes the loaf over the top. Don’t worry, you can reduce the amount if you prefer less sweetness.
- 2-3 tablespoons fresh lemon juice (for glaze): This tangy addition to the glaze is what makes it so irresistible!
Step-by-Step Instructions
Let’s get into the fun part! Follow these steps to whip up your Easy Moist Lemon Loaf:
-
Preheat the oven to 350°F (175°C). This ensures your oven is hot enough to create that lovely crust on the loaf.
-
Prepare your pan: Grease a 9×5 inch loaf pan with some butter or cooking spray, and then line the bottom with parchment paper for easy removal later.
-
Mix the dry ingredients: In a medium bowl, whisk together the flour, baking powder, and salt. This step helps distribute the baking powder evenly, which is key for even rising throughout your loaf.
-
Cream the butter and sugar: In a large bowl, beat the softened butter and granulated sugar together using a mixer on medium speed until the mixture is light and fluffy. This usually takes around 3-5 minutes. The air you incorporate here will create a light texture in the loaf.
-
Add eggs one at a time: Beat in the eggs one at a time, making sure to mix well after each addition. Your batter should be smooth and creamy at this stage. Don’t forget to scrape down the sides of the bowl to include all the buttery goodness!
-
Incorporate the lemon juice and zest: Pour in the fresh lemon juice and lemon zest. Trust me, the aroma will be heavenly! Mix just until everything is combined.
-
Alternate dry ingredients and milk: Gradually add the flour mixture in three additions, alternating with the milk. Start and finish with the flour. Mix until just incorporated—overmixing can lead to a dense loaf.
-
Pour the batter into the prepared pan: Use a spatula to spread the batter evenly. Don’t worry if it doesn’t look perfect; it’ll spread out as it bakes.
-
Bake: Pop it in the preheated oven and bake for about 50-60 minutes, or until a toothpick inserted into the center comes out clean. Your kitchen will fill with a delightful lemony scent as it bakes!
-
Cool: Once baked, let it cool in the pan for about 10 minutes before transferring it to a wire rack to cool completely. This helps maintain the moisture—trust me, it’s worth the wait!
-
Make the glaze: While the loaf is cooling, whisk together the powdered sugar and fresh lemon juice in a small bowl until smooth. You may adjust the consistency by adding more sugar or lemon juice as needed.
-
Glaze the cooled loaf: Once the loaf has cooled, drizzle the glaze over the top, allowing it to cascade down the edges. Lovely, right? Let it sit for a few minutes before slicing for the best presentation.
Serving Suggestions
When serving your Lemon Loaf, a simple plating style works wonders. Cut into generous slices and arrange them on a beautiful serving platter. To elevate the presentation, sprinkle a bit of grated lemon zest on top and add some fresh berries or a sprig of mint for that extra touch of elegance. Serve with a hot cup of tea or a refreshing glass of lemon-infused water to complement the flavors perfectly.
Recipe Variations
Looking to switch it up? Here are a few creative twists you can try:
- Blueberry Lemon Loaf: Fold in 1 cup of fresh or frozen blueberries into the batter for a burst of berry goodness.
- Lemon Poppy Seed Loaf: Add 2 tablespoons of poppy seeds to the batter for that classic combination.
- Lemon Raspberry Swirl: Layer fresh raspberries into your batter for a stunning red and yellow swirl.
- Lemon Parmesan Savory Loaf: Replace some of the sugar with grated Parmesan and add fresh herbs for a savory take on the loaf.
- Gluten-free Lemon Loaf: Substitute the all-purpose flour with a 1:1 gluten-free baking blend for a gluten-free version.
Chef’s Notes
Over the years, my lemon loaf has evolved, and you know what? Each iteration came with a new funny kitchen story! Once, I completely miscalculated and added salt instead of sugar. The shocked look on my family’s faces at the first bite is something I’ll never forget! But from that mistake, I learned how oversights can lead to new recipes, and if you can laugh at the kitchen mishaps, you’re halfway to becoming a culinary pro.
FAQs and Troubleshooting
-
Why did my lemon loaf not rise?
This can happen if your baking powder is expired. Always check the expiration date before using; fresh leavening agents are key! -
My lemon loaf is too dense, what went wrong?
Overmixing can lead to a dense texture. Be gentle when combining the ingredients, especially after adding the flour. -
How do I store leftovers?
Wrap your lemon loaf tightly in plastic wrap or foil and store it in an airtight container at room temperature for up to 3 days. For longer preservation, freeze individual slices! -
Can I make this vegan?
Absolutely! Substitute the eggs with flax eggs and use plant-based milk and butter for a vegan-friendly loaf.
Nutritional Info
While it varies based on substitutions, here’s a rough estimate per slice (based on 12 servings):
- Calories: 220
- Total Fat: 9g
- Saturated Fat: 5g
- Carbohydrates: 32g
- Fiber: 1g
- Sugars: 16g
- Protein: 3g
There you have it—a delightful Easy Moist Lemon Loaf that’s bound to become a cherished recipe in your kitchen! I hope you enjoy this labor of love, and don’t forget to gather your loved ones around the table to share this scrumptious treat. Happy baking, and always remember: good food isn’t just about the dishes you create—it’s about the memories you make. Cheers!
PrintEasy Moist Lemon Loaf
A delightful lemon loaf that balances sweetness and citrus tang, perfect for any occasion.
- Prep Time: 15 minutes
- Cook Time: 60 minutes
- Total Time: 75 minutes
- Yield: 12 servings 1x
- Category: Dessert
- Method: Baking
- Cuisine: American
- Diet: Vegetarian
Ingredients
- 1 1/2 cups all-purpose flour
- 1 cup granulated sugar
- 1/2 cup unsalted butter, softened
- 2 large eggs
- 1/2 cup milk
- 1/4 cup fresh lemon juice
- Zest of 1 lemon
- 1 1/2 teaspoons baking powder
- 1/2 teaspoon salt
- 1 cup powdered sugar (for glaze)
- 2–3 tablespoons fresh lemon juice (for glaze)
Instructions
- Preheat the oven to 350°F (175°C).
- Prepare your pan by greasing a 9×5 inch loaf pan and lining the bottom with parchment paper.
- Mix the dry ingredients in a medium bowl: whisk together the flour, baking powder, and salt.
- Cream the butter and sugar in a large bowl using a mixer until light and fluffy, for about 3-5 minutes.
- Add eggs one at a time, mixing well after each addition.
- Incorporate the lemon juice and zest into the mixture.
- Alternate adding the flour mixture and milk in three additions, starting and finishing with the flour.
- Pour the batter into the prepared pan.
- Bake for about 50-60 minutes, or until a toothpick comes out clean.
- Cool in the pan for about 10 minutes before transferring to a wire rack.
- Make the glaze by whisking together powdered sugar and lemon juice until smooth.
- Glaze the cooled loaf and let it sit for a few minutes before slicing.
Notes
Store leftovers wrapped in plastic wrap or foil for up to 3 days at room temperature.
Nutrition
- Serving Size: 1 slice
- Calories: 220
- Sugar: 16g
- Sodium: 150mg
- Fat: 9g
- Saturated Fat: 5g
- Unsaturated Fat: 3g
- Trans Fat: 0g
- Carbohydrates: 32g
- Fiber: 1g
- Protein: 3g
- Cholesterol: 30mg
Keywords: lemon loaf, quick bread, citrus dessert
Lemon Posset
Indulge in Elegance: Whip Up a Delightful Lemon Posset
Hello, lovely foodies! Today, I’m thrilled to share one of my absolute favorite treats that embodies simplicity and sophistication: Lemon Posset. This creamy, luscious dessert feels like a warm hug on a plate, and the best part? It’s so easy to make that you’ll wonder why you haven’t been whipping it up all along!
If you’re new to the world of possets, you’re in for a delightful surprise. Imagine velvety cream infused with refreshing lemon zest and juice, all perfectly balanced with a touch of sweetness. Seriously, each bite is like a sunny day in dessert form!
A Slice of Nostalgia: My First Lemon Posset
Let me take you back to a warm summer’s evening. Picture this: I was a young culinary enthusiast, eager to impress my friends with a homemade dessert for our casual gathering. I wanted something that would put smiles on their faces without sending me into a tornado of chaos in the kitchen. That’s when I stumbled upon the wonderful world of lemon posset.
With just a handful of ingredients, I felt like a culinary magician turning basic elements into something truly spectacular. The moment I served it, I watched as everyone took their first spoonful. As they savored the sweet-tart flavors, the room filled with laughter and compliments. I was hooked! That night solidified my love for desserts that were both simple and elegant. Since then, lemon posset has become a staple not only on my table but in my heart as well.
Ingredients You’ll Need
Gather these simple yet essential ingredients to make your lemon posset shine:
- 3 Large Lemons: The star of the show, lemons provide that zesty brightness we adore. Opt for organic if you can, as they tend to have more flavor and less wax on the skin.
- 1 Cup Heavy Cream: This luscious cream is what gives the posset its rich texture. If you must, you can substitute with full-fat coconut milk for a dairy-free version.
- ⅓ Cup Sugar: Sweetness is key! I recommend granulated sugar, but feel free to experiment with honey or agave for a more natural option.
- ¼ Teaspoon Kosher Salt: Just a pinch! It brings out the flavors and balances the sweetness.
- ½ Tablespoon Lemon Zest: Zest is where the lemon’s essential oils shine. Use a microplane for the best results. You can substitute with lime zest for a fun twist!
- 2½ Tablespoons Lemon Juice: Freshly squeezed is always best. Use the juicer to ensure you get every drop!
- 1 Teaspoon Vanilla Extract: This adds a warm undertone to the posset. If you want to keep it more citrusy, you can skip this.
Step-by-Step Instructions
Let’s make this gorgeous Lemon Posset together!
-
Zest and Juice the Lemons: Start by zesting your lemons, then cut them in half and juice them. Pro Tip: Roll the lemons on the countertop before cutting to release more juice!
-
Combine the Cream and Sugar: In a saucepan, combine the heavy cream and sugar over medium heat. Stir gently until the sugar is dissolved. There’s no need to bring it to a boil; just warm it until the sugar is fully incorporated. This step will keep the creamy texture while ensuring the flavors marry beautifully.
-
Add Salt and Zest: Once your cream mixture is warm and sugared, add the kosher salt and lemon zest. Stir to combine and let it simmer for another minute. The zest will infuse your cream with a lovely lemony aroma—it’s heavenly!
-
Incorporate the Lemon Juice: Now, remove the saucepan from heat and stir in the freshly squeezed lemon juice. This is where the magic happens. Watch as the cream thickens slightly; this is the sign of a successful posset!
-
Strain the Mixture: To ensure a silky-smooth consistency, strain the mixture through a fine-mesh sieve into a measuring cup or bowl. This step removes the zest, leaving you with pure, luscious cream.
-
Chill the Posset: Pour the strained posset into your serving cups or bowls. Let them cool to room temperature before refrigerating for at least 4 hours, or until set. Note this is a great make-ahead dessert—wonderful for hosting!
-
Serve and Enjoy: When you’re ready to serve, garnish with a little extra zest, fresh berries, or whipped cream. Delightful!
Serving Suggestions
For presentation, consider serving your posset in delicate glass cups to showcase its creamy texture and zesty hue. A sprinkle of lemon zest or a handful of fresh berries on top not only adds color but also a burst of freshness that complements the dish beautifully.
Recipe Variations
Feeling inspired to shake things up? Here are a few fun variations to try:
- Berry Twists: Add a fruit puree (like raspberry or blueberry) at the bottom of your cups for a delightful layer of flavor.
- Herb Infusion: Infuse your heavy cream with a sprig of rosemary or mint while warming it for an aromatic twist.
- Lime Posset: Swap out the lemons for limes for a refreshing and tropical take.
- Chocolate Drizzle: For a decadent treat, drizzle melted dark chocolate over the top before serving.
- Spiced Citrus: Add a pinch of ground cardamom or ginger when warming the cream for a warm, spiced flavor.
Chef’s Notes
This lemon posset recipe has been with me through thick and thin in my culinary journey! Over the years, I’ve perfected my technique and learned the importance of patience while letting it chill. I still giggle at the time I forgot to strain the mixture, resulting in a zestier dessert than intended—my friends loved it, but I learned my lesson! Long story short? Sometimes a little unexpected twist can make food all the more memorable.
FAQs and Troubleshooting
-
Why didn’t my posset set? If your posset didn’t set, it may be due to insufficient chilling time. It needs to cool completely in the fridge. Also, ensure you used enough fat in your cream—heavy cream is essential for that firm consistency.
-
Can I use low-fat cream? I highly recommend sticking with heavy cream for the best texture and flavor. Low-fat alternatives can end up too runny.
-
How long can I store leftovers? Your lemon posset will keep in the fridge for up to 3 days. Just cover it with plastic wrap to keep it fresh!
-
Can I double or halve the recipe? Absolutely! You can adjust the ingredients as desired. Just make sure to maintain the same ratios for the best results!
Nutritional Info
While I always recommend indulging in treats with mindfulness, here’s a rough estimate per serving of lemon posset:
- Calories: 220
- Total Fat: 21g
- Saturated Fat: 13g
- Sugar: 10g
- Protein: 1g
Whether you savor it alone or share it with loved ones, this lemon posset is a testament to effortless elegance in the kitchen. Remember, cooking is not just about the food but the stories we create around it. So tie on that apron, gather those ingredients, and let’s whip up something beautiful together! Enjoy every delicious bite, my friends!
PrintLemon Posset

A creamy and luscious dessert infused with refreshing lemon zest and juice, simple to make and delightfully elegant.
- Prep Time: 15 minutes
- Cook Time: 10 minutes
- Total Time: 240 minutes
- Yield: 4 servings 1x
- Category: Dessert
- Method: Chilling
- Cuisine: French
- Diet: Vegetarian
Ingredients
- 3 Large Lemons
- 1 Cup Heavy Cream
- ⅓ Cup Sugar
- ¼ Teaspoon Kosher Salt
- ½ Tablespoon Lemon Zest
- 2½ Tablespoons Lemon Juice
- 1 Teaspoon Vanilla Extract
Instructions
- Zest and juice the lemons.
- Combine the heavy cream and sugar in a saucepan over medium heat.
- Add salt and zest to the warm cream mixture.
- Incorporate the lemon juice after removing from heat.
- Strain the mixture through a fine-mesh sieve.
- Chill the posset in serving cups for at least 4 hours.
- Serve with garnish of lemon zest or berries.
Notes
For variations, add fruit purees, herbs, or chocolate drizzles. This dessert can be made ahead of time.
Nutrition
- Serving Size: 1 serving
- Calories: 220
- Sugar: 10g
- Sodium: 50mg
- Fat: 21g
- Saturated Fat: 13g
- Unsaturated Fat: 5g
- Trans Fat: 0g
- Carbohydrates: 24g
- Fiber: 0g
- Protein: 1g
- Cholesterol: 80mg
Keywords: lemon posset, dessert, easy recipe, creamy dessert, summer dessert