Discover the Joy of Indian Fry Bread: A Step-by-Step Guide
Hello, my lovely food enthusiasts! Today, we’re diving into a recipe that’s close to my heart and rich in tradition: Indian Fry Bread. This fluffy, crispy, and delicious bread has a story rooted in the culture and history of Native American cuisine. Not only is it a fantastic vehicle for toppings, but it also serves as a canvas for creativity in your kitchen. Let’s embark on this flavorful journey together!
A Personal Story: The First Time I Made Fry Bread
I remember the first time I tried making Indian Fry Bread—oh, what an adventure it was! I was invited to a gathering where the host was making this magnificent bread, and I was immediately captivated by its enticing aroma. The way it puffed up in hot oil, golden and inviting, had me mesmerized.
When I asked for the recipe, the host smiled and said, "It’s simple, but it’s about the love you put into it." As soon as I got home, I rolled up my sleeves, ready to recreate this culinary masterpiece. The kitchen filled with a fragrant warmth as I mixed the ingredients. My dog, Charlie, sat patiently at my feet, hoping for crumbs. The first batch came out surprisingly well, making me feel like a champion chef! We piled them high with honey, powdered sugar, and even savory toppings like chili and beans. From that day forward, fry bread became a staple in my kitchen.
Ingredients: What You’ll Need
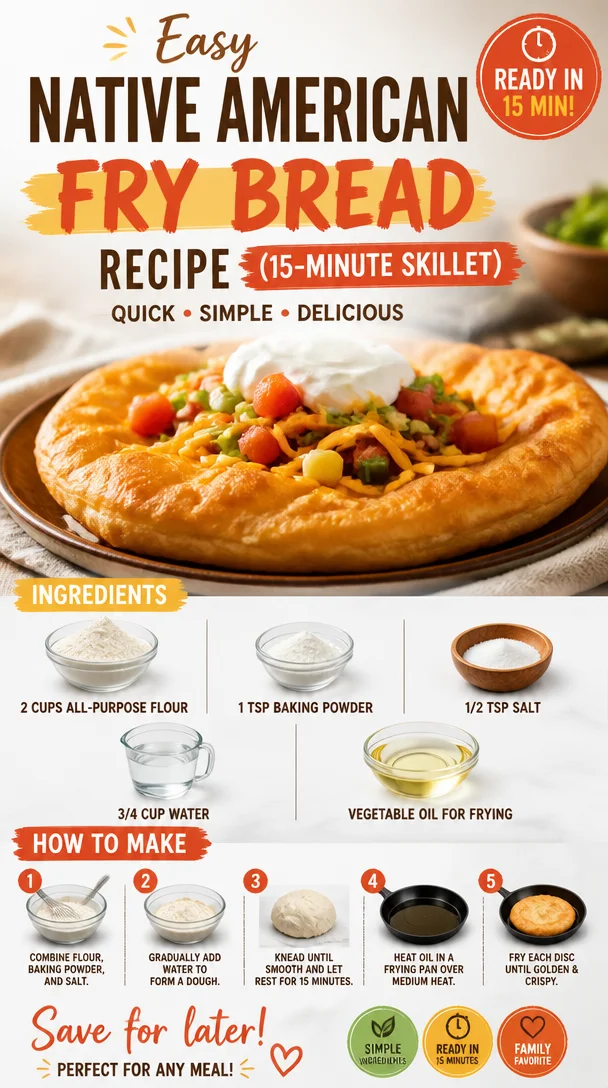
Here’s what you’ll need to whip up your own Indian Fry Bread:
-
2 cups all-purpose flour
The backbone of our bread; you can substitute with whole wheat flour for a nuttier flavor. Just note that it may require extra water since whole wheat absorbs more moisture. -
1 tsp baking powder
This little magic ingredient provides that gorgeous fluffiness. If you’re out, you can use baking soda with a splash of vinegar for a similar effect, but keep an eye on your ratios! -
1/2 tsp salt
Salt enhances flavor and balances sweetness. If you’re keeping an eye on sodium, you can reduce the amount or even use a salt substitute, but flavor may suffer. -
3/4 cup water
This is essential for bringing everything together—warm water works best! You can experiment by mixing in a bit of milk for a richer flavor. -
Vegetable oil for frying
Choose a neutral oil like canola or peanut for better frying results. Avoid olive oil as it has a lower smoke point.
Step-by-Step Instructions: Let’s Get Cooking!
Ready to make some delicious fry bread? Here’s how to do it!
-
Mix the Dry Ingredients
In a large bowl, stir together the flour, baking powder, and salt. Utilizing a whisk helps to incorporate air, ensuring a fluffier texture. Trust me; this is where the magic begins! -
Add Water Gradually
Make a small well in the center of your dry ingredients and pour in the water a little at a time. Using your hands or a wooden spoon, mix until the dough comes together. You want a moist, not sticky, dough—don’t fret if it feels a bit uneven at first; it will come together! -
Knead the Dough
Turn the dough out onto a lightly floured surface. Knead it gently for about 3-4 minutes, just until it becomes smooth and elastic. Think of this as your dough getting a mini workout! If it’s sticky, sprinkle a touch more flour. Tension is your friend here. -
Let It Rest
Cover the dough with a damp cloth or plastic wrap and let it rest for about 10-15 minutes. This allows the gluten to relax, which is essential for that perfect puff! -
Prepare to Fry
In a deep skillet, heat about 2 inches of vegetable oil over medium-high heat until a thermometer registers about 350°F (180°C). You can test if it’s ready by dropping a small piece of dough into the oil—if it sizzles and bubbles, you’re good to go! -
Shape the Dough
Divide the dough into golf ball-sized portions and flatten them gently with your hands—about ¼ inch thick. Feel free to use a rolling pin if you want them more uniform. The key is to avoid making the pieces too thick; we want them to puff beautifully. -
Fry the Bread
Carefully slide the flattened dough into the hot oil. Fry for about 1-2 minutes on each side, or until they turn golden brown. Use tongs to flip—this part is exciting! The bread will puff up, creating that delightful texture we adore. Place fried bread on paper towels to drain excess oil. -
Repeat
Continue with the remaining dough, making sure the oil temperature stays consistent for even cooking. Have fun with this process; it’s all about that golden color!
Serving Suggestions: Make it Beautiful
Now that your Indian Fry Bread is all puffed and golden, it’s time to serve! You can stack the breads on a pretty platter, then drizzle with honey or maple syrup for a sweet treat. Or, go savory—top it with seasoned ground beef, beans, cheese, and a sprinkle of fresh cilantro for a delightful Navajo taco! Serve with a side of salsa or guacamole, and watch your guests indulge in pure bliss.
Recipe Variations: Get Creative!
Here are some delicious twists to make the recipe your own:
- Herb-Infused Dough: Add chopped herbs like rosemary or thyme to the dough for a fragrant twist.
- Sweet Cinnamon Variation: Mix in a spoonful of cinnamon and sugar to the dough for a sweet breakfast treat.
- Spicy Fry Bread: Incorporate a pinch of cayenne pepper or paprika to the dry mix to give the bread a nice kick!
- Gluten-Free Option: Substitute the all-purpose flour with a 1:1 gluten-free baking flour—just make sure the baking powder is gluten-free!
- Cheesy Indo-Fry Bread: Fold in shredded cheese such as cheddar or mozzarella into the dough for a cheesy delight!
Chef’s Notes: A Little Extra Love from My Kitchen
Fry bread has always had a special place in my heart, and interestingly, it evolves each time I make it. The first time was strictly traditional, but experimenting has made it even more delightful! I once hosted a taco night inspired by my fry bread. I offered various toppings, and it turned out to be such a hit that my friends keep asking for a repeat! Remember, in cooking, it’s okay to make mistakes. My first few attempts didn’t puff perfectly, and that’s part of the charm. Just laugh it off—your kitchen should be a joyful place after all!
FAQs and Troubleshooting
-
Why isn’t my fry bread puffing up?
Make sure your dough is not too thick and that the oil is hot enough. If it’s not sizzling when you drop it in, give it more time to heat! -
Can I make the dough ahead of time?
Absolutely! You can prepare the dough and store it in the fridge for up to 24 hours. Just let it come to room temp before frying. -
What’s the best way to store leftovers?
Store them in an airtight container at room temperature for up to 2 days. Reheat in the oven or microwave—but fresh is always best! -
What if my dough is too sticky?
If your dough feels too sticky, don’t despair! Just sprinkle a bit more flour and knead carefully, adjusting until it reaches the right consistency.
Nutritional Info (Optional)
While the exact nutritional values will depend on the specific ingredients and portion sizes you use, here’s a quick overview for one piece of Indian Fry Bread (without toppings):
- Calories: 200
- Fat: 10g
- Carbohydrates: 25g
- Protein: 3g
And there you have it — a delightful journey into the world of Indian Fry Bread! I hope this recipe inspires you to tie on that apron and create something delicious in your kitchen. Let’s gather our friends and family around the table, sharing stories and laughter as we savor every bite of this beautiful bread. Happy cooking, and remember: good food is all about showing up!
PrintIndian Fry Bread

Deliciously fluffy and crispy Indian Fry Bread that serves as a perfect canvas for both sweet and savory toppings.
- Prep Time: 15 minutes
- Cook Time: 15 minutes
- Total Time: 30 minutes
- Yield: 4 servings 1x
- Category: Side Dish
- Method: Frying
- Cuisine: Native American
- Diet: Vegetarian
Ingredients
- 2 cups all-purpose flour
- 1 tsp baking powder
- 1/2 tsp salt
- 3/4 cup warm water
- Vegetable oil for frying
Instructions
- Mix the dry ingredients in a large bowl.
- Add water gradually to form a dough.
- Knead the dough on a floured surface until smooth.
- Let it rest for 10-15 minutes.
- Heat vegetable oil in a deep skillet over medium-high heat.
- Shape the dough into golf ball-sized portions and flatten.
- Fry each piece until golden brown, about 1-2 minutes per side.
- Repeat with remaining dough.
Notes
Experiment with toppings and variations to personalize your fry bread. Serve with honey, savory toppings, or make taco-style dishes.
Nutrition
- Serving Size: 1 piece
- Calories: 200
- Sugar: 1g
- Sodium: 200mg
- Fat: 10g
- Saturated Fat: 1g
- Unsaturated Fat: 7g
- Trans Fat: 0g
- Carbohydrates: 25g
- Fiber: 1g
- Protein: 3g
- Cholesterol: 0mg
Keywords: fry bread, Indian fry bread, traditional recipe, Native American cuisine, easy recipes