
Halloween Bat Cheese Crackers: Crispy, Easy 15-Minute Snack
The Ultimate Guide to Bat Cheese Crackers: A Fun, Flavorful Snack for Everyone
Welcome to the delectable world of Bat Cheese Crackers! If there’s one snack that can elevate a casual gathering or just make your afternoon a little brighter, it’s this delightful creation. They’re delicious, easy to prepare, and make for the perfect companion to a glass of wine or a chilly drink. Whether you’re entertaining guests, hosting an impromptu movie night, or simply looking for a scrumptious snack to enjoy solo, Bat Cheese Crackers are here to bring joy to your table.
There’s something wonderfully charming about homemade snacks. They carry a sort of love that store-bought options simply can’t replicate. And today, we’re going to make these delightful crackers from scratch, infusing them with a touch of nostalgia and excitement. As a passionate recipe creator, I love to share my kitchen escapades, and these Bat Cheese Crackers hold a special place in my heart. They remind me of long evenings spent with friends, laughter echoing off the walls, and the aroma of warm, cheesy goodness wafting through the air.
So, grab your apron, tie it on, and let’s dive into the crispy, cheesy world of Bat Cheese Crackers. With just a handful of ingredients, we’ll transform humble cheddar cheese into charming snacks that are sure to impress anyone who indulges in them!
A Fond Memory
I can’t help but smile when I think back to my childhood and my grandmother’s kitchen. Her little home was a treasure trove of culinary delights, and every summer, she’d host family gatherings filled with laughter, warmth, and of course, tremendous food. One of my fondest memories is of her pulling trays of freshly baked cheese crackers from the oven, the golden edges crisping just perfectly.
The whole family would gather around the kitchen table, joyfully crunching on those cheesy treats while sharing stories and updates from our lives. It was pure magic! Inspired by her spirit and those incredible gatherings, I’ve evolved her traditional recipe into my version: the Bat Cheese Crackers. They’re a celebration of those cherished memories and a nod to the communal experience of sharing good food.
Let’s recreate that magic in our kitchens today!
Ingredients
Here’s what you’ll need to whip up a batch of Bat Cheese Crackers. Each ingredient plays a role in creating those mouthwatering bites of cheese perfection.
-
Cheddar Cheese (2 cups, shredded)
The star ingredient! Aged cheddar adds a rich, sharp flavor. Feel free to substitute with Gruyère or even a sharp white cheddar for a twist! -
All-Purpose Flour (1 cup)
This gives the crackers their structure. For a healthier option, try whole wheat flour or a gluten-free blend to accommodate dietary needs. -
Butter (½ cup, cold and cubed)
Unsalted butter adds richness. You could also use coconut oil for a dairy-free alternative, but be mindful of the temperature. -
Salt (½ teaspoon)
Brings out the flavor of the cheese. You can adjust this according to taste or use garlic salt for an extra flavor kick. -
Paprika (1 teaspoon)
A touch of smoky paprika adds complexity. Experiment with smoked paprika for deeper flavor, or even a sprinkle of cayenne if you’re in the mood for a little heat! -
Water (cold, as needed)
Just enough to bind it all together. If you want to infuse the dough with extra flavor, consider using a splash of broth instead!
With these stars in our lineup, we are well on our way to creating a delightful snack that recalls fond memories while making new ones!
Step-by-Step Instructions
Now that we have our ingredients prepped, let’s roll up our sleeves and get to the cooking! Here’s how to make your fabulous Bat Cheese Crackers step-by-step:
-
Preheat Your Oven
Start by preheating your oven to 350°F (175°C). This is the perfect temperature for our crackers to bake into crispy perfection without burning. -
Mix Dry Ingredients
In a large mixing bowl, combine the flour, salt, and paprika. Whisk them together to blend evenly. This helps ensure that the seasoning is distributed well throughout the crackers. -
Incorporate the Cheese
Add the shredded cheddar cheese to the dry ingredients. Using your hands or a fork, mix until the cheese is well-coated with the flour mixture—a technique you can thank me later for, as it prevents clumping. -
Cut in the Butter
Add the cold, cubed butter to the bowl. Using a pastry cutter (or your fingertips), cut the butter into the mixture until it resembles coarse crumbs. This is where the magic happens; the butter will help create flaky layers in your crackers. -
Add Water Gradually
Start adding cold water, one tablespoon at a time, and mix until the dough comes together. You want it to be moist but not sticky. If it feels too dry, don’t hesitate to add a bit more water. Be cautious—too much can lead to chewy crackers! -
Chill the Dough
Once the dough is formed, shape it into a disk, wrap it in plastic wrap, and refrigerate for about 30 minutes. This will help the flavors meld and make rolling it out much easier. -
Roll Out the Dough
After the dough has chilled, dust your work surface with a little flour. Roll out the dough to about ¼ inch thick. Keep your surface floured to prevent sticking, and don’t stress if the edges aren’t perfectly straight—imperfections add character! -
Cut Into Shapes
Using a cookie cutter or a knife, cut the dough into desired shapes. Classic squares or fun bat shapes (perfect for the theme!) are fabulous! -
Arrange and Bake
Place the cut-out crackers onto a parchment-lined baking sheet. If you want, sprinkle a little more salt on top of each cracker for that extra punch. Pop them into the oven and bake for 15-20 minutes, or until they are golden brown. -
Cool and Enjoy!
Once out of the oven, let them cool for a few minutes on the baking sheet before transferring them to a cooling rack. This will keep them crispy! Serve warm or store in an airtight container for later snacking.
Chef Tip: To check if the crackers are done, lift one from the pan. The underside should be slightly golden, and when you crunch it, there should be a satisfying snap!
Serving Suggestions
When it comes to serving these Bat Cheese Crackers, presentation can elevate even the simplest dish! Arrange them on a beautiful wooden board or a colorful platter. Pair them with a tangy dipping sauce or some fresh fruit. They’re delightful with a side of homemade chili, a creamy dip, or even a luscious guacamole for a twist on flavor!
For an extra special touch, consider garnishing the platter with fresh herbs or a sprinkle of extra cheese. This adds a dash of elegance and makes them irresistible!
Recipe Variations
The beauty of Bat Cheese Crackers is their versatility! Here are a few variations to mix things up:
- Herbed Cheese Crackers: Incorporate dried herbs like rosemary or oregano into the dough for a fragrant twist.
- Spicy Jalapeño Cheddar: Add finely chopped jalapeños for a spicy kick, making these the ultimate snack for heat lovers.
- Cheese Medley: Experiment with a blend of cheeses like gouda and parmesan for different flavor profiles.
- Sweet Potato Edition: For a hint of sweetness, replace some cheese with roasted sweet potato purée (and a touch of cinnamon!) for a unique flavor.
- Gluten-Free Version: Use a gluten-free flour blend to accommodate those with dietary restrictions—everyone deserves a delicious snack!
Chef’s Notes
As I reflect on my journey with Bat Cheese Crackers, it’s heartwarming how these little creations have evolved. From my grandmother’s humble recipe to this fun twist, each bite is steeped in love and nostalgia. They’ve been present at countless gatherings, making every occasion feel special.
One particularly hilarious moment I recall happened during a family reunion. As the excitement grew, I decided to experiment by adding cayenne pepper for some extra flair. In the frenzy of laughter and conversation, I completely forgot about the spice level! Let’s just say, my uncle wasn’t smiling anymore after the first bite! But that’s the beauty of cooking—unexpected twists and tons of laughter weave together delightful memories.
FAQs and Troubleshooting
-
Why are my crackers tough?
Overworking the dough can lead to tough crackers. Remember to mix just until combined, and don’t add too much water! -
How do I store the leftovers?
Keep leftover crackers in an airtight container at room temperature. They should stay crispy for a few days — if they last that long! -
Can I freeze the dough?
Absolutely! You can freeze the unbaked dough wrapped tightly for up to three months. Thaw it in the fridge before rolling and baking! -
What’s the best way to know when they’re done?
Look for a golden brown color and listen for that satisfying crunch when you bite into one. Trust me—your taste buds will certainly let you know!
Nutritional Info (Optional)
Serving Size: 1 oz (about 6 crackers)
Calories: 120
Total Fat: 8g
Saturated Fat: 5g
Cholesterol: 20mg
Sodium: 150mg
Total Carbohydrates: 8g
Dietary Fiber: 0g
Sugars: 0g
Protein: 5g
Feel free to adjust the cheese or type of flour you use to customize the nutritional profile to fit your needs!
And there you have it—a comprehensive journey into the delightful world of Bat Cheese Crackers! With every crunch, you’ll not only be savoring a delicious snack but also creating memories. Happy cooking, and may your kitchen be filled with warmth and creativity!
PrintBat Cheese Crackers

Delightful homemade cheese crackers, perfect for snacks or gatherings, infused with nostalgia and cheesy goodness.
- Prep Time: 15 minutes
- Cook Time: 20 minutes
- Total Time: 35 minutes
- Yield: 4 servings 1x
- Category: Snack
- Method: Baking
- Cuisine: American
- Diet: Vegetarian
Ingredients
- 2 cups Cheddar Cheese, shredded
- 1 cup All-Purpose Flour
- ½ cup Butter, cold and cubed
- ½ teaspoon Salt
- 1 teaspoon Paprika
- Cold Water, as needed
Instructions
- Preheat your oven to 350°F (175°C).
- Mix flour, salt, and paprika in a large bowl.
- Add the shredded cheddar cheese to the dry ingredients and blend.
- Cut in the cold, cubed butter until resembling coarse crumbs.
- Add cold water gradually until the dough comes together.
- Chill the dough by wrapping it and refrigerating for about 30 minutes.
- Roll out the dough to about ¼ inch thick.
- Cut into desired shapes using a cookie cutter or knife.
- Arrange on a baking sheet and bake for 15-20 minutes until golden brown.
- Cool on a rack before serving.
Notes
For variation, try adding herbs, jalapeños, or different cheese blends.
Nutrition
- Serving Size: 1 serving
- Calories: 120
- Sugar: 0g
- Sodium: 150mg
- Fat: 8g
- Saturated Fat: 5g
- Unsaturated Fat: 3g
- Trans Fat: 0g
- Carbohydrates: 8g
- Fiber: 0g
- Protein: 5g
- Cholesterol: 20mg
Keywords: snack, cheese crackers, homemade snacks, entertaining
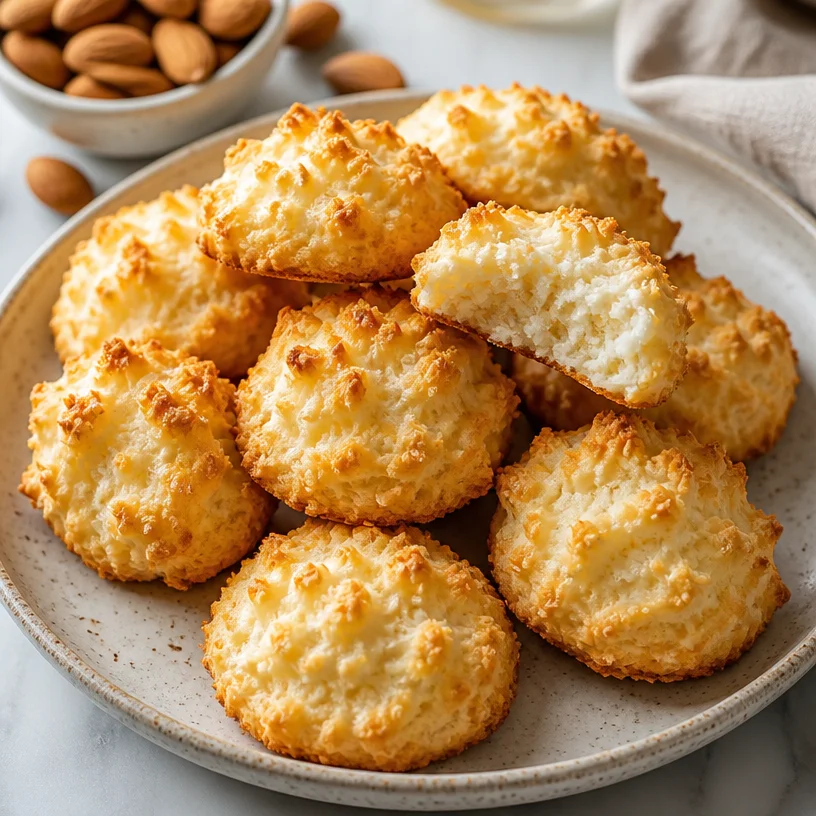
Beginner-Friendly Almond Cloud Cookies (15-Minute Bake)
Almond Cloud Cookies: A Whimsical Treat That Dances on Your Taste Buds
Hello, my fellow foodies! Today, we’re diving into the delightful realm of Almond Cloud Cookies—a treat that’s as whimsical as a cloud and as comforting as a hug from a loved one. These cookies are light, airy, and packed with almond flavor that will make your taste buds sing! What could be better than a dessert that feels like a little indulgence but is surprisingly simple to whip up?
A Little Taste of Nostalgia
Let me take you back to my grandmother’s kitchen. Picture this: I was a curious kid, standing on a stool, peering over the counter as she carefully measured out ingredients. The joy on her face when she pulled those puffy, golden cookies from the oven was infectious. Almond Cloud Cookies were an absolute favorite in our family. We would gather around the table, and she’d serve them warm with a sprinkle of powdered sugar, her eyes sparkling with delight as we munched on them, crumbs flying everywhere!
Those moments instilled in me a love for baking—not just for the delectable cookies but for the laughter, stories, and connections that were shared over a plate of homemade goodness. When I recreate these cookies in my own kitchen today, I’m reminded of those sweet memories and the joy that baking can bring, not just to our taste buds, but to our hearts. So, are you ready to create some clouds of your own? Let’s get started!
Ingredients
Here’s what you’ll need to make these ethereal Almond Cloud Cookies:
-
2 cups almond flour
- A nutty, gluten-free alternative to traditional flour. It gives these cookies their distinct flavor and texture. If you’re looking for a substitution, you could try hazelnut flour for a unique twist, but the texture may vary slightly.
-
1 cup sugar
- Sweetness in its most universal form! You can use granulated sugar, but feel free to swap in coconut sugar for a caramel-like taste or for a lower glycemic index. Just keep in mind, it might slightly change the color of your cookies.
-
3 egg whites
- These little wonders are what give our cookies that light, airy cloud-like texture. If you’re vegan, aquafaba (the liquid from canned chickpeas) is a fantastic substitute—3 tablespoons of aquafaba equals one egg white!
-
1 teaspoon vanilla extract
- Vanilla adds a warm, comforting aroma and flavor. For an extra touch of elegance, you could infuse your vanilla with a splash of almond extract, which will amplify the almond taste in these cookies.
-
1/4 teaspoon salt
- Just a pinch! Salt enhances the overall flavor, balancing out the sweetness. If you’re feeling adventurous, a dash of sea salt on top just before baking adds a delightful contrast.
Step-by-Step Instructions
Ready to kitchen magic? Here we go!
-
Preheat the Oven
- Start by preheating your oven to 325°F (163°C). This is essential—I can’t stress enough how important it is to have your oven ready, like a warm embrace on a cozy day!
-
Prepare Your Baking Sheet
- Line a baking sheet with parchment paper. This not only prevents sticking but also helps in evenly baking your cookies. A little tip? Lightly spray the parchment with cooking spray for an even smoother release.
-
Combine Dry Ingredients
- In a large mixing bowl, whisk together the almond flour and sugar until they’re well combined. No lumps allowed in the cloud!
-
Beat the Egg Whites
- In a separate bowl, using a mixer, beat the egg whites until they form soft peaks. You want the texture to be fluffy and light, like a gentle spring breeze. This should take about 2-3 minutes. A pro tip: Ensure your bowl and whisk are completely clean and dry—any bit of oil can prevent your egg whites from whipping up perfectly.
-
Incorporate the Wet Ingredients
- Gently fold the beaten egg whites into the almond flour mixture using a spatula. This step is crucial, so take your time and do it slowly! You want to maintain the airiness of the egg whites while ensuring everything is combined nicely.
-
Add Vanilla and Salt
- Once combined, add the vanilla extract and salt. Gently fold these in as well until everything is well blended.
-
Scoop and Shape
- Using a cookie scoop or two spoons, drop dough rounds onto your prepared baking sheet, leaving space between each one to allow for spreading. If you’re feeling fancy, lightly dust the tops with powdered sugar before baking for that delightful finish.
-
Bake to Perfection
- Place the baking sheet in the oven and bake for about 15-18 minutes, or until the edges start to turn a light golden brown. Keep an eye on them—oven temperatures can vary!
-
Cool and Enjoy
- Once baked, remove the cookies from the oven and allow them to cool on the baking sheet for about 5 minutes before transferring them to a wire rack to cool completely. This cooling step allows for their cloud-like texture to set just right.
Serving Suggestions
For a presentation that will have your guests oohing and aahing, stack several Almond Cloud Cookies on a ceramic cake stand, dust them with powdered sugar, and garnish with a few sprigs of fresh mint or edible flowers. Pair these cookies with a cup of tea or a nice cold glass of milk for the perfect treat!
Recipe Variations
Feeling adventurous? Here are a few ways you can shake things up with this cookie recipe:
- Chocolate Chip Variation: Add half a cup of mini chocolate chips to the batter for a sweet touch of decadence.
- Citrus Zest: Grate some lemon or orange zest into the dough for a bright citrus flavor that complements the almond beautifully.
- Spiced Clouds: Incorporate a teaspoon of ground cinnamon or cardamom into the mixture for a warm spice note.
- Nutty Delight: Mix in chopped pistachios or walnuts for added texture and richness!
- Dairy-Free: Swap the regular sugar for maple sugar or coconut sugar for a more wholesome dessert option.
Chef’s Notes
Every time I make these cookies, I remember my grandmother’s laughter echoing in the kitchen. Through the years, I’ve slightly tweaked the recipe, experimenting with different nut flours and flavors. I learned that a little creativity goes a long way in the kitchen. One day, I added a pinch of espresso powder to the batter, and to my surprise, it added a whole new layer of depth—who knew almond and coffee could dance so well together?
FAQs and Troubleshooting
1. Why are my cookies too flat?
- If your cookies spread too much, it could be due to overmixing the egg whites or not using enough almond flour. Make sure you’re gently folding the mixtures together and measuring accurately.
2. How can I store these cookies?
- Almond Cloud Cookies can be stored in an airtight container at room temperature for up to a week—if they last that long! For longer storage, you can freeze them layered with parchment paper and sealed in a freezer bag for up to three months.
3. Can I replace almond flour with regular flour?
- I wouldn’t recommend it as the texture and flavor will change dramatically. However, if you need to avoid nuts, try a gluten-free flour blend that’s suitable for baking, but do keep in mind that this recipe is crafted specifically for almond flour.
4. What’s the best way to know when they are done?
- The cookies should have lightly golden edges and might appear slightly underbaked in the center. They will continue to firm up as they cool, yielding that lovely chewy texture!
Nutritional Info (if applicable)
Each cookie contains approximately:
- Calories: 90
- Fat: 5g
- Carbohydrates: 8g
- Fiber: 1g
- Protein: 2g
(Please note this is an estimation based on the recipe’s ingredients.)
And there you have it! An enchanting journey into the world of Almond Cloud Cookies. I hope these little treats bring as much joy to your kitchen as they have in mine. So grab your apron, gather your ingredients, and let’s make some delicious memories! Happy baking, friends!
PrintAlmond Cloud Cookies

Light and airy Almond Cloud Cookies packed with almond flavor, reminiscent of cherished family memories.
- Prep Time: 10 minutes
- Cook Time: 18 minutes
- Total Time: 28 minutes
- Yield: 24 cookies 1x
- Category: Dessert
- Method: Baking
- Cuisine: American
- Diet: Gluten-Free
Ingredients
- 2 cups almond flour
- 1 cup sugar
- 3 egg whites
- 1 teaspoon vanilla extract
- 1/4 teaspoon salt
Instructions
- Preheat the oven to 325°F (163°C).
- Line a baking sheet with parchment paper.
- In a large mixing bowl, whisk together the almond flour and sugar.
- In a separate bowl, beat the egg whites until they form soft peaks.
- Gently fold the beaten egg whites into the almond flour mixture.
- Add the vanilla extract and salt, folding until well blended.
- Scoop dough rounds onto the prepared baking sheet, leaving space between each.
- Bake for about 15-18 minutes, until edges are light golden brown.
- Allow to cool on the baking sheet for 5 minutes before transferring to a wire rack.
Notes
For a touch of elegance, dust with powdered sugar before serving.
Nutrition
- Serving Size: 1 cookie
- Calories: 90
- Sugar: 8g
- Sodium: 5mg
- Fat: 5g
- Saturated Fat: 0.5g
- Unsaturated Fat: 4.5g
- Trans Fat: 0g
- Carbohydrates: 8g
- Fiber: 1g
- Protein: 2g
- Cholesterol: 0mg
Keywords: almond, cookies, gluten-free, dessert, baking, light

Crispy Ham & Cheese Puff Pastries: 15-Minute Snack Hit
The Ultimate Ham and Cheese Puff Pastries: An Easy Delight for Any Occasion
Hello, friends! Today, I’m thrilled to share a recipe that’s one of my absolute favorites: Ham and Cheese Puff Pastries. These little pockets of deliciousness are not just a hit at dinner parties but also perfect for a quiet evening in. Imagine flaking into soft, buttery pastry followed by savory ham and melted cheese—a bite that says “comfort” with every morsel! So let’s roll up our sleeves, tie on our aprons, and dive into this delightful culinary adventure.
Personal Story
This recipe takes me back to my childhood kitchen, where the aroma of golden pastries filled the air. My mom would whip them up on weekends for a special brunch. I can still picture her skillfully rolling out the puff pastry, her laughter echoing in the air as we chased each other around the kitchen. Those moments taught me that cooking is more than just preparing food—it’s about creating memories and cherishing time spent with loved ones. When I make Ham and Cheese Puff Pastries, I feel like I’m channeling my mom’s spirit, mixing nostalgia with creativity. I love serving these pastries at gatherings, knowing each bite can brighten someone’s day just like they did for me all those years ago.
Ingredients
-
1 sheet of puff pastry
Puff pastry is the star of this dish! It’s flaky, buttery, and creates a wonderful texture. Feel free to use store-bought for convenience. If you’re feeling adventurous, you might even try making your own, but that’s a recipe for another day! -
4 oz ham, diced
Choose your favorite type of ham—smoked, honey, or even leftover holiday ham works beautifully here. Don’t have ham? Cooked chicken or turkey make great substitutes, too! -
4 oz cheese (like cheddar or Swiss), shredded
The creaminess of the cheese complements the savory ham perfectly. You can swap cheddar for mozzarella or pepper jack for an extra kick—just keep it shredded for even melting. -
1 egg, beaten (for egg wash)
This golden egg wash will give your pastries that gorgeous, shiny finish. You can use an egg substitute if needed, like a mixture of grounded flaxseed and water. -
Salt and pepper to taste
Just a pinch is all you need for seasoning! Remember to taste as you go—cooking should be an adventure of flavor.
Step-by-Step Instructions
-
Preheat the Oven
Preheat your oven to 400°F (200°C). This step is vital, as a hot oven helps the puff pastry rise beautifully and become gloriously flaky. -
Prepare the Puff Pastry
If your puff pastry is frozen, let it thaw in the refrigerator or on the counter for about 30 minutes until it’s pliable but still cold. Once thawed, roll it out gently on a floured surface to prevent sticking. If it’s too soft, pop it in the freezer for a few minutes. Trust me, it’ll be easier to handle! -
Cut the Pastry
Using a sharp knife or a pizza cutter, slice the pastry into squares—roughly 4×4 inches. This doesn’t have to be exact; we’re going for rustic charm, not perfection! -
Mix Ham and Cheese
In a mixing bowl, combine the diced ham with the shredded cheese. Season with salt and pepper. Remember, the ham might already be salty, so taste your mixture before adding any extra salt. -
Fill the Pastry
Place a heaping tablespoon of the ham and cheese mixture in the center of each pastry square. Make sure not to overfill them—you don’t want the delicious filling spilling out while baking! -
Fold and Seal
Fold the corners of the pastry into the center to form a little pocket. You can press down around the edges with a fork to seal them securely. This is also a fun step—get creative with the design! -
Egg Wash Time
Brush the tops of the pastries with the beaten egg. This is where the magic happens; it gives them a beautiful golden color that will make them irresistible. -
Bake
Place the pastries on a parchment-lined baking sheet, ensuring they are spaced well apart. Bake for about 15-20 minutes or until they are puffed up and perfectly golden-brown. You might want to take a peek at them after 15 minutes—you’ll want them just right!
Serving Suggestions
Serve these lovely ham and cheese puff pastries warm, straight out of the oven! For an elegant touch, plate them on a beautiful serving platter alongside a small bowl of mustard for dipping. Fresh herbs, like parsley or chives, sprinkled on top will elevate the presentation even further. Trust me, they’ll disappear in no time!
Recipe Variations
-
Spinach and Feta: Swap the ham for sautéed spinach and crumbled feta cheese for a delicious vegetarian twist.
-
Apple and Cheddar: Add diced apples to the ham-and-cheese filling for a sweet and savory contrast.
-
Spicy Kick: Add jalapeños or red pepper flakes to the cheese mixture if you crave some heat.
-
Herbed Cream Cheese: Use herbed cream cheese for an extra creamy filling that adds a burst of flavor.
-
Whole Wheat Puff Pastry: For a more wholesome option, use whole wheat puff pastry for an added nutrient boost.
Chef’s Notes
This recipe has evolved so much over the years. I started with plain ham and cheese, and with time, I’ve experimented with different fillings and spices. I once hosted a gathering where I made a variety of pastries, and guests were encouraged to mix and match the fillings. It turned into a delightful culinary exploration! And here’s a funny tidbit: during that gathering, my dough didn’t fully seal on a few pastries. They oozed cheese, causing quite the mess—but they tasted amazing, and everyone loved the ‘lava’ effect!
FAQs and Troubleshooting
1. My puff pastry didn’t rise properly; what happened?
Ensure your oven was preheated and not overcrowded. Airflow is essential for perfect puffing! Also, check that your pastry was chilled before baking—warm dough doesn’t puff as well.
2. Can I make the filling ahead of time?
Absolutely! You can prepare the ham and cheese filling a day in advance. Just store it in an airtight container in the refrigerator and assemble the pastries just before baking.
3. How do I store leftovers?
Keep any uneaten pastries in an airtight container in the fridge for up to 2 days. Reheat them in the oven to regain their crispiness.
4. Can I freeze the pastries?
Yes! Assemble the pastries but don’t bake them. Place them on a baking sheet, freeze until solid, and then transfer to a freezer bag. Whenever you’re ready, pop them in the oven straight from the freezer—just add a few extra minutes to the baking time.
Nutritional Info
While I believe in enjoying food without stress, it’s always helpful to have a look at nutrition! Each Ham and Cheese Puff Pastry (based on this recipe) contains approximately:
- Calories: 223
- Total Fat: 15g
- Saturated Fat: 7g
- Cholesterol: 55mg
- Sodium: 360mg
- Total Carbohydrate: 15g
- Dietary Fiber: 1g
- Protein: 7g
So there you have it—a double delight of nostalgia and newfound kitchen magic! I hope you feel encouraged to try your hand at these Ham and Cheese Puff Pastries. They’re simple, straightforward, and oh-so-delicious. Gather your loved ones around, serve warm, and create your own wonderful memories in the kitchen—in the spirit of love, laughter, and great food. Happy cooking!
PrintHam and Cheese Puff Pastries

These flaky pastries filled with savory ham and melted cheese are perfect for any occasion, bringing comfort and nostalgia to your table.
- Prep Time: 15 minutes
- Cook Time: 20 minutes
- Total Time: 35 minutes
- Yield: 4 servings 1x
- Category: Appetizer
- Method: Baking
- Cuisine: French
- Diet: Omnivore
Ingredients
- 1 sheet of puff pastry
- 4 oz ham, diced
- 4 oz cheese (like cheddar or Swiss), shredded
- 1 egg, beaten (for egg wash)
- Salt and pepper to taste
Instructions
- Preheat your oven to 400°F (200°C).
- Prepare the puff pastry by thawing it if frozen and rolling it out.
- Cut the pastry into squares, roughly 4×4 inches.
- Mix the diced ham with shredded cheese, adding salt and pepper to taste.
- Fill each pastry square with a heaping tablespoon of the ham and cheese mixture.
- Fold the corners of the pastry into the center and seal with a fork.
- Brush the tops with the beaten egg.
- Bake for 15-20 minutes until golden brown.
Notes
Serve warm and optionally with mustard for dipping. Fresh herbs can elevate the presentation.
Nutrition
- Serving Size: 1 pastry
- Calories: 223
- Sugar: 1g
- Sodium: 360mg
- Fat: 15g
- Saturated Fat: 7g
- Unsaturated Fat: 5g
- Trans Fat: 0g
- Carbohydrates: 15g
- Fiber: 1g
- Protein: 7g
- Cholesterol: 55mg
Keywords: ham, cheese, puff pastry, appetizer, easy recipe
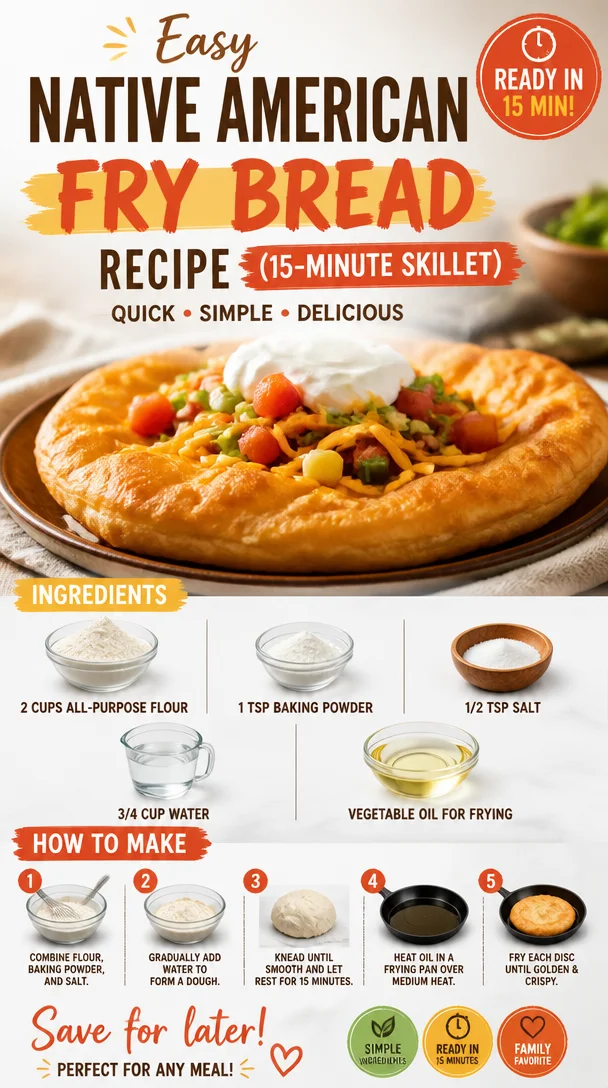
Easy Native American Fry Bread Recipe (15-Minute Skillet)
Discover the Joy of Indian Fry Bread: A Step-by-Step Guide
Hello, my lovely food enthusiasts! Today, we’re diving into a recipe that’s close to my heart and rich in tradition: Indian Fry Bread. This fluffy, crispy, and delicious bread has a story rooted in the culture and history of Native American cuisine. Not only is it a fantastic vehicle for toppings, but it also serves as a canvas for creativity in your kitchen. Let’s embark on this flavorful journey together!
A Personal Story: The First Time I Made Fry Bread
I remember the first time I tried making Indian Fry Bread—oh, what an adventure it was! I was invited to a gathering where the host was making this magnificent bread, and I was immediately captivated by its enticing aroma. The way it puffed up in hot oil, golden and inviting, had me mesmerized.
When I asked for the recipe, the host smiled and said, "It’s simple, but it’s about the love you put into it." As soon as I got home, I rolled up my sleeves, ready to recreate this culinary masterpiece. The kitchen filled with a fragrant warmth as I mixed the ingredients. My dog, Charlie, sat patiently at my feet, hoping for crumbs. The first batch came out surprisingly well, making me feel like a champion chef! We piled them high with honey, powdered sugar, and even savory toppings like chili and beans. From that day forward, fry bread became a staple in my kitchen.
Ingredients: What You’ll Need
Here’s what you’ll need to whip up your own Indian Fry Bread:
-
2 cups all-purpose flour
The backbone of our bread; you can substitute with whole wheat flour for a nuttier flavor. Just note that it may require extra water since whole wheat absorbs more moisture. -
1 tsp baking powder
This little magic ingredient provides that gorgeous fluffiness. If you’re out, you can use baking soda with a splash of vinegar for a similar effect, but keep an eye on your ratios! -
1/2 tsp salt
Salt enhances flavor and balances sweetness. If you’re keeping an eye on sodium, you can reduce the amount or even use a salt substitute, but flavor may suffer. -
3/4 cup water
This is essential for bringing everything together—warm water works best! You can experiment by mixing in a bit of milk for a richer flavor. -
Vegetable oil for frying
Choose a neutral oil like canola or peanut for better frying results. Avoid olive oil as it has a lower smoke point.
Step-by-Step Instructions: Let’s Get Cooking!
Ready to make some delicious fry bread? Here’s how to do it!
-
Mix the Dry Ingredients
In a large bowl, stir together the flour, baking powder, and salt. Utilizing a whisk helps to incorporate air, ensuring a fluffier texture. Trust me; this is where the magic begins! -
Add Water Gradually
Make a small well in the center of your dry ingredients and pour in the water a little at a time. Using your hands or a wooden spoon, mix until the dough comes together. You want a moist, not sticky, dough—don’t fret if it feels a bit uneven at first; it will come together! -
Knead the Dough
Turn the dough out onto a lightly floured surface. Knead it gently for about 3-4 minutes, just until it becomes smooth and elastic. Think of this as your dough getting a mini workout! If it’s sticky, sprinkle a touch more flour. Tension is your friend here. -
Let It Rest
Cover the dough with a damp cloth or plastic wrap and let it rest for about 10-15 minutes. This allows the gluten to relax, which is essential for that perfect puff! -
Prepare to Fry
In a deep skillet, heat about 2 inches of vegetable oil over medium-high heat until a thermometer registers about 350°F (180°C). You can test if it’s ready by dropping a small piece of dough into the oil—if it sizzles and bubbles, you’re good to go! -
Shape the Dough
Divide the dough into golf ball-sized portions and flatten them gently with your hands—about ¼ inch thick. Feel free to use a rolling pin if you want them more uniform. The key is to avoid making the pieces too thick; we want them to puff beautifully. -
Fry the Bread
Carefully slide the flattened dough into the hot oil. Fry for about 1-2 minutes on each side, or until they turn golden brown. Use tongs to flip—this part is exciting! The bread will puff up, creating that delightful texture we adore. Place fried bread on paper towels to drain excess oil. -
Repeat
Continue with the remaining dough, making sure the oil temperature stays consistent for even cooking. Have fun with this process; it’s all about that golden color!
Serving Suggestions: Make it Beautiful
Now that your Indian Fry Bread is all puffed and golden, it’s time to serve! You can stack the breads on a pretty platter, then drizzle with honey or maple syrup for a sweet treat. Or, go savory—top it with seasoned ground beef, beans, cheese, and a sprinkle of fresh cilantro for a delightful Navajo taco! Serve with a side of salsa or guacamole, and watch your guests indulge in pure bliss.
Recipe Variations: Get Creative!
Here are some delicious twists to make the recipe your own:
- Herb-Infused Dough: Add chopped herbs like rosemary or thyme to the dough for a fragrant twist.
- Sweet Cinnamon Variation: Mix in a spoonful of cinnamon and sugar to the dough for a sweet breakfast treat.
- Spicy Fry Bread: Incorporate a pinch of cayenne pepper or paprika to the dry mix to give the bread a nice kick!
- Gluten-Free Option: Substitute the all-purpose flour with a 1:1 gluten-free baking flour—just make sure the baking powder is gluten-free!
- Cheesy Indo-Fry Bread: Fold in shredded cheese such as cheddar or mozzarella into the dough for a cheesy delight!
Chef’s Notes: A Little Extra Love from My Kitchen
Fry bread has always had a special place in my heart, and interestingly, it evolves each time I make it. The first time was strictly traditional, but experimenting has made it even more delightful! I once hosted a taco night inspired by my fry bread. I offered various toppings, and it turned out to be such a hit that my friends keep asking for a repeat! Remember, in cooking, it’s okay to make mistakes. My first few attempts didn’t puff perfectly, and that’s part of the charm. Just laugh it off—your kitchen should be a joyful place after all!
FAQs and Troubleshooting
-
Why isn’t my fry bread puffing up?
Make sure your dough is not too thick and that the oil is hot enough. If it’s not sizzling when you drop it in, give it more time to heat! -
Can I make the dough ahead of time?
Absolutely! You can prepare the dough and store it in the fridge for up to 24 hours. Just let it come to room temp before frying. -
What’s the best way to store leftovers?
Store them in an airtight container at room temperature for up to 2 days. Reheat in the oven or microwave—but fresh is always best! -
What if my dough is too sticky?
If your dough feels too sticky, don’t despair! Just sprinkle a bit more flour and knead carefully, adjusting until it reaches the right consistency.
Nutritional Info (Optional)
While the exact nutritional values will depend on the specific ingredients and portion sizes you use, here’s a quick overview for one piece of Indian Fry Bread (without toppings):
- Calories: 200
- Fat: 10g
- Carbohydrates: 25g
- Protein: 3g
And there you have it — a delightful journey into the world of Indian Fry Bread! I hope this recipe inspires you to tie on that apron and create something delicious in your kitchen. Let’s gather our friends and family around the table, sharing stories and laughter as we savor every bite of this beautiful bread. Happy cooking, and remember: good food is all about showing up!
PrintIndian Fry Bread

Deliciously fluffy and crispy Indian Fry Bread that serves as a perfect canvas for both sweet and savory toppings.
- Prep Time: 15 minutes
- Cook Time: 15 minutes
- Total Time: 30 minutes
- Yield: 4 servings 1x
- Category: Side Dish
- Method: Frying
- Cuisine: Native American
- Diet: Vegetarian
Ingredients
- 2 cups all-purpose flour
- 1 tsp baking powder
- 1/2 tsp salt
- 3/4 cup warm water
- Vegetable oil for frying
Instructions
- Mix the dry ingredients in a large bowl.
- Add water gradually to form a dough.
- Knead the dough on a floured surface until smooth.
- Let it rest for 10-15 minutes.
- Heat vegetable oil in a deep skillet over medium-high heat.
- Shape the dough into golf ball-sized portions and flatten.
- Fry each piece until golden brown, about 1-2 minutes per side.
- Repeat with remaining dough.
Notes
Experiment with toppings and variations to personalize your fry bread. Serve with honey, savory toppings, or make taco-style dishes.
Nutrition
- Serving Size: 1 piece
- Calories: 200
- Sugar: 1g
- Sodium: 200mg
- Fat: 10g
- Saturated Fat: 1g
- Unsaturated Fat: 7g
- Trans Fat: 0g
- Carbohydrates: 25g
- Fiber: 1g
- Protein: 3g
- Cholesterol: 0mg
Keywords: fry bread, Indian fry bread, traditional recipe, Native American cuisine, easy recipes
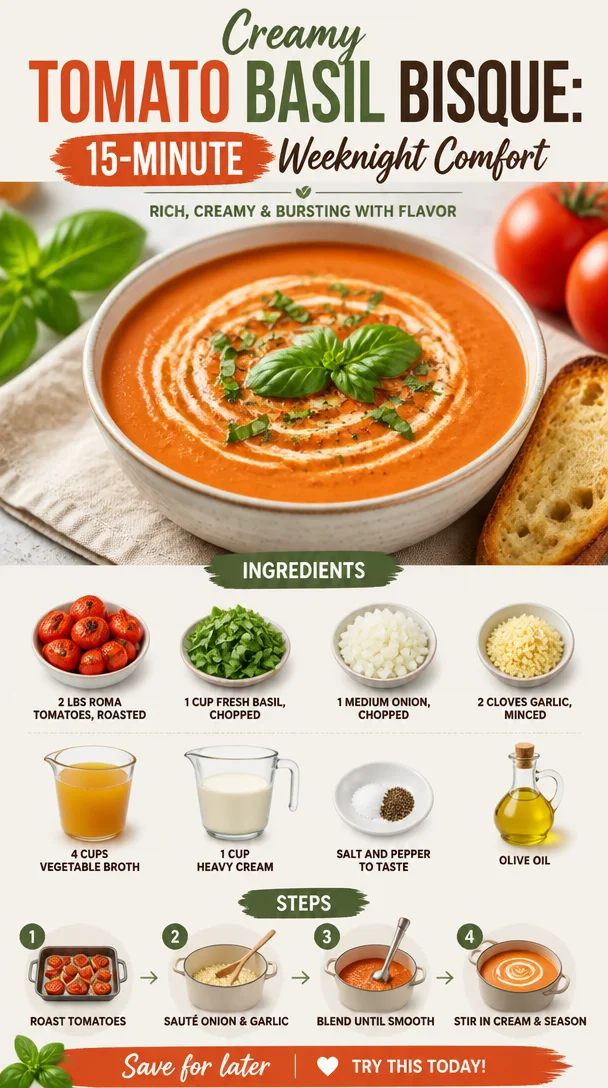
Creamy Tomato Basil Bisque: 15-Minute Weeknight Comfort
Creamy Tomato Basil Bisque: A Cozy Culinary Hug
Hello, my friends! Today, we’re diving into a warm, comforting classic that dances on your taste buds and wraps around you like a soft, cozy blanket. Yes, I’m talking about Creamy Tomato Basil Bisque. This dish is perfect for those chilly nights when you just want to curl up with something delicious and nourishing. It’s creamy, it’s bright, and it’s bursting with the fresh flavors of summer — even if you enjoy it in the heart of winter!
As we gather around the table and embark on this culinary adventure together, I hope you can feel the joy and warmth that a pot of homemade bisque can bring. So, grab your favorite apron and let’s get cooking!
A Taste of Nostalgia
Before we jump into the recipe, let me share a little personal story. I have fond memories of my grandmother’s kitchen, where the tantalizing aroma of roasted tomatoes would fill the air, beckoning us to the table. She had a magical way of transforming simple ingredients into something extraordinary.
Every Saturday, I would spend the day at her house, and we would make a big batch of tomato soup together. We would pick ripe tomatoes from her garden, their skins so bright they seemed to glow in the sunlight. Our laughter mingled with the sounds of chopping and simmering, and it always felt like we were making more than just soup — we were making memories.
As we poured the velvety bisque into bowls, she would sprinkle fresh basil on top, the vibrant green sparkling like jewels. The first spoonful was always an experience; the creamy tang of the tomatoes perfectly complemented the fresh, herbaceous notes of basil, igniting a symphony of flavors in my mouth.
That feeling of comfort and love has been at the heart of my cooking since then, and I’m excited to share this delicious bisque with all of you. Let’s recreate that magic together!
Ingredients
Here’s what you’ll need to create your own bowl of bliss:
-
2 lbs Roma tomatoes, roasted
Sweet and juicy, Roma tomatoes are perfect for roasting due to their lower moisture content. If you can’t find Roma, any variety will do, but you might need to adjust cooking times slightly. -
1 cup fresh basil, chopped
Fresh basil adds a bright, herby flavor that elevates the bisque. If fresh basil isn’t available, feel free to use a teaspoon of dried basil, but fresh is always best for that vibrant taste! -
1 medium onion, chopped
A pivotal player in adding depth and sweetness. If you’re aiming for a sweeter flavor, try caramelizing the onion first! -
2 cloves garlic, minced
Garlic brings warmth and richness. You can substitute with garlic powder (1 teaspoon) in a pinch, but fresh is always the way to go! -
4 cups vegetable broth
This adds a lovely base to our soup. You can make your own or choose a high-quality store-bought option. Want an extra kick? Try a low-sodium chicken broth! -
1 cup heavy cream
This makes the bisque indulgently creamy. For a lighter version, swap it with coconut cream or cashew cream for a vegan-friendly option. -
Salt and pepper to taste
Essential for highlighting all those fantastic flavors. Feel free to adjust based on your preferences! -
Olive oil
This will help sauté our aromatics and lend a beautiful flavor. If you’re out, avocado oil works beautifully too!
Step-by-Step Instructions
Now, let’s get down to business and whip up this sumptuous bisque. Follow along with these steps, and I promise you’ll be savoring every last spoonful in no time!
-
Roast the Tomatoes: Preheat your oven to 400°F (200°C). Slice your Roma tomatoes in half, drizzle them with olive oil, and sprinkle with salt and pepper. Spread them on a baking sheet, cut side up, and roast for about 30-40 minutes until they are caramelized and bursting with sweetness.
Chef Tip: Keep an eye on your tomatoes! If they’re starting to brown too quickly, don’t hesitate to lower the heat a tad. Roasting brings out the natural sugars in the tomatoes, making your bisque super sweet and flavorful.
-
Sauté the Aromatics: In a large pot, heat 2 tablespoons of olive oil over medium heat. Add the chopped onion and a pinch of salt, cooking until the onion is translucent and fragrant — about 5 minutes. Next, toss in the minced garlic and sauté for another minute, making sure it doesn’t burn.
Chef Hack: To prevent your garlic from burning, you can add it right at the end of the onion cooking time. Garlic can turn bitter if it cooks too long!
-
Combine and Simmer: Once your tomatoes are ready, carefully transfer them to the pot with the onion and garlic mixture. Pour in the vegetable broth and bring everything to a boil. Once boiling, reduce the heat and let it simmer for about 10 minutes to meld those delicious flavors together.
-
Blend It Up: Remove the pot from the heat. You can use an immersion blender for this step, which is a game changer, or transfer the bisque to a blender in batches. Blend until smooth — you want it creamy and luscious!
Little Tip: If you prefer a chunkier texture, blend just half the soup and mix it back with the unblended part.
-
Add the Cream and Basil: Stir in the heavy cream until fully combined, and then add the chopped fresh basil. Let it simmer for another 5 minutes to infuse the flavors.
Pro Tip: Taste before serving! Adjust the seasoning with salt and pepper as needed. Sometimes just a pinch more can bring everything together!
-
Serve Hot: Your bisque is ready to be devoured! Ladle it into bowls and maybe top it with a drizzle of olive oil or a little extra basil for flair.
Serving Suggestions
For an elevated presentation, consider serving your bisque in elegant bowls. A sprinkle of freshly cracked pepper and a drizzle of olive oil on top will make it visually irresistible. Pair it with crusty bread for dipping or a simple side salad for a complete meal.
If you’re feeling fancy, why not serve it with a sprinkle of homemade croutons or a dollop of pesto on top? The options are endless!
Recipe Variations
Here are some creative twists and variations on this bisque:
-
Roasted Garlic Tomato Basil Bisque: Throw in a head of roasted garlic with the tomatoes for an even deeper flavor profile.
-
Spicy Tomato Basil Bisque: Add a pinch of red pepper flakes or a diced jalapeño while sautéing the onions for some heat!
-
Vegan Tomato Basil Bisque: Substitute the heavy cream with full-fat coconut milk for a rich, creamy vegan version. Add a squeeze of lemon for a burst of acidity.
-
Herbed Tomato Basil Bisque: Experiment by adding other herbs like thyme or oregano for a unique flavor twist.
-
Lentil Tomato Basil Bisque: For added protein, toss in some red lentils before blending. They will cook down and add a lovely creaminess too!
Chef’s Notes
This recipe has evolved over time. Initially, it was a simple formula handed down to me by my grandmother — just tomatoes, basil, and cream. Over the years, I’ve played around with the ingredients and techniques. I often remind myself that cooking is all about experimenting and finding out what you love!
One funny kitchen misadventure I had occurred while I was testing a variation that included sun-dried tomatoes. The first time I made it, I accidentally used tomato puree instead of roasted tomatoes. Talk about a flavor bomb! The bisque still turned out well, but it definitely packed a punch and taught me the importance of careful ingredient selection.
FAQs and Troubleshooting
-
Why is my bisque too thin?
If your bisque turns out thinner than expected, you can thicken it by simmering it without a lid for a few extra minutes to evaporate some of the liquid. Alternatively, blend in a little more roasted tomato or add cornstarch mixed with water to achieve a creamier consistency. -
Can I make this bisque in advance?
Absolutely! This bisque actually tastes even better the next day as the flavors meld together. Just be sure to store it in an airtight container in the fridge and reheat gently on the stove. -
What if I don’t have fresh basil?
If fresh basil isn’t available, dried basil is a suitable substitute. Use about 1 teaspoon of dried basil for the best results. Or get creative and try using fresh parsley for a different herbaceous note. -
Can I freeze the bisque?
Yes! This bisque freezes beautifully. Just make sure it’s completely cooled before transferring it to freezer-safe containers. When you’re ready to enjoy it, let it thaw overnight in the fridge and reheat on the stove.
Nutritional Information
If you’re curious: this creamy delight is rich in vitamins and is a filling, heartwarming meal option. A typical serving of this bisque provides a good source of vitamins A and C, with healthy fats coming from the cream and olive oil.
So there you have it, my friends! Your very own bowl of Creamy Tomato Basil Bisque awaits. I hope this dish brings warmth to your kitchen and smiles to your table, just like it has in mine. Remember, cooking is a journey and there’s no right or wrong way — only delicious flavors waiting to be discovered.
Let’s keep gathering around our tables, sharing good food and good company. Until next time, tie on that apron and let the cooking adventures continue at Ivory Apron!
PrintCreamy Tomato Basil Bisque

A cozy and comforting bisque bursting with the fresh flavors of summer, perfect for chilly nights.
- Prep Time: 15 minutes
- Cook Time: 40 minutes
- Total Time: 55 minutes
- Yield: 4 servings 1x
- Category: Soup
- Method: Baking
- Cuisine: Italian
- Diet: Vegetarian
Ingredients
- 2 lbs Roma tomatoes, roasted
- 1 cup fresh basil, chopped
- 1 medium onion, chopped
- 2 cloves garlic, minced
- 4 cups vegetable broth
- 1 cup heavy cream
- Salt and pepper to taste
- Olive oil
Instructions
- Roast the tomatoes: Preheat your oven to 400°F (200°C). Slice your Roma tomatoes in half, drizzle them with olive oil, and sprinkle with salt and pepper. Spread them on a baking sheet, cut side up, and roast for about 30-40 minutes until they are caramelized and bursting with sweetness.
- Sauté the aromatics: In a large pot, heat 2 tablespoons of olive oil over medium heat. Add the chopped onion and a pinch of salt, cooking until the onion is translucent and fragrant — about 5 minutes. Next, toss in the minced garlic and sauté for another minute, making sure it doesn’t burn.
- Combine and simmer: Once your tomatoes are ready, carefully transfer them to the pot with the onion and garlic mixture. Pour in the vegetable broth and bring everything to a boil. Once boiling, reduce the heat and let it simmer for about 10 minutes to meld those delicious flavors together.
- Blend it up: Remove the pot from the heat. Use an immersion blender or transfer the bisque to a blender in batches. Blend until smooth.
- Add the cream and basil: Stir in the heavy cream until fully combined, and then add the chopped fresh basil. Let it simmer for another 5 minutes to infuse the flavors.
- Serve hot: Ladle it into bowls and top with a drizzle of olive oil or a little extra basil for flair.
Notes
For an elevated presentation, consider serving with crusty bread or a simple side salad.
Nutrition
- Serving Size: 1 serving
- Calories: 350
- Sugar: 8g
- Sodium: 800mg
- Fat: 24g
- Saturated Fat: 12g
- Unsaturated Fat: 10g
- Trans Fat: 0g
- Carbohydrates: 30g
- Fiber: 4g
- Protein: 6g
- Cholesterol: 60mg
Keywords: tomato, bisque, soup, creamy, basil, vegetarian, comfort food