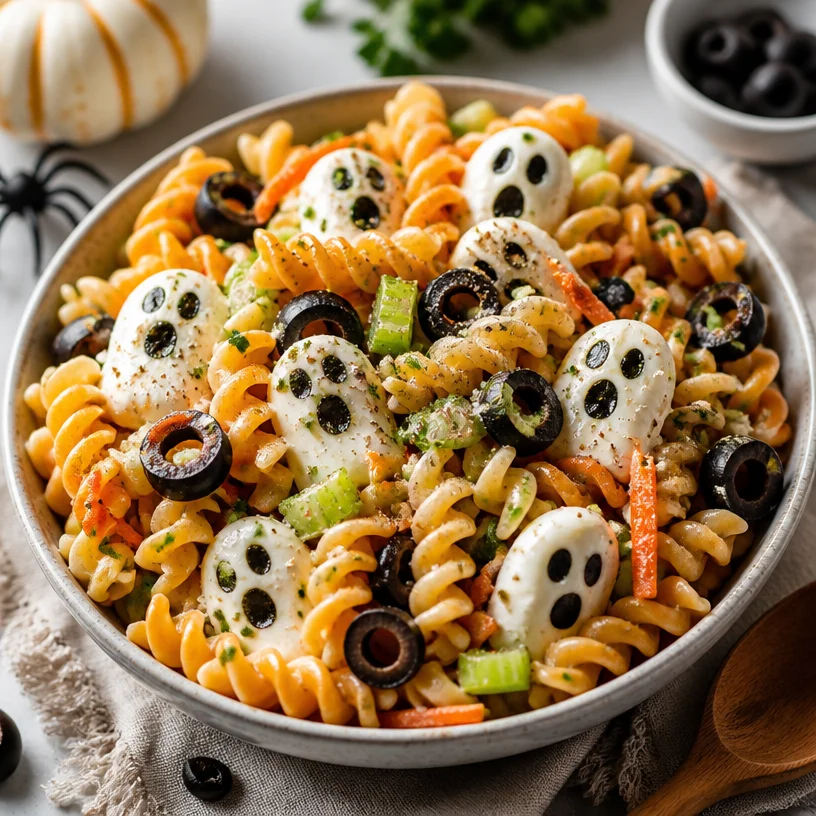
Halloween Pasta Salad: 15-Min Spooky, Crispy Bowls
Spooktacular Halloween Pasta Salad: An Elegant Treat for All Ages
Hello, fellow food lovers! As October rolls in and the leaves begin to crunch under our feet, thoughts of Halloween start swirling around in our minds. Whether you’re organizing a fun gathering for friends, a family get-together, or simply looking to add a festive flair to your dinner table, I have the perfect recipe for you: a Halloween Pasta Salad! This vibrant, whimsical dish is not only a feast for the eyes but also a celebration of flavors that will keep your guests delighted and coming back for more.
As we all know, Halloween is about more than just scares and sweets. It’s a time for gathering around tables decked out in clever decorations and mouthwatering treats. My Halloween Pasta Salad is versatile and easy to whip up, and it brings a dash of elegance while remaining totally approachable. Believe me; you don’t need to have the skills of a Michelin-star chef to impress with this pasta salad!
What makes this dish especially special to me is how it encapsulates the very essence of entertaining—bringing people together over delectable food. There’s something about the colors of Halloween—vibrant oranges, deep greens, and a pop of white—that sparks creativity in the kitchen. And when food looks playful, it creates an atmosphere where everyone can relax and have fun, easing the chatter and laughs into the evening.
So, let’s roll up our sleeves, tie on our aprons, and conjure up some deliciousness in the kitchen together!
My Love for Pasta Salad
One vivid memory that always brings a smile to my face happens in my childhood kitchen. Picture this: I was around ten years old, standing on my tiptoes to reach the counter, armed with a wooden spoon and a sense of adventure. My mom decided we would make a special dish, a vibrant pasta salad, to celebrate the changing season.
With colorful ingredients spread out before us—bright red cherry tomatoes, crisp greens, and morsels of mozzarella—the kitchen blossomed into a canvas of color. As we added olives and a drizzle of olive oil, I felt the excitement of creativity flowing through me. The beauty of this recipe was that it didn’t just taste good; it felt like an experience!
Now, as an adult and a lover of hosting, I treasure that kitchen memory. It taught me that cooking is all about connection—the joy of creating something lovely to share with others. With this Halloween Pasta Salad, I aim to replicate the fun of my childhood while giving it a festive twist that’s sure to please both kids and adults alike.
Ingredients
Let’s gather our witch’s brew of ingredients and get ready to create some magic! Here’s what you’ll need:
-
Pasta: Choose your favorite type—penne, rotini, or even spooky-shaped Halloween pasta if you can find it! Whole grain or gluten-free options work wonderfully too.
-
Olives: Black olives add that delicious briny flavor. If you’re not a fan, green olives or even capers bring a unique twist!
-
Mozzarella: Fresh mozzarella balls (bocconcini) are fantastic here. They’re both tender and creamy. For a vegan option, try marinated tofu or vegan cheese.
-
Cherry Tomatoes: Their sweet burst of flavor is essential! Any color works—red, orange, or even yellow add a fun pop.
-
Bell Peppers: Choose orange or yellow for that festive autumn hue. If you want a little heat, red peppers can bring a nice kick!
-
Basil and Parsley: Fresh herbs elevate any dish! If you have dried herbs, use them sparingly. Dried basil can work in a pinch.
-
Olive Oil: A good-quality extra virgin olive oil is a must for drizzling and adding depth.
-
Balsamic Vinegar: Adds a tangy sweetness. You can substitute red wine vinegar if that’s what you have!
-
Salt and Pepper: Essential to bring all the flavors together. Freshly cracked black pepper adds a nice touch!
Step-by-Step Instructions
Now that we have our ingredients, it’s time to get cooking! Let’s dive into the delightful process of crafting this Halloween Pasta Salad.
-
Cook the Pasta: Begin by bringing a large pot of salted water to a rolling boil; this is where the magic will begin! Add your pasta of choice and cook according to package instructions until al dente (usually about 8-10 minutes). Remember to stir occasionally to prevent sticking. Chef Tip: Always taste your pasta a minute or two before the suggested cooking time to catch that perfect doneness!
-
Prep the Olives: While the pasta is cooking, take your olives and slice them in half. This not only makes them more visually interesting but also ensures their briny goodness coats the pasta beautifully. If you’re using olives from a jar, remember to rinse them under cold water to remove excess brine. Chef Insight: If you want a fancier presentation, consider pitting and slicing black olives into fun shapes or eyes!
-
Dice the Cherry Tomatoes and Bell Peppers: Chop your cherry tomatoes into halves (or quarters for larger ones) and dice the bell peppers into bite-sized pieces. The colors of orange, yellow, and red should shine through, creating a beautiful autumn palette! Presentation Hack: For an extra pop of seasoning, sprinkle a tiny pinch of salt on the tomatoes to enhance their sweetness.
-
Prepare the Herbs: Finely chop your fresh basil and parsley. This step brings a fresh element to the pasta salad and contributes a lovely aroma that sets the mood. Chef Hint: If you want to save time, chiffonade (stack, roll and slice) the basil. This gives an elegant look!
-
Combine Ingredients: Once your pasta is cooked, don’t forget to reserve about a half cup of pasta water before draining! Drain and rinse the pasta under cold water to stop the cooking process. In a large mixing bowl, combine the pasta with olives, cherry tomatoes, diced bell peppers, mozzarella, and herbs.
-
Dress It Up: Add a generous drizzle of olive oil, a splash of balsamic vinegar, and season with salt and pepper. Mix gently, letting all those flavors mingle together. If it feels a bit dry, add a bit of the reserved pasta water to loosen it up.
-
Chill and Serve: It’s best to let the salad chill in the refrigerator for at least 30 minutes. This allows the flavors to meld beautifully. But if you’re eager, dig in right away!
-
Garnish for Spookiness: For that Halloween touch, consider garnishing with additional herbs, a few extra olives, and maybe even some pumpkin seeds for crunch!
Serving Suggestions
When it’s time to serve your Halloween Pasta Salad, I recommend presenting it in a large, deep serving bowl. This not only makes for a beautiful centerpiece but also gives everyone easy access. For an added festive flair, you can decorate the table with mini pumpkins or fun Halloween-themed napkins. This salad is also lovely served on fun Halloween plates, or even better—a cauldron-shaped dish for that extra whimsy!
Recipe Variations
-
Ghostly Pesto Pasta Salad: Swap out the oil and vinegar for store-bought or homemade pesto to give the salad a deliciously vibrant flavor and bright green hue!
-
Pumpkin Spice Surprise: Add a touch of pumpkin puree to your dressing for a festive spin, bringing autumn flavor and color to the mix.
-
Zesty Lemon Twist: Replace balsamic vinegar with fresh lemon juice and zest to give your pasta salad a refreshing twist!
-
Cheesy Boost: Mix in some crumbled feta or goat cheese for an extra creamy dimension.
-
Protein-Packed Option: Incorporate some grilled chicken or chickpeas for a heartier meal.
Chef’s Notes
One of my favorite things about this recipe is its adaptability. Over the years, I’ve played around with various add-ins depending on what’s in season or in my fridge. You can easily make this recipe your own! I remember one Halloween, we had a last-minute guest, and I had some roasted pumpkins sitting around. I cubed them up and tossed them in! The sweetness added a delightful contrast and an unexpected element to the dish. Food is always evolving, just like our tastes.
FAQs and Troubleshooting
1. What type of pasta should I use?
Any pasta shape works! Penne, rotini, or even Halloween-themed shapes if you can find them add a fun twist. Just be sure to cook it al dente.
2. Can I assemble this salad ahead of time?
Absolutely! You can make this pasta salad a day in advance. Just store it in the refrigerator in an airtight container and give it a good stir before serving.
3. It’s too dry! What can I do?
Don’t panic! Simply add a splash of reserved pasta water or extra olive oil as needed. Give it a toss to bring everything back together.
4. Can I customize this with different veggies?
You bet! Feel free to use whatever veggies you enjoy or have on hand—zucchini, broccoli, or even roasted carrots can be great additions.
As you can see, this Halloween Pasta Salad is so much more than just a side dish. It’s an invitation to gather, create, and enjoy. I hope it brightens your table and fills your hearts with joy. So, stretch your apron strings, grab a glass of something bubbly, and let’s celebrate the beauty of cooking and gathering around our tables!
Happy Halloween cooking! 🎃👻✨
PrintSpooktacular Halloween Pasta Salad
A vibrant and whimsical pasta salad perfect for Halloween gatherings, bringing together delightful flavors and colors.
- Prep Time: 15 minutes
- Cook Time: 10 minutes
- Total Time: 45 minutes
- Yield: 4 servings
- Category: Salad
- Method: Mixing
- Cuisine: Italian
- Diet: Vegetarian
Ingredients
- Pasta: penne, rotini, or spooky-shaped
- Olives: black or green
- Mozzarella: fresh mozzarella balls or vegan alternatives
- Cherry Tomatoes: red, orange, or yellow
- Bell Peppers: orange, yellow, or red
- Basil: fresh or dried
- Parsley: fresh or dried
- Olive Oil: extra virgin
- Balsamic Vinegar: or red wine vinegar
- Salt and Pepper: to taste
Instructions
- Cook the pasta in a boiling pot of salted water until al dente, about 8-10 minutes.
- Prep the olives by slicing them in half.
- Dice the cherry tomatoes and bell peppers into bite-sized pieces.
- Prepare the fresh basil and parsley by finely chopping them.
- Combine the cooked pasta, olives, tomatoes, bell peppers, mozzarella, and herbs in a large bowl.
- Dress the salad with olive oil, balsamic vinegar, salt, and pepper, mixing gently.
- Chill the salad in the refrigerator for at least 30 minutes before serving.
- Garnish with additional herbs, olives, or pumpkin seeds for a spooky touch.
Notes
This salad is adaptable; feel free to include seasonal add-ins like roasted pumpkins for extra sweetness.
Nutrition
- Serving Size: 1 serving
- Calories: 350
- Sugar: 5g
- Sodium: 400mg
- Fat: 12g
- Saturated Fat: 4g
- Unsaturated Fat: 6g
- Trans Fat: 0g
- Carbohydrates: 45g
- Fiber: 3g
- Protein: 15g
- Cholesterol: 30mg
Keywords: Halloween, pasta salad, festive dish, party food, vegetarian dish

Bang Bang Chicken in 15 Minutes: Crispy, Spicy Peanut-Sauce Skillet
A Flavor Explosion: Bang Bang Chicken Recipe
Hello, dear friends! I’m so excited to have you join me here at Ivory Apron as we dive into one of my all-time favorite dishes: Bang Bang Chicken! This dish isn’t just about flavor; it’s a story. It’s an invitation to gather around the table, to share laughter, and to create memories that linger long after the last bite. So roll up those sleeves, tie on your apron, and let’s get cooking!
A Personal Story: The First Bite of Bang Bang Chicken
I still remember the first time I tasted Bang Bang Chicken. It was a balmy summer evening, and I was at a charming little bistro with friends. The atmosphere was vibrant with laughter and the clinking of glasses, while the tantalizing aroma of spices filled the air. As I took my first bite, I was taken aback by the delightful crunch of the chicken followed by a creamy, spicy sauce that danced on my taste buds. That moment was magic—a perfect blend of heat and sweetness, and from then on, I was hooked!
Fast forward to my kitchen at home, experimenting with flavors and techniques to recreate that unforgettable dish. Each attempt became a delightful memory in itself, laughter echoed through the kitchen as I tried to find the right balance of flavors. The essence of this dish is not just about eating; it’s about sharing with loved ones, making every dinner a fun gathering!
Ingredients: What You’ll Need for Bang Bang Chicken
Now, let’s gather our ingredients to whip up this savory delight. Here’s what you’ll need:
-
1 lb chicken tenderloins
Tenderloins are juicy and quick-cooking, but you can substitute them with chicken breasts if needed—just slice them into thin strips for even cooking! -
1 cup panko breadcrumbs
These light, Japanese-style breadcrumbs give a delightful crunch. You can use regular breadcrumbs, but panko will always have that extra texture! -
1/2 cup all-purpose flour
This helps in coating the chicken and creating a lovely crisp. If you need a gluten-free option, almond flour or a gluten-free flour blend works great too. -
2 eggs, beaten
The egg wash helps the breadcrumbs adhere nicely. If you’re avoiding eggs, try using flaxseed meal mixed with water (1 tablespoon flaxseed + 2.5 tablespoons water). -
Oil for deep frying
We want that perfect sizzle! For frying, canola or peanut oils are excellent choices due to their high smoke point. -
Salt and pepper to taste
Always essential! Freshly cracked pepper will give the dish a lovely bite. -
1/2 cup mayonnaise
This is the creamy base for our bang bang sauce—super versatile and adds a base cloud of creaminess! Feel free to swap it with Greek yogurt for a lighter version. -
2 tablespoons sweet chili sauce
Trust me, this is the magic ingredient that brings in that sweet and tangy flavor. -
1 tablespoon sriracha sauce
Spice it up! Adjust according to your taste—we want that kick without overwhelming the dish. -
1 tablespoon lime juice
Adds brightness to the sauce. If you’re out of fresh limes, bottled lime juice will do!
Step-by-Step Instructions: Let’s Cook!
-
Prep Your Chicken
Start by patting your chicken tenderloins dry with a paper towel. This step helps the coating stick better. Season them with salt and pepper. A little seasoning goes a long way, so don’t skimp here! -
Set Up Your Breading Station
In one bowl, place the all-purpose flour. In the second bowl, beat the eggs until well mixed. In the third bowl, add the panko breadcrumbs. This is your assembly line—let’s keep it tidy! -
Coat the Chicken
Take each seasoned tenderloin and dip it into the flour, ensuring it’s fully coated to prevent the egg from washing off during the next step. Next, dip it into the beaten eggs, letting the excess drip off. Finally, roll it in the panko breadcrumbs, pressing lightly to ensure they adhere well. Set aside on a plate. -
Heat the Oil
In a deep skillet or pot, pour enough oil to cover the bottom, about an inch deep. Heat it over medium-high heat. You can test the oil’s readiness by dropping a few breadcrumbs in—if they sizzle right away, you’re good to go! -
Fry the Chicken
Carefully add your coated chicken tenderloins in batches, making sure not to overcrowd the pan (this can lower the oil temperature). Fry for about 3-4 minutes on each side until golden brown and crispy. Use a slotted spoon to transfer the cooked chicken onto a plate lined with paper towels to drain any excess oil. Don’t rush this step; it’s where the magic happens! -
Make the Bang Bang Sauce
In a small bowl, combine the mayonnaise, sweet chili sauce, sriracha, and lime juice. Stir until smooth and well blended. Taste it—this is your chance to adjust the heat or sweetness! -
Toss the Chicken
In a large bowl, gently toss your crispy chicken with the bang bang sauce. You want to coat each piece but not drown them—let that lovely crunch shine through!
Serving Suggestions: How to Present It
Now for the fun part—serving! I love to plate my Bang Bang Chicken in a shallow dish that showcases the golden-brown crispy chicken. Drizzle a little extra bang bang sauce over the top for that beautiful finish, and scatter some chopped fresh cilantro or green onions for a pop of color. Pair it with a side of steamed rice and perhaps some crisp vegetables for a balanced meal!
Recipe Variations: Get Creative!
Looking to switch it up? Here are a few variations of Bang Bang Chicken to keep your taste buds dancing:
-
Bang Bang Tofu: For a vegetarian twist, substitute the chicken with cubes of firm tofu. Fry it up until it’s golden and crispy, just like the chicken.
-
Bang Bang Shrimp: Use shrimp in place of the chicken! The cooking time will be shorter, about 2-3 minutes each side.
-
Spicy Garlic Bang Bang: Add minced garlic into the sauce to give it a lovely garlicky kick.
-
Bang Bang Bowls: Serve the crispy chicken over a bed of leafy greens with shredded carrots, cucumbers, and avocado, drizzled with the bang bang sauce as a salad!
-
Zesty Citrus: Add some lemon zest into your sauce for an extra layer of flavor and brightness!
Chef’s Notes: A Few Final Thoughts
Bang Bang Chicken has become a staple in my household. What started as an experiment has turned into a family favorite. I often prepare it for get-togethers, and it’s always met with applause (and some happy dance moves)! Nowadays, I love serving it with a side of grilled veggies or a refreshing tomato salad to cut through the richness. And remember to embrace those little imperfections—sometimes my chicken turns out a bit more rustic than picture-perfect but that just makes it feel more homemade and inviting!
FAQs and Troubleshooting
-
Why is my chicken not crispy?
If your chicken isn’t getting the desired crunch, check that your oil is hot enough before adding the chicken. A common mistake is trying to cook too many pieces at once, which can drop the temperature. -
Can I make this ahead of time?
While Bang Bang Chicken is best served fresh, you can prepare the sauce in advance and store it in the fridge. Just reheat the chicken briefly in the oven to regain some crispiness before serving. -
How do I store leftovers?
Store any leftover chicken in an airtight container in the fridge for up to 2 days. To reheat, pop it in the oven for a quick re-crisp! -
What if I can’t find sweet chili sauce?
You can substitute with equal parts honey and chili flakes for a quick DIY version!
Nutritional Info (Optional)
If you’re keeping an eye on nutrition, roughly, one serving of Bang Bang Chicken contains about 350 calories, with protein from the chicken and healthy fats from the oil. Pair it with veggies for a balanced meal!
And there you have it—Bang Bang Chicken brought to life in your kitchen! I hope you enjoyed this culinary journey with me and that you feel inspired to gather around your own table. Cooking should always be fun, filled with creativity and joy. So tie on that apron and let’s whip up something amazing together! Happy cooking!
PrintBang Bang Chicken

A crispy and flavorful dish featuring chicken tenderloins coated in panko breadcrumbs and tossed in a creamy, spicy bang bang sauce.
- Prep Time: 15 minutes
- Cook Time: 20 minutes
- Total Time: 35 minutes
- Yield: 4 servings 1x
- Category: Main Course
- Method: Frying
- Cuisine: Asian
- Diet: Gluten-Free (if using gluten-free flour and breadcrumbs)
Ingredients
- 1 lb chicken tenderloins
- 1 cup panko breadcrumbs
- 1/2 cup all-purpose flour
- 2 eggs, beaten
- Oil for deep frying
- Salt and pepper to taste
- 1/2 cup mayonnaise
- 2 tablespoons sweet chili sauce
- 1 tablespoon sriracha sauce
- 1 tablespoon lime juice
Instructions
- Prep your chicken: Pat the chicken tenderloins dry and season with salt and pepper.
- Set up your breading station with bowls for flour, beaten eggs, and panko breadcrumbs.
- Coat the chicken by dipping it into flour, then eggs, and finally rolling it in panko breadcrumbs.
- Heat the oil in a deep skillet over medium-high heat.
- Fry the chicken in batches for about 3-4 minutes on each side until golden brown and crispy.
- Make the bang bang sauce by combining mayonnaise, sweet chili sauce, sriracha, and lime juice in a bowl.
- Toss the crispy chicken with the bang bang sauce in a large bowl.
Notes
Serve with steamed rice and vegetables for a balanced meal. For variations, try Bang Bang Tofu or Bang Bang Shrimp.
Nutrition
- Serving Size: 1 serving
- Calories: 350
- Sugar: 5g
- Sodium: 400mg
- Fat: 12g
- Saturated Fat: 1.5g
- Unsaturated Fat: 7g
- Trans Fat: 0g
- Carbohydrates: 45g
- Fiber: 2g
- Protein: 15g
- Cholesterol: 30mg
Keywords: Bang Bang Chicken, Crispy Chicken, Asian Recipe, Chicken Tenderloins, Panko Chicken
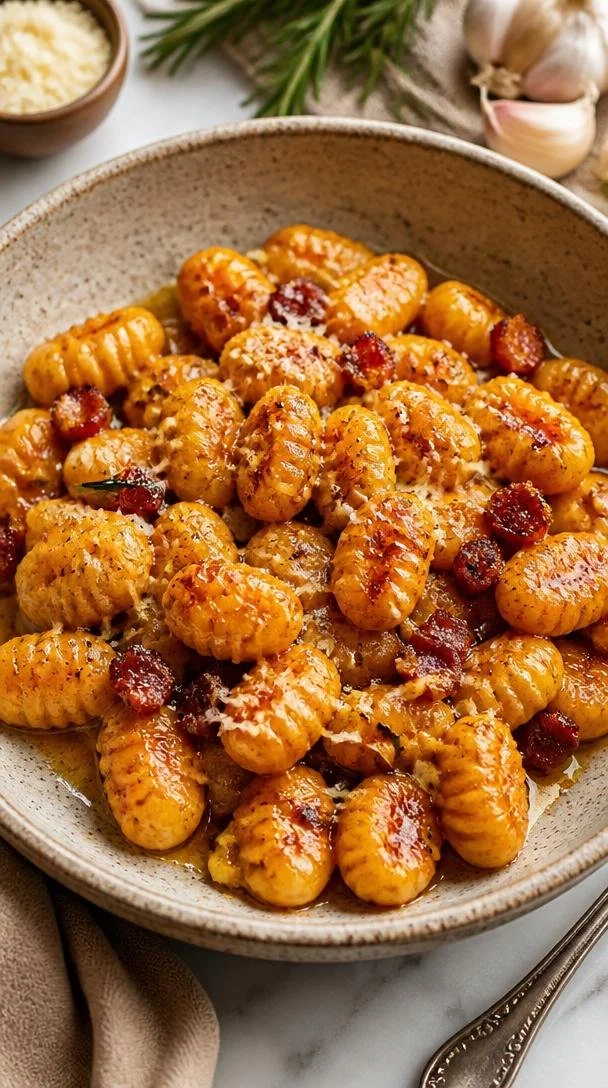
Weeknight 15-Minute 5-Ingredient Sweet Potato Gnocchi
Discover the Delight of 5-Ingredient Sweet Potato Gnocchi
Hello, lovely foodies! Today, I’m thrilled to share with you a delightful recipe that beautifully showcases the humble sweet potato: 5-Ingredient Sweet Potato Gnocchi. If you’ve ever been intimidated by the thought of making gnocchi from scratch, fear not! This simple and approachable version will have you feeling like a kitchen rockstar in no time. With just five key ingredients, you can whip up a dish that is not only comforting and satisfying but also impressively elegant.
Imagine sitting around the table with family or friends, laughter and warmth in the air, and a heaping plate of soft, pillowy gnocchi dressed in a simple butter sauce. It’s a dish that invites conversation and connection, a dish that says “welcome” and “stay a little longer.” Let’s dive into this culinary journey together!
A Nostalgic Kitchen Memory
The first time I made gnocchi was in my grandmother’s cozy kitchen when I was just a child. I remember her pulling out sweet potatoes, gently peeling them with care, and talking about how these little gems could be transformed into something magical. We rolled those soft potatoes with flour on her old wooden table, and I giggled as they bounced around, taking on whimsical shapes.
As we worked, the smell of nutmeg wafted through the air, instantly connecting me to memories of autumn festivities. That day, I wasn’t just learning how to cook—I was learning the art of creating a gathering. The joy of sharing food, the conversations around the table, and the love we infused into each dish are memories I cherish. Now, as I share this recipe with you, I hope to evoke that same sense of nostalgia and warmth. Let’s create our own memories, shall we?
Ingredients for Your Delicious Gnocchi
Let’s get to the star of the show—our ingredients! Here’s what you’ll need:
-
1 lb (500g) sweet potatoes (roughly 2 medium)
Sweet potatoes bring a naturally sweet flavor and a vibrant color to our gnocchi. If you can’t find sweet potatoes, you can use regular potatoes, although the flavor will differ slightly. -
1 tablespoon olive oil
Olive oil adds richness and helps to enhance the flavors of our ingredients. You could also use melted butter for a more decadent twist. -
1 cup ricotta
Creamy and dreamy, ricotta lends moisture and a lovely texture. If you’re looking for a dairy-free option, try using a nut-based ricotta or silken tofu blended until smooth. -
1/4 cup grated parmesan cheese
This adds a savory umami punch! If you wish to keep it vegetarian, ensure your parmesan is veggie-friendly or substitute with nutritional yeast for a vegan option. -
1 teaspoon salt
Salt is essential for enhancing all the other flavors. You can adjust it to your taste based on how salty your cheese is. -
1/2 teaspoon nutmeg
Nutmeg adds warmth and a hint of spice that beautifully complements the sweet potatoes. If you aren’t a nutmeg fan, you can skip it or use a pinch of cinnamon for a different flavor profile. -
1 1/4 cups all-purpose flour
Flour is our binding agent and helps create the perfect texture. If you’re gluten-free, feel free to substitute with almond flour or a gluten-free blend—just watch the amount, as you may need less. -
2 oz (50g) chorizo, casing removed and diced (optional)
For those who enjoy a meaty addition, chorizo offers a spicy kick. You can completely omit it for a vegetarian dish or swap in cooked mushrooms for a similar umami flavor. -
4 tablespoons butter
For the sauce, butter brings richness and richness to every bite. You can use olive oil here for a lighter alternative. -
3 garlic cloves, crushed
Garlic adds a beautiful aroma and flavor to the sauce. Feel free to adjust the amount if you prefer milder garlic notes. -
1 sprig of rosemary, stem removed
Rosemary adds a fragrant note that elevates the dish. Thyme or sage would be wonderful substitute herbs if you’re looking for a different flavor direction. -
1 teaspoon flaky salt
Flaky salt is perfect for finishing the dish, adding a crunch that contrasts beautifully with the soft gnocchi. -
Parmesan cheese, grated, to serve
A sprinkle of fresh parmesan at the end is always a good idea!
Step-by-Step Instructions for Making Gnocchi
Now, let’s dive into the cooking process. I promise it’s easier than it sounds!
-
Prepare the Sweet Potatoes
Start by preheating your oven to 400°F (200°C). Pierce the sweet potatoes a few times with a fork and place them on a baking sheet lined with foil. Roast them for about 45 minutes or until they’re tender and easily pierced with a fork. This roasting process intensifies their sweetness! -
Mix the Dough
Once the sweet potatoes are cool enough to handle, peel off the skin and mash them in a large mixing bowl until smooth. Add the ricotta, parmesan cheese, olive oil, salt, and nutmeg. Use a fork to combine everything until it’s creamy and delightful. -
Incorporate the Flour
Gradually add the flour to the sweet potato mixture, mixing gently until a soft dough forms. You may not need all the flour, so add it slowly. The dough should be slightly sticky but manageable. If it feels too wet, add more flour a tablespoon at a time. -
Shape the Gnocchi
Lightly flour your work surface and your hands. Divide the dough into four pieces for easier handling. Roll each piece into a long rope about 1/2 inch thick. Use a knife to cut the rope into bite-sized pieces, about 1 inch apart. For that classic gnocchi look, you can press each piece lightly with a fork to create ridges—that’s where the sauce will cling! -
Boil the Gnocchi
In a large pot of salted boiling water, gently drop the gnocchi in batches. They’re ready when they rise to the surface, which should take about 2-3 minutes. Scoop them out with a slotted spoon and set them on a towel to drain while you prepare the sauce. -
Make the Butter Sauce
In a large skillet over medium heat, melt the butter. Add the crushed garlic and cook until fragrant, about 1 minute—don’t let it brown! Toss in the diced chorizo if you’re using it, and let it cook for a few minutes until it’s nice and crisp. -
Combine Everything
Add the drained gnocchi directly into the skillet with the butter and garlic sauce, tossing to coat. If it feels dry, you can splash in a little reserved pasta water. Add the rosemary and season with flaky salt. -
Serve it Up!
Plate the gnocchi with a sprinkle of grated parmesan on top. You can also add a drizzle of olive oil for extra richness or a few extra fresh herbs.
Serving Suggestions
For serving, I love plating these delightful gnocchi in a shallow bowl or on a rustic wooden platter, allowing the colors and textures to shine. Add a sprinkle of flaky salt and a final touch of fresh parsley or rosemary for that pop of freshness. Pair with a crisp salad and a glass of white wine, and you’re all set for a cozy night in!
Recipe Variations for Everyone
Looking to flex your culinary creativity? Here are a few variations you might enjoy:
- Herbed Gnocchi: Add chopped fresh herbs (like basil or parsley) directly into the dough for a flavor boost.
- Sweet and Savory: Toss in some caramelized onions or roasted garlic for a different layer of flavor.
- Spicy Kick: Mix in some crushed red pepper flakes for a bit of heat in the butter sauce.
- Nutty Flavor: Substitute half of the butter with browned butter for a nutty taste and richer color.
- Veggie Boost: Mix in finely chopped spinach or kale to the dough to sneak in some greens!
Chef’s Notes
This sweet potato gnocchi recipe has truly been a labor of love over the years. I remember the first batch I made was a bit of a disaster—they turned out more like heavy rocks than the pillowy gnocchi I had envisioned! I learned the importance of the right amount of flour and measuring the moisture in sweet potatoes. Each attempt taught me something new. I love that cooking is an ever-evolving journey!
FAQs and Troubleshooting
1. Why is my gnocchi sticky?
This usually happens when there’s too much moisture in the sweet potatoes. Make sure to drain any excess liquid before mixing in the flour. A little extra flour can help, but be careful not to overdo it, or the gnocchi may become tough!
2. Can I freeze gnocchi?
Absolutely! After shaping your gnocchi, lay them on a baking sheet to freeze individually before transferring them to a freezer bag. When you’re ready to cook, just drop them directly into boiling water without thawing.
3. What if my dough is too dry?
If your dough feels too dry, add a touch more ricotta or a little water, one teaspoon at a time, until you reach the desired consistency.
4. Can I make this dish in advance?
Certainly! You can prepare the gnocchi ahead of time and store them in the fridge for up to 24 hours. Just make sure to toss them with a bit of flour to prevent sticking.
Nutritional Info
While I always encourage enjoying food without guilt, here’s a little glimpse into the nutritional aspect per serving (assuming 4 servings):
- Calories: Approx. 400
- Protein: 15g
- Carbohydrates: 56g
- Fat: 15g
Remember, you can adjust the cheese and butter for a lighter version if that’s your preference!
I hope you’re ready to roll up your sleeves and get cooking! This 5-Ingredient Sweet Potato Gnocchi is sure to become a staple in your home just as it has in mine. Together, let’s create those little moments that turn into big memories. Happy cooking, my friends!
Print5-Ingredient Sweet Potato Gnocchi
A simple and delightful recipe for making homemade sweet potato gnocchi with just five ingredients, perfect for cozy gatherings.
- Prep Time: 15 minutes
- Cook Time: 45 minutes
- Total Time: 60 minutes
- Yield: 4 servings 1x
- Category: Main Course
- Method: Baking
- Cuisine: Italian
- Diet: Vegetarian
Ingredients
- 1 lb (500g) sweet potatoes (roughly 2 medium)
- 1 tablespoon olive oil
- 1 cup ricotta
- 1/4 cup grated parmesan cheese
- 1 teaspoon salt
- 1/2 teaspoon nutmeg
- 1 1/4 cups all-purpose flour
- 2 oz (50g) chorizo, diced (optional)
- 4 tablespoons butter
- 3 garlic cloves, crushed
- 1 sprig of rosemary
- 1 teaspoon flaky salt
- Parmesan cheese, grated, to serve
Instructions
- Preheat your oven to 400°F (200°C). Pierce the sweet potatoes a few times with a fork and place them on a baking sheet lined with foil. Roast them for about 45 minutes or until they’re tender.
- Cool the sweet potatoes. Peel off the skin and mash them in a large mixing bowl until smooth. Add the ricotta, parmesan cheese, olive oil, salt, and nutmeg. Use a fork to combine everything until creamy.
- Gradually add the flour to the sweet potato mixture, mixing gently until a soft dough forms. Adjust the flour according to the dough’s stickiness.
- Lightly flour your work surface and hands. Divide the dough into four pieces and roll each into a long rope about 1/2 inch thick. Cut into bite-sized pieces and press lightly with a fork to create ridges.
- Boil the gnocchi in a large pot of salted boiling water in batches. They’re ready when they rise to the surface, about 2-3 minutes. Drain them on a towel.
- Melt the butter in a large skillet over medium heat. Add crushed garlic and cook until fragrant. If using, toss in diced chorizo and cook until crisp.
- Add the drained gnocchi directly into the skillet, tossing to coat. If the mixture feels dry, splash in a little reserved pasta water. Add the rosemary and season with flaky salt.
- Plate the gnocchi with a sprinkle of grated parmesan and a drizzle of olive oil or fresh herbs if desired.
Notes
Customize with fresh herbs or add caramelized onions for extra flavor. This dish can be made in advance and stored in the fridge.
Nutrition
- Serving Size: 1 serving
- Calories: 400
- Sugar: 3g
- Sodium: 550mg
- Fat: 15g
- Saturated Fat: 7g
- Unsaturated Fat: 8g
- Trans Fat: 0g
- Carbohydrates: 56g
- Fiber: 5g
- Protein: 15g
- Cholesterol: 40mg
Keywords: gnocchi, sweet potato, homemade pasta, Italian food
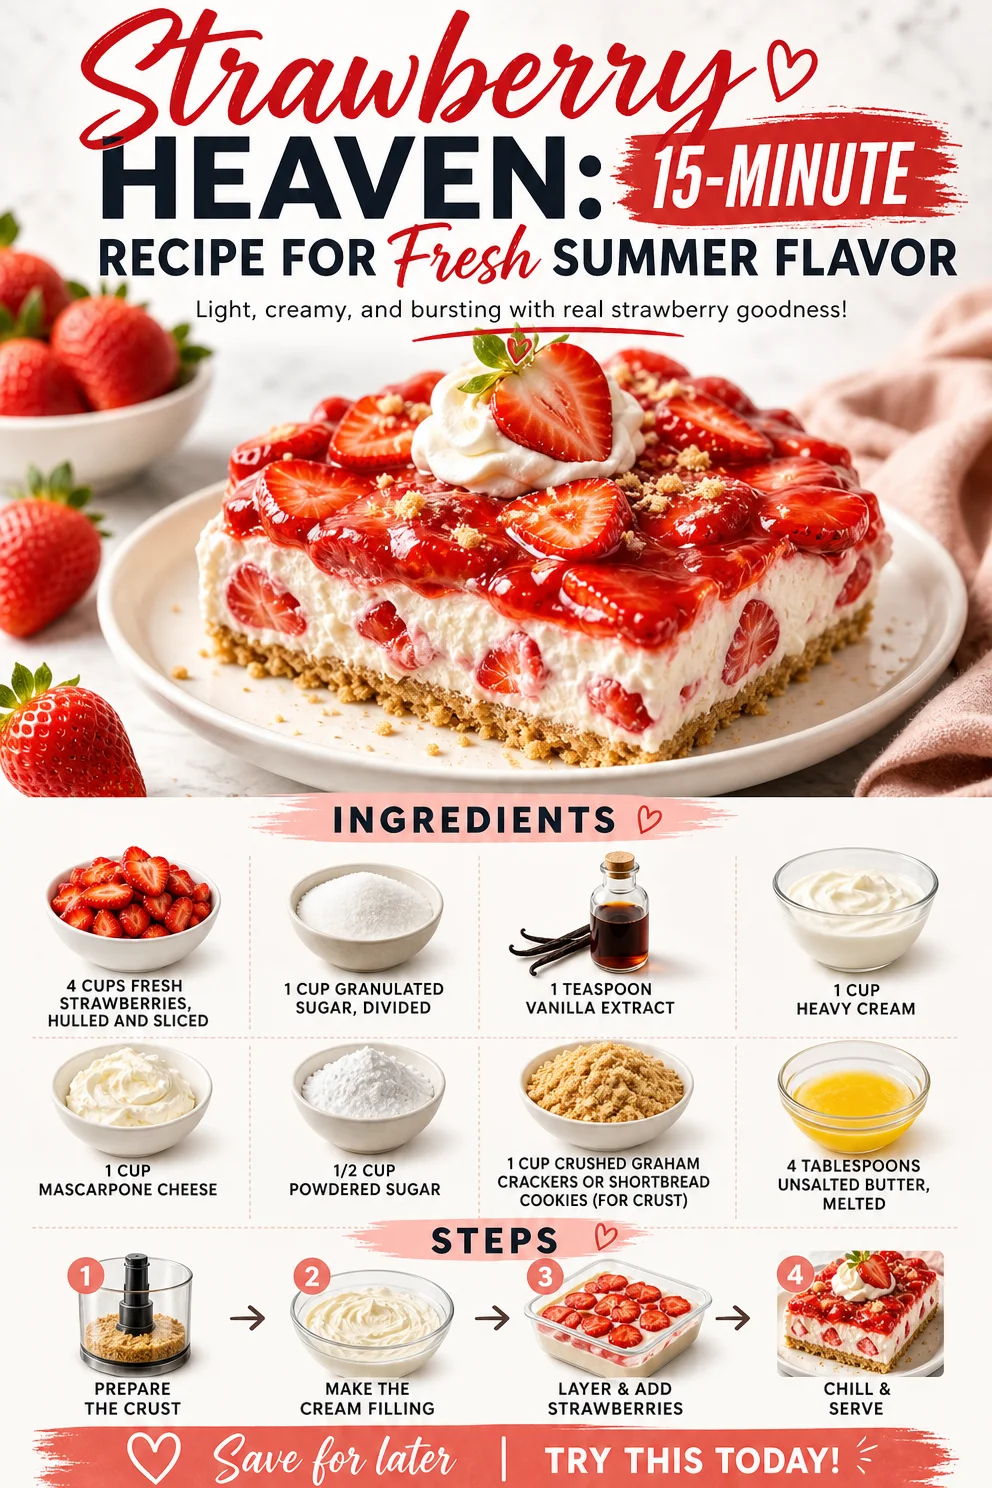
Strawberry Heaven: 15-Minute Recipe for Fresh Summer Flavor
Strawberry Heaven: The Amazing Ultimate Recipe You Need in Your Life
Welcome to the delightful world of Strawberry Heaven! If you’re looking to elevate your dessert game and impress your guests or simply indulge in a slice of joy yourself, this recipe is about to become your new kitchen staple. Imagine a dessert that embodies the essence of summer—sweet, vibrant, and oh-so-satisfying. Whether you’re hosting a dinner party, celebrating a birthday, or just seeking a sweet escape after a long day, this Strawberry Heaven recipe will make your heart sing.
Let me take you on a little journey. Picture this: It’s a bright Sunday afternoon, the sun is shining, and my kitchen is filled with the delicious aroma of fresh strawberries. I can still hear my grandmother’s laughter echoing through the air as she whipped up her famous strawberry shortcake. Every bite was a burst of summer that transported me right back to those beautiful days spent in her backyard, surrounded by family and friends, food and joy.
For years, I have cherished that memory, and today I’m sharing a modern take on that classic moment: Strawberry Heaven! This delightful dessert is a combination of creamy mascarpone, rich whipped cream, and fresh strawberries, all layered on a buttery crust that creates a symphony of flavor and texture. It’s not just a treat; it’s an experience that brings people together.
So, grab your apron, and let’s dive into this heavenly creation that will make your taste buds dance and your heart flutter.
Ingredients
For Strawberry Heaven, gather these delightful ingredients:
-
4 cups fresh strawberries, hulled and sliced
Fresh strawberries are the star of the show! Look for berries that are plump, vibrant red, and fragrant. If fresh strawberries aren’t available, you can use frozen strawberries, but be sure to thaw and drain them well. -
1 cup granulated sugar, divided
A classic sweetener that brings out the natural sweetness of the strawberries. You can also swap a portion with brown sugar for a hint of caramel flavor. -
1 teaspoon vanilla extract
This adds a warm, comforting note to the cream mixture. Opt for pure vanilla extract for the best flavor, but if you’re in a pinch, imitation vanilla can work, too. -
1 cup heavy cream
Heavy cream is key for achieving that light and fluffy texture. You can substitute with coconut cream for a dairy-free option, but it will impart a different flavor. -
1 cup mascarpone cheese
This luscious cheese adds a rich creaminess that takes the dessert to the next level. If you can’t find mascarpone, cream cheese is a good substitute, though it will be tangier. -
1/2 cup powdered sugar
This helps sweeten the whipped cream without grittiness. If you’re looking to cut down on sugar, you can use a sugar substitute made for baking. -
1 cup crushed graham crackers or shortbread cookies (for crust)
These provide a crunchy base with a sweet aroma. You can swap them out for gluten-free cookies or even oats for a healthier option. -
4 tablespoons unsalted butter, melted
Rich and necessary for binding the crust. If you’re looking for a dairy-free option, coconut oil can work well here.
Step-by-Step Instructions
Now that we’ve gathered our ingredients, let’s dive into the fun part—making Strawberry Heaven!
-
Prepare the Strawberries
Start by hulling and slicing your fresh strawberries. It’s like prepping for a party; you want them to look beautiful and vibrant. Place them in a bowl and sprinkle about 1/2 cup of granulated sugar over them. Gently toss to coat and let them sit for about 20–30 minutes. This step helps the strawberries release their juices, creating a wonderfully sweet syrup! -
Make the Crust
While the strawberries are mingling with the sugar, let’s whip up the crust. In a mixing bowl, combine the crushed graham crackers (or shortbread cookies) and melted butter, mixing until the crumbs are well-coated. The texture should resemble wet sand. Press this mixture into the bottom of a 9-inch springform pan evenly. Don’t rush through this; a well-packed crust ensures a sturdy base! Bake it in a preheated oven at 350°F (175°C) for about 8–10 minutes until golden and fragrant. Allow it to cool completely before moving on. -
Prepare the Cream Mixture
In a large mixing bowl, add the heavy cream, mascarpone cheese, powdered sugar, and vanilla extract. Now it’s time to whip! Using a hand mixer or a stand mixer, beat the mixture on medium-high speed. It’s crucial to keep an eye on it—stop once soft peaks form. You want it to be airy but avoid overbeating, which will turn it grainy. -
Combine Strawberries and Cream
Once your strawberries have released their juices, gently fold them into the whipped cream mixture. Use a spatula and be careful not to deflate the cream. You want those luscious strawberry slices dotted throughout, making every bite a perfect blend of sweetness and creaminess. -
Assemble the Dessert
Pour the strawberry-cream mixture onto your cooled crust, smoothing the top gently. Cover and place it in the refrigerator for at least 3 hours, or even overnight if time permits. The longer it chills, the more the flavors will meld together. -
Serve and Enjoy!
When you’re ready to serve, carefully release the sides of the springform pan. You can garnish the top with additional strawberry slices or a drizzle of chocolate for a touch of elegance. Slice into it, and watch the layers reveal their beauty—each piece as inviting as the last.
Serving Suggestions
Plate your Strawberry Heaven by presenting it on a beautiful cake stand, allowing the layers to shine. Consider adding a sprig of fresh mint on top for a pop of color and a refreshing hint. Pair each slice with a dollop of leftover whipped cream, maybe even a sprinkle of crushed graham crackers for that added crunch. This will not only enhance the visual appeal but also make every bite unforgettable!
Recipe Variations
- Chocolate Lovers: Add cocoa powder into the cream mixture for a chocolate twist.
- Berry Medley: Mix in blueberries or raspberries for a delightful berry assortment.
- Nutty Crunch: Incorporate crushed nuts into the crust for an added layer of flavor.
- Lemon Zest: A hint of freshly grated lemon zest can brighten the flavors beautifully.
- Vegan Twist: Use coconut cream for whipping, and swap mascarpone for a cashew-based cream for a dairy-free version.
Chef’s Notes
One of my favorite kitchen memories involves a slight mishap while preparing this recipe the first time. I had excitedly whipped my cream until it reached that silky perfection, only to realize that I had forgotten to add the mascarpone! I chuckled as I adjusted my steps to incorporate it afterward, and while it wasn’t what I had initially intended, it turned out to be a delightful flavor that I still use to this day! It’s stories like these that remind me—cooking is about exploration and having fun. Don’t be afraid to make your own adjustments; that’s where the magic happens!
FAQs and Troubleshooting
-
What if my whipped cream deflates?
If your whipped cream deflates, it could mean you overmixed it. Be sure to whip it only until soft peaks form. If you do overbeat, you can salvage it by folding in some fresh cream gently. -
How can I make the crust gluten-free?
You can easily swap out the graham crackers for gluten-free cookies or almond flour for a deliciously crumbly crust. -
Can I make this in advance?
Absolutely! Strawberry Heaven actually tastes better the longer it has to set. Just cover it tightly and store it in the refrigerator for up to 2 days before serving. -
How do I store leftovers?
Store any leftover Strawberry Heaven in an airtight container in the refrigerator for up to 3 days.
Nutritional Info (optional)
This section can be tailored with estimated nutritional values if applicable based on the ingredients used.
Now that you’re armed with this delightful recipe, prepare to dazzle your guests! With its simple yet elegant layers, Strawberry Heaven is perfect for any occasion, or just an indulgent weeknight treat. Happy cooking, my fellow food lovers—let’s get to creating those small, beautiful moments around our tables. 🍓✨
PrintStrawberry Heaven
A delightful dessert featuring layers of creamy mascarpone, whipped cream, and fresh strawberries on a buttery crust.
- Prep Time: 20 minutes
- Cook Time: 10 minutes
- Total Time: 210 minutes
- Yield: 8 servings 1x
- Category: Dessert
- Method: Baking
- Cuisine: American
- Diet: Vegetarian
Ingredients
- 4 cups fresh strawberries, hulled and sliced
- 1 cup granulated sugar, divided
- 1 teaspoon vanilla extract
- 1 cup heavy cream
- 1 cup mascarpone cheese
- 1/2 cup powdered sugar
- 1 cup crushed graham crackers or shortbread cookies (for crust)
- 4 tablespoons unsalted butter, melted
Instructions
- Prepare the Strawberries: Hull and slice the fresh strawberries, place them in a bowl and sprinkle with 1/2 cup of granulated sugar. Toss gently and let sit for 20–30 minutes.
- Make the Crust: Combine crushed graham crackers and melted butter in a mixing bowl. Press into the bottom of a 9-inch springform pan and bake at 350°F (175°C) for 8–10 minutes. Allow to cool completely.
- Prepare the Cream Mixture: In a large bowl, combine the heavy cream, mascarpone cheese, powdered sugar, and vanilla. Beat on medium-high speed until soft peaks form.
- Combine Strawberries and Cream: Fold the strawberries into the whipped cream mixture gently.
- Assemble the Dessert: Pour the mixture onto the cooled crust and smooth the top. Refrigerate for at least 3 hours, or overnight.
- Serve and Enjoy: Release the sides of the springform pan and garnish with additional strawberry slices or chocolate drizzle.
Notes
For a chocolate twist, add cocoa powder to the cream mixture. This dessert is best enjoyed chilled and can be made in advance.
Nutrition
- Serving Size: 1 slice
- Calories: 400
- Sugar: 35g
- Sodium: 150mg
- Fat: 24g
- Saturated Fat: 12g
- Unsaturated Fat: 10g
- Trans Fat: 0g
- Carbohydrates: 45g
- Fiber: 2g
- Protein: 5g
- Cholesterol: 60mg
Keywords: strawberry dessert, summer dessert, no-bake dessert
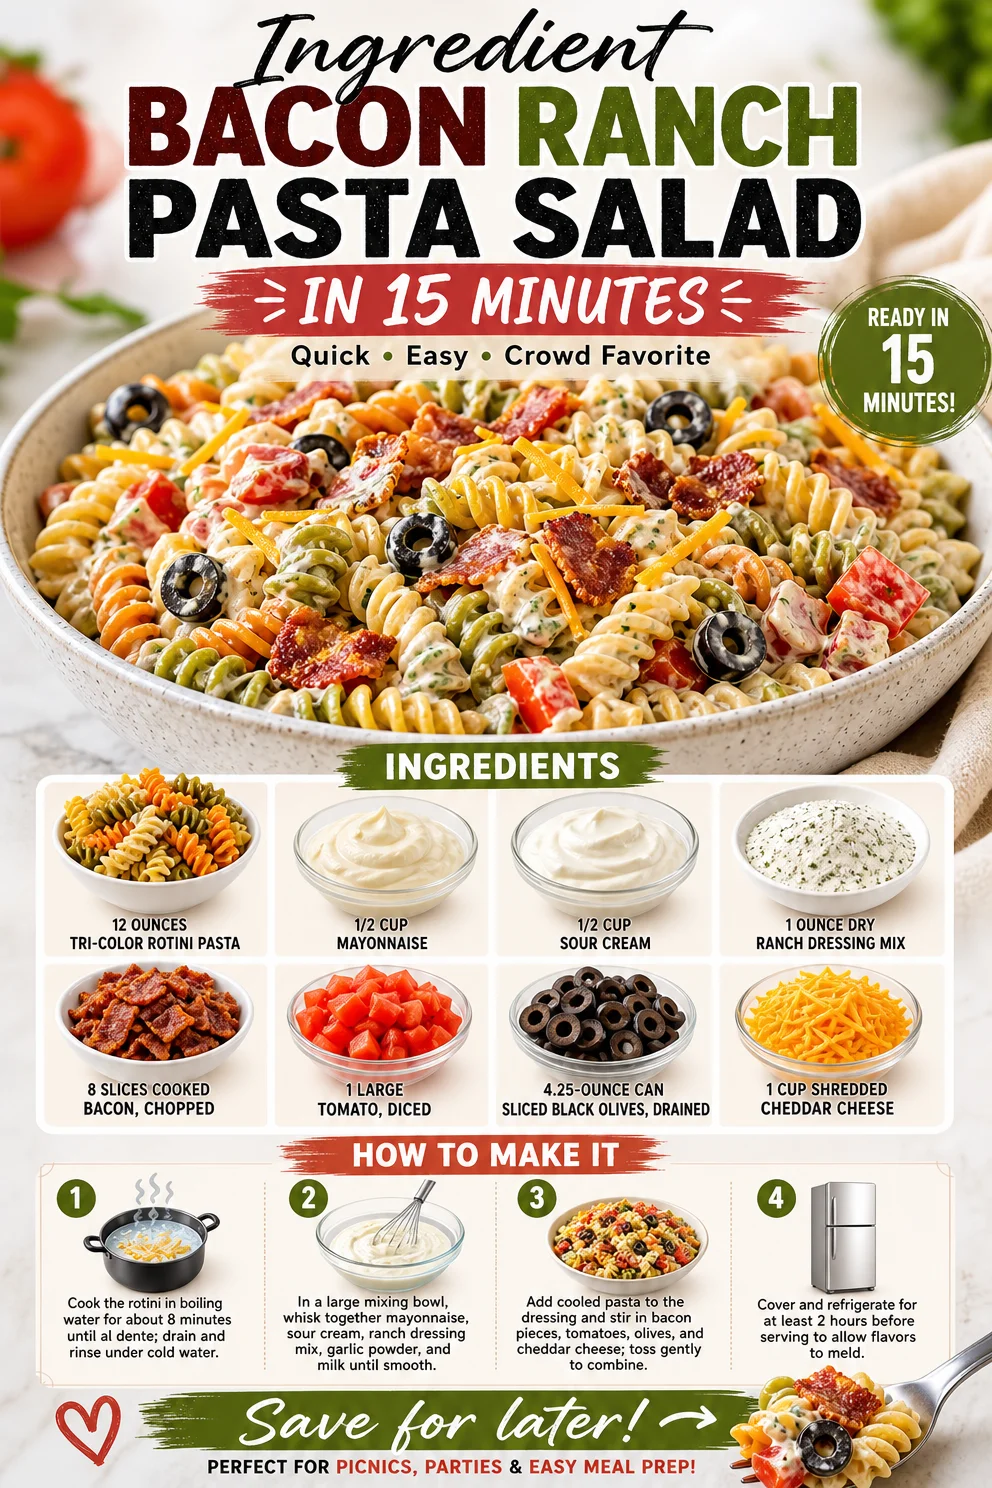
Ingredient Bacon Ranch Pasta Salad in 15 Minutes
Say Hello to Your New Favorite Dish: Bacon Ranch Pasta Salad
Welcome, food enthusiasts! Today, we’re diving into the world of summer picnics, potluck gatherings, and cozy barbecues with the ultimate crowd-pleaser: Bacon Ranch Pasta Salad. Imagine a vibrant dish bursting with flavor, creamy dressing, and the irresistible crunch of crispy bacon. That’s exactly what we’re serving up today. So, grab your apron, and let’s get cooking!
A Bite of Nostalgia
As I whisk away memories of summer afternoons, one dish always makes me smile: my Aunt Linda’s famous pasta salad. Growing up, every family gathering was punctuated by laughter and the clink of forks as we dug into that bright bowl of twirly pasta, colorful veggies, and chunks of bacon. Aunt Linda had a knack for making everyone feel welcome with her cooking, and her pasta salad was no exception. I remember the aroma of sizzling bacon wafting through the air and the way the kids would dash for the bowl before the adults even had a chance to claim their portion.
As I’ve grown into my role as a culinary creator, I’ve been inspired by Aunt Linda’s knack for hosting and sharing. This Bacon Ranch Pasta Salad is a nod to her original recipe—simplified, of course, for the everyday chef—and it’s become a staple for my gatherings. Your guests are guaranteed to leave with full hearts (and bellies) each time you serve it!
Ingredients You’ll Need
Let’s talk about the star players of this fantastic Bacon Ranch Pasta Salad. These ingredients come together in a symphony of flavors and textures that everyone will rave about.
-
12 ounces tri-color rotini pasta
- These fun, spiraled noodles hold onto the dressing and give a delightful bite. Feel free to swap in whole wheat or gluten-free pasta if you’re looking for alternatives!
-
1/2 cup mayonnaise
- The creamy base of our dressing offers richness. You can also use Greek yogurt for a lighter version—we all love a good swap!
-
1/2 cup sour cream
- Adds a tanginess that balances the creaminess of the mayo. Not a fan? Try using plain yogurt instead for a zesty flavor.
-
1 ounce dry ranch dressing mix
- The secret weapon! It brings all those classic ranch flavors without needing to mix everything from scratch. You could also use homemade ranch if you have a favorite recipe.
-
8 slices cooked bacon, chopped
- Crispy, savory perfection. Turkey bacon is a great alternative if you want to lighten things up or keep it turkey-friendly.
-
1 large tomato, diced
- Bursting with fresh flavor, tomatoes add a delightful juiciness. For a twist, you can use cherry tomatoes halved or even roasted tomatoes for a richer taste.
-
4.25-ounce can sliced black olives, drained
- A tasty addition that introduces a touch of brininess. If you’re not an olive fan, feel free to omit them or substitute with diced pickles for a different tangy kick!
-
1 cup shredded cheddar cheese
- The final touch that brings creaminess and a little saltiness to the dish. You can use other cheeses like Monterey Jack or even a spicy pepper jack if you’re feeling adventurous.
Step-by-Step Instructions
Now that we have our ingredients, it’s time to get to the fun part! Follow these detailed steps, and you’ll have this magical dish ready in no time.
-
Cook the Pasta
Bring a large pot of salted water to a boil. Add the tri-color rotini and cook according to the package instructions until al dente (usually around 8-10 minutes). The key here is to avoid overcooking, as we want that perfect bite! Once done, drain and rinse under cold water to stop the cooking. This also cools it down quickly so we can continue assembling! -
Prepare the Dressing
In a mixing bowl, whisk together the mayonnaise, sour cream, and dry ranch dressing mix until smooth. This creamy concoction is going to coat every delicious noodle, so give it a good mix! Pro Tip: Taste the dressing here. If you like it super flavorful, consider adding a splash of lemon juice or some fresh herbs. -
Combine Ingredients
In a large mixing bowl, combine the cooled pasta, ranch dressing, chopped bacon, diced tomato, sliced olives, and shredded cheese. Gently fold the ingredients together until everything is nicely coated in that creamy dressing. No need to be too rough here. We want this to look pretty, after all! -
Chill the Salad
Cover the bowl with plastic wrap, and pop it in the fridge for at least 30 minutes to let those flavors mingle. Trust me; this is a crucial step that elevates the taste. It’ll also help if any dressings need to thicken up! -
Final Touches
Once it’s chilled, give the salad another gentle toss. Depending on personal taste, you might want to adjust seasoning with salt and pepper. Sometimes, a sprinkle of paprika gives it a great finish, or even a dash of hot sauce if you like a bit of spice!
Serving Suggestions
For a beautiful presentation, serve your Bacon Ranch Pasta Salad in a large, colorful bowl. Consider garnishing with fresh herbs like parsley or chives for a pop of color. For gatherings, individual servings look delightful in small mason jars, making it easy for guests to grab and go.
Recipe Variations
Let your creativity run wild! Here are a few fun twists to make this salad uniquely yours:
-
Mediterranean Twist: Swap bacon for sliced pepperoni or salami, and use feta cheese in place of cheddar. Add chopped cucumbers for an undeniable freshness!
-
Tex-Mex Flair: Sprinkle some cilantro, black beans, corn, and spices like cumin into the mix. Use a jalapeño ranch dressing for an extra kick!
-
Vegetarian Delight: Omit the bacon entirely and load up on extra veggies. Zucchini, bell peppers, and even avocado will elevate the dish while keeping it hearty.
-
Creamy Avocado Ranch: Replace some mayo with ripe avocado for a creamy, healthy twist. Just remember to toss it with lemon juice to keep that vibrant green color!
Chef’s Notes
As I reflect on how this recipe has evolved, I remember the early days of experimenting—adding a little of this, a splash of that—turning a simple dish into a family favorite. I once made a version with leftover grilled chicken. It was a game changer! Each time I make it, I discover new possibilities, making it hard for me to serve the same dish twice in a row. Cooking should be fun and filled with personal touches, don’t you think?
FAQs and Troubleshooting
1. Can I make this a day ahead?
Absolutely! In fact, prepping it a day in advance allows the flavors to meld beautifully. Just keep it in an airtight container in the fridge until you’re ready to serve.
2. Why does my pasta salad seem dry?
If your pasta salad appears dry, it’s likely the pasta absorbed the dressing. Simply add a little more mayo or sour cream before serving. A splash of olive oil can also refresh the dressing.
3. How do I store leftovers?
Store any leftover pasta salad in an airtight container in the fridge for up to 3 days. Keep in mind that the pasta might absorb moisture, so you might want to mix in a little extra dressing when serving.
4. What if I don’t like ranch?
No worries! This salad is versatile. You could substitute the ranch dressing with any creamy dressing you love, like Caesar or a zesty vinaigrette!
Nutritional Info
This Bacon Ranch Pasta Salad is not only delicious, but it also packs a good protein punch from the bacon and cheese. Each serving contains approximately:
- Calories: 350
- Protein: 9g
- Carbohydrates: 30g
- Fat: 22g
- Fiber: 2g
Remember, it’s all about balance—you can enjoy this treat while incorporating fresh veggies to boost the nutrition!
There you have it! The perfect recipe for Bacon Ranch Pasta Salad that speaks elegance yet feels entirely approachable. I can’t wait for you to try it and sprinkle your own magic into the mix. Until next time, my friend—keep cooking with love and gathering your loved ones around the table! Cheers!
PrintBacon Ranch Pasta Salad
A delicious and creamy Bacon Ranch Pasta Salad perfect for summer picnics and potlucks.
- Prep Time: 15 minutes
- Cook Time: 10 minutes
- Total Time: 45 minutes
- Yield: 6 servings 1x
- Category: Side Dish
- Method: Mixing
- Cuisine: American
- Diet: Vegetarian option available
Ingredients
- 12 ounces tri-color rotini pasta
- 1/2 cup mayonnaise
- 1/2 cup sour cream
- 1 ounce dry ranch dressing mix
- 8 slices cooked bacon, chopped
- 1 large tomato, diced
- 4.25-ounce can sliced black olives, drained
- 1 cup shredded cheddar cheese
Instructions
- Cook the Pasta: Bring a large pot of salted water to a boil. Add the tri-color rotini and cook according to the package instructions until al dente. Once done, drain and rinse under cold water.
- Prepare the Dressing: In a mixing bowl, whisk together the mayonnaise, sour cream, and dry ranch dressing mix until smooth.
- Combine Ingredients: In a large mixing bowl, combine the cooled pasta, ranch dressing, chopped bacon, diced tomato, sliced olives, and shredded cheese. Gently fold the ingredients together.
- Chill the Salad: Cover the bowl with plastic wrap, and pop it in the fridge for at least 30 minutes.
- Final Touches: Once chilled, give the salad another gentle toss and adjust seasoning with salt and pepper as desired.
Notes
For a lighter version, substitute Greek yogurt for mayonnaise. Feel free to add more veggies or omit the bacon for a vegetarian option.
Nutrition
- Serving Size: 1 serving
- Calories: 350
- Sugar: 5g
- Sodium: 400mg
- Fat: 22g
- Saturated Fat: 7g
- Unsaturated Fat: 10g
- Trans Fat: 0g
- Carbohydrates: 30g
- Fiber: 2g
- Protein: 9g
- Cholesterol: 30mg
Keywords: pasta salad, bacon, ranch, summer recipes, potluck, picnic