
Fourth of July Creamy BLT Pasta Salad (15-Minute BBQ Side)
Celebrate Summer with a Creamy BLT Pasta Salad
Hello, fellow foodies! As the warm breeze flutters through the garden and the scent of summer fills our kitchens, there’s one thing that’s simply perfect for any gathering — a delightful dish that marries comfort with a touch of elegance. That’s right, I’m here to share my Creamy BLT Pasta Salad recipe, one that’s bursting with summer flavors and a family favorite to boot. Perfect for 4th of July BBQs, picnics, and any outdoor soirée, this dish is as fun to prepare as it is to share!
The Allure of the Creamy BLT Pasta Salad
Growing up, summer weekends were filled with warm sun, laughter, and, of course, plenty of good food. I remember my mom hosting backyard barbecues where we’d gather around a huge picnic table, plates overflowing with all sorts of delicious dishes. The star player, however, was her creamy pasta salad. It quickly became a tradition, each year adding its own twists and turns as my mom perfectly blended flavors.
In particular, my favorite was the BLT twist. Imagine crispy bacon, juicy tomatoes, and crunchy lettuce seamlessly woven into your pasta — blissful, right? There’s something about a creamy pasta dish that instantly brings a feeling of nostalgia. Plus, it’s perfect for showcasing the ripe, juicy tomatoes straight from the garden! Let me take you through the steps to create this summertime joy in your kitchen.
Ingredients
Here’s what you’ll need for this delightful recipe:
-
12 oz (340 g) rotini pasta
The spirals hold onto the creamy dressing and bits of flavor beautifully. You can substitute with any pasta shape you have on hand — fusilli, penne, or even whole wheat pasta work here too! -
8 strips thick-cut bacon
This adds a savory crunch. If you prefer a healthier option, turkey bacon or even crispy roasted chickpeas can substitute for that delightful crunch. -
2 cups (300 g) ripe cherry tomatoes, halved
Fresh and sweet, these tomatoes add a juicy burst. Grape tomatoes can also do the trick if that’s what you have around! -
3 cups (90 g) romaine lettuce, chopped
This brings a refreshing crunch to the salad. If you’re looking for something a bit different, try baby spinach or arugula for a peppery kick. -
½ cup (120 ml) mayonnaise
This is the base for our creamy dressing. For a lighter option, use Greek yogurt or a vegan mayonnaise if you’re aiming for plant-based. -
¼ cup (60 ml) sour cream or plain Greek yogurt
A dollop of tanginess. If you’re aiming for a richer flavor, feel free to use crème fraîche. -
1 tablespoon Dijon mustard
This adds a subtle kick. If you want more sweetness, honey mustard is a great alternative! -
1 tablespoon apple cider vinegar
The acidity balances the richness of the dressing. White wine vinegar also works well! -
½ teaspoon garlic powder
For that zesty backbone. Fresh minced garlic can also be used for an extra punch. -
Salt and black pepper, to taste
Season well! Always taste as you go; seasoning is key in this salad. -
2 tablespoons fresh chives, chopped (optional)
These add a beautiful garnish and a hint of onion flavor. You can also use green onions or fresh parsley if you prefer.
Step-by-Step Instructions
Step 1: Cook the Pasta
Begin by bringing a large pot of salted water to a boil. Once boiling, add the rotini pasta. Cook according to package instructions until al dente, typically around 8-10 minutes. Tip: Reserve about half a cup of pasta water before draining — it’s liquid gold for adjusting the texture of your dressing!
Step 2: Prepare the Bacon
While your pasta cooks, let’s get that bacon sizzling! In a large skillet over medium heat, cook the bacon strips until they’re crispy, about 5-7 minutes. Once they’re golden, transfer them to a paper towel-lined plate to cool. Chef Hack: Instead of discarding the bacon grease, you can use a tablespoon of it for added flavor in your dressing!
Step 3: Combine the Dressing
In a large mixing bowl, whisk together the mayonnaise, sour cream (or Greek yogurt), Dijon mustard, apple cider vinegar, and garlic powder. Add salt and pepper to taste. If the dressing feels too thick, add a bit of the reserved pasta water to help loosen it up. Tip: Taste the dressing to ensure it suits your palate — adjust seasoning as needed!
Step 4: Chop and Mix
Chop your cooled bacon into bite-sized pieces and prepare the tomatoes and lettuce. Add the cooked and drained pasta to the bowl of dressing, tossing gently to coat. Then add in the bacon, cherry tomatoes, and chopped romaine lettuce. Give it all a gentle stir until everything is well combined.
Step 5: Chill and Enjoy
Cover the bowl with plastic wrap or transfer to an airtight container. Allow the pasta salad to chill in the refrigerator for at least 30 minutes. This resting time allows the flavors to meld beautifully! Chef Tip: The salad keeps well for 3 days in the fridge, so this can be made in advance for a stress-free gathering.
Serving Suggestions
To serve, plate the pasta salad in a pretty bowl, garnishing with fresh chives on top. For an elevated touch, consider serving it in individual mason jars for a fun, portable presentation, great for picnics! Pair it with grilled chicken or shrimp for a complete meal.
Recipe Variations
-
Mediterranean Twist: Substitute bacon with crumbled feta and add kalamata olives, diced cucumbers, and bell peppers. Drizzle with a lemon-oregano dressing for a refreshing change!
-
Creamy Avocado BLT: Incorporate cubed ripe avocado into the salad for extra creaminess and healthy fats.
-
Spicy BLT Salad: Add a kick! Toss in some diced jalapeños or a touch of sriracha in your dressing for a spicy spin.
-
Vegan Delight: Use plant-based bacon, vegan mayo, and coconut yogurt for a delicious dairy-free option.
-
Herb-Infused: Experiment with fresh herbs like basil or dill for a unique flavor profile!
Chef’s Notes
As I mentioned, this pasta salad is a staple from my childhood summers. It’s a dish that grows and evolves with the seasons and ingredients available. I love tinkering with it, whether adding seasonal veggies or switching up the dressing flavors! Just the other day, I added some roasted corn, and it took me right back to those summer BBQs. Sometimes, it’s the simplest recipes that hold the most precious memories.
FAQs and Troubleshooting
Q: Can I make this pasta salad ahead of time?
A: Absolutely! It actually tastes better after sitting a bit as the flavors meld together. Just store it in an airtight container in the fridge for up to 3 days.
Q: My pasta salad seems too dry, what do I do?
A: No worries! Just add some reserved pasta water or a splash of milk to loosen it up. The creamy dressing should cling nicely without being heavy.
Q: Can I use other vegetables in this salad?
A: Yes! Feel free to toss in your favorites — bell peppers, cucumbers, or even sweet corn can add wonderful flavors and colors to your salad.
Q: How do I prevent my pasta from getting mushy?
A: Make sure to cook the pasta al dente; it should have a slight bite to it. Rinse it with cold water after draining to stop the cooking process and avoid it getting mushy.
Nutritional Info (per serving)
- Calories: 280
- Protein: 9g
- Carbohydrates: 30g
- Fat: 14g
There you have it! A creamy, comforting BLT pasta salad that’s perfect for summer gatherings. Here’s to good food, good friends, and creating beautiful moments around the table. Grab your apron, pour a refreshing lemonade, and let’s get cooking! Enjoy every bite!
PrintCreamy BLT Pasta Salad

A delightful BLT pasta salad bursting with summer flavors, perfect for gatherings and picnics.
- Prep Time: 15 minutes
- Cook Time: 15 minutes
- Total Time: 30 minutes
- Yield: 4 servings 1x
- Category: Salad
- Method: Chilling
- Cuisine: American
- Diet: Pescatarian
Ingredients
- 12 oz (340 g) rotini pasta
- 8 strips thick-cut bacon
- 2 cups (300 g) ripe cherry tomatoes, halved
- 3 cups (90 g) romaine lettuce, chopped
- ½ cup (120 ml) mayonnaise
- ¼ cup (60 ml) sour cream or plain Greek yogurt
- 1 tablespoon Dijon mustard
- 1 tablespoon apple cider vinegar
- ½ teaspoon garlic powder
- Salt and black pepper, to taste
- 2 tablespoons fresh chives, chopped (optional)
Instructions
- Begin by bringing a large pot of salted water to a boil. Once boiling, add the rotini pasta. Cook according to package instructions until al dente, typically around 8-10 minutes. Reserve about half a cup of pasta water before draining.
- While your pasta cooks, in a large skillet over medium heat, cook the bacon strips until crispy, about 5-7 minutes. Transfer to a paper towel-lined plate to cool.
- In a large mixing bowl, whisk together the mayonnaise, sour cream, Dijon mustard, apple cider vinegar, and garlic powder. Add salt and pepper to taste. If the dressing feels too thick, add a bit of the reserved pasta water.
- Chop your cooled bacon into bite-sized pieces and prepare the tomatoes and lettuce. Add the cooked and drained pasta to the bowl of dressing, tossing gently to coat. Then add in the bacon, cherry tomatoes, and chopped romaine lettuce. Stir until well combined.
- Cover the bowl with plastic wrap or transfer to an airtight container. Allow the pasta salad to chill in the refrigerator for at least 30 minutes.
Notes
This pasta salad is even better when made ahead, allowing the flavors to meld. Stores well for up to 3 days.
Nutrition
- Serving Size: 1 serving
- Calories: 280
- Sugar: 4g
- Sodium: 800mg
- Fat: 14g
- Saturated Fat: 4g
- Unsaturated Fat: 8g
- Trans Fat: 0g
- Carbohydrates: 30g
- Fiber: 3g
- Protein: 9g
- Cholesterol: 30mg
Keywords: pasta salad, summer recipes, BBQ, picnic recipes
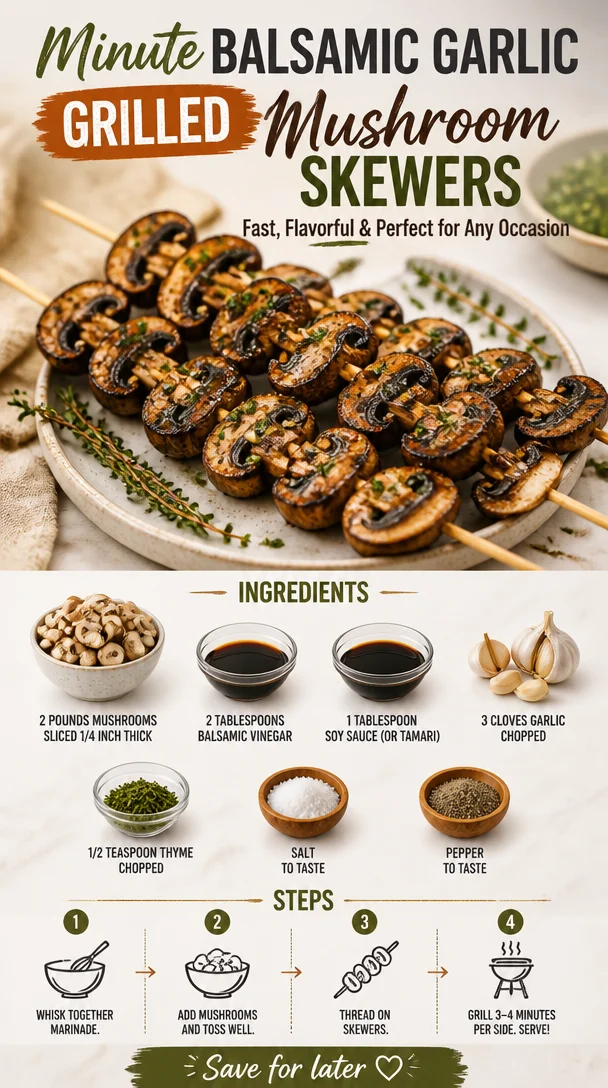
Minute Balsamic Garlic Grilled Mushroom Skewers
Balsamic Garlic Grilled Mushroom Skewers: A Friendly Guide to Flavorful Cooking
Introduction
Hello, fellow foodies! If you’re anything like me, when it comes to grilling, you might be inclined to think that it’s all about the meats. But let me tell you, there’s a whole world of flavor to be discovered with vegetables, especially when you bring mushrooms into the mix. Today, I’m so excited to share with you my favorite recipe for Balsamic Garlic Grilled Mushroom Skewers—a dish that’s earthy, savory, and absolutely perfect for the grill!
I remember the first time I decided to swap out the usual burgers for something that truly celebrates plant-based flavors. It was an impromptu barbecue at a friend’s place. I had a craving for something hearty but not meat-centric. As I stood there, gazing at a basket of fresh mushrooms, the idea struck! I whisked together balsamic vinegar, garlic, and a touch of soy sauce, and before I knew it, these grilled skewers became the star of the show. The way the mushrooms soaked up that marinade and developed a smoky, rich flavor left everyone raving about them.
These bad boys aren’t just delicious; they’re also super easy to whip up, making them perfect for any occasion—whether you’re hosting a dinner party, enjoying a light meal, or just grilling out with friends. Plus, they’re versatile enough to complement any main dish or serve as a fantastic appetizer. So grab your skewers, and let’s get cooking!
Personal Story
Growing up, my family had a tradition of prepped meals on the weekends, where we would gather together in the kitchen, chopping, stirring, and, of course, taste-testing. One weekend, it was all about the grill. Everyone had a hand in preparing our favorites. My dad was in charge of the steaks, while my mom tossed together her famous grilled veggies. That weekend was so special; we laughed, shared stories, and just savored the time together.
As we lined our plates with various grilled items, I suddenly had an idea: "Why not try throwing some mushrooms on the grill?" The skeptical looks turned into excitement as I quickly marinated them in a balsamic garlic mixture. The result was a hit! They were so flavorful and juicy that they became a must-have at every barbecue thereafter. Even today, anytime I fire up the grill, I think back to those warm, sunny afternoons filled with laughter and the smoky aroma of grilled goodness wafting through the air.
Ingredients
For these delicious Balsamic Garlic Grilled Mushroom Skewers, you will need the following:
-
2 pounds mushrooms, sliced 1/4 inch thick
These can be button, portobello, or cremini mushrooms. Each type brings its unique texture and flavor! For a gluten-free option, ensure your soy sauce or tamari is certified gluten-free. -
2 tablespoons balsamic vinegar
This is the star of the dish! It adds a beautiful tang and depth of flavor. If you want to switch things up, try a flavored balsamic, like fig or raspberry. -
1 tablespoon soy sauce (or tamari)
This adds umami to the mushrooms. Tamari is a great gluten-free alternative. -
3 cloves garlic, chopped
Fresh garlic gives a lovely aroma and spice. If you’re feeling adventurous, roasted garlic can add a sweeter, mellower flavor! -
1/2 teaspoon thyme, chopped
Thyme complements the earthiness of the mushrooms beautifully. Fresh is best, but if you only have dried thyme, use about a third of the amount. -
Salt and pepper to taste
Always season with salt and pepper; they enhance the flavors of the other ingredients.
Step-by-Step Instructions
-
Prepping the Marinade
In a medium bowl, whisk together the balsamic vinegar, soy sauce, chopped garlic, thyme, and a pinch of salt and pepper. You want to create a harmonious blend of flavors that will soak into the mushrooms beautifully. Don’t be shy—give it a good whisking to fully incorporate those garlicky goodness and tangy notes. -
Marinating the Mushrooms
Add in the sliced mushrooms, tossing them gently but thoroughly in the marinade. The goal here is to coat each piece evenly—think of them having a lovely balsamic hug! Let them marinate for at least 30 minutes at room temperature. If you’re prepping ahead, you can throw them in the fridge for up to 2 hours. Just remember to bring them back to room temperature before grilling. -
Skewering the Shrooms
Preheat your grill (or a grill pan) to medium-high heat. While the grill heats up, start threading the marinated mushrooms onto skewers. You can use metal or soaked wooden skewers—just make sure to leave a little space between the mushrooms for those beautiful grill marks and even cooking! If you’re using wooden skewers, remember to soak them in water for about 30 minutes so they won’t burn on the grill. -
Grilling Perfection
Place the skewers on the grill. Grill them for about 5–7 minutes per side, turning them halfway through. Keep an eye out for those gorgeous grill marks that bring some serious flavor! The mushrooms should be tender and slightly charred. You’ll know they are done when they become juicy and soften but still hold their shape. -
Serve and Enjoy
Once off the grill, let the skewers rest for a couple of minutes. This helps retain the lovely juices! Drizzle any leftover marinade over the skewers for an extra burst of flavor. You can serve them directly on the skewers for a rustic touch or plate them up with a sprinkle of fresh herbs or a dash of extra balsamic for an elevated presentation.
Serving Suggestions
These mushroom skewers are fantastic on their own, but they also play well with others! Serve them alongside grilled vegetables for a colorful platter, or pair them with a light salad and crusty bread for a full meal. If you’re feeling a little fancy, sprinkle some shaved parmesan or crumbled feta on top, or pair them with rosemary-infused olive oil for dipping.
Recipe Variations
- Herb Adventure: Swap out the thyme for rosemary or oregano for a different herb profile that brings out new flavors.
- Spice It Up: Add a sprinkle of red pepper flakes to the marinade for a spicy kick!
- Umami Boost: Add a teaspoon of miso paste for a deeper umami flavor.
- Sweet and Savory: Drizzle some honey or maple syrup in the marinade for a sweet twist on this savory dish.
- Cheesy Delight: Toss some feta crumbles on top before serving for that creamy, tangy goodness.
Chef’s Notes
One of my favorite things about this recipe is how it has evolved over time. Initially, I kept it super simple, but then I started experimenting with different marinades and flavors. I’ve had friends ask to swap out mushrooms for other veggies like zucchini or bell peppers, and let me tell you, the results are fantastic. The key is finding the right marinade balance to complement whatever veggie you choose! It’s all about embracing creativity in the kitchen.
Oh, and let me share a funny memory revolving around this dish. During one of my first attempts at grilling with friends, I decided to multitask and ended up with charred mushrooms and laughing friends. Their comments, “Well, at least they’re crispy!” has stuck with me. Now, I’m always adamant about keeping an eye on the grill!
FAQs and Troubleshooting
-
Why did my mushrooms turn out tough?
If you grill mushrooms too long or at too high a heat, they can become rubbery. Aim for medium heat and a good 5–7 minutes per side. -
Can I use other vegetables?
Absolutely! Bell peppers, zucchini, and cherry tomatoes also grill beautifully. Just be mindful of timing since different vegetables have different grilling durations. -
How do I store leftover skewers?
Store any leftovers in an airtight container in the fridge for up to three days. They’re delightful in salads or as a topping for grain bowls. -
What can I do with the leftover marinade?
If you’ve grilled the mushrooms, it’s best to discard the leftover marinade for safety. However, if you’re marinating fresh veggies, it makes a great salad dressing after a quick whisking!
Nutritional Info (Optional)
While I don’t usually dive deep into the nitty-gritty of nutritional info, these skewers are a powerhouse of flavor and health! They offer a good source of fiber, vitamins, and minerals without compromising on taste.
Now that you have the complete rundown, it’s time to grab those mushrooms, fire up the grill, and bring some stunning flavors to your table. I hope you enjoy making these Balsamic Garlic Grilled Mushroom Skewers as much as I do. Let me know how yours turn out—I can’t wait to hear your kitchen stories! Happy cooking!
PrintBalsamic Garlic Grilled Mushroom Skewers
Delicious and earthy Balsamic Garlic Grilled Mushroom Skewers, perfect for grilling occasions.
- Prep Time: 15 minutes
- Cook Time: 15 minutes
- Total Time: 30 minutes
- Yield: 4 servings 1x
- Category: Appetizer
- Method: Grilling
- Cuisine: Vegetarian
- Diet: Vegetarian
Ingredients
- 2 pounds mushrooms, sliced 1/4 inch thick
- 2 tablespoons balsamic vinegar
- 1 tablespoon soy sauce (or tamari)
- 3 cloves garlic, chopped
- 1/2 teaspoon thyme, chopped
- Salt and pepper to taste
Instructions
- Whisk together the balsamic vinegar, soy sauce, chopped garlic, thyme, and a pinch of salt and pepper in a medium bowl.
- Add the sliced mushrooms and toss them gently in the marinade, letting them marinate for at least 30 minutes.
- Preheat your grill to medium-high heat and thread the marinated mushrooms onto skewers.
- Grill the skewers for about 5–7 minutes per side, until tender and slightly charred.
- Let the skewers rest for a couple of minutes before serving, drizzling any leftover marinade over them.
Notes
Store leftovers in an airtight container for up to three days. This recipe can also be adapted with other vegetables.
Nutrition
- Serving Size: 1 serving
- Calories: 250
- Sugar: 5g
- Sodium: 300mg
- Fat: 7g
- Saturated Fat: 1g
- Unsaturated Fat: 6g
- Trans Fat: 0g
- Carbohydrates: 26g
- Fiber: 4g
- Protein: 8g
- Cholesterol: 0mg
Keywords: mushroom skewers, grilled vegetables, balsamic garlic