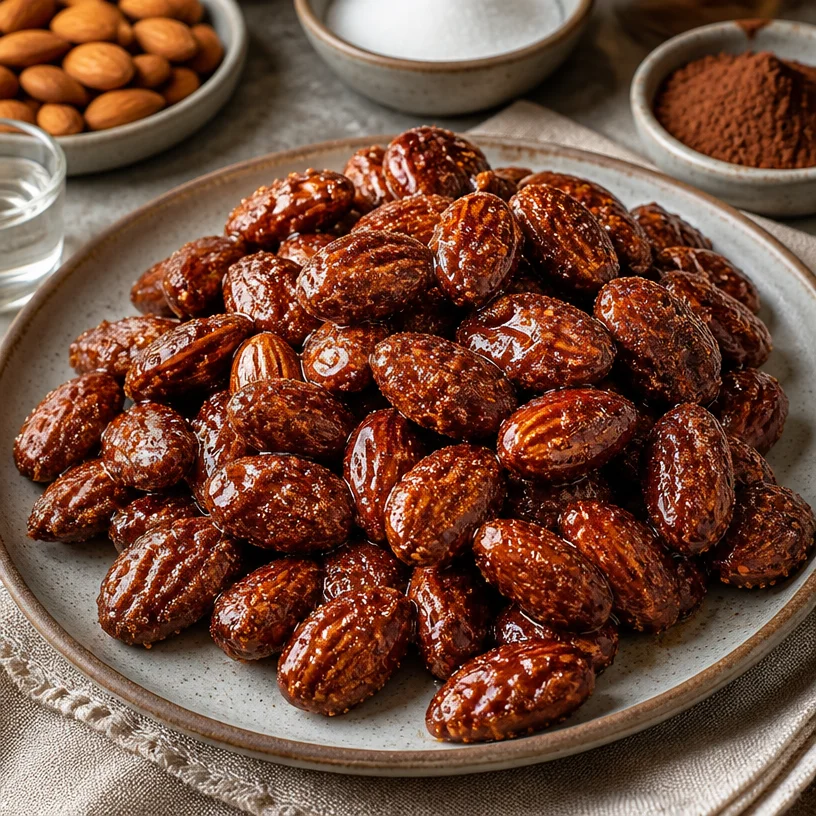
Beginner-Friendly 5-Ingredient No-Bake Almond Pralines
The Sweet Symphony of Almond Pralines: A Delightful Recipe
Hello, fellow foodies! Today, I’m bringing you a recipe that is close to my heart and has been a cherished part of my kitchen repertoire: Almond Pralines. These delightful treats are not just simple to make; they also carry with them a deliciously rich flavor that can brighten any day. There’s something magical about the crunch of the almonds coated in a sweet, caramelized sugar that just evokes joy. Let’s get ready to create this sweet treat that’s perfect for sharing or enjoying on your own—because we all deserve a little indulgence now and then!
A Personal Taste of Nostalgia
I remember the first time I made Almond Pralines like it was yesterday. I was a teenager, freshly inspired by a cooking show I had binge-watched over the weekend. My friends were coming over for a movie night, and I wanted to impress them with something sweet that wasn’t just store-bought cookies. So, I rallied my courage and gathered the ingredients. With a little guidance from my mom, I stirred the bubbling sugar mixture while keeping an eye on the almond-toasting process.
When I finally pulled those golden, crunchy nuggets from the pan and let them cool, the pride I felt was palpable! I remember watching my friends’ eyes widen in delight as they tasted the pralines. That night, laughter filled the kitchen, and the smell of warm caramel clung to the air. From that moment on, those Almond Pralines became a staple for all gatherings: birthdays, holidays, or just a Wednesday night. Each batch spurred new memories, confirming that food truly is a love language.
Ingredients You’ll Need
Now, let’s gather the ingredients for these delectable Almond Pralines. Here’s what you’ll need:
-
250 g – 1 ¾ cups almonds (unpeeled)
Unsalted almonds work best for this recipe. If you prefer a toasted flavor, feel free to toast them lightly in the oven before starting the praline process. You can also swap in other nuts, but the classic crunchy almond is my favorite! -
250 g – 1 ¼ cups granulated sugar
This is the backbone of our praline! For a less sweet version, you might experiment with coconut sugar, but it will give a different flavor profile. Always use a fine-grained sugar for the best texture. -
1 tsp cocoa powder
This ingredient adds a hint of depth to the flavors without dominating the taste. Feel free to skip it if you’re in the mood for a purely nutty flavor, or use a dash of cinnamon for a warm kick! -
1 tbsp water
Water helps in melting the sugar and creating the syrup. You can use a splash of your favorite liqueur instead for a fun twist, just remember to keep the proportions similar!
Step-by-Step Instructions
Ready to create something magical? Let’s dive into making these Almond Pralines!
-
Prepare Your Workspace:
Before you start cooking, make sure your counter is clear. Gather all your ingredients, and keep your utensils handy, including a spatula and a baking sheet lined with parchment paper. This step saves you from scrambling later! -
Toast the Almonds (Optional):
If you’re toasting your almonds, preheat your oven to 350°F (175°C). Spread the almonds on a baking sheet in a single layer and toast them for about 10 minutes, or until they are golden fragrant, stirring halfway. Keep a close eye on them; burnt almonds are no fun! Keep them to the side to cool while you prepare the sugar mixture. -
Make the Sugar Syrup:
In a medium saucepan, combine the sugar, cocoa powder, and water. Stir it together until well combined, and then place it over medium heat. As the mixture begins to heat, don’t stir! Instead, let the sugar dissolve naturally as it bubbles. Watch closely until the mixture turns a lovely amber color. This can take about 5-10 minutes, so don’t get distracted. If you’re unsure, use a candy thermometer—you’re aiming for about 240°F (115°C), the soft ball stage. -
Add the Almonds:
Once your sugar syrup reaches that gorgeous golden hue, remove it from the heat immediately. Quickly add the almonds, stirring to coat them evenly in that luscious syrup. Be careful; it’s hot! The mixture will be sticky and gooey—perfect! -
Cool and Set:
Immediately pour the nut mixture onto the lined baking sheet and spread it out into a thin layer. Let it cool completely at room temperature. Once it’s hardened, you can break it into pieces. The pralines should be chunky and irregular for that homemade charm, but you can always chop them more finely if you prefer tiny bits! -
Enjoy or Store:
These Almond Pralines can be enjoyed right away, but they also store beautifully in an airtight container for up to two weeks. Just make sure they’re completely cool before sealing!
Serving Suggestions
When it comes to serving these Almond Pralines, I always love to place them in a beautiful bowl on the table for everyone to share. You can also garnish your dessert plates with a sprinkle of sea salt or a dusting of powdered sugar for an elegant touch. Think about adding them to a cheese platter or enjoying them with a scoop of vanilla ice cream for a delightful dessert duo!
Recipe Variations
Want to switch things up a bit? Here are a few creative twists and dietary swaps you can try:
-
Chocolate-Covered Almonds: After the pralines cool, dip them in melted dark chocolate for an indulgent treat!
-
Spiced Pralines: Add a pinch of cayenne or nutmeg for a spicy twist that will surprise your taste buds.
-
Nut-Free Option: Substitute the almonds with sunflower seeds for a nut-free version that’s still crunchy and delightful!
-
Maple Pralines: Use maple sugar instead of granulated sugar for a unique, earthy flavor profile.
-
Dairy-Free: Keep it dairy-free by ensuring all ingredients, especially any suggested substitutes, are labeled dairy-free.
Chef’s Notes
Every time I make these Almond Pralines, I’m reminded of how simple ingredients can create something so delightful. I’ve played around with different nut varieties and flavorings, occasionally even adding a touch of sea salt to the hot mixture for a sweet-and-salty kick. The best part? People always remember the first time they tried these little nuggets of joy! They are the perfect conversation starter for any gathering.
FAQs and Troubleshooting
Q: What do I do if my sugar crystallizes?
A: If your sugar mixture starts to crystallize, try lowering the heat and stirring it gently. A little bit of corn syrup in the initial mix can also help prevent crystallization.
Q: Can I use blanched almonds?
A: Absolutely! Blanched almonds will give you a slightly different texture since they won’t have the skin, but they’ll still be delicious.
Q: How can I store these pralines?
A: Store them in an airtight container at room temperature. If they start to get sticky, a bit of wax paper between layers can help.
Q: My pralines are too hard; what did I do wrong?
A: If your syrup cooked too long, it could lead to hard, crunchy pralines. Cooking them to the soft ball stage will give you that melt-in-your-mouth texture you crave!
Nutritional Info (optional)
While I love reaching for these treats now and then, remember that moderation is key. Each praline is packed with nutrients from almonds while being a sugar-laden delight. Balancing your indulgences is always a good approach!
Well, there you have it—your deep dive into the world of Almond Pralines! I hope you find as much joy in making (and sharing) these sweet treats as I do. Tie on your apron, crank up some music, and let’s bring a little sweetness into our kitchens and lives! Happy cooking!
PrintAlmond Pralines

Delightfully rich Almond Pralines, coated in sweet caramelized sugar, perfect for sharing or indulging on your own.
- Prep Time: 10 minutes
- Cook Time: 15 minutes
- Total Time: 25 minutes
- Yield: 12 servings 1x
- Category: Dessert
- Method: Baking
- Cuisine: American
- Diet: Vegetarian
Ingredients
- 250 g – 1 ¾ cups unsalted almonds (unpeeled)
- 250 g – 1 ¼ cups granulated sugar
- 1 tsp cocoa powder
- 1 tbsp water
Instructions
- Prepare your workspace by gathering all your ingredients and utensils, including a spatula and a lined baking sheet.
- Toast the almonds by preheating your oven to 350°F (175°C) and spreading them on a baking sheet for about 10 minutes until golden.
- Make the sugar syrup by combining sugar, cocoa powder, and water in a medium saucepan and heating over medium heat without stirring.
- Add the almonds to the syrup once it reaches a golden hue, stirring to coat them evenly.
- Cool the mixture by pouring it onto a lined baking sheet and spreading it into a thin layer, then let it cool completely.
- Enjoy the Almond Pralines immediately or store them in an airtight container for up to two weeks.
Notes
For a chocolate twist, dip cooled pralines in melted dark chocolate. Experiment with different nuts and spices for unique flavors.
Nutrition
- Serving Size: 1 praline
- Calories: 150
- Sugar: 12g
- Sodium: 1mg
- Fat: 7g
- Saturated Fat: 0.5g
- Unsaturated Fat: 6g
- Trans Fat: 0g
- Carbohydrates: 18g
- Fiber: 2g
- Protein: 3g
- Cholesterol: 0mg
Keywords: Almond, Pralines, Dessert, Sweet Treats, Caramel
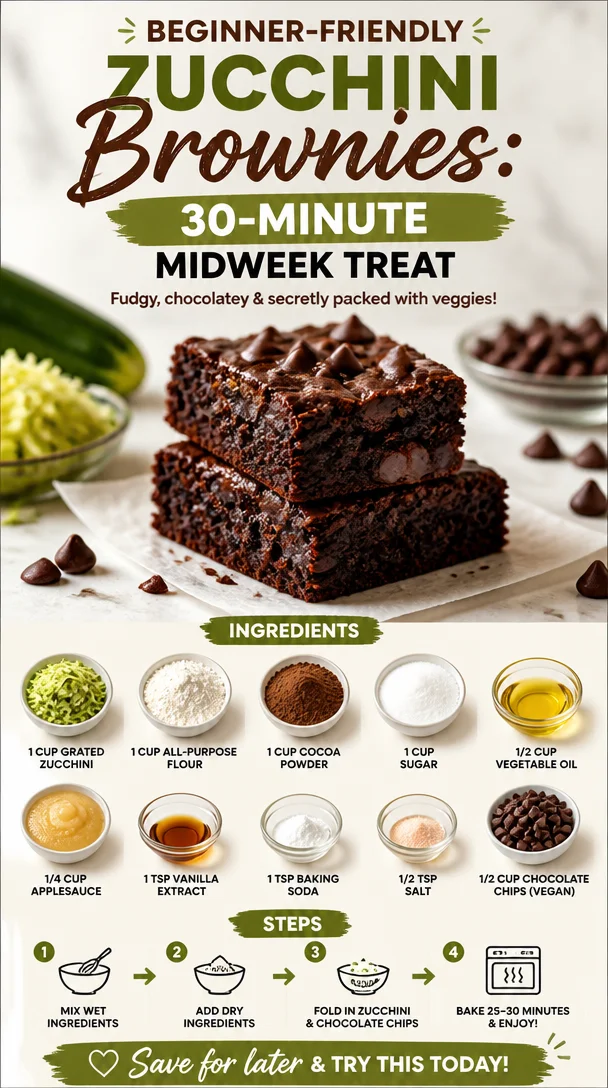
Beginner-friendly Zucchini Brownies: 30-Minute Midweek Treat
Zucchini Brownies: A Deliciously Surprising Treat
Hey there, foodie friends! Are you ready to dive into a dessert that will change the way you think about vegetables? Today, we’re whipping up Zucchini Brownies — a delightful twist on a classic favorite that’s not just indulgent but also surprisingly good for you! Whenever I think of brownies, I can’t help but reminisce about those blissful afternoons spent in my grandmother’s kitchen, sneaking spoonfuls of warm batter from the bowl. It was a sacred ritual that filled the air with sweet, chocolatey goodness.
Brownies have a special place in my heart, and I believe every kitchen should have a go-to brownie recipe. But wait! What if I told you that we could sneak some greens in without compromising that rich chocolaty flavor? That’s right! Zucchini is our secret weapon here, adding moisture and a subtle sweetness while remaining completely undetectable. You might even find yourself in a happy debate over whether zucchini deserves its spot in dessert land.
As we journey through this recipe, I invite you to embrace the unexpected and delight in the whimsical nature of cooking. Grab your apron, gather your ingredients, and let’s create something magical together!
A Little Kitchen Story
Let me take you back to a sunny afternoon in my childhood. Picture this: my grandmother, donned in her favorite apron, exuded warmth as she reigned over her domain — the kitchen. The comforting aroma of chocolate was intoxicating. I stood on a stool beside her, eager to learn her secret brownie techniques. I watched as she combined rich cocoa powder, sugar, and butter, the mixture bubbling joyously in the bowl.
One day, while rummaging through the fridge, she pulled out a surprising addition: zucchini! I was skeptical, to say the least. “Zucchini in brownies? No way!” But her reassuring smile melted my doubts. “Trust me, dear.” And trust her I did! The result was a batch of gooey, fudgy brownies that were every bit as indulgent as they were mysterious.
Now, every time I whip up a batch of Zucchini Brownies, I fondly think of Grandma and her surprising little twist. They’ve become a beloved family recipe, proving that you can sneak in the good stuff while keeping the rich and decadent flavor we all crave. This recipe is about more than just baking; it’s about creating memories and inviting loved ones to partake in your culinary adventures.
Ingredients
Let’s talk about the stars of the show! Here’s what you’ll need to recreate these delightful Zucchini Brownies:
-
1 cup grated zucchini
Zucchini adds moisture and a hint of sweetness without being detectable. You can substitute it with shredded carrots for a different flavor, though the texture may vary slightly. -
1 cup all-purpose flour
A basic but essential ingredient, providing structure. For a gluten-free version, you can use a 1:1 gluten-free flour blend, and the result should still be delightful. -
1 cup cocoa powder
This rich cocoa powder is what gives our brownies that signature chocolate flavor. Use Dutch-processed cocoa for a deeper flavor, or if you’re feeling adventurous, try a blend of dark and regular cocoa! -
1 cup sugar
Sweetness is key in brownies! You can use organic cane sugar, brown sugar for a hint of caramel, or even coconut sugar for a healthier option if you prefer. -
1/2 cup vegetable oil
This keeps the brownies moist and fudgy. You can use melted coconut oil for a wonderful flavor twist, or swap it for unsweetened applesauce for a lighter version, but keep that in mind since it will change the texture slightly. -
1/4 cup applesauce
This adds additional moisture and helps cut down on oil. Feel free to use homemade or store-bought. If you want to keep things simple, just double the vegetable oil. -
1 tsp vanilla extract
Vanilla brings all the flavors together in harmony. Make sure to use real vanilla extract for the best flavor — it makes a big difference! -
1 tsp baking soda
Our leavening agent that will help the brownies rise to the occasion. Don’t substitute with baking powder; they have different leavening properties. -
1/2 tsp salt
A crucial element that enhances all the flavors. It may sound small, but a pinch of salt balances the sweetness beautifully. -
1/2 cup chocolate chips (vegan)
These are the cherry on top! Choose vegan chocolate chips if you’re keeping it dairy-free. You can also use white chocolate chips or nuts for a different flavor profile.
Step-by-Step Instructions
Now that we have our ingredients lined up, let’s dive into the baking process! Trust me, this is going to be a breeze.
-
Preheat Your Oven
Start by preheating your oven to 350°F (175°C). This step is crucial for achieving that perfect fudgy texture in your brownies. While the oven heats up, line an 8-inch square baking pan with parchment paper for easy removal later. -
Prepare the Zucchini
Wash and grate your zucchini; a box grater works wonders here! Don’t worry about peeling it; the skin packs a ton of nutrients. After grating, squeeze out any excess moisture using a clean kitchen towel. This prevents the brownies from getting too soggy. -
Mix the Wet Ingredients
In a large mixing bowl, combine the vegetable oil, applesauce, sugar, and vanilla extract. Whisk them together until it’s smooth and all the ingredients are well combined. Feel free to let loose here — mix with joy! -
Add the Dry Ingredients
Next up, sift in the flour, cocoa powder, baking soda, and salt. Sifting helps prevent clumps and ensures even distribution of the dry ingredients. Gently fold the mixture using a spatula until just combined. Avoid over mixing; we’re aiming for tender brownies here! -
Incorporate the Zucchini and Chocolate Chips
Gently fold in the grated zucchini and 1/2 cup of chocolate chips until evenly distributed. You can reserve a few chips to sprinkle on top for that irresistible melty finish! -
Pour the Mixture into the Baking Pan
Spread the brownie batter evenly in the greased baking pan, using a spatula to smooth out the top. Don’t worry about perfection; those little imperfections add character! -
Bake to Perfection
Slide the pan into the preheated oven and bake for 25-30 minutes or until a toothpick inserted in the center comes out with a few moist crumbs. Remember, it’s better to underbake slightly for a fudgy texture! -
Cool and Serve
Once baked, remove the brownies from the oven and let them cool in the pan for about 10 minutes. Then, carefully lift them out using the parchment paper and let them cool completely on a wire rack. This helps set the fudgy texture; patience is key! -
Slice and Enjoy
Once cooled, slice into squares (or rectangles, if you’re feeling fancy) and serve. Optional but recommended: dust with powdered sugar for some extra flair!
Serving Suggestions
When it comes to serving these Zucchini Brownies, a little creativity goes a long way! Consider presenting them warm with a scoop of vanilla ice cream or a dollop of whipped cream on top. If you want to impress, drizzle some melted dark chocolate over the brownies for that “wow” factor. You could even sprinkle some crushed nuts or sea salt on top for added texture and flavor. These brownies can be enjoyed on their own or with a freshly brewed cup of coffee for that cozy afternoon treat!
Recipe Variations
Ready to mix things up? Here are a few fun ideas to personalize your Zucchini Brownies:
- Nutty Bliss: Fold in 1/2 cup of chopped walnuts or pecans for a crunchy texture that complements the brownies beautifully.
- Minty Fresh: Add 1 tsp of peppermint extract for a refreshing mint chocolate brownie twist!
- Fruity Addition: Throw in a handful of dried cherries or cranberries to add a sweet and tangy fruit element.
- Spicy Kick: For a fall-inspired treat, add a pinch of cinnamon or pumpkin spice for warmth and depth.
- Swaps for the Health-Conscious: Substitute half the sugar with a natural sweetener like maple syrup or agave nectar for a healthier version.
Chef’s Notes
Ah, the beauty of Zucchini Brownies! They bring all sorts of delicious memories and a few funny kitchen stories along. I once attempted to bake these brownies for a friend’s birthday party and realized I had run out of cocoa powder! In a moment of creativity, I used dark chocolate bars melted down instead, and guess what? They turned out even better than the original recipe! This little mishap reminded me that sometimes the best recipes evolve through experimentation.
Every time I bake these brownies, I think about how far they’ve come from my grandmother’s original recipe — add a little zucchini here, a dash of this there — and it has become a sweet tradition in my family. I love seeing how each batch brings joy to others as they indulge in the rich flavors.
FAQs and Troubleshooting
Why are my brownies dry?
Dry brownies can result from overbaking. Always keep an eye on them and test with a toothpick for gooeyness. Slightly underbaking can give you a more fudgy brownie.
Can I make these brownies ahead of time?
Absolutely! Zucchini Brownies store well in an airtight container for up to 3 days at room temperature. For longer storage, try freezing them for up to a month.
What can I substitute for eggs?
Although this recipe does not contain eggs, if you ever have a version that does, you could replace each egg with 1/4 cup of unsweetened applesauce or 1/4 cup of mashed banana for moisture.
What if I can’t find vegan chocolate chips?
If you can’t find vegan chocolate chips, feel free to finely chop up your favorite chocolate bar. Just ensure it’s dairy-free!
Nutritional Info
While I love focusing on taste and experience rather than strict nutrition, it’s worth noting that these Zucchini Brownies carry health benefits thanks to the zucchini! They’re a great source of vitamins while still satisfying that sweet tooth. Each brownie (based on 16 servings) contains approximately:
- Calories: 130
- Carbohydrates: 22g
- Protein: 2g
- Fat: 5g
- Fiber: 1g
Keep in mind these values can vary based on ingredient choices.
So there you have it, my dear kitchen companions! Zucchini Brownies are not just a delicious dessert; they’re a canvas for creativity and a testament to how we can embrace the unexpected in our kitchens. The next time you’re tempted to sneak a veggie into a dessert, I say go for it — you may just create a new favorite recipe that your family will cherish for years to come. Happy baking! 🍫✨
PrintZucchini Brownies

A delightful twist on classic brownies, incorporating zucchini for added moisture and sweetness.
- Prep Time: 15 minutes
- Cook Time: 30 minutes
- Total Time: 45 minutes
- Yield: 16 servings 1x
- Category: Dessert
- Method: Baking
- Cuisine: American
- Diet: Vegetarian; Vegan
Ingredients
- 1 cup grated zucchini
- 1 cup all-purpose flour
- 1 cup cocoa powder
- 1 cup sugar
- 1/2 cup vegetable oil
- 1/4 cup applesauce
- 1 tsp vanilla extract
- 1 tsp baking soda
- 1/2 tsp salt
- 1/2 cup chocolate chips (vegan)
Instructions
- Preheat your oven to 350°F (175°C) and line an 8-inch square baking pan with parchment paper.
- Prepare and grate your zucchini, then squeeze out excess moisture using a clean towel.
- Mix the vegetable oil, applesauce, sugar, and vanilla in a large bowl until smooth.
- Add the flour, cocoa powder, baking soda, and salt, sifting them into the bowl and folding gently until just combined.
- Incorporate the grated zucchini and chocolate chips until evenly distributed.
- Pour the batter into the prepared baking pan and spread evenly.
- Bake for 25-30 minutes, testing with a toothpick for doneness.
- Cool for about 10 minutes in the pan before transferring to a wire rack to cool completely.
- Slice into squares and serve, optionally dusted with powdered sugar.
Notes
For added creativity, try mixing in nuts, mint extract, or dried fruits. Store in an airtight container for up to 3 days.
Nutrition
- Serving Size: 1 brownie
- Calories: 130
- Sugar: 12g
- Sodium: 200mg
- Fat: 5g
- Saturated Fat: 1g
- Unsaturated Fat: 4g
- Trans Fat: 0g
- Carbohydrates: 22g
- Fiber: 1g
- Protein: 2g
- Cholesterol: 0mg
Keywords: Zucchini Brownies, Dessert, Vegan Brownies, Healthy Brownies, Chocolate Dessert