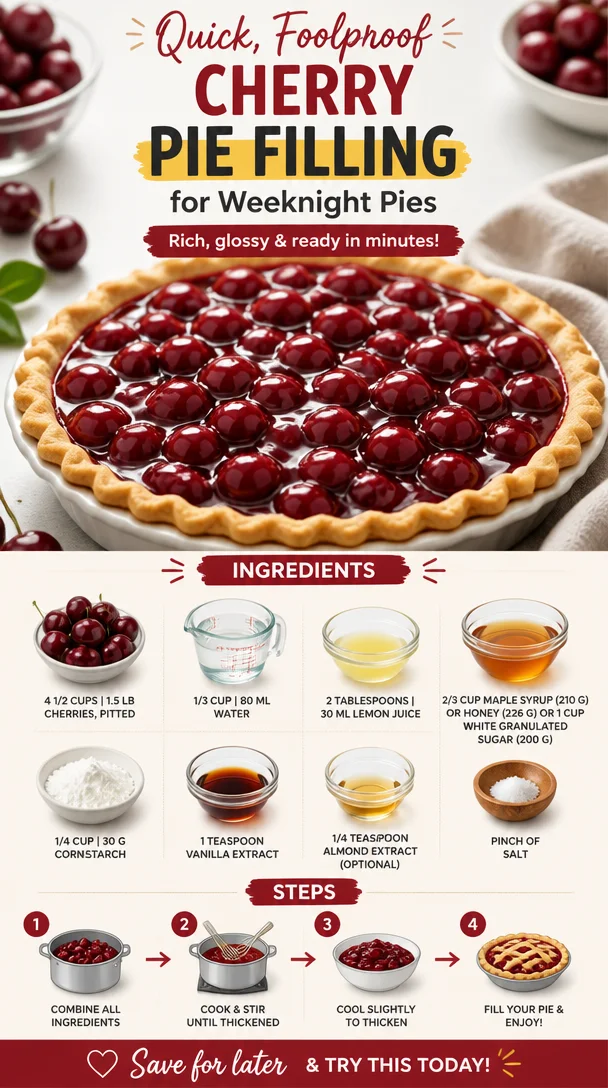
Quick, Foolproof Cherry Pie Filling for Weeknight Pies
The Sweet Symphony of Cherry Pie Filling
Welcome to my cozy corner of the kitchen, where the aroma of freshly baked pies dances through the air and memories linger like the sweetest notes of a favorite song. Today, we’re diving into the delightful world of Cherry Pie Filling. This luscious creation is not just a filling; it’s a story waiting to be told, a family tradition frosted with love, and a sprinkle of nostalgia.
Personal Story: The Cherry Pie that Stole My Heart
Growing up, my summers were filled with backyard barbecues, laughter, and the echo of my grandmother’s voice guiding me through the joyful chaos of the kitchen. One of my fondest memories is the annual cherry-picking expedition. My family and I would head to a local farm, baskets in hand, ready to pluck the brightest, juiciest cherries from the trees. The thrill of searching for the perfect cherries was only rivaled by the sweet reward that followed — Grandma’s famous cherry pie.
The process was magical. We’d sit together at the kitchen table, pitting cherries and sharing stories about our day. The kitchen would fill with the sound of laughter and the sugary scent of the pie crust baking in the oven. As the pie cooled, we’d gather around the table, savoring the fruits of our labor with whipped cream and smiles that could light up the room. It was in those moments that I learned not just how to bake but how to connect through food. And that, my friends, is what I want to share with you today — the joy of making your own cherry pie filling.
Ingredients
Let’s gather our ingredients! Here’s what you’ll need, along with some handy insights for each:
-
4 1/2 cups | 1.5 lbs cherries, pitted
Fresh cherries are ideal, but if they’re out of season, feel free to use frozen ones. Just make sure they are pitted and thawed before cooking! -
1/3 cup | 80 ml water
Water helps create the sauce for our filling. If you’re feeling adventurous, try swapping it with cherry juice for an extra flavor boost! -
2 tablespoons | 30 ml lemon juice
The zing of lemon juice balances the sweetness of the cherries. If you’re out of fresh lemons, bottled juice is a fine substitute, just watch for the acidity level! -
2/3 cup | 210 g maple syrup or honey (226 g) or 1 cup white granulated sugar (200 g)
Each sweetener gives a unique flavor — maple syrup adds a warm depth, while honey provides floral notes. Use what you have or mix and match for fun! -
1/4 cup | 30 g cornstarch
Cornstarch thickens the filling. For a gluten-free option, you can use tapioca starch instead — it works wonders! -
1 teaspoon vanilla extract
Vanilla enhances all the flavors beautifully. You can also experiment with almond extract for a delightful twist! -
1/4 teaspoon almond extract (optional)
This is where magic happens! It brings a lovely nutty flavor that complements the cherries perfectly. -
Pinch of salt
Don’t skip the salt — it enhances sweetness and balances flavors like a pro!
Step-by-Step Instructions
Ready to create your cherry pie filling? Let’s get cooking! Here’s how to whip this up, step by step:
-
Prep the Cherries
Start by washing and pitting your cherries. If you’re using fresh cherries, a good cherry pitter can save you time and keep your hands stain-free. Remember, it’s okay to mess up a bit; cooking is all about having fun! -
Combine Ingredients
In a medium saucepan, combine the pitted cherries, water, lemon juice, and half of your sweetener (maple syrup, honey, or sugar). Stir gently to mix — you want the cherries to feel embraced by the liquid warmth! -
Bring to a Simmer
Set your saucepan over medium heat. Bring the mixture to a simmer, allowing the cherries to release their juices and meld with the other ingredients. This step takes about 5-7 minutes. You’ll know it’s ready when the cherries start to bubble and fill your kitchen with a sweet aroma. -
Thicken the Filling
While stirring, mix your cornstarch with a little cold water in a small bowl to create a slurry. It’s important to get this right; it’s the secret to a silky-smooth filling! Gradually add this to the cherry mixture, stirring constantly. Continue cooking for another 2-3 minutes until the filling thickens. If it feels too thick, don’t panic; a splash of water can help loosen it. -
Add the Finishing Touches
Remove the saucepan from heat. Stir in the vanilla extract and almond extract, if using, along with that pinch of salt. Give it a taste — does it need a touch more sweetener? Adjust to your liking! Plus, if you want an even deeper cherry flavor, let it cool slightly before adding more extract. -
Cool and Enjoy
Transfer your cherry filling into a bowl and let it cool to room temperature. Trust me, the wait is worth it! Once it’s cool, it’s ready to be spooned into pies, slathered on pancakes, or enjoyed straight from the bowl (I won’t tell anyone!).
Serving Suggestions
When it comes to serving your cherry pie filling, the possibilities are endless! Whether you’re layering it into a flaky pie crust, drizzled over a scoop of vanilla ice cream, or even added to yogurt parfaits, make it beautiful. For that professional touch, consider placing it in a decorative dish and garnishing with a sprig of mint or a dusting of powdered sugar. You want to make it look as fabulous as it tastes!
Recipe Variations
Don’t be afraid to get creative with your cherry pie filling! Here are a few fun variations to try:
-
Berry Medley: Add raspberries or blueberries for a mixed berry flavor that’s bursting with summer vibes.
-
Spiced Up: Introduce cinnamon or nutmeg for a warm twist, making it perfect for fall desserts.
-
Zesty Citrus: Replace the lemon juice with fresh orange juice and zest for a bright, citrusy twist.
-
Chocolate Cherry: Stir in mini chocolate chips or cocoa powder for a decadent chocolate-cherry filling that’s perfect for a rich dessert.
-
Low-Sugar Option: Use a sugar substitute like erythritol or stevia for a guilt-free version!
Chef’s Notes
Ah, cherry pie filling — it’s been a beloved staple in my kitchen for years, and it never ceases to amaze me how the simplest ingredients can come together to create something so delectable. I still remember the first time I experimented with using honey instead of sugar. It took some trial and error, but that golden sweetness added a whole new dimension!
Another memory that always brings a smile is when I decided to surprise my friends with a cherry bake-off. Little did they know I had a few sneaky tricks up my apron’s sleeve! Watching their reactions to my secret almond extract was priceless.
FAQs and Troubleshooting
1. My filling turned out too runny. What went wrong?
Sometimes, it needs a little more cornstarch to thicken. Mix a teaspoon of cornstarch with cold water and add that to your simmering cherry mixture until it reaches the desired thickness.
2. Can I use frozen cherries?
Absolutely! Frozen cherries work beautifully. Just make sure they are pitted, and thaw them thoroughly — the juices will help flavor the filling.
3. How long does the cherry filling last?
Stored in an airtight container in the fridge, your cherry pie filling will last about 4-5 days. If you want to freeze it, just let it cool completely and place it in a freezer-safe container!
4. Can I use this filling for something other than pies?
Definitely! Cherry pie filling is versatile and can be used in parfaits, cheesecakes, pancakes, and even as a topping for yogurt or oatmeal.
Nutritional Info
(If applicable, please consult your nutritional database or calculating software based on your exact ingredients and portion sizes.)
In closing, I hope this cherry pie filling recipe inspires you to create cherished memories in your kitchen. Every bite tells a story, and I can’t wait for you to make this recipe your own. Tie on that apron and let’s get cooking. Cheers to sweet moments and beautiful gatherings around the table!
PrintSweet Symphony of Cherry Pie Filling
A delightful cherry pie filling recipe that brings nostalgia to every bite, perfect for enhancing pies, pancakes, or yogurt.
- Prep Time: 10 minutes
- Cook Time: 15 minutes
- Total Time: 25 minutes
- Yield: 2 cups 1x
- Category: Dessert
- Method: Stovetop
- Cuisine: American
- Diet: Vegetarian
Ingredients
- 4 1/2 cups (1.5 lbs) cherries, pitted
- 1/3 cup (80 ml) water
- 2 tablespoons (30 ml) lemon juice
- 2/3 cup (210 g) maple syrup or 1 cup (200 g) white granulated sugar
- 1/4 cup (30 g) cornstarch
- 1 teaspoon vanilla extract
- 1/4 teaspoon almond extract (optional)
- Pinch of salt
Instructions
- Prep the cherries by washing and pitting them.
- Combine ingredients in a medium saucepan: pitted cherries, water, lemon juice, and half of your sweetener.
- Bring the mixture to a simmer over medium heat, about 5-7 minutes.
- Thicken the filling by mixing cornstarch with cold water to create a slurry, then gradually add it to the cherry mixture.
- Add the finishing touches: stir in vanilla and almond extract, plus a pinch of salt.
- Cool the filling to room temperature before using.
Notes
For variations, try adding raspberries, cinnamon, or mini chocolate chips. Store in an airtight container for 4-5 days in the fridge.
Nutrition
- Serving Size: 1/4 cup
- Calories: 150
- Sugar: 28g
- Sodium: 5mg
- Fat: 0g
- Saturated Fat: 0g
- Unsaturated Fat: 0g
- Trans Fat: 0g
- Carbohydrates: 38g
- Fiber: 1g
- Protein: 1g
- Cholesterol: 0mg
Keywords: cherry pie filling, dessert, easy recipe, homemade cherry filling, summer recipe
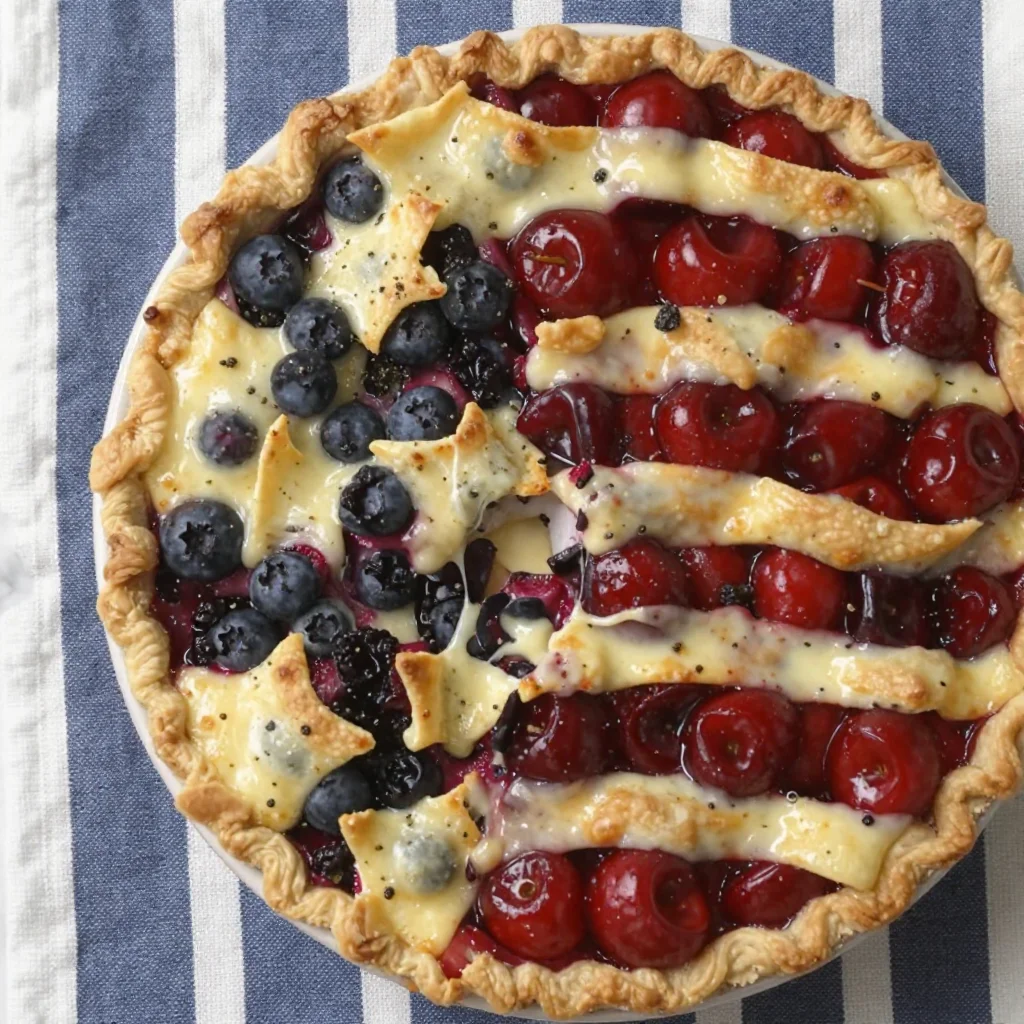
Beginner-Friendly Summer Cherry & Blueberry Pie Recipe
A Slice of Summer: Cherry and Blueberry Pie
Hello, fellow foodies! If you’re anything like me, summer’s bounty brings out your inner baker. There’s something magical about the sweet-tart burst of cherries and the juicy flavor of blueberries. Together, they create a pie that’s not only delicious but also a celebration of the summer months. Today, I’m thrilled to share my cherished recipe for Cherry and Blueberry Pie—a dish that’s simple enough for a weekday treat yet impressive enough for a dinner party.
Imagine walking into your kitchen on a sunny afternoon, the scent of fresh fruit wafting through the air, and that golden pie crust waiting to be filled with juicy berries. Whether it’s a casual family gathering or a fancy soirée, this pie is like a warm hug served on a plate. So, grab your apron, pour yourself a little something sparkling, and join me on this delightful adventure!
A Sweet Memory
Let me take you back in time to one of my favorite childhood summer memories. Growing up, my grandma had the most enchanting garden. Each summer, the trees were heavy with fruit—especially the cherry and blueberry bushes. I remember the excitement we felt as we plucked the ripest cherries, the juice staining our fingers bright red. We’d make our way back to her kitchen, where the air was warm and the anticipation of pie was palpable.
Once we arrived, my grandma would set us up with bowls, and here’s where the magic happened. She would guide us through making the pie from scratch, teaching us her tricks along the way: “Always taste the filling before sealing up the crust,” she’d say with a wink. It was during those afternoons I learned that cooking is about love, laughter, and a pinch of creativity. Unbeknownst to me, these moments would inspire my culinary journey—making every pie I create a homage to those summer days.
Ingredients
Let’s dive into what you’ll need for this luscious Cherry and Blueberry Pie:
-
Refrigerated Pie Crust
- Quick and convenient! Feel free to use your favorite store-bought crust or go all-in with a homemade one if you’re feeling adventurous.
-
Daisy Sour Cream
- This adds a creamy richness to the pie filling. If you need a dairy-free option, try coconut cream or a dairy-free yogurt.
-
Egg Yolks (divided)
- They help give the filling a lovely custard-like texture and a golden hue. Keep the whites for brushing on the crust for that beautiful shine!
-
Sugar
- Essential for sweetness! You can use granulated sugar, but if you’re feeling adventurous, try brown sugar for a deeper flavor.
-
Cherry Pie Filling
- You can buy this pre-made or make your own with fresh cherries! If you prefer fresh, toss your cherries with sugar, cornstarch, and a touch of lemon juice.
-
Blueberry Pie Filling
- Same as the cherries, you can choose pre-made or whip up a homemade version. Fresh blueberries with sugar and a bit of cornstarch yield a wonderful, fresh filling.
-
Milk
- You can use whole milk, almond milk, or even oat milk, depending on dietary preferences.
Now that you have your ingredients, let’s get cooking!
Step-by-Step Instructions
-
Preheat Your Oven
Start by preheating the oven to 425°F (220°C). This ensures a beautifully crispy crust right off the bat. -
Prepare Your Pie Crust
Roll out your refrigerated pie crust and place it into a 9-inch pie plate. If you’re using homemade dough, roll it out to about 1/8-inch thick. Don’t stress if it tears a little—just patch it up. Baking is all about love and imperfections! -
Mix the Fruit Fillings
In a large bowl, combine your cherry pie filling and blueberry pie filling. Add 1/4 cup of sugar, 2 tablespoons of cornstarch, and gently fold everything until well mixed. The sweetness should balance beautifully with the tartness of the cherries. If it’s too sweet, feel free to adjust with a bit of lemon juice! -
Add the Sour Cream
Stir in the Daisy sour cream and one egg yolk into the filling. This makes it luscious and rich. It may seem unusual, but trust me—this addition gives the pie an extraordinary depth of flavor. -
Fill the Pie Crust
Pour the filling mixture into the prepared pie crust, spreading it evenly. Make sure to leave a little space at the top because the filling will bubble as it bakes. -
Top It Off
If you’re feeling fancy, you can roll out another crust to place on top or create a lattice design. Brush the top with the remaining egg yolk mixed with a splash of milk for that golden-brown finish. -
Bake
Bake the pie in the preheated oven for about 45-50 minutes or until the crust is golden and the filling is bubbly. I like to place a baking sheet on the lowest rack to catch any drips—less mess! -
Cool and Serve
Once out of the oven, let it cool for at least an hour. This will help the filling set up nicely. Trust me, a steaming-hot pie can make quite a mess!
Serving Suggestions
When it comes to serving, a slice of this pie alone is delightful, but let’s elevate it! Serve a piece of pie warm (or at room temperature) with a generous scoop of vanilla ice cream or a dollop of whipped cream. For a little extra flair, add a sprinkle of fresh mint leaves or a drizzle of caramel sauce. Set it all on a rustic wooden board for a charming presentation!
Recipe Variations
Feeling adventurous? Here are a few fun twists to try:
- Mixed Berry Medley: Swap in strawberries or raspberries for an entirely new flavor profile.
- Zesty Lemon: Add a tablespoon of lemon zest to the filling for a bright, refreshing taste.
- Spiced Up: Introduce a pinch of cinnamon or nutmeg for a warm, cozy flavor.
- Gluten-Free Crust: Use a gluten-free pie crust if you’re catering to dietary restrictions.
- Vegan Version: Substitute egg yolks with flaxseed meal or a vegan egg replacer and use dairy-free alternatives throughout.
Chef’s Notes
Over the years, this recipe has evolved and become a staple in my kitchen. I remember one summer when I swapped the sour cream for Greek yogurt on a whim—what a delightful surprise that was! And just like any good family recipe, I’ve received countless variations and tips from friends and culinary enthusiasts who added their personal touch. The joy of cooking comes from these shared experiences, and I’m always excited to hear how you make it your own!
FAQs and Troubleshooting
-
Why is my pie crust soggy?
This can happen if the filling is too wet or if the crust hasn’t been pre-baked. For future reference, consider pre-baking the crust for 5-10 minutes before adding your filling. -
Can I use frozen fruit?
Absolutely! Just be sure to thaw and drain excess liquid, or adjust the amount of cornstarch to account for added moisture. -
What if my filling is too sweet?
Balance it out with a squeeze of lemon juice or fresh zest. This will enhance flavors and cut through the sweetness. -
How do I store leftovers?
Store any leftover slices in the refrigerator for up to 3 days, but trust me, it’s unlikely there will be any left!
Nutritional Info
Considering the pie’s decadent nature, here’s a rough breakdown of a slice:
- Calories: 300
- Total Fat: 15g
- Saturated Fat: 7g
- Carbohydrates: 38g
- Sugars: 18g
- Protein: 3g
This pie may not be the lightest dessert, but every slice is packed with love and summer’s best flavors!
So there you have it, my friend! Your guide to creating a gorgeous Cherry and Blueberry Pie that will fascinate your guests and satisfy your craving for something sweet and fruity. I hope you enjoy every moment in the kitchen, and may your pie turn out just as enchanting as those afternoons with my grandma.
Let me know how your pie turns out, and as always, happy baking! 🍒🥧💖
PrintCherry and Blueberry Pie

A delightful summer pie filled with the sweet-tart flavors of cherries and blueberries, perfect for any occasion.
- Prep Time: 15 minutes
- Cook Time: 50 minutes
- Total Time: 65 minutes
- Yield: 8 servings 1x
- Category: Dessert
- Method: Baking
- Cuisine: American
- Diet: Vegetarian
Ingredients
- 1 Refrigerated Pie Crust
- 1 cup Daisy Sour Cream
- 2 Egg Yolks (divided)
- 3/4 cup Sugar
- 1 can Cherry Pie Filling
- 1 can Blueberry Pie Filling
- 1/4 cup Milk
- 2 tablespoons Cornstarch
Instructions
- Preheat your oven to 425°F (220°C).
- Prepare your refrigerated pie crust and place it into a 9-inch pie plate.
- Mix the cherry pie filling and blueberry pie filling in a large bowl. Add 1/4 cup of sugar and 2 tablespoons of cornstarch.
- Add the Daisy sour cream and one egg yolk into the filling.
- Fill the prepared pie crust with the filling mixture.
- Top it off with another crust or a lattice design and brush with remaining egg yolk mixed with milk.
- Bake for 45-50 minutes until the crust is golden and the filling is bubbly.
- Cool for at least an hour before serving.
Notes
Serve warm with vanilla ice cream or whipped cream for a delicious treat.
Nutrition
- Serving Size: 1 slice
- Calories: 300
- Sugar: 18g
- Sodium: 200mg
- Fat: 15g
- Saturated Fat: 7g
- Unsaturated Fat: 4g
- Trans Fat: 0g
- Carbohydrates: 38g
- Fiber: 1g
- Protein: 3g
- Cholesterol: 30mg
Keywords: cherry pie, blueberry pie, summer dessert, baking, fruit pie, pie recipe