
Peach Pie Cruffins
Peach Pie Cruffins: A Delightful Twist on a Classic
Hello, fellow food lovers! I’m beyond excited to share one of my favorite indulgences with you today: Peach Pie Cruffins. You might be wondering what in the world a “cruffin” is. Well, picture this: the delightful layers of a croissant meet the comforting goodness of a muffin, and sprinkle it with a burst of juicy peaches, sweet sugar, and warm spices. It’s a match made in dessert heaven and it’s as delightful as it sounds.
Now, let me take you on a little journey before we dive into the recipe. Many of my fondest memories revolve around the kitchen—gathering with family, the aroma of baked goods wafting through the air, and the heartwarming sounds of laughter at the table. I remember helping my grandmother make her famous peach pies during the hot summer months, the wooden counter dusted with flour, rolling out that flaky dough, and watching in awe as she transformed simple ingredients into golden, luscious pies. Each slice served brought an explosion of flavor, and even now, I can still hear her enchanting tales of picking those peaches right from the orchard.
Inspired by those sweet moments and the joy of offering something wonderful, I created these Peach Pie Cruffins—a clever homage to the classic pie that embodies summertime bliss. Not only are they incredibly delicious, but they also offer a fun, unique way to experience the essence of a peach pie. So gather your baking gear, and let’s get started!
Personal Story
I have to confess; one of the best summer memories I cherish is picking peaches with my family at a local orchard. We’d spend hours under the sun, carefully plucking the ripest peaches from the trees, their sweet scent filling the air. We’d indulge in the juiciest ones before even making it home, with peach juice running down our arms and giggles erupting from the sheer delight of it all.
Once home, my grandmother would whip out her trusted mixer and start prepping for her famous peach pie. I was her sidekick, rolling out the dough with my tiny hands, trying to mimic her skilled movements. The way she converted fresh, ripe peaches into a cozy masterpiece was pure magic to me—one of those moments when you just know you’re part of something special.
Creating this Peach Pie Cruffin is like taking a bite out of that memory, offering the same warmth and heart in a delightful pastry form. Plus, it’s easier to make than my grandmother’s classic pie, and can be shared among friends in a fun way—hampered by no one’s oven or rolling skills!
Ingredients
Let’s gather everything we need to create these heavenly Peach Pie Cruffins! Here’s what you’ll need:
-
1 package of puff pastry: This is the perfect base for our cruffins. A wonderful, flaky texture that holds up well to our peach filling. If you’d like a whole wheat version, look for whole wheat puff pastry in your grocery store or try using phyllo dough for a lighter option.
-
2 cups fresh peaches, diced: The star of our show! Sweet, juicy peaches add a beautiful flavor and texture. If peaches aren’t in season, you can substitute with ripe nectarines, or even canned peaches—just be sure to drain them well!
-
1/2 cup sugar: This sweetens the peach filling just right. You can use coconut sugar or brown sugar for a more caramel-like flavor if you prefer.
-
1 tablespoon cornstarch: This is our secret ingredient for thickening the peach filling so it doesn’t get too runny. You can substitute it with tapioca starch or arrowroot if you’re avoiding corn.
-
1 teaspoon vanilla extract: Adding depth and warmth to our peach mixture. You could try using almond extract for a unique twist that complements the peaches beautifully.
-
1/2 teaspoon cinnamon: Because you can’t have a peach pie without a dash of cinnamon! If you want to switch things up, nutmeg also works wonderfully here.
-
1 egg (for egg wash): This gives our cruffins a lovely golden-brown color. If you need an egg substitute, a tablespoon of milk or a non-dairy milk brushed on will do the trick.
-
Powdered sugar for dusting (optional): A floral finish to our cruffins! Feeling extra? Why not make a simple glaze with powdered sugar and a splash of milk for drizzling.
Step-by-Step Instructions
Alright, it’s time to roll up our sleeves and get baking! Here’s how you can whip up these Peach Pie Cruffins step-by-step:
Step 1: Preheat the Oven
First things first! Preheat your oven to 375°F (190°C). This ensures that your cruffins will bake evenly, giving you that perfect flaky texture.
Step 2: Prepare the Peach Filling
In a medium bowl, combine your diced peaches, sugar, cornstarch, vanilla extract, and cinnamon. Mix gently to coat the peaches. Let this sit for about 10-15 minutes to allow the peaches to release their juices and combine the flavors. This is a crucial step—don’t skip it! The cornstarch works its magic as it absorbs excess moisture, keeping your cruffins from getting soggy.
Step 3: Roll Out the Puff Pastry
Unroll your thawed puff pastry sheet on a lightly floured surface. Using a rolling pin, gently roll it out to smooth out any creases. We want to make sure it’s nice and uniform, about 1/8 inch thick.
Step 4: Cut the Pastry
Now, let’s cut the pastry into rectangles—about 4 inches by 6 inches. You should aim for about 6 rectangles from a standard puff pastry sheet. If you’re feeling bold, you can even cut them into squares or triangles for a fun variation!
Step 5: Assemble the Cruffins
Take your peach mixture and spoon a generous amount into the center of each rectangle, leaving space around the edges. Now, here’s where the magic happens: fold the pastry around the filling. If you have excess dough, crimp it together at the top to create a little pocket. Place the cruffins in a muffin tin (sprayed with cooking spray) to help them hold their shape.
Step 6: Brush the Egg Wash
In a small bowl, whisk your egg and brush the egg wash generously on top of each cruffin. This will give them that glorious, golden color that’ll have everyone drooling in anticipation.
Step 7: Bake Until Golden Brown
Pop your muffin tin in the preheated oven and bake for about 20-25 minutes or until the tops are beautifully golden and puffed up. Keep an eye on them during the last few minutes—the puff pastry will be rising dramatically, and you’ll want to catch them before they overbake.
Step 8: Cool and Dust
Once they’re out of the oven, allow your cruffins to cool for about 5-10 minutes in the tin. Carefully transfer them to a wire rack and let them cool a bit longer. Just before serving, dust them with powdered sugar or drizzle with glaze, if you’re feeling indulgent.
Serving Suggestions
For the best presentation, serve your Peach Pie Cruffins on a lovely platter, perhaps alongside some fresh whipped cream or a scoop of vanilla ice cream. You could even pair them with a warm cup of tea or coffee for a delightful afternoon treat. Enjoy them warm, fresh from the oven, or at room temperature—they’re delicious either way!
Recipe Variations
Want to experiment with your Peach Pie Cruffins? Here are a few fun twists:
-
Berry Mix: Swap half the peaches for fresh blueberries or raspberries. The sweet-tart berries complement the peaches beautifully!
-
Spice It Up: Add a hint of nutmeg or some grated fresh ginger for a spicy kick that balances the sweetness of the peaches.
-
Chocolate Drizzle: Drizzle melted dark chocolate over your baked cruffins for a decadent touch that is sure to impress.
-
Nutty Crunch: Sprinkle some chopped pecans or almonds over the filling before folding to add a delightful crunch.
-
Vegan Alternative: Use vegan puff pastry and substitute the egg wash with almond milk or a plant-based egg option for a delicious vegan treat.
Chef’s Notes
I can’t help but smile every time I pull out my muffin tin at the thought of how this recipe has evolved. The concept of cruffins is a fun one—first pioneered in a bakery many years ago, I was immediately inspired to embrace the idea and adapt it into my own style. They’ve become a favorite little indulgence in our home! I love finding new flavors to fill them with, ranging from fruity to savory, and they never disappoint at gatherings or picnics.
One time, I decided to experiment and didn’t quite seal the edges properly; the filling overflowed, creating a sweet, sticky mess! But instead of a disaster, it turned into a deliciously messy moment that we all laughed about. Sometimes the best moments in the kitchen are the unplanned ones.
FAQs and Troubleshooting
1. Why are my cruffins not rising?
- Make sure your puff pastry is well-chilled before baking and has been rolled out to the right thickness. If it’s too warm, it may not puff up as expected. And remember, a busy oven can lead to uneven cooking, so give them space to rise!
2. My filling leaked during baking; what went wrong?
- This can happen if the filling is too watery. Make sure you allow the peach mixture to sit long enough for the cornstarch to absorb the juices. Additionally, sealing the pastry well should help prevent leakage!
3. Can I use frozen peaches?
- Absolutely! If using frozen peaches, thaw and drain them thoroughly before mixing with other ingredients. This helps to keep the filling from becoming too watery.
4. How long will these last?
- These cruffins are best enjoyed fresh, but you can store leftovers in an airtight container at room temperature for up to 2 days. To reheat, warm them slightly in the oven to retain that beautiful flakiness.
Nutritional Info (Optional)
Note: Nutritional information will vary based on brands and specific ingredients used. Here’s a general estimate per cruffin:
- Calories: 180
- Total Fat: 10g
- Saturated Fat: 3g
- Cholesterol: 35mg
- Sodium: 45mg
- Total Carbohydrates: 22g
- Dietary Fiber: 1g
- Sugars: 6g
- Protein: 2g
And there you have it, my friends—a delicious recipe for Peach Pie Cruffins that’s sure to become a treasured addition to your baking roster. Let the love of summer peaches light up your kitchen, and enjoy creating beautiful moments around your table. Remember, cooking is all about sharing joy, so don’t forget to invite some friends over to share these indulgent treats! Happy baking! 🥳✨
PrintPeach Pie Cruffins

A delightful twist on classic peach pie, combining croissant layers with juicy peach filling in a fun cruffin form.
- Prep Time: 15 minutes
- Cook Time: 25 minutes
- Total Time: 40 minutes
- Yield: 6 servings 1x
- Category: Dessert
- Method: Baking
- Cuisine: American
- Diet: Vegetarian
Ingredients
- 1 package of puff pastry
- 2 cups fresh peaches, diced
- 1/2 cup sugar
- 1 tablespoon cornstarch
- 1 teaspoon vanilla extract
- 1/2 teaspoon cinnamon
- 1 egg (for egg wash)
- Powdered sugar for dusting (optional)
Instructions
- Preheat the oven to 375°F (190°C).
- Combine peaches, sugar, cornstarch, vanilla, and cinnamon in a bowl.
- Let the mixture sit for 10-15 minutes.
- Unroll the puff pastry sheet on a lightly floured surface.
- Cut the pastry into rectangles, aiming for about 6.
- Spoon the peach mixture into the center of each rectangle.
- Fold the pastry around the filling and crimp the edges.
- Brush the tops with the egg wash.
- Bake for about 20-25 minutes until golden brown.
- Cool for 5-10 minutes before dusting with powdered sugar.
Notes
Serve warm or at room temperature, optionally with whipped cream or ice cream.
Nutrition
- Serving Size: 1 cruffin
- Calories: 180
- Sugar: 6g
- Sodium: 45mg
- Fat: 10g
- Saturated Fat: 3g
- Unsaturated Fat: 4g
- Trans Fat: 0g
- Carbohydrates: 22g
- Fiber: 1g
- Protein: 2g
- Cholesterol: 35mg
Keywords: Peach, Dessert, Cruffin, Baking, Summer
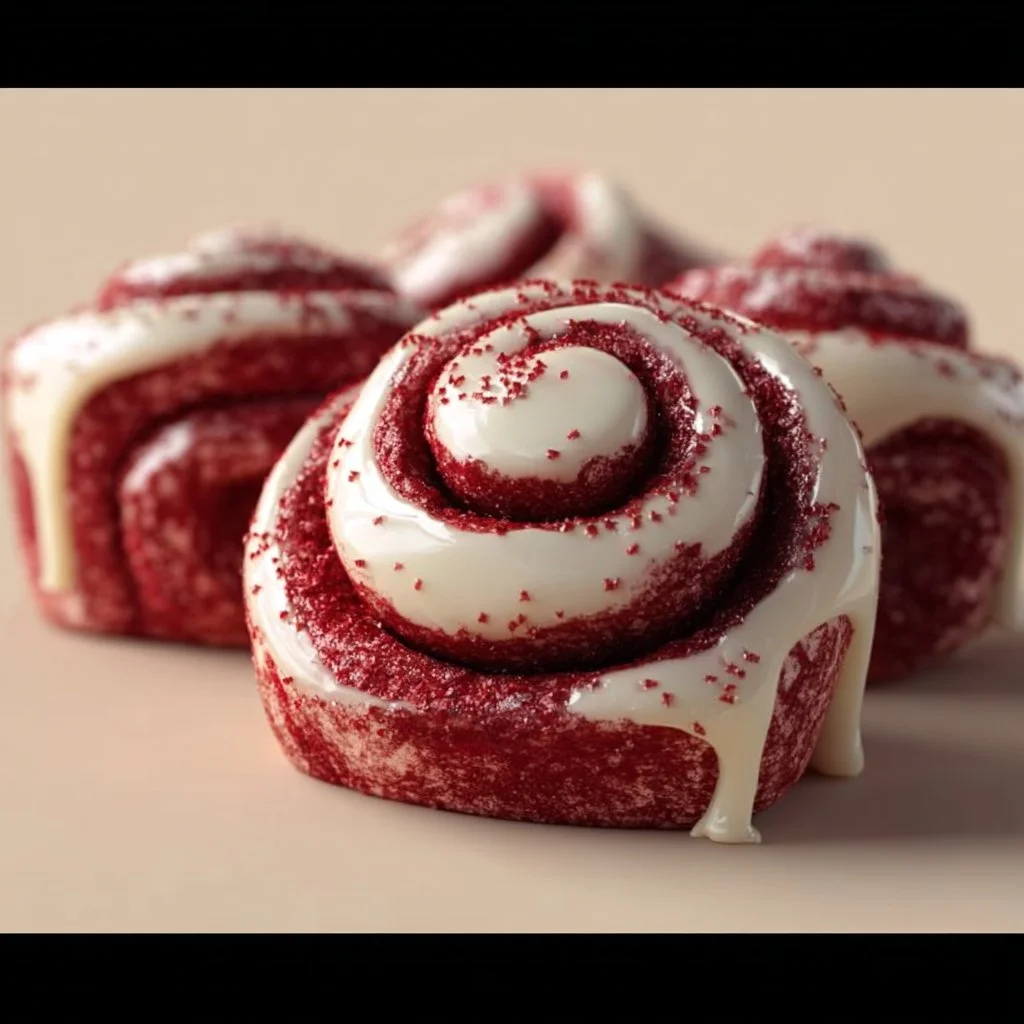
Red Velvet Cinnamon Rolls
Red Velvet Cinnamon Rolls: A Taste of Comfort and Joy
Hello, food lovers! Today, I am bubbling with excitement to share with you a recipe that combines two of life’s greatest delights: the velvety richness of red velvet cake and the warm, comforting nature of cinnamon rolls. Yes, you guessed it—it’s time for Red Velvet Cinnamon Rolls!
These beauties are not just a treat for the taste buds but also a feast for the eyes. Their deep crimson hue, swirled with creamy tang and topped with luscious frosting, makes them a show-stopper no matter where they’re served. Whether you’re prepping for a cozy brunch with friends, surprising your loved ones on a lazy Sunday morning, or brightening a weekday afternoon, these cinnamon rolls are guaranteed to elevate your day.
I know what you might be thinking: “Savannah, isn’t making cinnamon rolls a daunting task?” Well, my friends, I’m happy to report that these rolls are surprisingly simple. With a few key ingredients and just a bit of love (and some dough kneading), you can have these delightful gems ready to impress in no time!
So, grab your apron, pour yourself a warm cup of coffee, and let’s dive into this delicious adventure together. I promise, you’ll be glad you did!
Personal Story
As a kid, I fondly remember baking with my grandma on those chilly winter afternoons. The air would be filled with the smells of spices and sweets, and I’d eagerly await our creations to emerge golden and warm from the oven. One of her favorite recipes was that of her famous cinnamon rolls—but we would always jazz them up with a festive twist around the holidays.
One snowy December, we decided to dabble in the vibrant world of food coloring, and red velvet became our muse. The beautiful, rich color of the dough captured my imagination. Watching my grandma expertly blend the ingredients and swirl the cinnamon mixture was pure magic. When we took our rolls out of the oven, I could hardly wait to slather them with the cream cheese frosting! That day, I learned that food is more than just sustenance; it’s a way to weave memories, share love, and bring people together. That’s the spirit I’ve poured into these Red Velvet Cinnamon Rolls—a dish that embodies warmth, love, and a sprinkle of nostalgia.
Ingredients
Let’s gather our ingredients! Here’s what you’ll need for this colorful treat:
Ingredients List
-
2 cups all-purpose flour
A staple ingredient for so many recipes—this is the base for your rolls. If you want a gluten-free version, feel free to substitute with a gluten-free 1-to-1 flour blend. -
1 cup sugar
This sweetness makes all the difference. For a less sugary twist, you can cut the sugar down to ¾ cup or use coconut sugar for a hint of caramel flavor. -
1 teaspoon baking powder
This helps the dough rise. A must-have for all baked goods! -
1 teaspoon baking soda
Another leavening agent that gives the rolls their fluffiness. They work hand in hand with the acidic components (like buttermilk) to create the perfect lift. -
1/2 teaspoon salt
Balances the sweetness and brings out the flavors. Don’t skip it! -
1/2 cup buttermilk
This adds moisture and tenderness. If you don’t have buttermilk, make a substitute by adding 1/2 tablespoon of vinegar or lemon juice to 1/2 cup of milk and let it sit for 5 minutes. -
1/4 cup unsalted butter, melted
Adds richness. Melted butter helps the rolls maintain their soft texture. For a dairy-free version, coconut oil works great here! -
1 large egg
Binds everything together and gives structure. You can use a flax egg (1 tablespoon ground flaxseed mixed with 2.5 tablespoons water) for a vegan alternative. -
2 tablespoons red food coloring
The star of the show! This gives the roll its iconic color. Use natural beet juice or powder as an alternative for a more natural dye option. -
1 teaspoon vanilla extract
Adds an aromatic depth of flavor. Trust me, it’s worth the splash! -
1 tablespoon ground cinnamon
Adds warmth and coziness! You can use pumpkin pie spice for a delicious twist. -
1/2 cup brown sugar
Sweet and granulated with caramel notes. To keep it lower in sugar, try reducing the amount to 1/3 cup or substituting with a granulated sugar alternative. -
1/2 cup cream cheese, softened
This creamy goodness is key for the filling. For a non-dairy version, use a vegan cream cheese alternative. -
1/4 cup powdered sugar
To sweeten the frosting. This creates a lovely consistency for drizzling. -
1 teaspoon vanilla extract (for frosting)
More vanilla for more flavor! You can leave it out if you want a more minimalist approach.
Step-by-Step Instructions
Alright, let’s get into the fun part—making your Red Velvet Cinnamon Rolls! Here’s how to whip these up:
Step 1: Prepare Your Dough
-
Mix Dry Ingredients
In a large mixing bowl, combine 2 cups of all-purpose flour, 1 cup of sugar, 1 teaspoon of baking powder, 1 teaspoon of baking soda, and ½ teaspoon of salt. Whisk them together until they’re all blended nicely. This ensures that the leaveners are evenly distributed—no one wants a lumpy roll! -
Combine Wet Ingredients
In another bowl, whisk together ½ cup of buttermilk, ¼ cup of melted unsalted butter, 1 large egg, 2 tablespoons of red food coloring, and 1 teaspoon of vanilla extract. Make sure the butter isn’t too hot, or it might cook the egg! -
Create the Dough
Slowly pour the wet mixture into the dry ingredients. Use a spatula to marry the two until no dry flour is visible. It’s okay if it’s a little sticky—this means it’s gonna be super soft!
Step 2: Knead and Rise
-
Knead the Dough
On a floured surface, knead your dough for about 3-5 minutes until it’s smooth and elastic. If it’s too sticky, sprinkle a little more flour while kneading. -
Let It Rest
Place your dough into a greased bowl, cover it with a kitchen towel, and let it rise in a warm place for about 1 hour or until it doubles in size. Grab a cup of coffee and relax—you deserve this!
Step 3: Create the Filling
- Make Your Cinnamon Mix
While your dough rises, let’s work on the filling. In a small bowl, mix together ½ cup of brown sugar, 1 tablespoon of ground cinnamon, and a dash of vanilla extract. This will create that warm, sweet filling we all love.
Step 4: Roll It Out
-
Flour Your Surface Again
After resting, punch down the dough and place it on a lightly floured surface. Roll it out into a rectangle about 1/4 inch thick. Keep it even so the rolls cook up uniformly. -
Spread the Filling
Using a spatula, spread the softened cream cheese (½ cup) over the dough, then top it with your cinnamon mixture. Just go wild and spread it all out to the edges!
Step 5: Form the Rolls
-
Rolling It Up
Starting from one of the long edges, carefully roll the dough into a tight log. The tighter you roll, the nicer your swirls will be! -
Slice and Dice
Using a sharp knife or kitchen string, slice the log into 12 equal pieces. Place them cut side up in a greased baking dish, and cover with a kitchen towel to rise again for about 30 minutes.
Step 6: Bake Away
-
Preheat Your Oven
Preheat your oven to 350°F (175°C). They’ll bake faster if the oven is ready when you are! -
Bake
Pop your rolls into the oven and bake for about 25-30 minutes until they’re nicely golden. You’re gonna want to keep an eye on them to prevent burning.
Step 7: Frost and Serve
-
Make the Frosting
While your rolls are baking, mix ½ cup of softened cream cheese, ¼ cup of powdered sugar, and 1 teaspoon of vanilla extract in a bowl until smooth and creamy. -
Glaze the Rolls
Once your rolls come out of the oven, resist the urge to dig in immediately! Let them cool for about 10 minutes—then spread the frosting generously on top.
Serving Suggestions
Presentation can elevate any dish! For these Red Velvet Cinnamon Rolls, serve them warm on a rustic wooden platter. Dust a touch of powdered sugar on top for that charming café vibe. Pair them with a hot cup of coffee or spiced chai, and don’t hesitate to add some fresh berries on the side for a pop of color and freshness. Your table will look stunning!
Recipe Variations
- Nutty Delight: Add chopped pecans or walnuts to the filling for a delightful crunch.
- Chocolate Lovers: Incorporate chocolate chips into the filling for a rich twist.
- Spiced Twist: Swap out the ground cinnamon for pumpkin pie spice for a seasonal flair.
- Vegan Version: Use almond milk, vegan butter, and a flax egg to make these plant-based!
- Cream Cheese Swirl: Instead of just spreading the cream cheese, swirl it into the rolls for a marbled effect.
Chef’s Notes
Ah, where do I begin! These Red Velvet Cinnamon Rolls are a new favorite in my kitchen. When I first tried this recipe, I accidentally added too much food coloring—let’s just say my kitchen looked like a Valentine’s Day card exploded! But what came out of that kitchen mishap was a lesson in being creative and experimental in the kitchen.
These rolls have evolved over time, reflecting my love for simple yet elegant food. And guess what? They freeze beautifully! So make a double batch, frost them before they’re completely cool, put them in an airtight container, and enjoy later.
FAQs and Troubleshooting
1. Why are my cinnamon rolls not rising?
Make sure your yeast (in the form of baking powder and soda) is fresh! It’s also vital to keep the dough in a warm, draft-free place while it rises.
2. How do I prevent my rolls from drying out?
Keep them covered with a kitchen towel while they rise and store leftover rolls in an airtight container once they’re cooled.
3. Can I make these a day in advance?
Absolutely! Prepare the rolls, place them in the baking dish, cover tightly with plastic wrap, and refrigerate overnight. Bake them in the morning straight from the fridge, just add a few extra minutes to the baking time.
4. How can I make them less sweet?
Feel free to reduce the sugar in both the dough and the filling. You can also omit the frosting for a more minimalist approach.
Nutritional Info
(Optional, could be based on preferences)
- Serving Size: 1 roll
- Calories: Approximately 320
- Fat: 12g
- Carbohydrates: 47g
- Protein: 4g
- Sugar: 20g
There you have it, friends! Your guide to making mouthwatering Red Velvet Cinnamon Rolls at home. I hope you enjoy making them as much as I do. Remember, the kitchen is all about experimenting, so let your creativity shine. Happy baking! Let’s gather around that table soon.
PrintRed Velvet Cinnamon Rolls

Delicious red velvet cinnamon rolls swirled with cream cheese filling and topped with luscious frosting, perfect for any occasion.
- Prep Time: 30 minutes
- Cook Time: 30 minutes
- Total Time: 60 minutes
- Yield: 12 servings 1x
- Category: Dessert
- Method: Baking
- Cuisine: American
- Diet: Vegetarian
Ingredients
- 2 cups all-purpose flour
- 1 cup sugar
- 1 teaspoon baking powder
- 1 teaspoon baking soda
- 1/2 teaspoon salt
- 1/2 cup buttermilk
- 1/4 cup unsalted butter, melted
- 1 large egg
- 2 tablespoons red food coloring
- 1 teaspoon vanilla extract
- 1 tablespoon ground cinnamon
- 1/2 cup brown sugar
- 1/2 cup cream cheese, softened
- 1/4 cup powdered sugar
- 1 teaspoon vanilla extract (for frosting)
Instructions
- Mix Dry Ingredients: In a large mixing bowl, combine flour, sugar, baking powder, baking soda, and salt. Whisk until blended.
- Combine Wet Ingredients: In another bowl, whisk together buttermilk, melted butter, egg, red food coloring, and vanilla extract.
- Create the Dough: Pour the wet mixture into the dry ingredients and combine until just mixed.
- Knead the Dough: On a floured surface, knead the dough for 3-5 minutes until smooth and elastic.
- Let It Rest: Place dough in a greased bowl, cover, and let rise for about 1 hour.
- Make Your Cinnamon Mix: Mix brown sugar, cinnamon, and a dash of vanilla in a small bowl.
- Flour Your Surface: Roll out the dough into a rectangle about 1/4 inch thick.
- Spread the Filling: Spread softened cream cheese over the dough and sprinkle with cinnamon mixture.
- Rolling It Up: Roll the dough from one edge into a tight log.
- Slice and Dice: Cut the log into 12 equal pieces and place in a greased baking dish.
- Preheat Your Oven: Preheat oven to 350°F (175°C).
- Bake: Bake for 25-30 minutes until golden.
- Make the Frosting: Mix cream cheese, powdered sugar, and vanilla until smooth.
- Glaze the Rolls: Spread frosting over rolls once they have cooled for about 10 minutes.
Notes
These cinnamon rolls freeze well, so make a double batch and enjoy later!
Nutrition
- Serving Size: 1 roll
- Calories: 320
- Sugar: 20g
- Sodium: 400mg
- Fat: 12g
- Saturated Fat: 6g
- Unsaturated Fat: 3g
- Trans Fat: 0g
- Carbohydrates: 47g
- Fiber: 1g
- Protein: 4g
- Cholesterol: 30mg
Keywords: cinnamon rolls, red velvet, dessert, sweet rolls, baking