
Tall, Creamy New York Cheesecake in 4 Simple Steps
Tall and Creamy New York Cheesecake: A Slice of Heaven
Hello, fellow food lover! Today, I’m inviting you into the wonderful world of cheesecake—specifically, the iconic Tall and Creamy New York Cheesecake. This dessert is more than just a sweet treat; it’s a slice of nostalgia, comfort, and celebration all packed into one creamy delicacy that has a reputation for being the “queen of the desserts.” Whether you’re hosting a gathering, celebrating a birthday, or just treating yourself after a long day, this cheesecake has got your back!
The Magic of Cheesecake
Before we dive into the recipe, let’s take a moment to appreciate what makes cheesecake so special. Have you ever noticed how a single slice can brighten up even the gloomiest of days? For me, cheesecake evokes memories of family gatherings where the dessert table was always the highlight. I can still picture my grandmother carefully releasing her prized cheesecake from the springform pan, her eyes twinkling with joy as we all gathered around—spoons at the ready—for that first bite. It was always a moment to savor.
This Tall and Creamy New York Cheesecake is set to be a showstopper, boasting a rich and creamy texture that sets it apart from other desserts. It’s decadent without being heavy—sure to impress your family and friends. So, let’s roll up our sleeves and create some sweet magic!
Ingredients
Here’s what you’ll need to craft this unforgettable cheesecake:
-
32 ounces cream cheese (4 packages), room temperature
This is the star of the show! Make sure it’s at room temperature for a smooth, creamy consistency. If you need a lighter alternative, try using mascarpone cheese mixed with cream cheese. -
5 large eggs, room temperature
Eggs help the cheesecake achieve its tall, airy texture. If you’re short on eggs, you can replace each egg with 1/4 cup of unsweetened applesauce for a lower-cholesterol option. -
2 cups sour cream, room temperature
Sour cream adds that signature tanginess—essential for balancing the sweetness. You can substitute with Greek yogurt for a similar effect with a protein boost! -
8 tablespoons butter, room temperature
Butter takes the crust to the next level! If you’re looking for a dairy-free option, you can use coconut oil or a vegan butter substitute. -
1 1/2 cups sugar
Sugar sweetens everything perfectly. For a healthier twist, try using coconut sugar or honey (just remember that honey is sweeter, so use a bit less). -
2 tablespoons cornstarch
Cornstarch helps the cheesecake set properly and prevents cracks. If you’re in a pinch, you can swap it with arrowroot powder. -
2 vanilla beans
Nothing beats the aroma and flavor of fresh vanilla beans! If you can’t find them, 1 1/2 teaspoons of pure vanilla extract will do. -
1 teaspoon fresh lemon juice
A touch of lemon juice brightens up the flavors. If you don’t have fresh lemons on hand, bottled juice works but is less vibrant.
Step-by-Step Instructions
Now, let’s dive into the fun part—making this cheesecake! Follow these steps, and you’ll be a cheesecake master in no time.
-
Preheat the Oven
Preheat your oven to 325°F (160°C). A properly preheated oven ensures even baking, which is crucial for our enchanting cheesecake. -
Prep the Pan
Grease a 9-inch springform pan with a bit of butter. Line the bottom with parchment paper for easy release after baking. Trust me—nobody wants to lose a piece of cheesecake to the pan! -
Make the Crust
In a bowl, mix together 2 cups of crushed graham crackers (or your choice of cookies) with 8 tablespoons of melted butter and 1/4 cup of sugar. Press this mixture firmly into the bottom of your springform pan and slightly up the sides. This crust is the crunchy counterpart to the creamy filling! -
Mix the Cream Cheese
In a large mixing bowl, beat the 32 ounces of room-temperature cream cheese with an electric mixer on medium speed until it is smooth and creamy—about 3-4 minutes. Make sure to scrape down the sides to incorporate everything thoroughly. -
Incorporate the Sugar
Gradually add in the 1 1/2 cups of sugar, mixing until well combined. At this point, you can also add in the scraped seeds of your vanilla beans for that rich flavor. -
Add the Eggs
Now, it’s time to beat in the 5 large eggs one at a time, mixing well after each addition. This is key to achieving that light, airy texture! Don’t overmix; just combine until smooth. -
Blend in the Cream and Cornstarch
Gently fold in the 2 cups of sour cream, the 2 tablespoons of cornstarch, and 1 teaspoon of lemon juice until smooth. This mixture should look heavenly and creamy! -
Pour the Filling
Carefully pour the cheesecake batter into the prepared crust, smoothing the top with a spatula. It should look beautiful, and it will be once it’s baked! -
Bake It
Bake in your preheated oven for about 75-90 minutes. You’ll know it’s done when the edges are set, but the center still has a slight jiggle. Remove it from the oven and allow it to cool at room temperature. -
Cool the Cheesecake
Once cooled, cover the cheesecake with plastic wrap and refrigerate it for at least 4 hours, but preferably overnight. Patience pays off with cheesecakes!
Serving Suggestions
When it’s finally time to indulge, plate that glorious cheesecake with grace! Use a sharp knife to cut clean slices, wiping the knife between cuts for neat pieces. Serve each slice with a dollop of whipped cream or a drizzle of raspberry coulis for that extra flair. A sprinkle of fresh berries doesn’t hurt either!
Recipe Variations
Why stop at classic? Here are a few fun twists to take your cheesecake to the next level:
- Chocolate Chip Cheesecake: Mix in 1 cup of chocolate chips to the batter for a delightful treat.
- Fruit-Topped: Add fresh fruit like strawberries or blueberries on top for a refreshing finish.
- Caramel Swirl: Drizzle caramel sauce on top of the batter before baking and gently swirl with a knife.
- Coffee Lovers: Incorporate 2 tablespoons of instant coffee granules for a tasty coffee-flavored cheesecake.
- Lemon Zest: Add the zest of one lemon to the batter for a bright, citrusy zing.
Chef’s Notes
Cheesecake may seem intimidating, but it’s honestly one of the most rewarding desserts to make! I’ve had my fair share of flat, cracked cheesecakes (who hasn’t?), but remember, every great chef falls short sometimes. The key is to learn from those experiences. Over the years, I’ve experimented with different flavors and crusts, but the classic remains my absolute favorite.
Each time I make this cheesecake, it takes me back to my early kitchen days, where I learned that cooking is about joy—enjoying the process and, of course, enjoying delicious food!
FAQs and Troubleshooting
-
Why did my cheesecake crack?
Cracking can happen if the oven temperature is too high or if the cheesecake bakes too rapidly. Avoid opening the oven door during baking to minimize sudden temperature changes. -
How can I store leftover cheesecake?
Cover the cheesecake tightly with plastic wrap and store it in the refrigerator. It should stay fresh for up to a week (if it lasts that long!). -
Can I freeze cheesecake?
Absolutely! Wrap slices individually in plastic wrap, then foil, and store in an airtight container. When ready to enjoy, let it thaw in the refrigerator overnight. -
How do I know when my cheesecake is done?
Look for a slightly jiggly center but firm edges. The center should set as it cools.
Nutritional Info (if applicable)
While rich and creamy desserts aren’t typically low-calorie, knowing what you’re enjoying can help. Each slice has around 450 calories, depending on how many toppings you add. Remember, balance in life (and food) is key!
Conclusion
I hope this Tall and Creamy New York Cheesecake recipe enriches your kitchen adventures just as it has mine. Remember, cooking should be a beautiful experience filled with laughter, creativity, and a sprinkle of love. Gather your ingredients, tie on your apron, and let’s bake something memorable together. Cheers to many delightful moments shared around the table with this stunning cheesecake!
So tell me: What’s your favorite cheesecake memory? I’d love to hear your stories! Happy baking!
PrintTall and Creamy New York Cheesecake

A rich and creamy cheesecake that is a perfect balance of sweetness and tanginess, making it a beloved dessert for any occasion.
- Prep Time: 30 minutes
- Cook Time: 90 minutes
- Total Time: 120 minutes
- Yield: 12 servings 1x
- Category: Dessert
- Method: Baking
- Cuisine: American
- Diet: Vegetarian
Ingredients
- 32 ounces cream cheese, room temperature
- 5 large eggs, room temperature
- 2 cups sour cream, room temperature
- 8 tablespoons butter, room temperature
- 1 1/2 cups sugar
- 2 tablespoons cornstarch
- 2 vanilla beans (or 1 1/2 teaspoons vanilla extract)
- 1 teaspoon fresh lemon juice
- 2 cups crushed graham crackers
- 1/4 cup sugar (for crust)
Instructions
- Preheat the oven to 325°F (160°C).
- Grease a 9-inch springform pan with butter and line the bottom with parchment paper.
- Mix together the crushed graham crackers, melted butter, and 1/4 cup of sugar. Press into the bottom of the springform pan.
- Beat the cream cheese with an electric mixer until smooth and creamy, about 3-4 minutes.
- Add in the sugar gradually and mixed until well combined.
- Incorporate the eggs one at a time, mixing until smooth after each addition.
- Fold in the sour cream, cornstarch, and lemon juice until smooth.
- Pour the cheesecake batter into the prepared crust, smoothing the top.
- Bake for 75-90 minutes, until the edges are set and the center has a slight jiggle.
- Cool the cheesecake at room temperature, then refrigerate for at least 4 hours or overnight before serving.
Notes
For best results, allow the cheesecake to cool completely before refrigerating. Serve with whipped cream or fresh fruit for added flavor.
Nutrition
- Serving Size: 1 slice
- Calories: 450
- Sugar: 30g
- Sodium: 300mg
- Fat: 28g
- Saturated Fat: 17g
- Unsaturated Fat: 9g
- Trans Fat: 0g
- Carbohydrates: 45g
- Fiber: 1g
- Protein: 8g
- Cholesterol: 120mg
Keywords: cheesecake, New York cheesecake, dessert
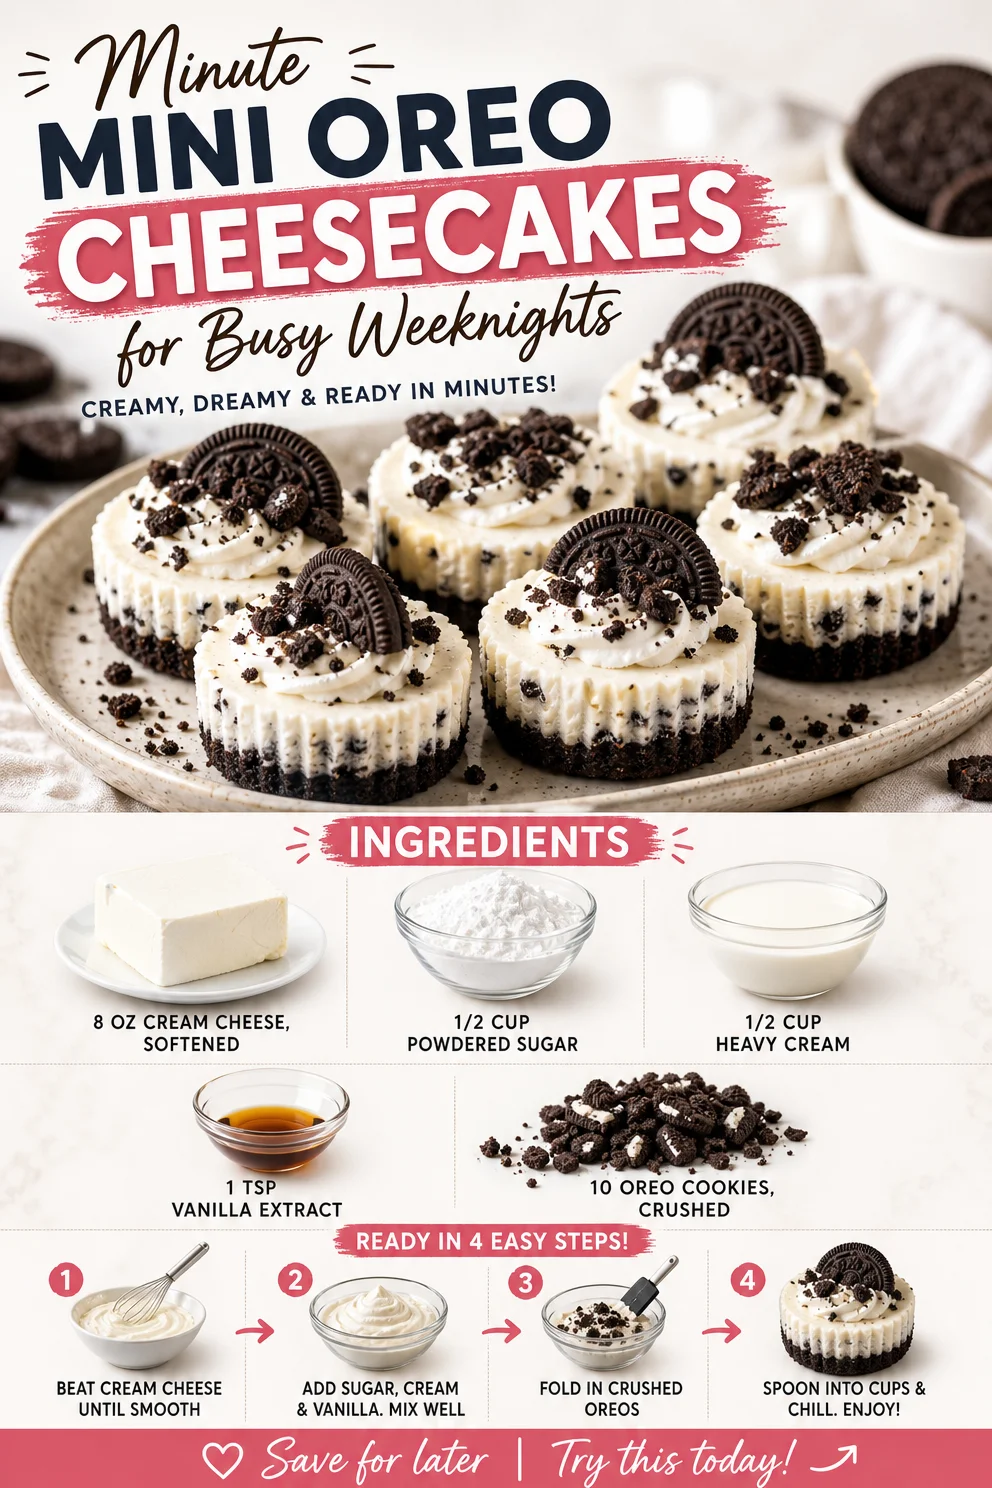
Minute Mini Oreo Cheesecakes for Busy Weeknights
Mini Oreo Cheesecakes: A Sweet Indulgence for Every Occasion
Hello, fellow food lovers! Savannah here, and today I’ve got something truly delightful to share: Mini Oreo Cheesecakes. These bite-sized treasures are the perfect blend of creamy, dreamy cheesecake and that irresistible chocolatey crunch we all love from Oreos. Whether it’s a dinner party, a casual get-together, or simply a sweet treat after a long day, these mini cheesecakes will steal the show and keep your guests coming back for seconds—and maybe even thirds!
You might be wondering, “Savannah, what makes these mini cheesecakes so special?” Well, let me tell you, it’s all about the balance of flavors and textures. They are rich but not overwhelming, sweet but not cloyingly so. Plus, they are so easy to whip up! No need for any baking skills or fancy kitchen gadgets—just your trusty mixing bowl and a little bit of love. So, let’s dive into this scrumptious recipe that’s sure to bring joy to any table.
My Mini Oreo Cheesecake Story
I remember the first time I made mini cheesecakes. It was for a friend’s birthday celebration. I wanted to create something special that would stand out among the usual cake options. While browsing through my pantry for inspiration, the sight of those familiar black-and-white cookies caught my eye. “What if I could incorporate Oreos?” I thought. The idea of a mini cheesecake infused with that classic Oreo flavor sparked my creativity, and before I knew it, I was mixing and tasting, feeling like a true kitchen alchemist.
The party was a hit! Guests raved about these little morsels, and their faces lit up with joy after each bite. It was that night I discovered the magic of individual desserts. There’s something so personal about having a treat made just for you, and I knew I had to share this recipe with all my culinary companions. Fast forward to today, and I’m thrilled to guide you through making your very own Mini Oreo Cheesecakes!
Ingredients
Here’s what you’ll need to create these luscious little cheesecakes:
-
8 oz cream cheese, softened
This is the star of the show! Softening the cream cheese is essential for a smooth and creamy texture. If you’re in a pinch, you can use Neufchâtel for a lighter option. -
1/2 cup powdered sugar
This sweetener dissolves beautifully into the cream cheese, giving the filling that silky-smooth finish. Need a swap? Coconut sugar will work, but it’s dark and may affect the final color slightly. -
1/2 cup heavy cream
Whipping cream adds lightness and richness. If you prefer a lower-fat version, you can use half-and-half, but it won’t whip up quite as fluffy. -
1 tsp vanilla extract
A splash of vanilla enhances the flavors and adds a lovely aroma. Always opt for pure vanilla extract when you can—it’s worth it! -
10 Oreo cookies, crushed
These delicious cookies will give our cheesecakes that classic flavor and a nice crunch. If you’re feeling adventurous, try different flavored Oreos for a unique twist!
Step-by-Step Instructions
Now, let’s make these adorable cheesecakes! Follow these steps closely, and I promise they will be a breeze to whip up:
-
Prepare the Cupcake Liners
Start by placing cupcake liners in a muffin tin. This will help with the removal later and ensure a beautiful presentation. Pro tip: choose festive liners if you’re feeling celebratory! -
Crush the Oreos
Place your 10 Oreo cookies in a zip-top bag and crush them using a rolling pin or your hands until they resemble fine crumbs. Alternatively, you can pulse them in a food processor for finer crumbs. This will be your crust! Leave a handful of crumbs to sprinkle on top later — it’s all about that final touch! -
Make the Cheesecake Filling
In a mixing bowl, combine the 8 oz of softened cream cheese and 1/2 cup of powdered sugar. Using an electric mixer, beat until smooth and creamy. This step is crucial—you want to make sure there are no lumps! Keep scraping down the sides of your bowl to ensure an even consistency. -
Add the Heavy Cream and Vanilla
Pour in the 1/2 cup heavy cream and 1 tsp of vanilla extract into your cream cheese mixture. Beat again until the mixture is thick and fluffy. This step usually takes about 2-3 minutes. If you’re feeling fancy, whip the cream separately until it forms stiff peaks before folding it in—this adds extra lightness! -
Fold in the Oreo Crumbs
Gently fold in the crushed Oreos, ensuring they’re evenly distributed. This gives you that lovely contrast between the creamy cheesecake and the crunchy bits of cookie. -
Fill the Cups
Spoon the cheesecake filling into your prepared cupcake liners, filling them about three-quarters of the way full. Smooth the tops with a spatula for a neat finish. Don’t worry about being too precise—that little rustic charm adds to the inviting nature of the dessert! -
Chill and Set
Place the muffin tin in the fridge for at least 4 hours, or ideally overnight. This chilling time is essential to help your cheesecakes set properly. While you’re waiting, treat yourself to a cup of tea or coffee; you’ve earned it! -
Serve and Enjoy
Once the cheesecakes are set, remove them from the muffin tin and remove the cupcake liners carefully. Top with the reserved Oreo crumbs and a dollop of whipped cream for that extra touch of decadence!
Serving Suggestions
To serve your Mini Oreo Cheesecakes, you can plate them on a beautiful dessert stand or arrange them on a rustic wooden board for that charming, homey vibe. Consider adding fresh mint leaves or a drizzle of chocolate sauce for a pop of color and contrast. And remember—presentation matters, but it’s the taste that truly counts, so don’t stress too much about it!
Recipe Variations
Here are a few fun variations to spice up your Mini Oreo Cheesecakes:
-
Peanut Butter Twist
Add 1/4 cup of creamy peanut butter to your cheesecake mixture for a rich, nutty flavor. -
Minty Fresh
Substitute mint Oreos for a refreshing spin and add a drop or two of mint extract. -
Fruit-Filled Delight
Top your cheesecakes with fresh berries or a quick berry compote for a fruity contrast. -
Chocolate Drizzle
Melt some chocolate and drizzle it over the cheesecakes just before serving for a luxurious touch. -
Gluten-Free Version
Use gluten-free Oreos and ensure your powdered sugar is gluten-free for a luscious treat everyone can enjoy!
Chef’s Notes
I can’t help but laugh when I think back to the first time I made these cheesecakes. I was so eager to whip them up that I accidentally confusingly added double the amount of powdered sugar! What resulted was an unbelievably sweet filling—almost too much for my taste! But instead of a disaster, it turned into a fun learning experience. I learned to take my time and follow my intuition in the kitchen. Remember, every mishap is a chance to learn!
FAQs and Troubleshooting
-
Q: My cheesecakes are too liquidy. What went wrong?
A: Make sure the cream cheese is fully softened before mixing. Also, ensure you whip the heavy cream until it reaches stiff peaks before folding it into the mixture for perfect texture. -
Q: Can I freeze these cheesecakes?
Absolutely! Just wrap them tightly in plastic wrap and foil, then store them in an airtight container. They can be frozen for up to 2 months. Thaw them in the fridge before serving. -
Q: How long do these last in the fridge?
They should be good for about 5 days in the refrigerator. Just keep them covered to maintain freshness! -
Q: Are these kid-friendly?
Definitely! Little ones love the mini size. Just keep an eye on portion sizes if they’re in a sugar rush!
Nutritional Info (Optional)
While indulging in delicious desserts can mean giving up a bit on the nutritional side, here’s a rough estimate for each mini cheesecake:
- Calories: 150
- Fat: 10g
- Carbohydrates: 15g
- Protein: 2g
Ultimately, indulging in sweets occasionally is all about balance, so enjoy these cheesecakes guilt-free!
Mini Oreo Cheesecakes are a delightful way to spread joy and sweeten any occasion. With easy preparation, customizable flavors, and irresistible taste, they’ll become a favorite no matter where you serve them. So, roll up those sleeves, gather your ingredients, and let’s create something timeless at your table! Tie on your apron, and let the fun begin!
PrintMini Oreo Cheesecakes
Bite-sized mini cheesecakes that combine creamy cheesecake and crunchy Oreos for a delightful treat.
- Prep Time: 15 minutes
- Cook Time: 240 minutes
- Total Time: 255 minutes
- Yield: 12 servings 1x
- Category: Dessert
- Method: No-Bake
- Cuisine: American
- Diet: Vegetarian
Ingredients
- 8 oz cream cheese, softened
- 1/2 cup powdered sugar
- 1/2 cup heavy cream
- 1 tsp vanilla extract
- 10 Oreo cookies, crushed
Instructions
- Prepare the cupcake liners by placing them in a muffin tin.
- Crush the Oreo cookies in a zip-top bag until they resemble fine crumbs.
- Make the cheesecake filling by beating the cream cheese and powdered sugar until smooth.
- Add the heavy cream and vanilla extract to the mixture and beat until thick and fluffy.
- Fold in the crushed Oreos carefully.
- Fill the cupcake liners with the cheesecake mixture.
- Chill in the fridge for at least 4 hours, or overnight.
- Serve with reserved Oreo crumbs and whipped cream on top.
Notes
Can be customized with various Oreo flavors or toppings. Best served chilled for a delightful experience.
Nutrition
- Serving Size: 1 serving
- Calories: 150
- Sugar: 10g
- Sodium: 200mg
- Fat: 10g
- Saturated Fat: 6g
- Unsaturated Fat: 4g
- Trans Fat: 0g
- Carbohydrates: 15g
- Fiber: 1g
- Protein: 2g
- Cholesterol: 30mg
Keywords: cheesecake, mini desserts, Oreo, no-bake, easy recipes