Cheesy Ground Beef and Rice Casserole
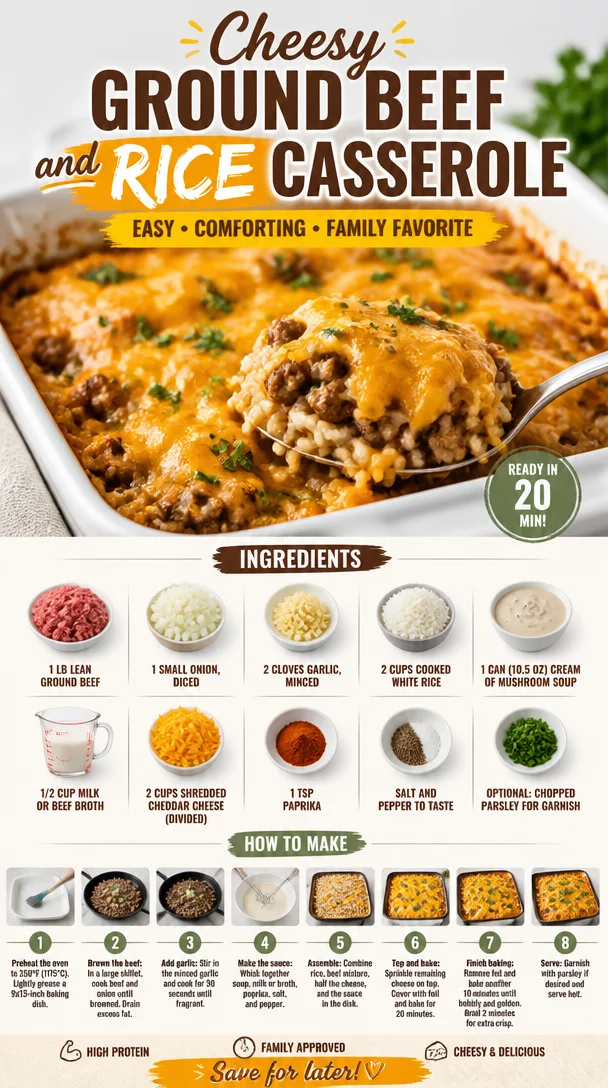
Cheesy Ground Beef and Rice Casserole: A Cozy Comfort Dish
Hello, friends! Today, we’re diving into a warm, cheesy, and oh-so-delicious dish that has nostalgia written all over it: Cheesy Ground Beef and Rice Casserole. When I think about cozy food that feels like a warm hug, this casserole instantly comes to mind. It’s simple, comforting, and perfect for those busy weeknight dinners or when company comes knocking unexpectedly. Plus, it’s incredibly adaptable, making it a staple in my kitchen.
Together, we’ll transform lean ground beef, fluffy rice, creamy goodness, and ooey-gooey cheese into a fabulous casserole that will have everyone asking for seconds. So slip on your apron, pour a glass of something cheerful, and let’s create a dish that’s as delicious as it is comforting.
My Cheesy Casserole Adventure
Let me take you back to my childhood, where one of my absolute favorite memories revolves around this casserole. Picture this: it’s a Friday night, the scent of something delicious wafts through the air, and as I come down the stairs, I can already hear laughter and clinking dishes from the dining room. My mom used to whip up this cheesy ground beef and rice casserole as a way to end the week on a high note.
She’d gather us all around the table, and while we devoured her creation, my siblings and I would share stories from our week. It was more than just a meal; it was a ritual – a moment to connect over stories and laughter, to be present for one another after the chaos of a busy week. I’ll never forget how she’d serve it straight from the oven, the melted cheese bubbling away, and the laughter spilling out like the best seasoning. It feels like yesterday yet remains etched in my heart forever. That’s the power of food! So, let’s recreate this moment in your kitchen.
Ingredients
Here’s what you’ll need to create your very own Cheesy Ground Beef and Rice Casserole:
-
1 lb lean ground beef
Ground beef is the cornerstone of this dish. Choose lean for a healthier option, but if you’re feeling indulgent, a bit of fatty beef adds rich flavor. You can also substitute with ground turkey or chicken if you prefer something lighter. -
1 small onion, diced
Onions bring a sweet and savory base to our casserole. If you’re not a fan of onions, feel free to swap with shallots or even leeks for a milder flavor. -
2 cloves garlic, minced
Garlic is a must-have! It elevates any dish and makes it feel gourmet. If you adore garlic, add an extra clove or two. If fresh isn’t available, garlic powder works too. -
2 cups cooked white rice
This is our binder that makes everything stick together. Brown rice can be used for a nuttier flavor, or even cauliflower rice for a low-carb option. -
1 can (10.5 oz) cream of mushroom soup (or cream of chicken)
This adds creaminess and richness. Don’t have any on hand? Whip up a quick white sauce using butter, flour, and milk if needed. -
1/2 cup milk or beef broth
This will help mix everything together. Chicken broth is also a great substitute, or even vegetable broth for a meat-free version. -
2 cups shredded cheddar cheese (divided)
You can’t have a cheesy casserole without cheese! Cheddar is classic, but feel free to mix it up with Monterey Jack or Pepper Jack for an extra kick. -
1 tsp paprika
Paprika adds flavor and a beautiful pop of color. Feel free to use smoked paprika for a deeper, smoky taste. -
Salt and pepper to taste
These are essential for bringing out all the flavors. Don’t shy away from seasoning it just right! -
Optional: chopped parsley for garnish
A sprinkle of parsley not only brightens the appearance but also adds a fresh element.
Step-by-Step Instructions
Ready to get cooking? Let’s break down the steps to build this delicious casserole!
-
Preheat Your Oven
Preheat your oven to 350°F (175°C). A warm oven ensures our casserole cooks evenly and the cheese gets perfectly melty. -
Cook the Ground Beef
In a large skillet over medium heat, add your lean ground beef. Cook until it’s browned, breaking it up with a wooden spoon as it cooks. This should take about 5 to 7 minutes. Look out for any pink bits—you want it all to be a nice, even browning. -
Add the Aromatics
Once the beef is browned, toss in the diced onion and garlic directly into the skillet. Sauté for another 3-4 minutes until the onion becomes translucent and fragrant. The smell is going to make you so hungry! -
Mix in the Rice
Stir in the cooked rice, and mix well with the beef and onion mixture—this will add texture and heartiness to our casserole. Make sure everything is evenly combined. -
Create the Creamy Mixture
Pour in the cream of mushroom soup and milk (or broth), followed by the paprika, and season with salt and pepper. Stir until everything is well combined. This is where the magic happens—smooth, creamy goodness! -
Add Cheese
Now comes the cheesy part! Fold in 1½ cups of shredded cheddar cheese to the mixture. Reserve ½ cup for topping later. Cheese makes everything better, don’t you think? -
Transfer and Bake
Pour your beef and rice mixture into a greased 9×13-inch baking dish. Even it out using a spatula, and then sprinkle the remaining cheese on top. Pop it into the preheated oven for about 25-30 minutes, or until it’s bubbling and golden on top. That’s the cue to drool! -
Serve it Up
Once out of the oven, let it rest for about 5 minutes. This allows everything to settle. If you’re feeling fancy, sprinkle some chopped parsley on top for that gorgeous pop of color!
Serving Suggestions
When it comes to serving your casserole, keep it classy yet homey. Scoop generous portions onto plates and serve alongside a fresh green salad to balance the richness. Warm biscuits or crusty bread can be a delightful addition too. And don’t forget—this dish is all about sharing, so gather everyone around for good times and great food!
Recipe Variations
Here are some fun ideas to put your own spin on this casserole:
- Mexican Twist: Add black beans, corn, and taco seasoning for a Tex-Mex flavor.
- Vegetarian Option: Substitute the ground beef with lentils or diced vegetables like bell peppers and zucchini for a plant-based dish.
- Spicy Kick: Mix in some jalapeños or a splash of hot sauce for those who like it spicy!
- Asian Inspired: Swap the cream of mushroom soup for a creamy sesame dressing and add stir-fried veggies for an entirely different experience.
- Herby Delight: Incorporate fresh herbs like thyme or rosemary for a fragrant twist that will add depth to every bite.
Chef’s Notes
As I reflect on how this casserole has evolved over the years, I can’t help but chuckle. What started as a simple, hearty dish has transformed into my go-to for gatherings and comforting family dinners. I once forgot to add cheese before baking and ended up creating an impromptu cheese sauce on top afterward with delicious results! Cooking is all about experimentation—and the occasional happy accident. This dish, like all recipes, is a canvas—so feel free to paint it however you like!
FAQs and Troubleshooting
1. Can I make this dish ahead of time?
Absolutely! You can prepare everything up to the baking step, cover it tightly, and refrigerate for up to 24 hours. When you’re ready to enjoy, simply pop it in the oven, likely extending the cooking time by about 10 minutes.
2. What if my casserole is too dry?
If you find your casserole drying out while baking, don’t panic! You can add a splash more broth or milk to the mixture before baking, or a drizzle of olive oil will do the trick too!
3. How do I store leftovers?
Leftovers can be stored in an airtight container in the refrigerator for up to 3 days. Reheat in the microwave or in the oven for the best results—just cover it with foil to keep it from drying out.
4. Can I freeze the casserole?
Yes, you can freeze it before baking! Just wrap it tightly in plastic wrap and foil. When you’re ready, thaw it in the fridge overnight and bake as directed.
Nutritional Info (Optional)
For those watching their intake, here’s a quick nutritional overview per serving (approx. 1 cup):
- Calories: 350
- Protein: 25g
- Carbohydrates: 30g
- Fat: 18g
- Fiber: 2g
Note: Values may vary based on specific ingredient choices and portion sizes.
And there you have it—my take on a classic Cheesy Ground Beef and Rice Casserole that will warm your heart and fill your belly. I hope you take this recipe into your kitchen, create your own cherished memories, and share it with loved ones for years to come. Happy cooking!
PrintCheesy Ground Beef and Rice Casserole

A warm and cheesy dish perfect for cozy family dinners, combining lean ground beef, fluffy rice, and gooey cheese.
- Prep Time: 15 minutes
- Cook Time: 30 minutes
- Total Time: 45 minutes
- Yield: 4 servings 1x
- Category: Main Course
- Method: Baking
- Cuisine: American
- Diet: Beef
Ingredients
- 1 lb lean ground beef
- 1 small onion, diced
- 2 cloves garlic, minced
- 2 cups cooked white rice
- 1 can (10.5 oz) cream of mushroom soup (or cream of chicken)
- 1/2 cup milk or beef broth
- 2 cups shredded cheddar cheese (divided)
- 1 tsp paprika
- Salt and pepper to taste
- Optional: chopped parsley for garnish
Instructions
- Preheat your oven to 350°F (175°C).
- Cook the ground beef in a large skillet over medium heat until browned, about 5 to 7 minutes.
- Add the diced onion and garlic, sauté for another 3-4 minutes.
- Mix in the cooked rice and combine well.
- Create the creamy mixture by adding cream of mushroom soup, milk (or broth), paprika, and seasoning.
- Add 1½ cups shredded cheddar cheese, then transfer to a greased 9×13-inch baking dish.
- Transfer the mixture and bake for about 25-30 minutes until bubbling and golden on top.
- Serve hot, optionally garnished with chopped parsley.
Notes
This casserole can be made ahead of time and is very adaptable; consider adding black beans for a Mexican twist.
Nutrition
- Serving Size: 1 serving
- Calories: 350
- Sugar: 2g
- Sodium: 600mg
- Fat: 18g
- Saturated Fat: 8g
- Unsaturated Fat: 8g
- Trans Fat: 0g
- Carbohydrates: 30g
- Fiber: 2g
- Protein: 25g
- Cholesterol: 70mg
Keywords: casserole, comfort food, ground beef, easy dinner, family recipe

One-Pan Ground Beef & Sweet Potato Taco Bowls w/ Lime Crema
Delicious Ground Beef Sweet Potato Taco Bowl with Lime Crema
Introduction
Hello, my fellow food lovers! If you’re looking for a dish that’s bursting with flavor, easy to prepare, and perfect for a weeknight dinner or a fun gathering with friends, then this Ground Beef Sweet Potato Taco Bowl with Lime Crema is just the ticket. Picture this: flavorful, seasoned ground beef, tender roasted sweet potatoes, and creamy lime-infused goodness all piled into a bowl and topped with vibrant fixings. Sounds inviting, doesn’t it?
As we embark on this culinary adventure together, rest assured that every bite of this taco bowl invites warmth and comfort into your home. With just the right balance of spices and textures, this dish is as lovely to look at as it is to eat. Your dinner guests will be raving, and you’ll be the star of the night, all without the slightest hint of kitchen intimidation!
Before we dive into the details, let’s take a moment to appreciate how a simple bowl of food can foster connections and create memories. Food has an incredible way of bringing us together, sparking laughter, and igniting conversations that linger far beyond the meal itself. So, grab your apron and let’s bring some magic to your table with this scrumptious Ground Beef Sweet Potato Taco Bowl!
Personal Story
Let me take you back to one of my early cooking escapades. It was a rainy afternoon, and my best friend Anna and I decided to host an impromptu taco night. With only a few ingredients on hand, we scavenged through the pantry and discovered some lean ground beef, a couple of sweet potatoes, and a nearly empty taco seasoning packet hiding in the back. Challenge accepted!
As we chopped, sautéed, and seasoned, the sweet aroma of caramelizing sweet potatoes filled the kitchen, weaving its way through my home, creating an atmosphere filled with warmth and excitement. We added a dollop of sour cream and a squeeze of lime, and, oh my goodness, it was heavenly! We couldn’t believe how delightful a few simple ingredients could turn into such a feast. That night, we reminisced about childhood memories, shared dreams, and created new ones—all while enjoying our spontaneous creation. It’s moments like these that make me love cooking deeply; it’s not just about the food; it’s about the memories we create around the table.
Ingredients
-
1 lb lean ground beef (90/10 or 93/7)
Perfect for a flavorful base that’s not overly greasy. You can substitute with ground turkey or chicken for a lighter option. -
2 medium sweet potatoes, cubed into 1/2-inch pieces
Sweet potatoes add a natural sweetness and a boost of nutrients. Feel free to swap with regular potatoes or even butternut squash! -
1-2 tablespoons olive oil
A drizzle enhances the flavor of the sweet potatoes while helping them caramelize. Avocado oil or grapeseed oil work well too! -
Salt, to taste
Elevates all the flavors! Always season as you go for the best results. -
Black pepper, to taste
A sprinkle adds depth. Try using freshly cracked for an extra punch. -
1/2 teaspoon chili powder or cumin
Either spice ranks high in flavor. They add warmth; if you enjoy heat, consider adding some cayenne! -
1 packet taco seasoning (or homemade blend of chili powder, cumin, paprika, oregano, garlic powder, onion powder, and cayenne pepper)
Taco seasoning is a lifesaver for flavor! Homemade blends can be tailored to your taste. -
1/4 cup water or beef broth
This helps to combine the spices and beef, creating a sauce-like consistency. Use vegetable broth for a vegetarian option. -
1 can black beans, rinsed and drained
You can never go wrong with black beans! They’re rich in protein and fiber; kidney beans are also a good option. -
1 cup canned or frozen corn, thawed
Sweet corn adds pops of sweetness and color. Fresh corn can be used in season for extra flavor. -
2 cups cooked white or brown rice (or quinoa, cauliflower rice, or lettuce for a greens-based bowl)
Rice serves as the hearty base. Quinoa or cauliflower rice keeps it lighter; use crispy lettuce for a fresh crunch! -
1/2 cup sour cream (or Greek yogurt)
The creamy touch balances the dish beautifully. For a lighter alternative, try plain Greek yogurt! -
Juice of 1/2 to 1 lime (to taste)
Lime adds brightness. Adjust based on your preference! -
2 tablespoons finely chopped fresh cilantro
Fresh herbs create a lovely freshness; parsley can substitute if cilantro isn’t your thing. -
Toppings: diced avocado, extra fresh cilantro, cotija cheese (or cheddar/Monterey Jack), hot sauce, sliced jalapeños, pickled red onions
These toppings are all about personal preference and creativity! Customize your bowl with what you love.
Step-by-Step Instructions
-
Prepare the Sweet Potatoes
Preheat your oven to 425°F (220°C). While it heats, start peeling and chopping your sweet potatoes into 1/2-inch cubes. The uniform size ensures even cooking! Toss the cubes in a bowl with 1-2 tablespoons of olive oil, salt, black pepper, and chili powder or cumin. Spread them out on a baking sheet, making sure they’re not overcrowded. We want that gorgeous caramelization, so give them room to roast! Bake for about 20-25 minutes or until they’re golden and tender. Flip halfway through for the best results. -
Cook the Ground Beef
While the sweet potatoes roast, let’s get that delicious beef cooking! Heat a large skillet over medium heat. Add the lean ground beef and cook, breaking it apart with a spoon until browned, about 5-7 minutes. Use a slotted spoon to drain excess grease if needed. The key here is to let it develop those brown bits on the bottom of the pan for extra flavor—so don’t rush this step! -
Flavor the Beef
Once the beef is cooked, add your taco seasoning and stir it in. Pour in 1/4 cup of water or beef broth, and let it simmer for about 5 minutes. This step creates a thicker sauce—perfect for your bowls! Make sure it’s well combined, and if you feel fancy, taste and adjust the seasoning as necessary. -
Heat the Black Beans and Corn
In another pan or the same one if you prefer, toss in the drained black beans and thawed corn. Heat them over medium heat until warmed through, about 3-4 minutes. For extra flavor, add a pinch of salt and pepper! -
Make the Lime Crema
In a small bowl, whisk together the sour cream (or Greek yogurt) and lime juice. It should be smooth and creamy with a zesty kick! Adjust the lime juice according to your taste. You can even sprinkle some lime zest for an extra burst! -
Assemble Your Taco Bowls
Now for the fun part! Start with a base of warm, fluffy rice or your choice of grain in each bowl. Then pile on the seasoned ground beef, followed by the roasted sweet potatoes, black beans, and corn. -
Dress It Up
Drizzle that lime crema generously over the top, and don’t forget your toppings! A sprinkle of cilantro, a few slices of avocado, a handful of cotija cheese, and perhaps a dash of hot sauce or sliced jalapeños if you’re feeling adventurous!
Serving Suggestions
To plate, consider using shallow bowls or deep plates that allow you to layer the ingredients attractively. Start by creating a beautiful swirl of rice at the bottom, followed by the beef, and finish with a colorful display of sweet potatoes, beans, and corn. The dreamy lime crema can be artfully drizzled on top in a circular motion for that Instagram-worthy touch. For a finishing touch, bring the toppings to the side for a pop of color and a DIY feel!
Recipe Variations
- Vegetarian Twist: Swap out the ground beef for a mix of sautéed mushrooms, bell peppers, and zucchini for a veggie-packed bowl.
- Spicy Kick: Add diced chipotle peppers in adobo sauce to the beef for a smoky heat.
- Southwest Style: Mix in chopped bell peppers and diced tomatoes with the beef for added freshness and flavor.
- Quinoa Base: Use cooked quinoa instead of rice for a protein-packed alternative that’s also gluten-free.
- Sweetness and Heat: Drizzle sriracha or a sweet chili sauce for a unique sweet and spicy experience.
Chef’s Notes
This recipe is one of those lovely dishes that has evolved wonderfully over time. What started as a simple, on-the-fly dinner has blossomed into a beloved go-to for any occasion. I often recall that rainy afternoon spent laughing with Anna, and it warms my heart to see my family and friends enjoy bowls filled with love and flavor. The great thing about this taco bowl is that it’s incredibly adaptable! You can truly make it your own with endless combinations. Don’t hesitate to play around with the spices and toppings! After all, cooking should be a joyful experience.
FAQs and Troubleshooting
-
My sweet potatoes are soggy! What went wrong?
An overcrowded baking sheet can lead to steaming instead of roasting. Ensure that your sweet potatoes have enough space when baking! -
Can I use a different protein?
Absolutely! Ground turkey, chicken, or even tofu can be fantastic substitutes. Adjust cooking times as necessary. -
What if I don’t have taco seasoning?
Don’t fret! You can create a quick mix with chili powder, cumin, paprika, oregano, garlic powder, onion powder, and a pinch of cayenne pepper for some heat. -
How can I make this dish ahead of time?
You can prep the ingredients and roast the sweet potatoes in advance. Assemble the taco bowls just before serving, or store them separately in the fridge until you’re ready to enjoy!
Nutritional Info
This taco bowl is not only delicious but also packed with nutrients. With the lean beef providing protein, sweet potatoes offering fiber and vitamins, and beans contributing additional protein and nutrients, it’s a well-rounded meal. Each serving provides a hearty amount of energy with balanced macronutrients—making it perfect for fueling your busy days!
So there you have it, a delightful dining experience wrapped up in a bowl! Each component works in harmony, making your taste buds dance with joy while you and your loved ones share and create lasting memories around the table. Happy cooking, and I can’t wait to hear how your Ground Beef Sweet Potato Taco Bowls turn out!
PrintGround Beef Sweet Potato Taco Bowl with Lime Crema

A flavorful and easy-to-prepare taco bowl featuring seasoned ground beef, roasted sweet potatoes, and a creamy lime sauce, perfect for any weeknight dinner or gathering.
- Prep Time: 15 minutes
- Cook Time: 30 minutes
- Total Time: 45 minutes
- Yield: 4 servings 1x
- Category: Main Course
- Method: Baking, Sautéing
- Cuisine: Mexican
- Diet: Gluten-Free
Ingredients
- 1 lb lean ground beef (90/10 or 93/7)
- 2 medium sweet potatoes, cubed into 1/2-inch pieces
- 1–2 tablespoons olive oil
- Salt, to taste
- Black pepper, to taste
- 1/2 teaspoon chili powder or cumin
- 1 packet taco seasoning (or homemade blend)
- 1/4 cup water or beef broth
- 1 can black beans, rinsed and drained
- 1 cup canned or frozen corn, thawed
- 2 cups cooked white or brown rice (or quinoa, cauliflower rice, or lettuce for a greens-based bowl)
- 1/2 cup sour cream (or Greek yogurt)
- Juice of 1/2 to 1 lime (to taste)
- 2 tablespoons finely chopped fresh cilantro
- Toppings: diced avocado, extra fresh cilantro, cotija cheese (or cheddar/Monterey Jack), hot sauce, sliced jalapeños, pickled red onions
Instructions
- Preheat your oven to 425°F (220°C). Peel and chop sweet potatoes into 1/2-inch cubes. Toss with olive oil, salt, pepper, and chili powder or cumin. Spread on a baking sheet and bake for about 20-25 minutes.
- Heat a large skillet over medium heat and add the ground beef. Cook until browned, about 5-7 minutes.
- Add taco seasoning and water or beef broth, simmer for about 5 minutes until well combined.
- Toss the black beans and corn in a pan and heat for 3-4 minutes.
- Whisk together sour cream and lime juice to make the lime crema.
- Assemble the taco bowls starting with a base of rice, topped with ground beef, sweet potatoes, black beans, and corn.
- Drizzle lime crema over the top and add your choice of toppings.
Notes
Feel free to customize the toppings and spice levels to your preference. The recipe allows for plenty of variations for dietary needs.
Nutrition
- Serving Size: 1 serving
- Calories: 450
- Sugar: 6g
- Sodium: 600mg
- Fat: 18g
- Saturated Fat: 6g
- Unsaturated Fat: 10g
- Trans Fat: 0g
- Carbohydrates: 45g
- Fiber: 8g
- Protein: 25g
- Cholesterol: 70mg
Keywords: taco bowl, ground beef, sweet potato, lime crema, easy dinner
Ultimate Cheesy Ground Beef Melt
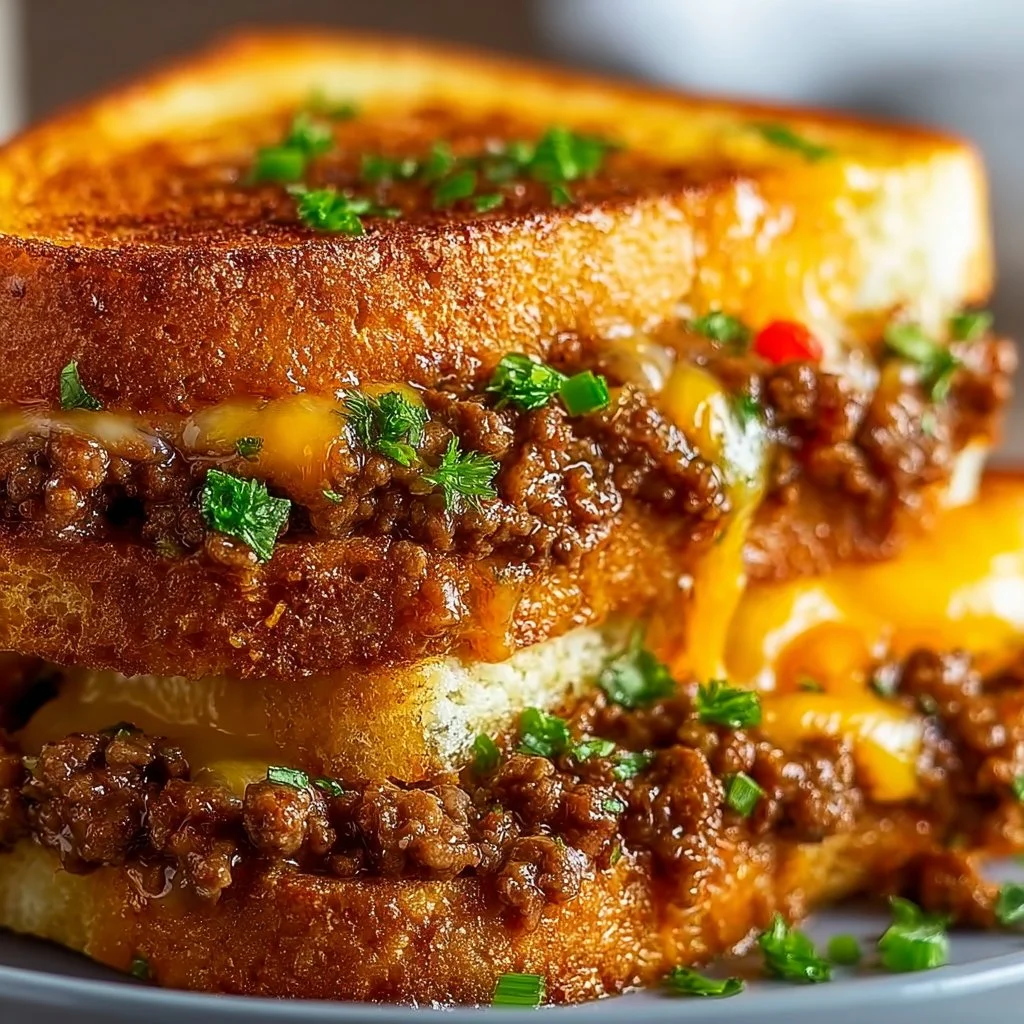
The Ultimate Cheesy Ground Beef Melt: A Comfort Food Classic
Introduction
Hello, culinary adventurers! I’m so excited you’re joining me today because we’re diving into one of my absolute favorite comfort food recipes: the Ultimate Cheesy Ground Beef Melt. It’s exactly what it sounds like—juicy, flavorful ground beef meeting a melty, gooey blanket of cheese all encapsulated in toasty bread. Yum, right?
There’s something so nostalgic about biting into a warm, cheesy melt that transports you back to those carefree days when dinner was simply about comfort, love, and the people gathered around the table. Whether you’re whipping this up for a weeknight meal, a cozy lunch, or a fun dinner party, this dish is sure to impress while still keeping things stress-free.
Now, let’s dive right in! I’ll share a personal story that showcases why this dish brings me joy, then take you through every step of the process, share chef tips, and sprinkle in a few fun variations that can personalize your melt. So, tie on your apron and let’s get cooking!
My Personal Story
When I think of the Ultimate Cheesy Ground Beef Melt, I’m transported back to my childhood kitchen, where my mom would host her “cheesy nights.” One evening, after a long day at school, I rushed home, my stomach growling in anticipation of the delightful aroma that filled our little home. My mom had whipped up this incredible ground beef dish, but the best part was watching her melt layers of gooey cheese over the top, transforming an everyday meal into something truly special.
We would sit around the kitchen table, my siblings and I, our plates piled high, laughter echoing against the walls as we shared stories from our day. Each bite was an explosion of flavor with the savory beef, the aromatic garlic and onions, and that melted cheese that stretched so beautifully—food that felt like a warm hug.
This simple yet fantastic recipe became a family staple, a tradition that I carry to this day. Whenever I prepare it now, I often find myself reminiscing, passing on the same warmth and joy to whoever joins me around the table. Trust me, my friends, once you taste this dish, it’ll weave its way into your own heart just like it did mine.
Ingredients
Before we get started, let’s round up our ingredients! Here’s what you’ll need for the Ultimate Cheesy Ground Beef Melt:
-
Ground Beef (1 lb): This is the star of the dish! I love using a higher fat content (80/20) for the juiciest results. For a healthier option, you can substitute it with ground turkey or chicken, but be careful not to dry it out.
-
Cheese (2 cups, shredded): Cheddar is my go-to for that sharpness, but mozzarella, Monterey Jack, or a melting blend can also do the trick. The creamier, the better!
-
Bread (4 slices or burger buns): Choose your favorite! Sandwich bread for a classic melt or burger buns for a heartier version. If you want a gluten-free alternative, look for gluten-free bread options or lettuce wraps.
-
Onion (1, diced, optional): Adds a lovely sweetness and complexity. If you’re not a fan, skip it, or swap in caramelized onions for a richer flavor.
-
Garlic (2 cloves, minced, optional): Fresh garlic brings that beautiful aromatic flavor. Feel free to substitute with garlic powder if you’re in a pinch!
-
Seasonings (Salt, pepper, paprika): Basic but essential! Salt enhances all the flavors, pepper adds a nice kick, and paprika tones it all down with a smokiness.
-
Butter or Oil (2 tbsp): For toasting the bread to perfection. You can choose olive oil for a lighter option or keep it classic with butter.
Step-by-Step Instructions
Now that we have everything ready, let’s get into the cooking! You won’t believe how simple this is to whip up. Follow these steps, and you’ll soon be savoring your cheesy creation.
-
Prep Your Ingredients: Begin by gathering all your ingredients. Chop that onion and mince your garlic, if you’re using them. Keeping everything within reach makes cooking much smoother and more enjoyable!
-
Cook the Ground Beef: In a large skillet, heat a tablespoon of butter or olive oil over medium-high heat. Once hot, add your ground beef, breaking it up with a spatula. Season it with salt, pepper, and paprika. Cook until browned, about 6-8 minutes, stirring occasionally. Don’t rush this step; you want all that flavor to develop! If you see excess fat, consider draining it off to avoid a greasy melt.
-
Add the Aromatics: If you’re using onions and garlic, now’s the time! Toss them in with the beef and let them sauté for about 3-4 minutes until the onions become translucent and the garlic smells heavenly. It’s like an instant flavor boost!
-
Melt the Cheese: Lower the heat to medium and sprinkle your cheese over the beef, covering it generously. Cover the skillet with a lid to let that cheese melt and become oozy, about 2-3 minutes. This is where the magic happens!
-
Toast the Bread: While your beef and cheese conjoin in cheesy harmony, heat another skillet or panini press with a little more butter or oil. If you’re using sandwich bread, take each slice or bun, and lightly brown them on both sides until golden and crispy—heavenly!
-
Assemble Your Melts: Now, take the toasted bread and pile on that flavorful beef and oozy cheese combo. Top it off with another slice of your crispy bread, creating a delicious sandwich that’s begging to be devoured.
-
Final Toasting: For extra melty goodness, consider grilling your assembled sandwiches in the same skillet over medium heat for a couple of minutes on each side until they’re golden brown and crisp. Nothing beats a perfectly toasted melt!
-
Slice and Serve: Once it’s all golden and cheesy, carefully slice those beauties in half. Feel free to get extra creative with your plating—maybe add a side of fresh greens or crispy fries for an indulgent touch!
Serving Suggestions
When serving your Ultimate Cheesy Ground Beef Melt, think of fun, hearty sides! A crisp salad with a tangy vinaigrette perfectly balances the richness of the melt, or consider some sweet potato fries for that added crunch. If you’re feeling adventurous, a touch of salsa or guacamole can elevate your melt to a whole new level!
Recipe Variations
Now for the fun part—personalizing your melt! Here are a few creative twists and flavor options to spice things up:
-
Spicy Kick: Add some diced jalapeños or a few dashes of hot sauce to bring on the heat.
-
Mushroom Delight: Sauté some mushrooms alongside the onions and garlic for an earthy component that pairs beautifully with beef and cheese.
-
Veggie Substitute: Incorporate lentils or black beans instead of beef for a vegetarian twist, maintaining that cheesy goodness.
-
Sourdough Bread: For a tangy, chewy texture, try sourdough bread instead of classic sandwich bread. The flavor combination is simply divine!
-
Herb Infusion: Fresh herbs like thyme or rosemary can give your melt a lovely aromatic flair. Just chop some finely and mix them in when cooking the beef.
Chef’s Notes
Oh, the stories I could tell about my cheesy nights gone awry! I once invited friends over for a “cheesy melt night,” only to realize I had burnt the first batch so badly it resembled charcoal. The laughter that erupted made it all worth it, but I learned the hard way to keep an eye on those toasting sandwiches! Since then, I’ve become a pro at keeping my kitchen timer handy.
I’ve also evolved the recipe over time, playing with the kind of cheese and seasonings until I landed on this dreamy combination. I genuinely believe that cooking should be fun and that experimenting in the kitchen can lead to delightful surprises!
FAQs and Troubleshooting
-
Why is my cheese not melting?
It can happen! Make sure you’re using a cheese known for melting, like cheddar or mozzarella. Covering the pan can also help trap in the heat for that gooey texture. -
Can I use a different type of meat?
Absolutely! Ground turkey or chicken work well too. Just remember to adjust seasoning and moisture, as lean meats can sometimes become dry. -
What if my bread is getting too brown before the cheese melts?
If you notice the bread browning too quickly, simply lower the heat. Alternatively, you can cover the skillet briefly to help the cheese melt while preventing the bread from getting overly crispy. -
Can I make this dish in advance?
Sure! You can prepare the ground beef mixture ahead and store it in the fridge. When you’re ready to eat, just reheat it, add cheese, and assemble the melts.
Nutritional Info
You might be curious about the nutritional breakdown. While this recipe is rich and indulgent, each melt can provide around 400-500 calories, depending on the ingredients used. If you’re counting calories, you can go light on bread and cheese or add more veggies to keep it balanced.
Now that you’re equipped with this Ultimate Cheesy Ground Beef Melt recipe, I hope you feel inspired to gather your loved ones, share some laughs, and create memorable meals. Remember, cooking should be joyful—just as much about the experience as the outcome. Happy cooking, friends!
PrintUltimate Cheesy Ground Beef Melt

A comforting and indulgent ground beef melt topped with gooey cheese and toasted bread, perfect for any meal.
- Prep Time: 15 minutes
- Cook Time: 20 minutes
- Total Time: 35 minutes
- Yield: 4 servings 1x
- Category: Main Course
- Method: Grilling
- Cuisine: American
- Diet: None
Ingredients
- 1 lb Ground Beef
- 2 cups Cheese (shredded)
- 4 slices Bread or burger buns
- 1 Onion (diced, optional)
- 2 cloves Garlic (minced, optional)
- Salt (to taste)
- Pepper (to taste)
- Paprika (to taste)
- 2 tbsp Butter or Oil
Instructions
- Prep your ingredients by gathering everything and chopping onion and mincing garlic if using.
- Cook the ground beef in a skillet over medium-high heat for 6-8 minutes until browned, seasoning with salt, pepper, and paprika.
- Add the onions and garlic to the beef and sauté for about 3-4 minutes until onions become translucent.
- Melt the cheese over the beef, covering the skillet with a lid for 2-3 minutes until oozy.
- Toast the bread in another skillet or panini press until golden and crispy.
- Assemble the melts by piling the beef and cheese on the toasted bread and topping with another slice.
- Final toasting of the sandwiches for an additional few minutes on each side until golden brown.
- Slice and serve your melts with preferred sides.
Notes
For a healthier option, substitute ground beef with turkey or chicken. Consider adding mushrooms, jalapeños, or herbs for a twist!
Nutrition
- Serving Size: 1 sandwich
- Calories: 450
- Sugar: 2g
- Sodium: 600mg
- Fat: 25g
- Saturated Fat: 12g
- Unsaturated Fat: 10g
- Trans Fat: 0g
- Carbohydrates: 30g
- Fiber: 2g
- Protein: 25g
- Cholesterol: 80mg
Keywords: ground beef, cheesy melt, comfort food, sandwiches, easy recipes