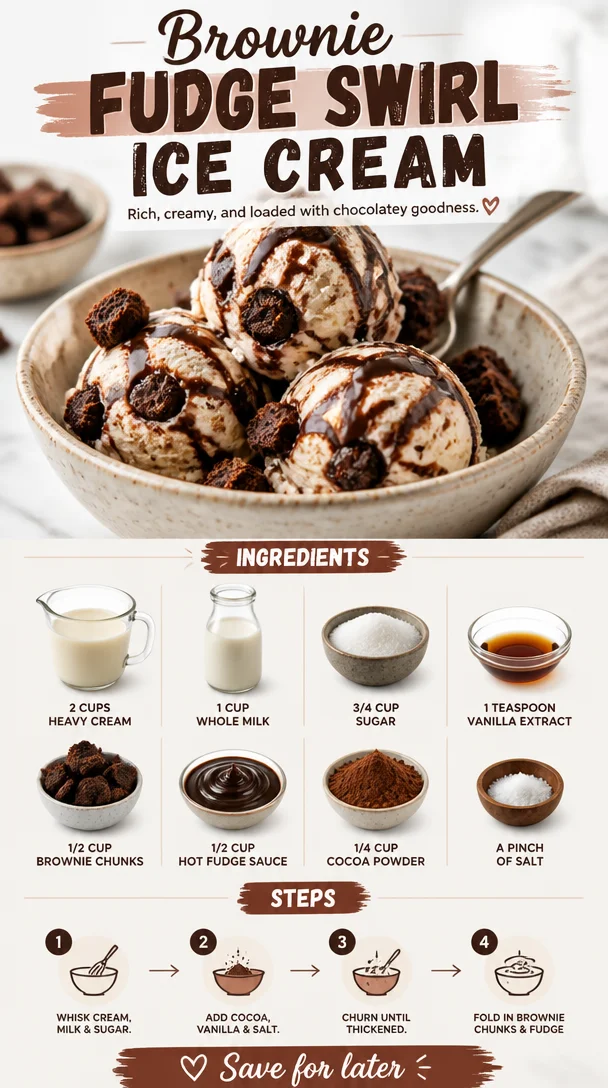
Brownie Fudge Swirl Ice Cream
Indulge in Homemade Brownie Fudge Swirl Ice Cream
Hello, ice cream lovers! Today, we’re diving into a sweet, creamy adventure that brings nostalgia and indulgence right into your kitchen. I’m excited to share with you my recipe for Brownie Fudge Swirl Ice Cream — a luscious treat that marries rich brownie chunks and decadent hot fudge into a silky ice cream base. This recipe is not only fun to make, but it also creates moments of pure joy when shared with family and friends around your table.
Picture this: it’s a warm summer evening, and you’ve just hosted a dinner party. The sun is golden, the candles are flickering, and laughter fills the air. As dinner wraps up, you whisk out bowls of this mouthwatering Brownie Fudge Swirl Ice Cream. Your guests’ eyes light up with excitement as the indulgent flavors of chocolate dance at the forefront, while the brownie bits add a delightful chew. It’s these kinds of moments that remind me of why I love cooking and sharing food so much.
But let me take you back to my very first homemade ice cream experience. It was years ago, during a cozy summer break when I was just starting my culinary journey. Armed with a newly acquired ice cream maker and an insatiable sweet tooth, I decided to create a classic vanilla base. However, in my eager spirit, I tossed in everything I could find in my pantry — chocolate chips, fresh berries, and yes, even crushed-up brownies! The result? A wonderfully chaotic and delicious swirl of flavors that completely swept me off my feet. That whimsical experiment inspired my love for creating ice cream that’s not only delicious but also tells a story.
Fast forward to today, this Brownie Fudge Swirl Ice Cream has become a staple in my kitchen. It’s a perfect representation of how simple ingredients can come together to create something remarkable. Ready to whip some up yourself? Let’s get started!
Ingredients
Let’s gather our ingredients! Here’s what you’ll need to bring this dreamy ice cream to life:
-
2 cups heavy cream: The cream is the star here, giving our ice cream that luxurious, rich texture. Opt for heavy cream, as it has a higher fat content which translates to creamier ice cream. If you’re looking for a lighter version, you can use half-and-half instead, but keep in mind the texture will be slightly different.
-
1 cup whole milk: This adds a slight lightness to our ice cream while balancing the richness of the heavy cream. If you’re dairy-free, you could substitute with coconut milk for a tropical twist.
-
3/4 cup sugar: Sugar not only sweetens our ice cream but also keeps it scoopable by lowering the freezing point. For a healthier alternative, consider using honey or agave syrup, but reduce the amount since they are sweeter than sugar.
-
1 teaspoon vanilla extract: Vanilla is a classic flavor enhancer that elevates every sweet dish. Use pure vanilla extract for the best flavor; however, you can use a vanilla bean for a more intense infusion (just scrape the seeds right into the mixture).
-
1/2 cup brownie chunks: The hero of our dessert! You can use store-bought brownies or homemade ones—whatever you prefer. If you’re in a pinch, even chocolate cake can work!
-
1/2 cup hot fudge sauce: This adds rich chocolatey goodness and a beautiful ribbon of flavor. You can either make your own or purchase a quality store-bought version. If you want a lighter option, a chocolate ganache can be a great substitute.
-
1/4 cup cocoa powder: This deepens the chocolate flavor of our ice cream beautifully. Use Dutch-processed cocoa for a smoother taste, or stick to natural cocoa for a more pronounced chocolate punch.
-
A pinch of salt: Salt is the secret ingredient that enhances all those sweet flavors. Don’t skip this — it’s a game-changer!
Step-by-Step Instructions
Ready to create some magic? Let’s dive into the steps:
-
Prepare Your Ice Cream Base: In a mixing bowl, whisk together the heavy cream, whole milk, sugar, cocoa powder, and vanilla extract until the sugar and cocoa are fully dissolved. This might take a few minutes of good whisking. I love using a whisk for this step to really incorporate air into the mixture — it makes for extra fluffy ice cream!
-
Chill the Mixture: Now, pour the mixture into an airtight container and place it in the refrigerator for at least 2 hours, or ideally overnight. This chilling ensures that your mixture is super cold when it hits the ice cream maker, which helps achieve that creamy texture!
-
Churn Time: When you’re ready to turn your chilled mixture into ice cream, get your ice cream maker ready. Pour the base into your machine and churn according to the manufacturer’s instructions. Typically this takes about 20-30 minutes. As it churns, you’ll see it start to thicken up — this is the best part!
-
Adding Brownie and Fudge: Once the ice cream is thick and creamy, gently fold in the brownie chunks. I like to break the brownies into smaller pieces so that there’s a perfect bite of brownie in every spoonful. Then, drizzle in the hot fudge sauce and swirl it gently — you want beautiful ribbons but not a full blend. The visual contrast is as appetizing as the taste!
-
Freeze Your Ice Cream: Transfer the ice cream to a lidded container and smooth the top. Freeze for at least 4 hours, or until firm. While waiting is hard, it gives all those flavors time to meld together beautifully. And trust me, it’s worth the wait!
-
Ready to Serve: When you’re ready to dig in, take your ice cream out of the freezer and let it sit for about 10 minutes to soften just slightly — this makes it easier to scoop.
Serving Suggestions
Plating your Brownie Fudge Swirl Ice Cream can be just as fun as making it! Serve it in classic ice cream bowls and top it with a sprinkle of chocolate shavings, a drizzle of extra hot fudge, or even some whipped cream for that extra flair. For an elegant touch, consider garnishing with fresh mint leaves or a sprinkle of sea salt, which can elevate that chocolate flavor profile.
Recipe Variations
One of the best things about homemade ice cream is the ability to customize. Here are a few fun variations you can try:
- Nutty Twist: Add a handful of chopped pecans or walnuts along with the brownie chunks for a delightful crunch.
- Mint Chocolate Fudge: Incorporate peppermint extract for a refreshing mint flavor that pairs beautifully with chocolate.
- Cookie Dough Delight: Instead of brownies, fold in chunks of edible cookie dough for a fun twist.
- Fruity Fudge: Consider swirling in strawberry or raspberry puree for a fruity contrast to the fudge — sweet and tart at the same time!
Chef’s Notes
I must confess, this recipe has gone through a few delightful evolutions over the years! Initially, I was skeptical about adding hot fudge to ice cream — wouldn’t it just melt and mess everything up? But oh, how wrong I was! That wonderful gooey chocolate actually creates a texture that is to die for. I remember one summer party where my friends and I had a contest to see who could come up with the craziest ice cream combination. There were some epic flavor fusions, but nothing could top this brownie fudge creation. I still smile at the memories and laughter that filled my kitchen that night.
FAQs and Troubleshooting
-
Why is my ice cream too hard to scoop?
- If your ice cream is almost rock solid, it could be due to excess air being churned into the mixture or it simply being frozen for too long. For a softer texture, try letting it sit out at room temperature for about 10 minutes before scooping.
-
Can I make this ice cream without an ice cream maker?
- Absolutely! Simply pour the cold ice cream base into a shallow dish, place it in the freezer, and stir every 30 minutes for about 3-4 hours, or until it reaches a smooth creamy consistency.
-
How can I make my ice cream smoother?
- Make sure to chill your mixture thoroughly before churning, and don’t skip the process of folding in your chocolate and brownie after churning. Over-churning can also introduce too much air, making it less creamy.
-
Can I make this ice cream dairy-free?
- Yes! Substitute the heavy cream and milk with coconut cream and almond milk or any other dairy-free milk of your choice. Ensure your brownie chunks are also dairy-free!
Nutritional Info
While you’re savoring this indulgent treat, keep in mind that moderation is key. Enjoy personal-sized scoops, and relish every bite!
Conclusion
I hope you’re as excited as I am to create this delightful Brownie Fudge Swirl Ice Cream! It’s more than just a dessert; it’s a heartwarming experience that leads to sweet memories at the table. Whether you enjoy it on a hot summer day, at a celebration, or simply to treat yourself, I promise this ice cream will bring smiles all around. So grab your ingredients, tie on that apron, and let’s make some delicious memories together! Cheers to sweet moments!
PrintBrownie Fudge Swirl Ice Cream
Indulge in a delicious Brownie Fudge Swirl Ice Cream made with rich brownie chunks and decadent hot fudge.
- Prep Time: 15 minutes
- Cook Time: 30 minutes
- Total Time: 270 minutes
- Yield: 8 servings 1x
- Category: Dessert
- Method: Churning
- Cuisine: American
- Diet: Vegetarian
Ingredients
- 2 cups heavy cream
- 1 cup whole milk
- 3/4 cup sugar
- 1 teaspoon vanilla extract
- 1/2 cup brownie chunks
- 1/2 cup hot fudge sauce
- 1/4 cup cocoa powder
- A pinch of salt
Instructions
- Prepare Your Ice Cream Base: In a mixing bowl, whisk together the heavy cream, whole milk, sugar, cocoa powder, and vanilla extract until fully dissolved.
- Chill the Mixture: Pour it into an airtight container and refrigerate for at least 2 hours or overnight.
- Churn Time: Pour the chilled mixture into your ice cream maker and churn according to instructions, usually about 20-30 minutes.
- Adding Brownie and Fudge: Slowly fold in the brownie chunks and drizzle in the hot fudge sauce, swirling gently.
- Freeze Your Ice Cream: Transfer to a lidded container and freeze for at least 4 hours or until firm.
- Ready to Serve: Let it sit for about 10 minutes at room temperature before scooping.
Notes
For a dairy-free version, substitute heavy cream and milk with coconut cream and almond milk.
Nutrition
- Serving Size: 1 scoop
- Calories: 350
- Sugar: 25g
- Sodium: 150mg
- Fat: 20g
- Saturated Fat: 12g
- Unsaturated Fat: 8g
- Trans Fat: 0g
- Carbohydrates: 40g
- Fiber: 2g
- Protein: 5g
- Cholesterol: 80mg
Keywords: ice cream, dessert, brownie, fudge, homemade

Ingredient Peach Cobbler Ice Cream: Summer Treat
Scoops of Summer: Peach Cobbler Ice Cream Bliss
Hello there, my fellow food enthusiasts! Today, I’m bringing you a delightful sweet treat that perfectly captures the essence of summer: Peach Cobbler Ice Cream. Picture this: warm, sunny days filled with laughter, friends gathered around, and you, the star of the show, serving up scoops of creamy goodness infused with the taste of sweet peaches and baked cobbler. Sounds dreamy, right?
Why Peach Cobbler Ice Cream?
Peaches are one of summer’s greatest gifts. Juicy, succulent, and bursting with flavor, they remind me of lazy afternoons spent in my grandmother’s backyard, where she’d serve us homemade peach cobbler fresh from the oven. That crispy, buttery crust paired with the warmth of vanilla ice cream made it an unbeatable summer dessert. As I grew older and started experimenting in my own kitchen, the idea popped into my head: why not merge those two summer staples into one heavenly dessert? Thus, Peach Cobbler Ice Cream was born—a treat that brings back those sweet memories while keeping things vibrant and fun.
You’ll appreciate how effortless this recipe is to whip up at home using simple ingredients that elevate a classic cobbler with velvety ice cream. And trust me, once you make this, you’ll find yourself indulging in it long after summer fades away.
The Ingredients You’ll Need
Let’s talk about the star players of this dessert. Each ingredient is chosen for its role in delivering that beloved peach cobbler flavor. Here’s what you’ll need:
-
2 cups heavy cream
- This is the base of your ice cream, giving it that rich, creamy texture. If you prefer a lighter option, you can substitute half of this with coconut cream!
-
1 cup whole milk
- Whole milk adds a perfect balance of creaminess without being overly rich. Feel free to use low-fat milk, but do note that the texture may be less creamy.
-
3/4 cup granulated sugar
- Sugar is essential for sweetness and to help prevent ice crystals from forming, giving a smoother texture. You can try using a sugar alternative like honey or agave if you’re looking to cut out refined sugar.
-
1 teaspoon vanilla extract
- Vanilla enhances the flavor of the ice cream, making it taste homemade and oh-so-delicious. High-quality pure vanilla extract yields the best results; it’s totally worth it!
-
1 cup peach compote
- This will be your rich, peachy layer. You can make your own compote with fresh peaches or buy a jar from your favorite store. Make sure it’s flavorful and sweet.
-
1 cup cobbler crumb pieces
- Nothing says cobbler like those little bits of buttery, crispy goodness. Use leftover cobbler, or crumble up your favorite biscuit recipe as a topping.
-
1/2 cup salted caramel sauce
- This is the pièce de résistance! It adds a luxe touch while balancing the sweetness of the peaches. Don’t skimp on this step; homemade or store-bought works fabulously.
Step-by-Step Instructions
Now, let’s dive into the magic of making this Peach Cobbler Ice Cream! The process is straightforward and will have your kitchen smelling divine.
-
Prepare the Peach Compote
If you’re starting from scratch, peel and chop about 4 ripe peaches and cook them over medium heat with a bit of sugar (about 2 tablespoons) until they break down and become syrupy (around 10-15 minutes). Allow it to cool. -
Mix the Base
In a large mixing bowl, combine the heavy cream, whole milk, and granulated sugar. Whisk until the sugar dissolves completely. It’s important to mix until you don’t see any granules of sugar; this ensures a silky ice cream. -
Add the Flavor
Stir in the vanilla extract and peach compote, mixing well. The vibrant orange-peach color is a sure sign that you’re headed in the right direction! To intensify the peach flavor, you can add an extra splash of peach nectar if you’d like. -
Chill the Mixture
Cover your bowl with plastic wrap and refrigerate the mixture for at least 2 hours (or even overnight!). This helps develop flavor and ensures your ice cream churns up nice and creamy. -
Churn the Ice Cream
Once chilled, pour the mixture into your ice cream maker. Follow your manufacturer’s instructions: typically, this takes about 20-30 minutes until it thickens. -
Incorporate Cobbler Crumbs
Near the end of churning, add the cobbler crumb pieces to the mix. These delicious bits will make your ice cream feel like a true cobbler experience. If you like a swirl instead, just fold them in gently after churning. -
Transfer to a Container
Scoop your ice cream into a lidded container, layering in additional cobbler crumbs as you go if you want extra crunch. Drizzle all that caramel sauce over the top like an artistic drizzle! This will ensure every scoop has that divine caramel flavor. -
Freeze Until Firm
Cover the container and pop it into the freezer for at least 4 hours, or until it’s firm enough to scoop. Patience is key here, but it’ll be so worth it when you dig in!
Serving Suggestions
When it comes time to serve your Peach Cobbler Ice Cream, a little presentation goes a long way. Serve in rustic bowls or elegant dessert cups, and don’t forget to drizzle a little extra salted caramel on top for that mouth-watering finish. Garnish with fresh peach slices and crushed cobbler crumbs for added flair. You can also add a sprig of mint for a pop of color!
Recipe Variations
Feeling adventurous? Here are some creative tweaks to customize your Peach Cobbler Ice Cream:
- Frozen Yogurt Twist: Swap half the heavy cream for Greek yogurt for a tangy and creamy texture.
- Berry Blend: Mix in some fresh or frozen berries (like blueberries or raspberries) with the peach compote for added color and flavor.
- Nutty Crunch: Throw in some chopped pecans or almonds during the churning process for an irresistible crunch.
- Pre-Made Mixes: Use store-bought seasonal fruit compotes instead of making your own. Set yourself up for easy and quick enjoyment!
- Tropical Vibe: Incorporate coconut flakes and perhaps a hint of lime juice for a tropical twist to your summer favorite.
Chef’s Notes
As a passionate home cook, I’ve seen my recipes evolve over the years. Peach Cobbler Ice Cream is a reflection of that growth—a recipe that started as simply a craving for summer comfort food but morphed into a beloved centerpiece at gatherings. The beauty of cooking is experimentation; don’t hesitate to tweak it until it feels just right for you! O, and children absolutely adore this; you’ll definitely get requests for seconds—and thirds, I promise you that!
FAQs and Troubleshooting
-
Why is my ice cream icy?
Ice crystals can form if not enough sugar is added. Ensure you’re mixing the sugar well and consider adding a bit more if your mixture doesn’t taste sweet enough. -
How do I get a smoother texture?
Ensure your base is chilled thoroughly and churn it until it thickens well. Over-churning can lead to icy textures; know when to stop! -
Can I make this without an ice cream maker?
Absolutely! After mixing everything, pour it into a container and freeze. Stir every 30 minutes for the first 2-3 hours to break up ice crystals and create a creamier texture. -
How long does this ice cream last?
Typically, it’ll last about 2 weeks in the freezer. But let’s be real—isn’t ice cream always better fresh?
Nutritional Info
For those keeping an eye on nutritional intake, here’s a rough estimate per serving (based on eight servings):
- Calories: 400
- Total Fat: 25g
- Saturated Fat: 15g
- Carbohydrates: 45g
- Sugars: 35g
- Protein: 3g
Now that you’re all set to make this Peach Cobbler Ice Cream, know that each scoop brings back memories and creates new ones. Whether it’s a summer gathering or cozy night at home, this dessert is sure to brighten your day. So, tie on that cute apron, grab some friends, and let’s create something timeless! Enjoy! 🍑🍦
PrintPeach Cobbler Ice Cream

A delightful summer treat that combines the flavors of peach cobbler and creamy ice cream.
- Prep Time: 15 minutes
- Cook Time: 15 minutes
- Total Time: 240 minutes
- Yield: 8 servings 1x
- Category: Dessert
- Method: Churning
- Cuisine: American
- Diet: Vegetarian
Ingredients
- 2 cups heavy cream
- 1 cup whole milk
- 3/4 cup granulated sugar
- 1 teaspoon vanilla extract
- 1 cup peach compote
- 1 cup cobbler crumb pieces
- 1/2 cup salted caramel sauce
Instructions
- Prepare the peach compote by peeling and chopping peaches, then cook with sugar until syrupy.
- Mix the heavy cream, whole milk, and sugar in a bowl until sugar dissolves.
- Add the vanilla extract and peach compote, stirring to combine.
- Chill the mixture in the refrigerator for at least 2 hours.
- Churn the mixture in an ice cream maker according to the manufacturer’s instructions.
- Incorporate the cobbler crumbs near the end of churning.
- Transfer the ice cream to a lidded container, layering in extra crumbs if desired.
- Freeze for at least 4 hours until firm.
Notes
Serve in rustic bowls garnished with fresh peach slices, crushed cobbler crumbs, and a drizzle of salted caramel.
Nutrition
- Serving Size: 1 serving
- Calories: 400
- Sugar: 35g
- Sodium: 100mg
- Fat: 25g
- Saturated Fat: 15g
- Unsaturated Fat: 5g
- Trans Fat: 0g
- Carbohydrates: 45g
- Fiber: 1g
- Protein: 3g
- Cholesterol: 80mg
Keywords: peach cobbler, ice cream, summer dessert, frozen treat, homemade dessert
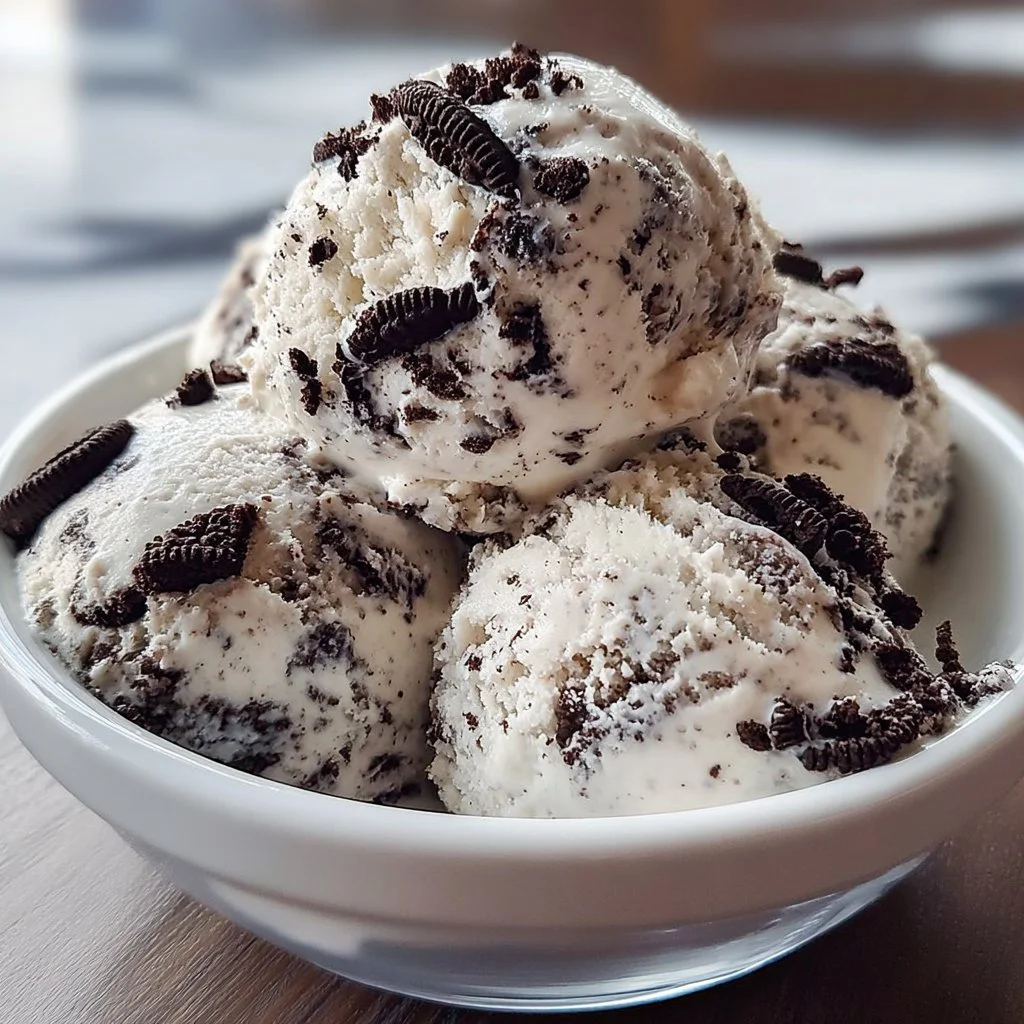
Cookies and Cream Ice Cream
The Joy of Homemade Cookies and Cream Ice Cream
Hello ice cream lovers! Let me take you on a delightful journey today as we explore one of my all-time favorite indulgences: Cookies and Cream Ice Cream. There’s something about the rich and creamy texture combined with the irresistible crunch of crushed Oreo cookies that just sings summer, childhood memories, and blissful adventures. What if I told you that you can create this beloved treat right in your own kitchen with just a handful of ingredients? Buckle up, because we’re diving into this dreamy creation together.
Personal Story: A Childhood Memory
Growing up, summer meant more than just long, sunny days and endless playtime; it was about daily trips to the local ice cream parlor. My friends and I would race down the street, our tiny legs moving at lightning speed, eager to pick out our favorite flavors. I was die-hard for Cookies and Cream. There was something magical about the way the crumbled Oreos blended with the sweet, velvety ice cream. I still remember sitting on the parlor’s rickety wooden benches, thick waffle cones dripping onto our hands as we giggled and debated which flavor was the best. Fast forward to today, and I still can’t resist that classic flavor, but now I make my own version—one that’s perfectly creamy, indulgent, and made with love.
Ingredients
Let’s gather our supplies for this ice cream dreamboat! Here’s what you’ll need:
-
2 cups heavy cream: This is the secret to getting that rich, smooth texture. You can substitute it with coconut cream for a dairy-free option, but the flavor won’t be as decadent.
-
1 cup sweetened condensed milk: This provides the necessary sweetness and creaminess. If you’re looking for a lower-sugar alternative, try using unsweetened condensed milk and adding a pinch of sugar to taste.
-
1 teaspoon vanilla extract: A must for adding depth to the flavors! You can use vanilla bean paste for an extra pop of flavor and those lovely little flecks.
-
1 cup crushed Oreo cookies: This is where the magic happens! Not a fan of Oreos? Any chocolate sandwich cookie will work, or you could even go wild with crushed chocolate wafers.
Step-by-Step Instructions
Now, let’s roll up those sleeves and get cooking! This is where the fun happens. Follow these steps to create your very own Cookies and Cream Ice Cream.
-
Prepare Your Mixing Bowl: Start by taking out a large mixing bowl. Ensure it’s chilled beforehand; this will help keep the cream from melting too quickly when whipped.
-
Whip the Heavy Cream: Pour the heavy cream into the bowl. Using an electric mixer, whip it on medium-high speed until soft peaks form. This usually takes about 2-3 minutes. What you’re looking for is fluffy, soft peaks that hold their shape but are still spoonable. Don’t overwhip; we want it light and airy, not butter!
-
Add Sweetened Condensed Milk and Vanilla: Once your cream is whipped to perfection, gently fold in the sweetened condensed milk and vanilla extract. Use a spatula to stir, taking care not to deflate all that beautiful whipped cream.
-
Incorporate the Crushed Oreos: Now for the fun part! Fold in the crushed Oreo cookies—reserve a few for topping, if you like. This step can get delightfully messy, and it’s absolutely worth it. The combination of textures makes every bite magical.
-
Chill the Mixture: Transfer your creamy cookie concoction to a suitable ice cream container or a loaf pan. Smooth the top with a spatula and cover it tightly with plastic wrap. This helps avoid ice crystals.
-
Freeze: Pop the container in the freezer for at least 4-6 hours, ideally overnight. This is the hardest part, but patience will pay off! The end result is a dreamy scoop of creamy goodness.
-
Enjoy Your Creation: Once frozen, take it out and let it sit for a few minutes to soften slightly. Scoop into your favorite bowl, top it with those reserved crumbled Oreos, and maybe a drizzle of chocolate sauce for the final touch.
Serving Suggestions
When serving your homemade Cookies and Cream Ice Cream, presentation is everything! Use a sturdy ice cream scoop for perfectly shaped scoops and serve in a chilled bowl to keep the ice cream from melting too quickly. For a fun twist, consider layering your ice cream with additional crushed Oreos or topping with whipped cream and a maraschino cherry for that classic sundae feel.
Recipe Variations
Feeling adventurous? Here are some creative twists you can try to elevate your ice cream experience:
-
Mint Cookies and Cream: Add a few drops of mint extract to the mixture for a refreshing twist.
-
Cookies and Cream Brownie Sundae: Serve your ice cream atop warm brownies and garnish with chocolate sauce and whipped cream.
-
Chocolate Chip Cookies and Cream: Swap out your Oreos for crumbled chocolate chip cookies for a delightful flavor combo.
-
Peanut Butter Swirl: Drizzle peanut butter into the mix before freezing for a rich and creamy peanut butter experience.
Chef’s Notes
Ah, this recipe has evolved beautifully over the years! It started with a simple desire to recreate that childhood parlor experience at home. I remember my first attempt—a delicious disaster! I forgot to whip the cream long enough, and the texture was all wrong. But that’s part of the fun! Every time I revisit this recipe, I tweak something because there’s always room for growth and personal flair. And let me tell you, making this with friends is a blast. There’s laughter in the air, and whether you’re spilling a scoop or adding a little too much cookie, it’s all part of the experience!
FAQs and Troubleshooting
1. Why is my ice cream icy?
If your ice cream has ice crystals, it likely hasn’t been mixed enough or needs to set longer. Make sure to whip your cream until soft peaks form for that creamy texture, and tightly cover the container before freezing.
2. Can I use low-fat cream instead?
While you can try low-fat cream, the richness and texture may not be the same. For a lighter version, consider a combination of low-fat whipped cream and Greek yogurt for creaminess.
3. How long will this ice cream last?
Homemade ice cream typically lasts about 1-2 weeks in the freezer, but it’s best enjoyed within a week for optimal texture and flavor.
4. What can I do if my ice cream won’t scoop easily?
Let it sit at room temperature for about 5-10 minutes to soften. This way, your scoop will glide right out!
Nutritional Info (if applicable)
While exact numbers may vary by brand and ingredient, a typical serving (about ½ cup) of this homemade Cookies and Cream Ice Cream will have approximately:
- Calories: 350
- Fat: 25g
- Carbohydrates: 32g
- Sugar: 24g
Indulging in a bowl of homemade Cookies and Cream Ice Cream is not just about the flavor; it’s about creating joyful memories that find their way back to the table. So grab that heavy cream and Oreos, roll up your sleeves, and dive into this delightful treat. You’ll find that making this ice cream brings as much happiness as enjoying it.
Happy cooking, and don’t forget to share those joyful moments with friends and family around the table! Enjoy every scoop!
PrintCookies and Cream Ice Cream

A creamy and indulgent homemade ice cream featuring crushed Oreo cookies for a delightful treat.
- Prep Time: 15 minutes
- Cook Time: 0 minutes
- Total Time: 360 minutes
- Yield: 4 servings 1x
- Category: Dessert
- Method: Freezing
- Cuisine: American
- Diet: Vegetarian
Ingredients
- 2 cups heavy cream
- 1 cup sweetened condensed milk
- 1 teaspoon vanilla extract
- 1 cup crushed Oreo cookies
Instructions
- Prepare Your Mixing Bowl: Start by taking out a large mixing bowl. Ensure it’s chilled beforehand to keep the cream from melting too quickly.
- Whip the Heavy Cream: Pour the heavy cream into the bowl and whip it on medium-high speed until soft peaks form (about 2-3 minutes).
- Add Sweetened Condensed Milk and Vanilla: Gently fold in the sweetened condensed milk and vanilla extract.
- Incorporate the Crushed Oreos: Fold in the crushed Oreo cookies, reserving a few for topping.
- Chill the Mixture: Transfer to an ice cream container, smooth the top, and cover with plastic wrap.
- Freeze: Pop the container in the freezer for at least 240-360 minutes, ideally overnight.
- Enjoy Your Creation: Once frozen, scoop into bowls, top with reserved crumbled Oreos, and enjoy!
Notes
For a dairy-free version, substitute heavy cream with coconut cream.
Nutrition
- Serving Size: 1/2 cup
- Calories: 350
- Sugar: 24g
- Sodium: 100mg
- Fat: 25g
- Saturated Fat: 15g
- Unsaturated Fat: 7g
- Trans Fat: 0g
- Carbohydrates: 32g
- Fiber: 1g
- Protein: 4g
- Cholesterol: 120mg
Keywords: ice cream, cookies and cream, homemade dessert