
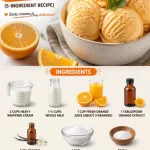
Creamy Homemade Orange Ice Cream (5-Ingredient Recipe)
Homemade Orange Ice Cream: A Zesty Delight
Hello and welcome to my kitchen! Today, you’re in for a real treat as we whip up some homemade orange ice cream that will not only cool you down but also transport you back to those sunny summer days of your childhood. There’s something magical about the rich, creamy texture combined with the zesty brightness of fresh oranges that makes this dessert a true delight.
Picture this: the sun casts its warm glow, the air is filled with laughter, and there you are, indulging in a scoop of the most refreshing ice cream. Every lick is a reminder of summers spent in the backyard, perhaps chasing after a soccer ball or lounging under a shady tree. Ice cream was the ultimate reward—nothing could beat the joy of savoring a treat that tasted like sunshine.
The beauty of making your own ice cream at home is that you can control the ingredients and customize the flavors to your heart’s content. My recipe for homemade orange ice cream is easy to follow and uses fresh ingredients that are not only delicious but good for you too. So, grab your apron and let’s get started!
My Ice Cream Memory
One summer evening, I remember sitting on the porch with my grandma, who had just finished churning a batch of her famous orange ice cream. The churning sound of the old machine was music to my ears. As we waited for those creamy dreams to solidify in the freezer, we shared stories about her childhood. That evening became one of my favorite memories, not only for the delicious treat but for the warmth of family stories and connection.
Grandma’s recipe had its quirks, and she always said the best part of making ice cream was tasting the mixture before it went into the churn. It felt like stealing a little secret. Now, I want to share that joy with you through this recipe. So let’s dive into the wonderful world of homemade ice cream!
Ingredients
Here’s what you’ll need to make this zesty delight:
-
2 cups heavy whipping cream: This gives the ice cream its rich, velvety texture. If you’re looking for a lighter version, you can use half and half.
-
1 ½ cups whole milk: Complements the cream for a perfectly smooth consistency. You can swap it out for low-fat milk or even a plant-based milk like coconut milk, but keep in mind the flavor may change slightly.
-
1 cup fresh orange juice (about 3 oranges): Freshly squeezed juice is a must for the bright, refreshing flavor! You can use bottled juice, but make sure it’s 100% orange juice without added sugars or preservatives.
-
1 tablespoon orange extract: This enhances the orange flavor and gives it an extra kick. If you want to tone it down, start with a teaspoon and adjust to taste.
-
2 teaspoons vanilla extract: Adds depth to the ice cream flavor and balances the citrus. Using homemade vanilla extract is a chef’s best-kept secret for an extra layer of warmth.
-
1 cup sugar: Sweetens the mixture perfectly. If you’re looking for a healthier alternative, you can use agave syrup or honey (and adjust the liquid content accordingly).
-
Pinch of salt: A little salt elevates the flavors, bringing out the sweetness and balancing the acidity of the oranges.
Step-by-Step Instructions
Ready to make some magic? Here’s how to create your homemade orange ice cream!
-
Juicing the Oranges (15 minutes): Start by juicing your fresh oranges. You’ll want about one cup of juice, so squeeze those beauties! This is the fun part; the fragrance of the freshly squeezed juice will fill your kitchen and bring a burst of sunshine. Tip: Use a citrus juicer or even a fork if you don’t have one handy. Don’t forget to strain out any seeds!
-
Mixing the Base (10 minutes): In a large mixing bowl, combine the heavy whipping cream, whole milk, fresh orange juice, orange extract, vanilla extract, sugar, and a pinch of salt. Chef Hack: Use a whisk to mix all the ingredients until the sugar is dissolved. This step is crucial because it ensures that your ice cream will be creamy and smooth without any gritty texture from undissolved sugar.
-
Chill the Mixture (1-2 hours): Cover the bowl with plastic wrap and place it in the refrigerator for at least one hour. Chilling the mixture will help it churn better, resulting in a creamier texture. Pro Tip: If you have time, letting it chill longer (even overnight) enhances the flavor!
-
Churning (20-30 minutes): Once chilled, pour the mixture into your ice cream maker and churn according to the manufacturer’s instructions. This process usually takes about 20-30 minutes. Tip: The mixture should thicken and double in size, becoming light and fluffy.
-
Freezing (4 hours or overnight): Transfer the churned ice cream into an airtight container and smooth the top with a spatula. Cover it with a piece of parchment paper before sealing the container to prevent ice crystals from forming. Freeze for at least four hours or overnight for best results.
-
Serve and Enjoy (5 minutes): Scoop your homemade orange ice cream into bowls or cones and savor the flavor! Serving Tip: Garnish with a few orange zest shavings or a sprig of mint to elevate the presentation.
Serving Suggestions
When it comes to serving your homemade orange ice cream, presentation is key! Use beautiful bowls or waffle cones to showcase your creation. Add an orange slice or a mint leaf on top for that extra touch of elegance!
For a more decadent dessert, serve it alongside a slice of warm chocolate cake or drizzle some melted dark chocolate over the top. The combination of sweet and tangy will make your taste buds dance!
Recipe Variations
Want to switch things up? Here are a few fun ideas to personalize your orange ice cream recipe:
-
Citrus Medley: Incorporate other citrus fruits like lemon or lime for a refreshing twist.
-
Creamy Sorbet: Substitute the cream with coconut milk for a dairy-free version that’s just as delicious.
-
Orange Creamsicle: Add a bit of zest and vanilla bean to replicate the classic summer treat.
-
Liqueur Infusion: For an adult version, consider adding a splash of triple sec or orange liqueur into the mix before churning.
-
Chocolate Chip: Stir in mini chocolate chips or candied orange peel just before transferring the mixture to the freezer for a delightful texture contrast.
Chef’s Notes
Creating this homemade orange ice cream has been a labor of love for me. Over time, I’ve experimented with different combinations and techniques. There was one particularly memorable concoction where I added in cardamom for a unique twist, which reminded me of my travels.
Also, I learned the hard way to always taste as you go. There was an unfortunate batch where I accidentally overdid the sugar, and I ended up with a soupy orange sugar syrup. It was still tasty, but you know—every error is just an opportunity to learn!
FAQs and Troubleshooting
1. My ice cream turned out hard! What did I do wrong?
- If your ice cream is too hard, it may have been frozen too long without being stirred. Allow it to sit at room temperature for a few minutes before scooping.
2. Can I make this without an ice cream maker?
- Yes! You can whip the mixture by hand or use a blender, pouring it into a container and mixing every 30 minutes for the first few hours to break up ice crystals.
3. Why is my ice cream grainy?
- This might happen if the sugar didn’t dissolve completely or if it froze too quickly. Make sure to mix well and chill before churning!
4. Can I add mix-ins?
- Absolutely! You can add in your favorite candies, nuts, or fruit chunks just before transferring to the freezer.
Making homemade orange ice cream is not just about whipping up a refreshing dessert; it’s about creating memories and enjoying the process in the kitchen. So tie on your apron, put on your favorite tunes, and let’s get to creating something delicious! I can’t wait for you to share your homemade creations—because good food isn’t just about the final product; it’s about the journey. Happy cooking!
PrintHomemade Orange Ice Cream
A refreshing homemade orange ice cream that combines rich creaminess with zesty brightness. Perfect for summer days!
- Prep Time: 15 minutes
- Cook Time: 30 minutes
- Total Time: 60 minutes
- Yield: 8 servings 1x
- Category: Dessert
- Method: Churning
- Cuisine: American
- Diet: Vegetarian
Ingredients
- 2 cups heavy whipping cream
- 1 ½ cups whole milk
- 1 cup fresh orange juice (about 3 oranges)
- 1 tablespoon orange extract
- 2 teaspoons vanilla extract
- 1 cup sugar
- Pinch of salt
Instructions
- Juicing the oranges: Start by juicing your fresh oranges. You’ll want about one cup of juice, so squeeze those beauties! Strain out any seeds.
- Mixing the base: In a large mixing bowl, combine the heavy whipping cream, whole milk, fresh orange juice, orange extract, vanilla extract, sugar, and a pinch of salt. Use a whisk to mix until the sugar is dissolved.
- Chill the mixture: Cover the bowl with plastic wrap and place it in the refrigerator for at least one hour.
- Churning: Once chilled, pour the mixture into your ice cream maker and churn according to the manufacturer’s instructions, usually taking about 20-30 minutes.
- Freezing: Transfer the churned ice cream into an airtight container, cover it with parchment paper, and freeze for at least four hours or overnight.
- Serve and enjoy: Scoop your homemade orange ice cream into bowls or cones and garnish as desired.
Notes
Feel free to customize with add-ins like chocolate chips or citrus zest. For a lighter version, use half and half instead of heavy cream.
Nutrition
- Serving Size: 1 serving
- Calories: 250
- Sugar: 25g
- Sodium: 80mg
- Fat: 15g
- Saturated Fat: 9g
- Unsaturated Fat: 3g
- Trans Fat: 0g
- Carbohydrates: 30g
- Fiber: 0g
- Protein: 3g
- Cholesterol: 60mg
Keywords: orange ice cream, homemade ice cream, summer dessert, citrus dessert
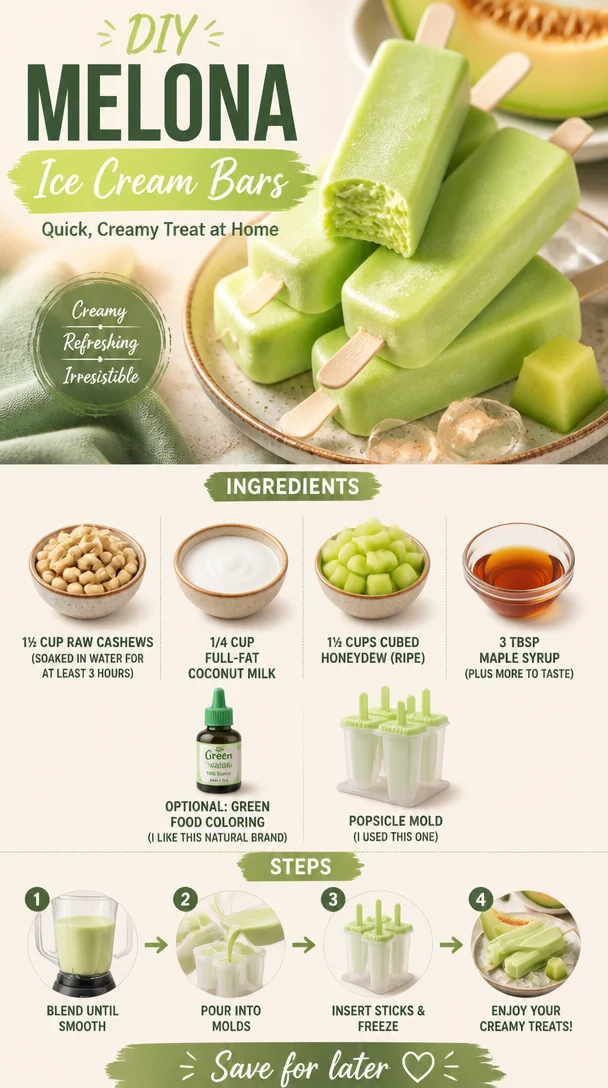
DIY Melona Ice Cream Bars: Quick, Creamy Treat at Home
Homemade Melona Ice Cream Bars: A Cool Treat to Beat the Heat
Hello, ice cream lovers! If you’re anything like me, the mere thought of warm sunshine, lazy afternoons, and the sound of kids laughing can only mean one thing: it’s ice cream season! Nothing quite hits the spot during those long, sunny days like a creamy, sweet homemade ice cream bar. Today, I’m excited to share with you my version of the delightful Melona Ice Cream Bar, a frozen treat inspired by the beloved South Korean dessert.
Imagine biting into a cold, refreshing honeydew ice cream bar—sweet, creamy, and oh-so-satisfying! But the best part? We’re making it completely dairy-free and using wholesome ingredients that will have your taste buds dancing. Trust me; you won’t need to head to the grocery store for those pre-packaged bars again after you whip these up in your kitchen. With just a few simple ingredients and a little bit of patience, you’ll create something that’s indulgent yet guilt-free. Ready to dive in? Let’s get started!
My Sweet Memory with Melona
Growing up, summers meant family road trips and roadside snack stops. One of my favorite treats was pausing at a little convenience store where we’d discover all sorts of goodies, including the iconic Melona bars. The first time I took a bite of that vibrant green ice cream wrapped in shiny packaging, it was pure magic! The coolness quenched my thirst while the sweet, fruity flavor almost felt like summer in every lick.
Each bite was a reminder of those carefree summer days and the joy of sharing simple pleasures with loved ones. Fast forward to today, and I’m thrilled to bring that nostalgic flavor to my kitchen in a way that feels fresh, fun, and completely healthy! Get ready to recreate those cherished memories and create new ones around your own table!
Ingredients
Here are the ingredients you’ll need to create these dreamy Melona ice cream bars:
-
1½ cup raw cashews (soaked in water for at least 3 hours): Cashews provide the creamy base for your ice cream, creating that rich texture we love while being dairy-free. Don’t have cashews? You can swap them for blanched almonds or macadamia nuts for a different flavor profile!
-
1/4 cup full-fat coconut milk: This luscious coconut cream sweetens and enriches the mixture, giving it a tropical feel. If you’re not a fan of coconut, you can use almond or oat milk for a lighter option.
-
1½ cups cubed honeydew (ripe): Honeydew is the star of the show here, and it adds that refreshing sweetness we cherished in those Melona bars. If honeydew is out of season, cantaloupe or ripe watermelon can serve as creative substitutes.
-
3 tbsp maple syrup (plus more to taste): Maple syrup sweetens the mixture naturally, making it light and flavorful. Agave syrup or date syrup can be fantastic substitutes too!
-
Optional: Green food coloring: For that iconic vibrant green color reminiscent of traditional Melona bars. I like a natural brand, but feel free to skip this if you prefer the natural hue.
-
Popsicle mold: This is where the magic happens! I used a silicone mold for easy release, but feel free to use whatever you have on hand.
Step-by-Step Instructions
Now that we have our ingredients ready, let’s get down to the delicious business of making these Melona ice cream bars!
-
Soak the Cashews: Start by soaking your raw cashews in water for at least three hours, or overnight if you can. This process softens the nuts, making them blend beautifully into the creamy base. Don’t skip this step—your ice cream’s texture will thank you!
-
Blend the Base: Once your cashews are nice and soft, drain and rinse them well. Toss them into a high-speed blender with the full-fat coconut milk, 1½ cups of cubed honeydew, and 3 tablespoons of maple syrup. Blend until smooth and creamy, scraping down the sides as needed. The consistency should be incredibly velvety, so take your time on this step for the best result. If you need a sweeter kick, taste the mixture and add more maple syrup as desired!
-
Add Color: If you’re feeling fancy and want that green hue to pop, add a few drops of green food coloring at this point. Blend again until you achieve your desired shade. Remember, natural color can be beautiful too—embrace the honeydew’s own soft tones!
-
Pour Into Molds: Carefully pour the creamy mixture into your popsicle molds. Leave a bit of space at the top for expansion when they freeze. If you have room, feel free to sprinkle in a few small pieces of fresh honeydew for added texture and surprise!
-
Insert Sticks: Follow the instructions for your molds to insert sticks. If they don’t hold up, you can freeze them for about an hour till the ice cream is slightly set before inserting the sticks.
-
Freeze: Pop the molds into the freezer for about 4-6 hours, or until fully frozen. It’s hard to wait, I know, but trust me—the anticipation will be worth it!
-
Unmold and Enjoy!: Once frozen, take the molds out and let them sit for a couple of minutes at room temperature for easy release. Gently wiggle the sticks to dislodge the bars, and they should slide right out! Now it’s time to enjoy!
Serving Suggestions
To serve, simply place your Melona ice cream bars on a cute plate or a popsicle stick holder for a fun, summery presentation. Drizzle them with a bit of melted dark chocolate or sprinkle some crushed nuts over the top for added texture. And if you’re feeling extra indulgent, serve them alongside some fresh fruit slices for a gorgeous spread!
Recipe Variations
Here are a few fun twists to make this recipe your own:
-
Tropical Melona: Add some crushed pineapple or mango instead of honeydew for a tropical vibe. You can also blend in a splash of coconut extract!
-
Minty Fresh: Toss in a handful of fresh mint before blending for a refreshing peppermint flavor.
-
Chocolate Dive: Make a chocolate version by swapping out part of the honeydew for cocoa powder or melted dark chocolate. Yum!
-
Raspberry Ripple: Before pouring the mixture into molds, fold in some homemade raspberry sauce for a fruity swirl!
-
Nut-Free Version: Replace the cashews with silken tofu for a soy-based alternative that’s rich and creamy without nuts.
Chef’s Notes
These Melona ice cream bars have been a fun addition to our family traditions. I love experimenting with flavors and colors, especially when kids get involved. My daughter is a pro at adding ingredients to the blender—though sometimes we end up with unexpected surprises! Like that one time I was aiming for chocolate mint and ended up with a green kale monstrosity! (Let’s just say we didn’t serve those at the dinner party!)
In any case, these bars are versatile! Over the years, I’ve transformed the original recipe countless times, always with delicious results! So don’t be shy—make them your own and share the love!
FAQs and Troubleshooting
1. My ice cream bars aren’t freezing properly. What did I do wrong?
This can happen if the mixture is too watery. Ensure that your cashews are well-soaked and blend until completely smooth. Also, check your freezer temperature—if it’s not cold enough, they may take longer to freeze.
2. Can I make these without a blender?
While I highly recommend a blender for the smoothest texture, you can mash the ingredients by hand if necessary, but the result will be chunkier. A food processor can also work if you have one!
3. How long can I store these ice cream bars?
They can be stored in an airtight container in the freezer for up to one month. However, they’re best enjoyed within a week for optimal flavor and texture!
4. What if I don’t have popsicle molds?
No popsicle molds? No problem! You can use small paper cups filled with the mixture and stick a toothpick in the center for a makeshift popsicle. Just freeze until solid!
Nutritional Info
Here’s a quick breakdown of the nutritional content for each Melona ice cream bar (approximation based on using cashews and honeydew):
- Calories: 150
- Protein: 3g
- Fat: 9g
- Carbohydrates: 14g
- Fiber: 1g
- Sugar: 7g
(Note: Nutritional values may vary based on exact ingredients and amounts used.)
Thank you for joining me on this cooling journey of Homemade Melona Ice Cream Bars! I hope this recipe inspires you to create beautiful, sweet moments in your kitchen. If you give it a try, be sure to share your creations with me—I’d love to see your delicious results! Cheers to summer and indulging (in moderation, of course) in this delightful frozen treat!
PrintHomemade Melona Ice Cream Bars
Refreshing homemade Melona ice cream bars made with wholesome, dairy-free ingredients that capture the iconic Korean dessert’s flavor.
- Prep Time: 15 minutes
- Cook Time: 0 minutes
- Total Time: 360 minutes
- Yield: 6 servings 1x
- Category: Dessert
- Method: Freezing
- Cuisine: Korean
- Diet: Vegan
Ingredients
- 1½ cup raw cashews (soaked in water for at least 3 hours)
- 1/4 cup full-fat coconut milk
- 1½ cups cubed honeydew (ripe)
- 3 tbsp maple syrup (plus more to taste)
- Optional: Green food coloring
- Popsicle mold
Instructions
- Soak the cashews in water for at least three hours, or overnight.
- Blend the soaked cashews, coconut milk, honeydew, and maple syrup until smooth and creamy.
- Add green food coloring if desired and blend again.
- Pour the mixture into popsicle molds, leaving space for expansion.
- Insert sticks into the molds as per the instructions, freezing slightly if needed.
- Freeze the molds for about 4-6 hours until fully frozen.
- Unmold the bars and enjoy!
Notes
For serving, drizzle melted dark chocolate or sprinkle crushed nuts on top. Enjoy these bars with fresh fruit slices for a delightful treat!
Nutrition
- Serving Size: 1 bar
- Calories: 150
- Sugar: 7g
- Sodium: 5mg
- Fat: 9g
- Saturated Fat: 7g
- Unsaturated Fat: 2g
- Trans Fat: 0g
- Carbohydrates: 14g
- Fiber: 1g
- Protein: 3g
- Cholesterol: 0mg
Keywords: Melona, ice cream, dairy-free, vegan, dessert, summer treats, popsicles

Ingredient Peach Cobbler Ice Cream: Summer Treat
Scoops of Summer: Peach Cobbler Ice Cream Bliss
Hello there, my fellow food enthusiasts! Today, I’m bringing you a delightful sweet treat that perfectly captures the essence of summer: Peach Cobbler Ice Cream. Picture this: warm, sunny days filled with laughter, friends gathered around, and you, the star of the show, serving up scoops of creamy goodness infused with the taste of sweet peaches and baked cobbler. Sounds dreamy, right?
Why Peach Cobbler Ice Cream?
Peaches are one of summer’s greatest gifts. Juicy, succulent, and bursting with flavor, they remind me of lazy afternoons spent in my grandmother’s backyard, where she’d serve us homemade peach cobbler fresh from the oven. That crispy, buttery crust paired with the warmth of vanilla ice cream made it an unbeatable summer dessert. As I grew older and started experimenting in my own kitchen, the idea popped into my head: why not merge those two summer staples into one heavenly dessert? Thus, Peach Cobbler Ice Cream was born—a treat that brings back those sweet memories while keeping things vibrant and fun.
You’ll appreciate how effortless this recipe is to whip up at home using simple ingredients that elevate a classic cobbler with velvety ice cream. And trust me, once you make this, you’ll find yourself indulging in it long after summer fades away.
The Ingredients You’ll Need
Let’s talk about the star players of this dessert. Each ingredient is chosen for its role in delivering that beloved peach cobbler flavor. Here’s what you’ll need:
-
2 cups heavy cream
- This is the base of your ice cream, giving it that rich, creamy texture. If you prefer a lighter option, you can substitute half of this with coconut cream!
-
1 cup whole milk
- Whole milk adds a perfect balance of creaminess without being overly rich. Feel free to use low-fat milk, but do note that the texture may be less creamy.
-
3/4 cup granulated sugar
- Sugar is essential for sweetness and to help prevent ice crystals from forming, giving a smoother texture. You can try using a sugar alternative like honey or agave if you’re looking to cut out refined sugar.
-
1 teaspoon vanilla extract
- Vanilla enhances the flavor of the ice cream, making it taste homemade and oh-so-delicious. High-quality pure vanilla extract yields the best results; it’s totally worth it!
-
1 cup peach compote
- This will be your rich, peachy layer. You can make your own compote with fresh peaches or buy a jar from your favorite store. Make sure it’s flavorful and sweet.
-
1 cup cobbler crumb pieces
- Nothing says cobbler like those little bits of buttery, crispy goodness. Use leftover cobbler, or crumble up your favorite biscuit recipe as a topping.
-
1/2 cup salted caramel sauce
- This is the pièce de résistance! It adds a luxe touch while balancing the sweetness of the peaches. Don’t skimp on this step; homemade or store-bought works fabulously.
Step-by-Step Instructions
Now, let’s dive into the magic of making this Peach Cobbler Ice Cream! The process is straightforward and will have your kitchen smelling divine.
-
Prepare the Peach Compote
If you’re starting from scratch, peel and chop about 4 ripe peaches and cook them over medium heat with a bit of sugar (about 2 tablespoons) until they break down and become syrupy (around 10-15 minutes). Allow it to cool. -
Mix the Base
In a large mixing bowl, combine the heavy cream, whole milk, and granulated sugar. Whisk until the sugar dissolves completely. It’s important to mix until you don’t see any granules of sugar; this ensures a silky ice cream. -
Add the Flavor
Stir in the vanilla extract and peach compote, mixing well. The vibrant orange-peach color is a sure sign that you’re headed in the right direction! To intensify the peach flavor, you can add an extra splash of peach nectar if you’d like. -
Chill the Mixture
Cover your bowl with plastic wrap and refrigerate the mixture for at least 2 hours (or even overnight!). This helps develop flavor and ensures your ice cream churns up nice and creamy. -
Churn the Ice Cream
Once chilled, pour the mixture into your ice cream maker. Follow your manufacturer’s instructions: typically, this takes about 20-30 minutes until it thickens. -
Incorporate Cobbler Crumbs
Near the end of churning, add the cobbler crumb pieces to the mix. These delicious bits will make your ice cream feel like a true cobbler experience. If you like a swirl instead, just fold them in gently after churning. -
Transfer to a Container
Scoop your ice cream into a lidded container, layering in additional cobbler crumbs as you go if you want extra crunch. Drizzle all that caramel sauce over the top like an artistic drizzle! This will ensure every scoop has that divine caramel flavor. -
Freeze Until Firm
Cover the container and pop it into the freezer for at least 4 hours, or until it’s firm enough to scoop. Patience is key here, but it’ll be so worth it when you dig in!
Serving Suggestions
When it comes time to serve your Peach Cobbler Ice Cream, a little presentation goes a long way. Serve in rustic bowls or elegant dessert cups, and don’t forget to drizzle a little extra salted caramel on top for that mouth-watering finish. Garnish with fresh peach slices and crushed cobbler crumbs for added flair. You can also add a sprig of mint for a pop of color!
Recipe Variations
Feeling adventurous? Here are some creative tweaks to customize your Peach Cobbler Ice Cream:
- Frozen Yogurt Twist: Swap half the heavy cream for Greek yogurt for a tangy and creamy texture.
- Berry Blend: Mix in some fresh or frozen berries (like blueberries or raspberries) with the peach compote for added color and flavor.
- Nutty Crunch: Throw in some chopped pecans or almonds during the churning process for an irresistible crunch.
- Pre-Made Mixes: Use store-bought seasonal fruit compotes instead of making your own. Set yourself up for easy and quick enjoyment!
- Tropical Vibe: Incorporate coconut flakes and perhaps a hint of lime juice for a tropical twist to your summer favorite.
Chef’s Notes
As a passionate home cook, I’ve seen my recipes evolve over the years. Peach Cobbler Ice Cream is a reflection of that growth—a recipe that started as simply a craving for summer comfort food but morphed into a beloved centerpiece at gatherings. The beauty of cooking is experimentation; don’t hesitate to tweak it until it feels just right for you! O, and children absolutely adore this; you’ll definitely get requests for seconds—and thirds, I promise you that!
FAQs and Troubleshooting
-
Why is my ice cream icy?
Ice crystals can form if not enough sugar is added. Ensure you’re mixing the sugar well and consider adding a bit more if your mixture doesn’t taste sweet enough. -
How do I get a smoother texture?
Ensure your base is chilled thoroughly and churn it until it thickens well. Over-churning can lead to icy textures; know when to stop! -
Can I make this without an ice cream maker?
Absolutely! After mixing everything, pour it into a container and freeze. Stir every 30 minutes for the first 2-3 hours to break up ice crystals and create a creamier texture. -
How long does this ice cream last?
Typically, it’ll last about 2 weeks in the freezer. But let’s be real—isn’t ice cream always better fresh?
Nutritional Info
For those keeping an eye on nutritional intake, here’s a rough estimate per serving (based on eight servings):
- Calories: 400
- Total Fat: 25g
- Saturated Fat: 15g
- Carbohydrates: 45g
- Sugars: 35g
- Protein: 3g
Now that you’re all set to make this Peach Cobbler Ice Cream, know that each scoop brings back memories and creates new ones. Whether it’s a summer gathering or cozy night at home, this dessert is sure to brighten your day. So, tie on that cute apron, grab some friends, and let’s create something timeless! Enjoy! 🍑🍦
PrintPeach Cobbler Ice Cream

A delightful summer treat that combines the flavors of peach cobbler and creamy ice cream.
- Prep Time: 15 minutes
- Cook Time: 15 minutes
- Total Time: 240 minutes
- Yield: 8 servings 1x
- Category: Dessert
- Method: Churning
- Cuisine: American
- Diet: Vegetarian
Ingredients
- 2 cups heavy cream
- 1 cup whole milk
- 3/4 cup granulated sugar
- 1 teaspoon vanilla extract
- 1 cup peach compote
- 1 cup cobbler crumb pieces
- 1/2 cup salted caramel sauce
Instructions
- Prepare the peach compote by peeling and chopping peaches, then cook with sugar until syrupy.
- Mix the heavy cream, whole milk, and sugar in a bowl until sugar dissolves.
- Add the vanilla extract and peach compote, stirring to combine.
- Chill the mixture in the refrigerator for at least 2 hours.
- Churn the mixture in an ice cream maker according to the manufacturer’s instructions.
- Incorporate the cobbler crumbs near the end of churning.
- Transfer the ice cream to a lidded container, layering in extra crumbs if desired.
- Freeze for at least 4 hours until firm.
Notes
Serve in rustic bowls garnished with fresh peach slices, crushed cobbler crumbs, and a drizzle of salted caramel.
Nutrition
- Serving Size: 1 serving
- Calories: 400
- Sugar: 35g
- Sodium: 100mg
- Fat: 25g
- Saturated Fat: 15g
- Unsaturated Fat: 5g
- Trans Fat: 0g
- Carbohydrates: 45g
- Fiber: 1g
- Protein: 3g
- Cholesterol: 80mg
Keywords: peach cobbler, ice cream, summer dessert, frozen treat, homemade dessert

No-Churn Coffee Crumble Ice Cream: 5-Ingredient Recipe
Indulge in the Richness of Coffee Crumble Ice Cream
Hello, fellow food lovers! If you’re anything like me, there’s nothing quite as comforting as a bowl of ice cream on a warm day—unless, of course, it happens to be Coffee Crumble Ice Cream. This delightful treat combines the rich, robust flavors of coffee with the sweet, crunchy goodness of toasted cashews and mini chocolate chips, creating a decadent dessert that’s sure to impress. Whether you’re winding down after a long day or entertaining friends, this ice cream is the perfect homemade indulgence.
A Simple Nostalgic Memory
Let me take you on a little journey down memory lane. Growing up, my grandmother was a magician in the kitchen. Among her many talents, she had a special knack for making ice cream. Every summer, she would surprise us all with her creations, but the highlight was always her coffee-flavored ice cream. I remember sitting on the sun-drenched porch as she churned the mixture, the smell of freshly brewed coffee wafting through the air.
I’d hover around the kitchen, eagerly waiting for that first spoonful, which was always a tiny bit melted—just the way I liked it. Grandmom would tell stories while we savored the sweet, creamy concoction. The combination of rich coffee, the crunch of nuts, and occasional chocolate bites felt like a hug in a bowl. Those moments were precious, and they all revolved around one magic ingredient: ice cream.
Now, I’m thrilled to share this nostalgia with you and hope this Coffee Crumble Ice Cream brings the same joy to your table!
Ingredients
Here’s what you’ll need to whip up this exquisite Coffee Crumble Ice Cream:
-
2 ½ tablespoons instant coffee granules
This is where the rich coffee flavor comes from. You can substitute it with brewed coffee for a more intense flavor—just ensure you reduce the cream slightly to maintain the right texture. -
1 tin sweetened condensed milk (395g/14oz)
This ingredient adds sweetness and creaminess, giving your ice cream that dreamy texture. You can use a dairy-free version if you want to make it vegan! -
1 teaspoon vanilla extract
Vanilla enhances the overall flavor profile. A good quality extract makes a noticeable difference here, but if you don’t have it, feel free to skip it in a pinch! -
2 ½ cups thickened cream (heavy cream) (600ml)
Essential for a rich and creamy texture. For a lighter version, you can use half-and-half or a non-dairy alternative—just check the fat content to ensure it freezes well. -
¾ cup toasted cashew nuts, roughly chopped
These add a delightful crunch and flavor. If you’re allergic to nuts, try crispy rice cereal for that needed texture! -
¾ cup mini chocolate chips (or ½ cup shaved chocolate)
Chocolate is the perfect complement to the coffee flavor. Dark chocolate works wonders if you prefer a deeper flavor, while white chocolate adds a sweeter touch!
Step-by-Step Instructions
Let’s dive into making this delightful treat together!
-
Dissolve Coffee Granules
Start by taking your instant coffee granules and mixing them with a tablespoon of warm water. This helps to dissolve the coffee evenly. If you choose to use brewed coffee, skip this step! -
Combine Cream and Condensed Milk
In a large mixing bowl, blend the thickened cream and sweetened condensed milk. Use a hand mixer or a whisk to combine them thoroughly. Whip until the mixture becomes slightly thickened, but don’t go too far; you want it to be airy yet smooth.Chef Tip: Go easy on the whipping! We’re looking for a soft peak, not stiff peaks.
-
Add Coffee and Vanilla
Once the cream and condensed milk are combined, gently fold in the dissolved coffee mixture and vanilla extract. Be careful to maintain as much air in the mixture as possible for that heavenly creaminess. -
Stir in Nuts and Chocolate
Now it’s time to add in the fun stuff! Gently fold in the toasted cashew nuts and mini chocolate chips. This step is so satisfying; you’ll want to savor how beautiful the mixture looks with those specks of chocolate and chunks of nuts. -
Freeze the Mixture
Pour the ice cream base into a suitable container—something airtight is ideal. Spread the mix evenly, cover, and place it in the freezer for at least 6-8 hours, or until it’s firm. -
Scoop and Serve
When you’re ready to enjoy your creation, pull it out of the freezer and let it sit for about 5-10 minutes for easier scooping. Dive in with a scoop and enjoy the rich flavors and creamy texture!
Serving Suggestions
For serving, I love to dish out the ice cream in stylish bowls, topped with a sprinkle of extra toasted cashews and a drizzle of chocolate sauce. You could even throw in a few coffee beans for that coffee lover’s flair! Serve it alongside a warm slice of cake or some cold brew coffee for a delightful dessert experience.
Recipe Variations
Feeling adventurous? Here are a few fun twists you can try with this base recipe:
- Mocha Crunch: Add a swirl of chocolate syrup throughout for a rich mocha flavor.
- Nutty Delight: Swap cashews for pecans or hazelnuts for a distinct crunch.
- Spiced Coffee: Add a pinch of cinnamon or nutmeg to give the ice cream some warmth and depth.
- Caramel Swirl: Drizzle with caramel sauce for extra sweetness.
- Vegan Version: Use coconut cream and maple syrup instead of condensed milk for a vegan-friendly treat.
Chef’s Notes
Making ice cream at home is truly an art, and I’ve loved playing with flavors and textures over the years. One fun memory I have was when I decided to experiment with different coffee beans during one summer picnic. I ended up using a bold espresso blend, and the results were astonishingly good! That was the magic moment I knew I could go beyond the basic recipe and reach new heights in flavor.
FAQs and Troubleshooting
1. Why is my ice cream too icy?
If your ice cream texture is icy, ensure that you are using fatty creams (like heavy cream) and whip enough air into the mixture. This helps create that velvety texture.
2. Can I use decaf coffee?
Absolutely! Decaf coffee works wonderfully if you love the flavor but want to avoid the caffeine rush.
3. My ice cream is too soft. What did I do wrong?
This can occur if the mixture isn’t cold enough before freezing or if it hasn’t been whipped adequately. Make sure to chill your ingredients and mix properly for the best results.
4. How long will this ice cream last in the freezer?
It will last about 2-3 weeks in the freezer, but trust me, it won’t last that long once everyone tries it!
Nutritional Info
While I won’t go into depths of calorie counts, it’s worth noting that indulging in homemade ice cream means you can control the quality of ingredients. Opting for lower sugar condensed milk and nut substitutes significantly changes these macronutrients, allowing for some guilt-free enjoyment!
So there you have it, my friends! A blend of nostalgia, flavor, and creative freedom that leads to the most delightful Coffee Crumble Ice Cream you can whip up at home. I hope you find joy in preparing this dish, just as I do, and don’t forget to share those lovely memories gathered around your table! Happy cooking!
PrintCoffee Crumble Ice Cream

A rich and creamy homemade ice cream made with coffee, toasted cashews, and mini chocolate chips.
- Prep Time: 15 minutes
- Cook Time: 0 minutes
- Total Time: 480 minutes
- Yield: 4 servings 1x
- Category: Dessert
- Method: Freezing
- Cuisine: American
- Diet: Vegetarian
Ingredients
- 2 ½ tablespoons instant coffee granules
- 1 tin sweetened condensed milk (395g/14oz)
- 1 teaspoon vanilla extract
- 2 ½ cups thickened cream (heavy cream) (600ml)
- ¾ cup toasted cashew nuts, roughly chopped
- ¾ cup mini chocolate chips
Instructions
- Dissolve coffee granules by mixing them with a tablespoon of warm water.
- Combine thickened cream and sweetened condensed milk in a large mixing bowl.
- Add the dissolved coffee mixture and vanilla extract, folding gently.
- Stir in toasted cashew nuts and mini chocolate chips.
- Freeze the mixture for at least 6-8 hours, or until firm.
- Scoop and serve, garnishing as desired.
Notes
For serving, top with extra toasted cashews or drizzle with chocolate sauce.
Nutrition
- Serving Size: 1 serving
- Calories: 350
- Sugar: 30g
- Sodium: 100mg
- Fat: 20g
- Saturated Fat: 10g
- Unsaturated Fat: 8g
- Trans Fat: 0g
- Carbohydrates: 40g
- Fiber: 2g
- Protein: 5g
- Cholesterol: 60mg
Keywords: ice cream, coffee dessert, homemade ice cream, summer treat, easy recipe
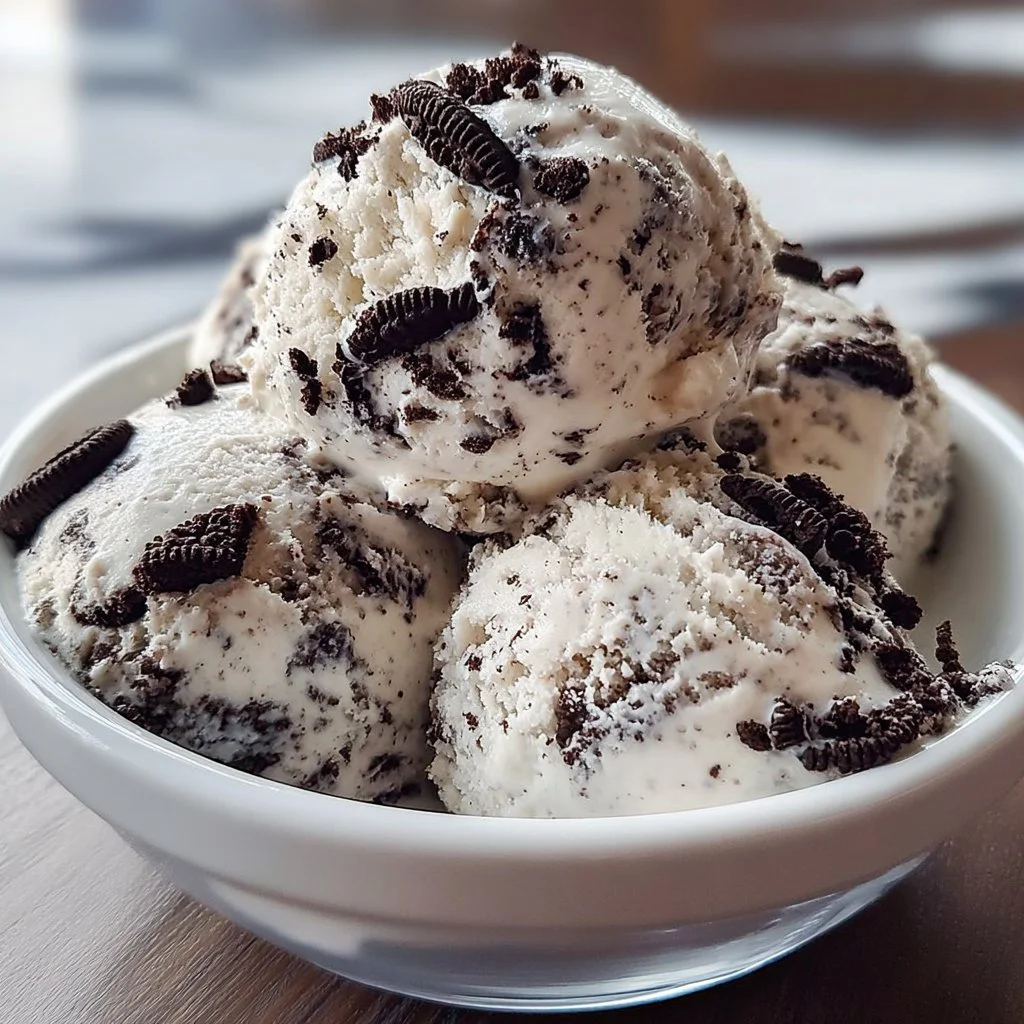
Cookies and Cream Ice Cream
The Joy of Homemade Cookies and Cream Ice Cream
Hello ice cream lovers! Let me take you on a delightful journey today as we explore one of my all-time favorite indulgences: Cookies and Cream Ice Cream. There’s something about the rich and creamy texture combined with the irresistible crunch of crushed Oreo cookies that just sings summer, childhood memories, and blissful adventures. What if I told you that you can create this beloved treat right in your own kitchen with just a handful of ingredients? Buckle up, because we’re diving into this dreamy creation together.
Personal Story: A Childhood Memory
Growing up, summer meant more than just long, sunny days and endless playtime; it was about daily trips to the local ice cream parlor. My friends and I would race down the street, our tiny legs moving at lightning speed, eager to pick out our favorite flavors. I was die-hard for Cookies and Cream. There was something magical about the way the crumbled Oreos blended with the sweet, velvety ice cream. I still remember sitting on the parlor’s rickety wooden benches, thick waffle cones dripping onto our hands as we giggled and debated which flavor was the best. Fast forward to today, and I still can’t resist that classic flavor, but now I make my own version—one that’s perfectly creamy, indulgent, and made with love.
Ingredients
Let’s gather our supplies for this ice cream dreamboat! Here’s what you’ll need:
-
2 cups heavy cream: This is the secret to getting that rich, smooth texture. You can substitute it with coconut cream for a dairy-free option, but the flavor won’t be as decadent.
-
1 cup sweetened condensed milk: This provides the necessary sweetness and creaminess. If you’re looking for a lower-sugar alternative, try using unsweetened condensed milk and adding a pinch of sugar to taste.
-
1 teaspoon vanilla extract: A must for adding depth to the flavors! You can use vanilla bean paste for an extra pop of flavor and those lovely little flecks.
-
1 cup crushed Oreo cookies: This is where the magic happens! Not a fan of Oreos? Any chocolate sandwich cookie will work, or you could even go wild with crushed chocolate wafers.
Step-by-Step Instructions
Now, let’s roll up those sleeves and get cooking! This is where the fun happens. Follow these steps to create your very own Cookies and Cream Ice Cream.
-
Prepare Your Mixing Bowl: Start by taking out a large mixing bowl. Ensure it’s chilled beforehand; this will help keep the cream from melting too quickly when whipped.
-
Whip the Heavy Cream: Pour the heavy cream into the bowl. Using an electric mixer, whip it on medium-high speed until soft peaks form. This usually takes about 2-3 minutes. What you’re looking for is fluffy, soft peaks that hold their shape but are still spoonable. Don’t overwhip; we want it light and airy, not butter!
-
Add Sweetened Condensed Milk and Vanilla: Once your cream is whipped to perfection, gently fold in the sweetened condensed milk and vanilla extract. Use a spatula to stir, taking care not to deflate all that beautiful whipped cream.
-
Incorporate the Crushed Oreos: Now for the fun part! Fold in the crushed Oreo cookies—reserve a few for topping, if you like. This step can get delightfully messy, and it’s absolutely worth it. The combination of textures makes every bite magical.
-
Chill the Mixture: Transfer your creamy cookie concoction to a suitable ice cream container or a loaf pan. Smooth the top with a spatula and cover it tightly with plastic wrap. This helps avoid ice crystals.
-
Freeze: Pop the container in the freezer for at least 4-6 hours, ideally overnight. This is the hardest part, but patience will pay off! The end result is a dreamy scoop of creamy goodness.
-
Enjoy Your Creation: Once frozen, take it out and let it sit for a few minutes to soften slightly. Scoop into your favorite bowl, top it with those reserved crumbled Oreos, and maybe a drizzle of chocolate sauce for the final touch.
Serving Suggestions
When serving your homemade Cookies and Cream Ice Cream, presentation is everything! Use a sturdy ice cream scoop for perfectly shaped scoops and serve in a chilled bowl to keep the ice cream from melting too quickly. For a fun twist, consider layering your ice cream with additional crushed Oreos or topping with whipped cream and a maraschino cherry for that classic sundae feel.
Recipe Variations
Feeling adventurous? Here are some creative twists you can try to elevate your ice cream experience:
-
Mint Cookies and Cream: Add a few drops of mint extract to the mixture for a refreshing twist.
-
Cookies and Cream Brownie Sundae: Serve your ice cream atop warm brownies and garnish with chocolate sauce and whipped cream.
-
Chocolate Chip Cookies and Cream: Swap out your Oreos for crumbled chocolate chip cookies for a delightful flavor combo.
-
Peanut Butter Swirl: Drizzle peanut butter into the mix before freezing for a rich and creamy peanut butter experience.
Chef’s Notes
Ah, this recipe has evolved beautifully over the years! It started with a simple desire to recreate that childhood parlor experience at home. I remember my first attempt—a delicious disaster! I forgot to whip the cream long enough, and the texture was all wrong. But that’s part of the fun! Every time I revisit this recipe, I tweak something because there’s always room for growth and personal flair. And let me tell you, making this with friends is a blast. There’s laughter in the air, and whether you’re spilling a scoop or adding a little too much cookie, it’s all part of the experience!
FAQs and Troubleshooting
1. Why is my ice cream icy?
If your ice cream has ice crystals, it likely hasn’t been mixed enough or needs to set longer. Make sure to whip your cream until soft peaks form for that creamy texture, and tightly cover the container before freezing.
2. Can I use low-fat cream instead?
While you can try low-fat cream, the richness and texture may not be the same. For a lighter version, consider a combination of low-fat whipped cream and Greek yogurt for creaminess.
3. How long will this ice cream last?
Homemade ice cream typically lasts about 1-2 weeks in the freezer, but it’s best enjoyed within a week for optimal texture and flavor.
4. What can I do if my ice cream won’t scoop easily?
Let it sit at room temperature for about 5-10 minutes to soften. This way, your scoop will glide right out!
Nutritional Info (if applicable)
While exact numbers may vary by brand and ingredient, a typical serving (about ½ cup) of this homemade Cookies and Cream Ice Cream will have approximately:
- Calories: 350
- Fat: 25g
- Carbohydrates: 32g
- Sugar: 24g
Indulging in a bowl of homemade Cookies and Cream Ice Cream is not just about the flavor; it’s about creating joyful memories that find their way back to the table. So grab that heavy cream and Oreos, roll up your sleeves, and dive into this delightful treat. You’ll find that making this ice cream brings as much happiness as enjoying it.
Happy cooking, and don’t forget to share those joyful moments with friends and family around the table! Enjoy every scoop!
PrintCookies and Cream Ice Cream

A creamy and indulgent homemade ice cream featuring crushed Oreo cookies for a delightful treat.
- Prep Time: 15 minutes
- Cook Time: 0 minutes
- Total Time: 360 minutes
- Yield: 4 servings 1x
- Category: Dessert
- Method: Freezing
- Cuisine: American
- Diet: Vegetarian
Ingredients
- 2 cups heavy cream
- 1 cup sweetened condensed milk
- 1 teaspoon vanilla extract
- 1 cup crushed Oreo cookies
Instructions
- Prepare Your Mixing Bowl: Start by taking out a large mixing bowl. Ensure it’s chilled beforehand to keep the cream from melting too quickly.
- Whip the Heavy Cream: Pour the heavy cream into the bowl and whip it on medium-high speed until soft peaks form (about 2-3 minutes).
- Add Sweetened Condensed Milk and Vanilla: Gently fold in the sweetened condensed milk and vanilla extract.
- Incorporate the Crushed Oreos: Fold in the crushed Oreo cookies, reserving a few for topping.
- Chill the Mixture: Transfer to an ice cream container, smooth the top, and cover with plastic wrap.
- Freeze: Pop the container in the freezer for at least 240-360 minutes, ideally overnight.
- Enjoy Your Creation: Once frozen, scoop into bowls, top with reserved crumbled Oreos, and enjoy!
Notes
For a dairy-free version, substitute heavy cream with coconut cream.
Nutrition
- Serving Size: 1/2 cup
- Calories: 350
- Sugar: 24g
- Sodium: 100mg
- Fat: 25g
- Saturated Fat: 15g
- Unsaturated Fat: 7g
- Trans Fat: 0g
- Carbohydrates: 32g
- Fiber: 1g
- Protein: 4g
- Cholesterol: 120mg
Keywords: ice cream, cookies and cream, homemade dessert