
Healthy Greek Yogurt Lemon Loaf Cake
Healthy Greek Yogurt Lemon Loaf Cake: A Culinary Hug in Every Slice
Hello, fellow food enthusiasts! Today, we’re diving into a delicately aromatic world of sunshine and sweetness with a recipe that will elevate your dessert game — Healthy Greek Yogurt Lemon Loaf Cake. This delectable cake is not only irresistibly moist and zesty, but it also packs a punch of protein thanks to the Greek yogurt. So grab your apron, tie it on, and let’s whip up something extraordinary that will delight your taste buds and warm your heart.
A Slice of Nostalgia
Let me whisk you back in time for a moment. I remember the first time I had a lemon loaf cake — I was at my Aunt Clara’s house for one of our summer family gatherings. She had this enchanting garden filled with vibrant flowers and herbs, and the aroma of her kitchen was like a warm hug from the sun. That day, she brought out a lemon loaf cake that was so fluffy and fragrant, it practically sang "summertime" with every bite!
As I took a slice, the tangy lemon danced with the sweet undertones, and the texture was unlike any dessert I’d had before. I practically begged her for the recipe, which she graciously shared — though she tossed in a playful reminder that a little love and creativity in the kitchen goes a long way. Inspired by those early memories and my love for healthy cooking, I wanted to create a version that packed all the flavor without sacrificing nutrition. Enter this Healthy Greek Yogurt Lemon Loaf Cake!
Ingredients
Here’s what you’ll need to create this zesty masterpiece:
-
1½ cups all-purpose flour
A staple in any kitchen, all-purpose flour can also be substituted with whole wheat flour for added fiber and nutrition. -
2 large eggs
Eggs provide structure and moisture. For a vegan option, you can use flaxseed eggs (1 tbsp flaxseed meal + 2.5 tbsp water = 1 egg). -
1 cup plain unsweetened Greek yogurt (whole-milk recommended)
This is the star ingredient, adding creaminess and a wonderful tang. If you want to lighten it further, opt for fat-free Greek yogurt. -
½ cup honey or maple syrup
Both sweeteners add a natural sweetness. Maple syrup will give it a deeper flavor, while honey lends a floral note. -
¼ cup neutral oil (vegetable, canola, or light olive oil)
Oil contributes to the cake’s moisture. Avocado oil is a lovely, heart-healthy alternative! -
¼ cup freshly squeezed lemon juice
Fresh juice is key for that zesty punch! Bottled lemon juice lacks the bright flavor, so make the squeeze worthwhile. -
Zest of 2 lemons
Lemon zest adds an intense, aromatic lemony flavor. Always zest before juicing — it’s a game-changer! -
2 tsp baking powder
This helps the cake rise. Ensure it’s fresh for the best results! -
½ tsp salt
A little salt enhances sweetness and balances flavors beautifully. -
1 tsp vanilla extract
This adds depth and warmth to your cake, reminiscent of an inviting kitchen filled with love.
Step-by-Step Instructions
Let’s get down to business and bake this delightful lemon loaf cake! Make sure to preheat your oven to 350°F (175°C), and grease a loaf pan while daydreaming about the deliciousness that’s coming your way.
-
Mix the Wet Ingredients: In a large bowl, whisk together the Greek yogurt, eggs, honey or maple syrup, oil, lemon juice, lemon zest, and vanilla extract until smooth. Make sure everything is well combined, like old friends catching up over a cup of tea!
-
Combine Dry Ingredients: In another bowl, whisk together the flour, baking powder, and salt. This little separation allows the baking powder to distribute evenly — think of it as a dance party where everyone gets a chance to shine!
-
Mix Wet and Dry Together: Gradually fold the dry ingredients into the wet mixture, stirring gently until just combined. Be careful not to overmix — we want a fluffy cake, not a dense brick!
-
Pour into the Pan: Transfer the batter into your prepared loaf pan. Smooth the top using a spatula so it bakes evenly.
-
Bake: Pop it in the oven and let it work its magic for about 45-50 minutes. The cake is ready when a toothpick inserted in the center comes out clean. Enjoy the delightful aroma filling your home — it’s like an invitation for the neighbors to stop by for a taste!
-
Cool Down: Once baked, cool the loaf in the pan for about 10-15 minutes. Then, carefully transfer it to a wire rack to cool completely. This is the hard part — the smell will make it tempting to dive right in!
Serving Suggestions
Now, how do we present this lovely loaf? Slicing it while it’s still warm is a treat, but for the perfect serving, allow it to cool completely first. Serve it on a beautiful platter with a dusting of powdered sugar or a drizzle of a lemon glaze (just mix some powdered sugar with lemon juice). Garnish with fresh berries or a sprig of mint to make it pop!
Recipe Variations
Feeling adventurous? Here are a few creative twists you can try with this lemon loaf cake:
-
Berry Burst: Add a cup of fresh blueberries or diced strawberries to the batter for a fruity surprise.
-
Nutty Addition: Fold in some chopped walnuts or almonds for crunch and a boost of healthy fats.
-
Coconut Twist: Swap half the Greek yogurt for coconut yogurt and add unsweetened shredded coconut for a tropical vibe!
-
Spicy Surprise: Add a teaspoon of ground ginger or cardamom for a spiced version — perfect for cozy evenings.
Chef’s Notes
This cake has a special place in my kitchen not just for its taste, but also for its versatility. Over the years, I’ve played with the ingredients, adapting it for seasonal flavors and occasions. One funny story: I once made this loaf for a friend’s birthday, but mistook baking soda for baking powder. Let’s just say the resulting cake had some interesting “character.” A quick lesson that always double-checking your spices can save the day!
FAQs and Troubleshooting
-
Why did my cake sink?
This can happen if the batter was overmixed or if it went into the oven too early. Ensure all ingredients are prepped and ready before starting! -
Can I make this cake gluten-free?
Absolutely! Substitute the all-purpose flour with a gluten-free blend. Just make sure it contains xanthan gum for structure. -
How can I store leftover cake?
Wrap it in plastic wrap and store it in the fridge for up to a week. You can also freeze slices for enjoying later — just thaw and enjoy! -
Can I make this as muffins?
Yes! This recipe can be transformed into muffins; just reduce baking time to around 20-25 minutes, keeping an eye on doneness.
Nutritional Info
While I won’t provide exact numbers, rest assured this cake, thanks to Greek yogurt and natural sweeteners, is a lighter option than traditional desserts. It combines healthy fats with proteins and the zesty goodness of lemons, making it a delightful treat you can feel good about!
So there you have it — a slice of Healthy Greek Yogurt Lemon Loaf Cake ready to brighten up your day! Whether you’re sharing it with loved ones or simply treating yourself, each bite is a little moment of joy. Let’s keep celebrating the art of cooking together. Happy baking!
PrintHealthy Greek Yogurt Lemon Loaf Cake

A moist and zesty loaf cake made with Greek yogurt, perfect for a healthy dessert option.
- Prep Time: 15 minutes
- Cook Time: 50 minutes
- Total Time: 65 minutes
- Yield: 8 servings 1x
- Category: Dessert
- Method: Baking
- Cuisine: Greek
- Diet: Healthy
Ingredients
- 1½ cups all-purpose flour
- 2 large eggs
- 1 cup plain unsweetened Greek yogurt
- ½ cup honey or maple syrup
- ¼ cup neutral oil (vegetable, canola, or light olive oil)
- ¼ cup freshly squeezed lemon juice
- Zest of 2 lemons
- 2 tsp baking powder
- ½ tsp salt
- 1 tsp vanilla extract
Instructions
- Preheat your oven to 350°F (175°C), and grease a loaf pan.
- Mix the Wet Ingredients: In a large bowl, whisk together the Greek yogurt, eggs, honey or maple syrup, oil, lemon juice, lemon zest, and vanilla extract until smooth.
- Combine Dry Ingredients: In another bowl, whisk together the flour, baking powder, and salt.
- Mix Wet and Dry Together: Gradually fold the dry ingredients into the wet mixture, stirring gently until just combined.
- Pour into the Pan: Transfer the batter into your prepared loaf pan and smooth the top using a spatula.
- Bake: Let it bake for about 45-50 minutes until a toothpick inserted in the center comes out clean.
- Cool Down: Cool the loaf in the pan for about 10-15 minutes, then transfer it to a wire rack to cool completely.
Notes
For variation, try adding berries, nuts, shredded coconut, or spices for a unique twist on the classic flavor.
Nutrition
- Serving Size: 1 slice
- Calories: 250
- Sugar: 10g
- Sodium: 200mg
- Fat: 8g
- Saturated Fat: 1g
- Unsaturated Fat: 7g
- Trans Fat: 0g
- Carbohydrates: 37g
- Fiber: 2g
- Protein: 7g
- Cholesterol: 60mg
Keywords: lemon loaf, Greek yogurt cake, healthy dessert, moist cake, zesty cake
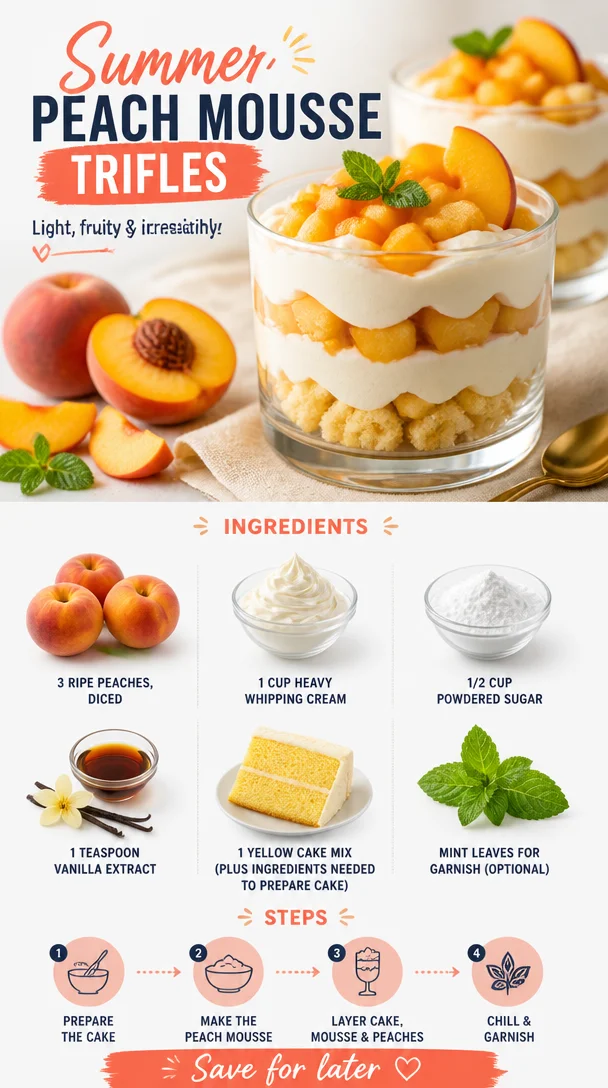
Summer Peach Mousse Trifles
Sweet Summertime Delight: Summer Peach Mousse Trifles
Hello, food lovers! Today, I’m excited to share a recipe that’s as vibrant as a summer sunset and as refreshing as a breeze on a hot afternoon. Summer Peach Mousse Trifles are the perfect way to showcase those juicy, sun-ripened peaches that tempt you at every farmer’s market. This dessert is all about layering flavors and textures—light, fluffy mousse meets moist cake, and fresh fruity goodness. So grab a spoon (and maybe a friend or two), and let’s get started!
Personal Story
Growing up, summers in my family were synonymous with afternoons spent in my grandmother’s sun-drenched kitchen, where stone fruits were in their prime. One memory that stands out is the time my grandma and I ‘borrowed’ a few peaches from our neighbor’s tree (with their permission, of course!) and turned them into a sweet treat. With the radio softly playing oldies in the background, we experimented with ingredients, laughter echoing as we stumbled through each step together.
It wasn’t just about the food; it was about the connection—the joy of creation, the anticipation of that first bite, and the warm satisfaction of sharing something homemade. That day, we whipped up a light peach mousse layered with fluffy cake, a dish that would become a family favorite. These trifles evoke those cherished memories and carry a piece of my heart with every lovely bite.
Ingredients
Here’s what you’ll need to whip up these delightful Summer Peach Mousse Trifles:
-
3 ripe peaches, diced
Choose firm peaches that yield slightly to pressure. If they’re not in season, feel free to use canned peaches (in syrup or juice) as a substitute. -
1 cup heavy whipping cream
This is essential for that luscious mousse texture. If you’re looking for a lighter version, you can use coconut cream or a whipped topping, but I highly recommend the real deal! -
1/2 cup powdered sugar
Perfect for sweetening your mousse without grit. Don’t have powdered sugar? You can easily blend granulated sugar in a food processor until fine. -
1 teaspoon vanilla extract
A splash of this extract adds warmth and elevates the overall flavor. For a twist, try almond extract instead! -
1 yellow cake mix
I love the convenience here, but you can make your favorite homemade cake if you’re feeling adventurous! Just remember to prepare it according to the package instructions. -
Mint leaves for garnish (optional)
Fresh mint adds a pop of color and a fragrant touch to your dessert. Plus, it’s a great way to impress your guests!
Step-by-Step Instructions
Now, let’s dive into the cooking process! Here’s how to create these beautiful trifles.
-
Bake the Cake:
Preheat your oven to the temperature indicated on the cake mix package (usually around 350°F/175°C). Prepare the yellow cake mix according to the package instructions. Pour it into a greased baking pan and bake until golden brown and a toothpick inserted in the center comes out clean—about 25 to 30 minutes. Once baked, let it cool in the pan for about 10 minutes before transferring it to a wire rack. -
Prepare the Peaches:
While the cake cools, let’s make use of those gorgeous peaches! Start by dicing them into small, bite-sized pieces. If you find that your peaches are a little tart, feel free to sprinkle them with a bit of sugar and let them sit for about 10 minutes. This will draw out their natural juices and enhance their sweetness. -
Whip the Cream:
In a large mixing bowl, pour in the heavy whipping cream and add the powdered sugar and vanilla extract. Using a hand mixer or a stand mixer, whip the cream on medium-high speed until it forms soft peaks. Be careful not to over-whip—you want it fluffy, not grainy! This step is where the magic happens, transforming simple cream into a cloud-like topping. -
Fold in the Peaches:
Gently fold the diced peaches into the whipped cream. The goal is to combine them without deflating the whipped cream—think light and airy! If you want a more peachy flavor throughout, save a few peach pieces for layering later. -
Assemble the Trifles:
Now it’s time to combine everything! Start with a layer of cake at the bottom of your trifle glass or a small dessert bowl. Top with a generous dollop of the peach mousse, followed by a layer of any leftover diced peaches. Repeat the layers until each glass is full, finishing with a generous swirl of mousse on top. -
Chill:
Once assembled, place the trifles in the refrigerator for at least 30 minutes to set. This helps meld the flavors beautifully! -
Garnish and Serve:
Just before serving, top with fresh mint leaves for that extra visual appeal and a burst of freshness.
Serving Suggestions
Serve your Summer Peach Mousse Trifles chilled, either individually in glasses or as a large trifle in a beautiful bowl for family-style sharing. Presenting them in clear glasses really showcases the gorgeous layers! Feel free to serve alongside extra peach slices or a drizzle of honey for a little added elegance.
Recipe Variations
Feeling adventurous? Here are a few twists you can try with your trifles:
-
Berry Blush: Substitute peaches with fresh strawberries, blueberries, or raspberries for a berry trifle. You could even mix in some lemon zest for a refreshing twist!
-
Chocolate Delight: Combine cubes of chocolate cake with the peach mousse instead of yellow cake. Chocolate and peach are a surprisingly delightful combo!
-
Nutty Crunch: Add a layer of crushed cookies or nuts between the mousse and cake for some texture—think graham crackers, almonds, or vanilla wafers.
-
Dairy-Free Version: Use coconut cream and a dairy-free cake mix to make these trifles suitable for those with dietary restrictions.
-
Spiced Up: Sprinkle a little cinnamon or nutmeg into the mousse for warmth and added flavor dimensions.
Chef’s Notes
Creating this recipe takes me back to that sun-soaked kitchen with my grandmother, pouring love into every scoop and layer. I remember one of our trials—my grandma accidentally added too much sugar to the mousse, and while we thought we had ruined it, the overly sweet dessert ended up being a hit! It just goes to show there are no mistakes in the kitchen—only delicious surprises. This recipe has evolved along with my culinary journey, and each time I make it, it feels like rekindling those joyful memories.
FAQs and Troubleshooting
1. My mousse turned out runny; what did I do wrong?
This could happen if you overwhip the cream initially, or if your peaches are too juicy. Make sure to whip the cream just to soft peaks and drain any excess juice from the peaches before folding them in.
2. Can I prepare these trifles in advance?
Absolutely! You can assemble them a day ahead. Just make sure to keep them refrigerated until you’re ready to serve.
3. What if I can’t find ripe peaches?
If fresh peaches aren’t available, you can use canned peaches or switch to another fruit like nectarines or plums. Just make sure to adjust the sweetness if they’re tinned in syrup!
4. Can I use a different type of cake?
Yes! Feel free to get creative. Pound cake, sponge cake, or even a brownie base would work beautifully with this mousse. Just keep the layers light and playful!
Nutritional Info
While I won’t provide exact numbers this time, remember that moderation is key when indulging! The trifles are rich from the cream and cake but packed with wholesome fruit. Enjoy them as a treat, and live a little!
And there you have it, my culinary friends! My Summer Peach Mousse Trifles are more than just a dessert; they are a celebration of summer flavors and sweet memories. So, gather your ingredients, don your favorite apron, and let the kitchen adventures begin!
PrintSummer Peach Mousse Trifles

A vibrant and refreshing dessert featuring layers of light peach mousse, moist cake, and fresh diced peaches, perfect for summer gatherings.
- Prep Time: 15 minutes
- Cook Time: 30 minutes
- Total Time: 45 minutes
- Yield: 4 servings 1x
- Category: Dessert
- Method: No-Bake
- Cuisine: American
- Diet: Vegetarian
Ingredients
- 3 ripe peaches, diced
- 1 cup heavy whipping cream
- 1/2 cup powdered sugar
- 1 teaspoon vanilla extract
- 1 yellow cake mix
- Mint leaves for garnish (optional)
Instructions
- Preheat your oven to the temperature indicated on the cake mix package (usually around 350°F/175°C). Prepare the yellow cake mix according to the package instructions. Pour it into a greased baking pan and bake until golden brown and a toothpick inserted in the center comes out clean—about 25 to 30 minutes. Once baked, let it cool in the pan for about 10 minutes before transferring it to a wire rack.
- While the cake cools, start by dicing the peaches into small, bite-sized pieces. If they are a little tart, sprinkle them with a bit of sugar and let them sit for about 10 minutes.
- In a large mixing bowl, pour in the heavy whipping cream and add the powdered sugar and vanilla extract. Beat on medium-high speed until soft peaks form.
- Gently fold the diced peaches into the whipped cream, saving a few pieces for later layering if desired.
- Start by layering cake at the bottom of your trifle glass or dessert bowl, followed by a generous layer of the peach mousse, and diced peaches. Repeat layers until glasses are full.
- Once assembled, place the trifles in the refrigerator for at least 30 minutes to set.
- Just before serving, top with fresh mint leaves.
Notes
Feel free to prepare the trifles a day in advance and keep them refrigerated. Variations include using different fruits or types of cake.
Nutrition
- Serving Size: 1 serving
- Calories: 350
- Sugar: 20g
- Sodium: 100mg
- Fat: 24g
- Saturated Fat: 14g
- Unsaturated Fat: 6g
- Trans Fat: 0g
- Carbohydrates: 36g
- Fiber: 2g
- Protein: 4g
- Cholesterol: 80mg
Keywords: peach mousse, summer dessert, trifles, peach dessert, layered dessert