One-Bowl Moist Banana Cake in 35 Minutes (Weeknight)
The Ultimate Moist Banana Cake: A Slice of Joy
Hello, dear food lovers! Today, we’re diving into the world of moist banana cake—a delightful dessert that feels like a warm hug on a chilly day. This recipe brings together the sweetness of ripe bananas with the richness of butter, creating a cake that’s tender, flavorful, and oh-so-satisfying. If you’re looking to impress your friends or just treat yourself, you’re in for a real treat!
A Slice of My Childhood
Let me take you back to my childhood—when baking was more like an adventure than a chore. I vividly remember standing on a stool in my grandmother’s kitchen, my little hands clumsily mixing ingredients in a bowl that was almost as big as I was. The aroma of ripe bananas filling the air would lure my brothers and me in, and soon we would be fighting over the beaters and scraping the bowl clean.
My grandma had a magic touch; her banana cake was famous in our family. It was more than just cake; it was an experience, bringing us all together for celebrations, birthdays, and even the most mundane Tuesdays. As we gathered around the table, my grandma’s laughter filled the room alongside the sweet scent of warm banana cake. Each bite was moist and flavorful, the kind of cake that made you feel like everything was right in the world.
Now, I want to share that same joy with you. This moist banana cake is perfect for any occasion, or even for when you just need a moment of sweet comfort. So tie on your apron, and let’s create a cake that’s brimming with memories and deliciousness!
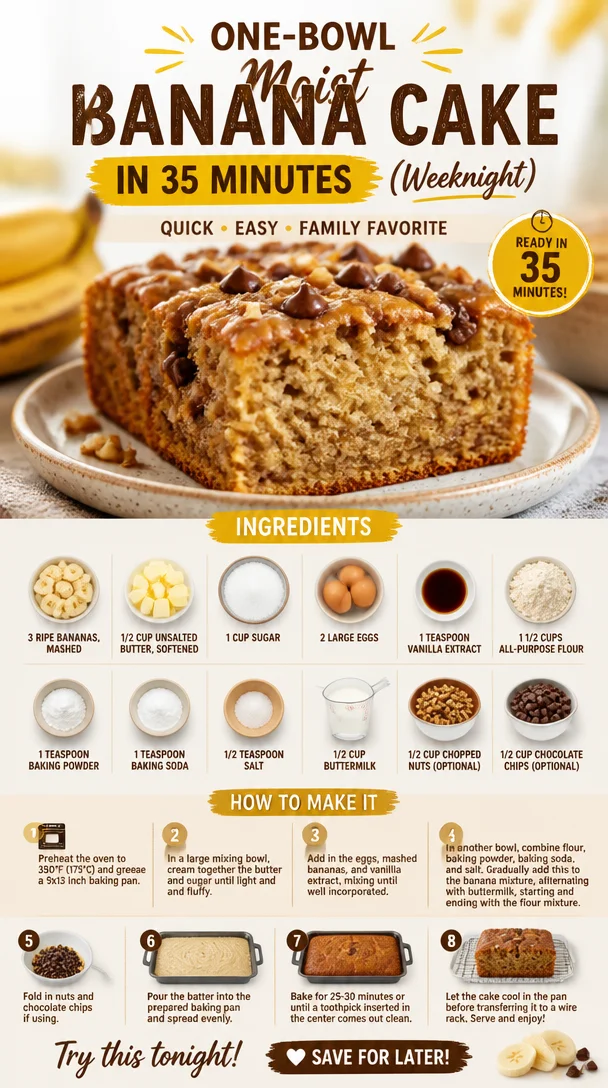
Ingredients
Here’s what you’ll need to bake this delectable banana cake:
-
3 ripe bananas, mashed
The riper, the better! Brown spots on the skin mean maximum sweetness and moisture. You can also use frozen bananas—just thaw them first and drain any excess liquid. -
1/2 cup unsalted butter, softened
Butter adds richness and flavor. If you’re in a pinch, feel free to swap with coconut oil or a plant-based margarine for a dairy-free option. -
1 cup sugar
Granulated sugar gives our cake the sweetness it needs. For a healthier twist, you could use coconut sugar or brown sugar; it’ll add a nice depth of flavor. -
2 large eggs
Eggs help bind everything together and contribute to the cake’s fluffiness. If you need a vegan alternative, try using flax eggs (1 tablespoon ground flaxseed + 2.5 tablespoons water = 1 egg). -
1 teaspoon vanilla extract
This enhances the sweetness and flavor profile of our cake. You can substitute with almond extract for a different taste. -
1 1/2 cups all-purpose flour
All-purpose flour is your go-to here, but if you want a gluten-free version, use a 1:1 gluten-free flour blend. -
1 teaspoon baking powder
This helps our cake rise. Ensure it’s fresh for maximum fluffiness! -
1 teaspoon baking soda
Another leavener that pairs with the acidity in the bananas for a perfect rise. -
1/2 teaspoon salt
Salt balances the sweetness and enhances all the flavors—don’t skip it! -
1/2 cup buttermilk
This adds moisture and a subtle tang. You can make your own by adding a tablespoon of vinegar or lemon juice to regular milk and letting it sit for a few minutes. -
1/2 cup chopped nuts (optional)
Walnuts or pecans add a crunchy texture and nutty flavor. Feel free to skip this if nuts aren’t your thing! -
1/2 cup chocolate chips (optional)
Who can resist chocolate? Add these in for a delightful chocolatey twist, or use dark chocolate for a gourmet feel!
Step-by-Step Instructions
Ready to get baking? Let’s walk through this recipe step-by-step!
-
Preheat Your Oven
Start by preheating your oven to 350°F (175°C). This ensures our cake bakes evenly from the get-go. -
Prepare Your Pan
Grease and flour a 9-inch round cake pan (or two for a layer cake). You can also line the bottom with parchment paper to prevent sticking—trust me; it’s the little things that make a big difference! -
Mash Those Bananas
In a bowl, mash the ripe bananas with a fork until they’re smooth but still have a few small chunks for texture. The more disheveled, the better! -
Cream the Butter and Sugar
In a separate bowl, beat the softened butter and sugar together until light and fluffy. This will take about 3-5 minutes. Creaming is crucial; it incorporates air into the batter, ensuring a light cake! -
Add Eggs and Vanilla
Next, add the eggs, one at a time, mixing well after each addition. This step helps with emulsifying the mixture. Don’t forget to add the vanilla extract – you want those flavor notes to dance in the background! -
Combine Wet Ingredients
Stir in the mashed bananas and buttermilk. This is where the magic begins. The batter will start to come together beautifully! -
Sift in Dry Ingredients
In a separate bowl, whisk together the flour, baking powder, baking soda, and salt. Gradually fold the dry ingredients into the wet mixture. Be gentle—overmixing can lead to a dense cake! -
Gently Fold in Extras
If you’re using nuts or chocolate chips, this is the time to add them in. Use a spatula or wooden spoon to fold them carefully into the batter. -
Pour and Level
Pour the batter into your prepared pan(s), smoothing the top with a spatula. Give the pan a little shake to level it all out—you want an even rise. -
Bake Away!
Place in the preheated oven and bake for 25-30 minutes (if using round pans) or 45-50 minutes for a single layer. A toothpick inserted in the center should come out clean! -
Cool it Down
Once baked, remove from the oven and let it cool in the pan for about 10 minutes. Then, transfer it to a wire rack to cool completely. Patience is key here—resist the urge to dive in too soon!
Serving Suggestions
For the best presentation, I like to serve slices of this banana cake on a beautiful plate, perhaps garnished with a sprig of mint or a dusting of powdered sugar. You can pair it with a scoop of vanilla ice cream or a dollop of whipped cream for an elevated dessert experience. Feel free to get creative with toppings—candied nuts or a drizzle of chocolate sauce could take it over the top!
Recipe Variations
Here are a few twists to make this recipe your own:
- Banana Nutella Cake: Swirl Nutella into the batter before baking for a decadent chocolate hazelnut vibe.
- Lemon Zest Banana Cake: Add a tablespoon of lemon zest for a fresh, zesty flavor contrast.
- Coconut Banana Cake: Incorporate shredded coconut into the batter for a tropical twist.
- Spiced Banana Cake: Add a pinch of cinnamon and nutmeg for extra warmth and flavor.
- Banana Oatmeal Cake: Substitute half the flour with rolled oats for a heartier, more filling texture.
Chef’s Notes
You know, every time I bake this banana cake, I can’t help but think about my grandma. She always said that the secret ingredient was love, and I truly believe that! Over the years, I’ve experimented with countless recipes, but this one remains a classic in my kitchen. It’s simple, straightforward, and never fails to bring smiles.
One little kitchen mishap I remember was the time I tried to rush the process. I grabbed a bowl straight from the sink without drying it fully, and my beautiful cake had a weird, soapy taste. Lesson learned! Always use a clean bowl—it makes all the difference.
FAQs and Troubleshooting
1. My cake turned out dry. What went wrong?
It could be a few things—overmixing the batter or baking it too long can both lead to dryness. Make sure to check the cake a few minutes before the timer goes off!
2. Can I make this recipe in advance?
Absolutely! You can bake the cake a day ahead and store it covered at room temperature. You can also freeze it for longer storage; just ensure it’s wrapped tightly!
3. My cake sank in the middle. Why did this happen?
This could be due to underbaking or a sudden change in temperature. Make sure to bake it until the toothpick test (clean or with a few moist crumbs) passes, and adjust your oven temperature accordingly.
4. Can I add more bananas?
Sure! Just be cautious not to add too much extra moisture. Substituting one ripe banana for a bit of flour can help balance it out as needed.
Nutritional Info (Optional)
While this cake is a treat, it’s always good to be aware of portions. A standard slice contains roughly 250-300 calories, depending on added ingredients. Enjoy every bite in moderation!
Now that you have all the tips, tricks, and a slice of my history, you’re ready to bake your own moist banana cake! Remember, great cooking is about the joy you share and the love you put in. So tie your apron, gather your ingredients, and let’s make some delicious memories together! Happy baking!
PrintThe Ultimate Moist Banana Cake
A delightful moist banana cake that combines the sweetness of ripe bananas with the richness of butter, perfect for any occasion.
- Prep Time: 15 minutes
- Cook Time: 30 minutes
- Total Time: 45 minutes
- Yield: 8 servings 1x
- Category: Dessert
- Method: Baking
- Cuisine: American
- Diet: Vegetarian
Ingredients
- 3 ripe bananas, mashed
- 1/2 cup unsalted butter, softened
- 1 cup sugar
- 2 large eggs
- 1 teaspoon vanilla extract
- 1 1/2 cups all-purpose flour
- 1 teaspoon baking powder
- 1 teaspoon baking soda
- 1/2 teaspoon salt
- 1/2 cup buttermilk
- 1/2 cup chopped nuts (optional)
- 1/2 cup chocolate chips (optional)
Instructions
- Preheat your oven to 350°F (175°C).
- Prepare a 9-inch round cake pan with grease and flour.
- Mash the ripe bananas in a bowl.
- Cream the butter and sugar together until light and fluffy.
- Add the eggs one at a time and mix well.
- Stir in the mashed bananas and buttermilk until combined.
- Sift the flour, baking powder, baking soda, and salt together, then gradually fold into the wet mixture.
- Gently fold in nuts and chocolate chips if using.
- Pour the batter into the prepared pan.
- Bake for 25-30 minutes or until a toothpick comes out clean.
- Cool in the pan for 10 minutes, then transfer to a wire rack to cool completely.
Notes
Serve with a garnish of mint, powdered sugar, or a scoop of vanilla ice cream for an elevated dessert experience.
Nutrition
- Serving Size: 1 slice
- Calories: 275
- Sugar: 16g
- Sodium: 300mg
- Fat: 10g
- Saturated Fat: 5g
- Unsaturated Fat: 4g
- Trans Fat: 0g
- Carbohydrates: 38g
- Fiber: 1g
- Protein: 3g
- Cholesterol: 40mg
Keywords: banana cake, moist cake, baking, dessert, sweet treats

Healthy Greek Yogurt Lemon Loaf Cake
Healthy Greek Yogurt Lemon Loaf Cake: A Culinary Hug in Every Slice
Hello, fellow food enthusiasts! Today, we’re diving into a delicately aromatic world of sunshine and sweetness with a recipe that will elevate your dessert game — Healthy Greek Yogurt Lemon Loaf Cake. This delectable cake is not only irresistibly moist and zesty, but it also packs a punch of protein thanks to the Greek yogurt. So grab your apron, tie it on, and let’s whip up something extraordinary that will delight your taste buds and warm your heart.
A Slice of Nostalgia
Let me whisk you back in time for a moment. I remember the first time I had a lemon loaf cake — I was at my Aunt Clara’s house for one of our summer family gatherings. She had this enchanting garden filled with vibrant flowers and herbs, and the aroma of her kitchen was like a warm hug from the sun. That day, she brought out a lemon loaf cake that was so fluffy and fragrant, it practically sang "summertime" with every bite!
As I took a slice, the tangy lemon danced with the sweet undertones, and the texture was unlike any dessert I’d had before. I practically begged her for the recipe, which she graciously shared — though she tossed in a playful reminder that a little love and creativity in the kitchen goes a long way. Inspired by those early memories and my love for healthy cooking, I wanted to create a version that packed all the flavor without sacrificing nutrition. Enter this Healthy Greek Yogurt Lemon Loaf Cake!
Ingredients
Here’s what you’ll need to create this zesty masterpiece:
-
1½ cups all-purpose flour
A staple in any kitchen, all-purpose flour can also be substituted with whole wheat flour for added fiber and nutrition. -
2 large eggs
Eggs provide structure and moisture. For a vegan option, you can use flaxseed eggs (1 tbsp flaxseed meal + 2.5 tbsp water = 1 egg). -
1 cup plain unsweetened Greek yogurt (whole-milk recommended)
This is the star ingredient, adding creaminess and a wonderful tang. If you want to lighten it further, opt for fat-free Greek yogurt. -
½ cup honey or maple syrup
Both sweeteners add a natural sweetness. Maple syrup will give it a deeper flavor, while honey lends a floral note. -
¼ cup neutral oil (vegetable, canola, or light olive oil)
Oil contributes to the cake’s moisture. Avocado oil is a lovely, heart-healthy alternative! -
¼ cup freshly squeezed lemon juice
Fresh juice is key for that zesty punch! Bottled lemon juice lacks the bright flavor, so make the squeeze worthwhile. -
Zest of 2 lemons
Lemon zest adds an intense, aromatic lemony flavor. Always zest before juicing — it’s a game-changer! -
2 tsp baking powder
This helps the cake rise. Ensure it’s fresh for the best results! -
½ tsp salt
A little salt enhances sweetness and balances flavors beautifully. -
1 tsp vanilla extract
This adds depth and warmth to your cake, reminiscent of an inviting kitchen filled with love.
Step-by-Step Instructions
Let’s get down to business and bake this delightful lemon loaf cake! Make sure to preheat your oven to 350°F (175°C), and grease a loaf pan while daydreaming about the deliciousness that’s coming your way.
-
Mix the Wet Ingredients: In a large bowl, whisk together the Greek yogurt, eggs, honey or maple syrup, oil, lemon juice, lemon zest, and vanilla extract until smooth. Make sure everything is well combined, like old friends catching up over a cup of tea!
-
Combine Dry Ingredients: In another bowl, whisk together the flour, baking powder, and salt. This little separation allows the baking powder to distribute evenly — think of it as a dance party where everyone gets a chance to shine!
-
Mix Wet and Dry Together: Gradually fold the dry ingredients into the wet mixture, stirring gently until just combined. Be careful not to overmix — we want a fluffy cake, not a dense brick!
-
Pour into the Pan: Transfer the batter into your prepared loaf pan. Smooth the top using a spatula so it bakes evenly.
-
Bake: Pop it in the oven and let it work its magic for about 45-50 minutes. The cake is ready when a toothpick inserted in the center comes out clean. Enjoy the delightful aroma filling your home — it’s like an invitation for the neighbors to stop by for a taste!
-
Cool Down: Once baked, cool the loaf in the pan for about 10-15 minutes. Then, carefully transfer it to a wire rack to cool completely. This is the hard part — the smell will make it tempting to dive right in!
Serving Suggestions
Now, how do we present this lovely loaf? Slicing it while it’s still warm is a treat, but for the perfect serving, allow it to cool completely first. Serve it on a beautiful platter with a dusting of powdered sugar or a drizzle of a lemon glaze (just mix some powdered sugar with lemon juice). Garnish with fresh berries or a sprig of mint to make it pop!
Recipe Variations
Feeling adventurous? Here are a few creative twists you can try with this lemon loaf cake:
-
Berry Burst: Add a cup of fresh blueberries or diced strawberries to the batter for a fruity surprise.
-
Nutty Addition: Fold in some chopped walnuts or almonds for crunch and a boost of healthy fats.
-
Coconut Twist: Swap half the Greek yogurt for coconut yogurt and add unsweetened shredded coconut for a tropical vibe!
-
Spicy Surprise: Add a teaspoon of ground ginger or cardamom for a spiced version — perfect for cozy evenings.
Chef’s Notes
This cake has a special place in my kitchen not just for its taste, but also for its versatility. Over the years, I’ve played with the ingredients, adapting it for seasonal flavors and occasions. One funny story: I once made this loaf for a friend’s birthday, but mistook baking soda for baking powder. Let’s just say the resulting cake had some interesting “character.” A quick lesson that always double-checking your spices can save the day!
FAQs and Troubleshooting
-
Why did my cake sink?
This can happen if the batter was overmixed or if it went into the oven too early. Ensure all ingredients are prepped and ready before starting! -
Can I make this cake gluten-free?
Absolutely! Substitute the all-purpose flour with a gluten-free blend. Just make sure it contains xanthan gum for structure. -
How can I store leftover cake?
Wrap it in plastic wrap and store it in the fridge for up to a week. You can also freeze slices for enjoying later — just thaw and enjoy! -
Can I make this as muffins?
Yes! This recipe can be transformed into muffins; just reduce baking time to around 20-25 minutes, keeping an eye on doneness.
Nutritional Info
While I won’t provide exact numbers, rest assured this cake, thanks to Greek yogurt and natural sweeteners, is a lighter option than traditional desserts. It combines healthy fats with proteins and the zesty goodness of lemons, making it a delightful treat you can feel good about!
So there you have it — a slice of Healthy Greek Yogurt Lemon Loaf Cake ready to brighten up your day! Whether you’re sharing it with loved ones or simply treating yourself, each bite is a little moment of joy. Let’s keep celebrating the art of cooking together. Happy baking!
PrintHealthy Greek Yogurt Lemon Loaf Cake

A moist and zesty loaf cake made with Greek yogurt, perfect for a healthy dessert option.
- Prep Time: 15 minutes
- Cook Time: 50 minutes
- Total Time: 65 minutes
- Yield: 8 servings 1x
- Category: Dessert
- Method: Baking
- Cuisine: Greek
- Diet: Healthy
Ingredients
- 1½ cups all-purpose flour
- 2 large eggs
- 1 cup plain unsweetened Greek yogurt
- ½ cup honey or maple syrup
- ¼ cup neutral oil (vegetable, canola, or light olive oil)
- ¼ cup freshly squeezed lemon juice
- Zest of 2 lemons
- 2 tsp baking powder
- ½ tsp salt
- 1 tsp vanilla extract
Instructions
- Preheat your oven to 350°F (175°C), and grease a loaf pan.
- Mix the Wet Ingredients: In a large bowl, whisk together the Greek yogurt, eggs, honey or maple syrup, oil, lemon juice, lemon zest, and vanilla extract until smooth.
- Combine Dry Ingredients: In another bowl, whisk together the flour, baking powder, and salt.
- Mix Wet and Dry Together: Gradually fold the dry ingredients into the wet mixture, stirring gently until just combined.
- Pour into the Pan: Transfer the batter into your prepared loaf pan and smooth the top using a spatula.
- Bake: Let it bake for about 45-50 minutes until a toothpick inserted in the center comes out clean.
- Cool Down: Cool the loaf in the pan for about 10-15 minutes, then transfer it to a wire rack to cool completely.
Notes
For variation, try adding berries, nuts, shredded coconut, or spices for a unique twist on the classic flavor.
Nutrition
- Serving Size: 1 slice
- Calories: 250
- Sugar: 10g
- Sodium: 200mg
- Fat: 8g
- Saturated Fat: 1g
- Unsaturated Fat: 7g
- Trans Fat: 0g
- Carbohydrates: 37g
- Fiber: 2g
- Protein: 7g
- Cholesterol: 60mg
Keywords: lemon loaf, Greek yogurt cake, healthy dessert, moist cake, zesty cake

Hawaiian Poke Cake
Hawaiian Poke Cake: A Slice of Paradise
Hello, food friends! Today, I am thrilled to take you on a delightful journey to the tropical paradise of Hawaii with a cake that’s not just a treat for the taste buds but also a feast for the eyes—Hawaiian Poke Cake! If you’re looking for a dessert that’s effortlessly impressive and reminiscent of sun-kissed beaches, you’ve hit the jackpot!
Now, I know what you might be thinking: “Poke cake? What’s that?” Well, let me assure you that this dessert is a true game-changer! It’s a moist, fluffy cake soaked in a sweet, fruity goodness that’s perfect for gatherings, potlucks, or simply treating yourself on a sunny afternoon. Trust me; once you serve this gem, you’ll have friends and family coming back for seconds (or thirds!).
What I love most about Hawaiian Poke Cake is how it manages to feel both special and approachable. The best part? You don’t need to be a pastry chef to recreate this beauty in your kitchen! So, tie on that apron, and let’s dive into this tropical escape!
Personal Story
One of my fondest memories surrounding Hawaiian Poke Cake takes me back to a summer spent visiting relatives in Hawaii. Picture this: warm sun, gentle beach breezes, and afternoons spent lounging in hammocks while sipping on coconut water. One evening, we gathered for a family barbecue—a tradition that never stopped growing. My aunt pulled this cake out of the fridge, its topping glistening under the soft glow of tiki torches.
As we took our first bites, we were transported. Flavors of sweet pineapple combined with creamy coconut danced along our palates, each mouthful simply singing of Hawaii. In that moment, amidst laughter and sound of waves crashing nearby, I knew that this cake was going to weave its way into my own family traditions back home. Every time I whip up a Hawaiian Poke Cake now, I’m reminded of those warm evenings and the shared love that good food brings.
Ingredients
Before we get cooking, let’s gather our ingredients! Here’s what you’ll need:
-
1 box yellow cake mix (15.25 oz)
The base of our cake! For a gluten-free version, you can substitute this with a gluten-free cake mix. -
1 cup pineapple juice (100%)
This will add sweetness and moisture. You can use freshly squeezed pineapple juice if you’re feeling adventurous! -
1 cup full-fat coconut milk
This rich ingredient gives our cake its creamy texture. For a lighter option, feel free to swap it with coconut cream or a lighter coconut milk. -
1 cup sweetened shredded coconut
Adds texture and flavor. If you want to reduce sweetness, use unsweetened coconut flakes. -
1 cup pineapple chunks (drained)
Sweet, juicy bursts of pineapple! You can use canned or fresh pineapple, but make sure to drain it well to avoid excess moisture. -
1 cup whipped topping
This light and fluffy topping brings everything together. You can easily make your own whipped cream for a fresher taste. -
¼ cup maraschino cherries (for garnish)
The perfect pop of color! If you want a more natural garnish, try using fresh cherries or sliced strawberries instead.
Step-by-Step Instructions
Now that we have our ingredients ready, it’s time to get cooking! Follow these steps for a flawless Hawaiian Poke Cake experience:
-
Preheat Your Oven: Start by preheating your oven to 350°F (175°C). You want it nice and hot to ensure the cake bakes evenly.
-
Prepare Your Cake Pan: Grease a 9×13-inch baking dish with cooking spray or butter. This will prevent sticking, making your life a lot easier later on!
-
Mix the Cake Batter: In a large mixing bowl, combine your yellow cake mix, 1 cup of pineapple juice, and 1 cup of coconut milk. Use an electric mixer to blend them until the mixture is smooth and well combined—about 2-3 minutes.
-
Pour and Bake: Pour the batter into the prepared baking dish, spreading it evenly. Bake it in your preheated oven for about 25-30 minutes or until a toothpick inserted in the center comes out clean. Pro tip: Ovens can be sneaky! Keep an eye on your cake, as baking times can vary.
-
Poke the Cake: Once baked, remove the cake from the oven and let it cool in the pan for about 10-15 minutes. Using the handle of a wooden spoon or a fork, poke holes all over the top of the cake—make them deep but not all the way through! This is where our pineapple juice goodness will soak in.
-
Soak the Cake: Slowly pour the remaining ½ cup of pineapple juice over the poked cake, ensuring it seeps into those holes. This is crucial for keeping the cake moist and infusing it with that tropical flavor.
-
Add Coconut and Pineapple: While the cake is still warm, sprinkle the sweetened shredded coconut and the pineapple chunks over the top. Gently press them down into the cake so they stick.
-
Chill the Cake: This is where the magic happens! Allow the cake to cool completely at room temperature, then cover it with plastic wrap and refrigerate for at least 2-4 hours (overnight is even better!) to let those flavors meld beautifully.
-
Top It Off: Before serving, spread the whipped topping over the chilled cake and garnish with maraschino cherries for that classic touch.
-
Slice and Serve: Finally, cut yourself a generous slice of this tropical delight and enjoy every delicious bite!
Serving Suggestions
When it comes to serving, I like to keep things simple yet elegant. Serve your Hawaiian Poke Cake chilled, straight from the fridge. For presentation, you can plate it on a lovely dessert platter, and maybe even add a sprinkle of extra shredded coconut or a fresh mint sprig on top for a pop of color.
Pair it with a refreshing iced tea or a fizzy drink to enhance that tropical feel. Your guests won’t just taste dessert; they’ll indulge in a delightful experience!
Recipe Variations
-
Tropical Twist: Add diced mango or papaya to the topping for an extra burst of flavor.
-
Berry Bliss: Incorporate mixed berries (blueberries, raspberries, strawberries) into the coconut topping for a fruity explosion.
-
Chocolate Delight: Drizzle dark chocolate ganache over the whipped topping for a decadent upgrade.
-
Nutty Crunch: Sprinkle chopped macadamia nuts on top for a delicious crunch and an authentic Hawaiian touch.
-
Vegan Version: For a plant-based twist, use a vegan cake mix, coconut cream instead of whipped topping, and ensure your pineapple juice is fresh and additive-free.
Chef’s Notes
Over the years, my Hawaiian Poke Cake has morphed from a traditional dessert into a canvas for creativity! I’ve played with flavors and toppings, ensuring that each iteration feels personal. Did you know the first time I made this cake, my son mistook the maraschino cherries for candy? His enthusiastic approval confirmed that this cake was destined to be a family favorite!
This dessert has become a staple at our family gatherings, proving that simplicity can create lasting memories. If you haven’t tried Hawaiian Poke Cake yet, do yourself a favor and whip one up—you’ll find it’s not just a cake; it’s a sweet slice of nostalgia.
FAQs and Troubleshooting
1. Can I make Poke Cake in advance?
Absolutely! In fact, it tastes even better after sitting in the fridge for a day. This allows the flavors to intensify and the cake to absorb the juices.
2. My cake turned out dry; what happened?
The key to a moist poke cake is giving it enough time to soak up the juice! Make sure to poke enough holes and pour the juice evenly. Also, be cautious about overbaking; a toothpick should come out mostly clean, not dry.
3. Can I freeze leftover cake?
You sure can! Just slice it up, wrap individual pieces tightly in plastic wrap, and place them in an airtight container. When you’re ready to enjoy it, let it thaw in the fridge overnight.
4. What if I can’t find pineapple juice?
No problem! You can substitute with orange juice or even a mix of coconut milk and a splash of vanilla. While it won’t have that distinct tropical flavor, it will still be delicious!
Nutritional Info
While I believe that enjoying food is worth indulging in, here’s a quick glance at the nutritional info per slice (based on 12 servings):
- Calories: 300
- Total Fat: 12g
- Saturated Fat: 8g
- Total Carbohydrates: 45g
- Sugars: 30g
- Protein: 2g
As always, enjoy your food and savor the moments spent around the table!
So there you have it, my friends! Hawaiian Poke Cake is more than just a recipe; it’s a celebration of tastes and memories. I can’t wait for you to try it and make it your own. Until next time, happy cooking!
PrintHawaiian Poke Cake

A moist and fluffy cake soaked in sweet pineapple juice and topped with coconut and whipped cream, perfect for any gathering.
- Prep Time: 20 minutes
- Cook Time: 30 minutes
- Total Time: 50 minutes
- Yield: 12 servings 1x
- Category: Dessert
- Method: Baking
- Cuisine: Hawaiian
- Diet: Vegetarian
Ingredients
- 1 box yellow cake mix (15.25 oz)
- 1 cup pineapple juice (100%)
- 1 cup full-fat coconut milk
- 1 cup sweetened shredded coconut
- 1 cup pineapple chunks (drained)
- 1 cup whipped topping
- ¼ cup maraschino cherries (for garnish)
Instructions
- Preheat your oven to 350°F (175°C).
- Prepare a 9×13-inch baking dish with cooking spray or butter.
- Mix the cake batter by combining yellow cake mix, 1 cup of pineapple juice, and 1 cup of coconut milk in a bowl.
- Pour the batter into the prepared baking dish and bake for 25-30 minutes.
- Poke holes all over the top of the cake once it is cool for about 10-15 minutes.
- Soak the cake with the remaining ½ cup of pineapple juice.
- Add sweetened shredded coconut and pineapple chunks on top of the warm cake.
- Chill the cake for at least 2-4 hours in the refrigerator.
- Top with whipped topping and garnish with maraschino cherries before serving.
- Slice and serve chilled.
Notes
This cake is best served chilled. It can be made in advance and tastes better after a day in the fridge.
Nutrition
- Serving Size: 1 slice
- Calories: 300
- Sugar: 30g
- Sodium: 200mg
- Fat: 12g
- Saturated Fat: 8g
- Unsaturated Fat: 4g
- Trans Fat: 0g
- Carbohydrates: 45g
- Fiber: 1g
- Protein: 2g
- Cholesterol: 10mg
Keywords: Hawaiian cake, poke cake, tropical dessert, easy cake recipe, summer dessert