4th of July Red White & Blue Poke Cake: Quick Patriotic Treat
Celebrate in Style with a Red, White, and Blue Patriotic Poke Cake
Hello, fellow food lovers! With summer festivities around the corner—think Fourth of July barbecues, Memorial Day gatherings, or just a sunny afternoon picnic—there’s no better way to celebrate than with a delightful Red, White, and Blue Patriotic Poke Cake! This cake is not just festive and fun; it’s a true showstopper that will have your friends and family gathering around the table with smiles all around.
There’s something magical about a poke cake. The concept is simple: poke holes in a baked cake and let it soak up a delicious mixture, usually sweet, to create layers of flavor. It’s effortless elegance in dessert form! Today, I’m here to guide you through crafting this stunning cake that is as easy as putting on your apron and tying it up. Let’s make some magic happen in the kitchen!
A Sweet Memory to Cherish
Whenever I think about festive treats, I am transported back to the summers of my childhood, spending weekends at my grandma’s house. She had a knack for bringing everyone together with her delicious desserts. One summer, she decided to celebrate the Fourth of July with a poke cake adorned in red and blue, topped with fluffy whipped topping and a sprinkle of berries. I vividly remember the excitement of poking holes into the cake with her and pouring that sweet, vibrant mixture over it. The anticipation of the first bite was palpable!
As the cake chilled in the refrigerator, we gathered outside, the warm sun kissing our skin while we sipped lemonade and chatted about fireworks and family stories. When that cake finally made its grand entrance, it was the highlight of our gathering. Each slice was a burst of flavors, and I realized that dessert has a way of stitching hearts together.
Fast forward to today, I carry that nostalgic joy in every poke cake I create. Let’s recreate some of that magic together as we whip up our Red, White, and Blue Patriotic Poke Cake!
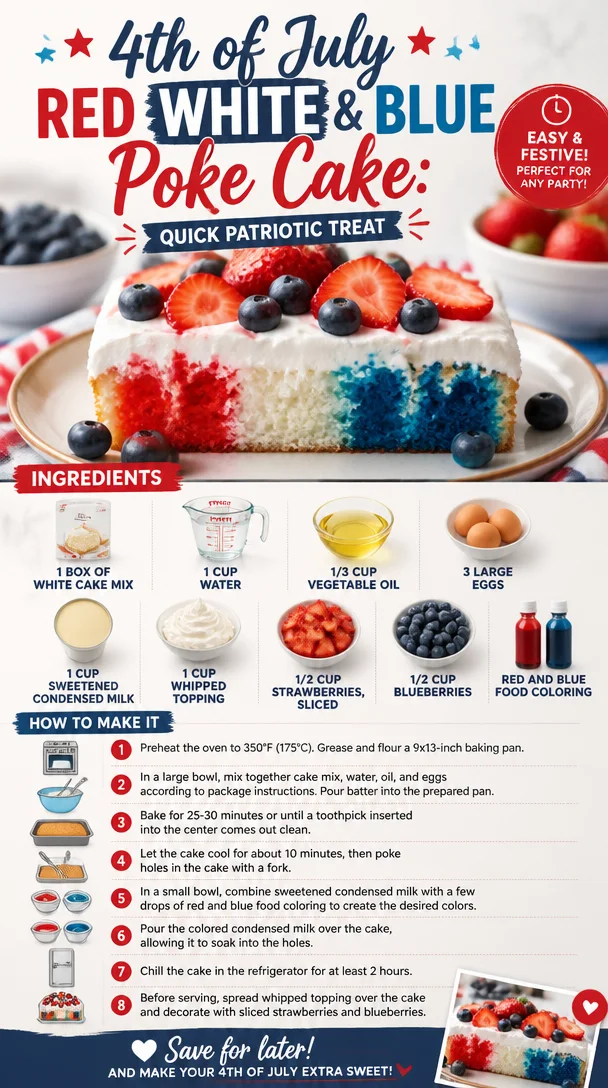
Ingredients
-
1 box of white cake mix
This serves as the cake’s base. Grab your favorite brand! You can also use a homemade white cake recipe if you want to take it to the next level. For a gluten-free option, consider using a gluten-free cake mix. -
1 cup water
The liquid that comes together with the cake mix to give it a lovely moist texture. You can swap it with milk for a richer flavor. -
1/3 cup vegetable oil
Oil keeps the cake tender. If you’re feeling fancy, try melted coconut oil for a subtle tropical twist. -
3 large eggs
Eggs provide structure and moisture. If you’re looking for an egg-free version, you can replace each egg with 1/4 cup unsweetened applesauce or a flax egg (1 tablespoon of ground flaxseed mixed with 2.5 tablespoons of water). -
1 cup sweetened condensed milk
This rich milk adds indulgent sweetness and creaminess. If you prefer a dairy-free option, look for coconut condensed milk. -
1 cup whipped topping
A fluffy topping that crowns your cake beautifully. You can use homemade whipped cream if you’re feeling inspired. Homemade is always a bit more special! -
1/2 cup strawberries, sliced
Beautiful red berries bursting with flavor. If strawberries are out of season, you can use raspberries or cherries. -
1/2 cup blueberries
Sweet, succulent, and perfect for our blue layer. You can also play around with blackberries or even diced kiwi for a twist. -
Red and blue food coloring
Essential for creating that gorgeous patriotic effect! Feel free to use natural food colorings for a healthier option.
Step-by-Step Instructions
-
Preheat the Oven
Preheat your oven to 350°F (175°C). This step is crucial for a perfectly baked cake. While the oven heats up, gather your ingredients to streamline the process! -
Mix the Cake Batter
In a large mixing bowl, combine the cake mix, water, vegetable oil, and eggs. Using an electric mixer, beat on medium speed until smooth (about 2-3 minutes). Here’s a handy tip: Be sure to scrape the sides of the bowl for a uniform batter; those little flour pockets try to hide and can lead to a lumpy cake! -
Bake the Cake
Pour the cake batter into a greased 9×13-inch baking pan. Bake in your preheated oven for 30-35 minutes, or until a toothpick inserted in the center comes out clean. Enjoy that delightful smell wafting through your kitchen! -
Cool and Poke
Once baked, allow the cake to cool in the pan for about 10 minutes. After that, grab a wooden spoon or a straw and poke holes all over the cake—not too deep, just enough to make openings for the sauce. This part is fun! It’s like giving the cake a bit of a massage. -
Prepare the Soaking Mixture
In a medium bowl, combine your sweetened condensed milk with 1/2 cup of whipped topping. For a colorful twist, divide this mixture into two separate bowls. Add red food coloring to one bowl and blue to the other. Stir until you achieve your desired colors. -
Soak the Cake
Begin by pouring the red mixture over the cake, letting it sink into those lovely holes. Use a spatula to spread any remaining mixture evenly. Repeat the process with the blue mixture. -
Chill the Cake
Cover the cake with plastic wrap (or just a clean kitchen towel if you want to keep it rustic) and chill in the refrigerator for at least 2 hours. This step is crucial for all those flavors to meld together beautifully! -
Top the Cake
Once chilled, it’s time to spread the remaining whipped topping over the cake. Be generous—this is the creamy crown that takes your poke cake to the next level! -
Add the Berries
Finally, arrange your sliced strawberries and blueberries on top of the whipped topping. Create patterns, make designs—be as creative as you like! Let your festive spirit shine.
Serving Suggestions
When it’s time to serve, slice the cake into squares and present them on a bright platter. You might want to garnish also with a sprig of mint for that refreshing touch. The stunning red, white, and blue layers shining through will have your guests reaching for their forks!
Recipe Variations
-
Add a Layer of Lemon
Consider making a zesty lemon syrup to drizzle over the cake before adding the whipped topping. It adds a refreshing twist that brightens up the flavors! -
Chocolate Charm
Add cocoa powder to your cake mix for a chocolate sponge and pair with dark chocolate ganache on top. The combination of chocolate, fruit, and whipped cream? Simply delectable. -
Dairy-Free Delight
Swap the whipped topping for coconut whipped cream and use plant-based condensed milk. You won’t miss a beat with this scrumptious alternative! -
Nutty Crunch
Toasted almond or pecan pieces sprinkled on top before serving will introduce a crispy texture that complements the cake’s moisture beautifully. -
Ice Cream Surprise
Why not serve individual pieces with a scoop of vanilla ice cream? It’s a match made in summer heaven!
Chef’s Notes
I absolutely adore how poke cakes have an element of surprise; each bite has a burst of flavor, and there’s just something special about the way it brings layers of delight.
Over the years, I’ve adapted the recipe in numerous ways, experimenting with different flavor combinations. I once made a tropical version with pineapple and coconut that stole the show at a summer gathering. Every poke cake I bake feels like a canvas for creativity!
FAQs and Troubleshooting
Q: Why did my cake fall flat?
A: This can happen if your eggs weren’t fresh or if the batter was overmixed. Always check the date on your eggs and mix just until combined for best results.
Q: Can I make this cake ahead of time?
A: Absolutely! The cake keeps well in the fridge for 3-4 days. Just be mindful of adding the whipped topping and fruit closer to serving time to keep them fresh.
Q: Could I make this gluten-free?
A: Yes! You can substitute the white cake mix with a gluten-free blend. Just check that your other ingredients are gluten-free too (some whipped toppings may not be!).
Q: What should I do if I run out of sweetened condensed milk?
A: You can create a quick alternative by simmering 2 cups of milk with 2/3 cup of sugar until it thickens (about 30 minutes); just remember to stir frequently!
Nutritional Info
While I like to focus on indulging in delicious food rather than strict dietary guidelines, here’s a rough idea (per slice, based on 12 servings):
- Calories: 270
- Fat: 10g
- Carbohydrates: 39g
- Protein: 3g
Enjoy this cake as a treat, and remember, it’s all about balance in life.
Well, there you have it—a deliciously festive Red, White, and Blue Patriotic Poke Cake that’s perfect for any celebration! I hope this recipe brings you as much joy as it has brought me over the years. Now, tie your apron and let’s get baking! Happy celebrating!
PrintRed, White, and Blue Patriotic Poke Cake

A festive and delightful poke cake perfect for summer celebrations, layered with a sweet filling and topped with fresh berries.
- Prep Time: 15 minutes
- Cook Time: 35 minutes
- Total Time: 50 minutes
- Yield: 12 servings 1x
- Category: Dessert
- Method: Baking
- Cuisine: American
- Diet: Vegetarian
Ingredients
- 1 box of white cake mix
- 1 cup water
- 1/3 cup vegetable oil
- 3 large eggs
- 1 cup sweetened condensed milk
- 1 cup whipped topping
- 1/2 cup strawberries, sliced
- 1/2 cup blueberries
- Red and blue food coloring
Instructions
- Preheat your oven to 350°F (175°C).
- Mix the cake batter by combining the cake mix, water, vegetable oil, and eggs in a large mixing bowl.
- Beat on medium speed for 2-3 minutes until smooth.
- Pour the cake batter into a greased 9×13-inch baking pan.
- Bake for 30-35 minutes or until a toothpick inserted comes out clean.
- Cool the cake in the pan for about 10 minutes.
- Poke holes all over the cake using a wooden spoon or straw.
- Prepare the soaking mixture by combining sweetened condensed milk with 1/2 cup of whipped topping, dividing into two bowls and adding food coloring.
- Pour the red mixture over the cake, followed by the blue mixture.
- Chill the cake in the refrigerator for at least 2 hours.
- Spread remaining whipped topping over the cake.
- Add sliced strawberries and blueberries on top for decoration.
Notes
This cake can be made ahead of time and stored in the fridge for 3-4 days. Add fresh fruit closer to serving time for optimal freshness.
Nutrition
- Serving Size: 1 slice
- Calories: 270
- Sugar: 22g
- Sodium: 180mg
- Fat: 10g
- Saturated Fat: 4g
- Unsaturated Fat: 6g
- Trans Fat: 0g
- Carbohydrates: 39g
- Fiber: 1g
- Protein: 3g
- Cholesterol: 30mg
Keywords: poke cake, patriotic cake, Fourth of July dessert, summer dessert, festive cake

Patriotic Poke Cake: No-Bake Party Dessert for 4th of July
Celebrate with a Patriotic Poke Cake: A Festive Treat for Every Occasion
Hello, darling foodies! Today, we’re diving into a recipe that’s as vibrant as the flag itself — the Patriotic Poke Cake! This delightful dessert is perfect for any summer celebration, whether it’s the Fourth of July, a backyard barbecue, or simply a Sunday dinner that calls for something sweet. The beauty of a poke cake is in its simplicity and approachability. With just a few ingredients, we can create a show-stopper that’ll impress your friends and family, all while bringing a burst of color to the table. So let’s roll up those sleeves, tie on our aprons, and get baking!
A Sweet Slice of Nostalgia
Growing up, many of my fondest memories were shaped around the dinner table during the summer. Our family would gather at my grandmother’s house, where the air was filled with laughter, the sound of sizzling grilled meats, and, of course, the delicious aroma of her famous poke cake. My grandmother had this way of making everything feel special, and her poke cake was a staple for every celebration. I can still see her in her worn apron, gently poking holes into the cake with the end of a wooden spoon, explaining how each hole would capture sweet flavor and moisture.
I love how a poke cake took something simple and let it shine in its own way. The layers of sweetened condensed milk soaking into the delicate cake made it moist and decadent. Topped with fresh strawberries and blueberries, it became a festive masterpiece to celebrate our American spirit. This is a dish that takes me back to those cherished moments, reminding me how good food creates an atmosphere of togetherness.
Ingredients You’ll Need:
Here are your star ingredients for the Patriotic Poke Cake:
-
1 Box of White Cake Mix: The base of our cake. You can use any brand you prefer; just make sure you follow the package instructions for baking.
-
1 Cup Water: Adds moisture to the cake; using room-temperature water helps achieve a fluffy texture.
-
1/3 Cup Vegetable Oil: This keeps the cake tender and moist. If you want a flavor twist, feel free to substitute with melted coconut oil!
-
3 Large Eggs: Eggs help bind the ingredients together and provide a rich flavor. If you’re making it vegan, you can replace each egg with 1/4 cup unsweetened applesauce.
-
1 Cup Sweetened Condensed Milk: The magic ingredient! This rich and creamy milk adds sweetness and moisture. If you prefer a dairy-free option, look for coconut condensed milk.
-
1 Cup Strawberries (sliced): These provide a sweet and fresh flavor — plus, they add a pop of red goodness.
-
1 Cup Blueberries: Another fruit that adds sweetness and provides that beautiful blue hue. Frozen blueberries can be a substitute, just drain them well.
-
1 Cup Whipped Topping: For that final creamy layer, you can use store-bought or homemade whipped cream. If you’re avoiding dairy, a coconut whipped topping works wonderfully.
-
Red and Blue Food Coloring: To enhance those patriotic colors! You can skip this if you prefer the natural look, but a little color never hurts for some festive fun!
Step-By-Step Instructions
Now that we have our ingredients ready, let’s get into the cooking. This cake is a breeze to whip up!
-
Preheat the Oven: Start by preheating your oven to 350°F (175°C). This ensures your cake bakes evenly.
-
Prepare Your Cake Batter: In a large mixing bowl, combine the white cake mix, water, vegetable oil, and eggs. [Chef tip: Mix this on medium speed for about 2 minutes until the batter is smooth and well combined.]
-
Bake the Cake: Pour the batter into a greased 9×13 inch baking dish. [Here’s a little hack: Make sure you spread the batter evenly to avoid uneven baking.] Bake according to the package directions, usually around 30-35 minutes, or until a toothpick comes out clean.
-
Cool the Cake: Once your cake is done baking, let it cool in the pan for about 10-15 minutes. After that, take a skewer or the handle of a wooden spoon and poke holes all over the top of the cake, about an inch apart. This is where all the flavor magic happens!
-
Add the Sweetened Condensed Milk: Carefully pour the sweetened condensed milk over the warm cake, ensuring that it seeps into the holes. [Chef insight: Letting the cake soak while it’s still warm will help it absorb more moisture.]
-
Chill Your Cake: Cover your cake with plastic wrap and pop it in the refrigerator for at least 2 hours, or overnight if you can wait! This step is crucial for flavor development.
-
Top It Off: Once chilled, spread your whipped topping evenly across the cake. Now, here comes the fun part — let’s decorate!
-
Create a Patriotic Design: Arrange the sliced strawberries and blueberries on top of the whipped topping to showcase those red, white, and blue colors. You can create a flag design or any pattern that excites you!
Serving Suggestions
To serve this lovely cake, slice it generously into squares, and plate each piece with a dollop of extra whipped topping and a fresh berry on top for a beautiful presentation. Don’t forget to set the mood! Scented candles, colorful plates, and maybe even some festive napkins will enhance the experience and make your guests feel special.
Recipe Variations
Feel free to get creative with this cake! Here are a few ideas:
-
Layered Poke Cake: Consider making two layers of cake and sandwiching the filling between them for a show-stopping effect.
-
Flavor Twist: Instead of white cake, use lemon or almond cake mix for an unexpected yet delightful flavor.
-
Dietary Swaps: Try a gluten-free cake mix for a gluten-free option or make mini poke cakes in muffin tins for single-serving treats.
-
Fruit Mix-up: Swap the strawberries and blueberries with your favorite seasonal fruits — think peaches or kiwi for a tropical twist!
-
Chocolate Sprinkle: Want to tempt chocolate lovers? Add cocoa powder to the cake mix or use chocolate whipped topping!
Chef’s Notes
I have to tell you, this recipe has evolved beautifully over the years. The first time I made it was quite a spectacle! I forgot to poke holes in the cake, and let me tell you, it turned out like a dense sponge. Lesson learned, but that’s the beauty of cooking — we learn from our moments in the kitchen, and each mistake leads to greater adventures! Now, it’s one of my go-to desserts when I want to impress someone (and, let’s be real, it always gets rave reviews!).
FAQs and Troubleshooting
-
Why did my poke cake turn out dry? Make sure to pour the sweetened condensed milk while the cake is warm. Additionally, letting it chill for at least 2 hours is essential for moistened goodness!
-
Can I freeze my poke cake? Absolutely! Just be sure to wrap it tightly in plastic wrap. It can be frozen for up to three months. Just thaw it in the fridge overnight before serving.
-
My cake fell while baking. What happened? This can happen if you opened the oven door too soon. Always wait for at least the first 20 minutes before peeking!
-
Can I use cool whip instead of whipped topping? Yes! If you’re looking for convenience, Cool Whip is a great alternative, just be sure to defrost it properly before spreading.
Nutritional Info
While nutrition details can vary, a serving of this Patriotic Poke Cake typically contains about 250-300 calories. Remember, it’s all about enjoying the moment around the table!
So, there you have it — a vibrant and delicious Patriotic Poke Cake that will have everyone asking for seconds. Whether it’s for a holiday or a casual gathering, this cake is your ticket to creating wonderful memories. I hope you try it out and make it your own. Happy baking, and let’s raise a slice to all the beautiful moments that food can share!
PrintPatriotic Poke Cake

A festive poke cake topped with strawberries and blueberries, perfect for summer celebrations.
- Prep Time: 15 minutes
- Cook Time: 35 minutes
- Total Time: 50 minutes
- Yield: 12 servings 1x
- Category: Dessert
- Method: Baking
- Cuisine: American
- Diet: Vegetarian
Ingredients
- 1 Box of White Cake Mix
- 1 Cup Water
- 1/3 Cup Vegetable Oil
- 3 Large Eggs
- 1 Cup Sweetened Condensed Milk
- 1 Cup Strawberries (sliced)
- 1 Cup Blueberries
- 1 Cup Whipped Topping
- Red and Blue Food Coloring
Instructions
- Preheat the oven to 350°F (175°C).
- Combine the white cake mix, water, vegetable oil, and eggs in a large mixing bowl, mixing for about 2 minutes until smooth.
- Pour the batter into a greased 9×13 inch baking dish and bake according to package directions for 30-35 minutes.
- Cool the cake in the pan for 10-15 minutes, then poke holes all over the top.
- Pour the sweetened condensed milk over the warm cake.
- Chill the cake covered with plastic wrap in the refrigerator for at least 2 hours.
- Spread whipped topping evenly across the chilled cake.
- Arrange sliced strawberries and blueberries on top in a patriotic design.
Notes
Letting the cake soak while still warm helps absorb more moisture. For different flavors, try lemon or almond cake mix.
Nutrition
- Serving Size: 1 slice
- Calories: 275
- Sugar: 23g
- Sodium: 320mg
- Fat: 9g
- Saturated Fat: 2g
- Unsaturated Fat: 7g
- Trans Fat: 0g
- Carbohydrates: 40g
- Fiber: 1g
- Protein: 4g
- Cholesterol: 50mg
Keywords: poke cake, patriotic dessert, summer cake, festive dessert, easy cake recipe

Hawaiian Poke Cake
Hawaiian Poke Cake: A Slice of Paradise
Hello, food friends! Today, I am thrilled to take you on a delightful journey to the tropical paradise of Hawaii with a cake that’s not just a treat for the taste buds but also a feast for the eyes—Hawaiian Poke Cake! If you’re looking for a dessert that’s effortlessly impressive and reminiscent of sun-kissed beaches, you’ve hit the jackpot!
Now, I know what you might be thinking: “Poke cake? What’s that?” Well, let me assure you that this dessert is a true game-changer! It’s a moist, fluffy cake soaked in a sweet, fruity goodness that’s perfect for gatherings, potlucks, or simply treating yourself on a sunny afternoon. Trust me; once you serve this gem, you’ll have friends and family coming back for seconds (or thirds!).
What I love most about Hawaiian Poke Cake is how it manages to feel both special and approachable. The best part? You don’t need to be a pastry chef to recreate this beauty in your kitchen! So, tie on that apron, and let’s dive into this tropical escape!
Personal Story
One of my fondest memories surrounding Hawaiian Poke Cake takes me back to a summer spent visiting relatives in Hawaii. Picture this: warm sun, gentle beach breezes, and afternoons spent lounging in hammocks while sipping on coconut water. One evening, we gathered for a family barbecue—a tradition that never stopped growing. My aunt pulled this cake out of the fridge, its topping glistening under the soft glow of tiki torches.
As we took our first bites, we were transported. Flavors of sweet pineapple combined with creamy coconut danced along our palates, each mouthful simply singing of Hawaii. In that moment, amidst laughter and sound of waves crashing nearby, I knew that this cake was going to weave its way into my own family traditions back home. Every time I whip up a Hawaiian Poke Cake now, I’m reminded of those warm evenings and the shared love that good food brings.
Ingredients
Before we get cooking, let’s gather our ingredients! Here’s what you’ll need:
-
1 box yellow cake mix (15.25 oz)
The base of our cake! For a gluten-free version, you can substitute this with a gluten-free cake mix. -
1 cup pineapple juice (100%)
This will add sweetness and moisture. You can use freshly squeezed pineapple juice if you’re feeling adventurous! -
1 cup full-fat coconut milk
This rich ingredient gives our cake its creamy texture. For a lighter option, feel free to swap it with coconut cream or a lighter coconut milk. -
1 cup sweetened shredded coconut
Adds texture and flavor. If you want to reduce sweetness, use unsweetened coconut flakes. -
1 cup pineapple chunks (drained)
Sweet, juicy bursts of pineapple! You can use canned or fresh pineapple, but make sure to drain it well to avoid excess moisture. -
1 cup whipped topping
This light and fluffy topping brings everything together. You can easily make your own whipped cream for a fresher taste. -
¼ cup maraschino cherries (for garnish)
The perfect pop of color! If you want a more natural garnish, try using fresh cherries or sliced strawberries instead.
Step-by-Step Instructions
Now that we have our ingredients ready, it’s time to get cooking! Follow these steps for a flawless Hawaiian Poke Cake experience:
-
Preheat Your Oven: Start by preheating your oven to 350°F (175°C). You want it nice and hot to ensure the cake bakes evenly.
-
Prepare Your Cake Pan: Grease a 9×13-inch baking dish with cooking spray or butter. This will prevent sticking, making your life a lot easier later on!
-
Mix the Cake Batter: In a large mixing bowl, combine your yellow cake mix, 1 cup of pineapple juice, and 1 cup of coconut milk. Use an electric mixer to blend them until the mixture is smooth and well combined—about 2-3 minutes.
-
Pour and Bake: Pour the batter into the prepared baking dish, spreading it evenly. Bake it in your preheated oven for about 25-30 minutes or until a toothpick inserted in the center comes out clean. Pro tip: Ovens can be sneaky! Keep an eye on your cake, as baking times can vary.
-
Poke the Cake: Once baked, remove the cake from the oven and let it cool in the pan for about 10-15 minutes. Using the handle of a wooden spoon or a fork, poke holes all over the top of the cake—make them deep but not all the way through! This is where our pineapple juice goodness will soak in.
-
Soak the Cake: Slowly pour the remaining ½ cup of pineapple juice over the poked cake, ensuring it seeps into those holes. This is crucial for keeping the cake moist and infusing it with that tropical flavor.
-
Add Coconut and Pineapple: While the cake is still warm, sprinkle the sweetened shredded coconut and the pineapple chunks over the top. Gently press them down into the cake so they stick.
-
Chill the Cake: This is where the magic happens! Allow the cake to cool completely at room temperature, then cover it with plastic wrap and refrigerate for at least 2-4 hours (overnight is even better!) to let those flavors meld beautifully.
-
Top It Off: Before serving, spread the whipped topping over the chilled cake and garnish with maraschino cherries for that classic touch.
-
Slice and Serve: Finally, cut yourself a generous slice of this tropical delight and enjoy every delicious bite!
Serving Suggestions
When it comes to serving, I like to keep things simple yet elegant. Serve your Hawaiian Poke Cake chilled, straight from the fridge. For presentation, you can plate it on a lovely dessert platter, and maybe even add a sprinkle of extra shredded coconut or a fresh mint sprig on top for a pop of color.
Pair it with a refreshing iced tea or a fizzy drink to enhance that tropical feel. Your guests won’t just taste dessert; they’ll indulge in a delightful experience!
Recipe Variations
-
Tropical Twist: Add diced mango or papaya to the topping for an extra burst of flavor.
-
Berry Bliss: Incorporate mixed berries (blueberries, raspberries, strawberries) into the coconut topping for a fruity explosion.
-
Chocolate Delight: Drizzle dark chocolate ganache over the whipped topping for a decadent upgrade.
-
Nutty Crunch: Sprinkle chopped macadamia nuts on top for a delicious crunch and an authentic Hawaiian touch.
-
Vegan Version: For a plant-based twist, use a vegan cake mix, coconut cream instead of whipped topping, and ensure your pineapple juice is fresh and additive-free.
Chef’s Notes
Over the years, my Hawaiian Poke Cake has morphed from a traditional dessert into a canvas for creativity! I’ve played with flavors and toppings, ensuring that each iteration feels personal. Did you know the first time I made this cake, my son mistook the maraschino cherries for candy? His enthusiastic approval confirmed that this cake was destined to be a family favorite!
This dessert has become a staple at our family gatherings, proving that simplicity can create lasting memories. If you haven’t tried Hawaiian Poke Cake yet, do yourself a favor and whip one up—you’ll find it’s not just a cake; it’s a sweet slice of nostalgia.
FAQs and Troubleshooting
1. Can I make Poke Cake in advance?
Absolutely! In fact, it tastes even better after sitting in the fridge for a day. This allows the flavors to intensify and the cake to absorb the juices.
2. My cake turned out dry; what happened?
The key to a moist poke cake is giving it enough time to soak up the juice! Make sure to poke enough holes and pour the juice evenly. Also, be cautious about overbaking; a toothpick should come out mostly clean, not dry.
3. Can I freeze leftover cake?
You sure can! Just slice it up, wrap individual pieces tightly in plastic wrap, and place them in an airtight container. When you’re ready to enjoy it, let it thaw in the fridge overnight.
4. What if I can’t find pineapple juice?
No problem! You can substitute with orange juice or even a mix of coconut milk and a splash of vanilla. While it won’t have that distinct tropical flavor, it will still be delicious!
Nutritional Info
While I believe that enjoying food is worth indulging in, here’s a quick glance at the nutritional info per slice (based on 12 servings):
- Calories: 300
- Total Fat: 12g
- Saturated Fat: 8g
- Total Carbohydrates: 45g
- Sugars: 30g
- Protein: 2g
As always, enjoy your food and savor the moments spent around the table!
So there you have it, my friends! Hawaiian Poke Cake is more than just a recipe; it’s a celebration of tastes and memories. I can’t wait for you to try it and make it your own. Until next time, happy cooking!
PrintHawaiian Poke Cake

A moist and fluffy cake soaked in sweet pineapple juice and topped with coconut and whipped cream, perfect for any gathering.
- Prep Time: 20 minutes
- Cook Time: 30 minutes
- Total Time: 50 minutes
- Yield: 12 servings 1x
- Category: Dessert
- Method: Baking
- Cuisine: Hawaiian
- Diet: Vegetarian
Ingredients
- 1 box yellow cake mix (15.25 oz)
- 1 cup pineapple juice (100%)
- 1 cup full-fat coconut milk
- 1 cup sweetened shredded coconut
- 1 cup pineapple chunks (drained)
- 1 cup whipped topping
- ¼ cup maraschino cherries (for garnish)
Instructions
- Preheat your oven to 350°F (175°C).
- Prepare a 9×13-inch baking dish with cooking spray or butter.
- Mix the cake batter by combining yellow cake mix, 1 cup of pineapple juice, and 1 cup of coconut milk in a bowl.
- Pour the batter into the prepared baking dish and bake for 25-30 minutes.
- Poke holes all over the top of the cake once it is cool for about 10-15 minutes.
- Soak the cake with the remaining ½ cup of pineapple juice.
- Add sweetened shredded coconut and pineapple chunks on top of the warm cake.
- Chill the cake for at least 2-4 hours in the refrigerator.
- Top with whipped topping and garnish with maraschino cherries before serving.
- Slice and serve chilled.
Notes
This cake is best served chilled. It can be made in advance and tastes better after a day in the fridge.
Nutrition
- Serving Size: 1 slice
- Calories: 300
- Sugar: 30g
- Sodium: 200mg
- Fat: 12g
- Saturated Fat: 8g
- Unsaturated Fat: 4g
- Trans Fat: 0g
- Carbohydrates: 45g
- Fiber: 1g
- Protein: 2g
- Cholesterol: 10mg
Keywords: Hawaiian cake, poke cake, tropical dessert, easy cake recipe, summer dessert