Beginner-Friendly Strawberry Earthquake Cake: Quick Dessert
Strawberry Earthquake Cake: A Deliciously Unique Dessert
Hello, fellow food lovers! I’m so excited to share a delightful treat that’s just bursting with flavors and memories—my delicious Strawberry Earthquake Cake! This cake is a delightful mix of melt-in-your-mouth chocolate, creamy filling, and fresh strawberries, creating a dessert that’s truly unforgettable.
But before we dive into the recipe, let me take you on a little journey down memory lane, back to a time when flavors were bold, and desserts were the pièce de résistance of every gathering.
Personal Story
One of my favorite childhood memories revolves around summer BBQs at my grandparents’ house. The backyard was filled with the smell of grilled vegetables, and laughter echoed around as family and friends came together. But what truly brought everyone together at the end of the meal was my grandma’s famous cake. She had a special recipe that combined chocolate and fresh strawberries, and it was always the star of the show.
I still remember the anticipation as the cake cooled down on the counter, the aroma wafting through the air, making our mouths water. When Grandma sliced into that cake, it was like an earthquake—rich chocolate and creamy layers would ooze out, making everyone gasp. That moment of delight has stuck with me, and it inspired this Strawberry Earthquake Cake. Let’s create that same magic together in your kitchen!
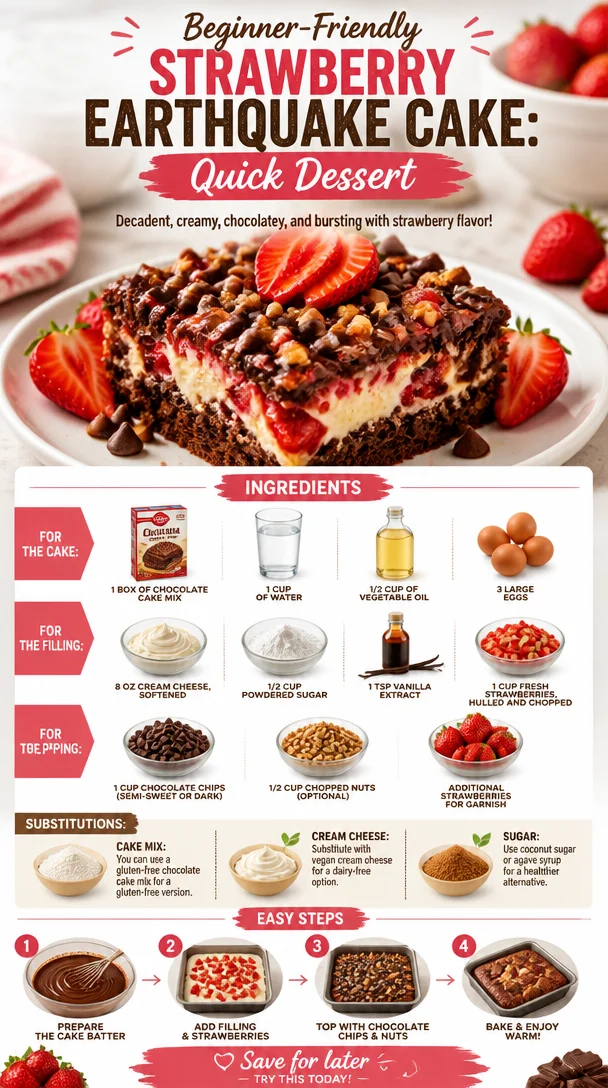
Ingredients
To get started on your Strawberry Earthquake Cake, here’s what you’ll need:
For the Cake:
-
1 box of chocolate cake mix (or homemade chocolate cake)
You can use any chocolate cake mix you love or make your chocolate cake from scratch for an enhanced flavor. -
1 cup of water
Just tap water will do the trick. You could also use milk for a richer flavor. -
1/2 cup of vegetable oil
Vegetable oil keeps the cake moist. Olive oil adds a delicious twist, but it may alter the flavor slightly. -
3 large eggs
Room temperature eggs blend better and help the cake rise higher.
For the Filling:
-
8 oz cream cheese, softened
Gives a wonderfully creamy texture. For a dairy-free option, choose vegan cream cheese. -
1/2 cup powdered sugar
Sweetens the filling without the graininess of granulated sugar. You can use coconut sugar for a more natural alternative. -
1 tsp vanilla extract
Enhances the flavor beautifully. A splash of almond extract adds a unique twist too! -
1 cup fresh strawberries, hulled and chopped
Fresh strawberries give the filling a juicy, fruity burst. You can substitute with other berries if you prefer.
For the Topping:
-
1 cup chocolate chips (semi-sweet or dark)
Chocolate chips add that gooey chocolatey goodness. Swap with butterscotch chips for a different flavor profile! -
1/2 cup chopped nuts (optional)
Nuts give a delightful crunch. Walnuts or pecans work wonderfully, but leave them out if you have nut allergies. -
Additional strawberries for garnish
Always a classic touch to decorate your dessert and add a pop of color!
Step-by-Step Instructions
Now that you’ve gathered your ingredients, let’s get down to the nitty-gritty of making this showstopper!
-
Preheat Your Oven
Set your oven to 350°F (175°C). This is always the key first step—your oven needs to be nice and hot when your cake is ready to go in! -
Prepare Your Baking Pan
Grease a 9×13 inch baking dish with butter or non-stick spray. This will prevent any sticky situations later on! -
Mix the Cake Batter
In a large mixing bowl, combine the chocolate cake mix with 1 cup of water, 1/2 cup of vegetable oil, and 3 large eggs. Whisk until everything is combined and smooth. You can use an electric mixer for a fluffier texture, but a hand whisk works just fine too. A little elbow grease never hurt anybody! -
Pour and Bake
Pour half of the cake batter into your prepared baking dish and smooth it out evenly. Now comes the fun part—set it aside and let’s make the filling. -
Prepare the Cream Cheese Filling
In a separate bowl, mix the softened cream cheese, powdered sugar, and vanilla extract until creamy and combined. You can use a fork or an electric mixer—whichever you have handy works. -
Layer It Up
Spoon dollops of the cream cheese mixture over the cake batter, followed by the chopped fresh strawberries. You want to create pockets of sweetness that will erupt like an earthquake when the cake bakes! -
Top with Remaining Batter
Carefully pour the remaining cake batter over the cream cheese and strawberries. It doesn’t need to cover completely—some filling peeking through is just what we want. -
Sprinkle on Chocolate Chips and Nuts
Now sprinkle those chocolate chips and nuts over the top. Those chocolate morsels are going to melt down into the cake, creating delicious pockets of gooeyness. -
Bake
Pop your cake into the oven and let it bake for about 30-35 minutes, or until a toothpick inserted in the center comes out clean. The tops should be slightly cracked (hence the ‘earthquake’ effect!). -
Cool
Let the cake cool in the pan for at least 10-15 minutes. It’ll be hot and bubbly, full of delicious flavors waiting to meld together.
Serving Suggestions
When it comes time to serve, here’s a tip: Slice your Strawberry Earthquake Cake into generous squares and plate each piece with a sprinkle of powdered sugar on top. Add a fresh strawberry or two for garnish, and if you’re feeling fancy, a scoop of vanilla ice cream on the side will elevate your presentation and taste to new heights.
Recipe Variations
Looking to switch things up? Here are some fun variations to try:
-
Chocolate Lovers Delight: Swap out the vanilla extract in the filling for a bit of chocolate extract, giving you a double chocolate punch!
-
Add a Zesty Twist: Mix in a little zest from an orange or lemon into the cream cheese filling for a zesty, refreshing flavor.
-
Berry Bonanza: Replace the strawberries with a mix of your favorite berries (like blueberries, raspberries, or blackberries) for a burst of color and flavor.
-
Nutty for Nuts: If you love nuts, try adding some pecans or walnuts to your filling, too—they’ll add a delightful crunch against the creaminess.
-
Gluten-Free Goodness: Use a gluten-free chocolate cake mix to make this delightful dessert gluten-free — trust me, no one will be able to tell the difference!
Chef’s Notes
Over the years, this Strawberry Earthquake Cake has evolved from my grandmother’s original recipe into my very own creation. Each time I make it, I find myself reminiscing about those warm summer nights filled with family laughter and delicious desserts. It’s become a staple in my home, and my friends can’t get enough of it.
Don’t worry if it isn’t perfect – remember, it’s all about the journey in the kitchen and the memories you create along the way. I once accidentally added double the amount of strawberries to the filling, and while it didn’t look quite right, the taste was phenomenal! That’s the beauty of cooking: you’re always learning and adjusting.
FAQs and Troubleshooting
1. Why is my cake too dense?
If the cake feels dense, it’s possible you overmixed the batter. Mixing just until everything is incorporated helps keep it light and fluffy.
2. Can I make this ahead of time?
Absolutely! You can bake the cake a day ahead and store it covered in the refrigerator. Just let it come to room temperature before serving.
3. How do I store leftovers?
Keep any leftover cake covered at room temperature for a day or two or in the refrigerator for longer storage. Just remember to enjoy it within a week!
4. My chocolate chips sank to the bottom; what happened?
This happens sometimes when the batter is too thin. Next time, consider chilling the chocolate chips in the fridge before sprinkling them on. It helps them stay suspended in the batter!
Nutritional Info
While I believe in enjoying dessert in moderation, if you’re curious, here’s a quick overview of the nutritional benefits of this delightful cake—especially when made with fresh strawberries! They provide Vitamin C, antioxidants, and have relatively low calories. Pair that with the rich chocolate cake, and you find both comfort and joy in every delicious bite.
And there you have it! Your very own Strawberry Earthquake Cake awaits. I’m thrilled you joined me on this tasty adventure, and I can’t wait to hear how your baking turns out. So, tie on that ivory apron, pour a glass of something bubbly, and let’s create more magical moments around our tables! Happy baking!
PrintStrawberry Earthquake Cake
A delightful mix of melt-in-your-mouth chocolate, creamy filling, and fresh strawberries that creates a dessert truly unforgettable.
- Prep Time: 15 minutes
- Cook Time: 35 minutes
- Total Time: 50 minutes
- Yield: 12 servings 1x
- Category: Dessert
- Method: Baking
- Cuisine: American
- Diet: Vegetarian
Ingredients
- 1 box chocolate cake mix
- 1 cup water
- 1/2 cup vegetable oil
- 3 large eggs
- 8 oz cream cheese, softened
- 1/2 cup powdered sugar
- 1 tsp vanilla extract
- 1 cup fresh strawberries, hulled and chopped
- 1 cup chocolate chips (semi-sweet or dark)
- 1/2 cup chopped nuts (optional)
- Additional strawberries for garnish
Instructions
- Preheat your oven to 350°F (175°C).
- Prepare a 9×13 inch baking dish by greasing it with butter or non-stick spray.
- Mix the chocolate cake mix with 1 cup of water, 1/2 cup of vegetable oil, and 3 large eggs in a large mixing bowl until smooth.
- Pour half of the cake batter into the prepared baking dish and smooth it out evenly.
- Prepare the cream cheese filling by mixing softened cream cheese, powdered sugar, and vanilla extract until creamy.
- Layer dollops of the cream cheese mixture over the cake batter, followed by the chopped fresh strawberries.
- Top with the remaining cake batter over the cream cheese and strawberries.
- Sprinkle chocolate chips and nuts over the top.
- Bake for 30-35 minutes, or until a toothpick comes out clean.
- Cool the cake in the pan for at least 10-15 minutes before serving.
Notes
For variations, consider adding a zesty twist with citrus zest or using a gluten-free chocolate cake mix.
Nutrition
- Serving Size: 1 slice
- Calories: 350
- Sugar: 20g
- Sodium: 450mg
- Fat: 15g
- Saturated Fat: 6g
- Unsaturated Fat: 7g
- Trans Fat: 0g
- Carbohydrates: 45g
- Fiber: 2g
- Protein: 6g
- Cholesterol: 70mg
Keywords: cake, dessert, chocolate, strawberries, family recipe, baking

Beginner-Friendly Strawberry Poke Cake (Quick Weeknight)
Easy Strawberry Poke Cake: A Slice of Joy
Hello, fellow food lovers! Today, we’re diving into a delightful dessert that’s as colorful as it is delicious: the Easy Strawberry Poke Cake. This cake has a special place in my heart—not just because it’s incredibly easy to whip up (hello, who doesn’t love a no-fuss dessert?), but also because it brings back those beautiful, sun-soaked summer days when my family would gather in the backyard to celebrate every little thing.
Imagine a warm afternoon, the scent of fresh strawberries filling the air, kids giggling in the background, and the table set with laughter and joy. That’s what this cake embodies. The bright strawberries peeking through a fluffy layer of whipped topping invite everyone to take a slice, making it impossible to resist! So, grab your apron, and let’s create some mouthwatering memories with this strawberry poke cake that’s sure to impress your friends and family.
My Strawberry Cake Memory
Let me take you back to one of those summer afternoons when I first discovered this recipe. My grandmother had a knack for creating simple yet sensational desserts. One day, she decided to make her famous poke cake after everyone had devoured a hearty barbecue feast. As a kid, I remember being fascinated by how she would poke holes into the cake and let fruity flavors seep into every slice. It’s like magic, but with food!
The delightful aroma of strawberries mixed with the sweetness of whipped topping made the kitchen feel warm and inviting. Once it was time to serve, I watched as she cut into that delightful cake, and my heart raced with anticipation. Every bite was a blissful explosion of flavor, and I fondly recall sneaking seconds… and maybe thirds! It’s one of those recipes that has been passed down through generations—a real testament to how food can create a sense of togetherness. Today, we’re going to recreate that joyful experience, one slice at a time!
Ingredients
To bring this Easy Strawberry Poke Cake to life, you’ll need the following ingredients:
-
1 package white cake mix
This is your base! Any brand will do, but I love a good classic Betty Crocker or Duncan Hines for reliability. If you want to switch things up, a lemon cake mix can add a tangy twist! -
1/2 cup vegetable oil
This keeps the cake moist and tender. Canola or sunflower oil work just as well if you don’t have vegetable oil on hand. -
3 large eggs (or 4 egg whites)
Eggs are essential for the cake’s structure and moisture. If you’re looking to cut some calories, just swapping for egg whites is a smart option! -
1 package Strawberry Jell-O
This is where the magic happens! It gives flavor and that oh-so-pretty color. If strawberries aren’t your jam, feel free to swap for raspberry or cherry Jell-O for a different color and taste. -
1 cup boiling water
This helps to dissolve the Jell-O completely, ensuring a smooth blend of flavors. If you want to make this step faster, boiling water from an electric kettle works wonders! -
8 oz whipped topping
This is the fluffy topping that’s sure to steal the show. If you prefer, you can whip up some heavy cream with a bit of sugar for a fresher alternative. -
12 strawberries (nice ones, cut in half)
Use the freshest strawberries you can find! Look for vibrant red berries with fresh green tops; they truly elevate the dish. Want a fun twist? Replace with halved peaches or even raspberries for different seasonal vibes.
Step-by-Step Instructions
-
Preheat your oven to 350°F (175°C). This may seem like a no-brainer, but starting with a preheated oven ensures that your cake bakes evenly and beautifully!
-
Prepare the cake mix according to the package instructions. Combine the white cake mix, vegetable oil, and eggs in a bowl. Mix well until just combined but don’t overmix—some lumps are perfectly fine! Pour the batter into a greased 9×13 inch baking pan.
-
Bake the cake in the preheated oven for 25-30 minutes or until a toothpick inserted into the center comes out clean. As the cake bakes, your kitchen will start smelling heavenly!
-
Cool the cake for about 15 minutes before the next step. This cooling period is essential because it allows the cake to settle and makes it easier to poke holes without tearing it apart.
-
Prepare the Jell-O by mixing the package with 1 cup of boiling water in a bowl. Stir until the Jell-O is fully dissolved. This bright, vibrant mixture is going to color and flavor our cake in such a fun way!
-
Poke holes in the cake using the end of a wooden spoon or a fork. Aim for about 20 holes evenly spaced throughout. Get excited—the more holes, the more the flavors will soak in!
-
Pour the dissolved Jell-O over the cake, making sure to cover every hole. Allow it to seep in fully—this is how we achieve that delicious layer of flavor that makes this cake truly special.
-
Refrigerate the cake for at least 3 hours (or preferably overnight) to allow the Jell-O to set completely. This is the hardest part—waiting!
-
Top the cake with whipped topping once you’re ready to serve. You can spread it evenly or get creative by creating peaks with a spatula.
-
Garnish with strawberries. Place the halved strawberries on top of the whipped topping for that pop of freshness and color. A sprinkle of mint leaves can add a lovely touch, too!
Serving Suggestions
When it comes to serving this delightful cake, presentation is key! Slice into squares, and make sure each piece gets a delectable layer of strawberries, with the sparkling colors of your Jell-O peeking through. Serve on a pretty plate with a sprig of mint for an added touch, and don’t forget to have forks ready! It’s the kind of dessert that brings everyone together, igniting conversations and smiles.
Recipe Variations
Looking to shake things up? Here are a few fun variations to try:
-
Lemon Poke Cake: Use lemon cake mix and lemon Jell-O for a zesty alternative that’s refreshing and perfect for summer!
-
Chocolate Strawberry Delight: Swap the white cake mix for chocolate cake and use strawberry Jell-O. The rich chocolate pairs beautifully with the berries!
-
Gluten-Free Option: Use a 1:1 gluten-free cake mix and ensure your Jell-O is gluten-free.
-
Coconut Twist: Add unsweetened shredded coconut to the whipped topping for a tropical vibe, or mix it into the cake batter before baking!
Chef’s Notes
One of my favorite things about this recipe is its versatility. It’s a blank canvas that you can dress up however you like! I’ve even hosted a “poke cake competition” at my home, encouraging friends to bring their unique spin on this beloved treat. Each version was delightful, leading to laughter and friendly debate over whose was best. Spoiler alert: it was always mine! (Just kidding—everyone did well. It’s tough to compete when it’s all about flavor and fun!)
FAQs and Troubleshooting
-
What if my cake falls apart when poking holes?
- No worries! Just be gentle when poking the holes. If your cake becomes crumbly, try using a skewer instead of a fork, which will create more precise holes.
-
How long can I store the leftovers?
- Covered in the fridge, this cake lasts for about 3-4 days. Just make sure to keep it sealed, so it stays fresh!
-
Can I make this cake a day in advance?
- Absolutely! In fact, letting it sit overnight allows the flavors to blend beautifully, so it’s often even better the day after.
-
Can I freeze the cake?
- Yes! Just be sure to freeze it before adding the whipped topping. Wrap it tightly in plastic wrap and foil; it can be stored for up to 3 months.
Nutritional Info
While I always recommend enjoying food in moderation, here’s a rough idea of the nutritional info per serving (based on 12 servings):
- Calories: 220
- Fat: 8g
- Carbohydrates: 35g
- Protein: 2g
- Sugar: 15g
Remember, these are estimated values and can vary depending on the specific ingredients you choose!
I hope this Easy Strawberry Poke Cake brings you as much joy and deliciousness as it has to me for all these years. It’s perfectly casual for any gathering and truly celebrates the sweetness of life. So, tie on that apron, dive into your kitchen, and let’s make some unforgettable moments and mouthwatering memories together! Happy baking!
PrintEasy Strawberry Poke Cake

A delightful dessert that layers fresh strawberries and fluffy whipped topping over a moist poke cake, perfect for summer gatherings.
- Prep Time: 15 minutes
- Cook Time: 30 minutes
- Total Time: 195 minutes
- Yield: 12 servings 1x
- Category: Dessert
- Method: Baking
- Cuisine: American
- Diet: Vegetarian
Ingredients
- 1 package white cake mix
- 1/2 cup vegetable oil
- 3 large eggs (or 4 egg whites)
- 1 package Strawberry Jell-O
- 1 cup boiling water
- 8 oz whipped topping
- 12 strawberries, cut in half
Instructions
- Preheat your oven to 350°F (175°C).
- Prepare the cake mix according to the package instructions by combining the white cake mix, vegetable oil, and eggs in a bowl. Mix well until just combined.
- Pour the batter into a greased 9×13 inch baking pan.
- Bake in the preheated oven for 25-30 minutes or until a toothpick inserted comes out clean.
- Cool the cake for about 15 minutes.
- Prepare the Jell-O by mixing with 1 cup of boiling water in a bowl until fully dissolved.
- Poke holes in the cake using the end of a wooden spoon or a fork, aiming for about 20 holes.
- Pour the dissolved Jell-O over the cake, making sure to cover every hole.
- Refrigerate for at least 3 hours (or overnight) to allow the Jell-O to set completely.
- Top the cake with whipped topping once ready to serve.
- Garnish with halved strawberries on top of the whipped topping.
Notes
This cake can be made a day in advance for better flavor absorption. Store leftovers in the fridge for 3-4 days.
Nutrition
- Serving Size: 1 slice
- Calories: 220
- Sugar: 15g
- Sodium: 200mg
- Fat: 8g
- Saturated Fat: 1g
- Unsaturated Fat: 7g
- Trans Fat: 0g
- Carbohydrates: 35g
- Fiber: 0g
- Protein: 2g
- Cholesterol: 30mg
Keywords: strawberry, poke cake, dessert, summer cake, easy cake
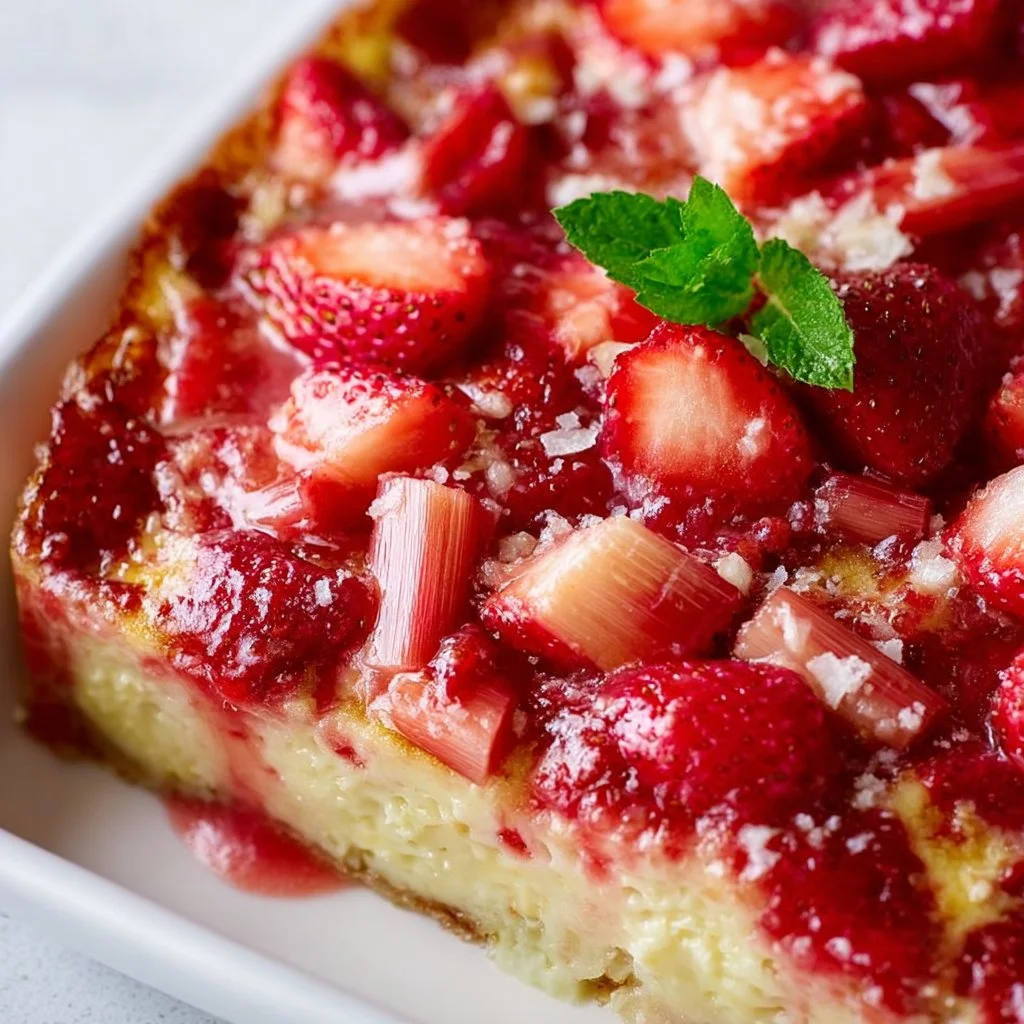
Strawberry Rhubarb Custard Dessert
Sweet Memories: Creating a Strawberry Rhubarb Custard Dessert
Hello there, fellow food enthusiasts! Today we’re diving into a dessert that perfectly marries the sweet and tart: Strawberry Rhubarb Custard Dessert. This dish is not just a treat for your taste buds; it’s a culinary homage to warm summer days, friendly gatherings, and the simplicity of fresh ingredients. With the vibrant colors of strawberries and the tangy crunch of rhubarb, each bite of this dessert sparks joy and nostalgia.
You see, cooking for me goes beyond just the end result. It’s about the stories we craft while whisking batter, the laughter shared over simmering pots, and how a simple dessert can evoke cherished memories. I still remember the first time I tasted strawberry rhubarb pie at my grandmother’s kitchen table. The sun streamed in through the window, illuminating her laughter as she shared stories of her garden adventures, where she lovingly tended to her rhubarb patch. That flavor—sweet strawberries intertwined with the zing of rhubarb—carried with it the warmth of family, love, and tradition. And that, my friends, is how this delightful dessert became a staple in my kitchen.
You’re in for a treat today, as we create this delicious custard dessert that not only looks impressive but is also incredibly attainable. Whether you’re planning to impress guests during a dinner party or simply treating yourself on a cozy night in, this recipe has got you covered. Let’s gather those aprons and dive right in!
Personal Story
The first time I fell head over heels for the combination of strawberries and rhubarb was during a weekend visit to my grandmother’s house in late spring. She was preparing her famous strawberry rhubarb pie, which had been a family favorite for generations. I recall the way her kitchen smelled—sweet and tangy, with the light spice of freshly baked crust wafting through the air.
As she rolled out the pastry, I eagerly helped chop the vibrant red rhubarb stalks and pluck the strawberries from their green tops. It became a delightful assembly line of laughter, flour dusting the countertops, and bowls precariously piled high with the fruits. I can still hear her gentle reminders about the difference between sugar and salt—a kitchen lesson I’ll forever cherish.
That pie made its debut at the kitchen table that evening, shining brightly under the twinkling lights. Each bite was a celebration, a small moment of joy that resonated deeply with everyone around that table. It was in that shared experience that I discovered the magic of cooking: it can unite us, create memories, and often become a delicious legacy. Today, we’re recreating a version of that beloved dish—only this time, we’re crafting a custard dessert that captures all those flavors without the fuss of pie crust. Let’s get started!
Ingredients
For our Strawberry Rhubarb Custard Dessert, you’ll need the following ingredients. Each element plays a significant role in creating that perfect balance of flavors, and I’m also sharing some substitution tips where applicable.
-
1 cup sugar
For sweetness! You can substitute with brown sugar for a deeper flavor or even a sugar alternative like coconut sugar if you’re watching your intake. -
1/2 cup butter, softened
Adds richness to our custard. If you want to make it dairy-free, coconut oil or vegan butter can work nicely too. -
1 egg
Helps to bind everything together. You can replace it with a flax egg (1 tablespoon of ground flaxseed with 2.5 tablespoons of water) for a vegan option. -
1 1/2 cups all-purpose flour
The base of our dessert. If gluten-free is your jam, a 1:1 gluten-free flour blend should do the trick. -
1/2 teaspoon baking powder
To give our dessert structure. You can omit it if you prefer a denser custard. -
1/4 teaspoon salt
Enhances all the flavors. Don’t skip this, it’s essential! -
2 cups chopped rhubarb
This gives our dessert that classic zing. If you can’t find rhubarb, you can substitute with tart apples or a little more strawberries, but you’ll miss that distinct flavor. -
1 cup sliced strawberries
For the sweetness and joy! Feel free to use frozen strawberries in a pinch—just thaw and drain before using. -
2 cups milk
The heart of our custard. Any milk works—whole, skim, almond, or oat milk—for this recipe! -
3/4 cup sugar
For our custard sweetness! You can use the same substitutions here. -
3 tablespoons cornstarch
Helps thicken our custard. If you don’t have cornstarch, you can use flour or arrowroot powder. -
1 teaspoon vanilla extract
Add warmth and depth to the flavors. Always opt for pure vanilla extract if you can find it—it makes a difference! -
4 large eggs, beaten
These are crucial for creating a creamy, luscious custard. For a plant-based option, try silken tofu blended until smooth in equal measurement.
Step-by-Step Instructions
Now that we have all our ingredients ready, it’s time to roll up our sleeves and get cooking! Follow these simple steps for a delightful dessert that’s sure to impress.
-
Preheat the Oven
Start by preheating your oven to 350°F (175°C). This is crucial—no one likes a dessert that’s unevenly cooked, am I right? While the oven is warming, you can prepare the rest of your ingredients. -
Prepare the Fruit
In a medium bowl, combine the chopped rhubarb and sliced strawberries. Toss them with 1/2 cup of the sugar. Set them aside to macerate while you prepare the rest of your batter. This will draw out the juices and create a beautiful mixture of flavors! -
Make the Base
In a large mixing bowl, cream the softened butter and remaining sugar together until light and fluffy (about 3–5 minutes). This process is super important for achieving that dreamy texture. If you’re feeling adventurous, add a dash of almond extract for a unique twist. -
Incorporate the Egg
Add in one egg at a time, mixing well after each addition. This ensures a silky smooth batter. Don’t rush—give each egg time to combine before adding the next. -
Mix the Dry Ingredients
In a separate bowl, whisk together the flour, baking powder, and salt. Gradually add this dry mixture to the butter-sugar-egg mixture. Mix just until combined. Over-mixing can lead to a tougher texture, which we want to avoid! -
Layer the Fruit
Carefully fold in the macerated rhubarb and strawberries into your batter. Here’s a chef tip: to keep your fruit evenly distributed, coat them lightly with flour before folding them in—that way they won’t sink to the bottom during baking. -
Prepare the Custard
In another bowl, whisk together the milk, 3/4 cup of sugar, cornstarch, vanilla extract, and beaten eggs until smooth. This custard will be poured over the fruit later, so it should be creamy and luscious! -
Assemble the Dessert
In a greased baking dish (9×13 works perfectly!), pour the batter first, then gently spoon the custard mixture over the top. You’ll see the fruit peeping through, and that’s exactly what we want! This layer effect makes for a stunning presentation once it’s baked. -
Bake
Pop it in the oven for about 45–55 minutes, or until the custard is set and a light golden crust forms on top. The aroma? Out of this world! If you notice the top is browning too quickly, feel free to cover it gently with foil. -
Cool and Serve
Allow your dessert to cool for at least 20 minutes before slicing into it. This not only helps the flavors settle but makes it easier to serve.
Serving Suggestions
When it comes to serving this delightful custard dessert, presentation is key! I love to serve it warm or at room temperature, topped with a dollop of fresh whipped cream or a scoop of vanilla ice cream. Drizzle some caramel or berry sauce for that extra touch of elegance. And don’t forget a sprig of mint for a pop of color!
Place each slice on a decorative plate, garnished with fresh berries and maybe even a sprinkle of powdered sugar. Your guests won’t just eat with their mouths—they’ll feast with their eyes!
Recipe Variations
While the classic version is unmatched, who says we can’t get creative? Here are some exciting variations you might enjoy:
-
Berry Medley: Swap out the strawberries and rhubarb for a mix of blackberries, blueberries, and raspberries. It adds a different level of tartness and sweetness!
-
Citrus Zing: Add the zest of an orange or lemon to the custard for a refreshing twist. The citrus notes pair beautifully with the berries.
-
Nutty Crunch: Before baking, sprinkle chopped pecans or walnuts atop the batter for added texture and flavor.
-
Coconut Custard: Substitute half of the milk with coconut milk to infuse a tropical vibe into the dish.
-
Spiced Option: Incorporate a dash of cinnamon or nutmeg into the batter for warmth, especially cozy during the colder months.
Chef’s Notes
This Strawberry Rhubarb Custard Dessert has come a long way since those cherished days of baking at my grandmother’s table. It’s evolved into a crowd-pleaser in my kitchen, appearing at everything from casual family dinners to elegant gatherings. I love telling the story of how this dessert came to be, sparking conversations and often, a few nostalgic tears.
Over the years, I’ve had my share of kitchen disasters—like the time I mistook salt for sugar and ended up with a rather sad custard. But those experiences are what have helped shape my approach to cooking. The essence of creating delicious food isn’t in achieving perfection; it’s in sharing love through the process, from mishaps to masterpieces.
FAQs and Troubleshooting
1. My custard didn’t set properly. What went wrong?
It’s likely that the custard didn’t bake long enough, or the eggs weren’t beaten well enough. For a foolproof set, ensure your eggs are well mixed, and let it bake until it just jiggles in the center when you gently shake the pan.
2. How do I store leftovers?
Store any leftovers in an airtight container in the refrigerator for up to 3 days. The flavors will continue to meld, making it even tastier the next day!
3. Can I freeze this dessert?
While it’s not ideal to freeze custard desserts, you can freeze slices of this dessert for up to a month. Just be sure to wrap them tightly. Thaw in the fridge overnight before serving!
4. Can I make this vegan?
Absolutely! Use flax eggs for binding, almond milk instead of regular milk, and coconut oil in place of butter. The flavor will still shine through beautifully!
Nutritional Info
[Optional section based on specific dietary requirements you may want to add here!]
And there you have it, my friends! Your very own Strawberry Rhubarb Custard Dessert—a beautiful blend of nostalgia and flavor that will surely impress everyone around your table. Remember, cooking is an adventure, and every recipe is a chance to create lasting memories. Now, let’s tie on those aprons, pour a little sparkling drink, and get baking!
PrintStrawberry Rhubarb Custard Dessert

A delightful dessert combining sweet strawberries and tart rhubarb, encased in a creamy custard for a nostalgic culinary experience.
- Prep Time: 20 minutes
- Cook Time: 55 minutes
- Total Time: 75 minutes
- Yield: 8 servings 1x
- Category: Dessert
- Method: Baking
- Cuisine: American
- Diet: Vegetarian
Ingredients
- 1 cup sugar
- 1/2 cup butter, softened
- 1 egg
- 1 1/2 cups all-purpose flour
- 1/2 teaspoon baking powder
- 1/4 teaspoon salt
- 2 cups chopped rhubarb
- 1 cup sliced strawberries
- 2 cups milk
- 3/4 cup sugar
- 3 tablespoons cornstarch
- 1 teaspoon vanilla extract
- 4 large eggs, beaten
Instructions
- Preheat the oven to 350°F (175°C).
- Combine the chopped rhubarb and sliced strawberries with 1/2 cup of sugar and set aside.
- Cream the softened butter and remaining sugar together until light and fluffy.
- Add one egg at a time, mixing well after each addition.
- Whisk together the flour, baking powder, and salt in a separate bowl.
- Add the dry mixture to the butter-sugar-egg mixture until just combined.
- Fold in the macerated rhubarb and strawberries.
- Whisk together the milk, 3/4 cup sugar, cornstarch, vanilla extract, and beaten eggs until smooth.
- Pour the batter into a greased baking dish and spoon the custard mixture over the top.
- Bake for 45–55 minutes, until set and golden.
- Cool for at least 20 minutes before serving.
Notes
Serve warm with whipped cream or ice cream for added indulgence. Experiment with variations like berry medleys or citrus zest.
Nutrition
- Serving Size: 1 serving
- Calories: 350
- Sugar: 25g
- Sodium: 180mg
- Fat: 20g
- Saturated Fat: 8g
- Unsaturated Fat: 10g
- Trans Fat: 0g
- Carbohydrates: 45g
- Fiber: 3g
- Protein: 6g
- Cholesterol: 140mg
Keywords: strawberry, rhubarb, custard, dessert, summer, baking, family recipe